This step by step diy woodworking project is about deck pergola plans. This detailed article features instructions and complete diagrams about building a deck pergola. Adjust the design of the simple gazebo to suit your needs and budget. This project requires basic tools and materials, so that any person with basic skills can get the job done in less than a week. See a lot more woodworking plans and projects sorted by category HERE.
Work with good judgement and don’t forget to take a look over the rest of the related plans, as there are many designs and woodworking projects to select from. Work with attention and don’t forget that a good planning will save you from many issues and it will keep the costs within the total budget. Invest in high quality materials, such as pine, redwood or cedar. Drill pocket holes before inserting the galvanized screws, to prevent the wood from splitting. See all my Premium Plans HERE.
Projects made from these plans
It’s that simple to build a deck pergola!
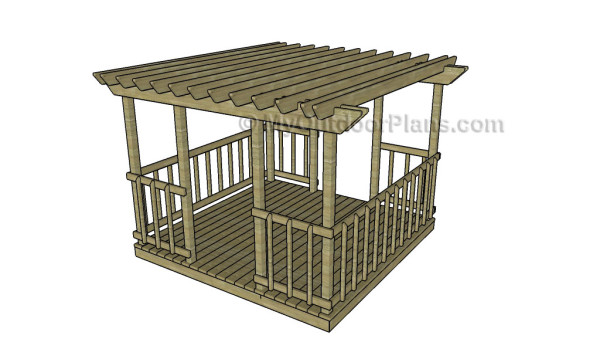
Deck Pergola Plans
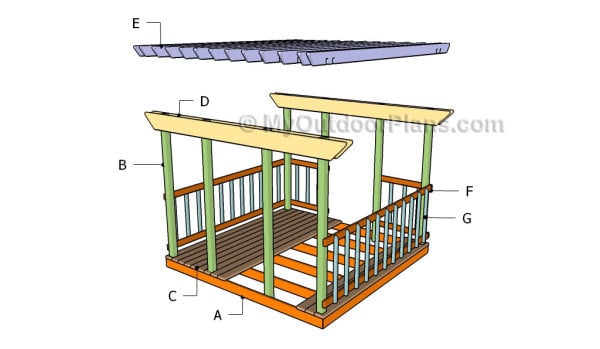
Building a deck pergola
Cut & Shopping Lists
- A – 4 pieces of 2×6 lumber – 120″ long, 4 pieces – 117″ long FRAME
- B – 8 pieces of 4×4 lumber – 96″ long POSTS
- C – 20 piece of 2×6 lumber – 120″ long DECKING
- D – 4 pieces of 2×10 lumber – 144″ long BEAMS
- E – 13 pieces of 2×6 lumber – 144″ long RAFTERS
- E – 12 pieces of 1×2 lumber – 120″ long TOP SLATS
- F – 4 pieces of 2×4 lumber – 117″ long, 8 pieces – 39 1/2″ long RAILS
- G – 34 pieces of 2×2 lumber – 36″ long BALUSTERS
- 28 pieces of 2×6 lumber – 10 ft
- 8 pieces of 4×4 lumber – 8 ft
- 13 pieces of 2×6 lumber – 12 ft
- 9 pieces of 2×2 lumber – 12 ft
- 7 pieces of 2×4 lumber – 10 ft
- 12 pieces of 1×2 lumber – 10 ft
- 4 pieces of 2×10 lumber – 12 ft
- 2 1/2″ screws, 3 1/2″ screws
- 3 1/2″ lag screw
- 7″ carriage bolts
- rafter ties, 1 1/4″ screws
- wood putty, wood stain
Tools
![]() Hammer, Tape measure, Framing square, Level
Hammer, Tape measure, Framing square, Level
![]() Miter saw, Drill machinery, Screwdriver, Sander
Miter saw, Drill machinery, Screwdriver, Sander
Time
![]() One day
One day
Related
How to build a gazebo pergola
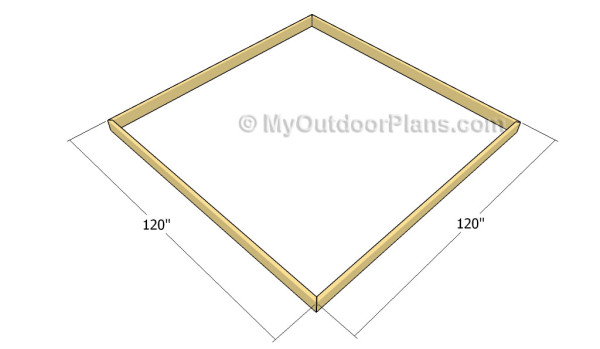
Building the floor frame
The first step of the project is to build the frame of the gazebo floor. As you can notice in the diagram, you need to cut both ends of the 2×6 beams at 45 degrees. Drill pilot holes through the beams and insert 2 1/2″ screws to lock them together tightly. Make sure the corners are right-angled and add glue to the joints.

Fitting the middle joists
Continue the project by fitting the intermediary joists to the frame. Cut the 2×6 beams at the right size and use joist hangers to secure them to the perimeter components. Make sure the corners are right-angled and leave no gaps between the components. Use 3 1/2″ screws.
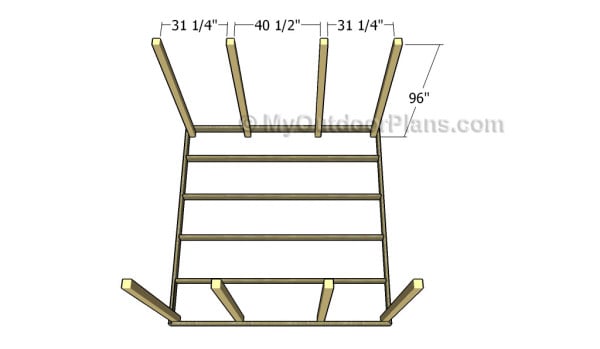
Fitting the posts
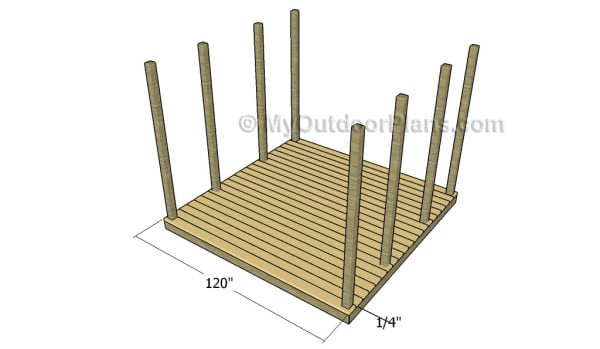
The next step of the project is to attach the 4×4 posts to the frame of the deck pergola. Plumb the posts with a spirit level before locking them to the frame. Drill pilot holes through the joists and insert 3 1/2″ lag bolts into the posts.
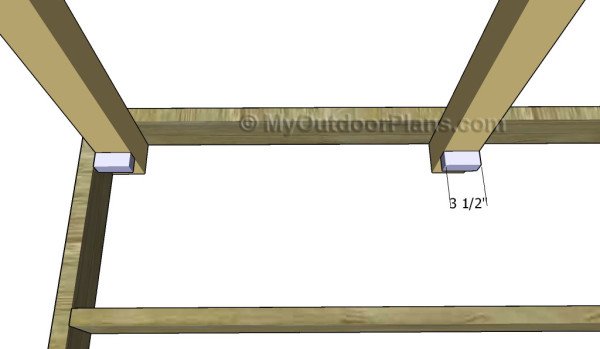
Fitting the cleats
Attach 2×2 cleats to the posts, in order to add rigidity to the structure. Secure the cleats to the posts by using 2 1/2″ screws.
Attaching the decking boards
Continue the outdoor woodworking project by laying the 2×6 decking boards. Place a nail between the boards in order to create consistent gaps and to make sure the water will drain properly. Drill pilot holes through the boards and secure them to the joists by inserting 2 1/2″ screws. Countersink the head of the screws to get a professional result.
Building the support beams
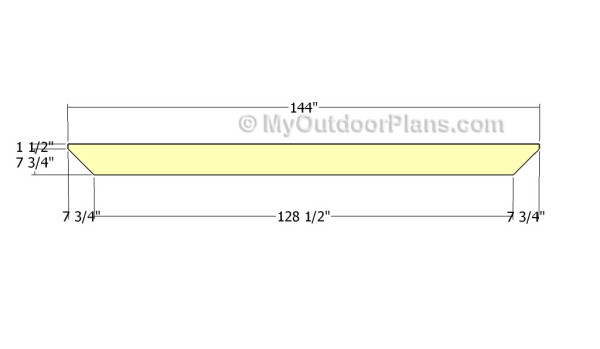
Build the support beams out of 2×10 lumber. Cut both ends of the beams in a decorative manner, as shown in the diagram. Smooth the cut edges with fine-grit sandpaper and remove the residues with a damp cloth.
Fitting the support beams
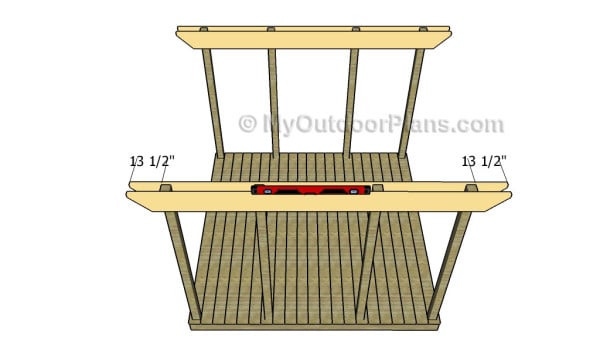
Clamp the support beams to the top of the posts, making sure you center them into place. In addition, use a spirit level to make sure the support beams are perfectly horizontal. Drill pilot holes through the beams and through the posts, before locking them together tightly with 7″ carriage bolts.
Building the rafters
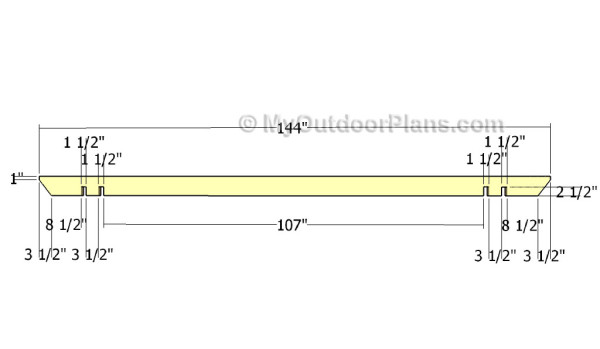
Next, you need to build the shade elements for the pergola. Use 2×6 beams to build the rafters. Mark the cut lines to the slats and make the notches with a circular saw. Smooth the recesses with a chisel and cut the ends in a decorative manner.
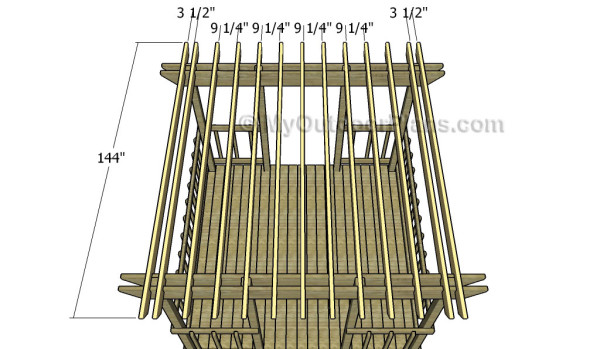
Fitting the rafters
Continue the backyard project by attaching the rafters to the support beams. Place the rafters equally-spaced, as described in the diagram. Drill pilot holes through the rafters and secure them to the support beams using 4 1/2″ screws or rafter ties.
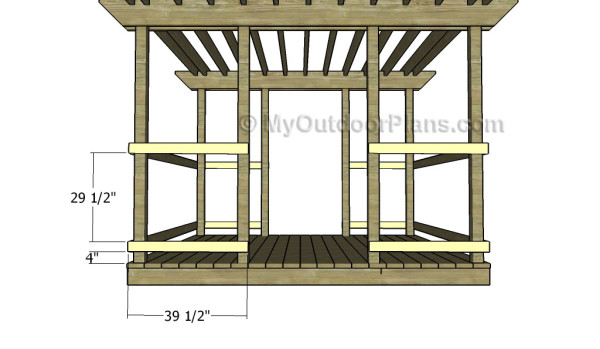
Fitting the front railings
Fit the 2×4 rails to the front and back faces of the pergola. Drill pilot holes through the rails and secure them to the posts using 2 1/2″ screws. Leave no gaps between the components and align the edges with great care.
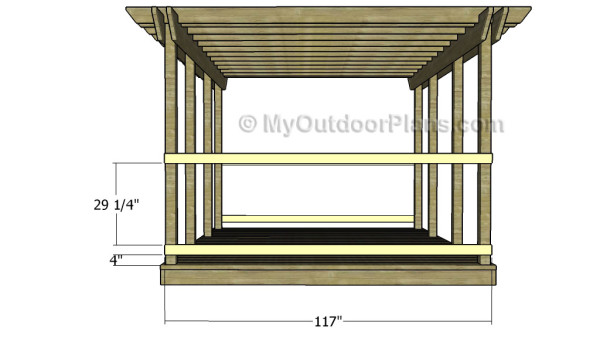
Fitting the side railings
Fit the 2×4 rails to the sides of the backyard gazebo. Use a spirit level to make sure the rails are horizontal. Leave no gaps between the components and align the edges with attention. Secure the rails to posts with 2 1/2″ screws.
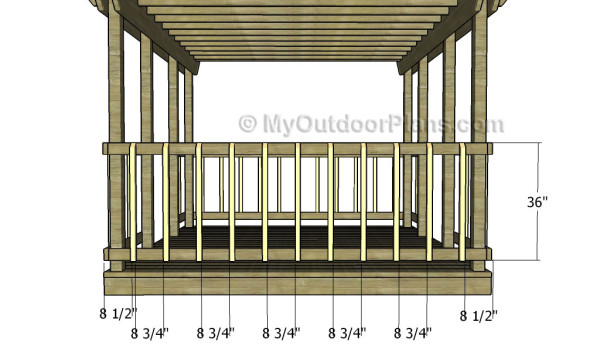
Fitting the side balusters
Fit the 2×2 balusters to the sides, as shown in the diagram. Cut the top of the balusters at 45 degrees, before attaching them to the rails. Drill pilot holes through the balusters and insert 2 1/2″ screws into the rails.

Fitting the front balusters
Fit the 2×2 balusters to the front and back faces of the deck pergola. Drill pilot holes and secure them to the rails using 2 1/2″ screws. Place the balusters equally-spaced, if you want to get a symmetrical appearance.

Fitting the top slats
If you want to keep the rafters equally-spaced on the long term and to create a rigid structure, we recommend you to fit 2×2 slats. Drill pilot holes through the slats and secure them to the rafters using 2 1/2″ screws.
Deck Pergola Plans
One of the last steps of the woodworking project is to take care of the finishing touches. Therefore, fill the pilot holes with wood putty and smooth the surface with 120-grit sandpaper.
Top Tip: If you want to enhance the look of the project and to protect the wooden garden pergola from decay, we recommend you to cover the components with paint or stain.
This woodworking project was about deck pergola plans free. If you want to see more outdoor plans, we recommend you to check out the rest of our step by step projects. LIKE us on Facebook and Google + to be the first that gets out latest projects and to hep us keep adding free woodworking plans for you.
2 comments
fantastic man, god bless you
Do you have to sink this into the ground or can you leave it resting on top? Do you use deck blocks or cement for the posts or does the structure balance itself?