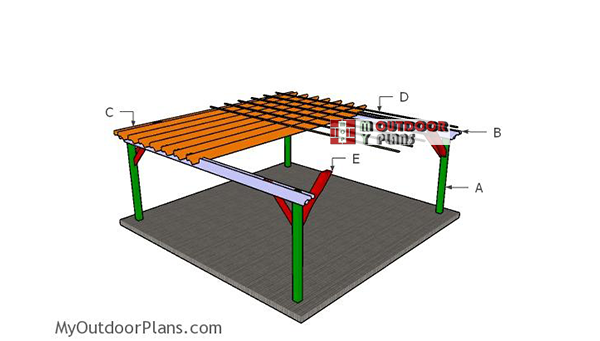
This step by step diy project is about 20×20 pergola plans. I have designed this square pergola with a 20’x20′ base and a 22’x22′ roof. This is a large project, so it requires a significant investment and also many labor hours. However, the end result will really impress the loved ones and add significant value to your life. Check if a building permit is required before starting the building process. Take a look over the rest of my woodworking plans, if you want to get more building inspiration.
When buying the lumber, you should select the planks with great care, making sure they are straight and without any visible flaws (cracks, knots, twists, decay). Investing in cedar or other weather resistant lumber is a good idea, as it will pay off on the long run. Use a spirit level to plumb and align the components, before inserting the galvanized screws, otherwise the project won’t have a symmetrical look. If you have all the materials and tools required for the project, you could get the job done in about a day. See all my Premium Plans HERE.
Projects made from these plans
How to build a 20×20 pergola
Building-a-20×20-pergola
Cut & Shopping Lists
- A – 4 pieces of 6×6 lumber – 8′ long POSTS
- B – 4 piece of 2×10 lumber – 22′ long SUPPORT BEAMS
- C – 15 pieces of 2×10 lumber – 18′ long SHADE ELEMENTS
- D – 11 pieces of 1×2 lumber – 22′ long SLATS
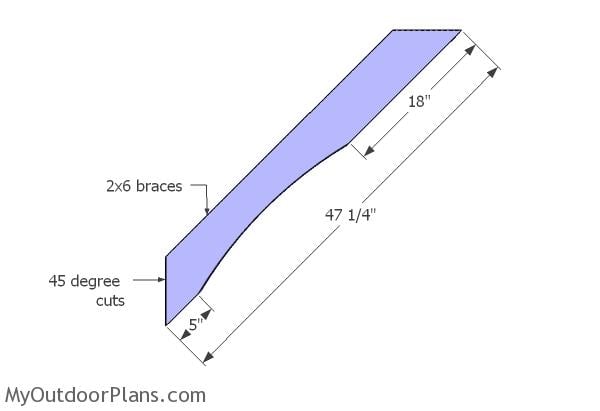
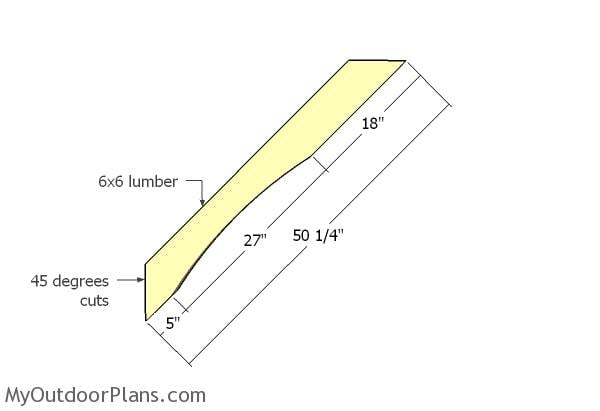
- E – 4 pieces of 6×6 lumber – 47 1/4″ long, 4 pieces of 2×6 lumber – 50 1/4″ long BRACES
- 6 pieces of 6×6 lumber – 8′
- 19 pieces of 2×10 lumber – 22′
- 11 pieces of 1×2 lumber – 22′
- 2 pieces of 2×6 lumber – 10′
- 2 pieces of 6×6 lumber – 8′
- 1 5/8″ screws, 3 1/2″ screws
- tube form
- rafter ties
- 8 pieces of 6″ carriage bolts
- wood filler , wood glue, stain/paint
- 6×6 post anchor 4 pieces
- post to beam connector 8 pieces
Tools
![]() Hammer, Tape measure, Framing square, Level
Hammer, Tape measure, Framing square, Level
![]() Miter saw, Drill machinery, Screwdriver, Sander
Miter saw, Drill machinery, Screwdriver, Sander
Time
Related
20×20 Pergola Plans
Laying-out-the-posts
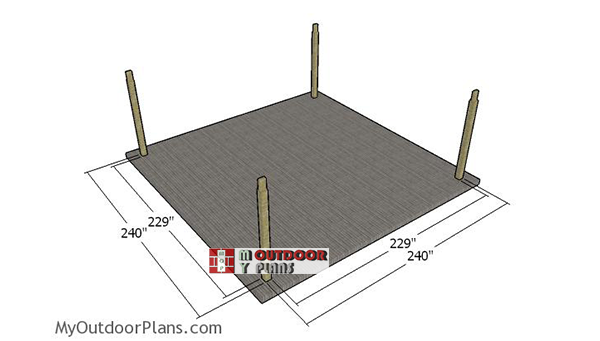
The first step of the large square pergola project is to layout the posts. Use batter boards and string to layout the location of the posts. Apply the 3-4-5 rule to every corner and then measure the diagonals to make sure they are perfectly equal. You need to make adjustments until you get the desired result.
If you want to give more support to the free standing 20×20 pergola, I recommend you to fit intermediary posts to the center of the end posts. With minor modification you can even add the pergola to an already existing building.
Building the posts
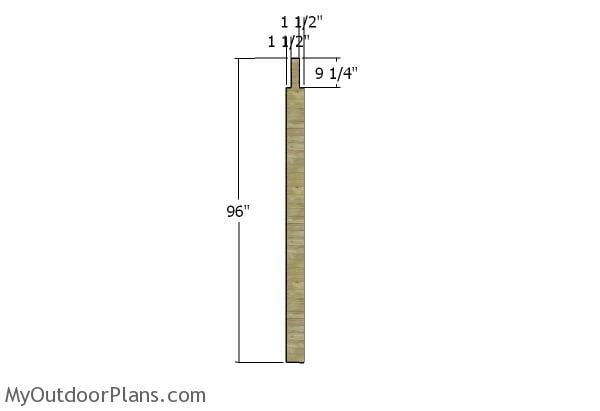
As you can easily notice in the plans, you need to make notches to the top of the 6×6 posts. Set the circular saw to 1 1/2″ depth and then make parallel cuts inside the marked areas. Remove the residues with a chisel and smooth area with sandpaper.
Anchoring the posts of the anchor
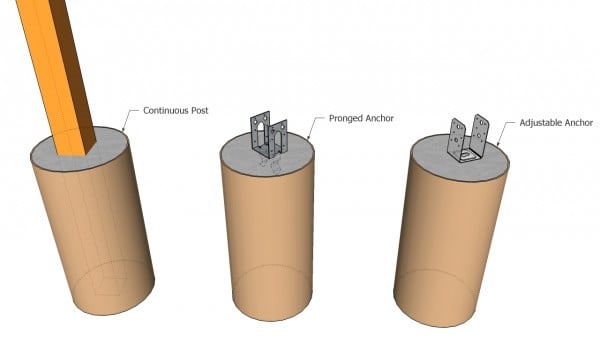
There are a few ways to secure the 6×6 posts into place. You can set the posts in concrete or you can use adjustable anchors and pour footings. Dig the holes 3′ deep (or under the front line) and about 12-13″ in diameter. Compact a layer of gravel to the bottom of the holes and then fit the tube forms. Fit the posts, align them and plumb them with a spirit level. Fill the forms with concrete, while the posts are locked into place with temporarily braces. If you use anchors, you need to align and set them into concrete. Fit the posts after the concrete dries, using lag screw.
Smart tip: Read the local building codes, so you dig the holes at the appropriate depth. The materials list is made considering you use post anchors. If you decide to set them in concrete, you need to buy longer posts.
Building-the-support-beams
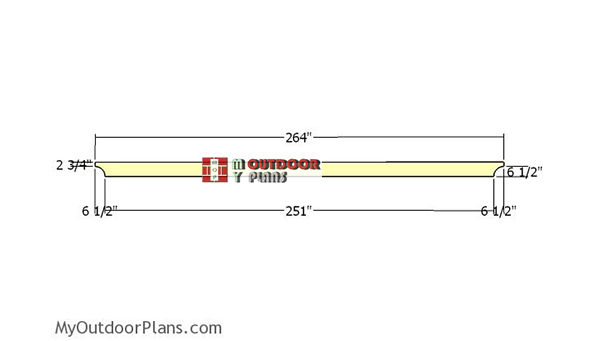
Use 2×10 lumber for the support beams. You can make decorative cuts to both ends of the beams, so you enhance the look of the 20×20 pergola. Use a large round object, so you can mark the curved lines on the beams. Get the job done with a jigsaw and then smooth the edges with sandpaper.
Alternatively, you can use other templates to make the decorative cuts to both ends of the beams, so it matches the design of your home.
Fitting the support beams
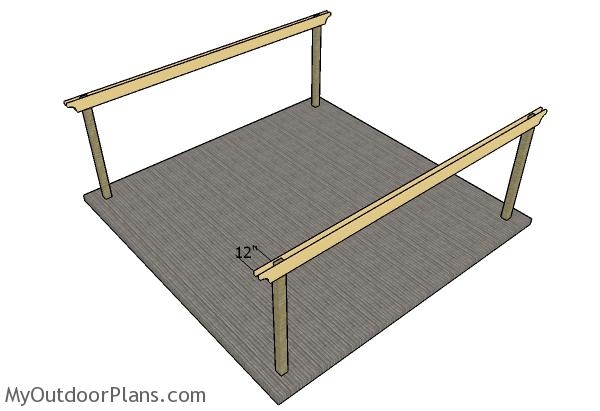
Fit the support beams to the top of the posts, making sure you leave 12″ overhangs on both sides. Drill pilot holes through the beams and then insert 6″ carriage bolts to lock them into place tightly. Use two carriage bolts for each joint, for a professional result. Use a spirit level to make sure the beams are horizontal.
Building the rafters
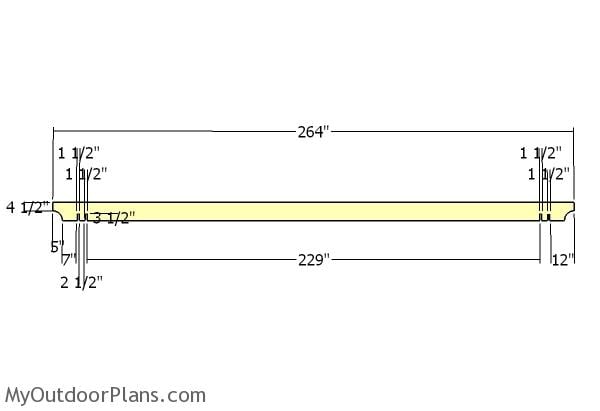
Build the shade elements from 2×10 lumber. Make the decorative cuts to both ends of the beams. In addition, you have to make notches to the beams, so you can fit them into place. Use a circular saw to make the cuts and then remove the excess with a chisel. You can adjust the depth of the notches to suit your needs.
Fitting-the-rafters
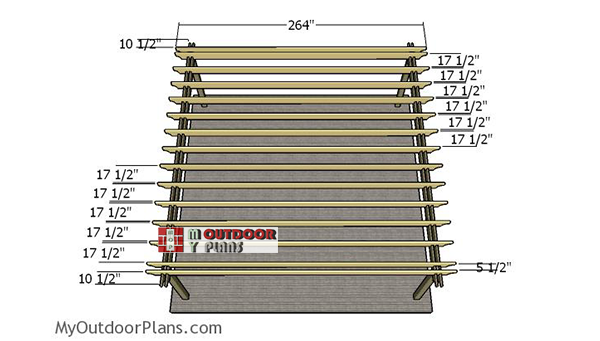
Fit the shade elements to the top of the pergola. You can adjust the distance between the shade elements to suit your needs. The closer you place the rafters one from another, the more shade you will create to the area. Use rafter ties to secure the rafters into place tightly. The rafters ties are needed due to the size of the shade elements, so they will really reinforce the joints.
Braces
Build four braces for the large pergola from 2×6 lumber. Make 45 degrees to both ends of the braces. In addition, use a jigsaw to make the decorative curved cuts. You can be creative here and add your own unique style to the braces.
6×6 braces
Build the other 4 braces for the pergola from 6×6 lumber. Make 45 degrees to both ends of the beams and then smooth the edges with sandpaper. Make the curved cuts to the braces and then smooth the edges with 120-220 grit sandpaper. Remember that you can also adjust the size of the braces.
Fitting the braces
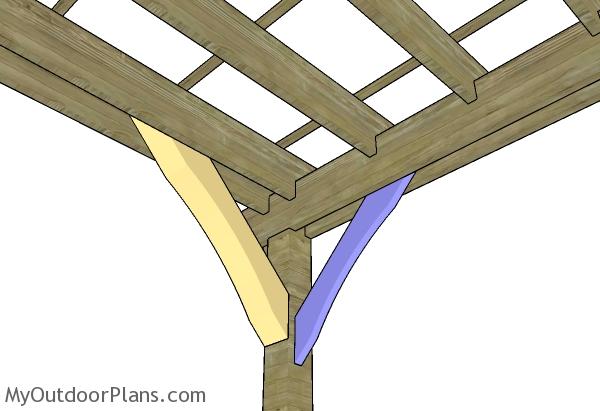
Fit the braces to the pergola, as shown in the diagram. Take accurate measurements and then drill pilot holes. Insert 4 1/2″ screws to lock the braces to the frame of the pergola.
Fitting the top slats
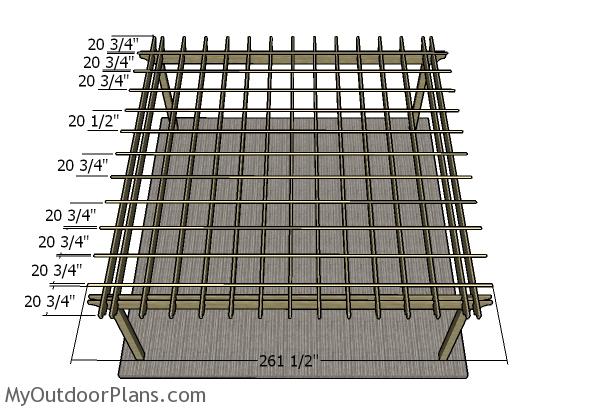
Fit the 1×2 trims to the top of the pergola. Center the slats to the top of the pergola and place them equally spaced. Drill pilot holes and insert 1 5/8″ screws to secure the slats into place tightly.
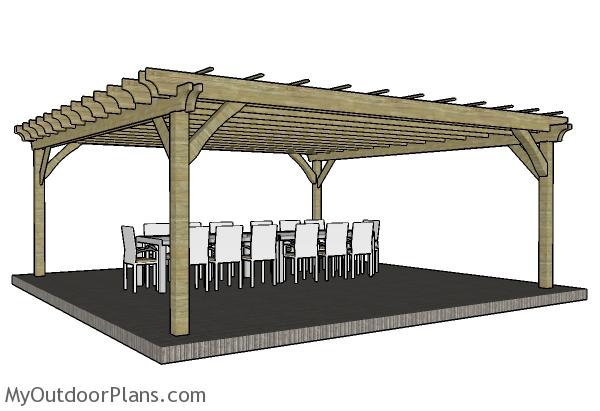
20×20 Pergola Plans
Last but not least, you need to take care of the finishing touches. Therefore, fill the holes with wood putty and then smooth the surface with 120-220 grit sandpaper. You can also fit braces, if you live in a windy area. Apply a few coats of paint or stain over the components, to enhance the look of the pergola and to protect the components from decay.
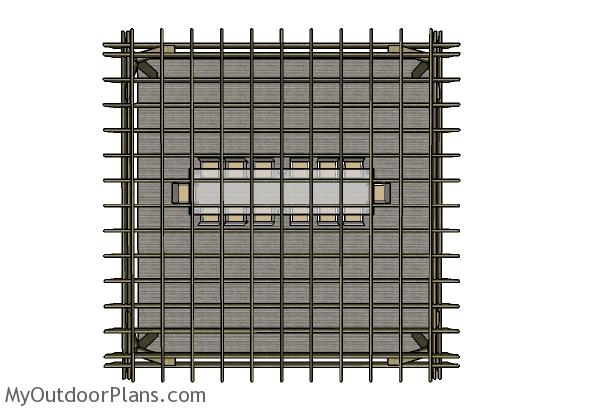
20×20 Pergola Plans – top view
This 20×20 pergola is large enough for setting outdoor sofas, a coffee table or even for creating a serving area for dinner. You can even cover the pergola with fabric so you create more shade during the hot summer days. This very large outdoor pergola is ideal for any backyard, as it will offer lots of shade and a surreal ambient.
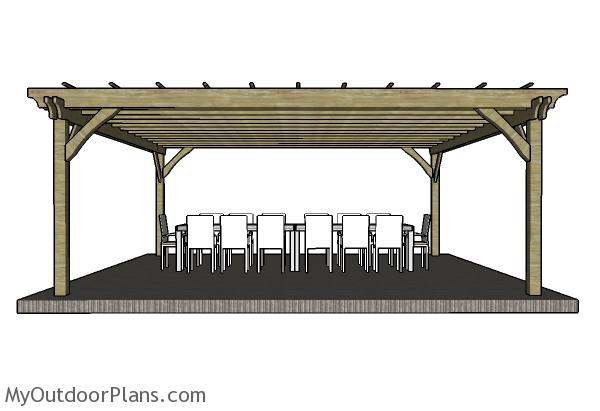
20×20 Pergola Plans – Front view
Building this 20×20 pergola is a great way to spice up the look of your property and to add rustic charm. This is an expensive and labor intensive project, so make sure you have the resources before starting the project. Make sure you invest in the most quality lumber you can afford, as the components will be exposed to the weather conditions.
This woodworking project was about 20×20 pergola plans free. If you want to see more outdoor plans, check out the rest of our step by step projects and follow the instructions to obtain a professional result.

27 comments
Thanks for the plan! It looks awesome. I had one question about the post. I recently had 4″ concrete poured and didn’t think about anchors until after the fact. Is it okay put put adjustable or prolonged anchors for the post? Will my concrete hold all that weight? It is only reinforced with mesh wire.
No, that will not work. All the weight of the pergola goes to the posts, so you need proper footings. In addition, it would be a great idea to read the local codes.
what if im adding this over and existing deck ?
You still need proper footings for the posts.
Where did you find 2x10x22 and 1x2x22 pieces of lumber?
I would like to also add some swings (~75lbs) that can hold 450lbs. Will the beams be able to support this?
You will need additional reinforcement for that.
Do you have engineered plans, or detailed plans for this project I can submit to permitting? If so please e-mail me the cost.
Also, what’s your thoughts on a center row of support posts and beams at the 10″ mark?
TY
How about wind? Our home is in area that get high wind from time to time (50mph) Would we need extra support?
If you live in an area with strong winds, first of all, you need to read the codes. Secondly, double check all the joints and use rafter ties for the top beams. The braces are strongly designed and it’s after all a pergola, if you make the joints super strong you will be ok.
Looking at the plans. Will the double 2×10’s Sag over that length? I may be missing it, but is there any 2xs screwed in between the 2 along the length between the 20ft span?
Also how low does the side braces go down and out on the post? I was thinking of making mine 9ft. But being were all on the tall side. I may have to move it up to 10ft.
If you have concerns, you can upgrade to 2×12. The top 1×2 slats reinforces the pergola and keeps the rafters straight and equally spaced.
how much to draw up some plans for a 20×20 attached to the side of a house?
I don’t design custom plans.
Also, if using the post to beam fastners that you have linked here in this pattern, does that take the place of notching the top of the post by 1.5 inches? Instead… these are used to attach just to the side of the post?
The notches are there so you can fit the rafters to the support beams a lot easier. I also think that adds an interesting look to the pergola. The rafter ties are needed in either case. The only alternative, would be to drill pilot holes through the top of the rafters and insert 12″ screws into the support beams, but that will be very difficult and costly.
I just noticed the “printer friendly” button over to the left of the site. WOW! that was easy to get the pattern printed. THANK YOU! I am excited to see what i can come up with.
You’re welcome. Looking forward to seeing your project.
Can I use 2x12x22 cedar boards here for the long spans? Hoping these will not sag over the long length.
Of course, the bigger the beams, the better.
For the shade elements, can I use 2×8 rather than 2×10’s? Will this sag? I I live in California and don’t see any snow. I also plan on using hearth redwood.
This is a pergola so snow is not a concern. No, it’s a wide span, 2c8s won’t work
what about a single 4″ x 8″ X 20′ beam?
Can I put metal roofing on it?
No, since this is a pergola and it has no roof slope
Do you have the 20x 20 pergola in the premium plans?
No, sorry. I’ll add it to my to do list.