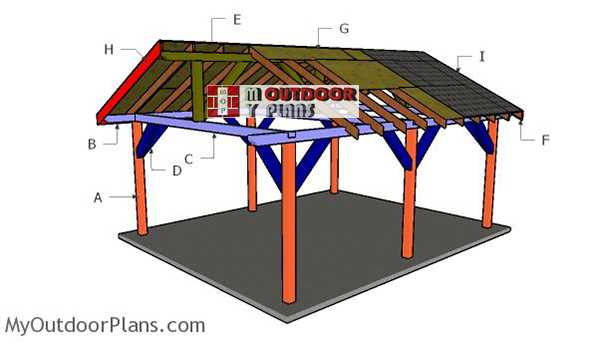
This step by step diy woodworking project is about a 16×24 outdoor pavilion roof plans. This is PART 2 of the large rectangular pavilion project, where I show you how to build the roof and how to attach the decorative trims. The roof has a 12:6 pitch, but you easily adjust it, if you need something else. Take a look over the rest of my woodworking plans, if you want to get more building inspiration.
When buying the lumber, you should select the planks with great care, making sure they are straight and without any visible flaws (cracks, knots, twists, decay). Investing in cedar or other weather resistant lumber is a good idea, as it will pay off on the long run. Use a spirit level to plumb and align the components, before inserting the galvanized screws, otherwise the project won’t have a symmetrical look. If you have all the materials and tools required for the project, you could get the job done in about a day. See all my Premium Plans HERE.
Projects made from these plans
16×24 Pavilion Roof Plans
Building-a-16×24-pavilion
Cut & Shopping Lists
- F – 30 pieces of 2×6 lumber – 120″ long RAFTERS
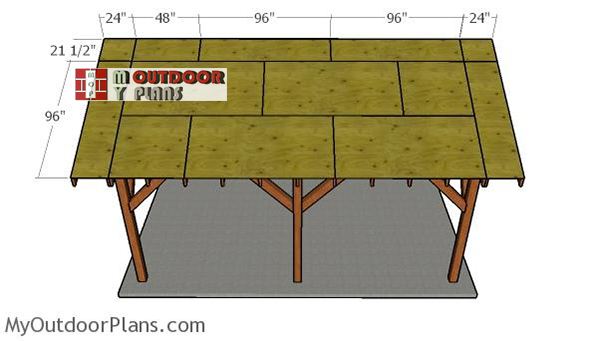
- G – 8 pieces of 3/4″ plywood – 48″x96″ long, 4 pieces – 48″x48″ long, 4 pieces – 24″x96″ long, 4 pieces – 21 1/2″x24″ long, 4 pieces – 21 1/2″x96″ long, 2 pieces – 21 1/2″x48″ long ROOF SHEETS
- H – 4 pieces of 1×8 lumber – 122″ long, 2 pieces – 288″ long TRIMS
- I – 500 sq ft of tar paper, 500 sq ft of asphalt shingles ROOFING
- 30 pieces of 2×6 lumber – 10′
- 15 pieces of 3/4″ plywood – 4’x8′
- 8 pieces of 1×8 lumber – 12′
- 500 sq ft of tar paper, 500 sq ft of asphalt shingles
- rafter ties
- 1 5/8″ screws, 2″ nails, 2 1/2″ screws
- wood glue, stain/paint
Tools
![]() Hammer, Tape measure, Framing square, Level
Hammer, Tape measure, Framing square, Level
![]() Miter saw, Drill machinery, Screwdriver, Sander
Miter saw, Drill machinery, Screwdriver, Sander
Time
Related
- PART 1: 16×24 Pavilion Plans
- PART 2: 16x24 Pavilion Roof Plans
How to build a 15×20 pavilion roof
Building-the-rafters
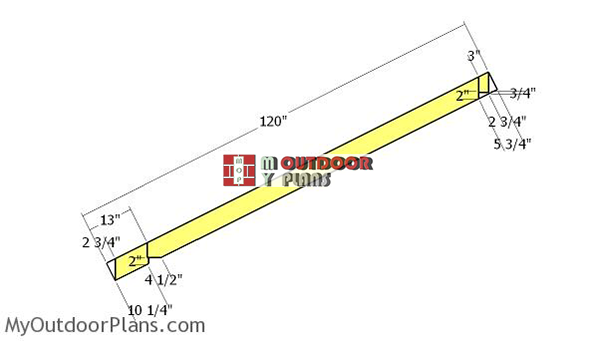
Use 2×6 lumber for the rafters. Make 26.6 degree cuts to both ends of the 2×6 rafters. Mark the cut lines to the rafters and then get the job done with a circular saw. Smooth the edges with sandpaper. Make the notches into the rafters, so you can fit them into place tightly.
Fitting-the-rafters-to-the-pavilion
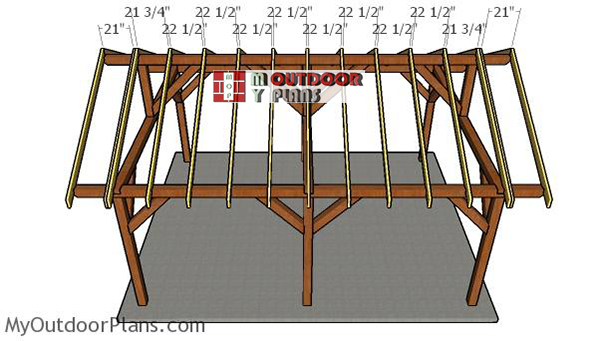
Fit the rafters to the top of the pavilion, using the information from the diagram. It is important to space the rafters properly (every 24″ on center), otherwise you won’t be able to attach the roofing sheets. Use rafters ties to lock the beams into place.
Roofing-sheets
Use 3/4″ plywood for the roof of the pavilion. Cut the sheets at the right dimensions and then lay them to the top of the pavilion. Leave no gaps between the sheets and then insert 1 5/8″ screws, every 8″ along the rafters, so you can secure them into place tightly.

Fitting the side trims
Fit 1×8 trims to the sides of the pavilion. Align the edges with attention and insert 2″ nails to lock them into place tightly.
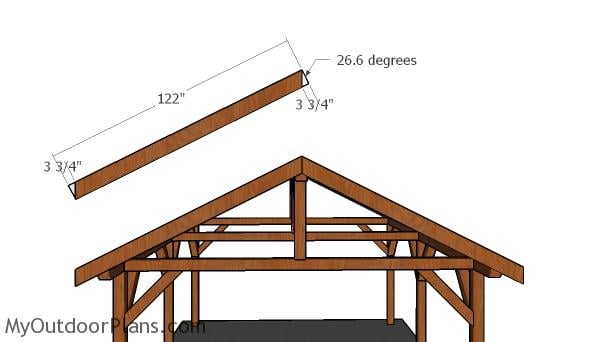
Gable trims
Fit the 1×8 trims to the front and back of the pavilion. Make the angle cuts to the trims before locking them into place with 2″ nails.
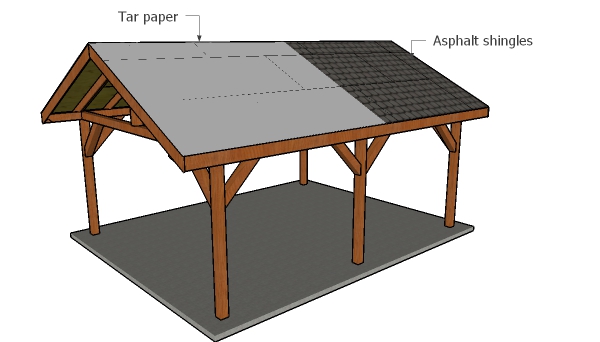
Fitting the roof
Cover the roof with tar paper and then install the asphalt shingles. Make sure you also install the appropriate drip edges, so you can seal the shed roof. Read the manufacturer’s instructions for a tight fit.
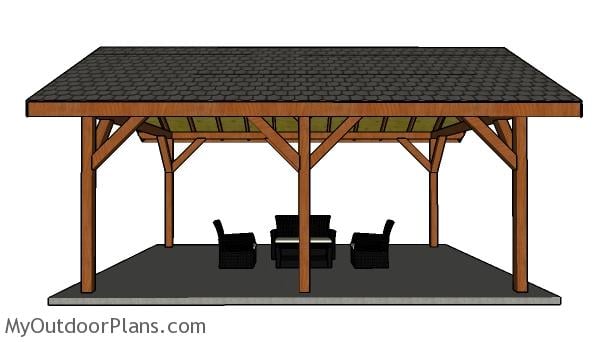
16×24 Pavilion Plans – Side view
Fill the holes with wood putty and let them dry out for a few hours. Smooth the surface with 100-200 grit sandpaper and remove the residues with a damp cloth. Apply a few coats of stain or paint to enhance the look of the pavilion. Make sure you take a look over PART 1 of the project, where I show you how to build the frame of the pavilion.
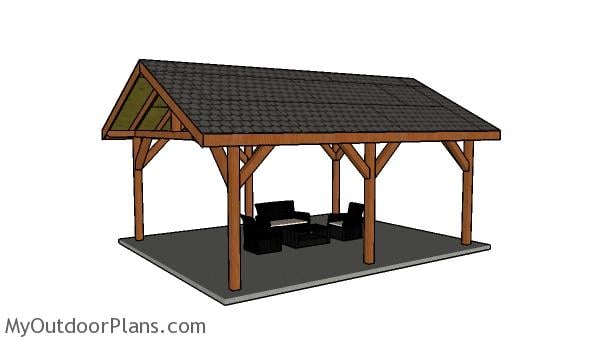
16×24 Pavilion Plans
Fill the holes with wood putty and let them dry out for a few hours. Smooth the surface with 100-220 grit sandpaper and remove the residues with a damp cloth.
Top Tip: Apply a few coats of paint or stain to the components, to enhance the look of the project. Make sure you take a look over the rest of my pergola/gazebo/pavilion plans HERE. See all my free woodworking plans (over 1000) HERE.
This woodworking project was about 16×24 outdoor pavilion plans free. If you want to see more outdoor plans, check out the rest of our step by step projects and follow the instructions to obtain a professional result. Feel free to SHARE my plans with your friends.


29 comments
The page for the 16×24 pavilion roof gives instructions for a 15×20 pavilion roof. Could you please send the link to the correct plans for the 16×24 roof? Thanks!
These are the plans for the roof of the 16×24 pavilion.
Hello, Thank you so much for these plans! They are great! I am trying to build my pavilion with the posts being 16×24 and a roof overhang of 2ft on both ends. Can you draw up plans for that? It would help me make sure I am ordering the correct amount of lumber. Thank you!
Sorry, I can’t help you with that. I don’t design custom plans.
Unless I am overlooking it the materials list is not showing Items A through E.
This is PART 2 of the plans. To see PART 1 click on the PREVIOUS button at the bottom of the article.
Hello,
I really like your 16 x 24 pavilion plans. I was wondering if I decide to use tie plates for some of the joints such as the Simpson Strong Tie HL35PC 3-1/4-Inch by 3-1/4-Inch by 5-Inch Heavy Angle Textured Black or even the Simpson Strong Tie Simpson Outdoor Accents APT6-8 x 6-inch ZMAX Galvanized Steel Black Powder-Coat Flat T Strap (8-Case) ( can get an idea of what they look like on amazon.com ). Or the 6×6 Blk Zmax L Strap, PartNo APL6, by Simpson Strong Tie, Pack of 8 on walmart.com
How many would I need and how many nuts and bolts and washers would I need. Also the recommended sizes. Also using the above mention ties would I need to use any on the braces. But at a 45 degree angle tie in those location instead. Ironwood 45 Degree Flush Inside Tie Plate By OZCO Ornamental Wood Ties found on decksdirect.com (for a visual on what they look like). Your thought on this would be greatly appreciated. I’m trying to achieve your creation but use bolts & nuts and washers instead of the long screws. Also how many rafter ties do you recommend and type and the nails or screws to use with them If you were building my way could you point me in the right direction by detailing some of these changes. I planned on using severe weather common 6″ x 6″ from Lowes and either stain or varnish the wood for a long lasting look. Thank you so much for you insght. I’m an amateur DIY guy just trying to build as sturdy as possible and give an aesthetic feel or look to my project. Again thank you for your time.
Sincerely,
Joe Harper
It depends on the type of rafter ties. Technically 2 for each rafter, most likely just one for the bottom. You can use the connectors for the structure but I cannot make a shopping list for that.
What kind of wood is this designed for? Would Western red cedar be strong enough as it’s drawn?
Yes, it works. I has the almost the same hardness as pine.
This is the plan I’ve been looking for. However, I would like to use it to build a two-car Carport. Can I adjust the width and make this plan work for a 20X24? Thanks
Yes, it will work.
Looking for the same concept as you 16 x24 plan for a 20×30.
I want to span the 20 section with a good enough header so I can leave open without a support beam in the middle. Any chance you have a plan that covers that. Also looking to use metal roofing so I would skip the plywood roof and lay down 2×4 across the roof trusses to fasten too
I don’t have plans for what you are looking for.
It says it calls for 6 pieces of 1×8 lumber at 12’ in length. It should be 8 though correct? Two 12’ pieces are needed on each of the 4 sides.
Yes, list updated. Thank you.
What is the cost associated with this plan for the materials?
i would like to use this for a 14′ x 19′ structure. can i use these plans? if so what would be the main edits? you also dont call out the quantities of screws/hardware.
That’s not the right plans for your need. You would need to change basically everything. I recommend you this one: https://myoutdoorplans.com/gazebo/14×14-outdoor-pavilion-plans/ You keep the structure, the rafters will be the same. You just enlong it 5 more feet. Use center posts on the sides.
Thank you for your time sharing these amazing plans! I am almost finished with the main structure using these plans and am preparing to order materials for the roof.
Do you think it would be okay to use 4×6 rafters @ 4′ OC with 2×6 Tongue and Groove roof deck? Thanks again!
I don’t recommend that. The spacing is too wide. I would use 2x6s every 2 ft
That’s what I will do, thank you!
Do you recommend rafter ties on the top and bottom of the rafters or just the bottom?
Use the rafter ties at both ends.
Im looking for plans for a 12×12 gazebo roof on 4or posts
Here: https://myoutdoorplans.com/pergola/12×12-hip-roof-gazebo-plans/
what is the glue for ?
I need 24×16. Do you have that?
No
Why did you cut the plywood like that instead of just laying whole sheets