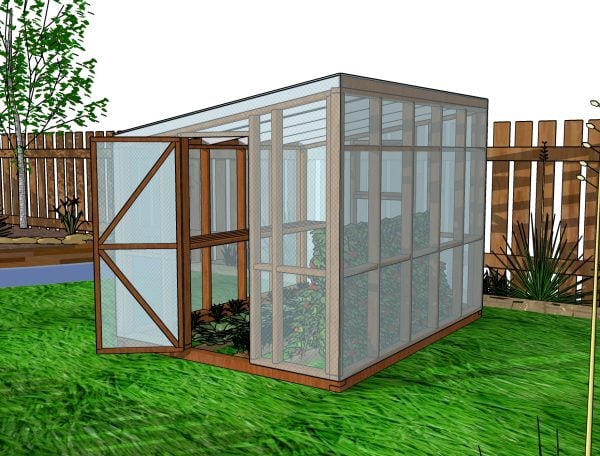
This step by step diy project is about 8×10 lean to greenhouse plans. I’m thrilled to share with you my plans for an 8×10 lean-to greenhouse. If you’ve been dreaming of extending your growing season and having fresh veggies or beautiful flowers all year round, this project is perfect for you. We’ll be building a sturdy, practical greenhouse that can lean right up against your house or shed, maximizing space and efficiency. So, grab your tools, get ready to roll up those sleeves, and let’s turn that backyard into a gardener’s paradise together!
In total, you’re looking at an estimate of $600-$1000, depending on the quality of materials and prices in your area. Take a look over the rest of my woodworking plans, if you want to get more building inspiration.
When buying the lumber, you should select the planks with great care, making sure they are straight and without any visible flaws (cracks, knots, twists, decay). Investing in cedar or other weather resistant lumber is a good idea, as it will pay off on the long run. Use a spirit level to plumb and align the components, before inserting the galvanized screws, otherwise the project won’t have a symmetrical look. If you have all the materials and tools required for the project, you could get the job done in about a day.
Projects made from these plans
8×10 Lean to Greenhouse – DIY Woodworking Plans

Building-a-8×10-greenhouse
Cut and Shopping Lists
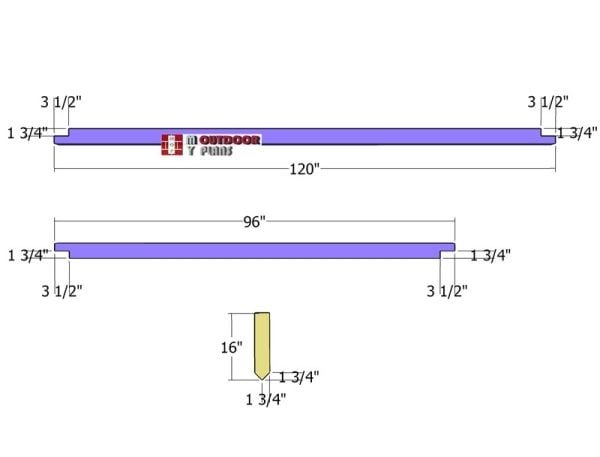
A – Skids – 4×4 lumber 8′ long – 2 pieces
A – Skids – 4×4 lumber 10′ long – 2 pieces
B – Stakes – 2×4 lumber 16″ long – 12 pieces
C – Short Wall – 2×4 lumber 10 ft long – 2 pieces
C – Short Wall – 2×4 lumber 68 1/8″ long – 6 pieces
C – Short Wall – 2×4 lumber 21 3/4″ long – 2 pieces
C – Short Wall – 2×4 lumber 22 1/2″ long – 3 pieces
D – Tall Wall – 2×4 lumber 10 ft long – 2 pieces
D – Tall Wall – 2×4 lumber 83 1/2″ long – 6 pieces
D – Tall Wall – 2×4 lumber 21 3/4″ long – 4 pieces
D – Tall Wall – 2×4 lumber 22 1/2″ long – 6 pieces
D – Braces – 6×6 lumber 35 3/8″ long – 2 pieces
D – Braces – 6×6 lumber 40 3/8″ long – 2 pieces
E – Front Wall – 2×4 lumber 30“ long – 2 pieces
E – Front Wall – 2×4 lumber 90 1/2“ long – 1 piece
E – Front Wall – 2×4 lumber 18 1/4“ long – 2 pieces
E – Front Wall – 2×4 lumber 7 1/4“ long – 2 pieces
E – Front Wall – 2×4 lumber 29“ long – 1 piece
E – Front Wall – 2×4 lumber 82 7/8“ long – 1 piece
E – Front Wall – 2×4 lumber 79 5/8“ long – 1 piece
E – Front Wall – 2×4 lumber 78 1/8“ long – 1 piece
E – Front Wall – 2×4 lumber 73 1/8“ long – 1 piece
E – Front Wall – 2×4 lumber 71 5/8“ long – 1 piece
E – Front Wall – 2×4 lumber 68 3/8“ long – 1 piece
F – Back Wall – 2×4 lumber 89“ long – 1 piece
F – Back Wall – 2×4 lumber 90 1/2“ long – 1 piece
F – Back Wall – 2×4 lumber 82 7/8“ long – 1 piece
F – Back Wall – 2×4 lumber 79 5/8“ long – 1 piece
F – Back Wall – 2×4 lumber 78 1/8“ long – 1 piece
F – Back Wall – 2×4 lumber 73 1/8“ long – 1 piece
F – Back Wall – 2×4 lumber 71 5/8“ long – 1 piece
F – Back Wall – 2×4 lumber 7 1/4“ long – 2 pieces
F – Back Wall – 2×4 lumber 18 1/4“ long – 2 pieces
F – Back Wall – 2×4 lumber 29“ long – 2 pieces
G – Rafters – 2×4 lumber 96“ long – 6 pieces
H – Trims – 1×4 lumber 10 ft long – 1 piece
H – Trims – 1×3 lumber 10 ft long – 1 piece
I – Trims – 2×2 lumber 29″ long – 2 pieces
I – Trims – 2×2 lumber 21″ long – 2 pieces
J – Door – 2×2 lumber 29″ long – 2 pieces
J – Door – 2×2 lumber 26″ long – 1 piece
J – Door – 2×2 lumber 70 1/8″ long – 2 pieces
J – Door – 2×2 lumber 43″ long – 2 pieces
Tools
![]() Hammer, Tape measure, Framing square, Level
Hammer, Tape measure, Framing square, Level
![]() Miter saw, Drill machinery, Screwdriver, Sander
Miter saw, Drill machinery, Screwdriver, Sander
Time
![]() One week
One week
Related
It’s that easy to build a lean to greenhouse!
Pin for later

How to build a 8×10 lean to greenhouse
Skids
Let’s get started with building the base for our greenhouse. First up, we’ll use 4×4 pressure-treated beams since they’re great at resisting moisture. Grab your circular saw and make notches at both ends of the beams.
Make parallel cuts inside the notched areas, then use a chisel to remove the excess wood and smooth out the recess. This will give us a solid and durable foundation for our greenhouse!
Assembling-the-base
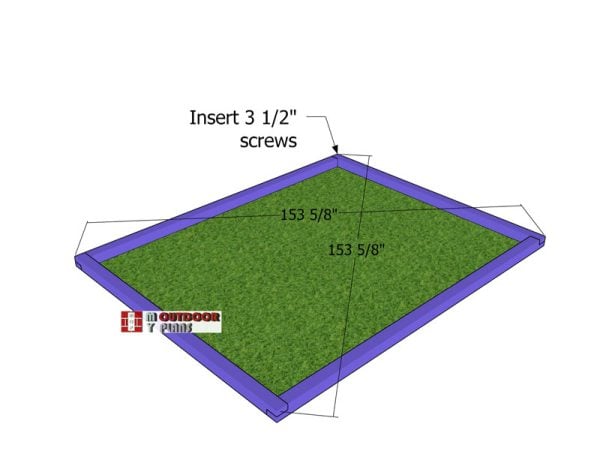
Choosing the right location for your greenhouse is crucial because you’ll need plenty of direct sunlight. So, pick a spot that gets good southern exposure and level the surface thoroughly. Lay down your beams and align those corners perfectly.
Drill pilot holes and secure everything with 3 1/2″ screws, making sure the corners are square. Use an L-square to check the corners and ensure the diagonals are equal.
Fitting-the-stakes
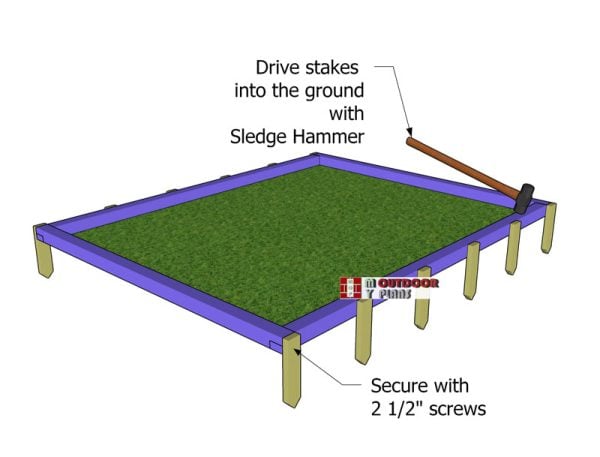
Next, fit the 2×4 anchors along the side skids and drive them into the ground until they’re flush with the beams. Secure the stakes to the base of the greenhouse using 2 1/2″ screws.
This is a simple method to anchor the greenhouse to the ground, but be sure to adjust the depth of the skids based on the wind conditions in your area. This will keep your greenhouse stable and secure!
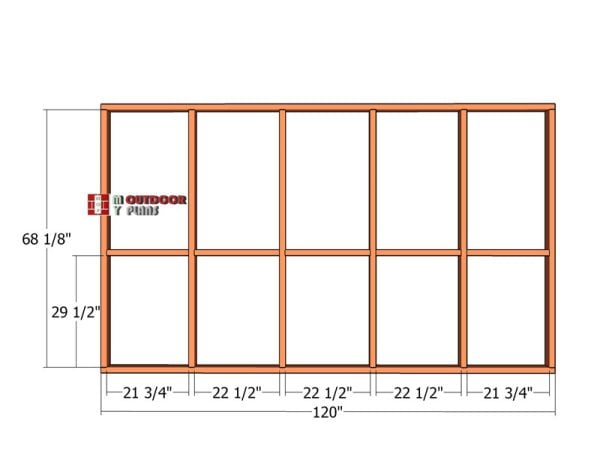
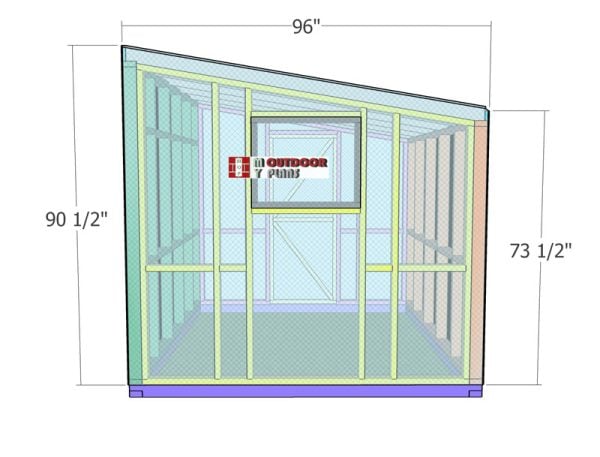
Short-side-frame
Alright, let’s frame the short side wall using 2×4 lumber. Drill pilot holes through the plates and insert 3 1/2″ screws into the studs, placing the studs every 24″ on center and aligning the edges carefully. Make sure those corners are square.
Next, fit the 2×4 supports to create the openings for the vents. Drill pocket holes at both ends of the supports and use 2 1/2″ screws to secure them to the studs. This will give us a solid structure with properly framed openings for ventilation.
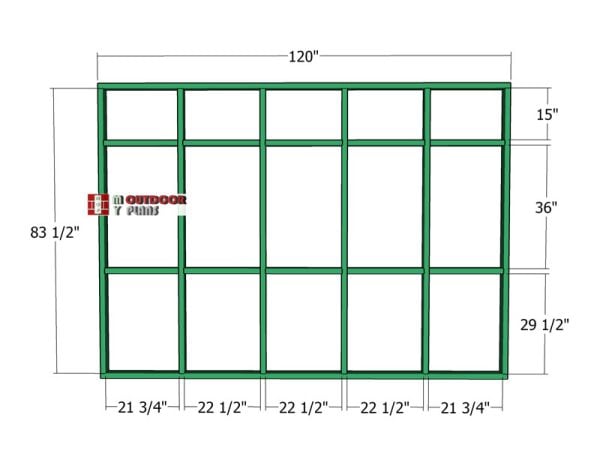
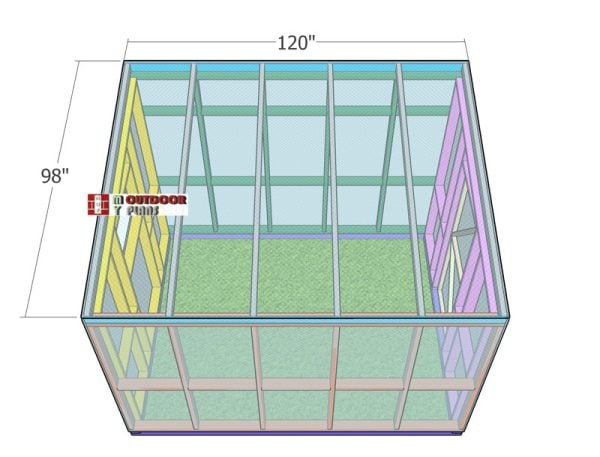
Tall-wall-frame
Next, we need to frame the tall side wall. Cut all the components to the right dimensions according to the plans. Drill pilot holes through the plates and secure the studs with 3 1/2″ screws, placing them every 24″ on center.
Don’t forget about the blockings, which add rigidity to the frame and support the translucent panels. Drill pocket holes at both ends of the blockings and use 2 1/2″ screws to lock them into place. Make sure those corners are square. This will ensure our greenhouse is strong and sturdy!
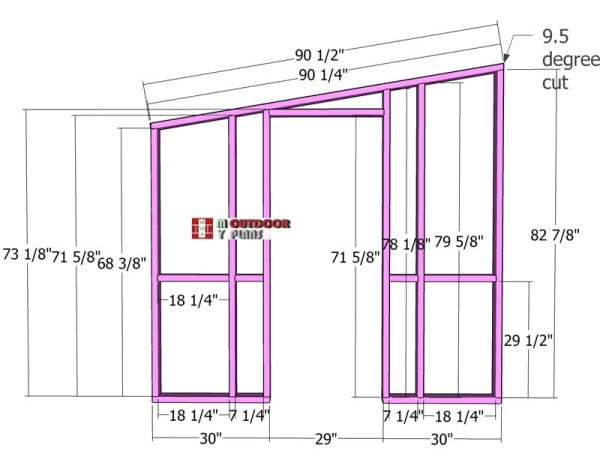
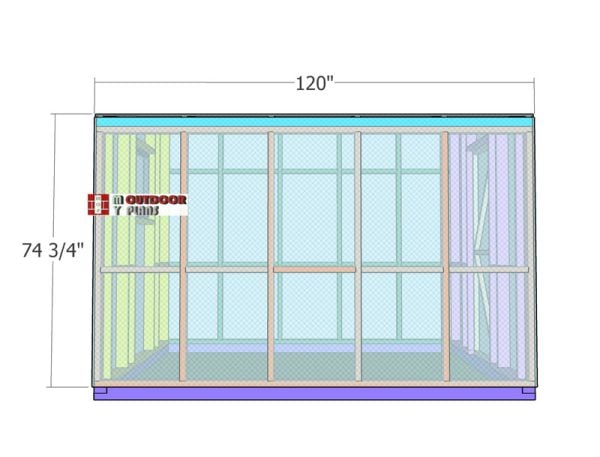
Back-wall-frame
Next, let’s build the back wall for the greenhouse. It’s almost identical to the front wall, with a couple of differences. The bottom plate is different, and we’ve included a window frame. I added the window to the back of the greenhouse so you can ventilate the interior and control the temperature properly. This will help keep your greenhouse environment just right!
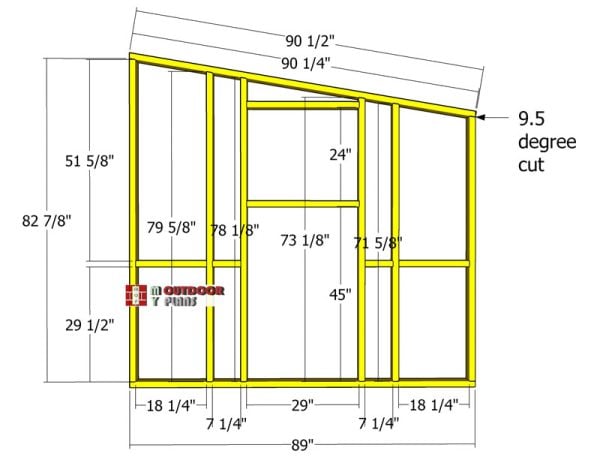
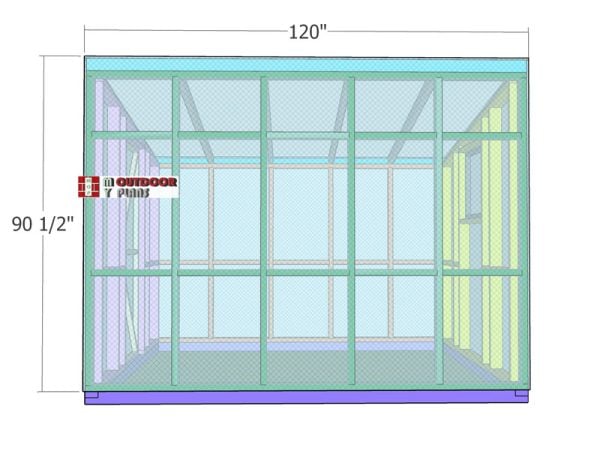
Front-wall-frame
Now, let’s build the front wall for the greenhouse following the diagram. Notice the 29″ opening for the door. You’ll need to make 9.5-degree cuts at the top of the studs, as well as 9.5-degree cuts on both ends of the top plate. Once you have everything cut, insert 3 1/2″ screws through the plates into the studs. This will form the perfect frame for our front wall, including a nice opening for the door!
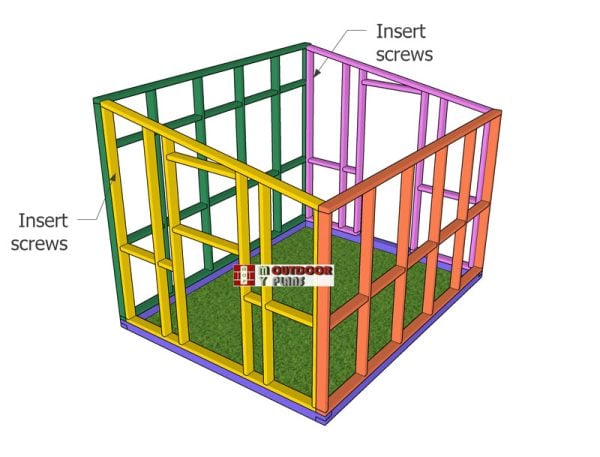
Assembling-the-frame-of-the-greenhouse
Fit the side wall frames onto the top of the skids. Use a spirit level to make sure they’re plumb, then secure them with temporary braces. Drill pilot holes through the bottom plates and insert 3 1/2″ screws every 12″. This will lock everything into place and ensure your side walls are solid and stable!
Fit the front and back wall frames onto the greenhouse. Use a spirit level to make sure the frames are plumb. Align the edges perfectly, then lock the wall frames together with 3 1/2″ screws. This will ensure everything is secure and aligned just right!
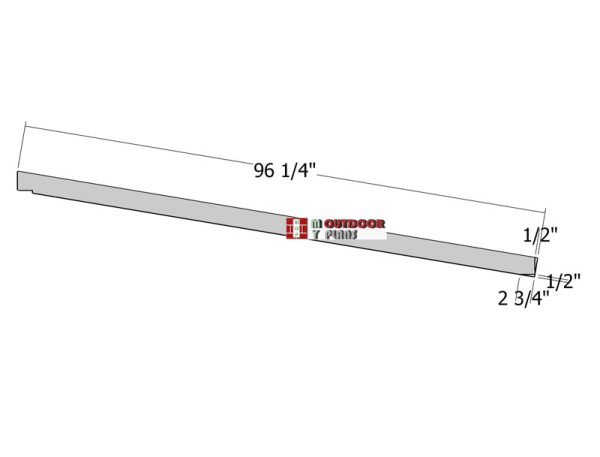
Rafters
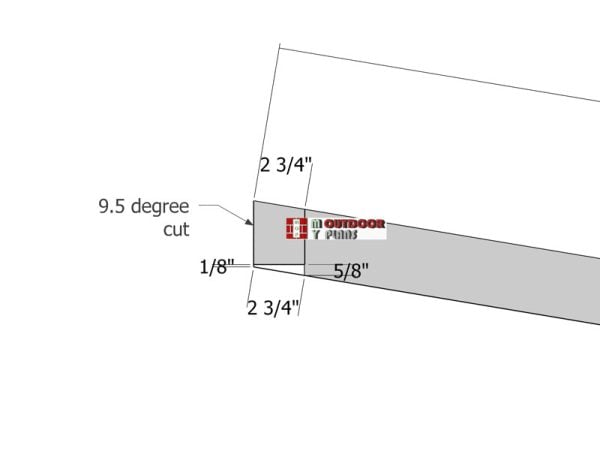
Rafter-detail
Now, let’s move on to the rafters using 2×4 lumber. Mark your cut lines on the beams and use a saw to get the job done. These cuts are essential to fit the rafters to the wall frames and lock them into place securely. This step will ensure our greenhouse roof is sturdy and well-supported!
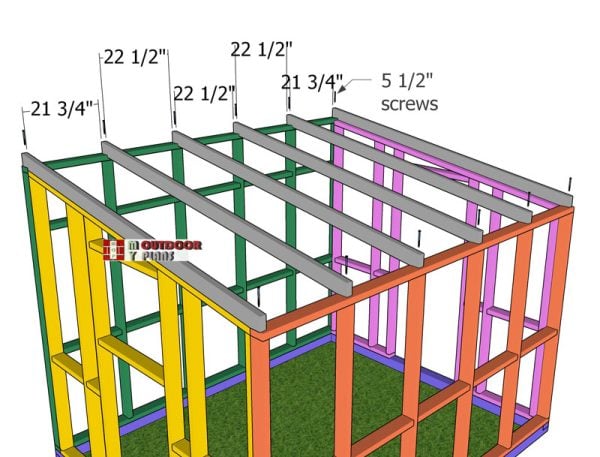
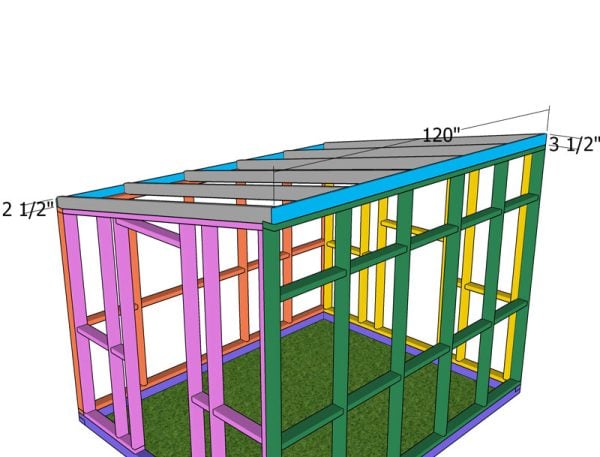
Attaching-the-rafters
Next, fit the rafters to the top of the greenhouse, spacing them every 24″ on center. Drill pilot holes first, then secure the rafters with 5 1/2″ screws. This will lock the rafters into place and give our greenhouse a strong, reliable roof structure!
Attaching-the-top-trims
Next, attach the trims to the sides of the greenhouse. Make sure the edges are flush, then secure them tightly with 2 1/2″ screws. This will give the greenhouse a clean, finished look and ensure everything is locked into place securely!
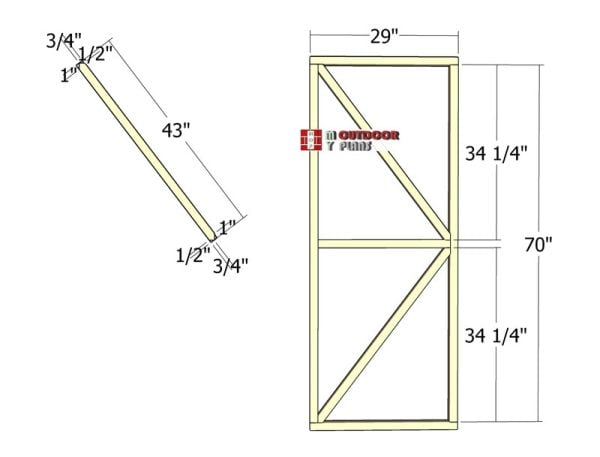
Framing-the-door
Continue the project by building the door frame using 2×2 lumber. Make the cuts at both ends of the diagonal braces. Lay everything out on a level surface and use 2 1/2″ screws to assemble the door frame.
Drill pilot holes through the top and bottom components, then insert the 2 1/2″ screws. Attach the middle support with 2 1/2″ screws, and finally, fit the diagonal braces to complete the frame. This will give us a sturdy and well-supported door for our greenhouse!
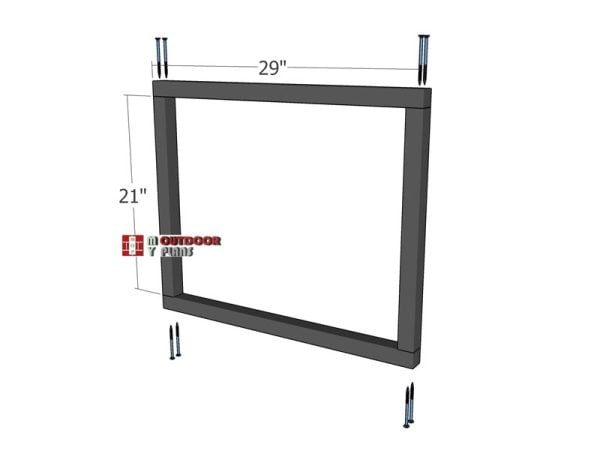
Building-the-window-frames
Assembling-the-windows
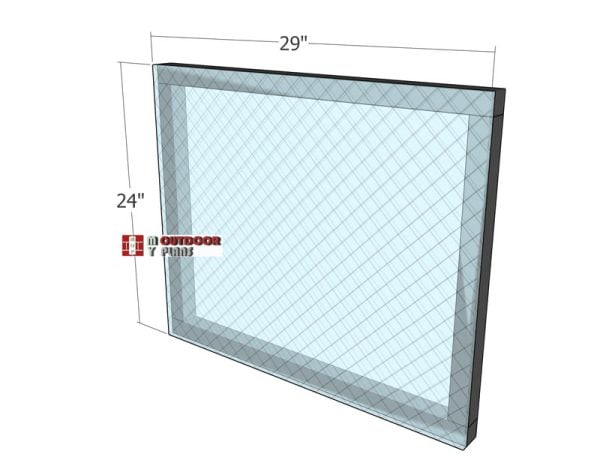
Now, let’s build the window frame using 2×2 lumber. Drill pilot holes through the top and bottom boards, then use 2 1/2″ screws to assemble the window frame.
Next, attach the translucent panel to the frame and lock it into place with appropriate screws. This will complete our window, adding both functionality and ventilation to the greenhouse!
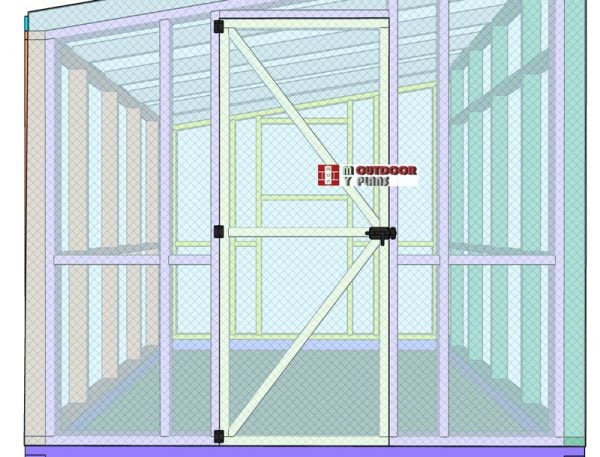
Fitting-the-door-to-the-greenhouse
Next, attach the door to the opening. Secure it tightly with hinges and a latch to ensure it stays in place. This will give us a functional and secure entrance to our greenhouse!
Fitting-the-window
Now, let’s fit the window to the greenhouse. Secure it with 2 hinges and a latch to lock it into place. This will provide proper ventilation and keep our greenhouse secure!
Tall-wall-panels
Short-side-wall-panels
Measure and cut the sheets to the appropriate size, drilling holes along the edges for attachment. Install end caps or flashing to protect the edges and give a finished look.
Carefully place the sheets onto the greenhouse frame, making sure they’re aligned properly. Secure the sheets to the frame with screws or bolts through the pre-drilled holes, but avoid over-tightening. Finally, inspect the installation for proper fit and alignment, and make any necessary adjustments before adding the finishing touches. This will ensure our greenhouse is well-protected and looks great!
Roof
Grab a fine-toothed saw, like a circular saw with a fine-toothed blade or a jigsaw, to cut those polycarbonate sheets to size. Don’t forget your safety gear—safety glasses and gloves are a must when cutting the sheets. Stay safe and precise, and you’ll have those sheets cut perfectly in no time!
How to build a 8×10 greenhouse
8×10 lean to greenhouse plans
Last but not least, let’s talk finishing touches for our greenhouse. First, apply a weather-resistant sealant to all the wooden surfaces to protect against the elements. Next, install some shelving and add decorative elements like hanging baskets and potted plants to make the space both functional and inviting. Finally, set up a drip irrigation system to ensure your plants get consistent watering with minimal effort.

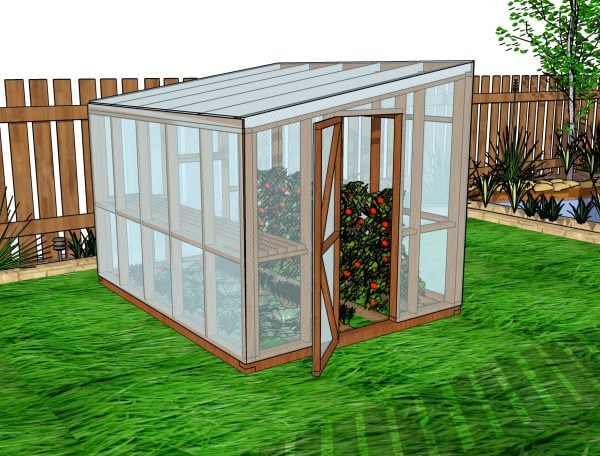
8×10 lean to greenhouse plans – front view
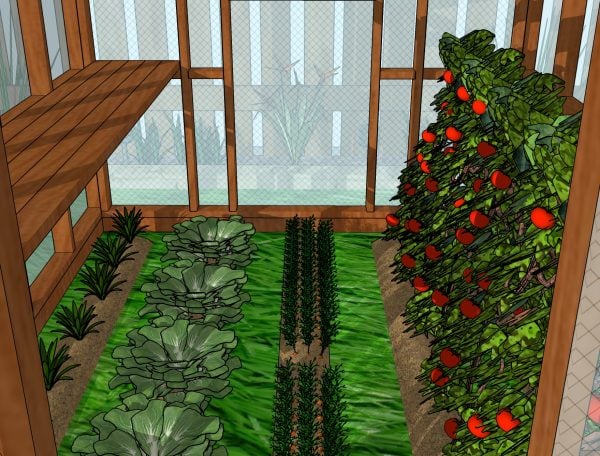
8×10 lean to greenhouse plans – interior view
You can build shelves inside the greenhouse by adding 2x4s along the sides, using the blockings as supports. Make it your own with some decorative elements like hanging baskets, potted plants, or colorful accents to create a welcoming and visually appealing space. For efficiency, set up a watering system like drip irrigation or a soaker hose to evenly distribute water to your plants, minimizing water waste and cutting down on labor.
If you’re ready to take your project to the next level, hit the GET PDF PLANS button below for the Premium Plans. You’ll get detailed Cut & Shopping Lists, plus a Cut Layout Diagram to help you stay organized and efficient from start to finish. Let’s make this project a breeze!

This woodworking project focused on building an 8×10 lean to greenhouse. If you’re looking for more outdoor plans, be sure to check out the rest of our step-by-step projects. Don’t forget to share them with your friends!