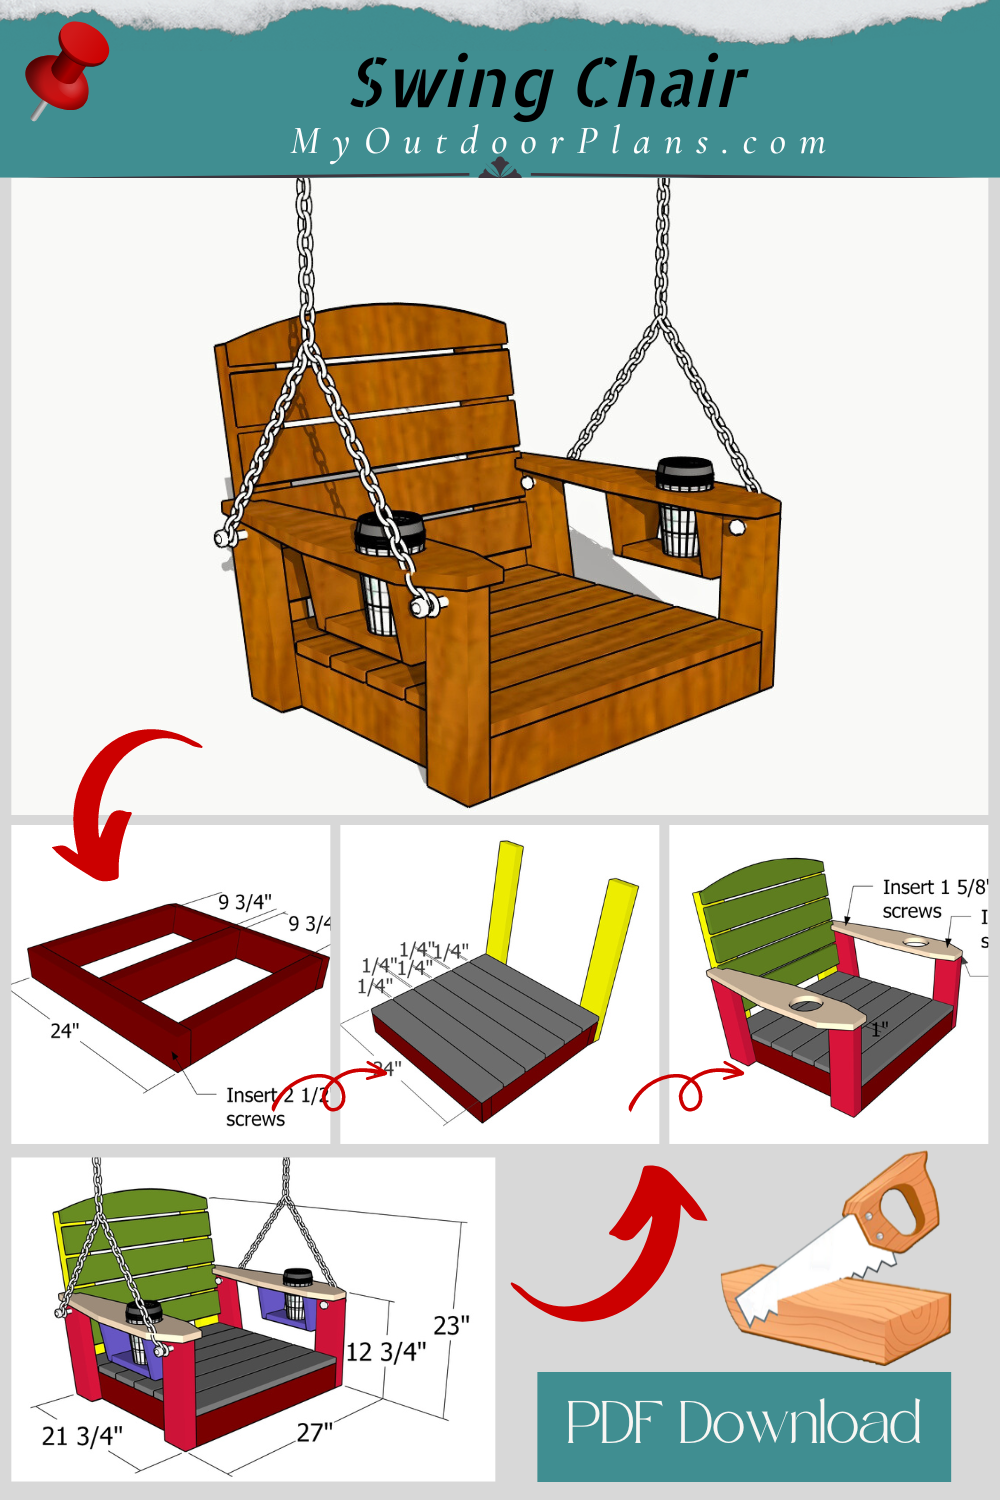
Welcome to this exciting DIY project where we’ll be looking over swing chair with cupholders plans! Just like any great journey, this project combines creativity, craftsmanship, and a dash of practicality, resulting in a piece that’s both functional and stylish. Whether you’re an experienced DIYer or new to the craft, this project is about creating something special—a place where you can relax, enjoy a good book, or simply unwind with a drink in hand. You can use this swing chair for a tree or for your porch. Let’s get started on this easy weekend project! Take a look over the rest of my woodworking plans, if you want to get more building inspiration. Premium Plans for this project available in the Shop.
In total, you can expect to spend around $40 – $100 on materials, depending on your choices. The project will likely take about 11-18 hours from start to finish, including planning, building, and final touches. Remember, take your time, enjoy the process, and don’t hesitate to get creative with the design!
For this project, I recommend using cedar or hardwood for their durability and natural resistance to the elements. Cedar is a fantastic option because it’s lightweight, rot-resistant, and has a beautiful, rustic look. Hardwood, on the other hand, provides superior strength and longevity, making your project a sturdy and stylish addition to your home.
Projects made from these plans
Swing Chair with Cupholders – Free Plans
Building-a-swing-chair
Cut and Shopping Lists
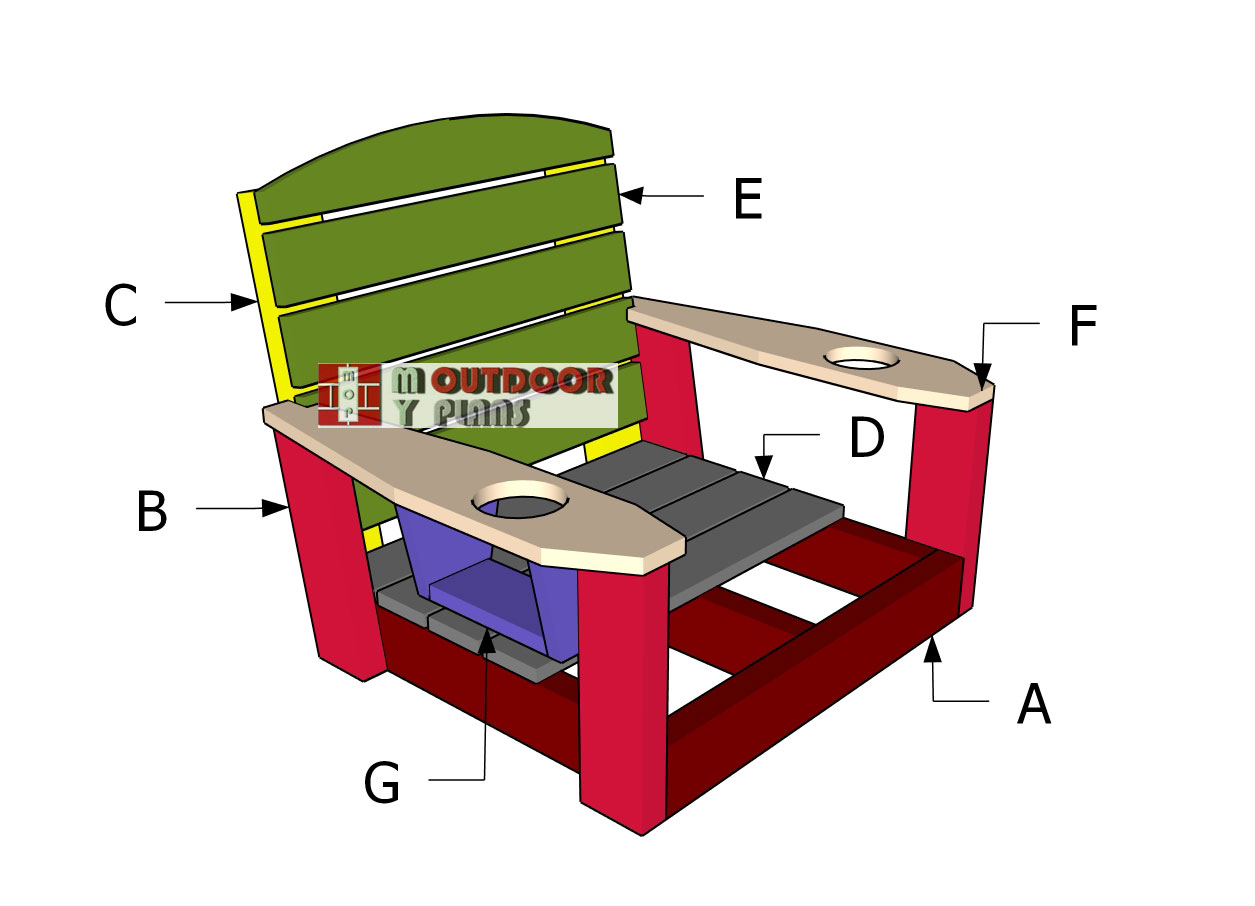
A – Seat frame – 2×4 lumber 24″ long – 2 pieces
A – Seat frame – 2×4 lumber 19 3/4″ long – 3 pieces
B – Supports – 2×4 lumber 12″ long – 2 pieces
B – Supports – 2×4 lumber 12 3/4″ long – 2 pieces
C – Backrest Supports – 2×4 lumber 23 1/2″ long – 2 pieces
D – Seat – 1×4 lumber 24″ long – 6 pieces
E – Backrest – 1×4 lumber 24″ long – 5 pieces
F – Armrests – 1×6 lumber 24 3/4″ long – 2 pieces
G – Cupholder – 1×6 lumber 4 3/4″ long – 4 pieces
G – Cupholder – 1×4 lumber 7 1/4″ long – 2 pieces
- 2×4 lumber 8 ft – 1 piece
- 2×4 lumber 10 ft – 1 piece
- 1×4 lumber 8 ft – 3 pieces
- 1×6 lumber 8 ft – 1 piece
- 2 1/2″ screws – 100 pieces
- 1 5/8″ screws – 100 pieces
- Swing chair kit – 1 set
- Wood glue – 1 can
- Stain – 1 can
Tools
![]() Hammer, Tape measure, Framing square, Level
Hammer, Tape measure, Framing square, Level
![]() Miter saw, Drill machinery, Screwdriver, Sander
Miter saw, Drill machinery, Screwdriver, Sander
Time
![]() One weekend
One weekend
Related
Pin for Later!
Swing Chair Plans – Building the Seat
Seat-frame-components
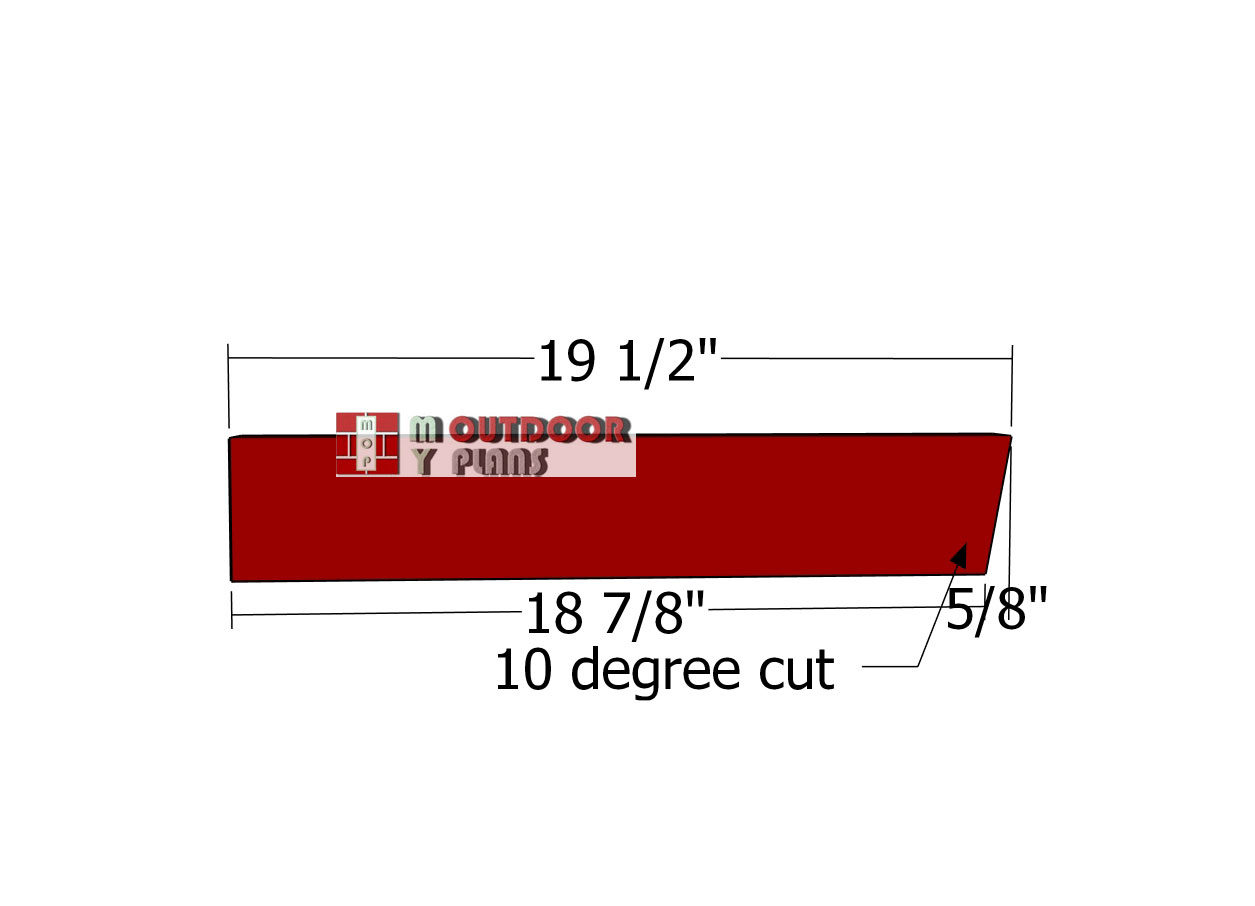
To kick off this project, we’re framing the seat for the swing chair using sturdy 2×4 lumber. Grab your miter saw and make a 10-degree cut on one end of each seat frame piece -this will give your swing a nice, angled flair. Don’t forget to smooth out the edges with some sandpaper for a polished, splinter-free finish!
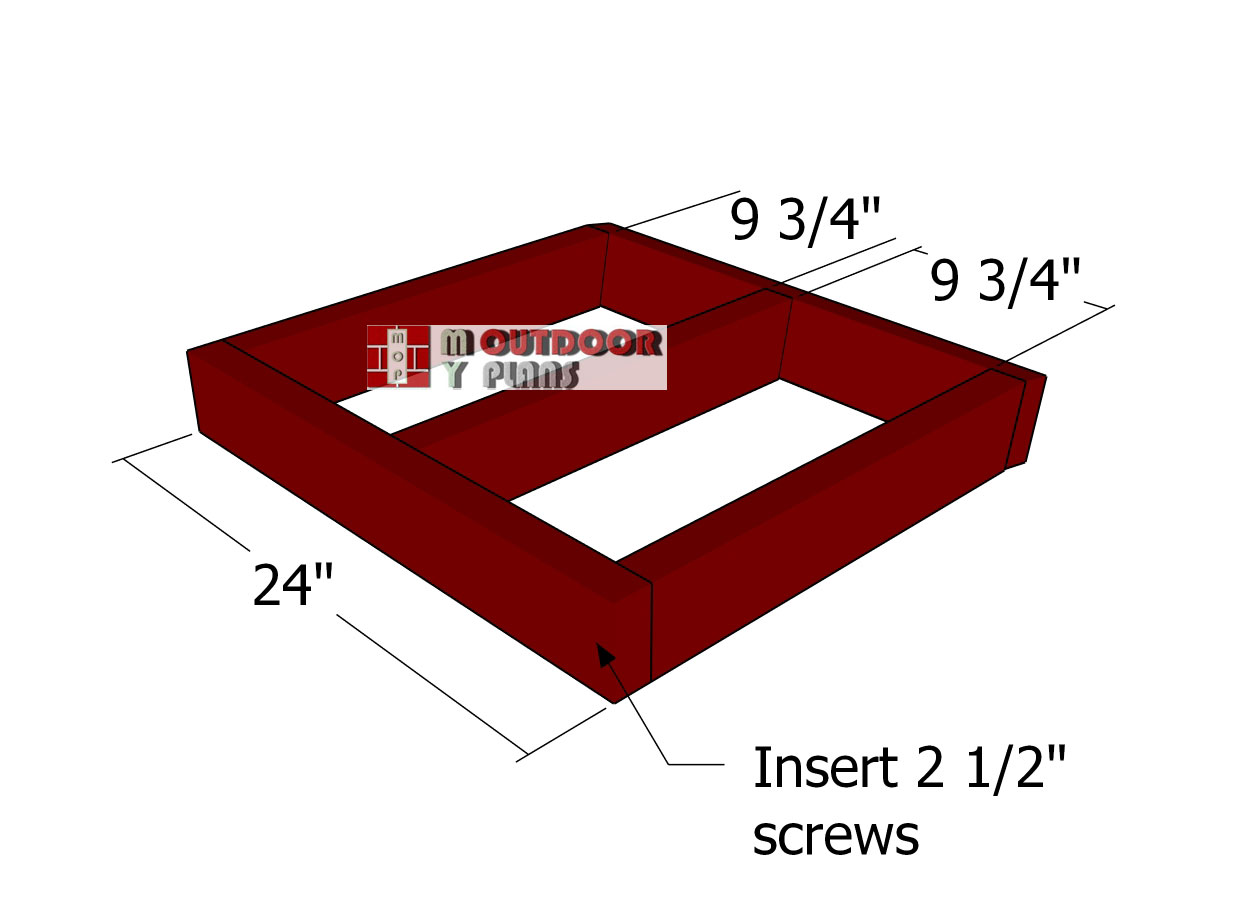
Assembling-the-seat-frame
Lay out all your components on a level surface, making sure everything’s ready to go. Drill pilot holes through the front and back pieces, then secure them to the perpendicular supports with 2 1/2″ screws. Align the edges perfectly flush and keep it tight—no gaps allowed! This way, your swing seat will be solid and ready for action.
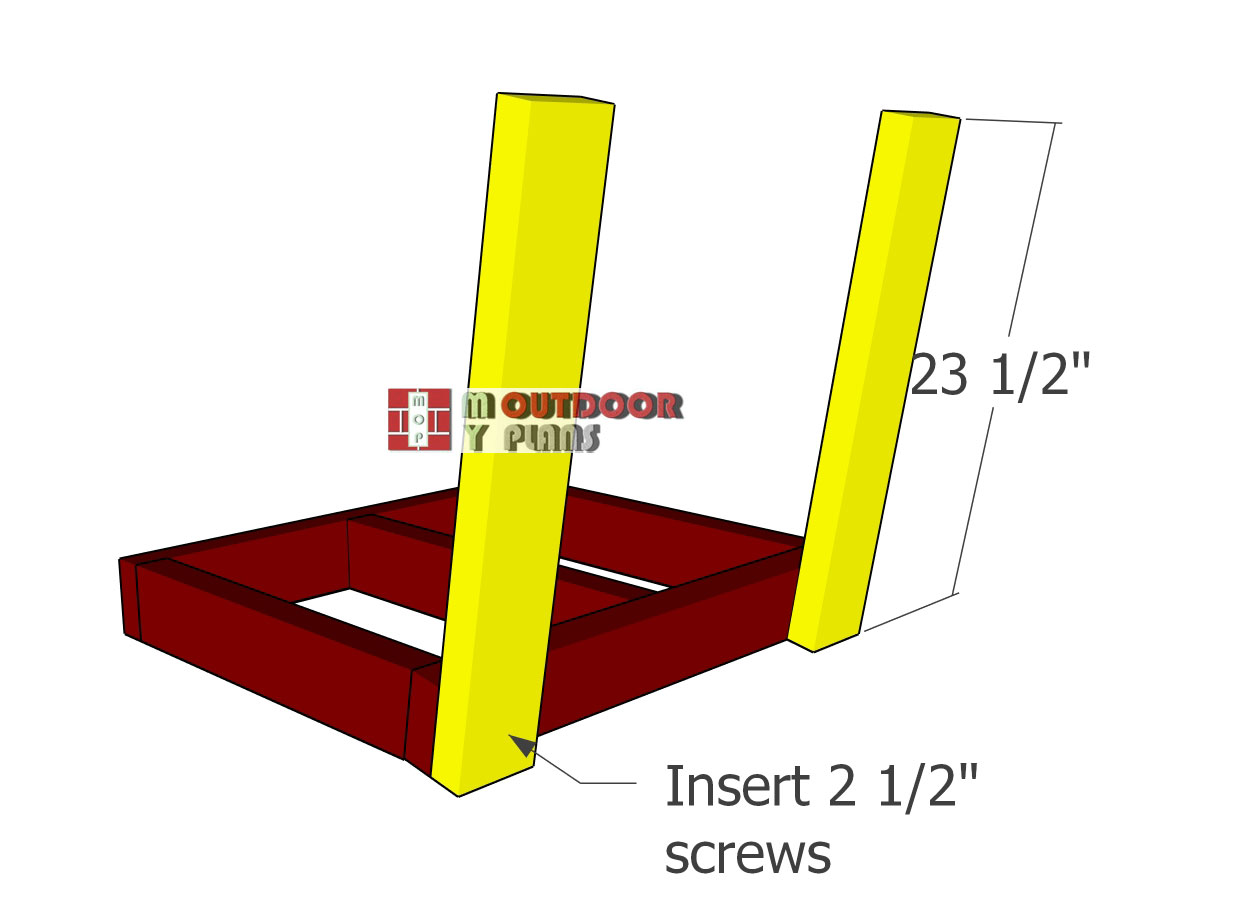
Backrest-supports
Next up, we’re adding the 2×4 board to the back of the seat frame. Line up the edges nice and flush, then attach the backrest supports to the seat frame using 2 1/2″ screws. Remember to drill pilot holes through the supports first to keep the wood from splitting—this will keep your swing chair sturdy and looking sharp!
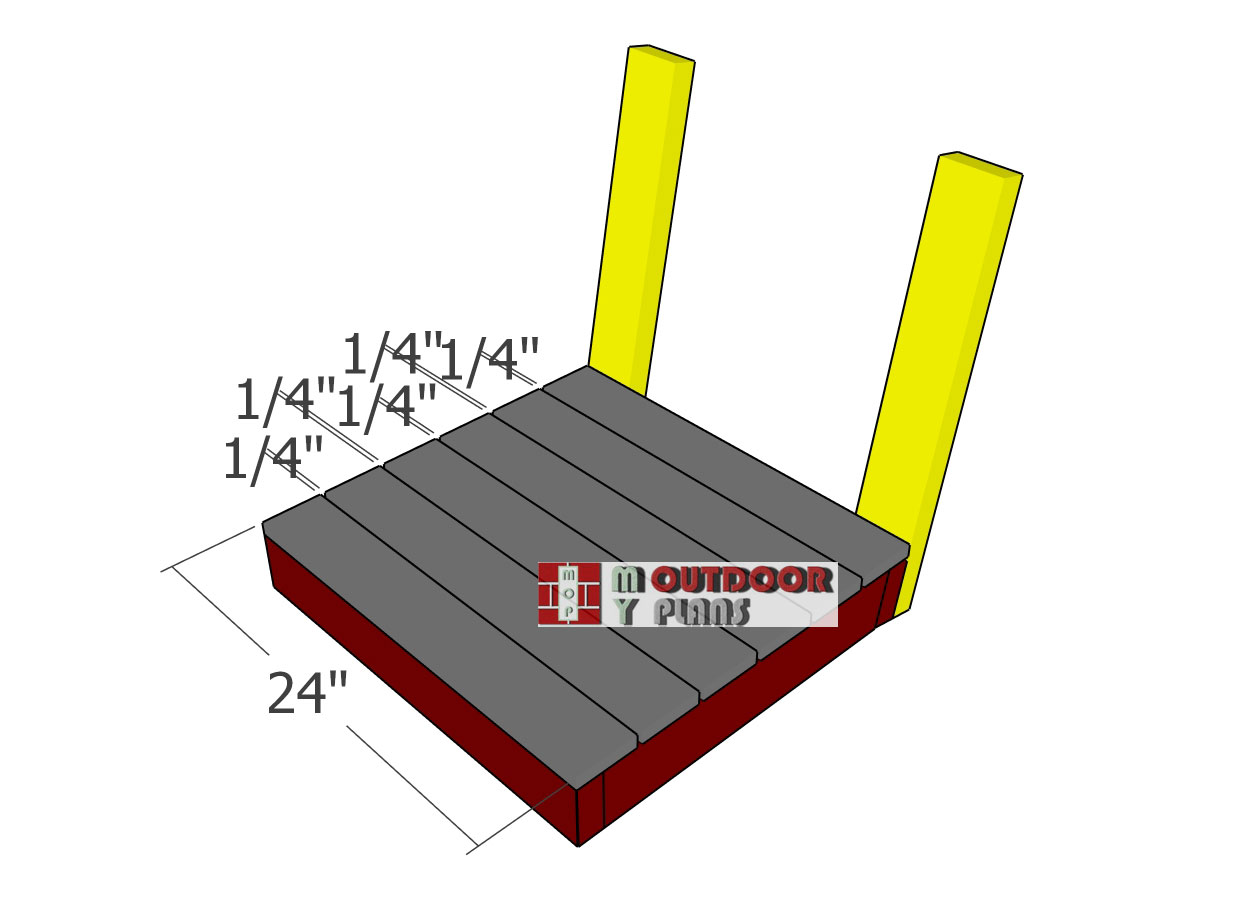
Seat-slats-installation
Now, let’s deck out the seat with some 1×4 boards. Use 1/4″ spacers between the boards to keep those gaps nice and even. Make sure the edges are flush with the seat frame for a clean look. Drill pilot holes before driving in 1 5/8″ screws to keep the wood from splitting. This will give your swing chair a neat, finished look that’s ready for some serious lounging!
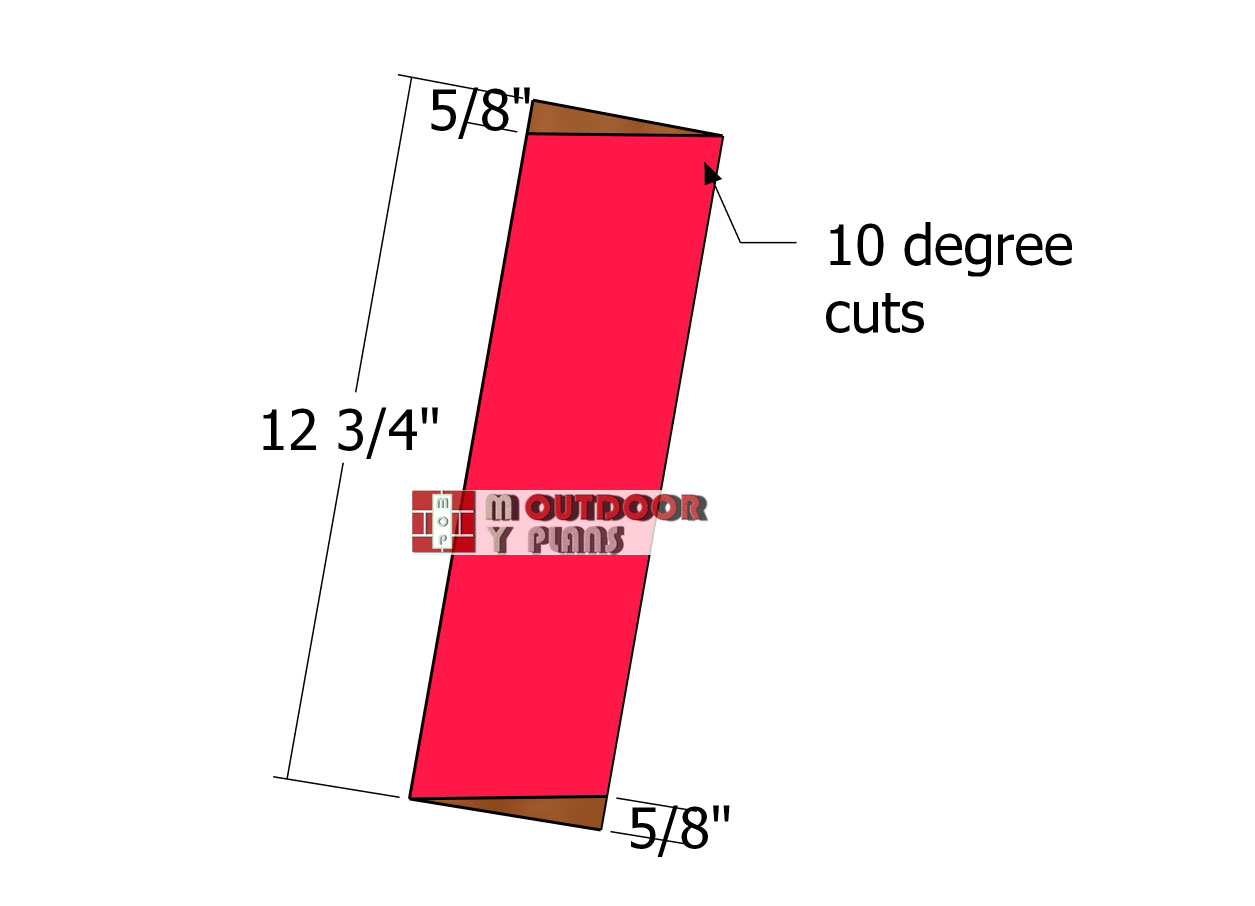
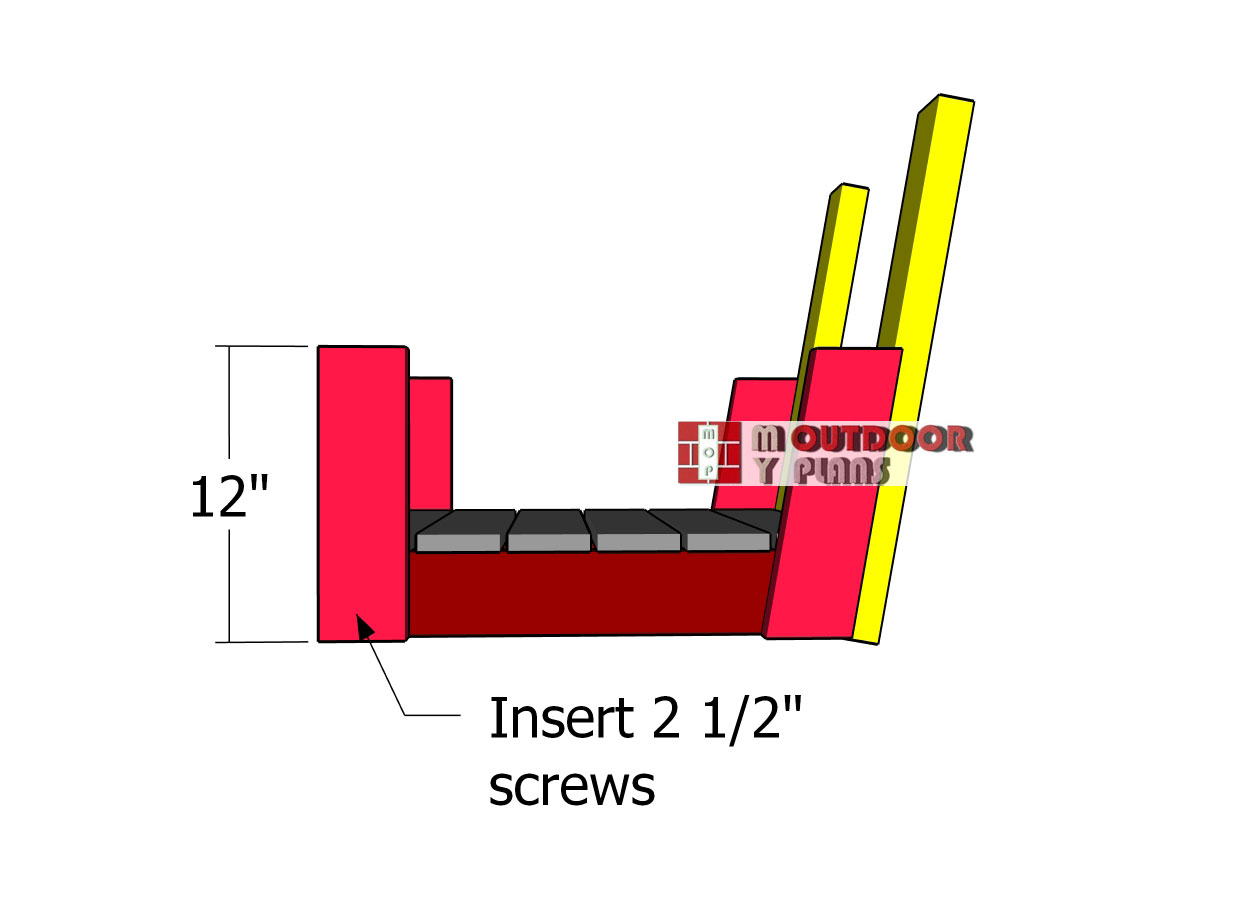
Armrest-back-supports
Supports
For the armrest supports, grab some 2×4 lumber and make 10-degree cuts on both ends of the back supports for that perfect angle. Attach these supports to the seat frame, following the diagram for the best placement. Drill pilot holes through the supports and secure them with 2 1/2″ screws. For extra stability, insert a few screws at an angle through the backrest supports into the armrest supports, making sure everything is locked in tight and ready for relaxing!
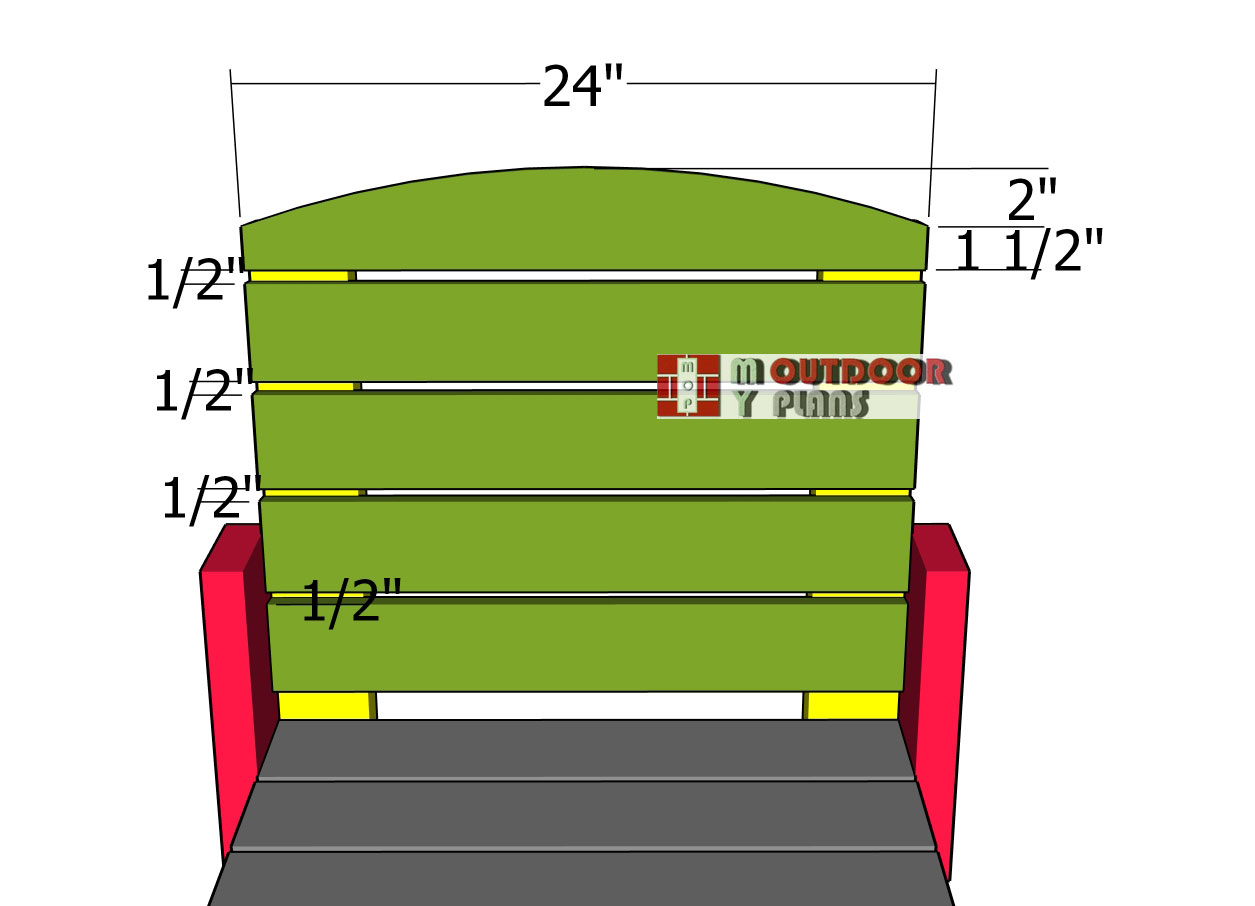
Fitting-the-backrest-slats
Now it’s time to add the backrest boards. Cut your 1×4 boards to 24″ lengths, then attach them to the backrest supports. Use 1/2″ spacers between each board to keep the gaps uniform. For a nice finishing touch, notice the curved cut on the top board—use a jigsaw to carefully make that cut, and then smooth out the edges with sandpaper. This little detail adds a touch of style and comfort to your swing chair!
Building the armrests
Armrests
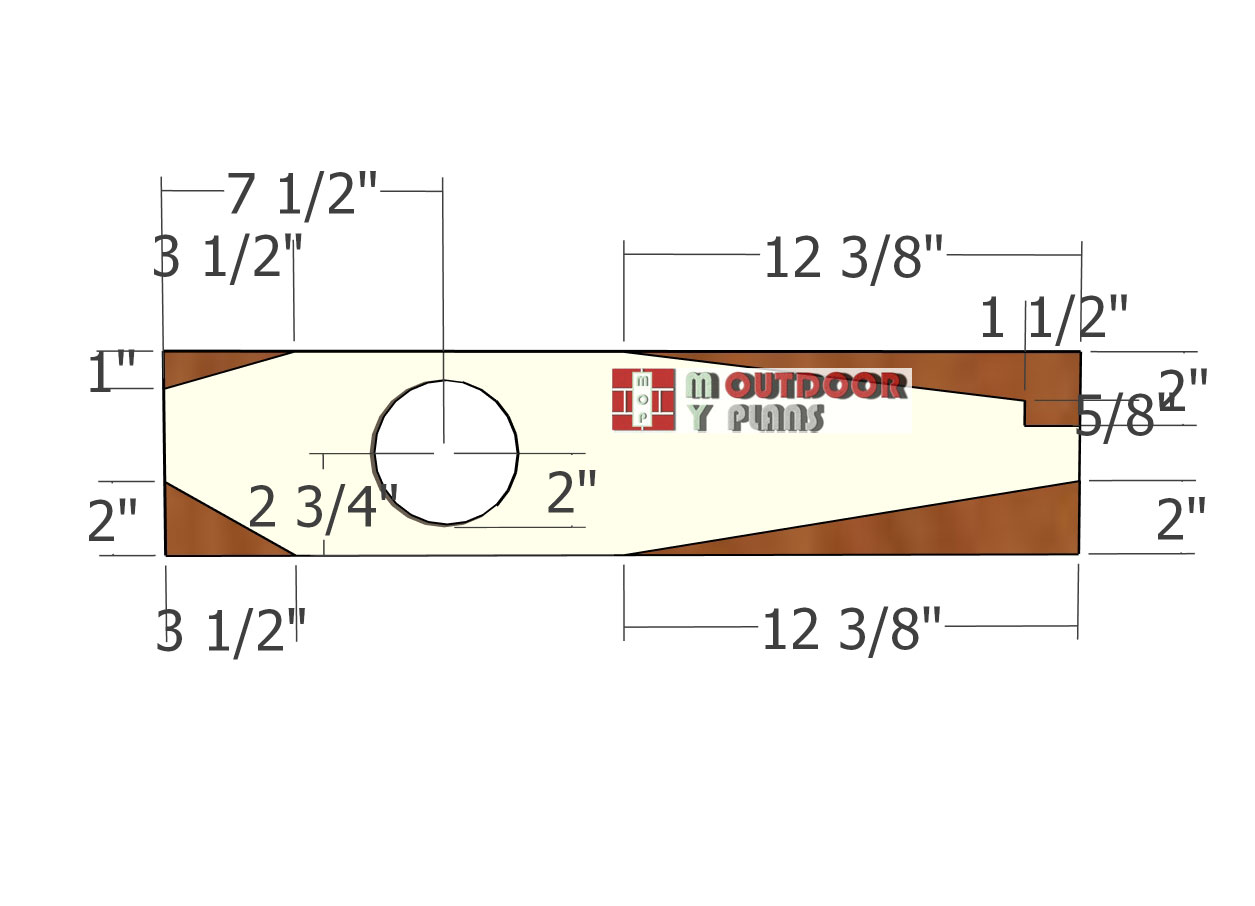
Next up, let’s cut the armrests for the swing chair, making them extra functional with built-in cupholders! For these, we’ll use 1×6 boards. Start by marking your cut lines on the boards, then cut them out with a saw. To create the 4″ round cutouts for the cupholders, use a jigsaw or a hole saw bit.
If you want to go the extra mile, grab a router with a round-over bit to smooth out the edges, giving your armrests a sleek and polished look. Cheers to comfy seating with a place for your favorite drink!
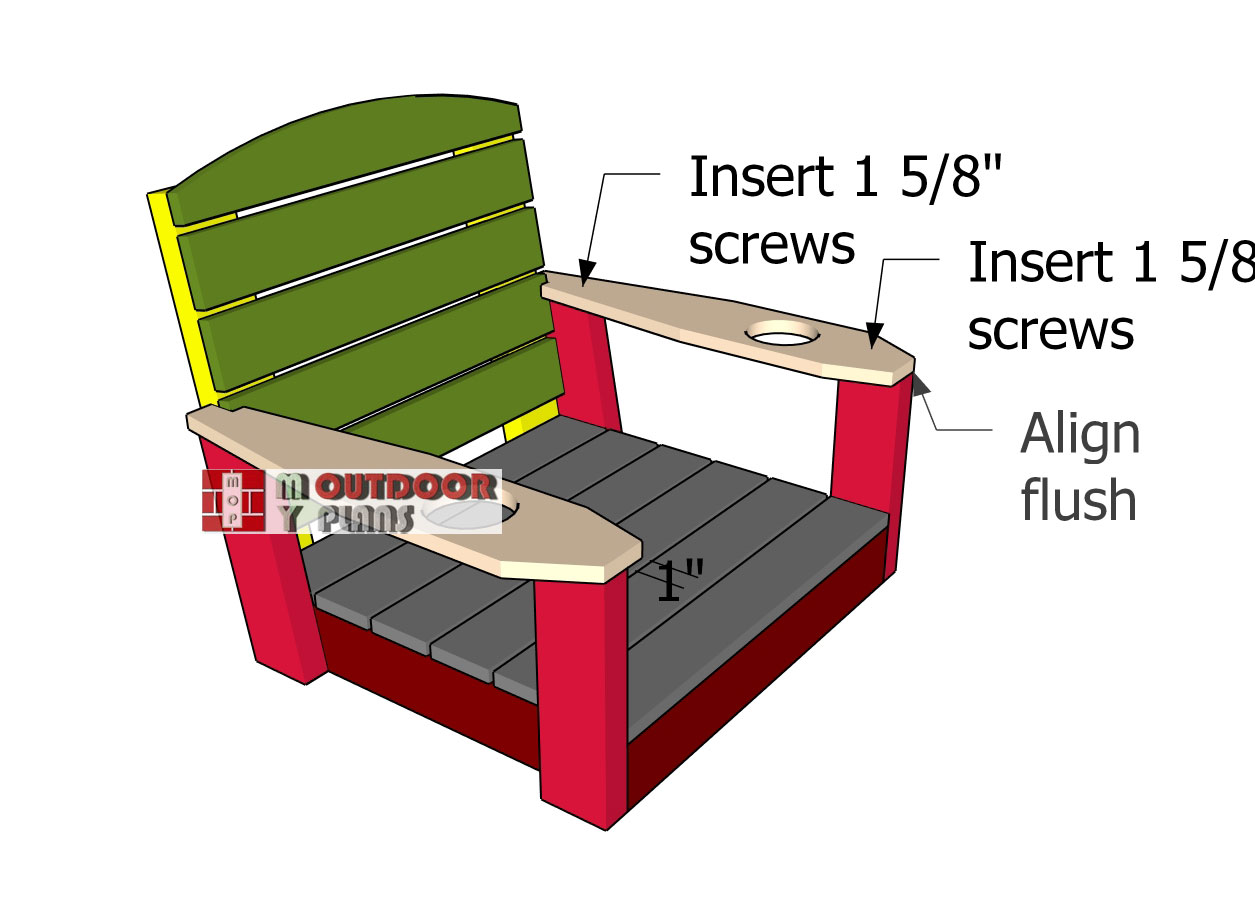
Fitting-the-armrests
Align the armrests with the supports, making sure the front edge is flush with the front support. Drill pilot holes and use 1 5/8″ screws to secure the armrests, two screws per joint.
Don’t forget to also secure the armrests to the backrest supports using 2 1/2″ screws. This setup will make your swing chair super sturdy and ready for some serious relaxation!

Components-for-cupholders
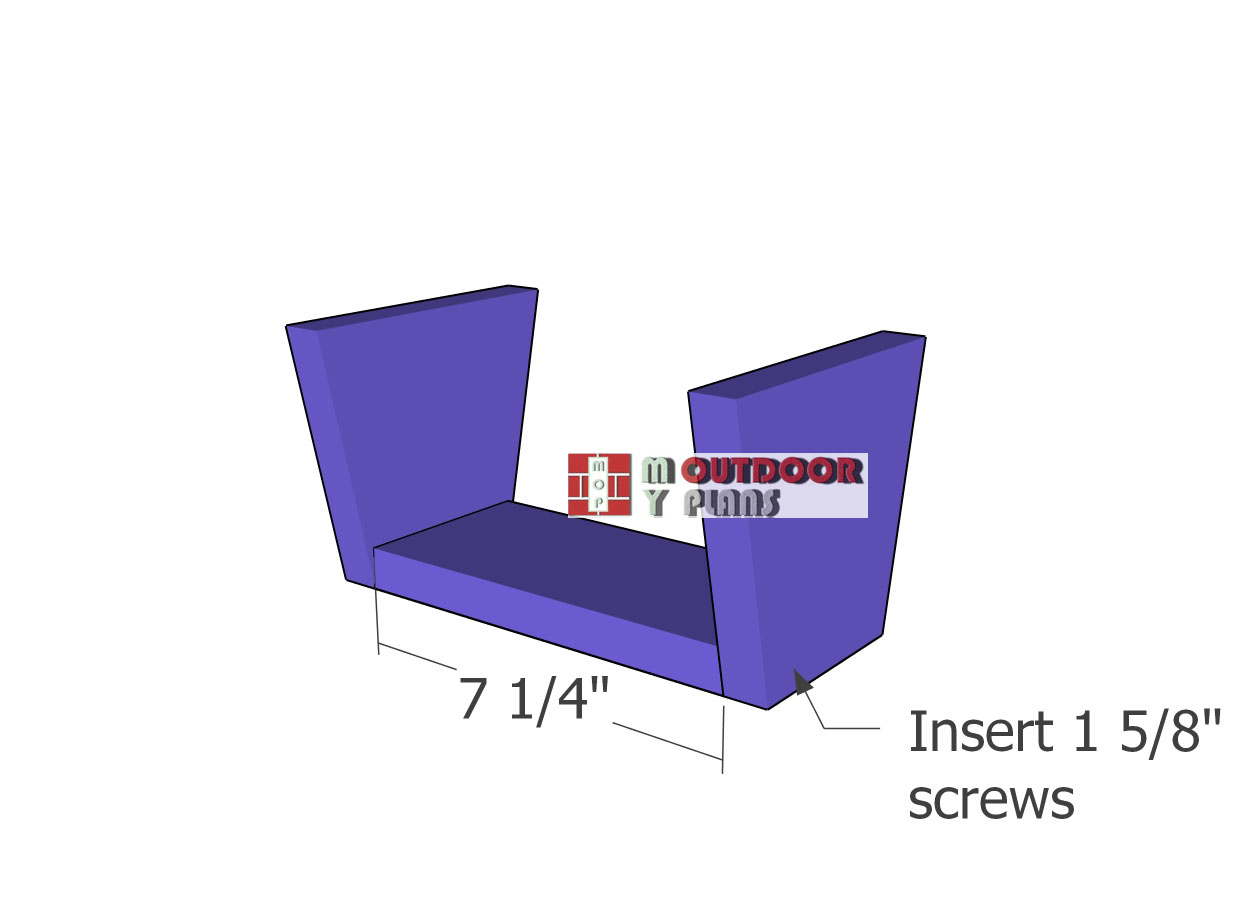
Cupholders
Grab some 1×6 boards for the end components and a 1×4 board for the base. Follow the cuts as shown in the diagram to get everything just right. Assemble the pieces with 1 5/8″ screws, ensuring the edges are flush for a clean and seamless look. This will bring everything together nicely and add that perfect finishing touch to your swing chair project!
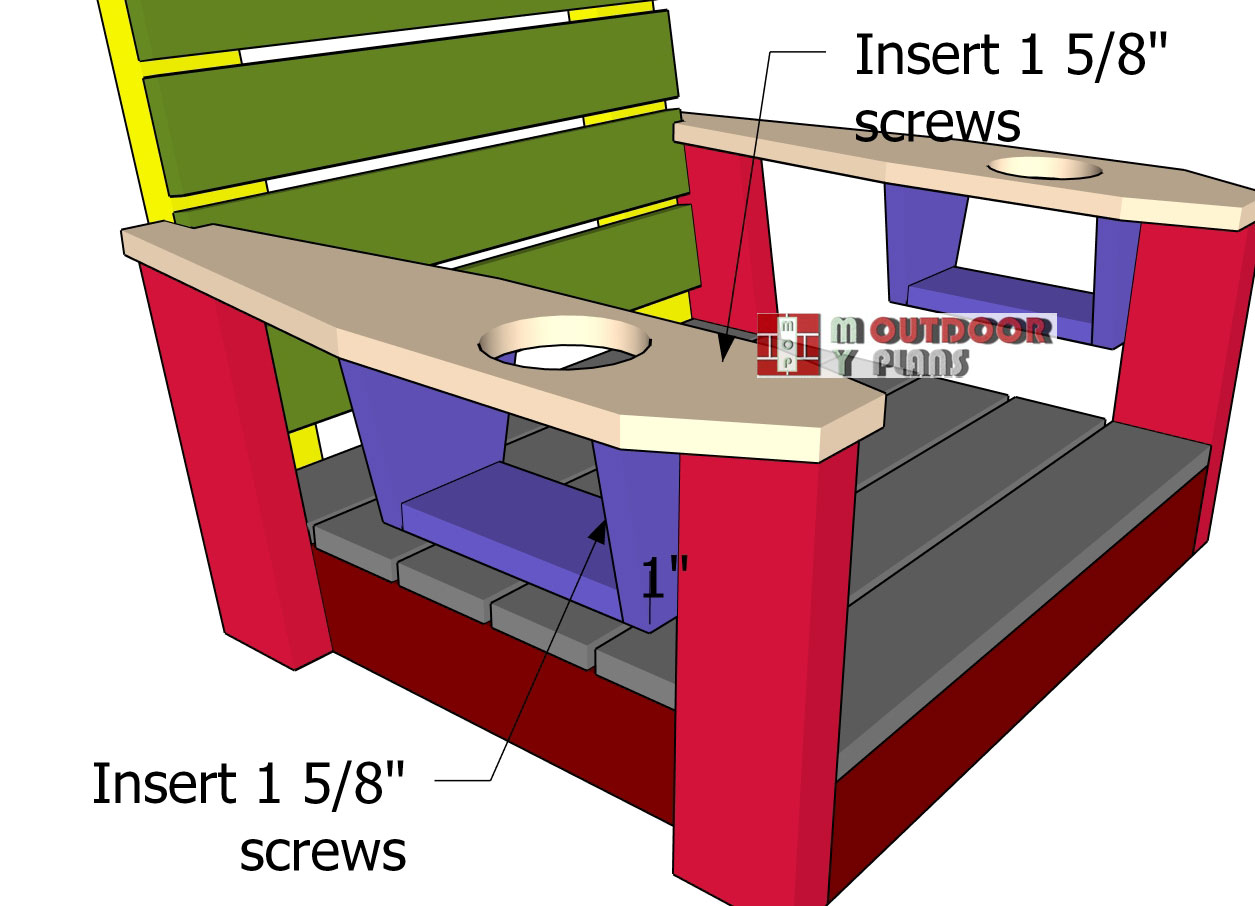
Fitting-the-cupholders
Now, let’s attach the cupholder to the swing chair as shown in the diagram. Center the cupholder in its designated spot, then secure it with 1 5/8″ screws. This little addition is perfect for keeping your favorite drink within arm’s reach while you relax!
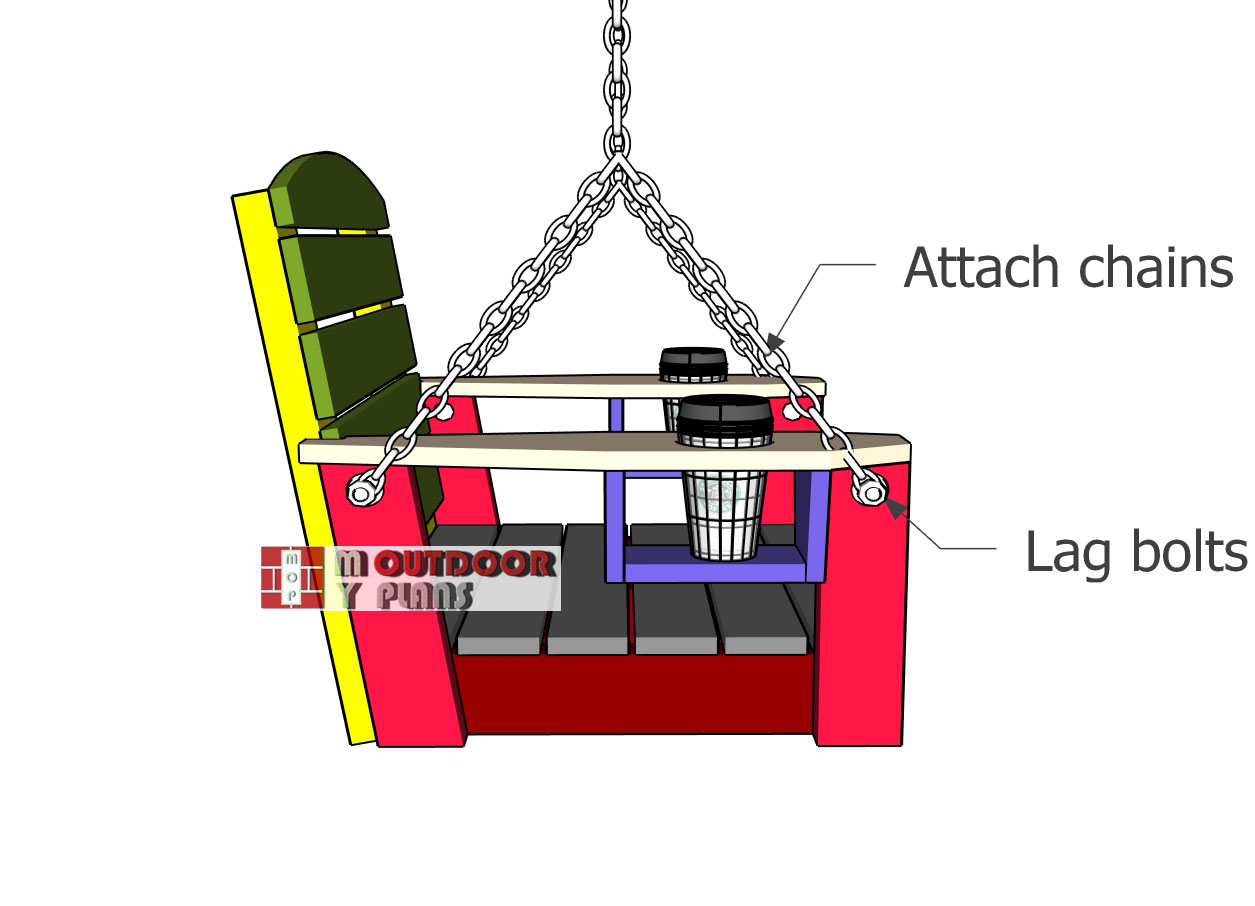
Chain-kit
To secure the swing chair with chains on both sides, first, drill pilot holes and install eye bolts or lag bolts on each side of the supports, making sure they’re evenly spaced and perfectly aligned.
Attach one end of the chain to each bolt using heavy-duty carabiners or quick links. Then, connect the other end of the chains to the swing chair, ensuring the chains are evenly tensioned for a balanced and secure setup. Now your swing chair is all set for some comfy, breezy moments!
Porch or Tree Chair Swing – Finishing touches
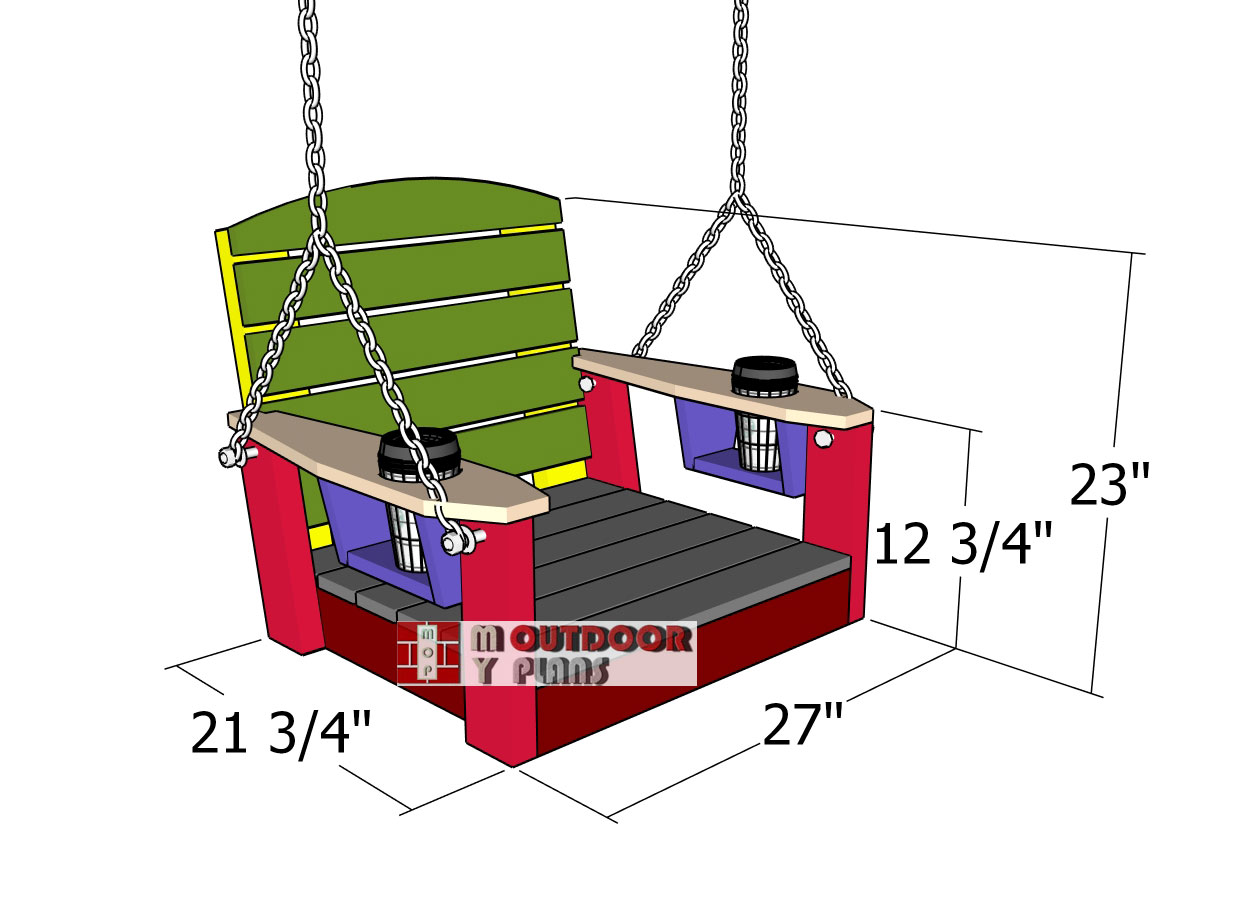
Swing-chair-dimensions
Wooden swing chair
For the finishing touches, give the swing chair a good sanding to smooth out any rough edges, then apply a coat of outdoor sealant to keep the wood protected from the elements. Add some decorative cushions for extra comfort and a splash of color. And to really set the scene, consider hanging some plants or stringing up fairy lights around the swing area for a cozy, inviting vibe that’ll make you never want to leave!

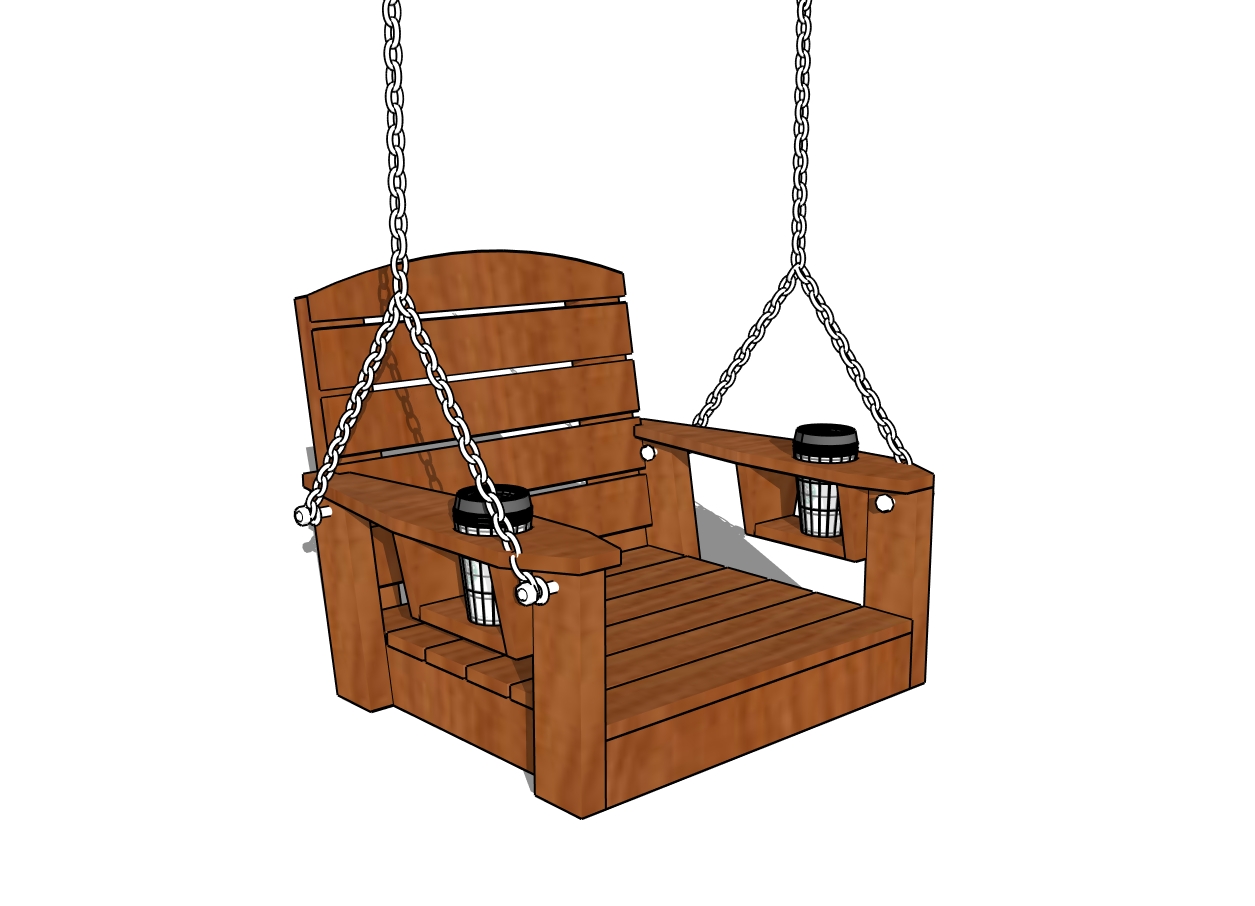
DIY Swing chair plans
Thank you for joining me on this creative journey to build a swing chair with cupholders! I hope this project not only brought out your inner craftsman but also inspired new ideas for your outdoor space. Now, kick back, swing gently in your handmade masterpiece, and savor those moments of serenity with your favorite beverage in hand.
If you want to get the Premium plans with all the extras, just press the GET PREMIUM PLANS button bellow. If you want to get the free plans, just read the blog FAQs.

This woodworking project was about DIY swing chair – free plans. If you want to see more outdoor plans, check out the rest of our step by step projects and follow the instructions to obtain a professional result.