This step by step diy project is about plans stand plans. Building a large plant stand for your backyard will create lots of storage space for your plants. This article features detailed instructions for making a sturdy wooden stand that doesn’t imply complex techniques nor a high investment. Therefore, all you need to do is to gather all the tools and materials and take accurate measurements.
We strongly recommend you to invest in quality materials, if you want to build a durable 4-tier plant stand. Materials such as cedar, redwood or pine are good choices, as they combine the durability with a beautiful appearance. Always adjust the size and the design of the plants stand to your needs, while following the tips and instructions described in the project. See all my Premium Plans HERE.
Projects made from these plans
Cut & Shopping Lists
- A – 2 pieces of 2×4 lumber – 40” long, 2 pieces – 30″, 2 pieces – 6″ LEGS
- B – 2 pieces of 2×4 – 48″ long, 2 pieces – 12″, 2 pieces – 24″, 2 pieces – 13 1/2″ SUPPORTS
- C – 2 pieces of 2×2 lumber – 17 1/2″ long, 2 pieces – 13 1/2″ SUPPORTS
- D – 8 pieces of 2×6 lumber – 60″ long SLATS
- 4 pieces of 2×4 lumber – 8 ft
- 1 piece of 2×2 lumber – 6 ft
- 4 pieces of 2×6 lumber – 10 ft
- 2 1/2″ screws
- 1 1/4″ screws
- wood stain
- wood filler
- wood glue
Tools
![]() Hammer, Tape measure, Framing square
Hammer, Tape measure, Framing square
![]() Power mixer, Miter saw, Drill machinery, Screwdriver, Sander
Power mixer, Miter saw, Drill machinery, Screwdriver, Sander
Time
Related
Building a plant stand
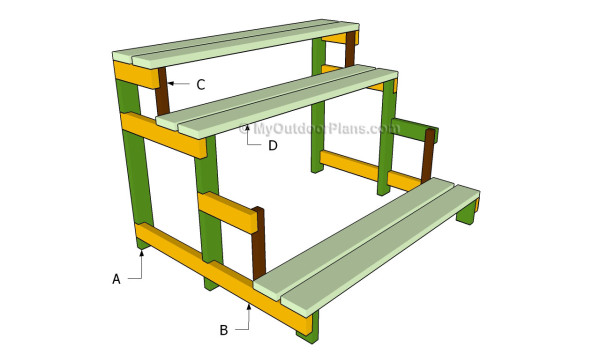
Building a plant stand
Top Tip: Building a basic plant stand is easy and can be done by any person with average skills , but you need to plan everything form the very beginning. Therefore, we recommend you to choose a simple design and follow the instructions described in the article.
Plant stand plans
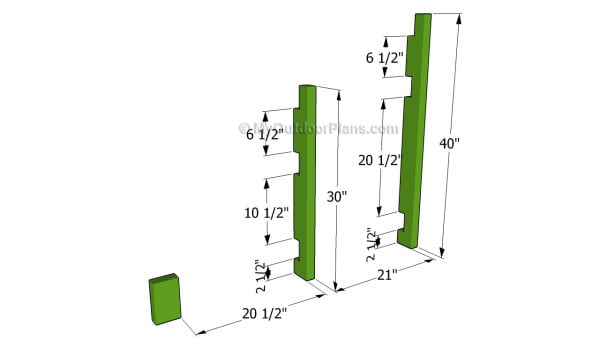
Building the legs
The first step of the project is about building the legs for the plant stand. As you can see in the plans, we recommend you to build the legs from 2×4 lumber. Cut small notches in the legs, as you need to attach the supports for the shelves.
Use a circular saw to make several cuts inside the marked lines. Clean the recess with a chisel and a sand-block. It is essential to take accurate measurements, so work with attention and with good judgement.
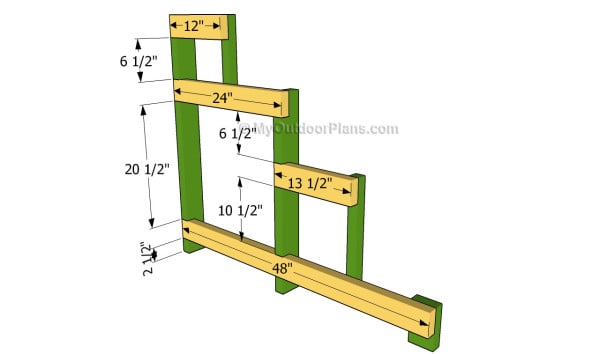
Attaching the supports
Attach the supports inside the notches and lock them with several galvanized screws. Drill pilot holes before inserting the screws, to prevent the wood from splitting.
Top Tip: Work on a perfectly level surface and check if the corners are right-angled, before inserting the screws. In addition, add waterproof glue to joints and let it dry out, if you want to create a rigid structure.
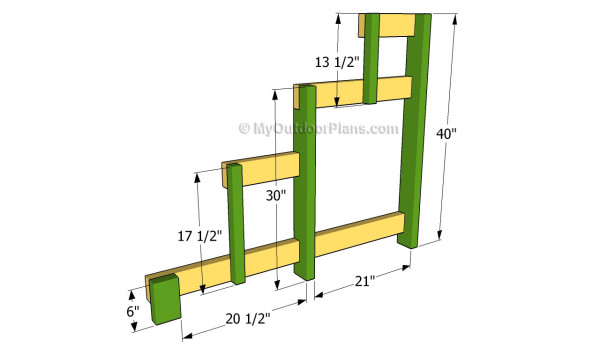
Attaching the supports to the slats
You can see in the image the opposite side of the frames. You need to make sure the corners are right-angled, otherwise the end result won’t fit your needs.
Top Tip: In addition, make sure the supports are horizontal, by using a spirit level.
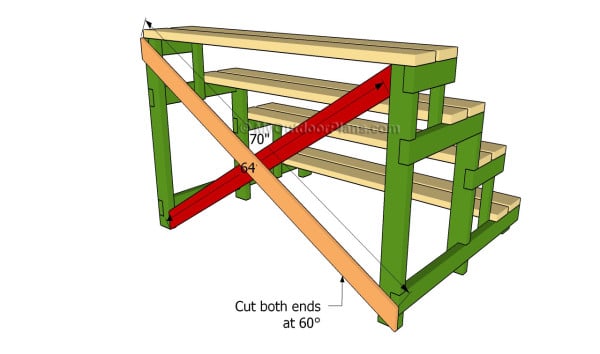
Attaching the slats
If you want to provide support to the plant stand plans, we recommend you to add X-shaped braces to the back of the structure. Attach the braces to the back of the plant stand and lock them into place with galvanized screws.
It is essential to check if the corners are right-angled and the side frames plumb, before attaching the braces. Work with good judgement, if you want to build a plant stand with a neat appearance.
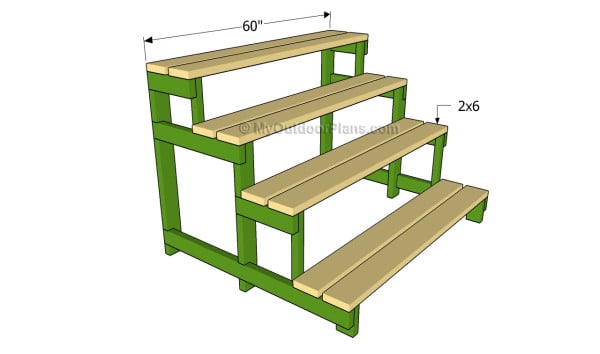
Attaching the slats
One of the last steps of the woodworking project is to attach 2×6 slats to the supports, as in the image. Make sure you leave about 1/2 – 1″ between the slats, after aligning them. Check if both ends of the slats are flush with the frame, drill pilot holes and insert 2 1/2″ galvanized screws.
Always adjust the size of the stand to your needs. Therefore, you could make the structure narrower or wider, while using the same techniques described above.
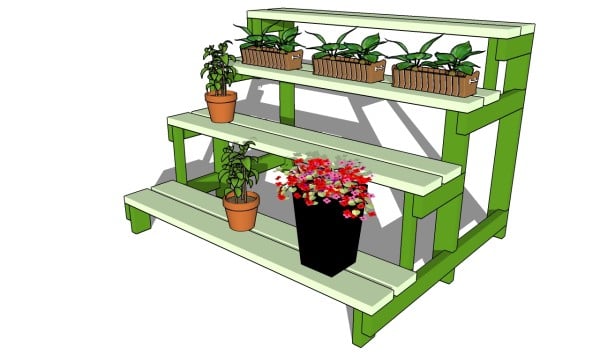
Plant stand plans
Afterwards, you have to fill the gaps and the holes with a good wood putty. Let the compound to dry out properly, before sanding the whole wooden components, along the wood grain, with 120-grit sandpaper.
Top Tip: Apply several coats of wood stain or paint, in order to enhance the look of the wooden bridge. Place the bridge on several concrete slabs and lock it into place with metal brackets and screws.
This woodworking project is about plant stand plans. If you want to see more outdoor plans, we recommend you to check out the rest of our step by step projects.

6 comments
Thank you for sharing these great ideas! I know my wife is going to love my next project. Thanx to you guys.
Thank you for the appreciation. Looking forward to seeing your build!
Thank you for sharing the detailed instruction. I’m going to build one tomorrow. Thanks.
You’re welcome. Looking forward to seeing your project.
Thank you for the plans.
The material list shows the horizontal supports as 2×6 but I believe they should be listed as 2×4. .
Thanks. I’ve updated the plans