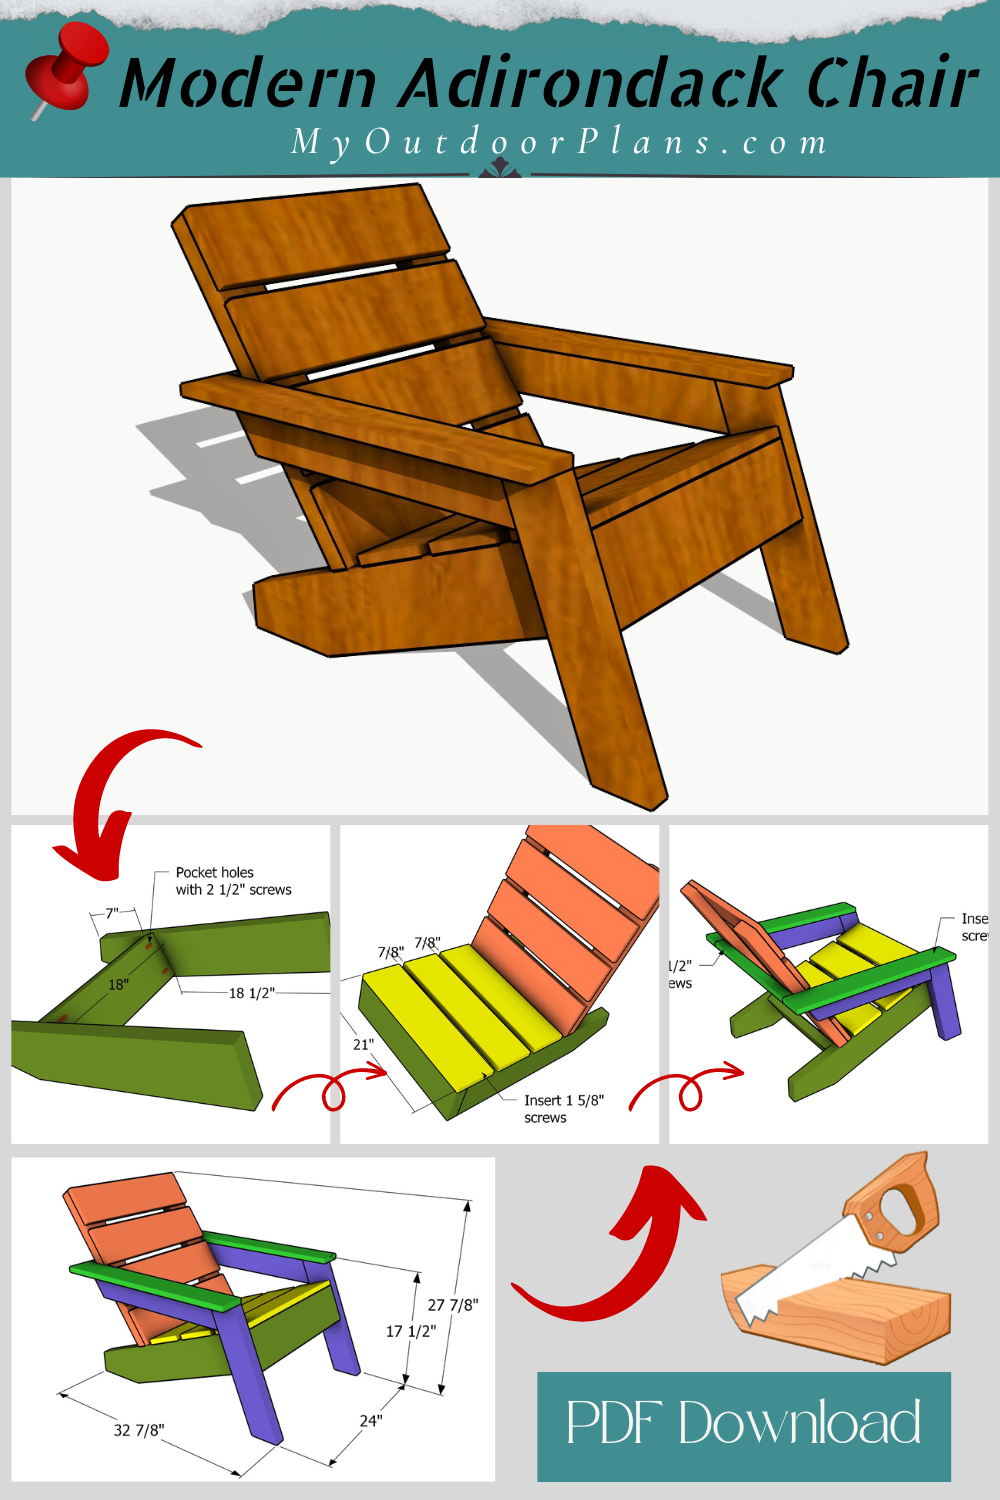
Ready to bring a touch of modern flair to your outdoor space? Today, we’re diving into a super easy project: modern Adirondack chair – free plans! These aren’t your typical Adirondacks; we’re talking clean lines, stylish angles, and a design that’s as comfy as it is chic. Whether you’re lounging by the pool or sipping iced tea on the porch, these simple wooden chairs will have you relaxing in style in no time! Take a look over the rest of my woodworking plans, if you want to get more building inspiration. Premium Plans for this project available in the Shop.
Alright, let’s break down the nitty-gritty details! For our modern Adirondack chair project, you’re looking at around $40-$60 for materials, depending on your choice of wood and finish. As for time, set aside a solid Saturday—about 5-8 hours—to cut, assemble, and finish these beauties. It’s a manageable project that packs a punch in style, and you’ll be lounging in your new chairs before you know it!
For this project, I recommend using cedar or hardwood for their durability and natural resistance to the elements. Cedar is a fantastic option because it’s lightweight, rot-resistant, and has a beautiful, rustic look. Hardwood, on the other hand, provides superior strength and longevity, making your project a sturdy and stylish addition to your home.
Projects made from these plans
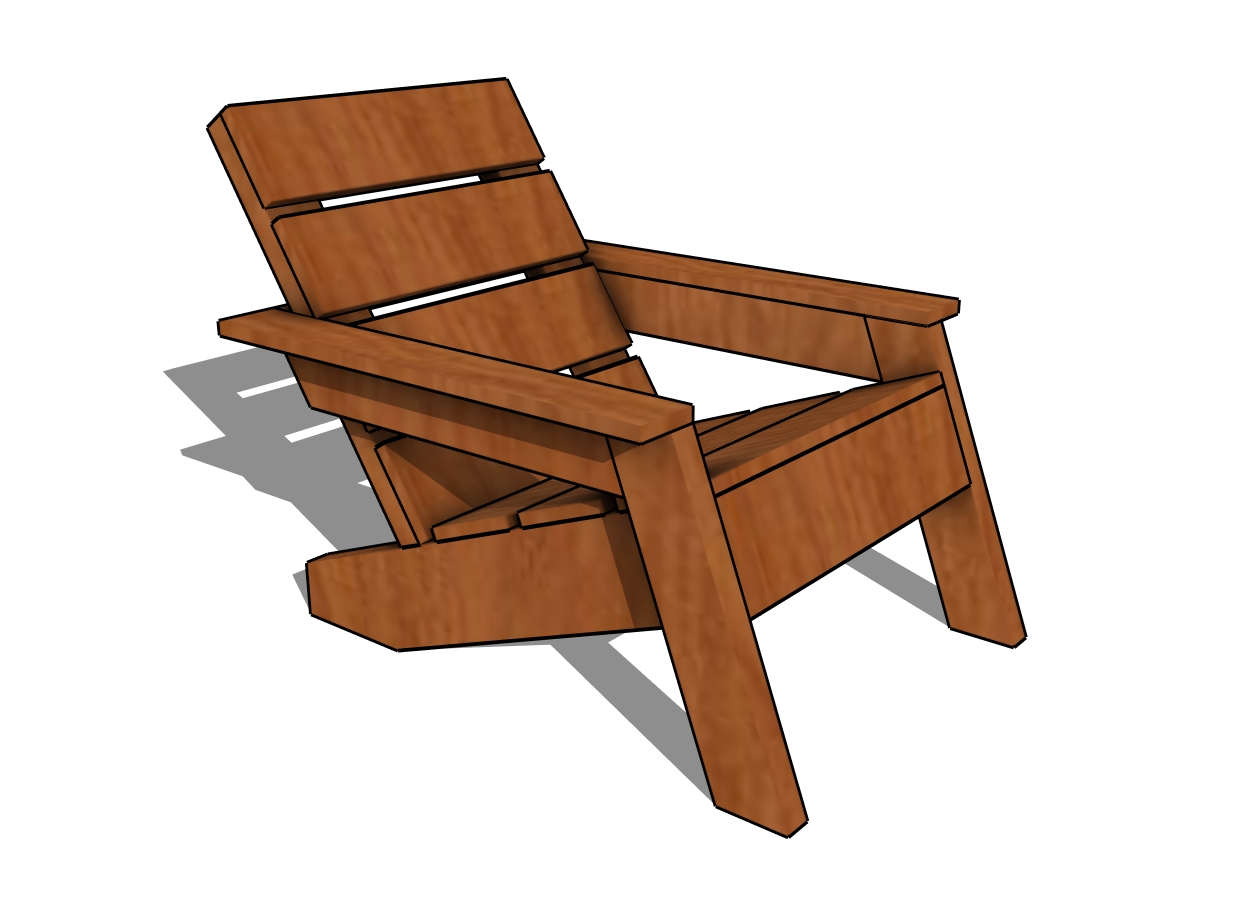
Modern Adirondack Chair – Free Plans
Building-a-modern-adirondack-chair
Cut and Shopping Lists
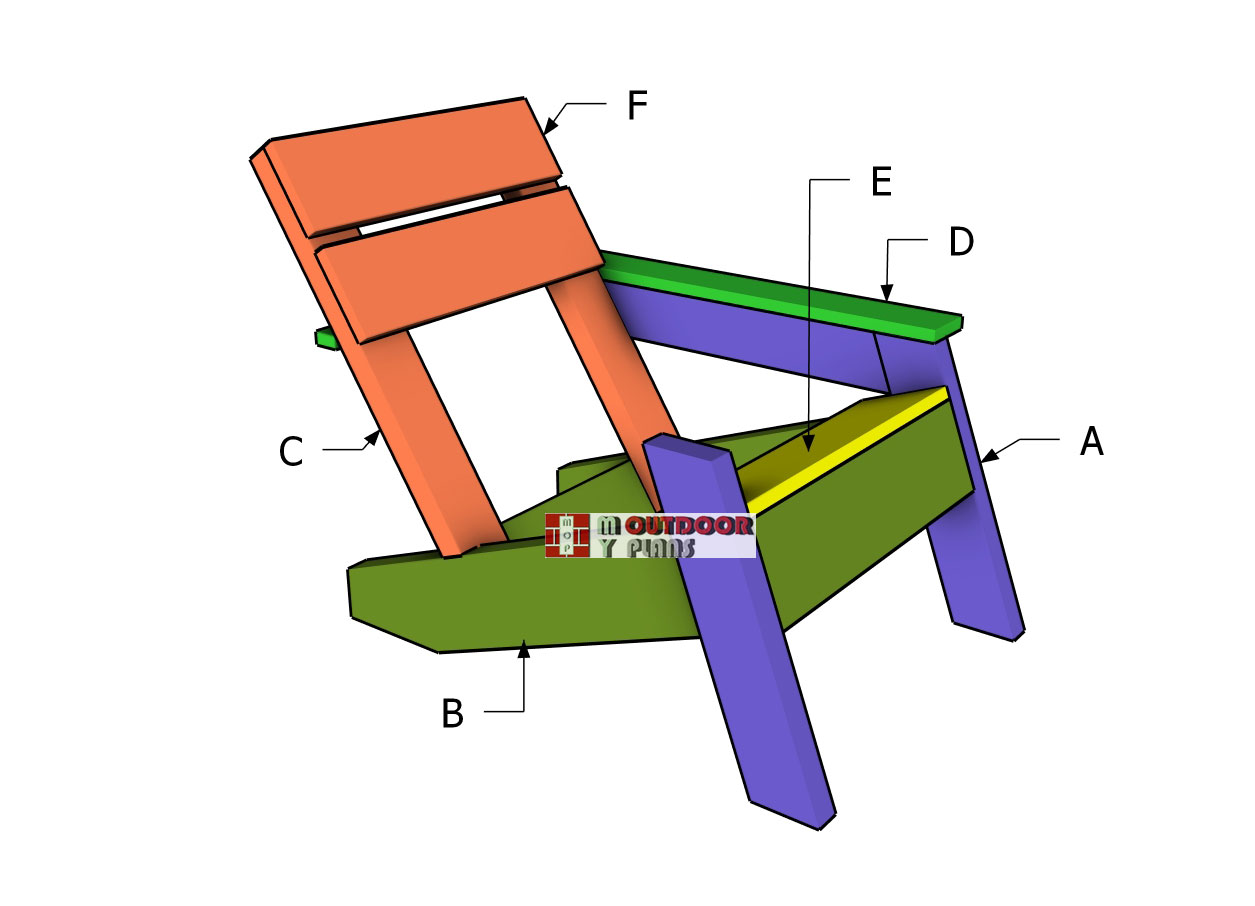
A – Legs – 2×4 lumber 19 3/8″ long – 2 pieces
A – Armrest Supports – 2×4 lumber 23″ long – 2 pieces
B – Legs – 2×6 lumber 29 1/8″ long – 2 pieces – 2 pieces
B – Support – 2×6 lumber 21″ long – 1 piece
B – Support – 2×6 lumber 18″ long – 1 piece
C – Backrest – 2×4 lumber 29 7/8″ long – 2 pieces
D – Armrests – 1×4 lumber 27 1/2″ long – 2 pieces
D – Armrests – 1×2 lumber 21″ long – 1 piece
E – Seat – 1×6 lumber 21″ long – 3 pieces
F – Backrest – 1×6 lumber 21″ long – 4 pieces
- 2×6 lumber 10 ft – 1 piece
- 2×4 lumber 8 ft – 1 piece
- 2×4 lumber 6 ft – 1 piece
- 1×6 lumber 8 ft – 1 piece
- 1×6 lumber 6 ft – 1 piece
- 1×4 lumber 6 ft – 1 piece
- 1×2 lumber 4 ft – 1 piece
- 2 1/2″ screws – 100 pieces
- 1 5/8″ screws – 40 pieces
- 1 1/4″ screws – 10 pieces
- Wood glue – 1 can
- Stain – 1 can
Tools
![]() Hammer, Tape measure, Framing square, Level
Hammer, Tape measure, Framing square, Level
![]() Miter saw, Drill machinery, Screwdriver, Sander
Miter saw, Drill machinery, Screwdriver, Sander
Time
![]() One weekend
One weekend
Related
Pin for Later!
Modern Adirondack Chair Plans – Building the Seat
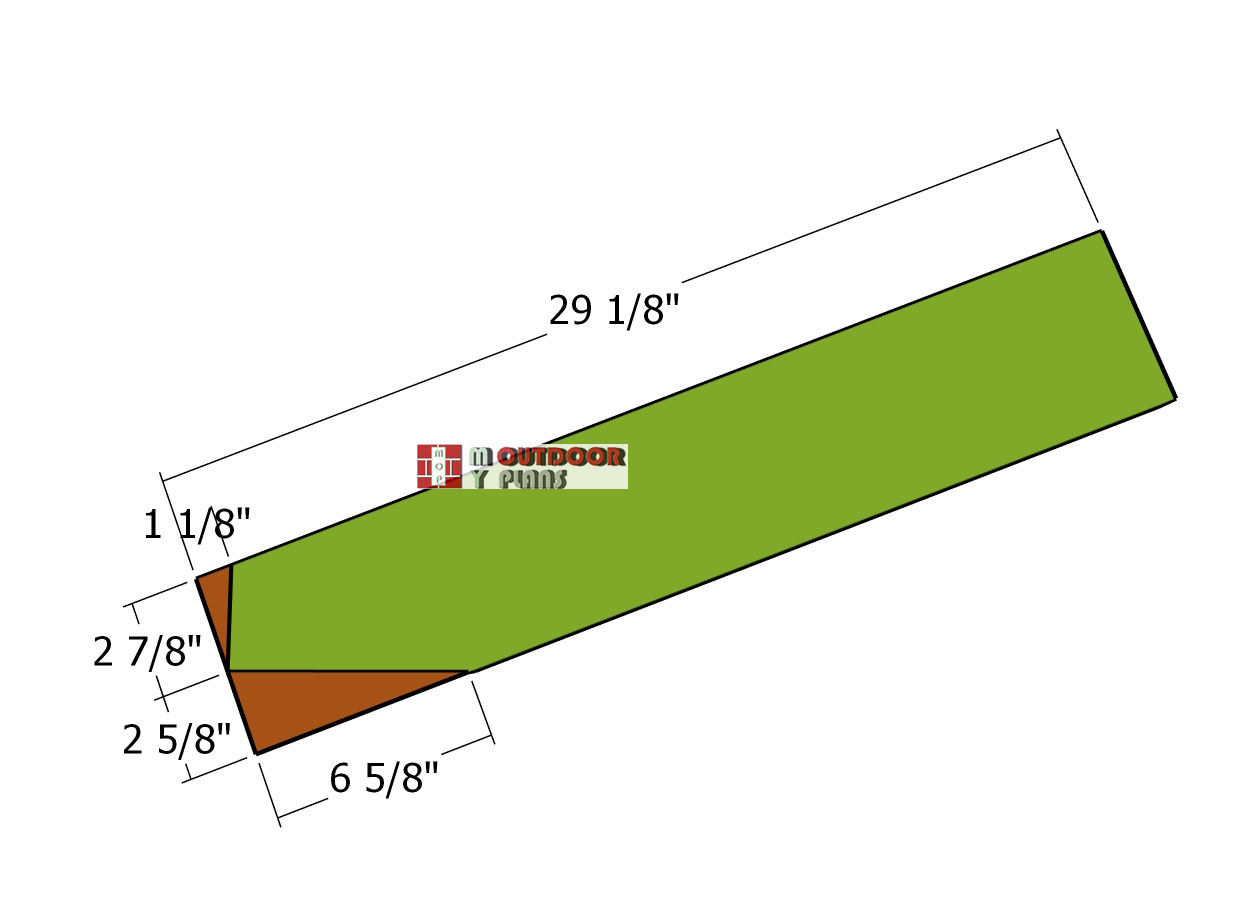
Back-legs—cut-diagram
First up, let’s cut the back legs for the modern Adirondack chair using 2×6 lumber. Mark your cut lines and then grab your circular saw or miter saw to make the cuts. Once you’ve got your pieces, smooth the edges with a sander to get them nice and clean.
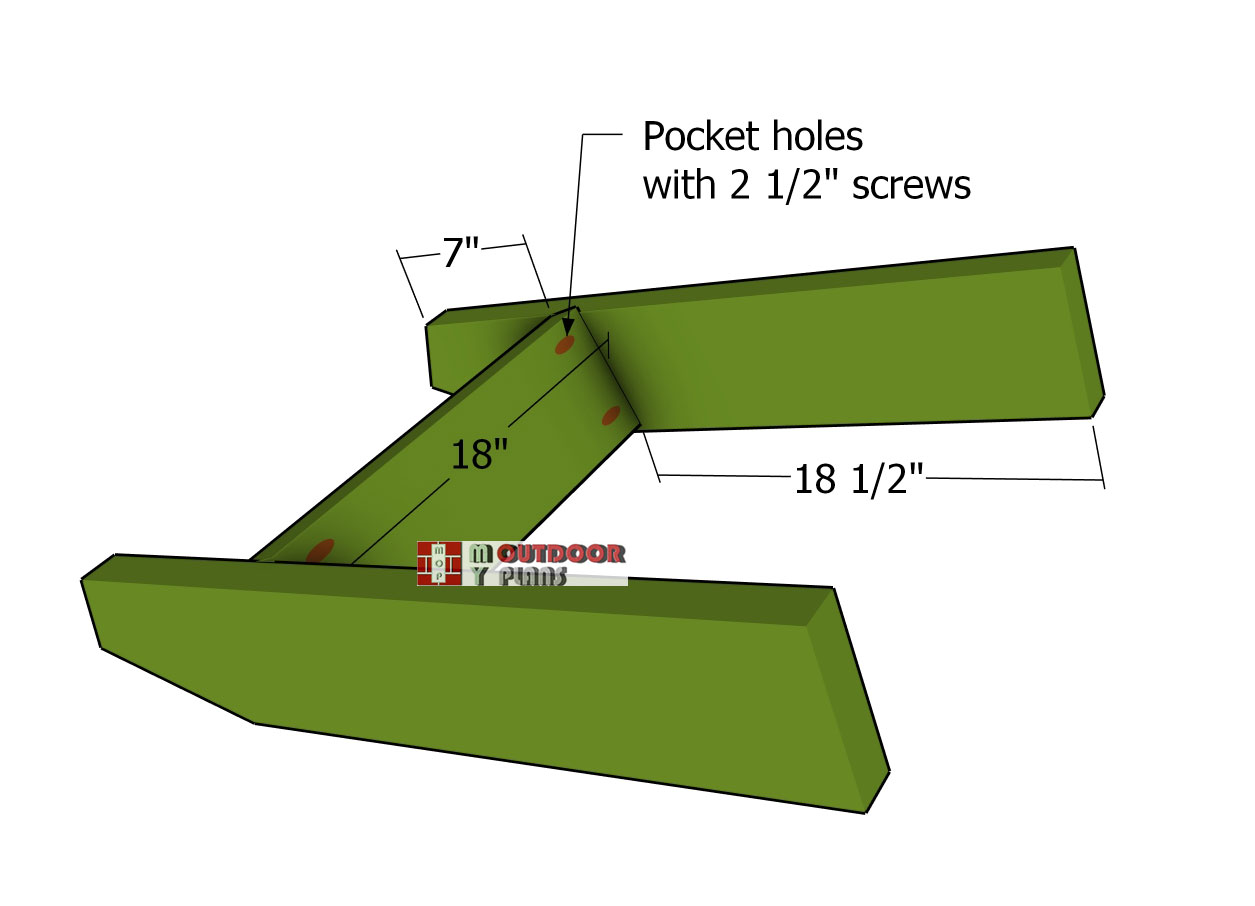
Assembling-the-base-frame
Next up, we’ll be assembling the seat frame for the modern chair. We’ll be using 2×6 lumber for the support piece. First, we’ll drill pocket holes at both ends of the support. Then, we’ll lay the legs on a level surface and carefully align the support, just as shown in the diagram. To finish up, we’ll secure the support to the back legs with 2 1/2″ screws.
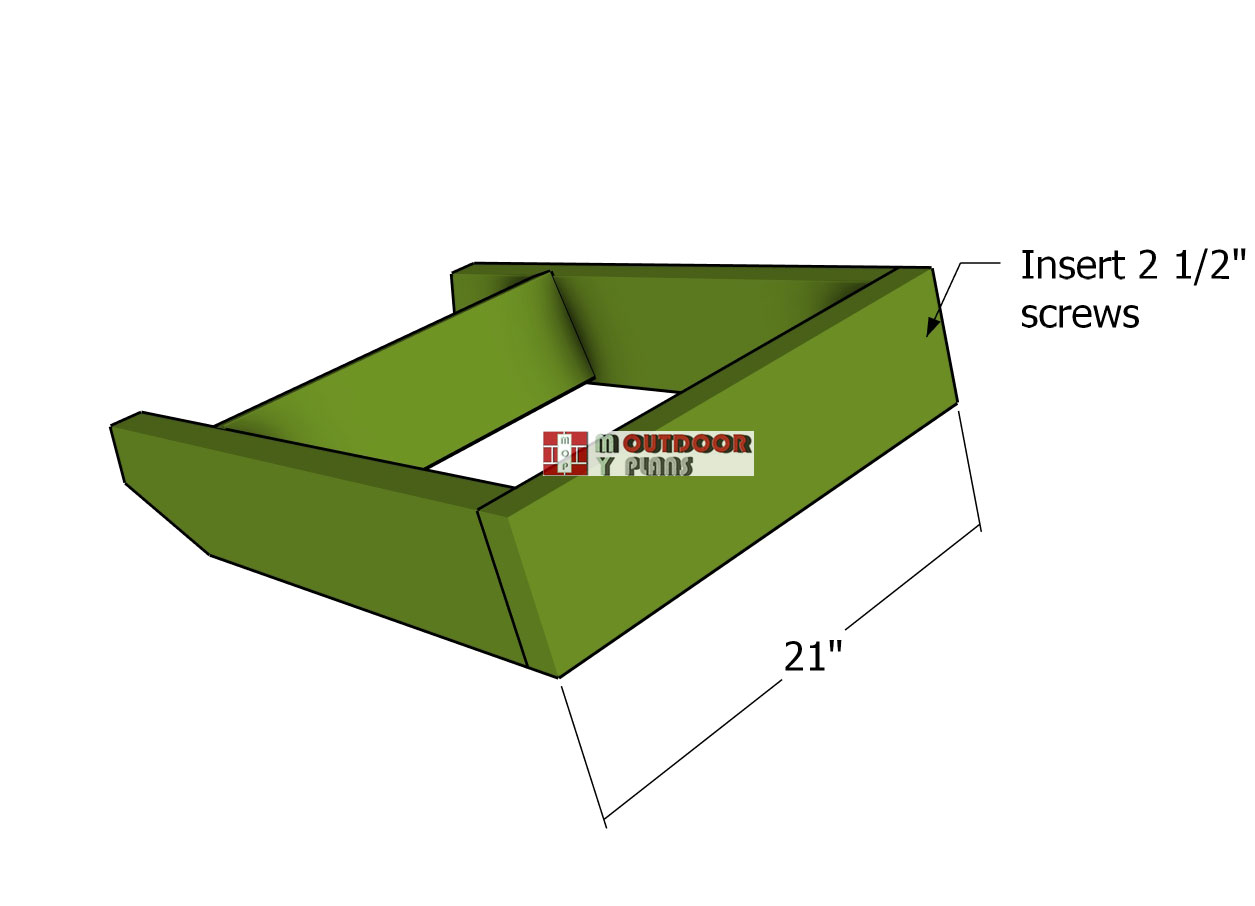
Attaching-the-front-panel
Next, it’s time to attach the 2×6 board to the front of the seat frame. Make sure the edges are flush with the legs, then drill pilot holes and insert 2 1/2″ screws. Use two screws for each joint and ensure there are no gaps between the components. Also add glue to the joints for extra strength and durability.
Building the Backrest
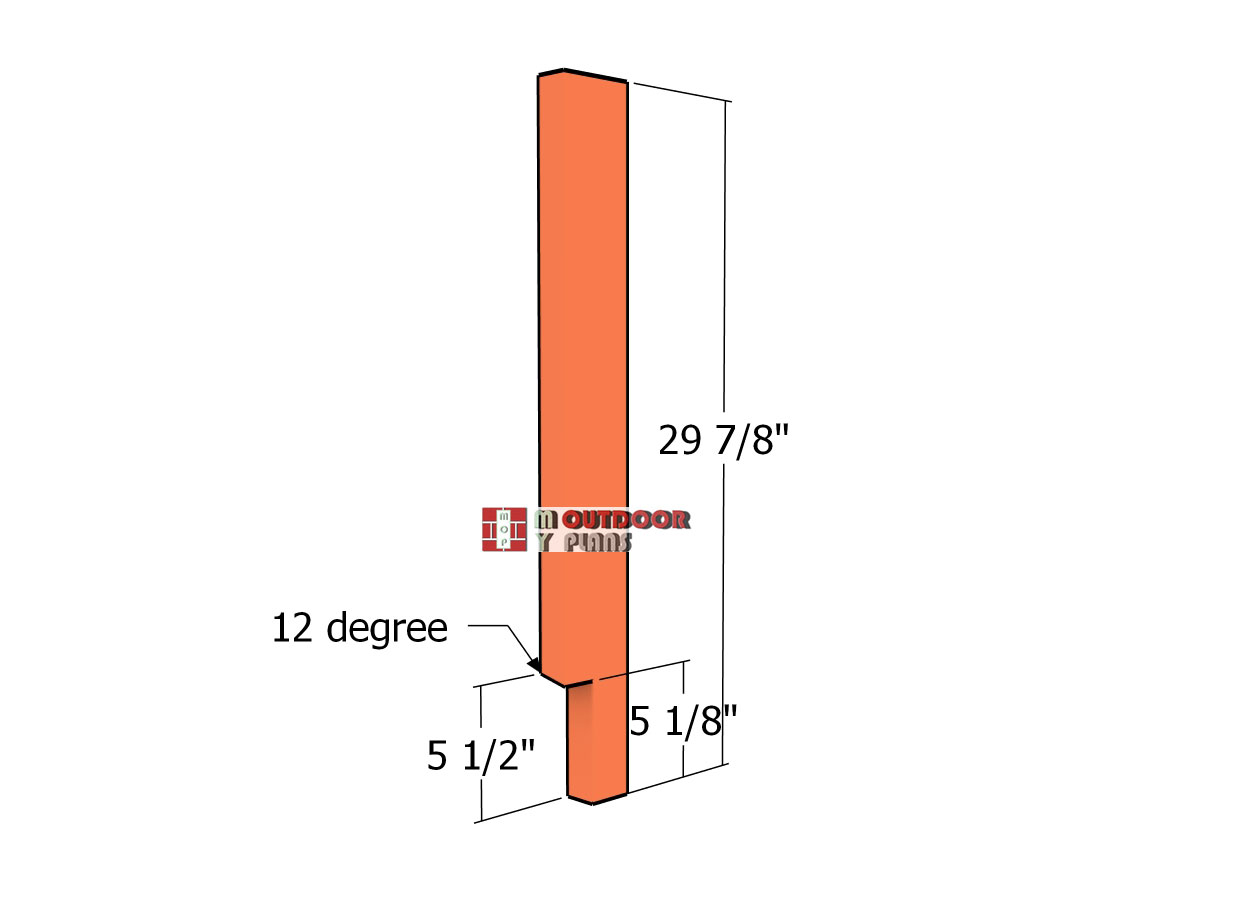
Backrest-supports
For the backrest supports, use 2×4 lumber. As shown in the diagram, you need to make a notch at the base of each support. Mark the cut lines and then make repeated parallel cuts with a circular saw. After that, use a hammer and chisel to remove the excess material.
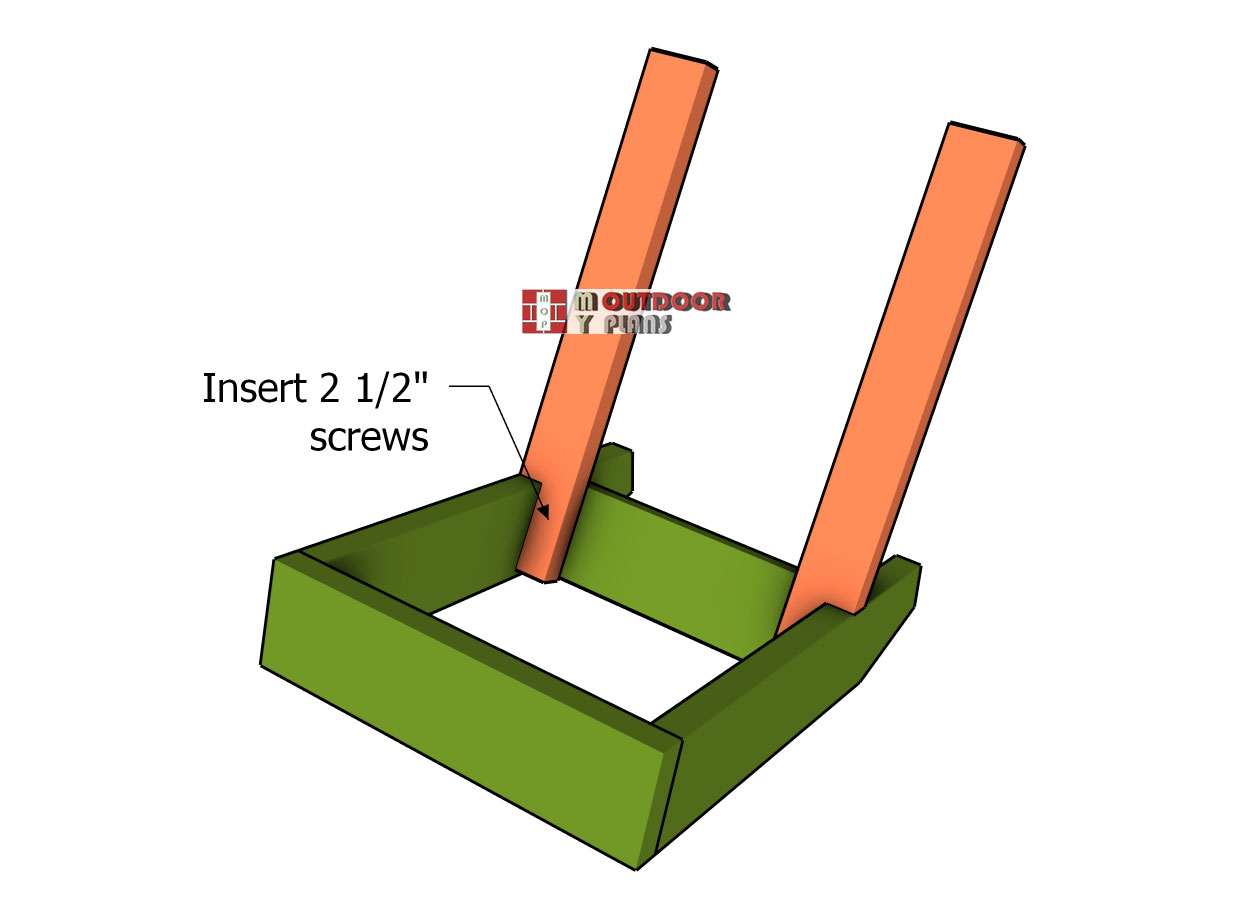
Fitting-the-backrest-supports
Once the supports are ready, fit them to the seat frame as indicated in the diagram. Drill pilot holes and secure them with 2 1/2″ screws, using two screws for each support to ensure they’re firmly in place.
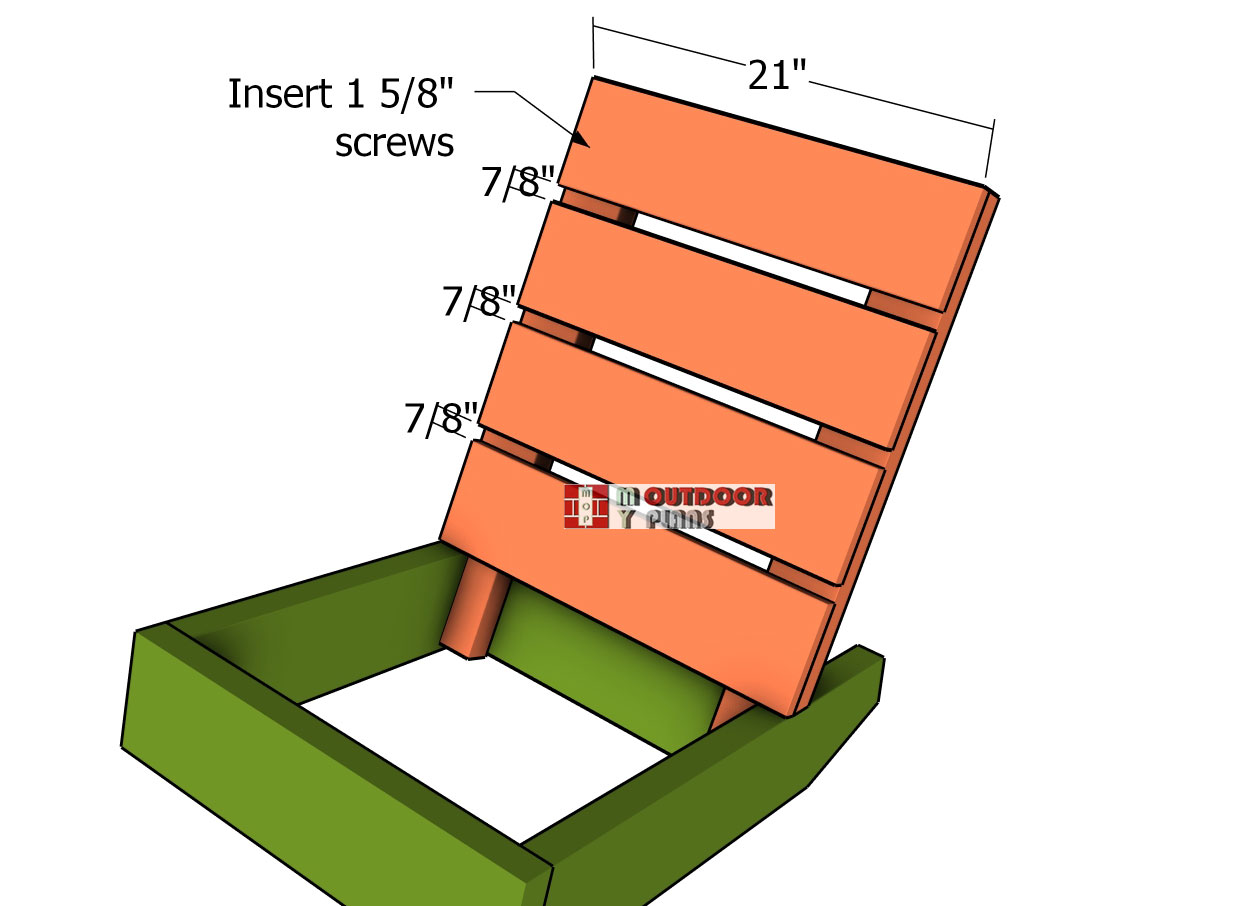
Attaching-the-backrest-slats
Now, let’s attach the 1×6 boards to the back of the chair. We’ll start by drilling pilot holes at both ends of the boards, then insert 1 5/8″ screws to secure them in place.
We’ll make sure the boards are aligned flush with the back supports. To create even gaps, we’ll use 7/8″ spacers between the boards.
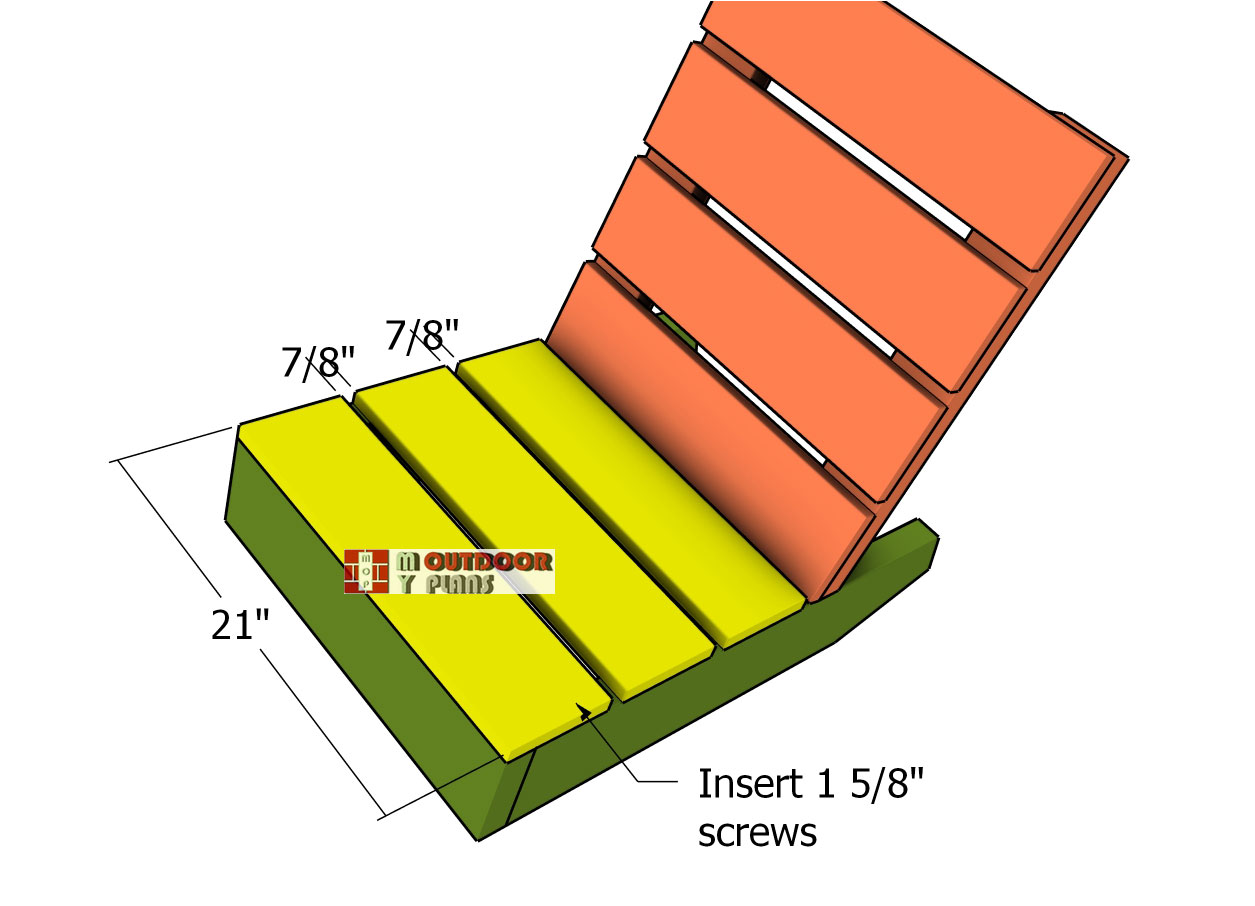
Fitting-the-seat-slats
Next, we have to add the seat boards. We’ll cut the pieces from 1×6 lumber and align them flush with the seat frame. Using 7/8″ spacers, we’ll create even gaps between the boards. Then, we’ll drill pilot holes and insert 1 5/8″ screws to secure them to the frame, using two screws for each joint to keep everything solid and sturdy.
Building the Armrests
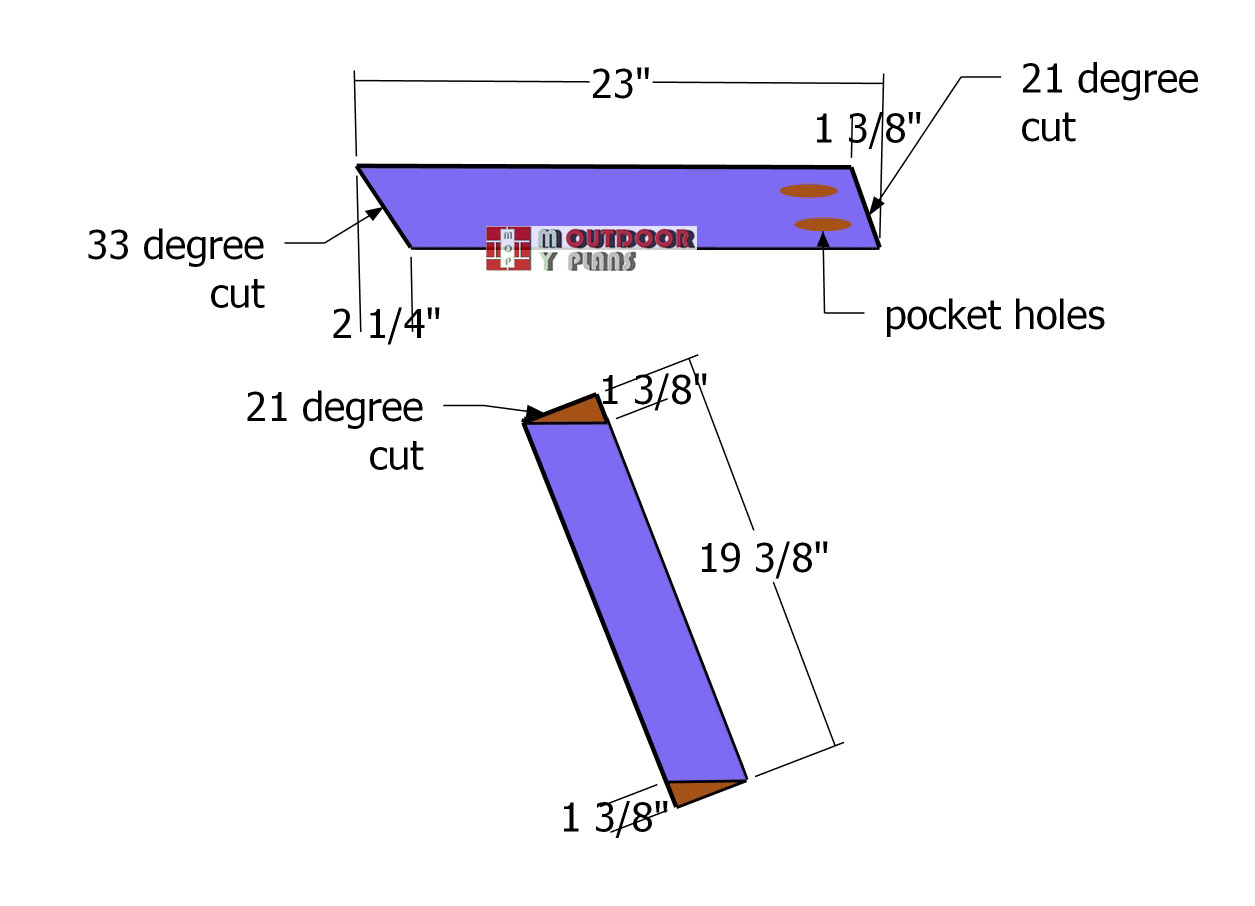
Front-legs
Next up, we need to assemble the frame for the front section of the modern chair. We’ll use 2×4 lumber for the components. Using a miter saw, we’ll make the angle cuts on both ends of the pieces.
We’ll drill pocket holes along the top supports, as shown in the diagram. It’s important to drill these pocket holes along the interior faces of the supports so they aren’t visible once the chair is assembled.
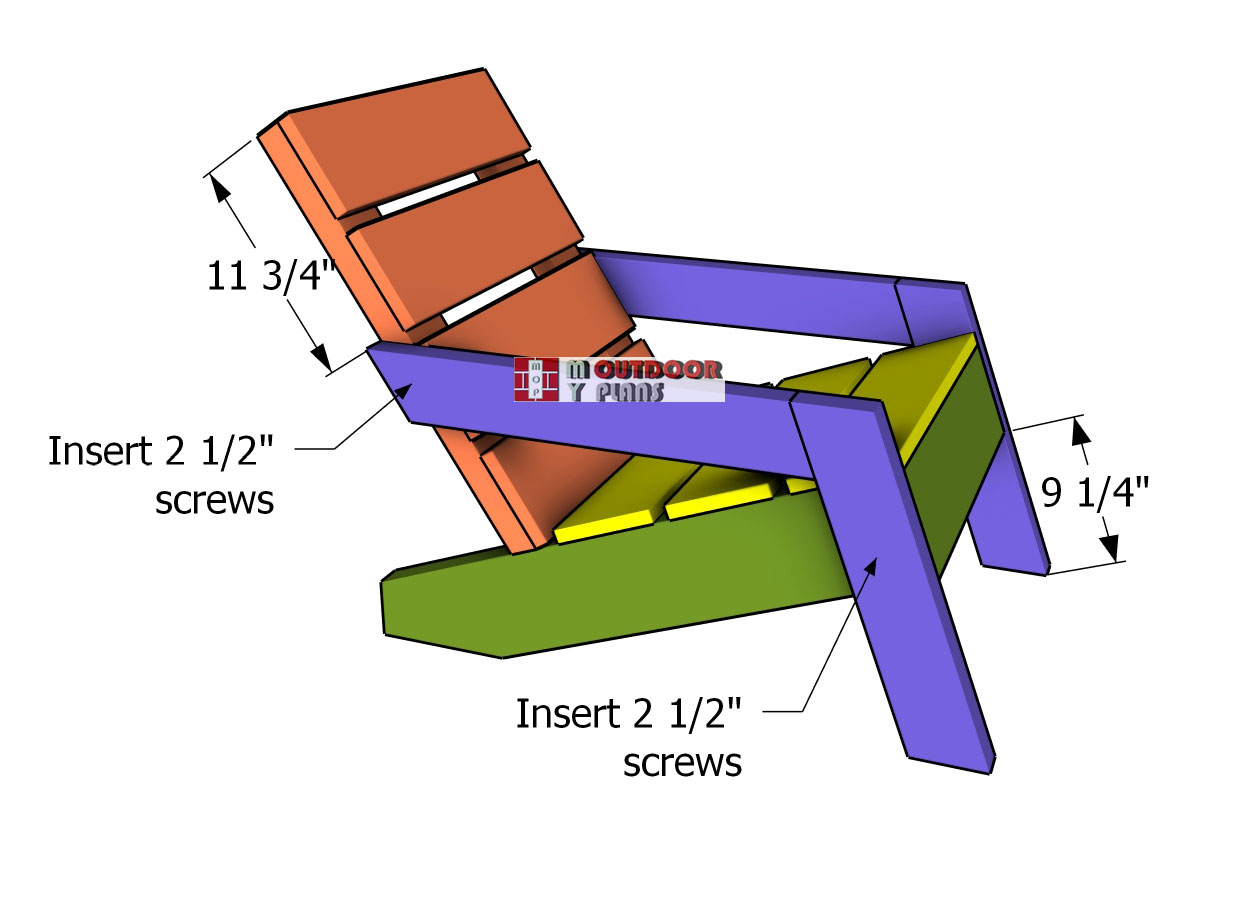
Attaching-the-front-legs
Let’s attach the frames to the sides of the modern chair. It’s important to align the frames using the guidelines from the diagram.
We’ll drill pilot holes through the legs and insert 2 1/2″ screws into the chair frame, using two screws for each joint. To ensure everything is perfectly level, we’ll use a spirit level to check the armrest supports.

Assembling-the-armrests
We’ll use 1×4 and 1×2 boards to assemble the armrests. First, we’ll drill pocket holes at both ends of the 1×2 board. Then, we’ll lay everything on a level surface, making sure the corners are square. Finally, we’ll insert 1 1/4″ screws to assemble the frame securely.
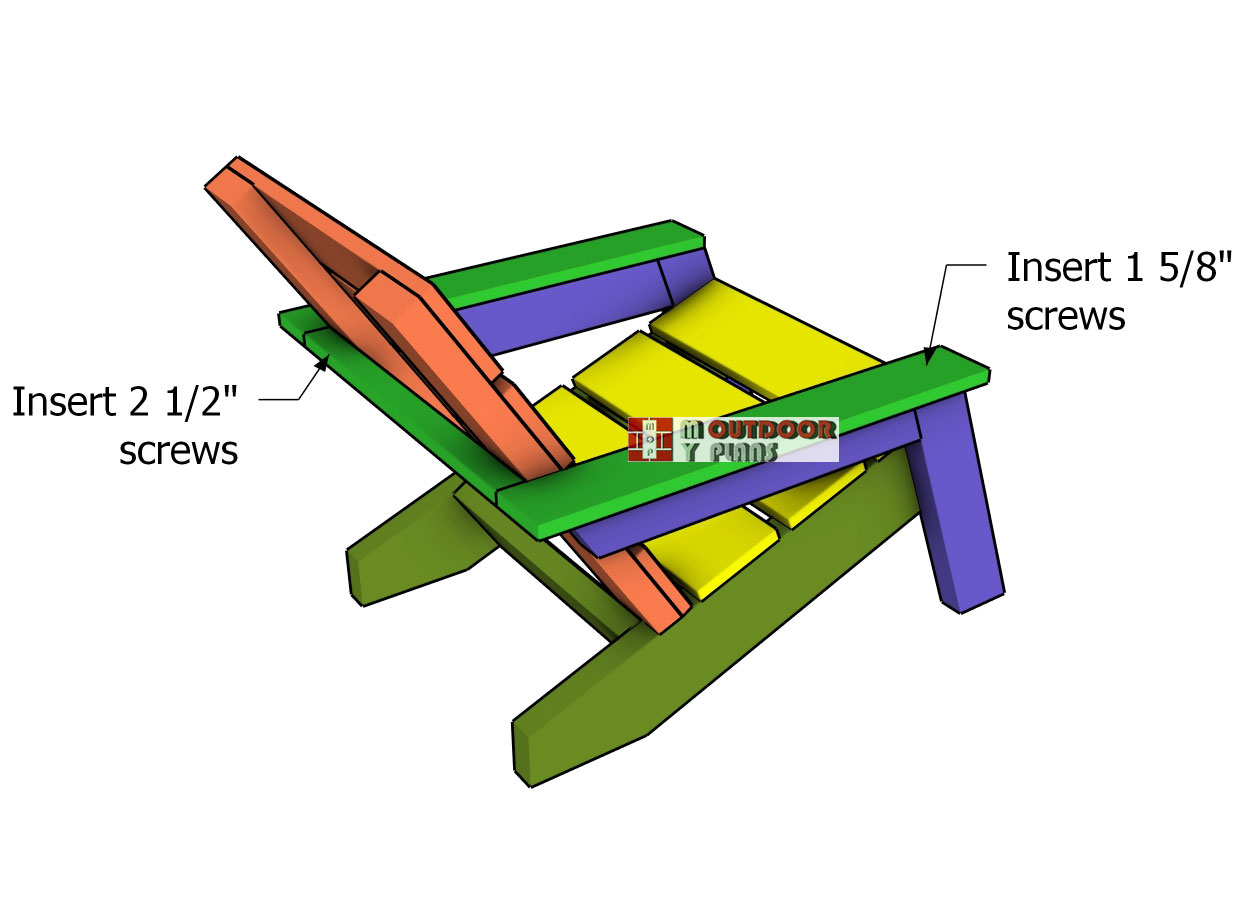
Fitting-the-armrests
Next up, we’ll fit the frame to the chair as shown in the diagram. We’ll align the armrests flush with the front legs and secure them in place with 1 5/8″ screws. To prevent the wood from splitting, we’ll drill pilot holes first. We’ll use four screws on each side of the chair to make sure everything is nice and secure.
Garden Chair – Finishing touches
free Modern adirondack chair plans
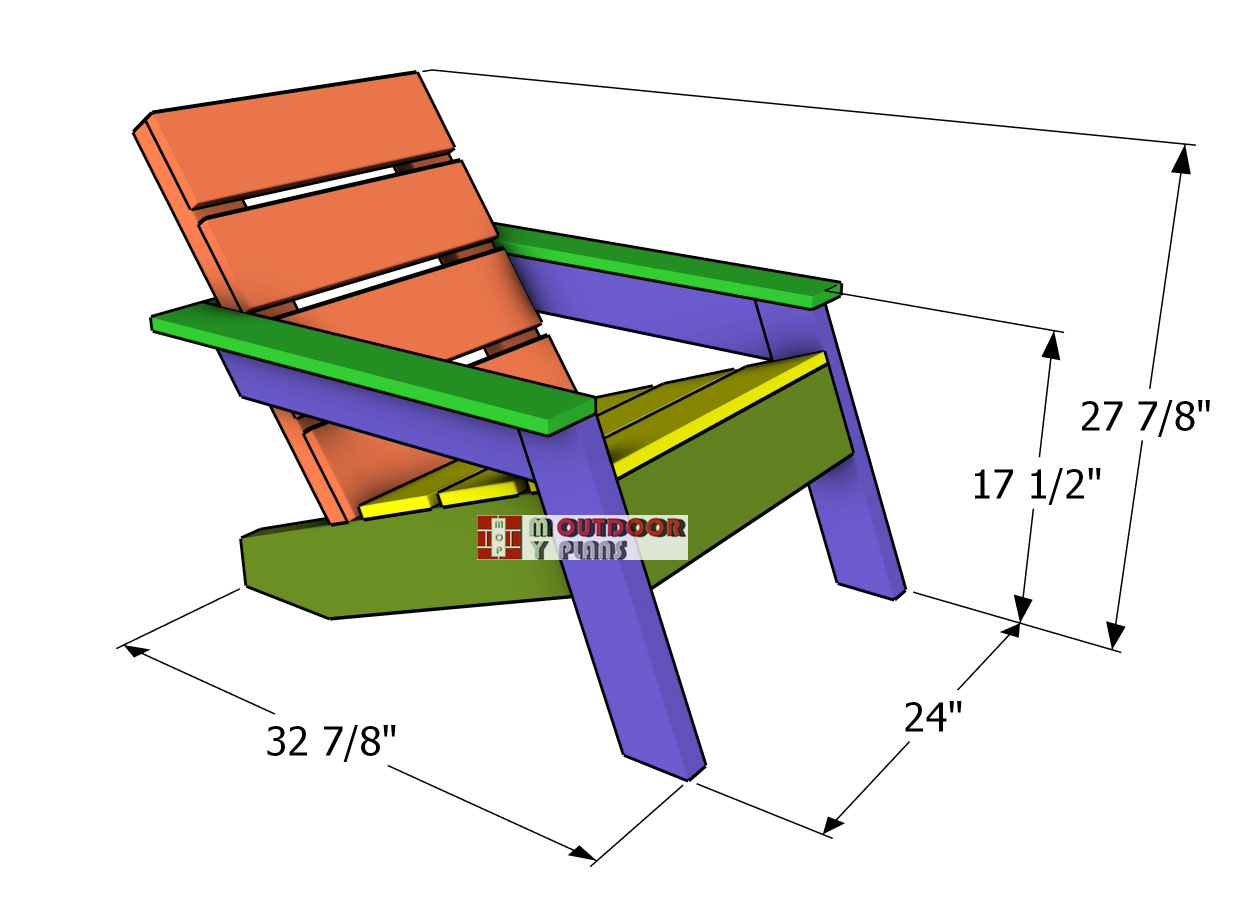
Modern-adirondack-chair—dimensions
Last but not least, let’s focus on the finishing touches. Fill any holes with wood putty and smooth the surface with 120-220 grit sandpaper. Apply a few coats of stain or paint to enhance the look and protect it from the elements.
Modern adirondack chair plans
How to build modern adirondack chairs
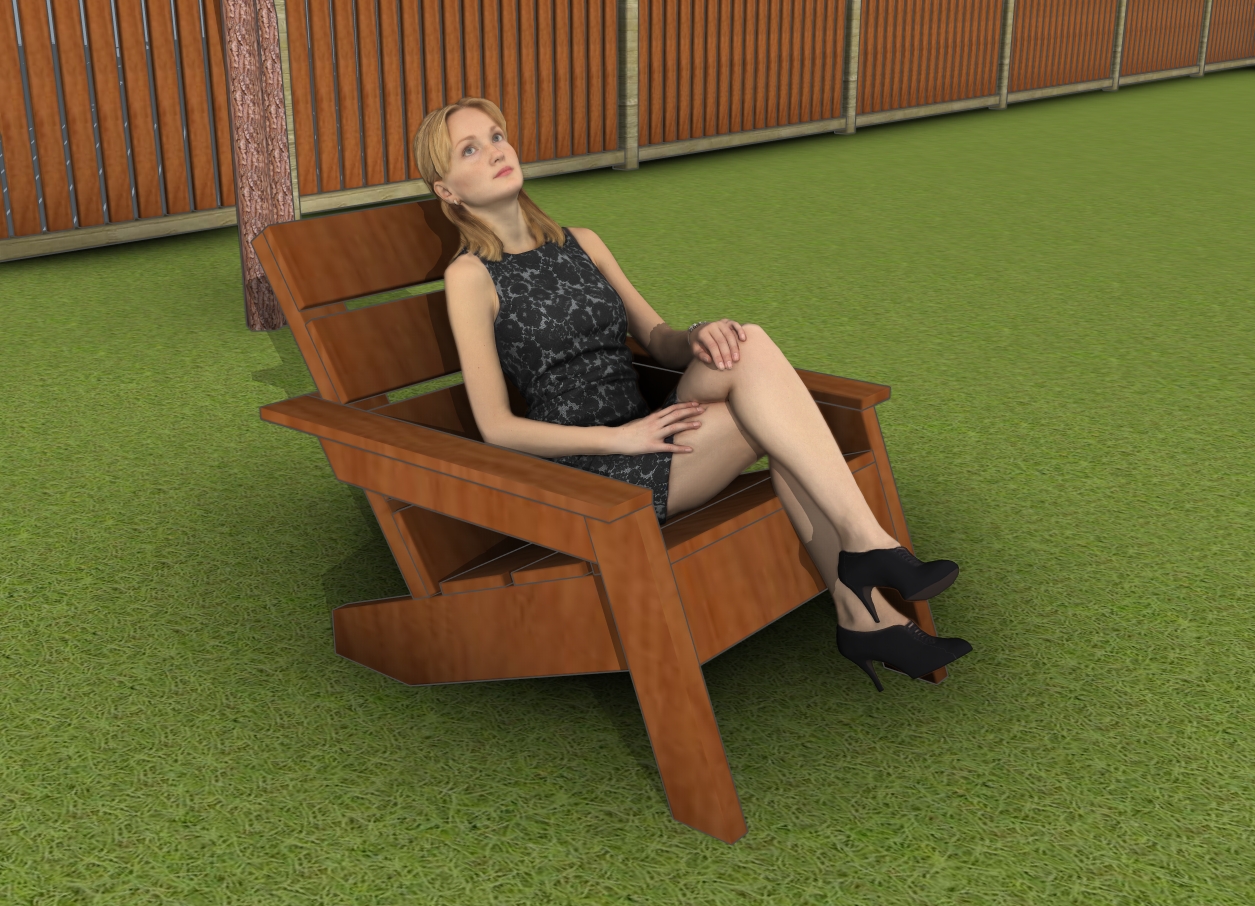
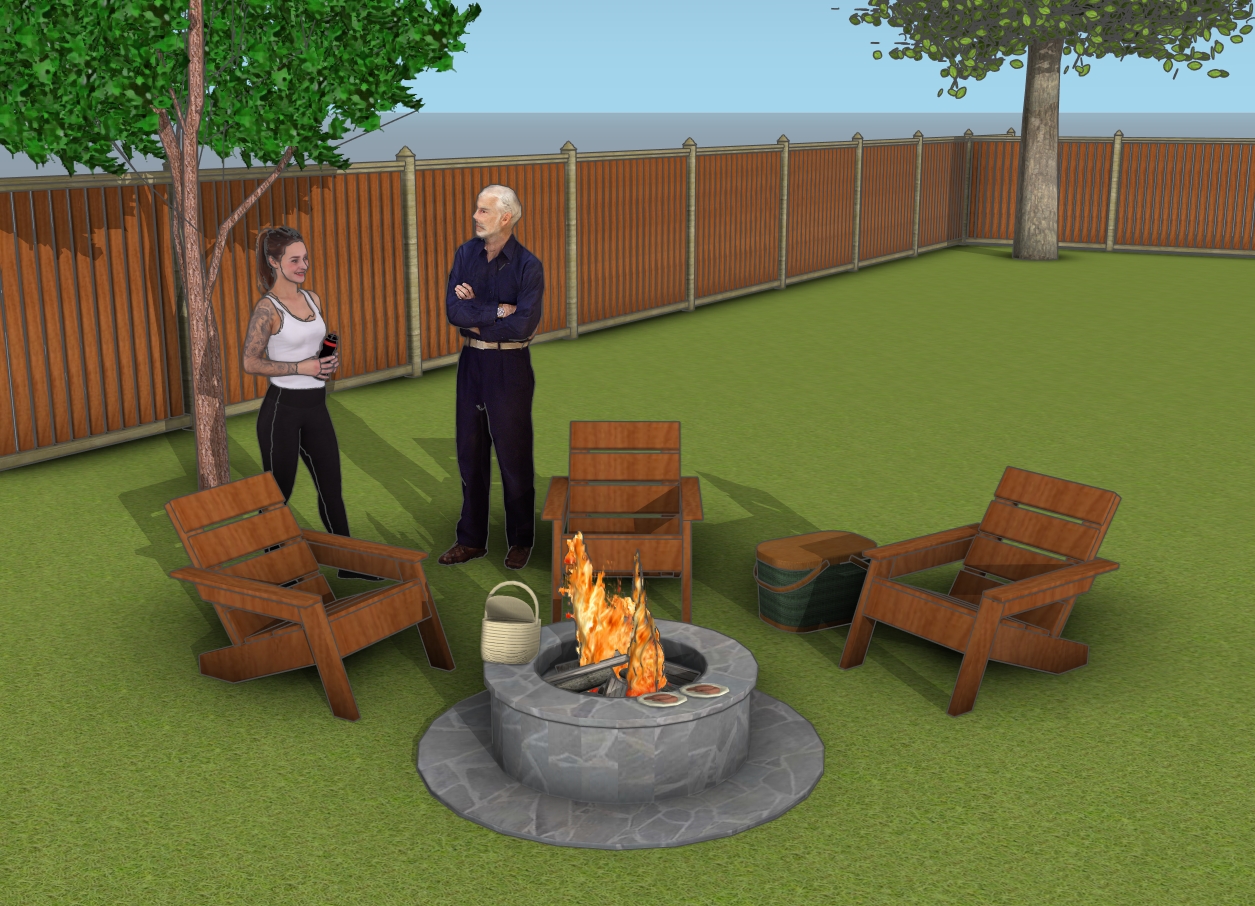
Picture this: the sun’s setting, casting a golden glow across your backyard, and you’re sinking into your modern Adirondack chair with a cold drink in hand. The sleek design hugs your back just right, while the wide armrests give you the perfect spot to rest your book or prop up your feet. As you lean back, the world seems to slow down, and it’s just you, the warm breeze, and the stars starting to peek out. Whether you’re sharing a laugh with friends or simply soaking in some me-time, these chairs are your new favorite spot to unwind and let your imagination run wild!
If you want to get the Premium plans with all the extras, just press the GET PREMIUM PLANS button bellow. If you want to get the free plans, just read the blog FAQs.

This woodworking project was about DIY garden arbor bench – free plans. If you want to see more outdoor plans, check out the rest of our step by step projects and follow the instructions to obtain a professional result.