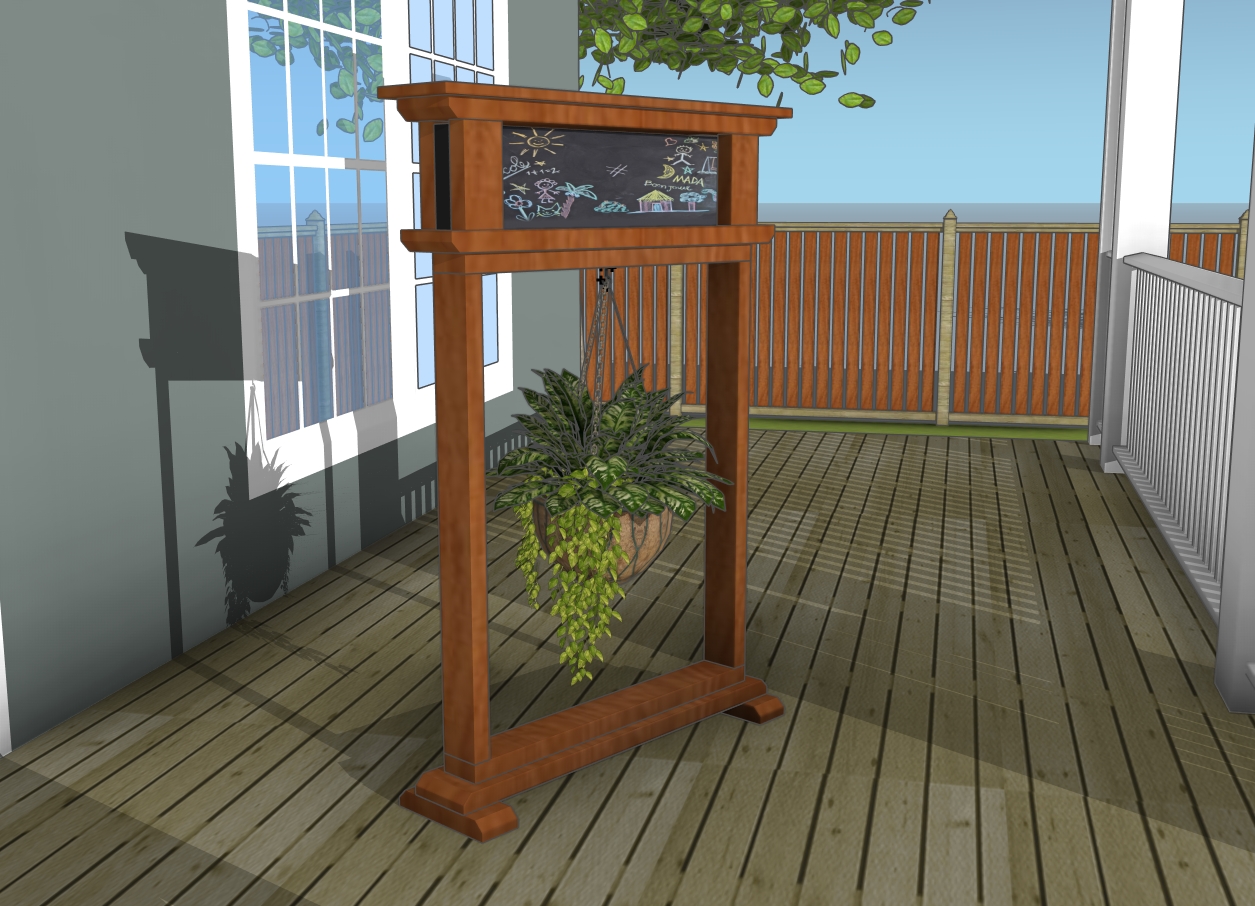
Picture this: a peaceful, inviting entrance that whispers of hospitality and the simple beauty of nature. Today, we’re crafting a porch welcome sign hanging plant stand plans – a project that brings together the rustic charm of wood and the vibrant life of plants. This isn’t just any stand; it’s a thoughtful creation that welcomes your guests with open arms and a touch of grace. Let’s embark on this delightful project and create an entryway that speaks of warmth, kindness, and the joy of a well-tended home.
For this porch welcome sign hanging plant stand project, you’re looking at a cost of around $30-$50, depending on the type of wood and hardware you choose. It’s a budget-friendly project that packs a lot of charm! As for time, set aside a few hours – I’d say around 3-5 hours should do the trick. It’s a quick and fun build that you can easily tackle in an afternoon, leaving you plenty of time to enjoy your new creation with a cup of coffee on the porch!
For this project, I recommend using cedar or hardwood for their durability and natural resistance to the elements. Cedar is a fantastic option because it’s lightweight, rot-resistant, and has a beautiful, rustic look. Hardwood, on the other hand, provides superior strength and longevity, making your project a sturdy and stylish addition to your home.
Projects made from these plans
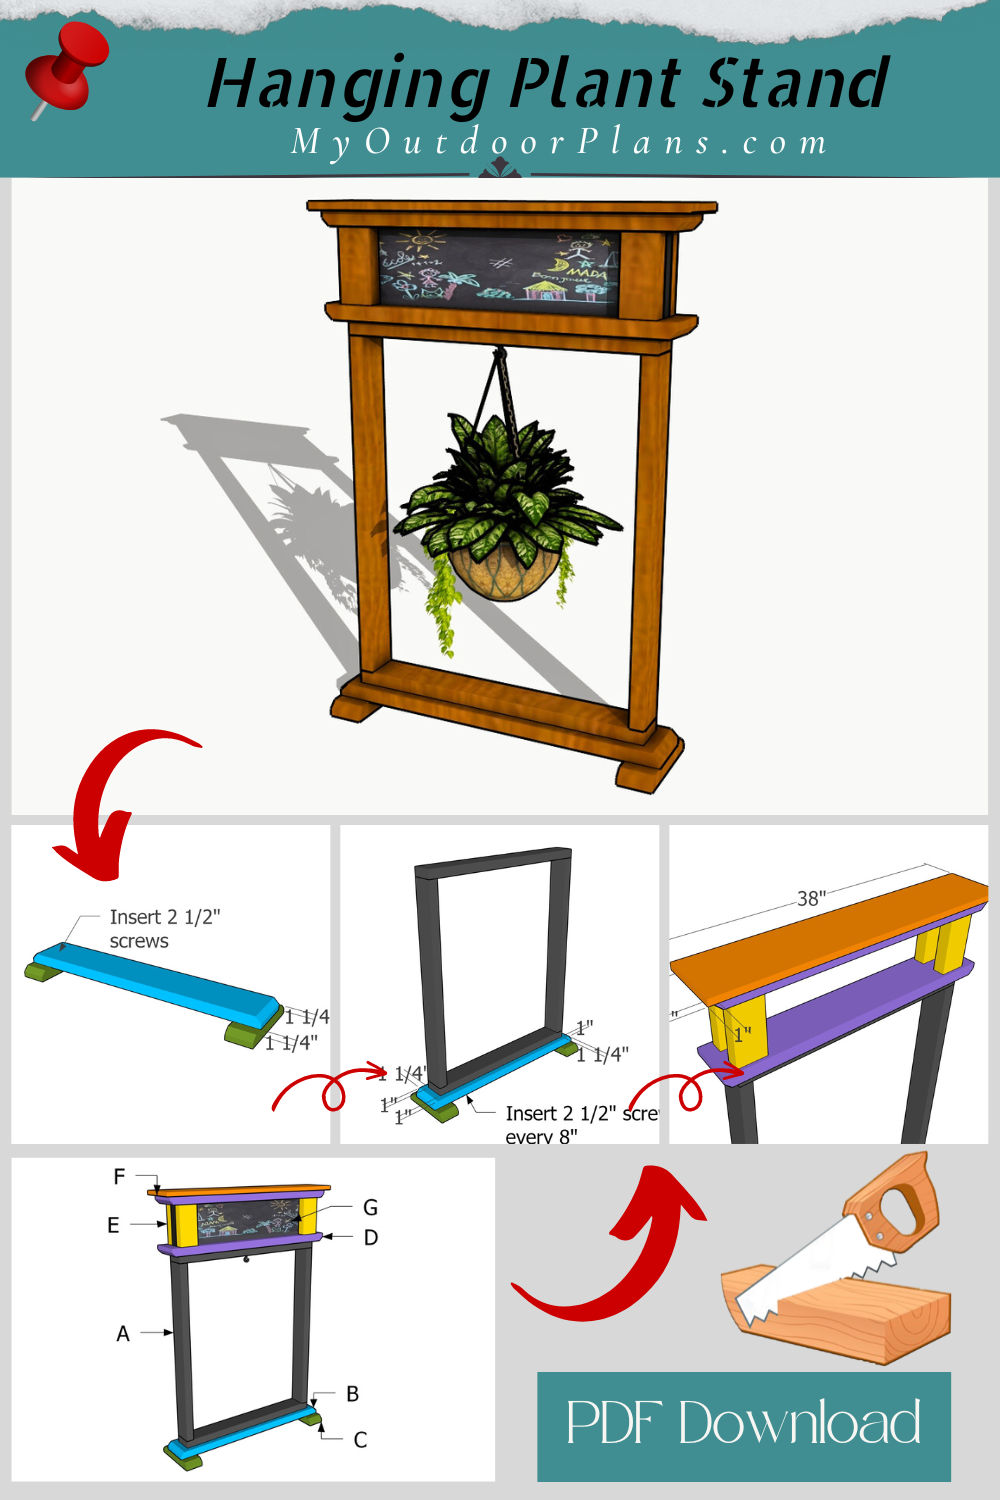
Hanging Plant Stand – Free Plans

Building-a-welcome-porch-stand
Cut and Shopping Lists
A – Frame – 2×4 lumber 36″ long – 2 pieces
A – Frame – 2×4 lumber 32″ long – 2 pieces
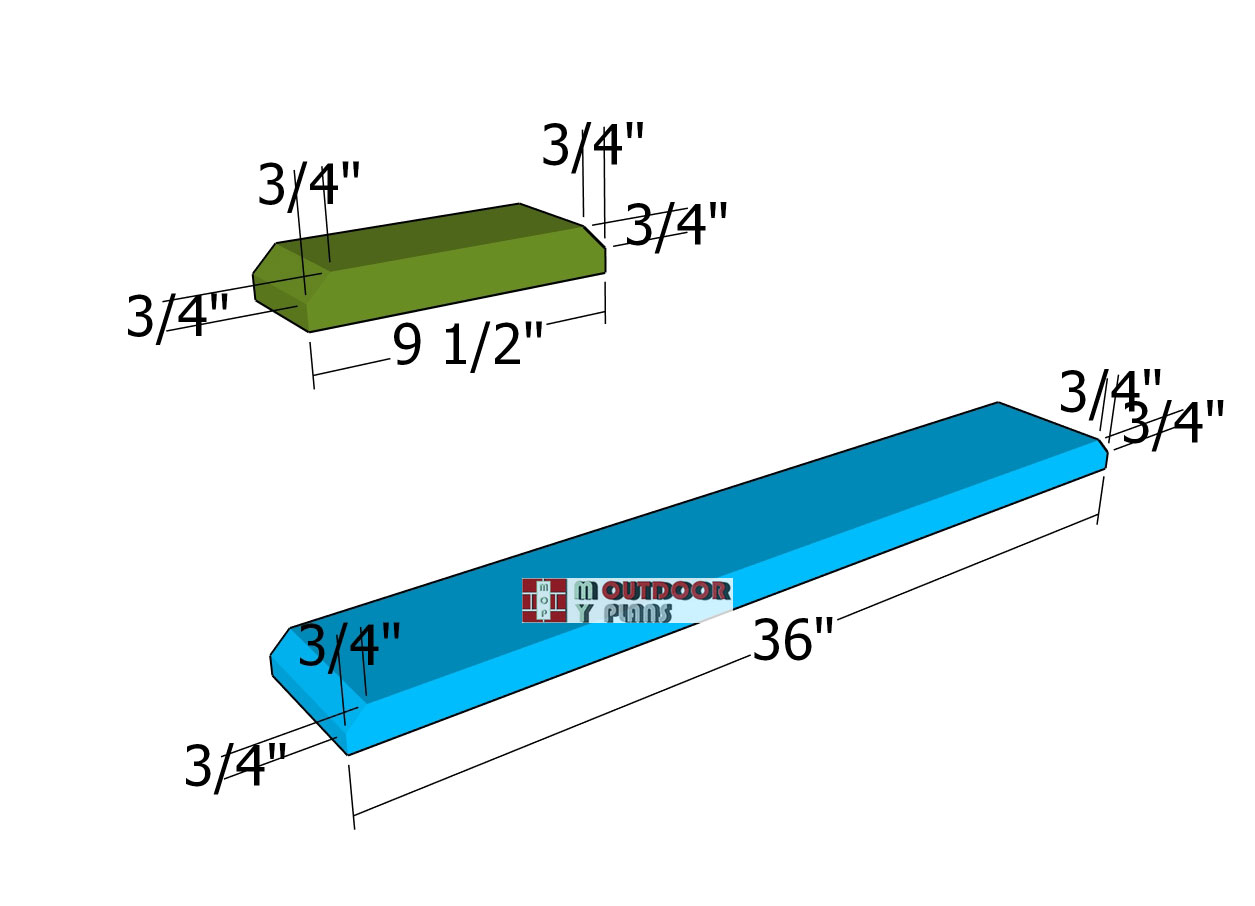
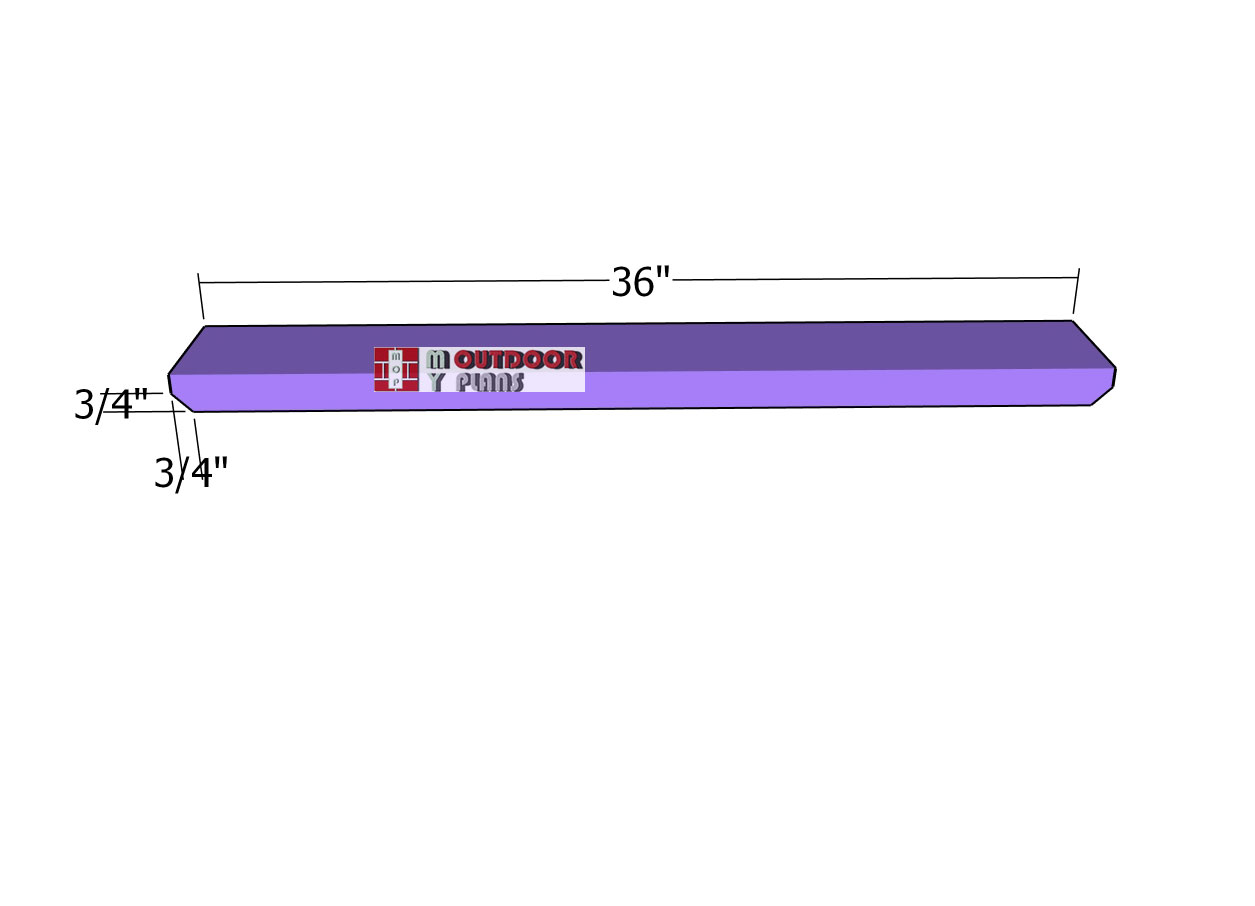
B – Base – 2×6 lumber 36″ long – 1 piece
C – Legs – 2×4 lumber 9 1/2″ long – 2 pieces
D – Top Frame – 2×6 lumber 36″ long – 2 pieces
E – Top Frame Supports – 2×4 lumber 7 1/2″ long – 4 pieces
F – Top Trim – 1×8 lumber 38″ long – 1 piece
G – Sign – 2×8 lumber 32 1/2″ long – 1 piece
- 2×4 lumber 8 ft – 2 pieces
- 2×6 lumber 10 ft – 1 piece
- 1×8 lumber 4 ft – 1 piece
- 1×8 lumber 4 ft – 1 piece
- 2 1/2″ screws – 100 pieces
- 2″ nails – 20 pieces
- Wood glue – 1 piece
- Stain – 1 can
- Chalkboard paint – 1 can
- Hanging plant hook – 1 piece
Tools
![]() Hammer, Tape measure, Framing square, Level
Hammer, Tape measure, Framing square, Level
![]() Miter saw, Drill machinery, Screwdriver, Sander
Miter saw, Drill machinery, Screwdriver, Sander
![]() Safety Gloves, Safety Glasses
Safety Gloves, Safety Glasses
Time
![]() One weekend
One weekend
Related
Pin for Later!
Welcome Sign Flower Stand – Building the base
Base-components
For the base of the stand, grab some 2×6 and 2×4 lumber. Use a miter saw to make 45-degree bevel cuts on both ends for a nice decorative touch. Then, smooth the edges with sandpaper to ensure everything feels nice and smooth to the touch.
Assembling-the-base
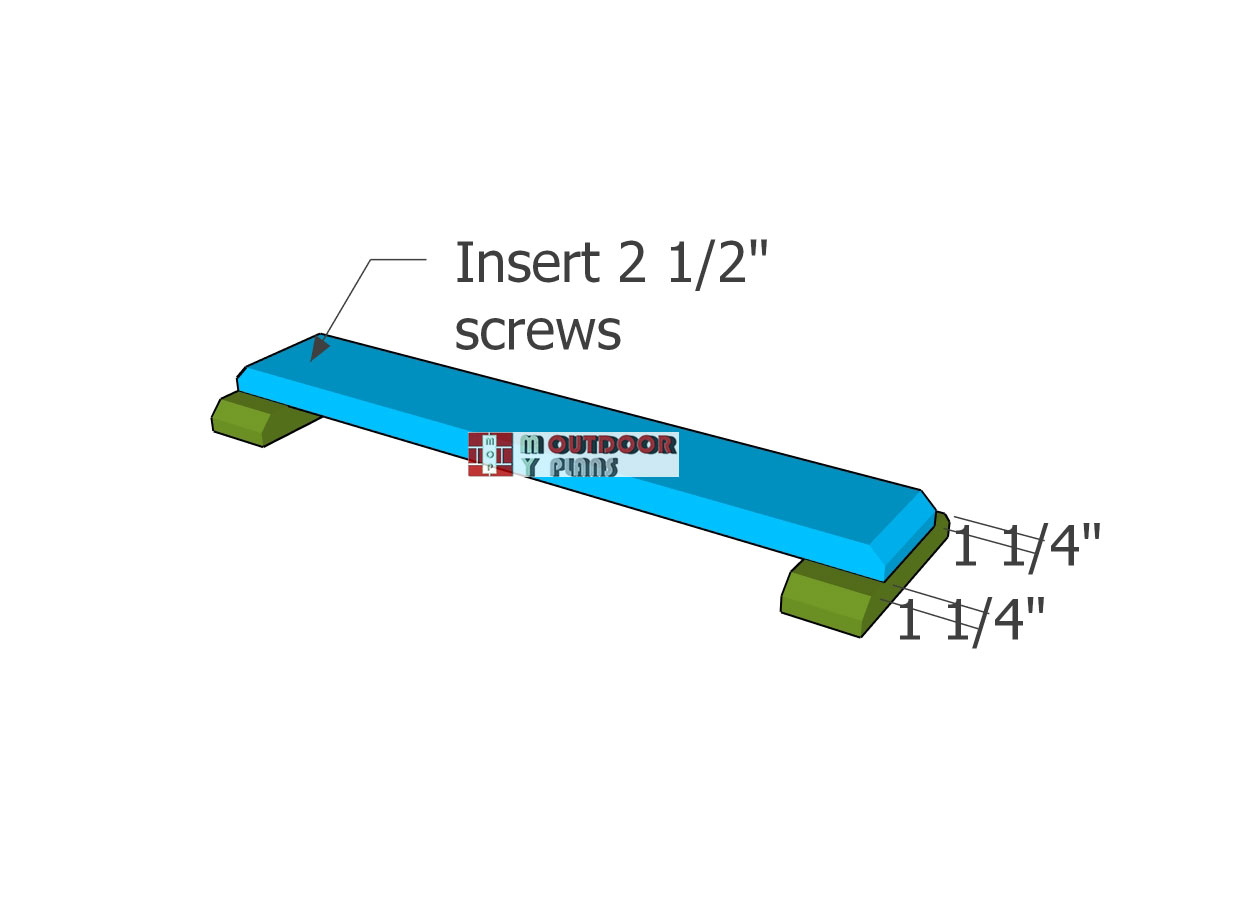
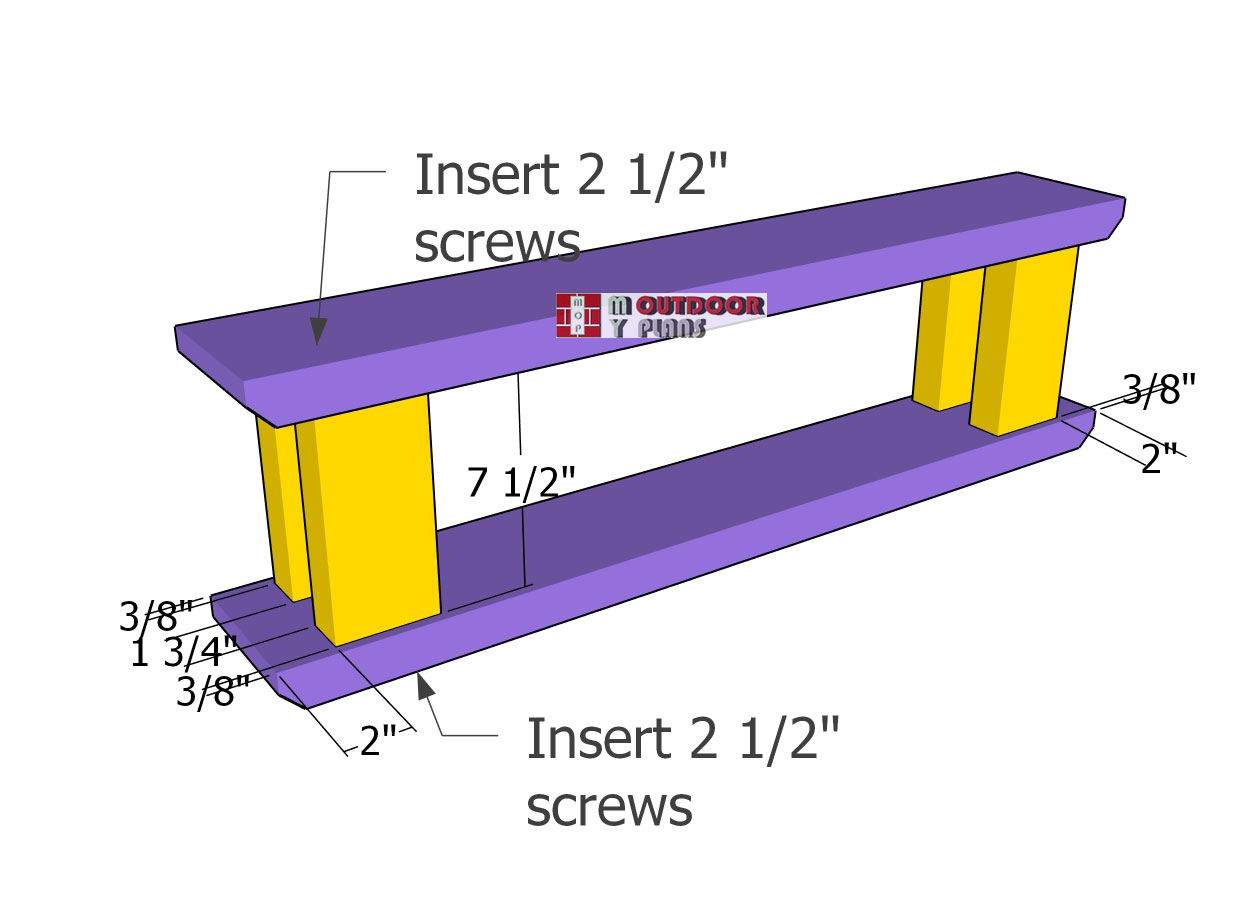
Let’s put together the base for the stand just like in the diagram. Start by attaching the legs to both ends of the base piece, leaving a 1 1/4″ overhang on each side.
Drill pilot holes and secure each joint with two 2 1/2″ screws. Don’t forget to add some wood glue to reinforce the joints for extra strength.
Assembling-the-main-frame
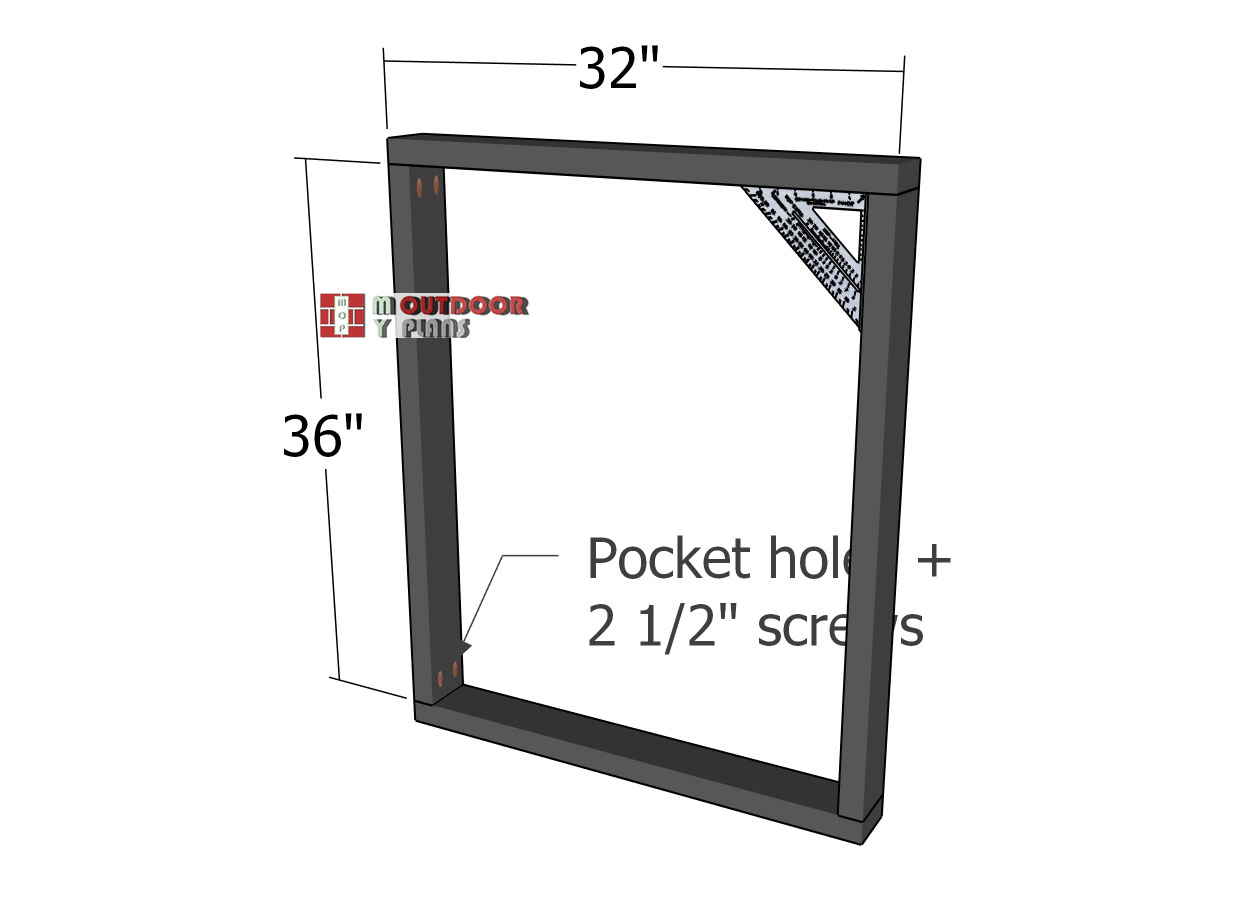
We’re building the main frame for our porch hanging plant stand using 2×4 lumber. Start by cutting all your pieces and laying them out on a level surface. Next, drill pocket holes at both ends of the vertical boards and assemble everything using 2 1/2″ screws. Be sure to align the edges flush and use a speed square to check that all the corners are perfectly square.
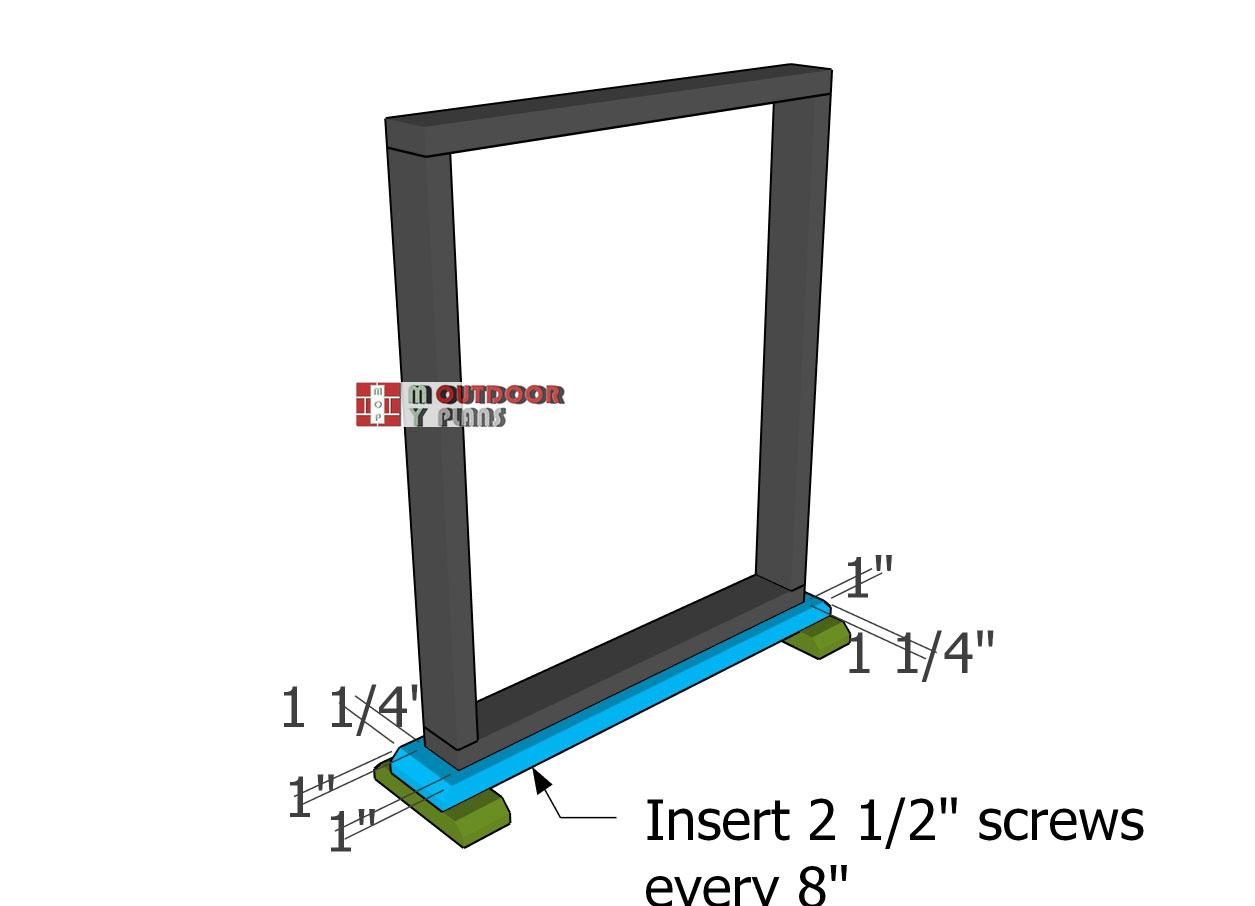
Attaching-the-base-to-the-stand
Next, it’s time to attach the main frame to the base. Center the frame on the base, ensuring there’s a 1″ overhang at the front and back, and a 1 1/4″ overhang on each side.
Building the top frame – Flower Hanger Stand
Frame-components
Now let’s put together the top frame. For this, use 2×6 boards for the horizontal pieces and 2x4s for the supports. Make 45-degree decorative cuts on both ends of the large boards.
Assembling-the-top-frame
Drill pilot holes through these boards and secure them to the supports with 2 1/2″ screws. Offset the supports as shown in the diagram to achieve that distinctive farmhouse style.
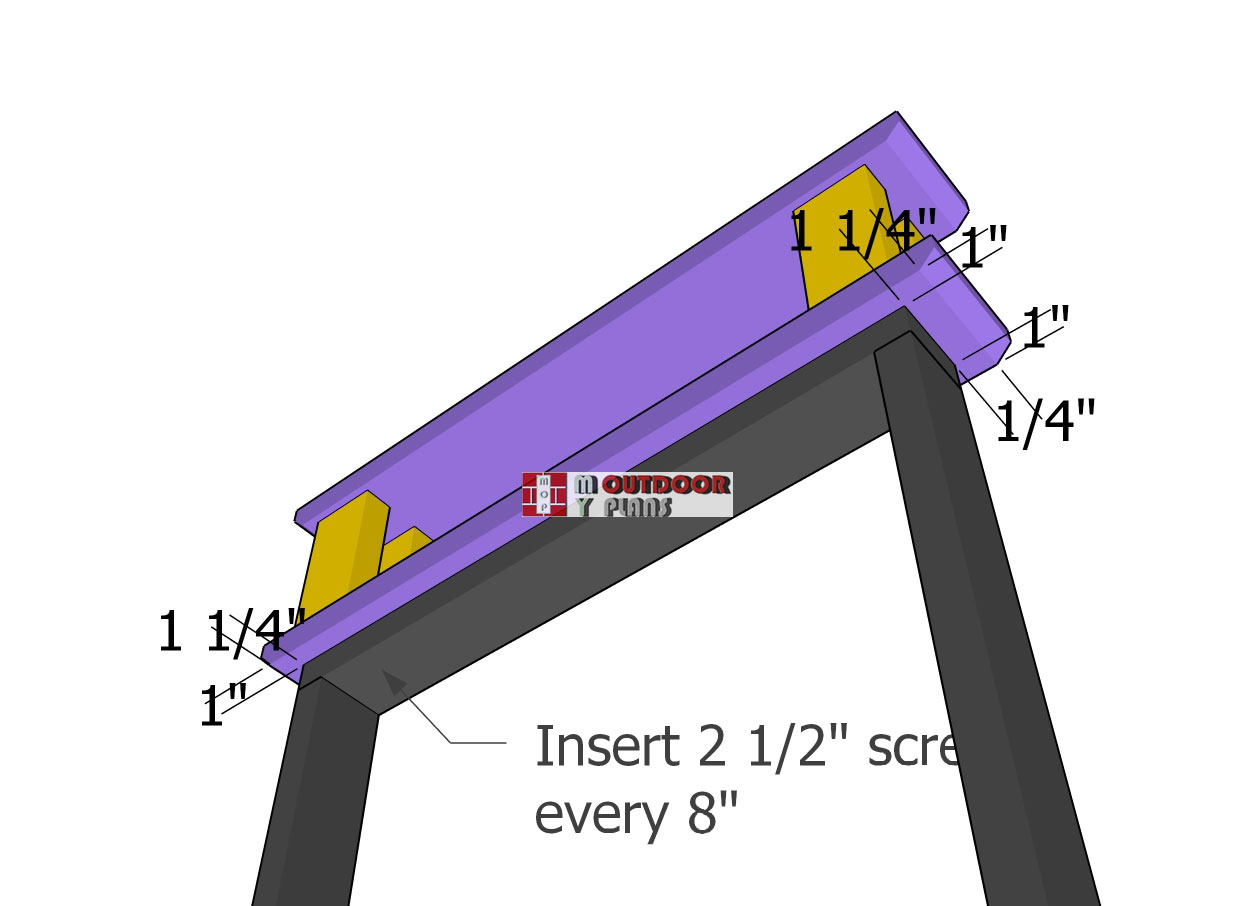
Attaching-the-top-frame-to-the-stand
Now, attach the top frame to the stand, ensuring you have 1″ overhangs at the front and back, and 1 1/4″ on the sides. Make sure everything is aligned properly, then clamp it all together. Use 2 1/2″ screws to secure it, drilling pilot holes first to prevent the wood from splitting.
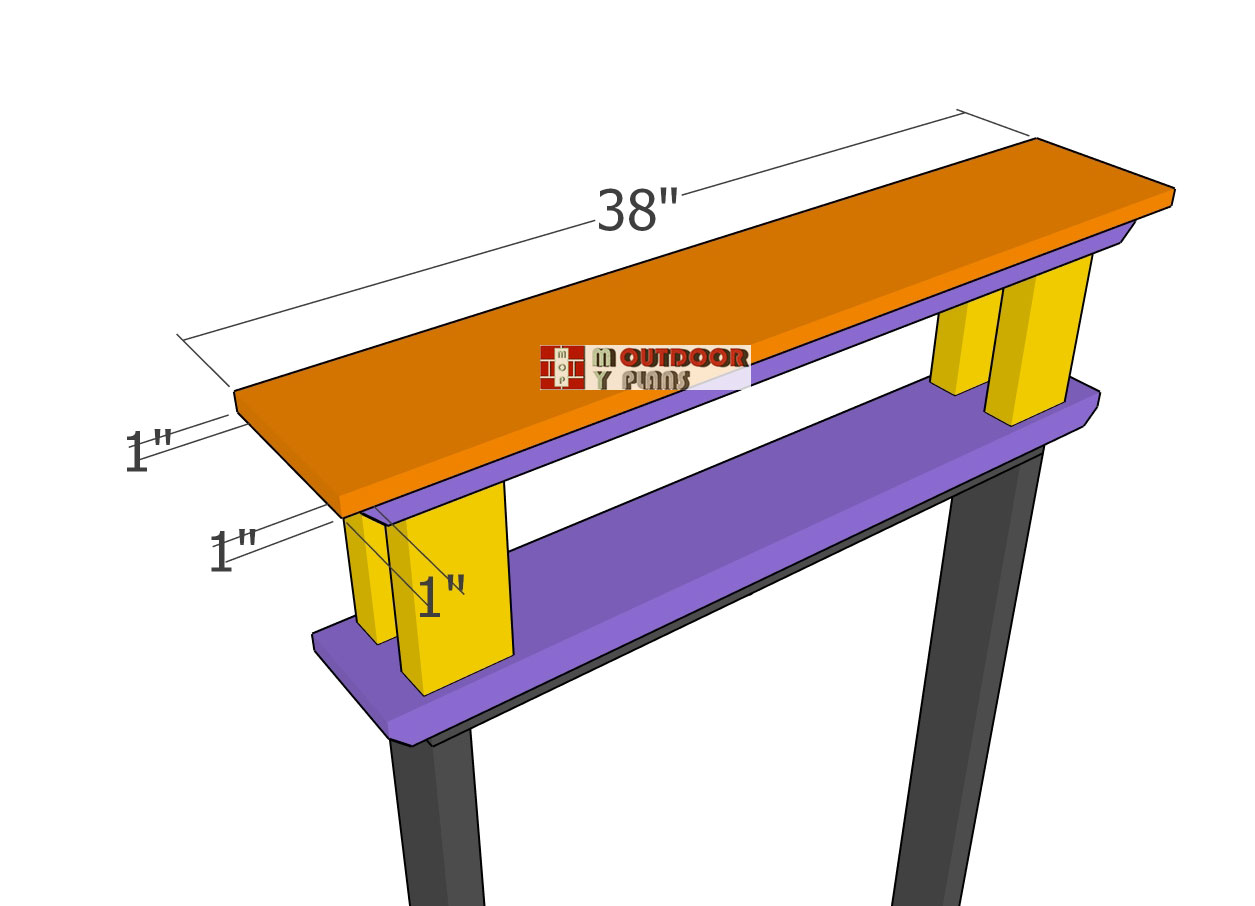
Fitting-the-top-trim
To add an extra layer of appeal, attach a 1×8 trim to the top of the hanging plant stand. Center it so there’s a 1″ overhang on all sides, then secure it with wood glue and 2″ nails.
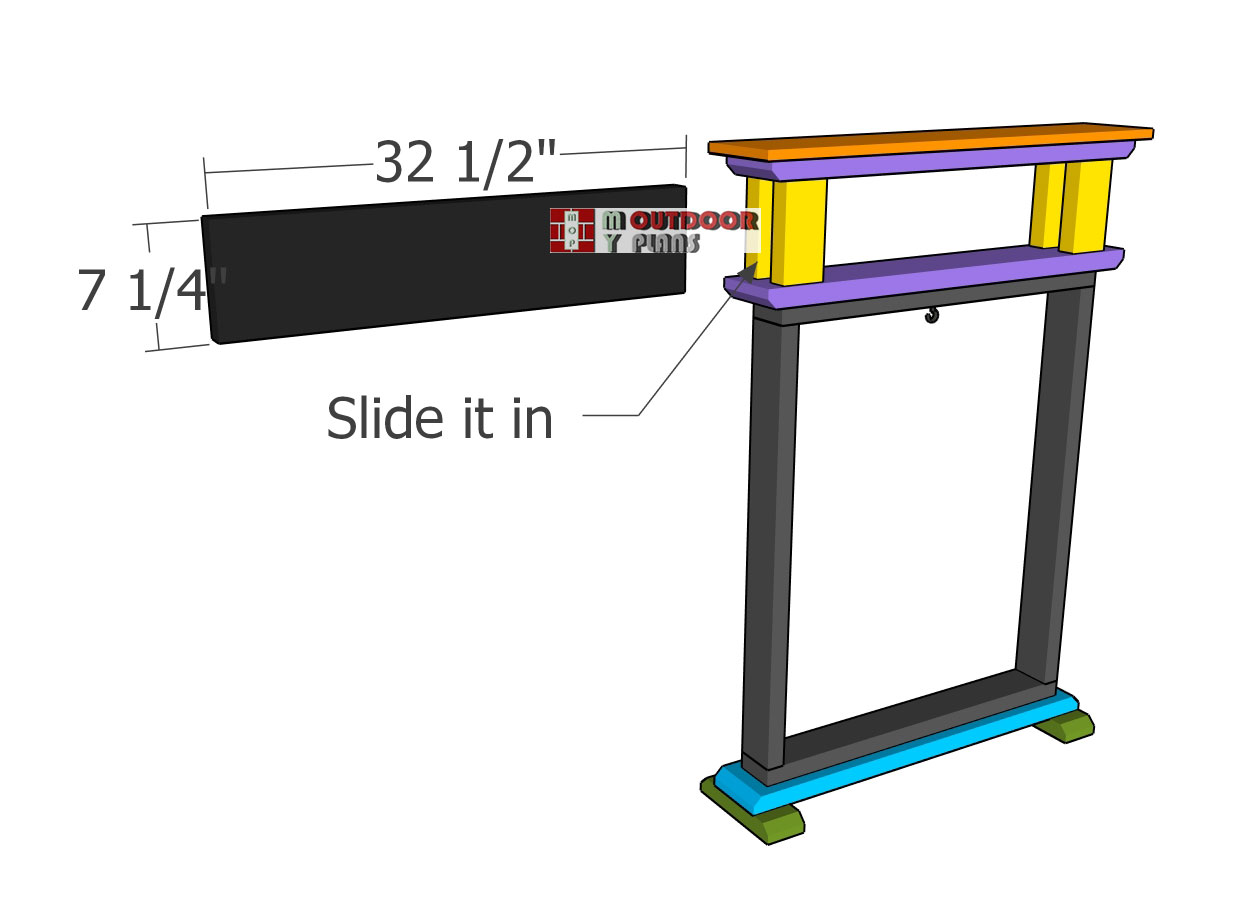
Fitting-the-sign
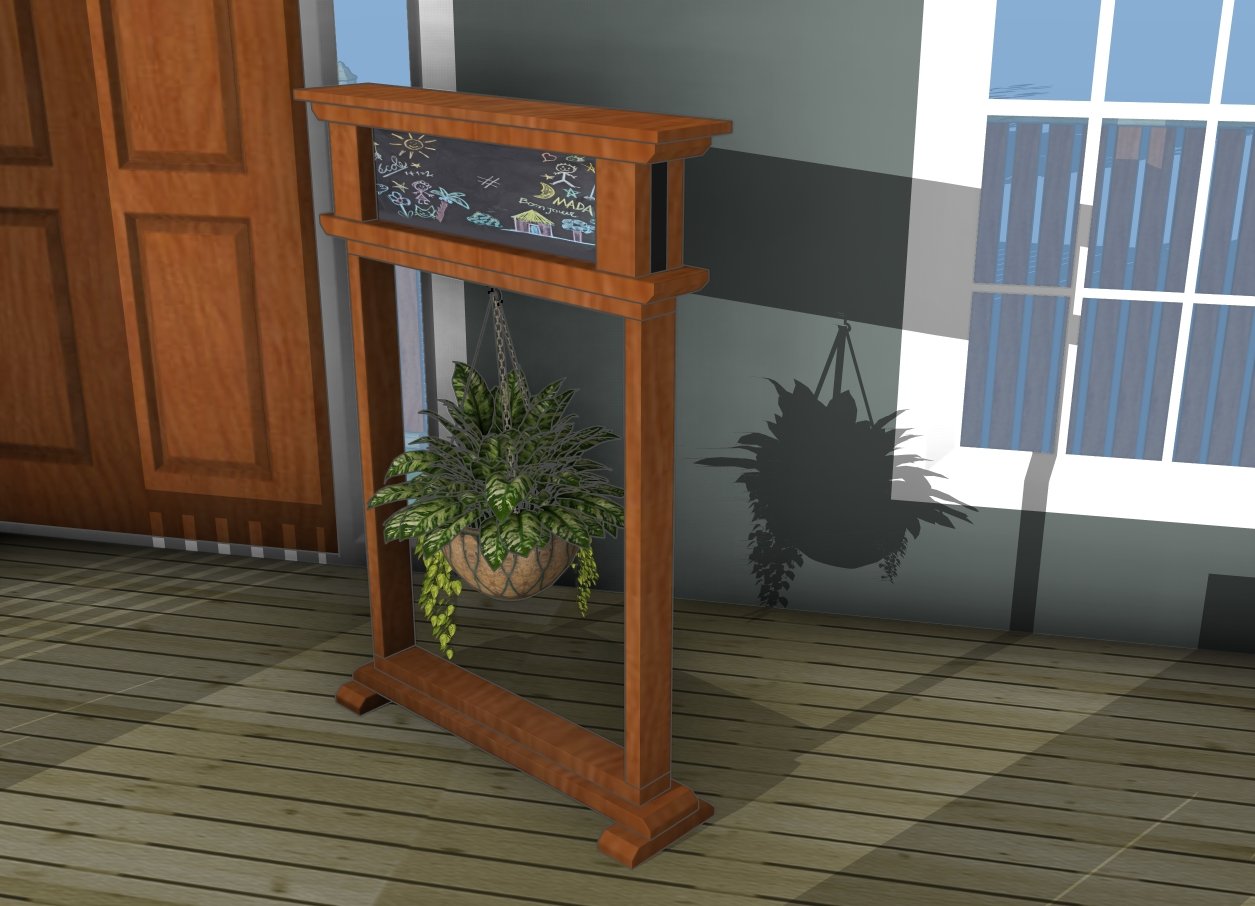
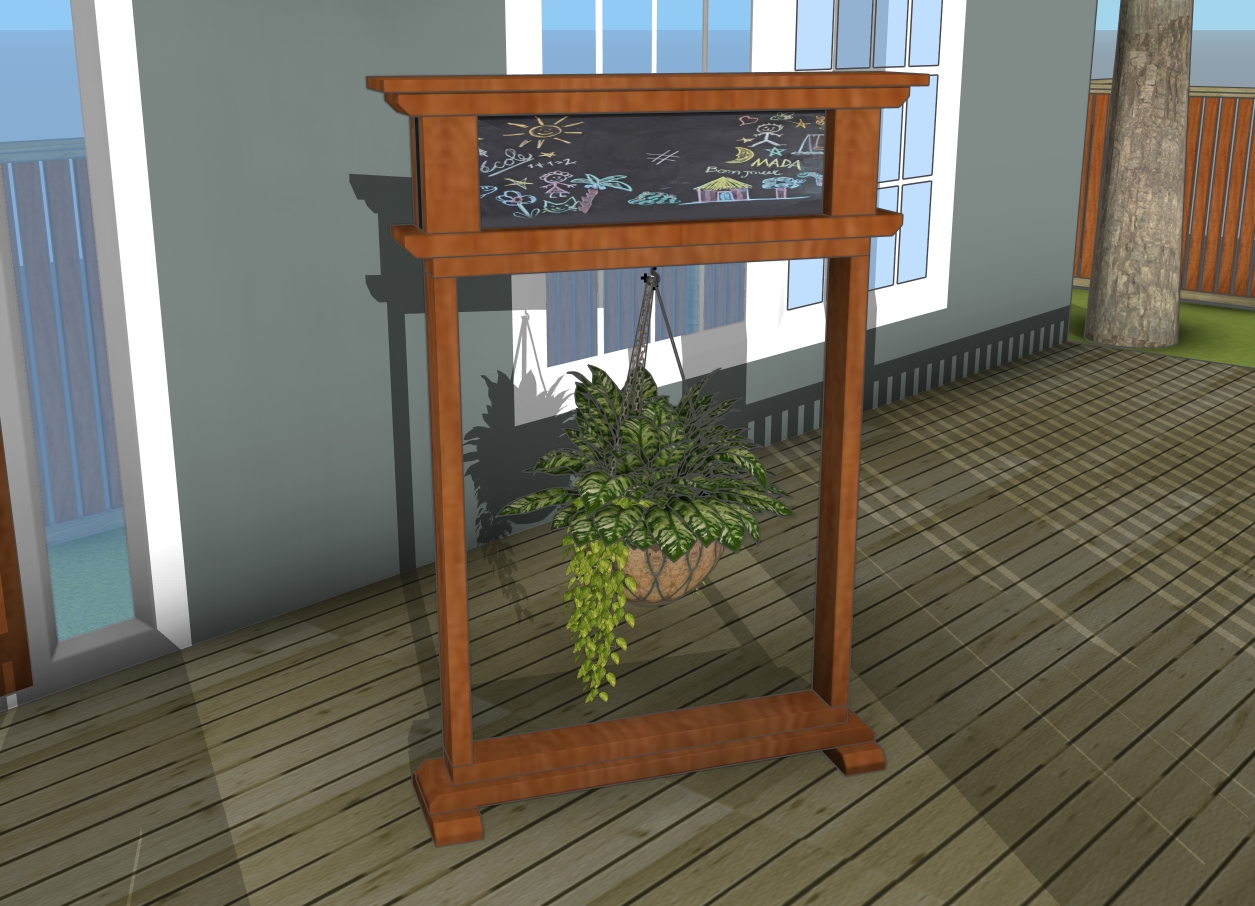
Next, let’s work on the sign board. Cut a piece of 2×8 lumber and cover it with chalkboard paint. This way, you can draw or write your welcome message and add some extra functionality to your plant stand.
The board can be easily removed and slid back into the frame whenever you want to change up the design.

Fitting-the-hook
Finally, let’s attach the hanging plant basket hook to the main frame. Center the hook to the top board, then secure it with screws.
Farmhouse Porch Welcome Sign – Finishing touches
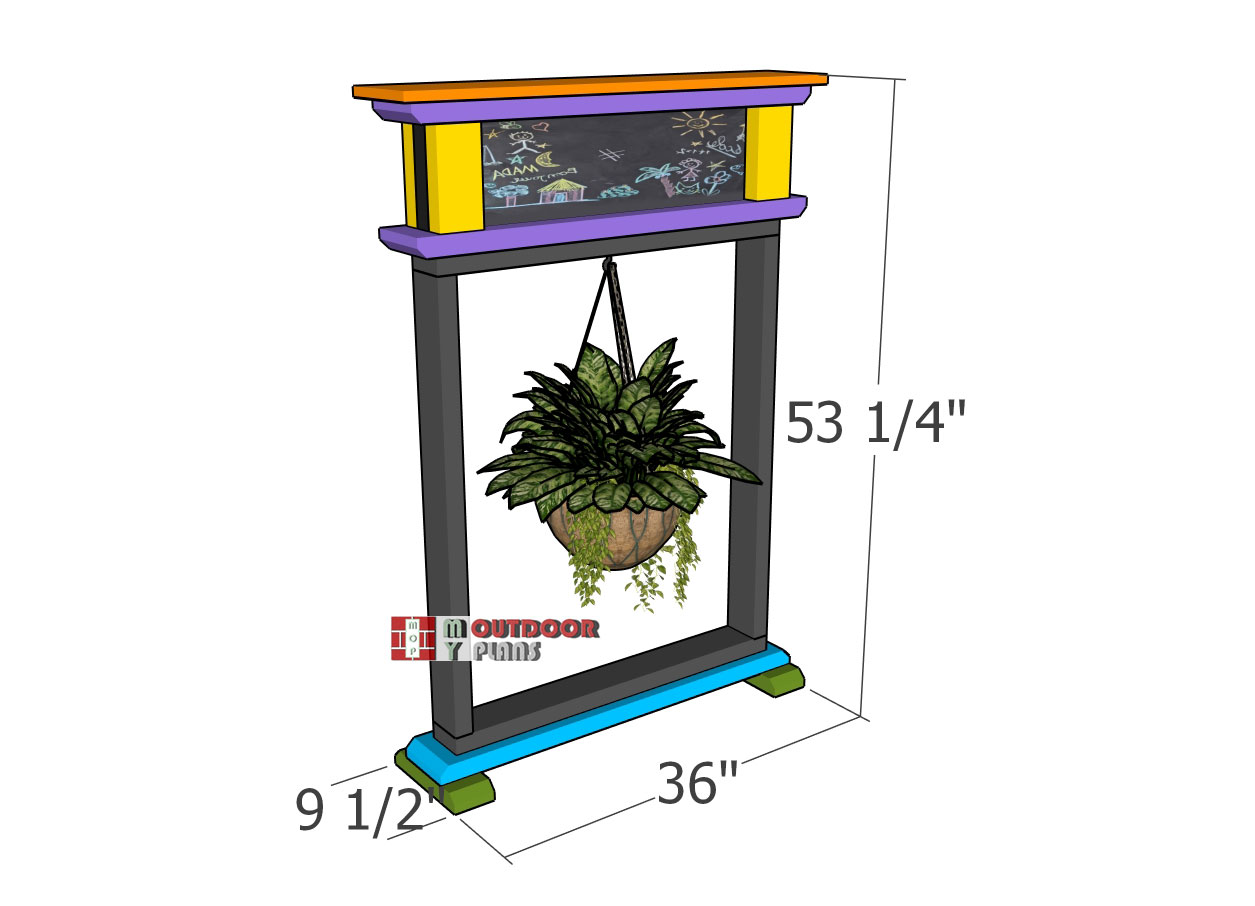
Welcome-signs-plans—dimensions
Last but not least, let’s focus on the finishing touches. Fill any holes with wood putty and smooth the surface with 120-220 grit sandpaper. Apply a few coats of stain or paint to enhance the look and protect it from the elements.
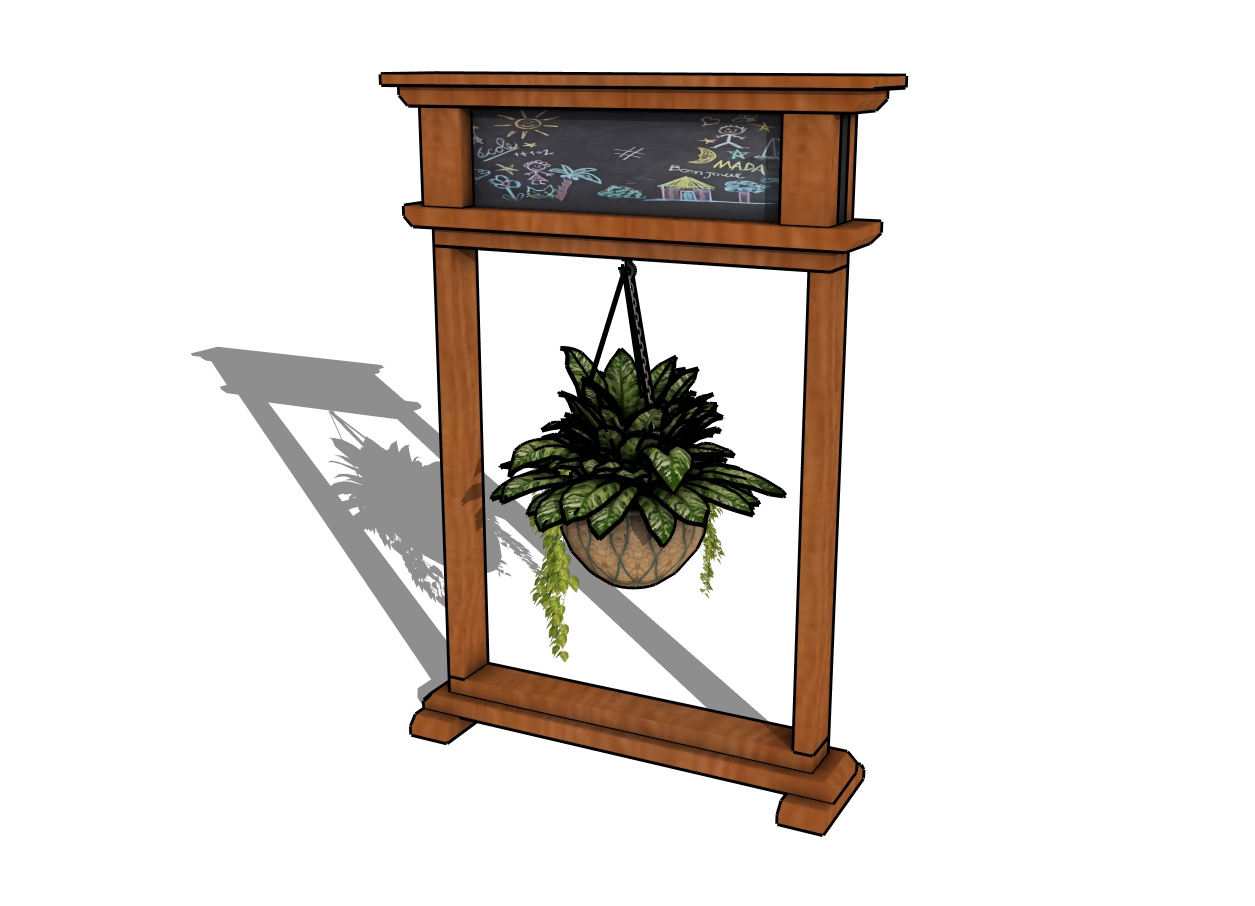
Welcome sign for porch
Build a porch flower basket stand
DIY hanging flower stand
This porch welcome sign is the perfect gift for the special mom or wife in your life! It’s a thoughtful, handcrafted piece that adds a personal touch to any home, making it a gift that keeps on giving. Not only does it brighten up the entryway with beautiful blooms, but it also shows you’ve put time and effort into creating something unique and meaningful – just like her.
Welcome sign stand
With this porch welcome sign hanging plant stand, you’ve created a beautiful and practical addition to any home, perfect for adding a warm, personal touch. Whether you’re gifting it or keeping it for yourself, this project is a great way to show your love for DIY and design. Now, grab your favorite plant, slide in your sign, and enjoy the welcoming vibe you’ve crafted with your own hands!
If you want to get the Premium plans with all the extras, just press the GET PREMIUM PLANS button bellow. If you want to get the free plans, just read the blog FAQs.

This woodworking project was about DIY hanging flower stand – free plans. If you want to see more outdoor plans, check out the rest of our step by step projects and follow the instructions to obtain a professional result.