This step by step diy project is about hammock stand plans. Building a wooden hammock stand is a quick project that will enhance the look of your backyard, while keeping the costs at minimum. If you want to create a rustic recreating corner in your backyard or on your patio, we strongly recommend you to consider building a wooden stand for a hammock. Always adjust the size of the stand to match the dimensions of the hammock, otherwise you might end up sitting on the ground. Premium Plans available for this project in the Shop.
A wooden hammock stand requires basic materials and tools, so any person that knows the basic woodworking techniques can get the job done in just a few hours. Cedar, pine or redwood are excellent choices if you want to create a durable structure. Take accurate measurements and always adjust the size and the design of the hammock stand to suit own needs and to fit within your budget. See all my Premium Plans HERE.
Projects made from these plans
It’s that easy to build a hammock stand!
Cut & Shopping Lists
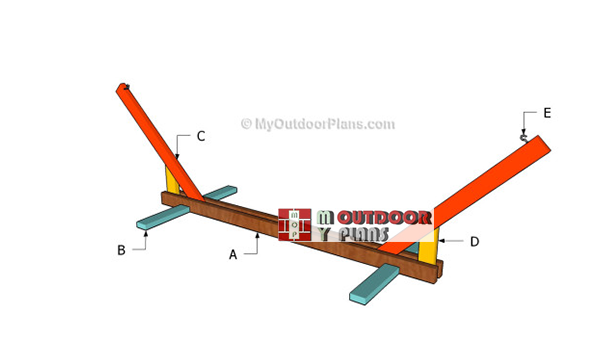
- A – 2 pieces of 2×4 lumber – 84” long FRAME
- B – 2 pieces of 2×4 lumber – 36″ long BASE
- C – 2 pieces of 2×4 lumber – 48-72″ long SUPPORTS
- D – 2 pieces of 2×4 lumber – 12″ long BRACES
- E – 2 hook screws HOOK SCREWS
- 5 pieces of 2×4 lumber – 8′
- 8 pieces of 5″ carriage bolts
- hanging kit
- 30 pieces of 2 1/2″ screws
- hammock
Tools
![]() Hammer, Tape measure, Framing square
Hammer, Tape measure, Framing square
![]() Miter saw, Drill machinery, Screwdriver, Sander, Post-hole digger
Miter saw, Drill machinery, Screwdriver, Sander, Post-hole digger
Time
![]() One weekend
One weekend
Related
Building A Stand Plans
Building-a-hammock-stand
Smart tip: Building a hammock stand is a great way to relax in your garden, while don’t having to invest a significant amount of money. Just follow the instructions and adjust the design and the size of the stand to your needs, if you want to save money and build something unique by yourself.
Hammock Stand Plans
Building-the-frame—base-of-hammock
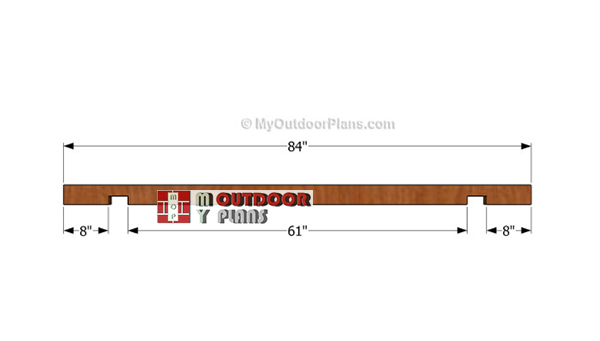
The first step of the outdoor project is to build the frame of the hammock stand. As you can see in the plans, we recommend you to build the components from 2×4 lumber. If you want to create a rigid structure, we recommend you to cut 1 1/2″ deep notches in the frame.
Follow the dimensions shown in the diagram when cutting out the notches. Make several cuts and clean the recess with a chisel and sandpaper.

Attaching-the-supports
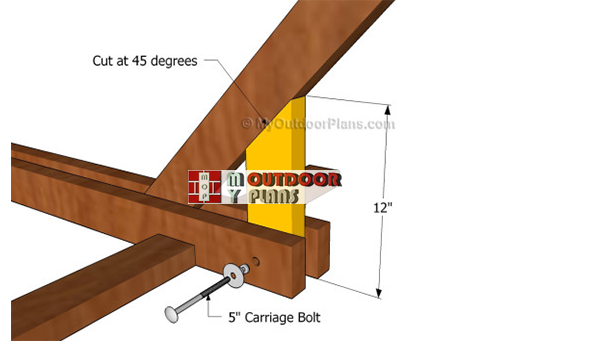
The next step of the project is to attach the supports to the frame. In order to create a durable stand, you need to cut one end of the supports at 45 degrees. Drill pilot holes through the supports and through the frame, before inserting the 5″ carriage bolts.
It is essential to insert at least 2 bolts trough both support, as to get a rigid structure. Alternatively, you could also add waterproof glue to the joints, if you don’t plan to disassemble the stand.

Installing the base
Afterwards, you need to attach fit the base to the frame, as in the plans. Adjust the size of the base components to your needs, before starting the actual project. Center the components to the frame, drill pilot holes and insert the galvanized screws.
Attaching-the-vertical-brace
One of the last steps of the project is to install the braces that will reinforce the supports. Cut one end of the braces at 45 degrees and lock them into place with carriage bolts and 3 1/2″ galvanized screws.
Make sure you make accurate cuts using a miter saw, otherwise they might not fit into place. Pay attention to this step, as it has a significant impact on the rigidity of the frame.

Fitting the hook screws
Install hook screws on the interior faces of both supports. Make sure you use appropriate screws, as you will hang the hammock to them and they have to support your weight.
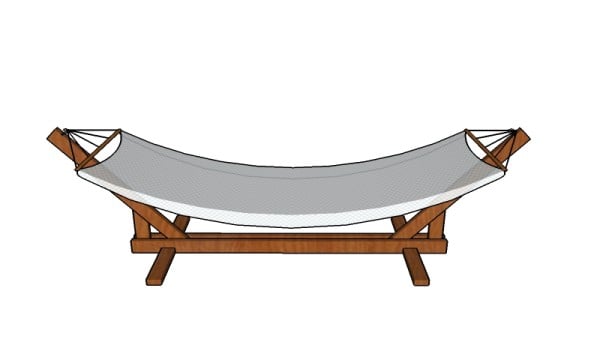
Hammock stand plans
Fit the hammock to the stand and make sure the structure is sturdy.

Hammock stand plans
Last but not least, you have to take care of the finishing touches. Therefore, fill the holes and the cracks with wood filler and let it dry out for several hours, before sanding the surface with 120-grit sandpaper.
Top Tip: Protect the wooden components from rot by applying several coats of paint. Choose colors that match the design of the rest of your property, as to enhance the look of the hammock stand. Premium Plans available for this project in the Shop.
This woodworking project was about hammock stand plans. If you want to see more outdoor plans, we recommend you to check out the rest of our step by step projects. SHARE our projects and follow us on the social networks to help us keep adding free woodworking plans. LIKE us on Facebook to be the first that gets our latest updates and submit pictures with your DIY projects.
EXPLORE MORE IDEAS FOR:
 |
 |
 |
 |
40 comments
Very easy. Thank you. Chuck
Hello
I’m a little curious how a 5″ bolt goes through 3 pieces of 2″ timber. Please explain or have I missed something.
Thanks
Matt
You are missing the essential part. 2×4 lumber is actually 1 1/2″ thick. See more here http://myoutdoorplans.com/imperial-to-metric-conversion/
I am a 67 yr old grandmother who is going to make this with her 9 yr old granddaughter for her birthday. Thank you so much. The directions were great and yes I got that the 2×4’s aren’t actual 2×4’s.
Thank you so much
How long of a hammock will this support. Mine is a 12′ double.
In order to fit the 12′ hammock you need to make the opening between the top of the supports at least 12′. Measure the length of your hammock and make the necessary adjustments to the opening of the hammock stand. Another possibility is to cut the supports first and then fit the hammock between the top of the supports. Afterwards, measure the base and cut the rest of the components. Follow the instructions to assemble everything tightly.
I was wondering where you used all the screws because it doesn’t say anywhere
If you read the article with more attention and look at the diagrams, you will see where to use the screws. Cheers!
Sorry all but this design is weak. The uprights will have to be longer (about 7′) for any normal hammock. With that length the uprights become flemsy. I recommend adding a second support on each end with a 12″ 2×4 separating the two. Basically follow these instructions but add a second support to the outer section of the frame then add a 3rd frame piece. Make the base sections 4′ at minimum and mount them to the outer frame pieces using 4- 5/16×4″ carrage bolts.
I appreciate any feedback, here on MyOutdoorplans. Some people used this design and were happy with the result. I am curious if you built the hammock stand using you recommendations. I am sure the rest of the readers will be more than happy to take a look over your own version of the stand.
I wasted half a day doing this. The thing cracked and dropped me on my ass as soon as I tried to sit on it. Too weak. I weigh 150lbs for reference.
Do you have a cost estimate for this plan?
It depend on the materials you use, but roughly speaking it should cost under 50 $. Make sure you buy the hammock first so you can adjust the stand size accordingly.
will this hold a double hammock
Not without additional reinforcements for the stand frame.
Hola! me gusta este proyecto, como podré obtener toda explicación en castellano.Gracias.
You should use google translate toolbar.
Help! how long do the supports need to be if i have a marlboro hammock?
It all depends on the size of the hammock. I am not an expert in all the hammock out there. I have designed this stand so you can easily adjust the size to suit the hammock you choose.
will that stand fit this
EXTRA LARGE SIZE – More room in this double parachute camping hammock. Luxuriously sized, measuring 320 x 200cm (125 x 79 In.). Easily fits two large adults comfortably.
No, it does not. You would need a longer stand for that, with more side bracing, to hold two adults. This design is for one person only.
I would really like the blueprints for the finalized product because I am a high school student who would like to do this project for a grade.
Please read the FAQs for more info on how to save the plans. Good luck with the project and let me know how it comes out.
The ‘tools’ section says a post-hole digger, am I missing when/where you dig & place posts?
Do you have measurements for placing the carriage bolts?i see specifics for 2 of the bolts but no others. I know you responded to another reader to “read with more attention” but that wasn’t very helpful.
That’s optional, in case you want to lock the hammock frame into place. Regarding the screws and bolts, I don’t see the point of the questions. Everything is explained in the tutorial and in the cut list.
Hello, i have 2 questions.
First of all where did you use the 5 pieces of 2×4 lumber – 8′
And second which size of a hammock does this stand support?
Thank you
You have the cut list you can add up. Secondly, this stand is good for a 7-8′ hammock.
I’m sorry I didn’t understand what cut list?
I’m trying to build this on my own and I don’t have any knowledge about it, I want to order the wood from a place this is why I’m asking if I’m gonna need those 5 pieces 2×4 lumber 8′
The cut list is represented by the A,B,C,D components. Those components add up to 5 pieces of 2×4 lumber 8′.
I made this last weekend. Took 2 hours and was fairly easy. I did leave the supports longer (cut the 8′ 2X4’s as a last step), and increased the angle (eyeballed it, so I don’t know the exact angle). I am able to get my 10′ hammock on it fine. My total cost was under $40.00. My question is – Why 30 screws? Where are you using them? I used a total of 10 screws. 3 in each of the 36″ base pieces and 2 each to attach the braces to the supports.
Thanks for the feedback and congrats for the project. It would be amazing if you sent a few pics at: http://myoutdoorplans.com/contact/ so I can feature it.
G wasn’t leaving feedback, they were asking a question that is still unanswered.
I am a DIY-er myself so I know that 10-20 screws is not a serious issue, because I will use them on the next project. It also depends on how strong one wants to make the joints.. you can use 2 or 6 screws for a joint…
Plans worked as expected. Kids love the new hammock.
Thank You.
Congrats! Looking forward to seeing your project. You can send a few pics here: http://myoutdoorplans.com/contact/
How long of a hammock can be used with this stand? My hammock is 140″. Can it be adjusted to fit longer or shorter hammocks?
The top opening of this stand is 10 ft, so this wouldn’t work for your hammock. I have a premium plans with an opening of 12 ft, that should probably work: https://myoutdoorplans.com/shop/ When you buy the hammock, there should be indications on what size stand is compatible.
Very nice design. One question what is the distance between the hooks used to attach the hammock to the stand?
10 ft
I did build my own hammock stand today, using the plans from this site. I did however modify the plans some, I have split the frame in two, so the stand is made in two pieces, I reinforced the base in the middle with 2×4, and 4 additional carriage bolts to keep it together, and I did reinforce the support on the sides, as I did see Melanie posted a photo of. The reason I have splitted the frame in two is so I can put it on my balcony, it is small, but the stand just fits, and by having it in sections it is easier to take it from the front of the building I am living in, and out on the balcony. I do not have the exact measurements of it, but it all went togheter in about 6 hours, it took some time to figure out how to reinforce it right, and still be able to split it in two sections.