This step by step diy project is about grill cart plans. Building a grill cart by yourself is a quick woodworking project, as it doesn’t require complex techniques nor a significant investment. Moreover, the best aspect when building a bbq cart is that you could customize the size and the design of your project, as to fit the rest of your outdoor furniture. Work with attention and plan everything from the very beginning.
It is essential to choose quality materials when starting this woodworking project. Redwood, cedar or pine are great choices, as they are both weather-resistant and have a nice natural finish. Always pre-drill the wooden components before inserting the screws / nails, to prevent the wood from splitting. In addition, align the components at both ends, if you want to get the job done as a professional. See all my Premium Plans HERE.
Projects made from these plans
Cut & Shopping Lists
- A – 2 pieces of 1×2 lumber – 33 1/4″, 2 pieces of 1×2 lumber – 32″ LEGS
- B – 2 pieces of 1×2 lumber – 35″, 2 pieces of 1×2 lumber – 20″ SUPPORTS
- C – 11 pieces of 1×3 lumber – 21 1/2″ long SLATS
- D – 2 pieces of 1×3 – 43″ long, 2 piece of 1×3 lumber – 20″ long SUPPORTS
- E – 11 pieces of 1×3 lumber – 20″ long, 2 oieces of 1×1 lumber – 32 SLATS
- F – 2 pieces of plastic wheels WHEELS
- wood glue
- wood filler
- wood stain
- 1 1/4″ screws
Tools
![]() Hammer, Tape measure, Framing square
Hammer, Tape measure, Framing square
![]() Miter saw, Drill machinery, Screwdriver, Sander
Miter saw, Drill machinery, Screwdriver, Sander
Time
Related
Building a grill cart
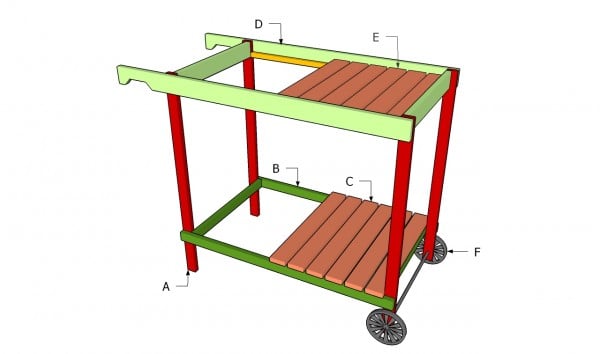
Building a grill cart
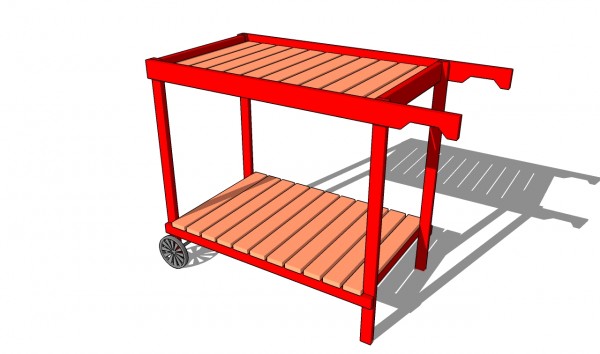
Building a grill cart is a nice project for woodworking amateurs, as it doesn’t require complex techniques nor expensive components. Choose quality lumber to get the job done and to enhance the look of the cart.
Grill Cart Plans
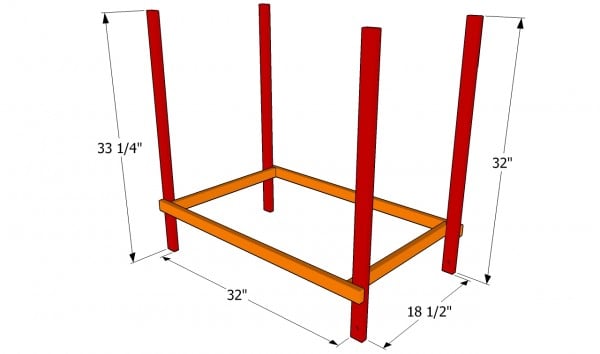
Building the frame of the cart
The first step of the woodworking project is to build the frame of the grill cart. As you can see in the plans, you should build the legs from 1×2 lumber. In order to get a professional result, we recommend you to round the exposed edges the components, using a router and a 1/4″ bit.
When installing the bottom supports, you should plumb the legs and the check if the braces are horizontal.
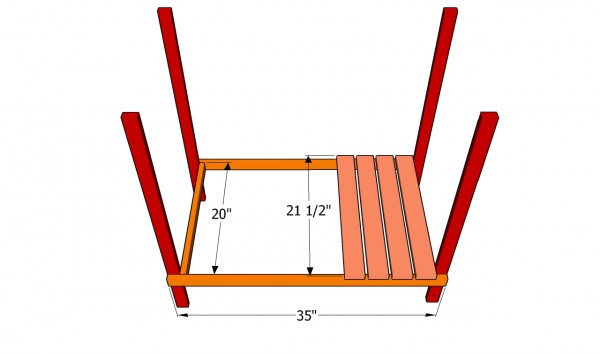
Attaching the bottom shelf
After cutting the legs, you should join them together with 1×2 supports. As you can see in the plans, you secure the supports to the legs, from the bottom. Drill pilot holes trough the supports and insert 1 1/4″ screws into the legs.
Don’t forget to countersink the head of the screws, if you want to get a professional result. Level the supports, before locking them into place with galvanized screws.
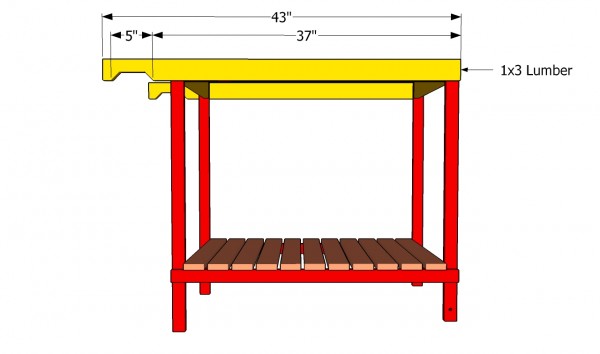
Installing the handles
The next step of the project is to secure the handles to the legs, as in the image. As you can easily notice in the image, you need to cut out at one end of the components, in order to give them a refined appearance.
Top Tip: Attach the components to the legs and lock them into place with 1 1/4” screws. Align the components at both ends, if you want to get a professional result.
Installing the top shelf
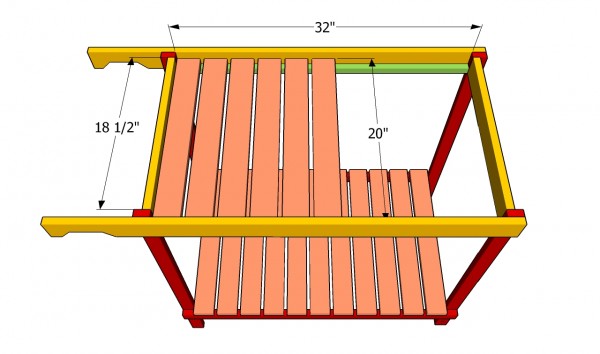
Attach 1×1 cleats to the bottom of the handles, on the interior faces of the grill cart. Use a spirit level before attaching the cleats to the handles, using 1 1 /2″ nails. Afterwards, secure the 1×3 slats to the cleats, by driving 1 1/4″ screws, at both ends.
Make sure you place the slats equally spaced, if you want to get a symmetrical result. Work with attention and with great care, if you want to get the job done as a professional.
Installing the cart wheels
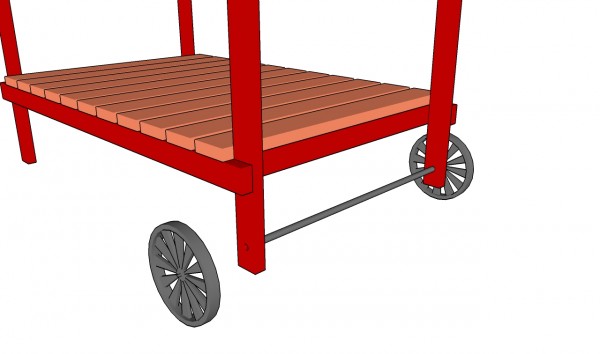
One of the last steps of the project is to attach the wheels to the grill cart. As you can easily notice in the image, you should drill pilot holes trough the legs, in order to fit the axle.
Grill cart plans
Last but not least, you should take care of the finishing touches. Therefore, fill the holes with wood putty and let the compound to dry out for several hours. Smooth the surface with medium-grit sandpaper along the wood grain.
Top Tip: Apply several coats of stain or paint to enhance the look of the grill cart and to protect the components from decay.
This project was about grill cart plans. If you want to see more outdoor plans, we recommend you to check out the rest of the projects. Don’t forget to share our projects with your friends, by using the social media widgets.

2 comments
Hi, would it be possible to have the Sketchup project for this grill cart?
Thanks in advance,
Francesco
No, it’s not possible.