This step-by-step woodworking project is about 2×4 outdoor sofa plans. I have designed this super easy outdoor sofa so you can create a nice relaxation area in your garden. This sofa can be built using just 2x4s and it is very sturdy. This design is modular so you can easily make adjustments to the dimensions. Adjust the size of the sofa to your needs, as the woodworking techniques are the same irrespective of your choice. Premium Plans available for this project in the Shop.
Align the wooden components at both hand before driving in the screws. Don’t forget to pre-drill holes in the components, as to prevent the wood from splitting. Moreover, don’t forget to countersink the head of the screws, before inserting the wooden screws. Last but not least, apply a good wood filler in the holes, let it dry out properly and sand the surface thoroughly with 120-grit sandpaper, before applying the final coats of stain. See all my Premium Plans HERE.
Projects made from these plans
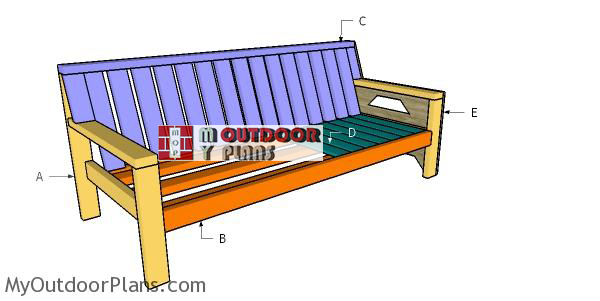
Building an outdoor sofa from 2x4s
Building-an-outdoor-sofa
Cut & Shopping Lists
- A – 2 pieces of 2×4 lumber – 20 1/2” long, 4 pieces – 31″ long, 2 pieces – 32 1/2″ long LEGS
- B – 5 pieces of 2×4 lumber – 72” long APRONS
- C – 2 pieces of 2×4 lumber – 10” long, 15 pieces – 20” long.1 piece – 79″ long BACKREST
- D – 15 pieces of 2×4 lumber – 22 1/2” long SEAT SLATS
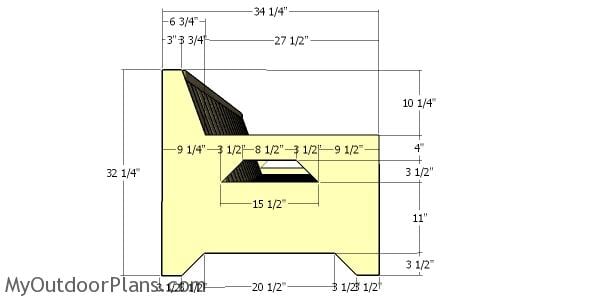
- E – 2 pieces of 3/4″ plywood – 32 1/4″x34 1/4″ long SIDES
- 16 pieces of 2×4 lumber – 8′
- 1 pieces of 3/4″ plywood – 4’x8′
- 2 1/2″ screws
- 2 1/2″ brad nail
- glue, filler
- cushions
- stain
Tools
![]() Hammer, Tape measure, Framing square
Hammer, Tape measure, Framing square
![]() Pocket hole Jig, Miter saw, Drill machinery, Screwdriver, Sander
Pocket hole Jig, Miter saw, Drill machinery, Screwdriver, Sander
Time
It’s that simple to build a 2×4 sofa!
2×4 Outdoor Sofa Plans
Assembling-the-sides-of-the-chair
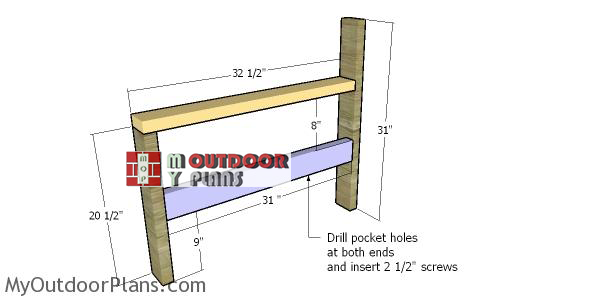
First of all, you have to build the sides of the outdoor sofa. Cut all the components from 2×4 lumber, at the dimensions shown in the plans. Drill pocket holes at both ends of the 31″ long supports and secure them to the legs with 2 1/2″ screws. Drill pilot holes and secure the armrests into place with 2 1/2″ screws. Make sure the corners are right angled, using a carpentry square.
Assembling-the-frame-of-the-sofa
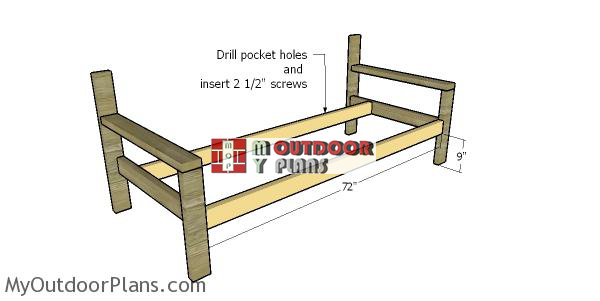
The next step of the project is to install the front and the back 2×4 aprons. Smooth the cut edges with a sand-block.
Top Tip: Drill pocket holes at both ends of the aprons, to hide the screws and the joints. Use a spirit level to align the components. Make sure the corners are right-angled.
Fitting the seat slats supports
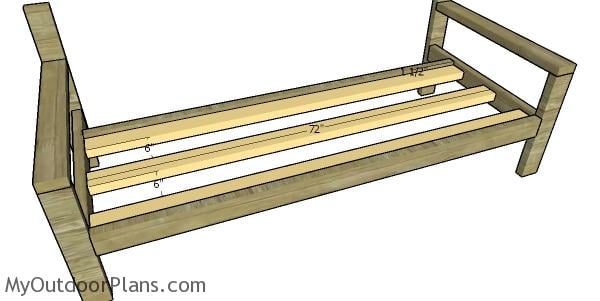
Afterwards, you have to install the seat slats, as you should notice in the image. Secure the cleats to the frame of the 2×4 outdoor couch with pocket holes and 2 1/2″ screws.
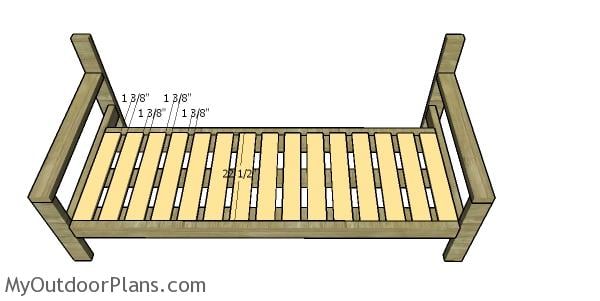
Fitting the seat slats
Attach the 2×4 slats to the seat frame of the sofa. Cut the slats at 22 1/2″ and then place them equally spaced. Cut a wood block at 1 3/8″ to create even gaps between the slats. Drill pilot holes and insert 2 1/2″ screws to lock the slats to the cleats.
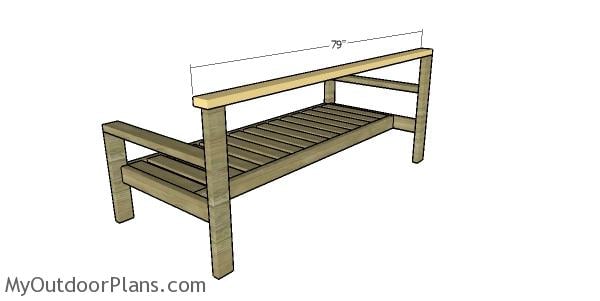
Fitting the top back slat
Fit the 2×4 trim to the top of the back walls. Align the edges with attention, drill pilot holes and insert 2 1/2″ screws.
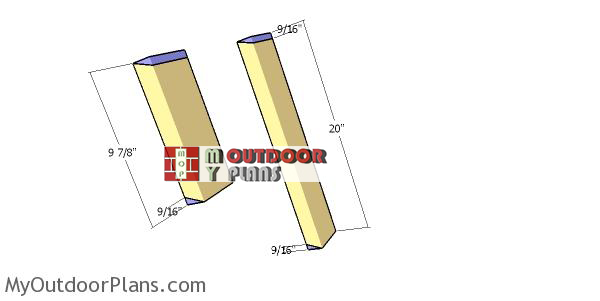
Building-the-back-slats
After building the main frame of the outdoor sofa, you should assemble the back support. Therefore, cut the slats from 2×4 lumber. Use a miter saw to make 20 degree bevel cuts to both ends of the slats.
Top Tip: Drill pocket holes in the slats, in order to secure them into place. Check the corners for squareness, before driving in the screws.
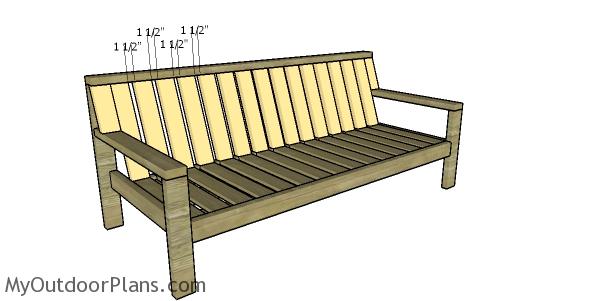
Fitting the back slats
On of the most challenging steps of this project is to install the back support into place, as you need to be precise and level the components properly. Use 2 1/2″ screws to secure the slats to the backrest frame.
Fitting the side panels
Use 3/4″ plywood for the side panels. Mark the cut lines on the panels and then get the job done with a saw. You can use your creativity and adjust my design. Attach the panel to the side frames and then secure them into place with 2 1/2″ brad nails and glue.
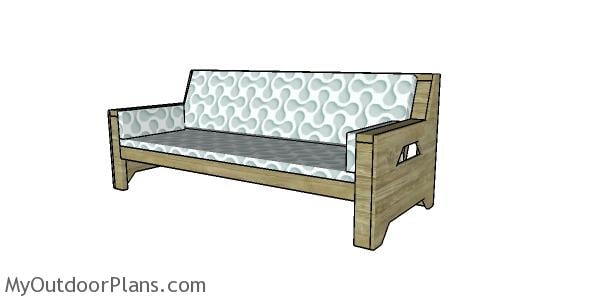
2×4 Outdoor Sofa Plans
Fill the head of the screws with a good wood putty and let it dry out properly. Next, sand the wooden surface with 120-grit sandpaper, making sure there is a smooth transition between the patches and the rest of the wood.
Top Tip: Apply several coats of wood stain to protect the wood from rot. Buy cushions and lay them on the sofa, to get the job done and to enhance the comfort of the wooden sofa.
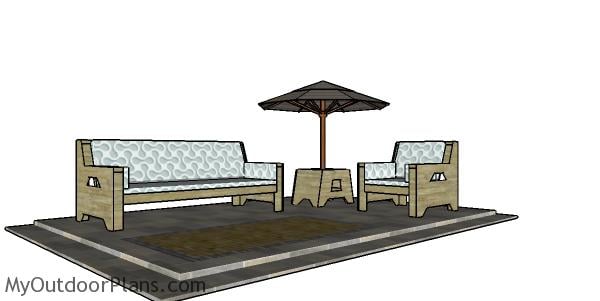
2×4 Outdoor Set Plans
This 2×4 outdoor sofa is really easy to build and it is modular. You can easily customize or change the dimensions of the furniture. Make sure you take a look over the matching chair and the side table. Premium Plans available for this project in the Shop.
This woodworking project is about 2×4 outdoor sofa plans. If you want to see more outdoor plans, check out the rest of our step by step projects and follow the instructions to obtain a professional result.
