This step by step diy project is about how to build a 10 ft hammock stand. The top opening of this stand is 10 ft, therefore make sure you buy the appropriate size to fit the project. The Premium Plans include a detailed Cut and Shopping list, as well as a nice Cut Layout Diagram that shows you how to cut the components from the beams to get minimal waste.
I’m thrilled to introduce my latest 10 ft Hammock Stand Plans. This design is perfect for creating a sturdy and stylish stand for your hammock, ensuring you have the ultimate spot to relax. With my detailed, step-by-step plans, you’ll have this project built and ready to enjoy in no time!
A wooden hammock stand requires basic materials and tools, so any person that knows the basic woodworking techniques can get the job done in just a few hours. Cedar, pine or redwood are excellent choices if you want to create a durable structure. Take accurate measurements and always adjust the size and the design of the hammock stand to suit own needs and to fit within your budget. See all my Premium Plans HERE.
Projects made from these plans
10 ft Hammock Stand Plans
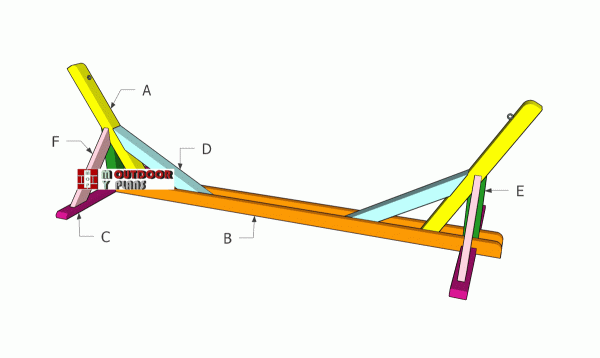
Building-a-hammock-stand
Cut and Shopping Lists
A – 2 pieces of 4×4 lumber – 43 5/8” UPRIGHTS
B – 2 pieces of 2×4 lumber – 10 ft BASE SUPPORTS
C – 2 pieces of 2×4 lumber – 4 ft BASEBOARDS
D – 2 pieces of 4×4 lumber –38 3/4” DIAGONAL BRACES
E – 2 pieces of 4×4 lumber – 17 7/8” VERTICAL SUPPORTS
F – 4 pieces of 2×4 lumber – 25 ¼” SIDE BRACES
Tools
![]() Hammer, Tape measure, Framing square
Hammer, Tape measure, Framing square
![]() Miter saw, Drill machinery, Screwdriver, Sander, Post-hole digger
Miter saw, Drill machinery, Screwdriver, Sander, Post-hole digger
Time
![]() One weekend
One weekend
Related
How to Build a Wooden Hammock Stand
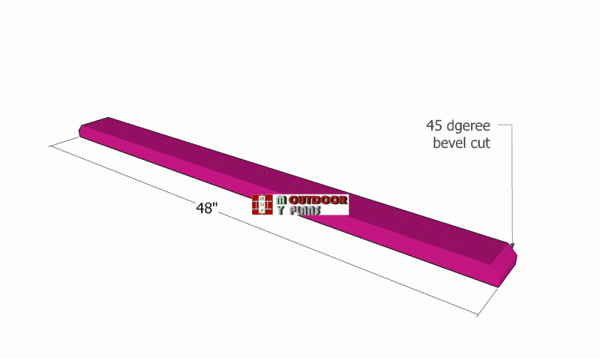
Base-board
The first step of the project is to build the base boards for the hammock stand. Cut the 2x4s to 48″ and then make decorative bevel cuts to both ends of the boards.
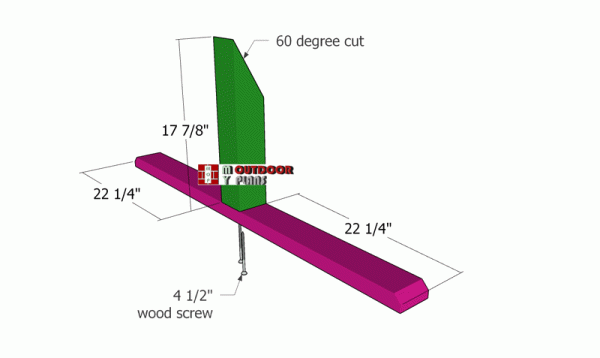
Assembling-the-side-frames
Next, you need to assemble the end frames for the stand. Use 4×4 lumber for the vertical support. Make a 60 degree cut to one end of the support. Center the suport to the 2×4 base, making sure you align the edges flush. Drill pilot holes through the base and insert 4 1/2″ screws into the 4×4 support.
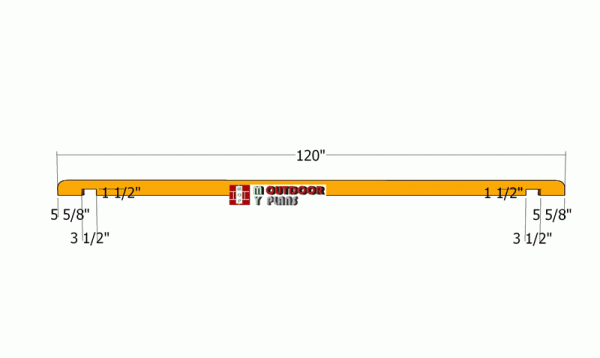
Horizontal-uprights
Continue the project by cutting the horizontal components. Mark the cut lines to the boards and then use a circular saw to make the notches. Set the blade depth to 1 1/2″ and then make parallel cuts inside the marked areas. Remove the excess material with a chisel and clean the notches.
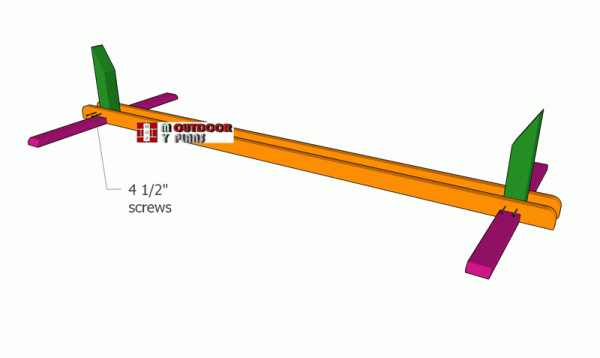
Assembling-the-hammock-stand
Fit the supports on both sides of the front and back frames. Align everything with attention and insert 4 1/2″ screws from both sides. Drill pilot holes before inserting the screws, to prevent the wood from splitting.
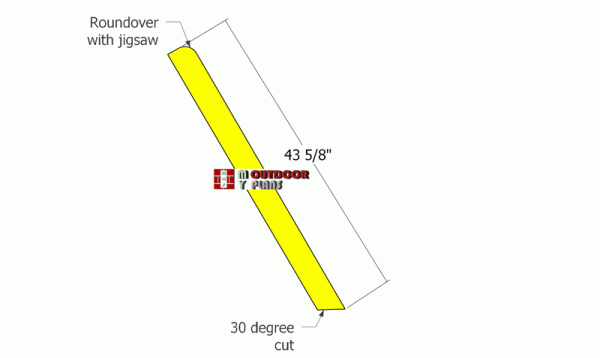
Uprights
Build the uprights from 4×4 lumber. Make a 30 degree cut to one end and roundover the exposed corner of the component using a jgsaw.
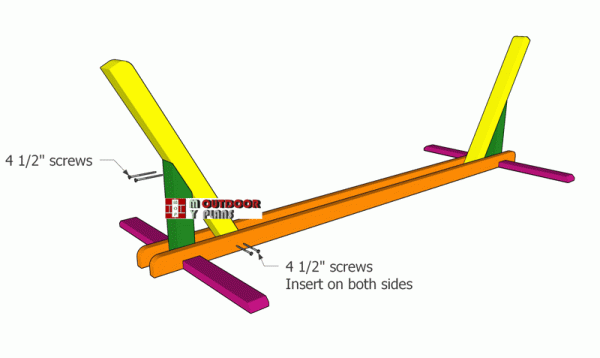
Fitting-the-uprights-to-the-hammock
Fit the uprights to the stand, as shown in the diagram. Align the edges to the bottom supports. Make sure the green component is perfectly vertical before inserting the 4 1/2″ screws. Drill pilot holes through the green component and insert the screws into the upright.
Also, drill pilot holes through the base supports and insert 4 1/2″ screws into the uprights.
Fitting the braces
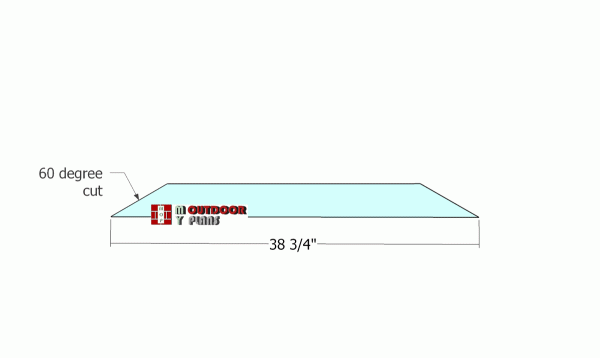
Braces-diagonal
Cut the diagonal braces from 4×4 lumber. Make 60 degree cuts to both ends of the braces.
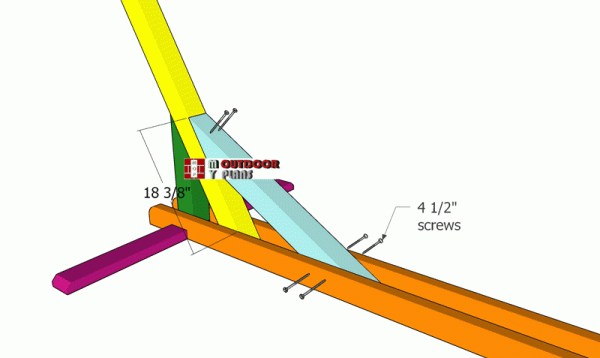
Fitting-the-diagonal-braces
Fit the braces to the hammock stand and align everything with attention.
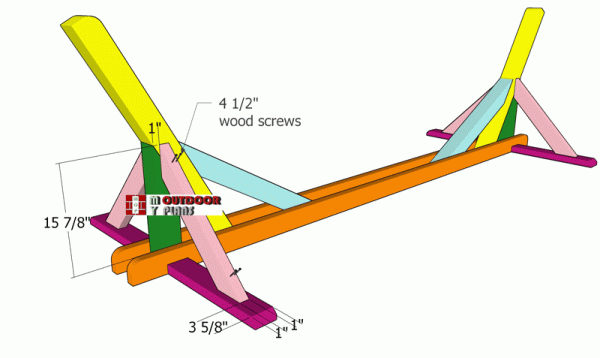
Fitting-the-side-diagonal-braces
Last but not least, we need to attach side braces to prevent the lateral movements. Make 45 degree cuts to the braces and lock them to the stand with 4 1/2″ screws. Drill pilot holes and insert 2 screws for each joint. Make sure the uprights are vertical before inserting the screws.
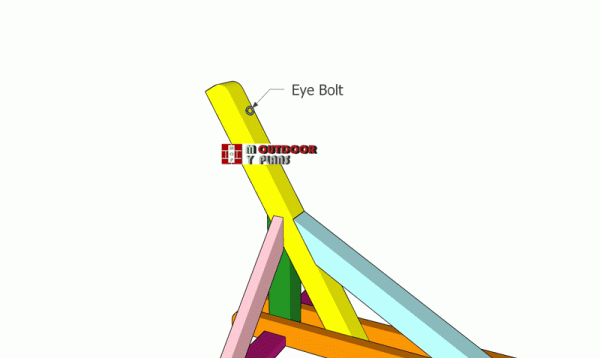
Fitting-the-eye-bolts
Install the hardware for the hammock, so you can hand it into place. Usually, you need an eye bolt, but there are different hardware products you can choose from. Remember this stand has a top opening of 10 ft. Note that down before buying the hammock, so you don’t get the wrong size.
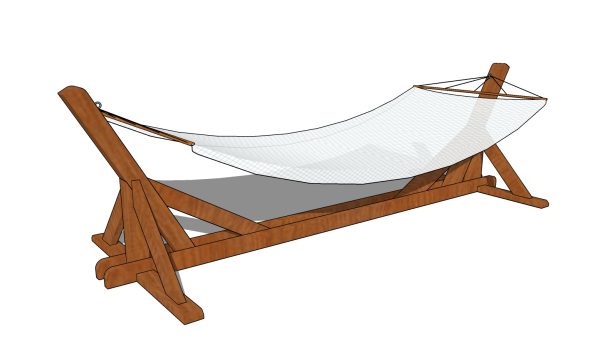
10 ft hammock stand plans – diy
Last but not least, you have to take care of the finishing touches. Therefore, fill the holes and the cracks with wood filler and let it dry out for several hours, before sanding the surface with 120-grit sandpaper.
For the 10 ft Hammock Stand project, you can expect to spend about a day or two on the build, depending on your experience level. In terms of cost, you’ll need around $100-$150 for lumber and hardware, making it a budget-friendly project. With my detailed plans, you’ll have everything you need to complete this in no time and start enjoying your hammock!
Top Tip: Protect the wooden components from rot by applying several coats of paint. Choose colors that match the design of the rest of your property, as to enhance the look of the hammock stand.
If you want to get the Premium plans with all the extras, just press the GET PREMIUM PLANS button bellow. If you want to get the free plans, just read the blog FAQs.
This woodworking project was about hammock stand plans. If you want to see more outdoor plans, we recommend you to check out the rest of our step by step projects. SHARE our projects and follow us on the social networks to help us keep adding free woodworking plans. LIKE us on Facebook to be the first that gets our latest updates and submit pictures with your DIY projects.

