If you like spending time in your garden and enjoy cooking for you family and friends, then an outdoor bbq would fit perfectly in your backyard. On one hand, you could buy a barbeque kit, while on the other hand you can save money if you choose to get the job done by yourself. The building process is straight forward, if you select the plans with great care, as to fit your needs and to harmonize with the rest of your backyard. In this article, we show you step by step how to choose the materials, what tools to use and how to lay the bricks in a professional manner.
The location of the brick barbeque is essential for this project, therefore you have to take a few things into account, before starting the construction process. First of all, you have to study the local building codes, as to get accustomed with the legal requirements. In the building codes, you will find the needed information regarding your project, meaning the distance you have to leave between the barbeque and your house or the property line.
Projects made from these plans
Cut & Shopping Lists
- Reinforcing net – REBARS
- Cement, sand, gravel – CONCRETE
- 250 bricks 4 1/2 x 9 x 3 BRICKS
- 20 fire bricks 4 1/2 x 9 x 3” – FIREBRICKS
- Fire clay and fine sand – CLAY MORTAR
- 2×6 lumber and 4×4 posts – FORM
Tools
![]() Hammer, Trowel, Bucket, Tape measure
Hammer, Trowel, Bucket, Tape measure
![]() Brick saw, Drill machinery, Screwdriver, Power mixer
Brick saw, Drill machinery, Screwdriver, Power mixer
Time
![]() Two Weekends
Two Weekends
Outdoor Bbq Plans
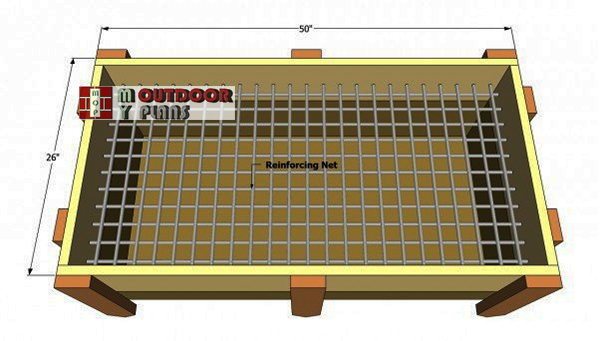
Outdoor-bbq-foundation-plans
First of all, you have to build the foundation of the outdoor bbq, to support the weight of the bricks. Therefore, lay out the foundation using several batter boards and string, before digging in the ground about 8-10”. Next, build a basic form (2×10 boards) and lock it into place with 2×4 stakes.
Top Tip: Plumb and align the form with a spirit level. Check the corners for squareness with a framing square.
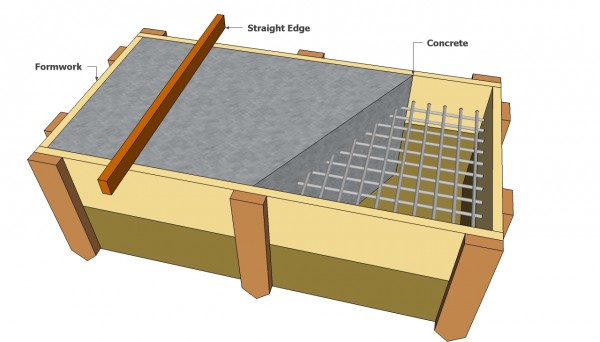
Pouring concrete foundation
Place several steel bars in the form, to reinforce the concrete. Mix a small quantity of concrete in a wheelbarrow or use a power mixer (2 parts cement, 3 parts sand, 4 parts gravel and water) and pour it in the form. Level the foundation by moving a straight edge along the sides of the form.
Top Tip: Hit the sides of the wooden form with a hammer, in order to remove the air pockets, or use a concrete vibrator.
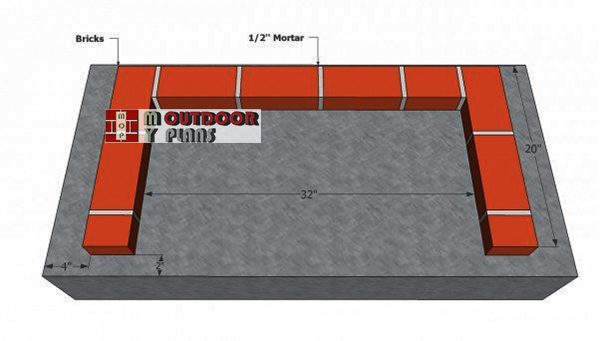
BBQ-base-plans-first-layer-of-bricks
Let the concrete to dry out for at least 72 hours before laying the bricks. Building the base of the bbq is a straight forward process, if you use the right method. Spread mortar on the foundation before fitting the bricks. Next, lay a brick at the end of the course and another one at the end. Afterwards, fill the rest of the row with bricks.
Use a spirit level to ensure bricks are level. Remove the excess mortar with a trowel, before it dries out.
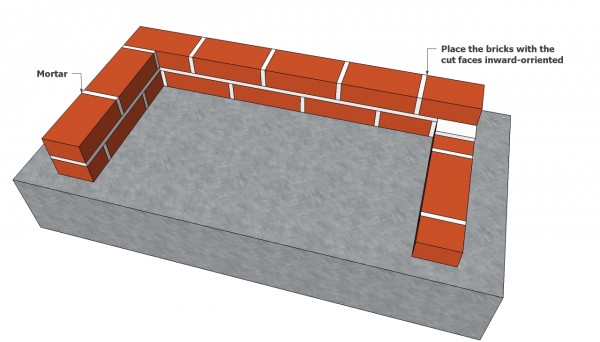
Laying another course of bricks
Continue the project by applying the second course of bricks, in the same manner described above. Work with great care and with good judgement, if you want to obtain a professional result. As you can see in the image, you have to lay the bricks in the stretcher bond.
Top Tip: Plumb the bricks with a spirit level and adjust their position by tapping them with a mallet. Cut the bricks with a wet saw and lay them with the cut edge inward-oriented.
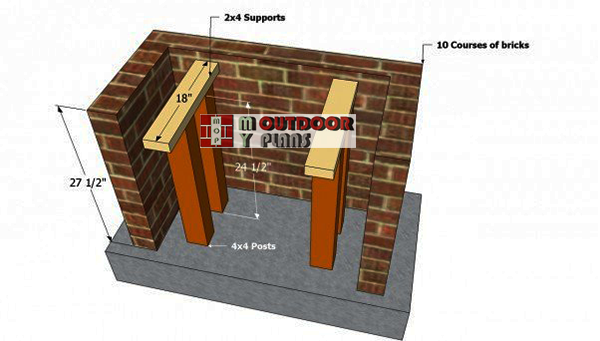
Outdoor-bbq-base-plans
Lay about 8-9 courses of bricks, before pouring the concrete counter-top. Next, build a basic form for the counter-top, using several 4×4 posts and 2×4 supports. Don’t forget to check the level of the surface with a spirit level, otherwise you won’t be satisfied with the end result.
We don’t recommend you to lock the components together with screws or nails, otherwise it would be difficult to remove them later.
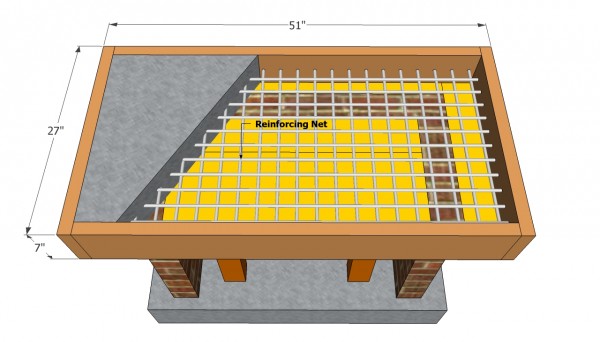
Concrete countertop plans
As you can see in the image, you have to reinforce the concrete counter-top with a net of re-bars. Mix a small quantity of concrete (2 parts cement, 3 parts sand, 4 parts gravel and water) and pour it in the wooden form. Level the surface with a straight edge and remove the pockets of air.
Top Tip: Make sure you plumb the sides of the form with a spirit level. In addition, the form should describe a horizontal surface, therefore adjust their position if necessary.
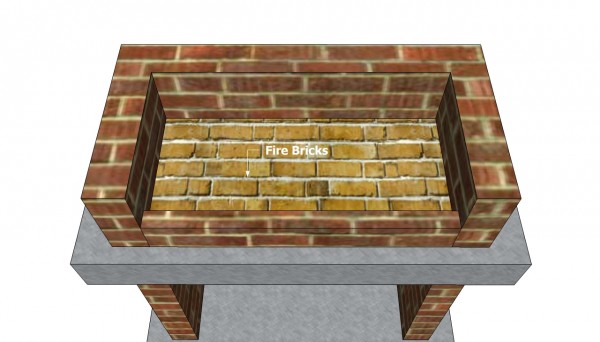
Bbq cooking floor floor
Let the concrete to dry out for at least 72 hours before laying the floor and the walls of the bbq. Taking into consideration the high temperatures developed inside the bbq, use firebricks instead of regular ones to build the fire box.
Top Tip: Use a clay mortar (4 parts sand to 6 parts fire clay) to glue the fire bricks together. A cement-based mortar won’t resist to the temperatures developed by the burning wood.
Outdoor Brick Barbeque Plans
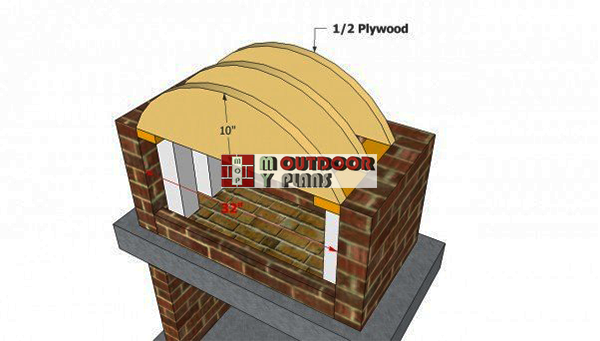
Building-the-top-arch-for-bbq
In order to build the arched top of the bbq, you should build a template from 1/2” plywood. Cut the curved templates and place them on several 4×4 posts. Work with great care and good judgement, making sure the templates are plumb.
Top Tip: Drive in several 3” screws trough the plywood in the supports and place several spacers between them, to increase the rigidity of the template.
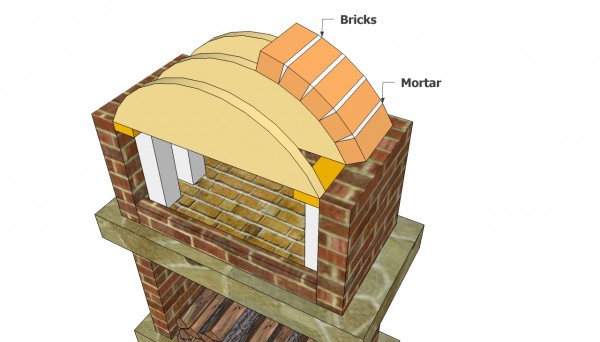
Building the arched top of the bbq
Start building the arched top by laying the bricks from both sides of the bbq. Take your time when laying the bricks, as they should be aligned perfectly at both ends. Mix a cement based mortar and glue the bricks together properly.
Top Tip: If you consider leaving the bricks exposed, then you have to remove the excess mortar with a trowel and to clean them with a damp sponge.
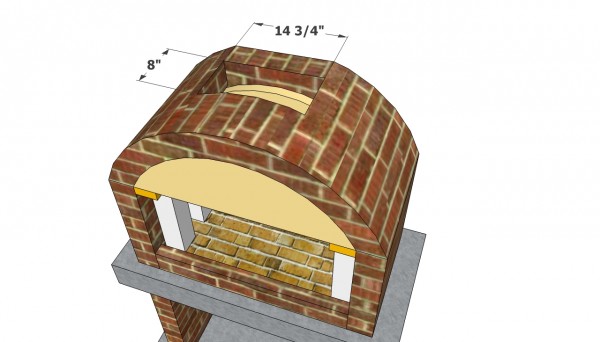
Chimney base plans
Continue laying the bricks into position, in the same manner described above. Nevertheless, don’t forget to leave enough space at the top of the barbeque, to let the smoke out. This aspect is essential for this project, therefore pay attention to the size of the hole.
Top Tip: Don’t remove the templates before the mortar has dried out properly (4-5 days), otherwise the whole structure might collapse.
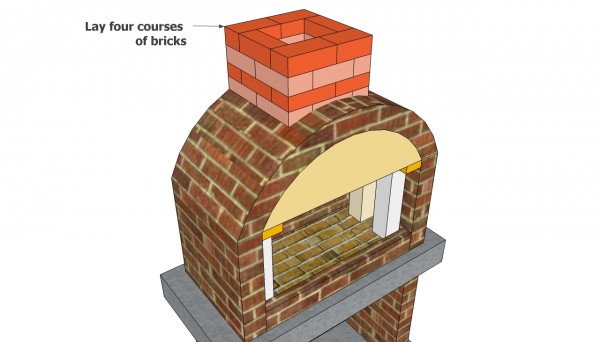
Building the brick chimney
Afterwards, you have to build the chimney of the outdoor bbq, as you can see in the plans. Place the regular bricks in a simple patter, making sure the four sides of the chimney are plumb.
Top Tip: From our experience, three or four courses of bricks are enough to let the smoke out far away from your outdoor kitchen, but you could adjust the size of the chimney according to your needs and tastes.
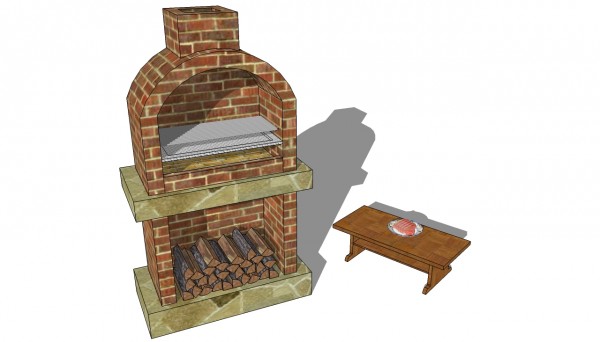
Outdoor bbq plans
After you get the job done, you have remove the excess mortar with a wire brush and clean the bricks with a damp sponge. If you would like to get a modern aspect, we recommend you to cement render the exterior faces of the outdoor barbeque.
Top Tip: Cover the concrete countertop and the foundation with flag stone or with ceramic tiles. Fill the gaps with grout or with a mix of sand and cement.
This backyard project is about outdoor bbq plans free. If you need more outdoor plans, we recommend you to check out the rest of our step by step projects. LIKE us on Facebook to be the first that gets our latest updates and submit pictures with your DIY projects.


11 comments
i have just built this can some one tell me why the smoke comes out the front and is not going up the chimney internal seize of chimney is 10×12 and is 4 rows high
There isn’t an exact answer, as there are many variables. Taking into account the opening of the bbq, it is normal that some smoke comes out. However, it also depends on the outside temperature, as the scientific process is that the hot smoke goes up. If the outside temperature is too high, there is not enough lifting force. In addition, if the firewood aren’t perfectly dried, they will tend to create more smoke.
I would be inclined to put a row or 2 of bricks one layer beneath the roof od the arch at the face of the bbq. This would act as a sort of lip to retain and direct smoke back to the chimney. ??
Please could you describe how you attach the grills inside the BBQ? is there a specific set i should be looking to purchase to complement the project?
If the set doesn’t have the supports included, then you could cut a few pieces of rebar and set them between the brick layers. This is a simple solution and a starting point.
Hi, nice plans and thank you for posting.
Armature question (but i am learning)… when you create the counter top and pour it into the wooden form how do you support the bottom of the counter top while the mixture is wet?… so the mixture doesn’t just fall straight through, do you have a sheet of wood or something on the bottom of the form?
Thanks
Of course, you need to use some slats over the 2×4 supports.
Do you have any plans for a smoker? Thank you for sharing your ideas.Ignore the critics,they probably can’t read a tape measure anyway.
I have plans for a cedar smokehouse: http://myoutdoorplans.com/bbq/smokehouse-plans/
Thank you very much. Just what I needed to know.
You have to make the chimney taller to create a natural draft. If chimney is too short then you will have a back draft. You can look on the internet and Google Chimney design for fireplace and based on your opening in the front, you can determine the size and height of the chimney.