In Part 2 of our 6×12 chicken coop project, we’re also going to build the lean-to roof and the run area. The lean-to roof is simple yet functional, offering easy water runoff and providing shade and shelter for your chickens. We’ll frame the roof, ensuring the correct pitch for drainage, and secure the rafters before moving on to the purlins and roofing sheets. This sturdy roof will ensure your chickens are protected from the elements year-round.
Alongside the roof, we’ll build the run area, which is just as important for providing your chickens with a safe outdoor space to roam and peck. We’ll frame the run, install chicken wire, and ensure the area is fully enclosed to keep predators out. This section of the project will give your chickens the freedom to explore while keeping them safe and secure. By the end of Part 2, your chicken coop will be well on its way to completion with a functional roof and run area.
When buying the lumber, you should select the planks with great care, making sure they are straight and without any visible flaws (cracks, knots, twists, decay). Investing in cedar or other weather resistant lumber is a good idea, as it will pay off on the long run. Use a spirit level to plumb and align the components, before inserting the galvanized screws, otherwise the project won’t have a symmetrical look. If you have all the materials and tools required for the project, you could get the job done in about a day.
Projects made from these plans
6×12 Chicken Coop With Run – Roof Plans
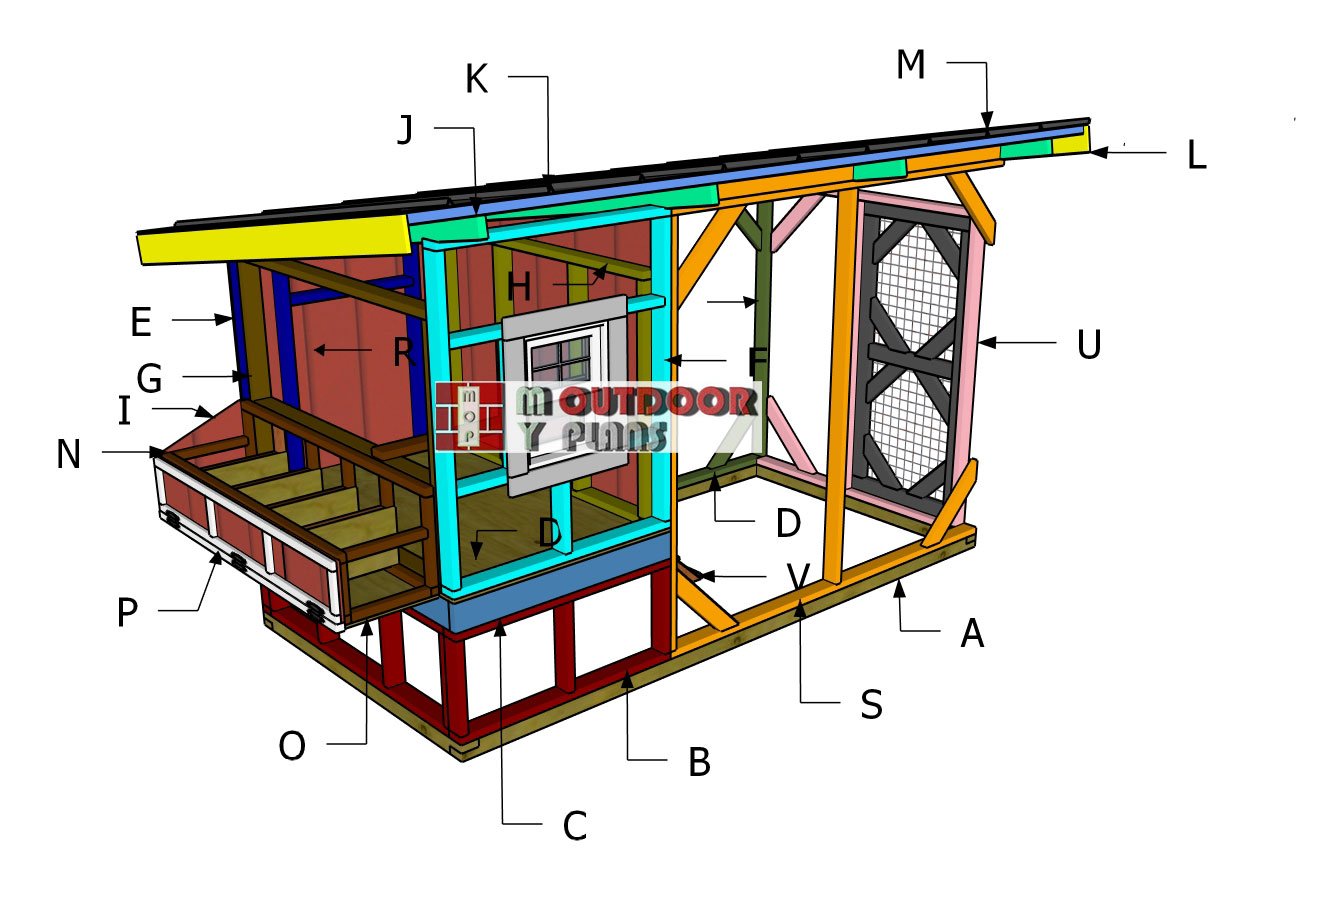
Building-a-6×12-chicken-coop-with-run
Cut & Shopping Lists
Tools
![]() Hammer, Tape measure, Framing square, Level
Hammer, Tape measure, Framing square, Level
![]() Miter saw, Drill machinery, Screwdriver, Sander
Miter saw, Drill machinery, Screwdriver, Sander
![]() Safety Gloves, Safety Glasses
Safety Gloves, Safety Glasses
Time
![]() One week
One week
Related
- PART 1: 6×12 Chicken Coop with Run Plans
- PART 2: 6×12 Chicken Coop with Run – Roof Plans
- PART 3: 6×12 Chicken Coop with Run – Nesting Boxes
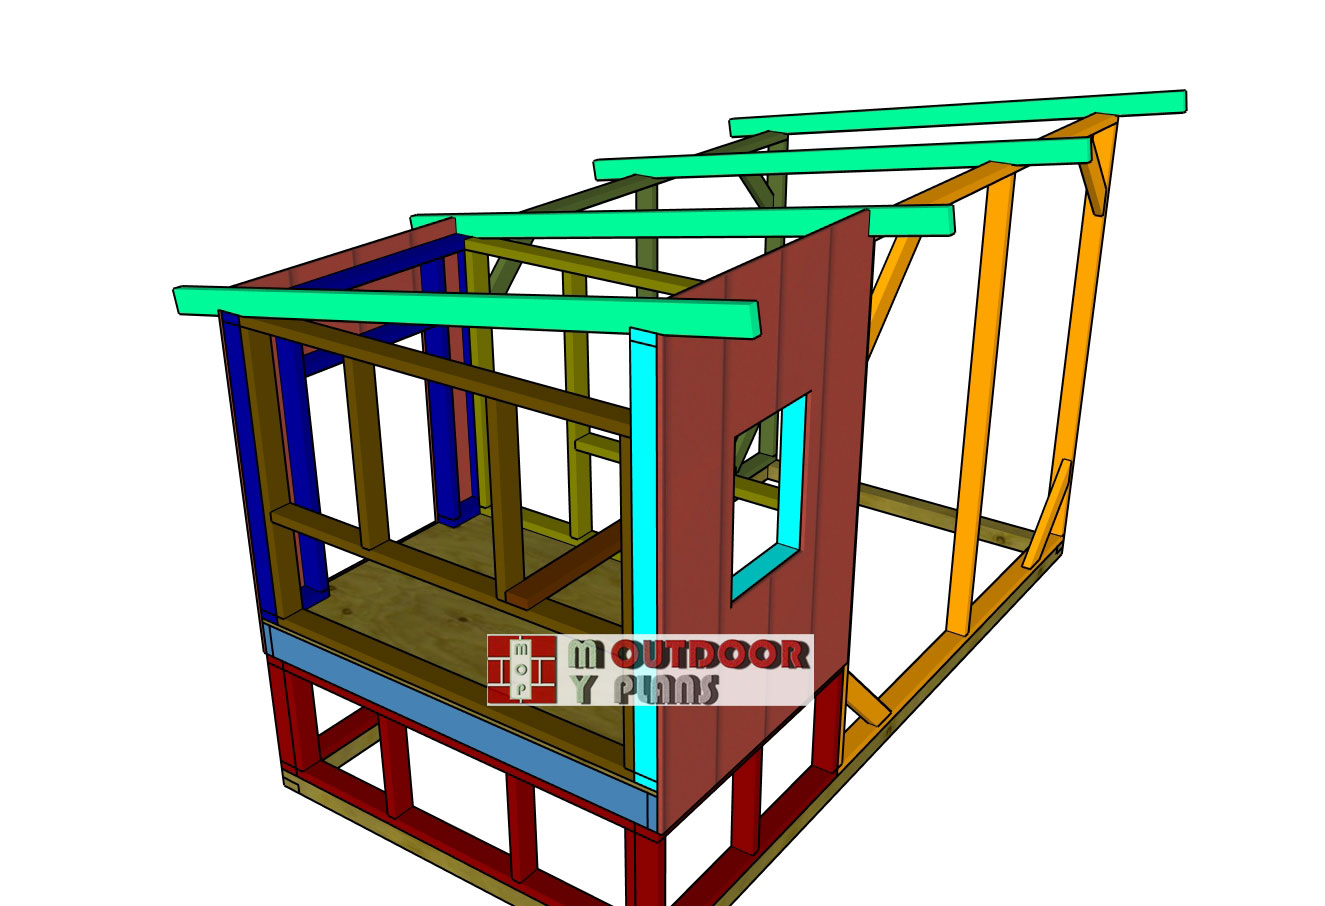
STEP 4: Building the roof
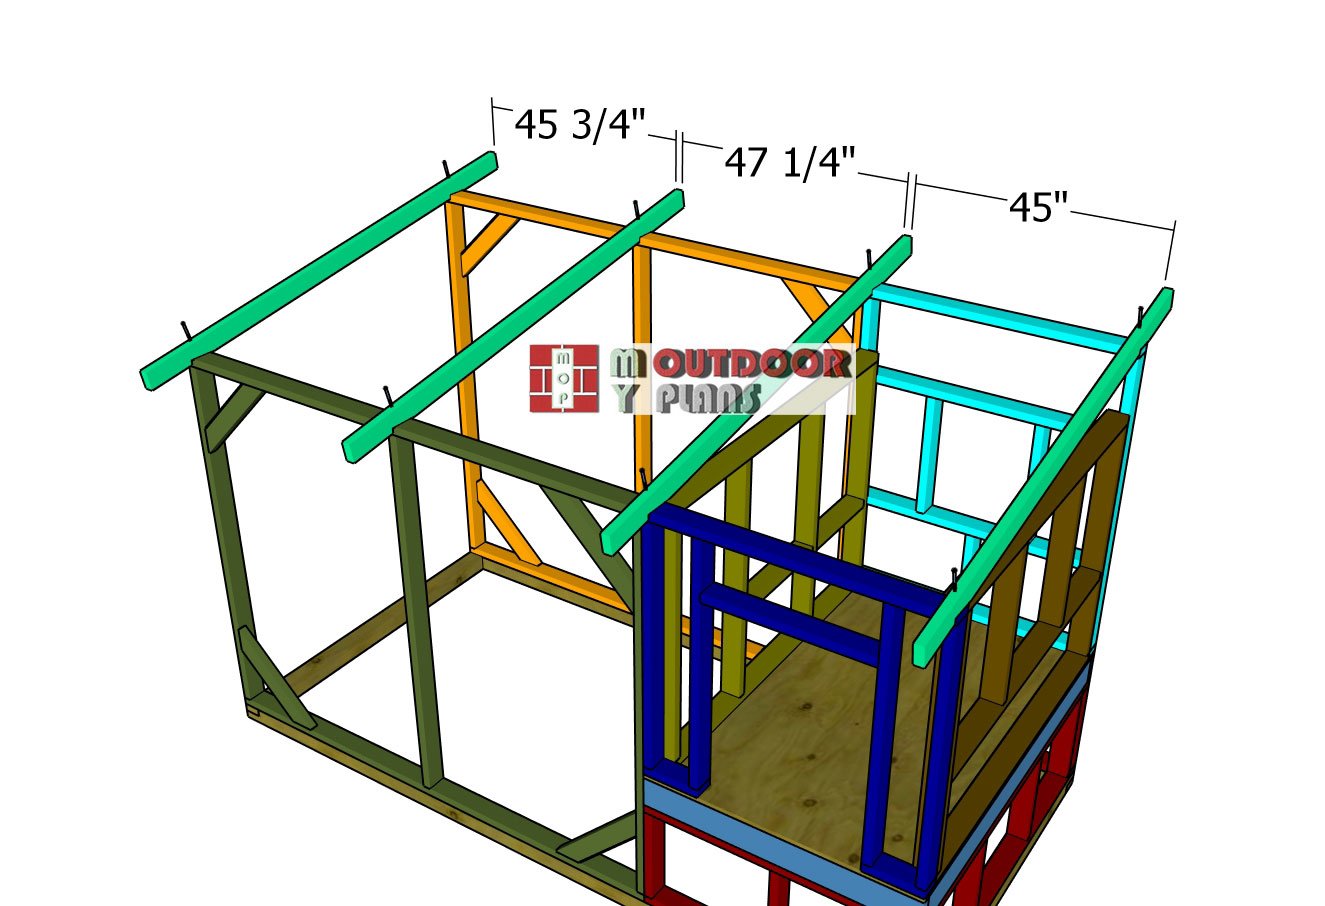
Installing-the-rafters
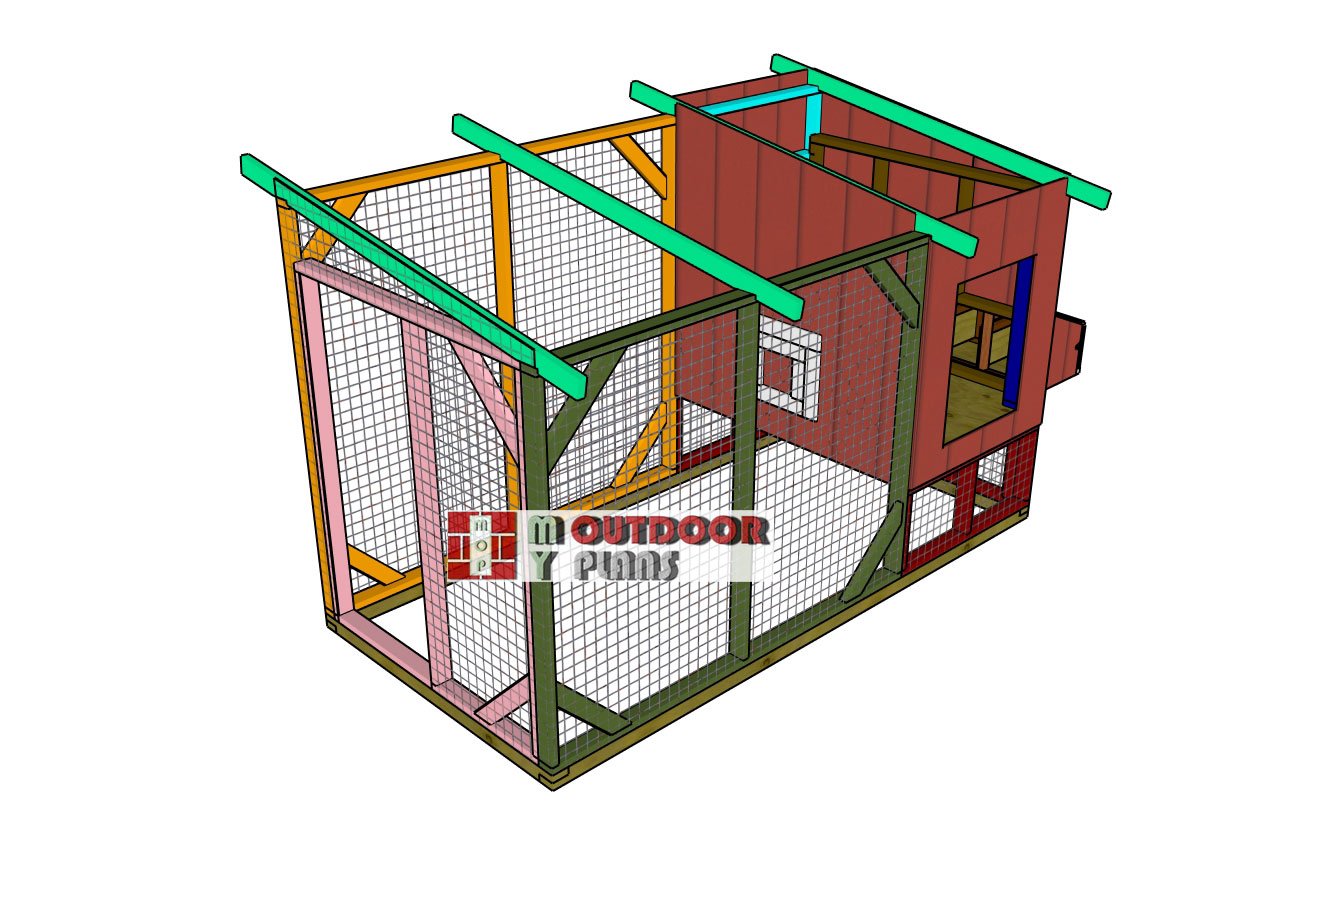
Attach the rafters to the top of the structure, following the spacing shown in the diagram. Drill pilot holes through the ends, then drive 4 1/2″ screws down into the wall frames to lock each rafter securely in place. Make sure everything is aligned before securing them—this keeps the roof structure solid and true.
Fitting-the-front-and-back-panels—coop
Attach the siding sheets to the front and back of the chicken coop, making sure the edges are flush with the framing. Secure the panels in place using 6-8d nails, spaced every 12″ along the studs and plates for a strong, even hold.
Side-siding-panel—interior
Cut and attach the siding sheets to the interior side wall of the coop, making sure to include the cutout for the small chicken door that leads into the run area. Align the sheets with the framing and fasten them securely using 6-8d nails, spaced every 12″ for a clean, solid installation.

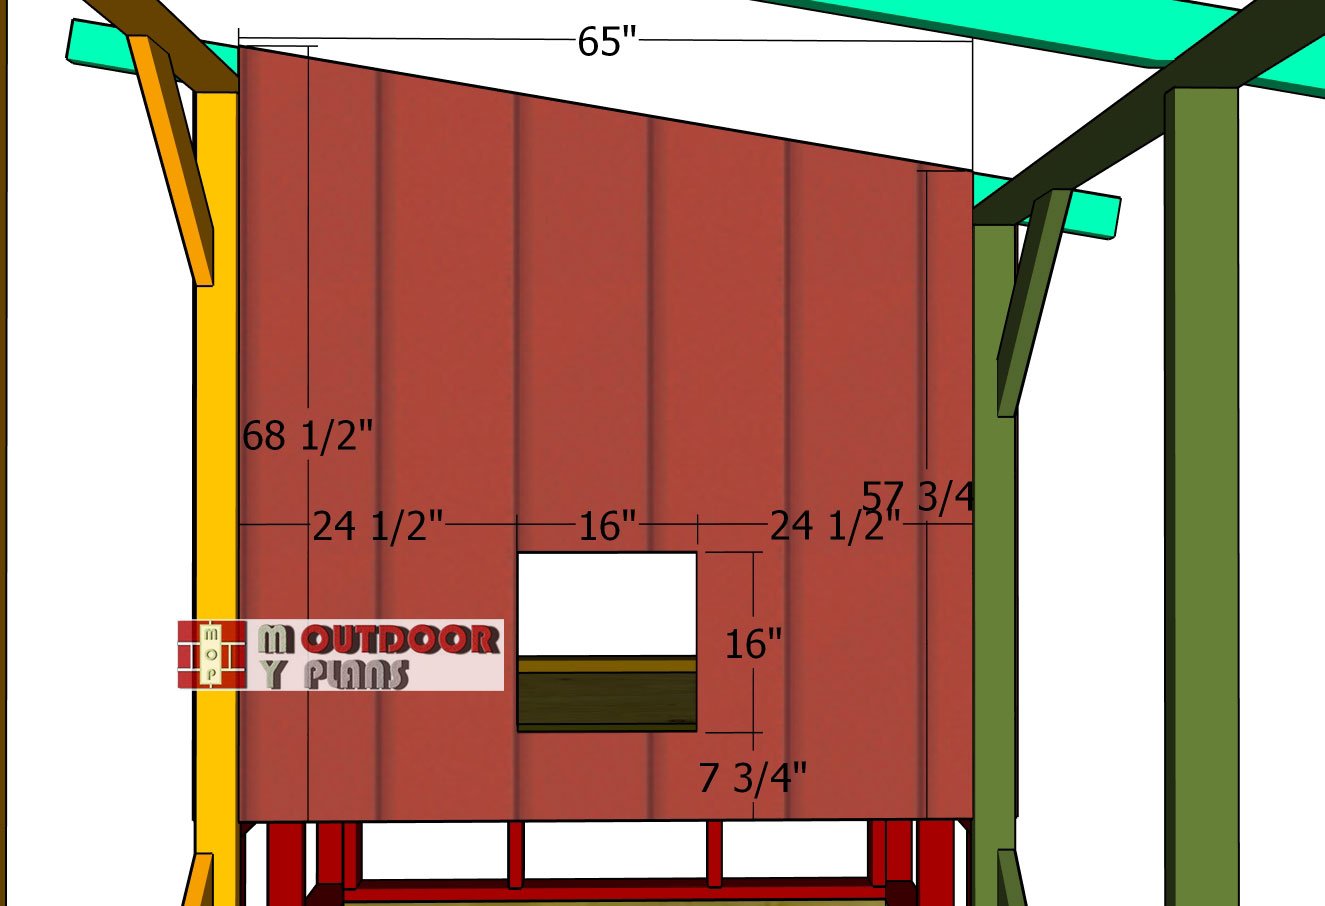
Side wall siding
Cut and fit the siding sheets to the exterior side wall of the coop, making sure to account for the opening where the nest box will go. Once everything is aligned, secure the panels in place using 6-8d nails, spaced every 12″ along the framing for a tight, durable fit.
Fitting the chicken wire
Attach the chicken wire to the exterior of the run area, starting at one corner and working your way around. Use galvanized chicken wire for durability and rust resistance—it’ll hold up better against the elements and keep predators out. Unroll the wire and stretch it tight as you go to avoid sagging. Secure it to the framing with 1″ staples or poultry fencing staples, spacing them every few inches for a snug, secure fit.
Make sure the wire covers all open sections, including between the rafters if needed. Overlap the edges of the wire by a few inches where two sections meet, and use staples or zip ties to bind them together for extra strength. For added protection, you can even bury the bottom edge of the wire a few inches into the ground or bend it outward in an L-shape to help prevent animals from digging under.
Fitting-the-purlins
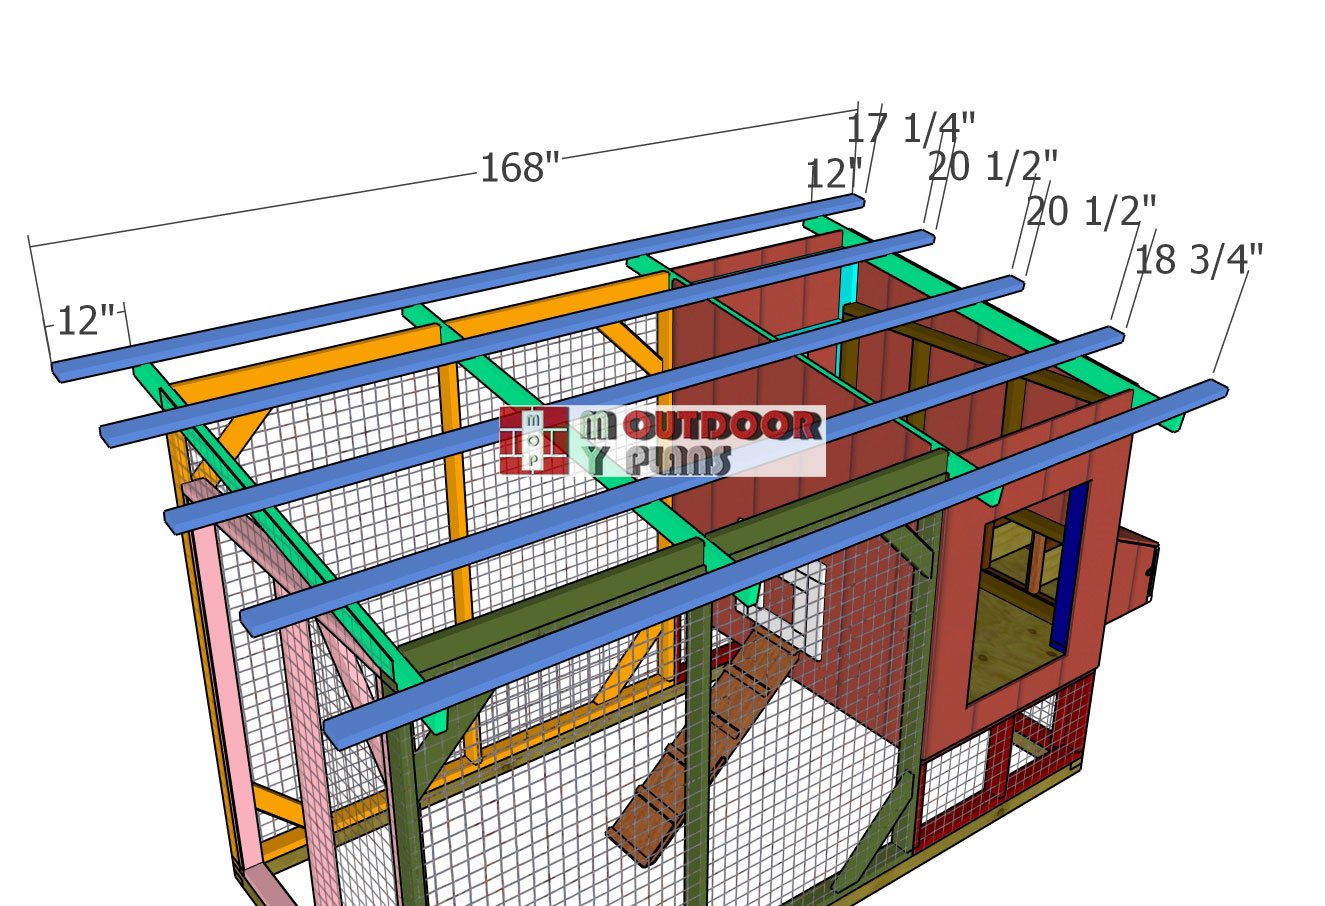
Fit the 2×4 purlins across the top of the roof, spacing them every 24″ on center. Align them with the rafters and secure each purlin using 3 1/2″ screws, drilling through the purlins and into the rafters. Make sure to maintain the 12″ overhangs on both sides for proper roof coverage and added protection.
Roof-sheets
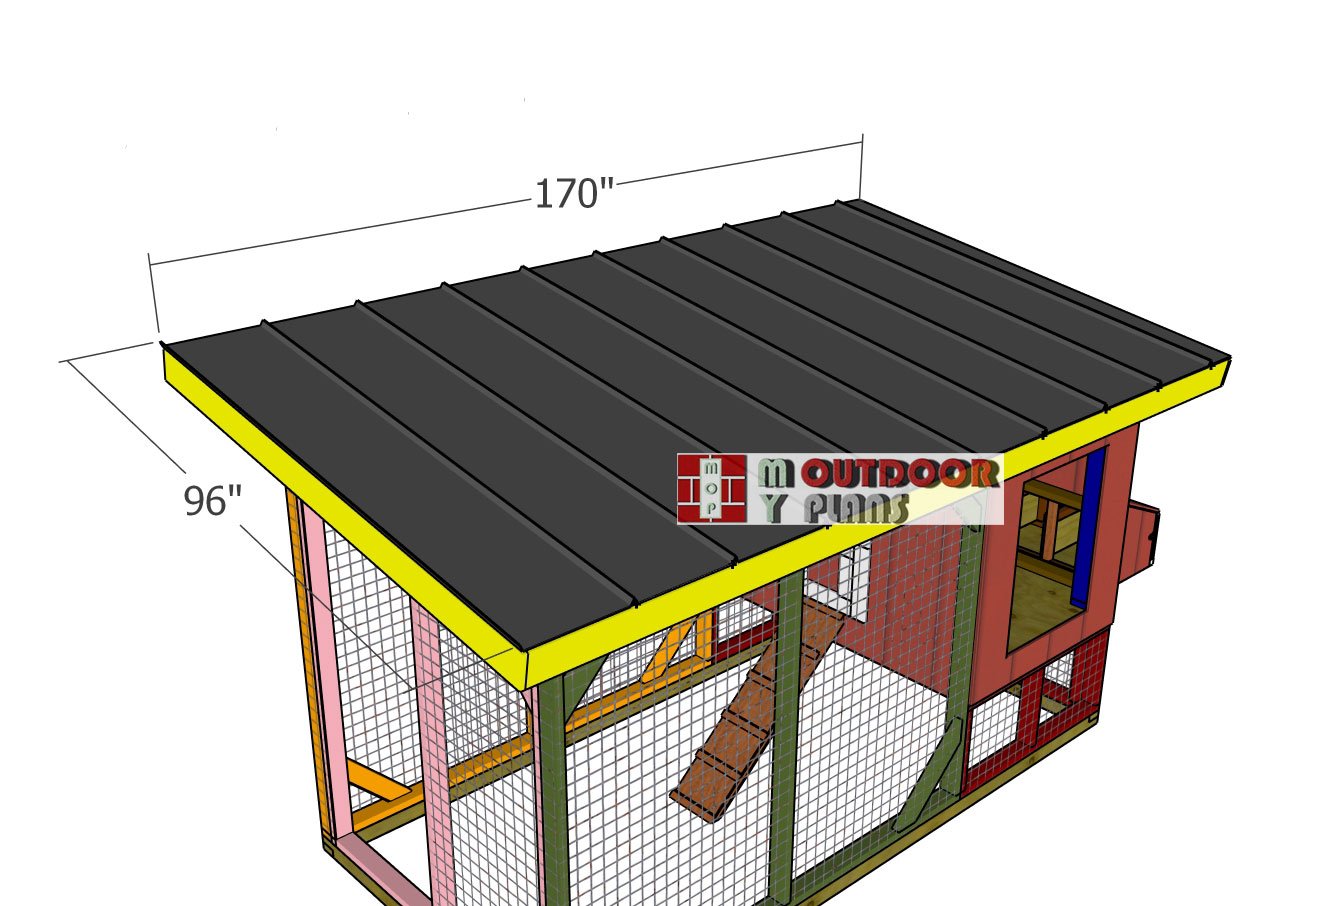
To begin installing the metal sheets on the roof, start at one side of the structure and work your way across. Lay the first sheet down, ensuring that it overhangs the edges slightly for proper water runoff. Align the sheet so it’s straight and flush with the roof’s edge, making sure it’s positioned tightly against the ridge or peak of the roof. Use metal roofing screws with rubber washers to fasten the sheet to the purlins, securing them every 12 to 16 inches along the length of the panel.
Make sure to follow the manufacturer’s instructions for spacing and placement of the screws to ensure a tight seal and to prevent leaks. As you install each subsequent sheet, overlap the edges of the panels according to the manufacturer’s recommendations, usually by at least 2 inches. This overlap ensures water runs off smoothly without seeping through the seams. Continue securing the sheets across the entire roof, ensuring each panel is aligned with the previous one for a clean, uniform look. When you reach the roof’s edge, make sure the metal sheets overhang slightly to direct water away from the structure and prevent moisture buildup.
A key detail when installing metal roofing is adding drip edges along the eaves. The drip edge is a metal flashing that runs along the roof’s edge, designed to direct water away from the sides of the structure and onto the ground. Install the drip edge before securing the final rows of roofing sheets. Place it under the metal roofing panels and fasten it to the roof’s edge using screws. The drip edge prevents water from running along the side walls of the coop, which helps avoid water damage to the wood and improves the overall durability of the structure.
Run-door-frame
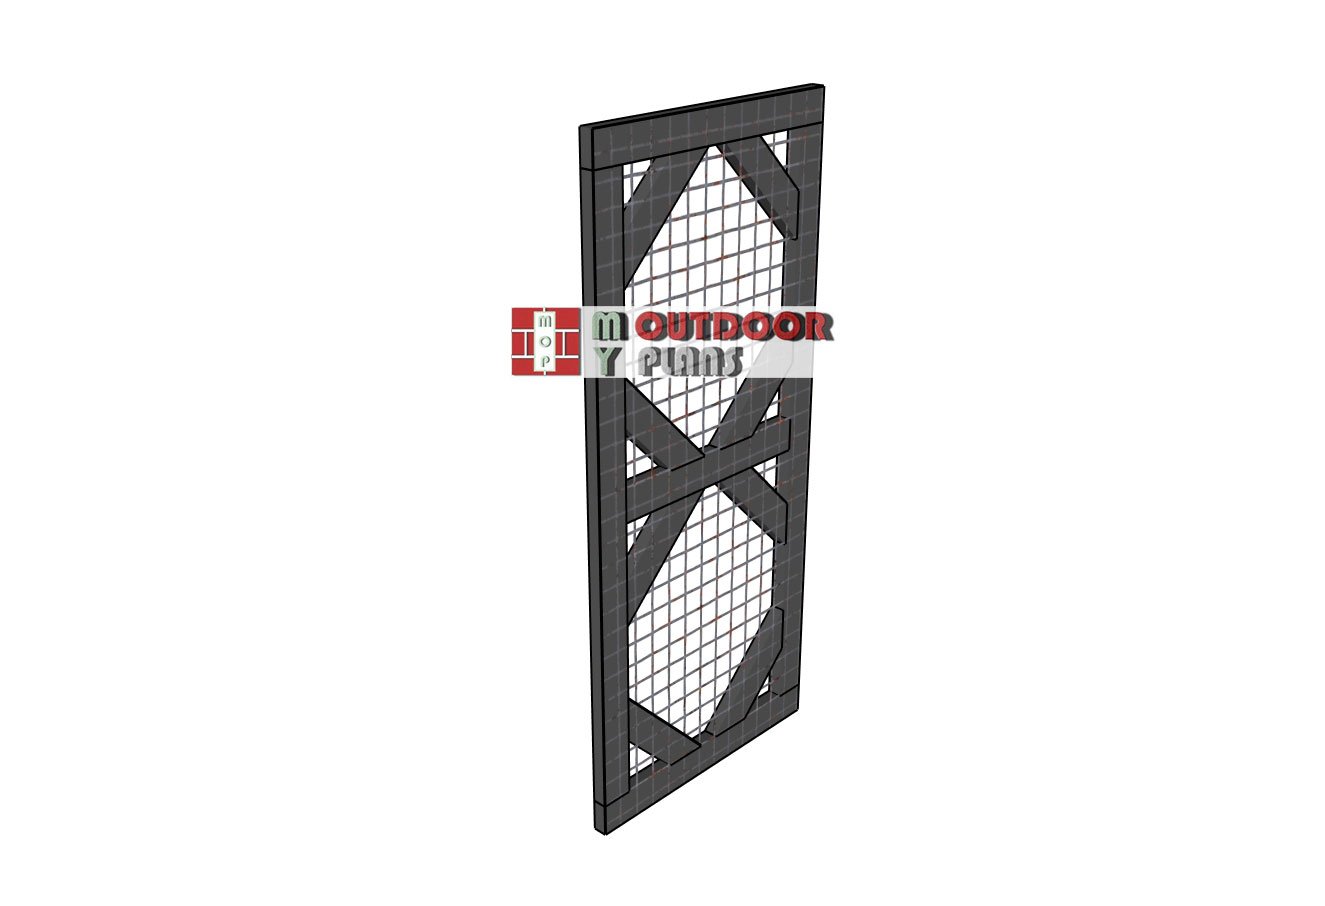
Let’s get started on the door for the run area! Begin by cutting your 2×4 lumber to size—this will give you a strong, durable frame that can handle daily use. Drill pocket holes at both ends of the verticals and the middle horizontal piece to create solid connections. Lay everything out on a level surface, double-check that your corners are square, and then drive in 2 1/2″ screws through the pocket holes to lock the frame together.
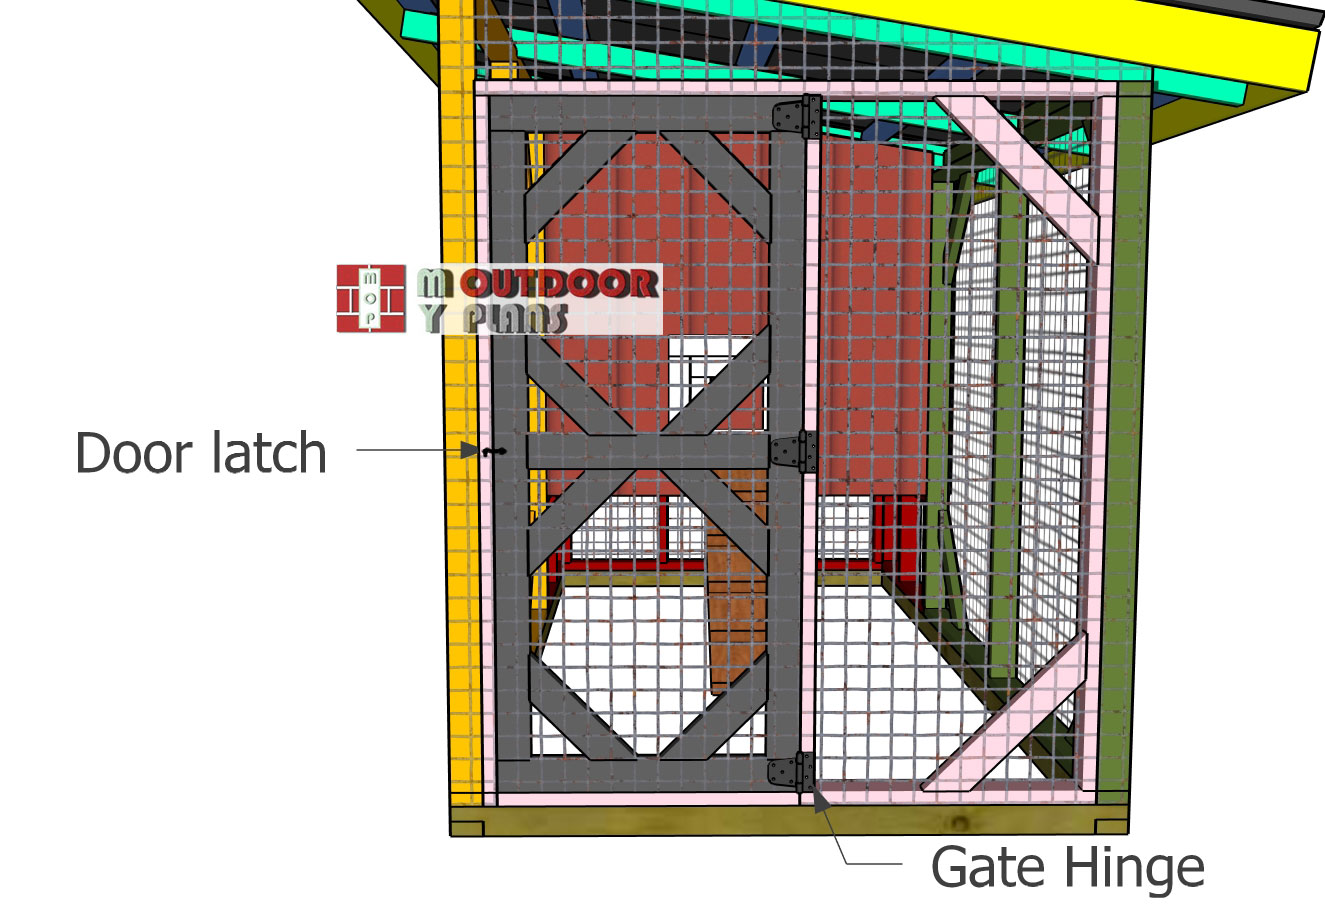
Installing-the-run-door
Next, reinforce the frame with diagonal braces. Cut both ends of each brace at a 45-degree angle for a snug fit. Drill pilot holes, then secure them with 3 1/2″ screws to keep the door sturdy and rattle-free. Attach chicken wire to the door frame, stretching it tight and stapling it securely all around. Once that’s done, fit the door into the run area opening and install it using sturdy hinges. Finish it off with a latch to keep things secure.
This woodworking project was about chicken coop roof plans. If you want to see more outdoor plans, we recommend you to check out the rest of our step by step projects.
 |
 |