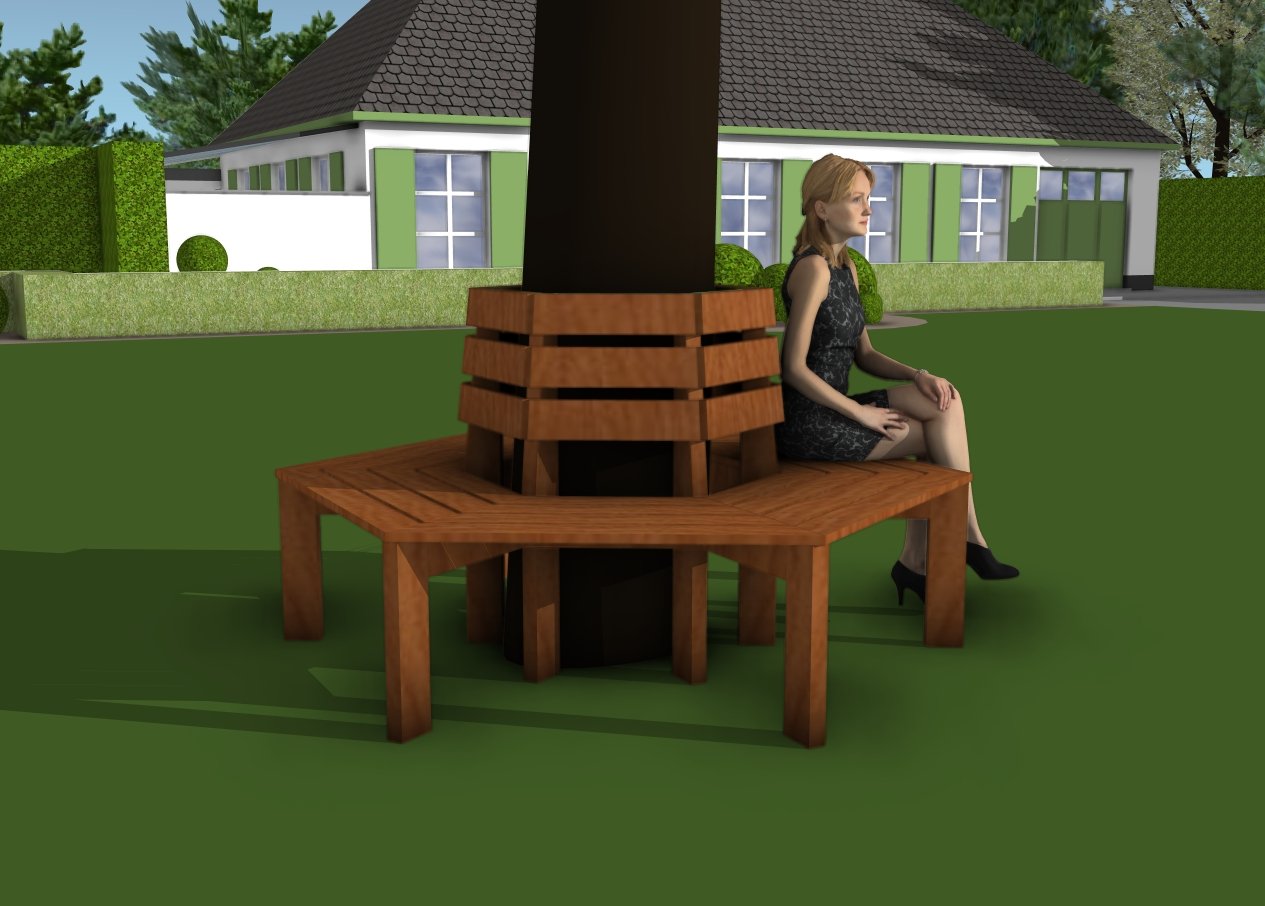
Create a stunning centerpiece for your yard with this DIY wraparound tree bench! This project combines style and function, giving you the perfect spot to relax under the shade of your favorite tree. Not only does it maximize seating for family and friends, but it also adds rustic charm to your outdoor space. With its classic design and sturdy construction, this bench is both practical and inviting—an ideal place to enjoy your morning coffee, read a book, or gather for summer evenings.
This DIY project is perfect for both beginners and experienced woodworkers, with easy-to-follow steps and clear measurements. You’ll build a durable bench that can withstand the elements while enhancing your backyard’s appeal. Plus, you can customize the finish to match your style, whether you prefer a natural wood stain or a pop of color with outdoor paint. By the end, you’ll have a functional, eye-catching bench that makes your tree the focal point of your landscape.
For this project, I recommend using cedar or hardwood for their durability and natural resistance to the elements. Cedar is a fantastic option because it’s lightweight, rot-resistant, and has a beautiful, rustic look. Hardwood, on the other hand, provides superior strength and longevity, making your project a sturdy and stylish addition to your home.
Projects made from these plans
Garden Tree Bench Plans Plans – Free DIY Plans
Building-a-tree-bench
Cut and Shopping Lists
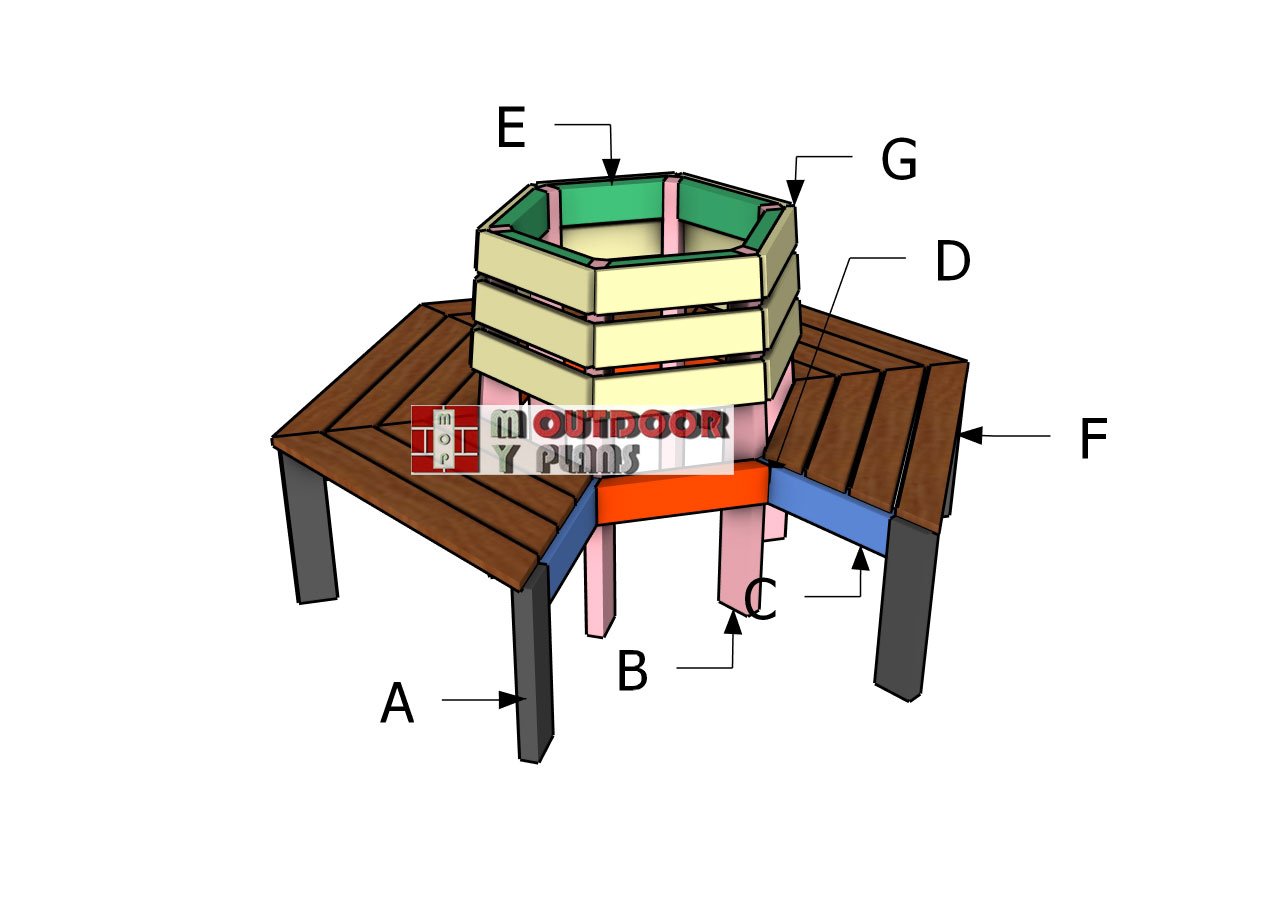
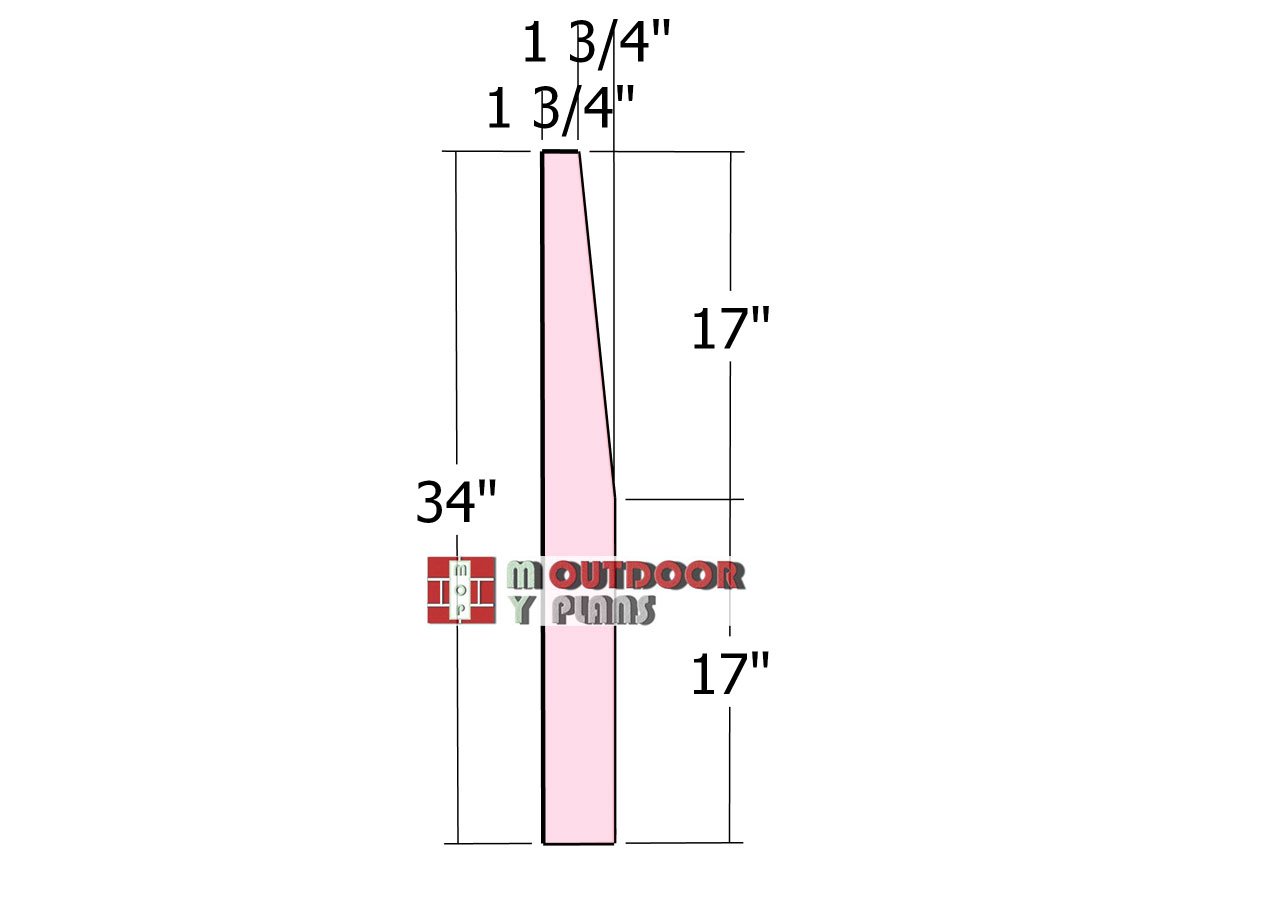
A – FRONT LEGS – 2×4 lumber 34″ long – 6 pieces
B – BACK LEGS – 2×4 lumber 16″ long – 6 pieces
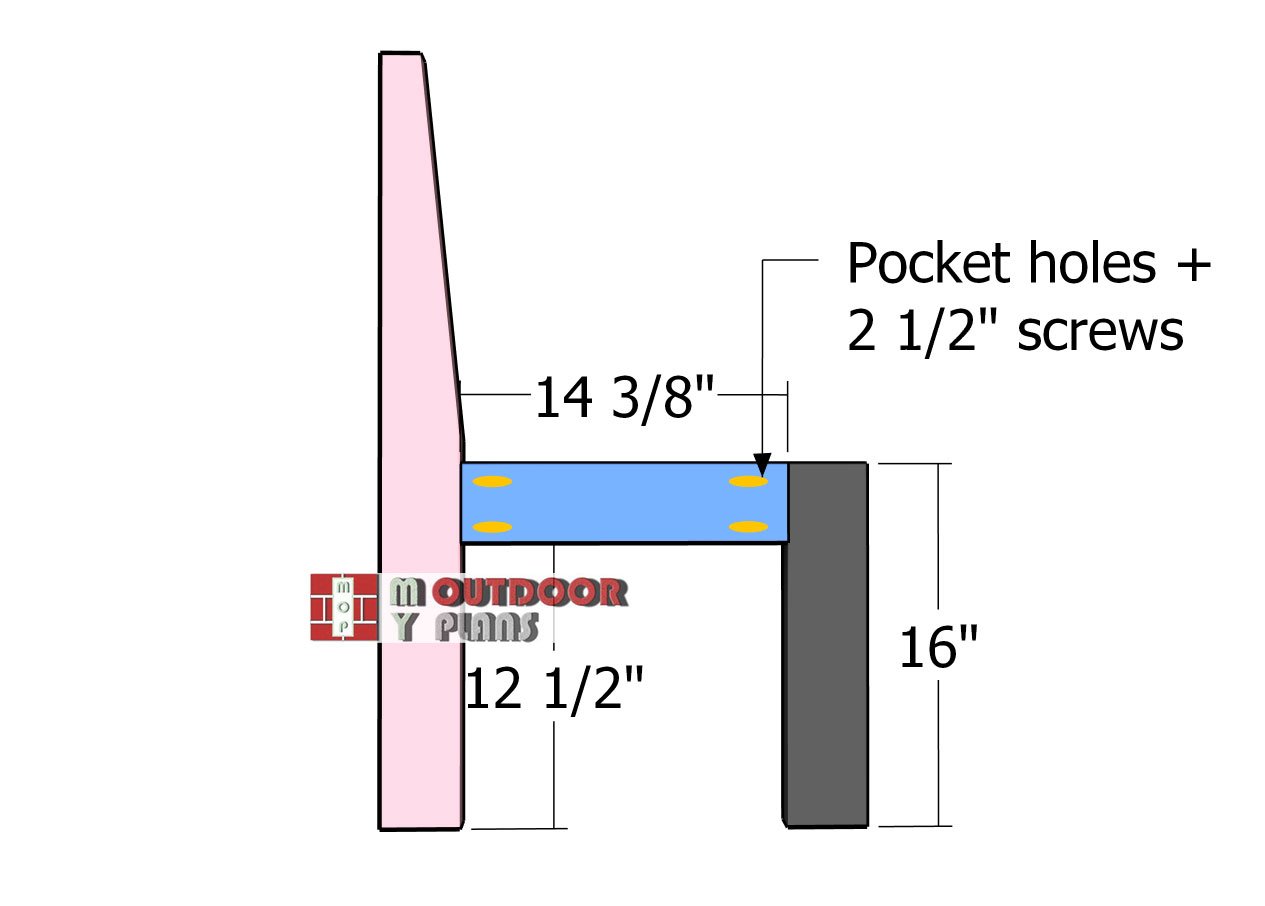
C – SEAT SUPPORTS – 2×4 lumber 14 3/8″ long – 6 pieces
D – BASE SUPPORTS – 2×4 lumber 15 1/4″ long – 6 pieces
E – TOP SUPPORTS – 2×4 lumber 11 3/4″ long – 6 pieces
F – SEAT SLATS – 1×4 lumber 33 1/4″ long – 6 pieces
F – SEAT SLATS – 1×4 lumber 28 5/8″ long – 6 pieces
F – SEAT SLATS – 1×4 lumber 24″ long – 6 pieces
F – SEAT SLATS – 1×4 lumber 19 3/8″ long – 6 pieces
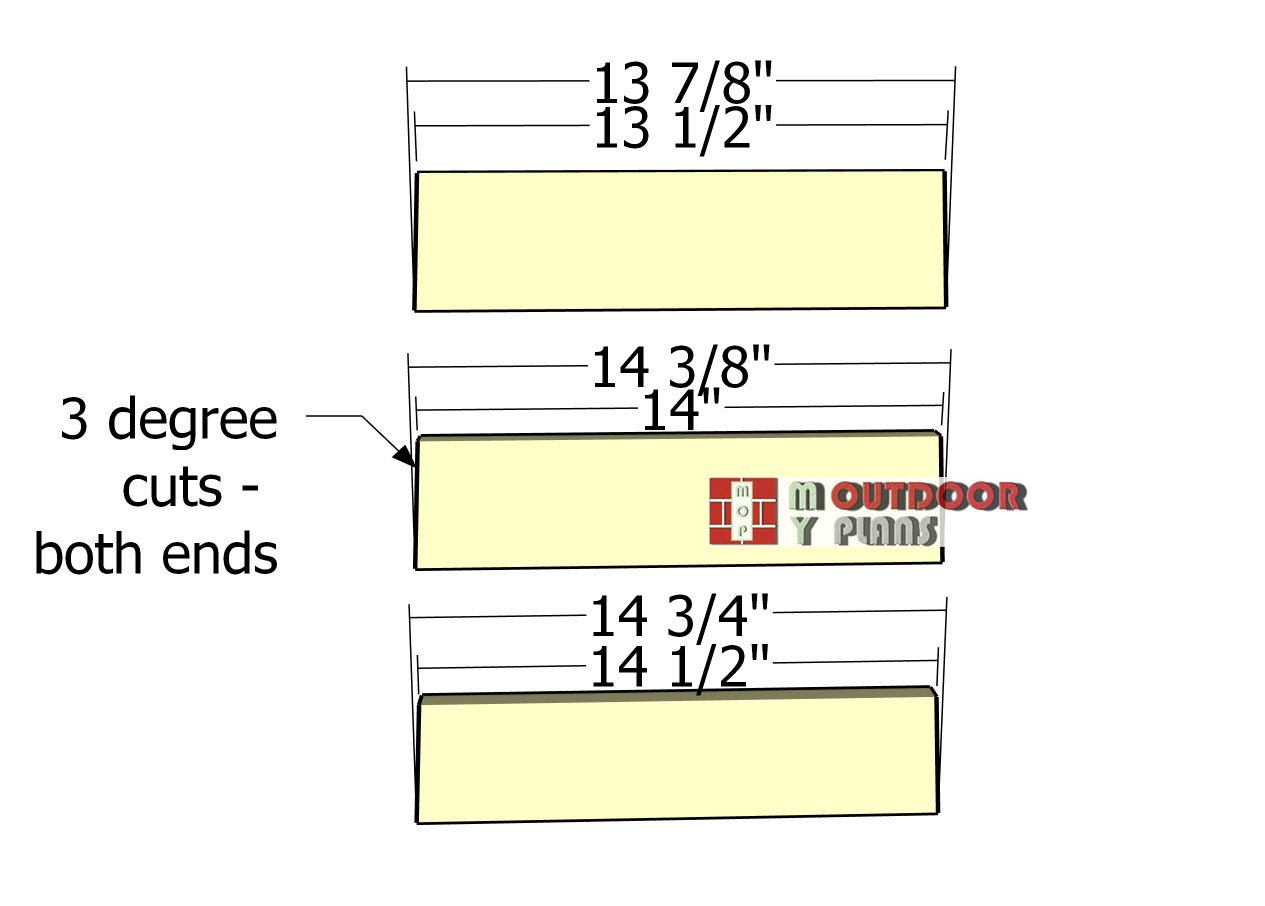
G – BACKREST SLATS – 1×4 lumber 13 7/8″ long – 6 pieces
G – BACKREST SLATS – 1×4 lumber 14 3/8″ long – 6 pieces
G – BACKREST SLATS – 1×4 lumber 14 3/4″ long – 6 pieces
Tools
![]() Hammer, Tape measure, Framing square, Level
Hammer, Tape measure, Framing square, Level
![]() Miter saw, Drill machinery, Screwdriver, Sander
Miter saw, Drill machinery, Screwdriver, Sander
![]() Safety Gloves, Safety Glasses, Pocket hole jig
Safety Gloves, Safety Glasses, Pocket hole jig
Time
![]() One weekend
One weekend
Related
Pin for Later!
It’s that easy to build a tree bench!
Step 1: Building the frames
Cutting-the-back-legs
We’re kicking off this project by cutting the back legs for the tree bench. Grab your 2×4 boards and mark the cut lines according to the diagram. A circular saw will handle the cuts with precision—just follow the lines. Once the pieces are cut, take a moment to smooth the edges with sandpaper for a clean, professional look.
Assembling-the-frames
Cut the front legs from 2×4 lumber at 16 inches. Next, cut the horizontal supports from 2×4 boards and drill pocket holes at both ends, following the plans. Lay all the pieces on a level surface, making sure the edges are perfectly flush. Secure the frames by driving 2 1/2-inch screws through the pocket holes. Repeat the process to build the rest of the frames. You’ll need a total of six identical frames for this project.
Assembling-the-tree-bench—base-supports
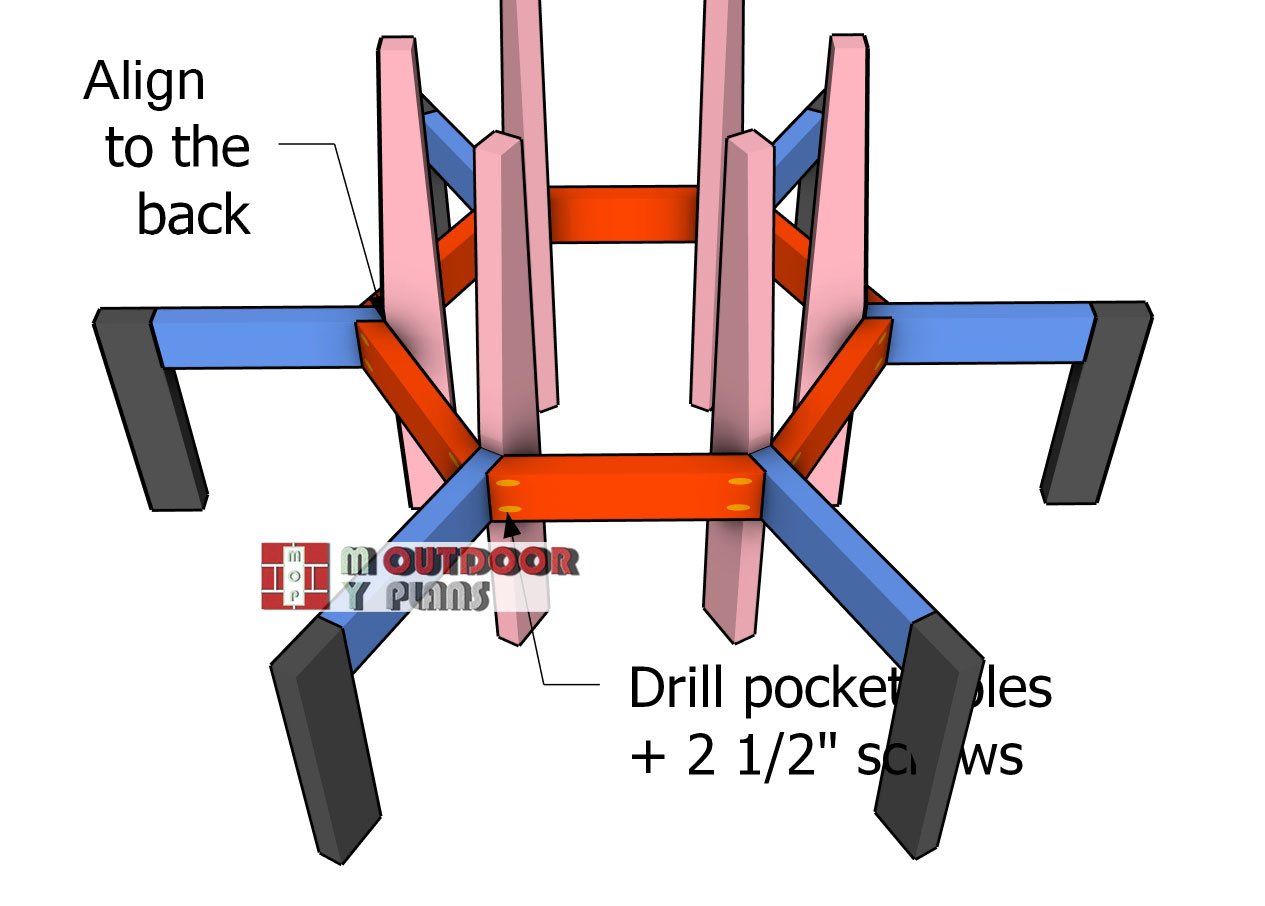
Drill pocket holes at both ends of the supports to ensure a tight and sturdy connection between the frames. Position the supports in place, making sure they sit flush with the back of the frames. Drive 2 1/2-inch screws through the pocket holes to lock everything together. This step forms the main frame for the wraparound tree bench, giving it the structure and stability it needs.
Top-backrest-supports
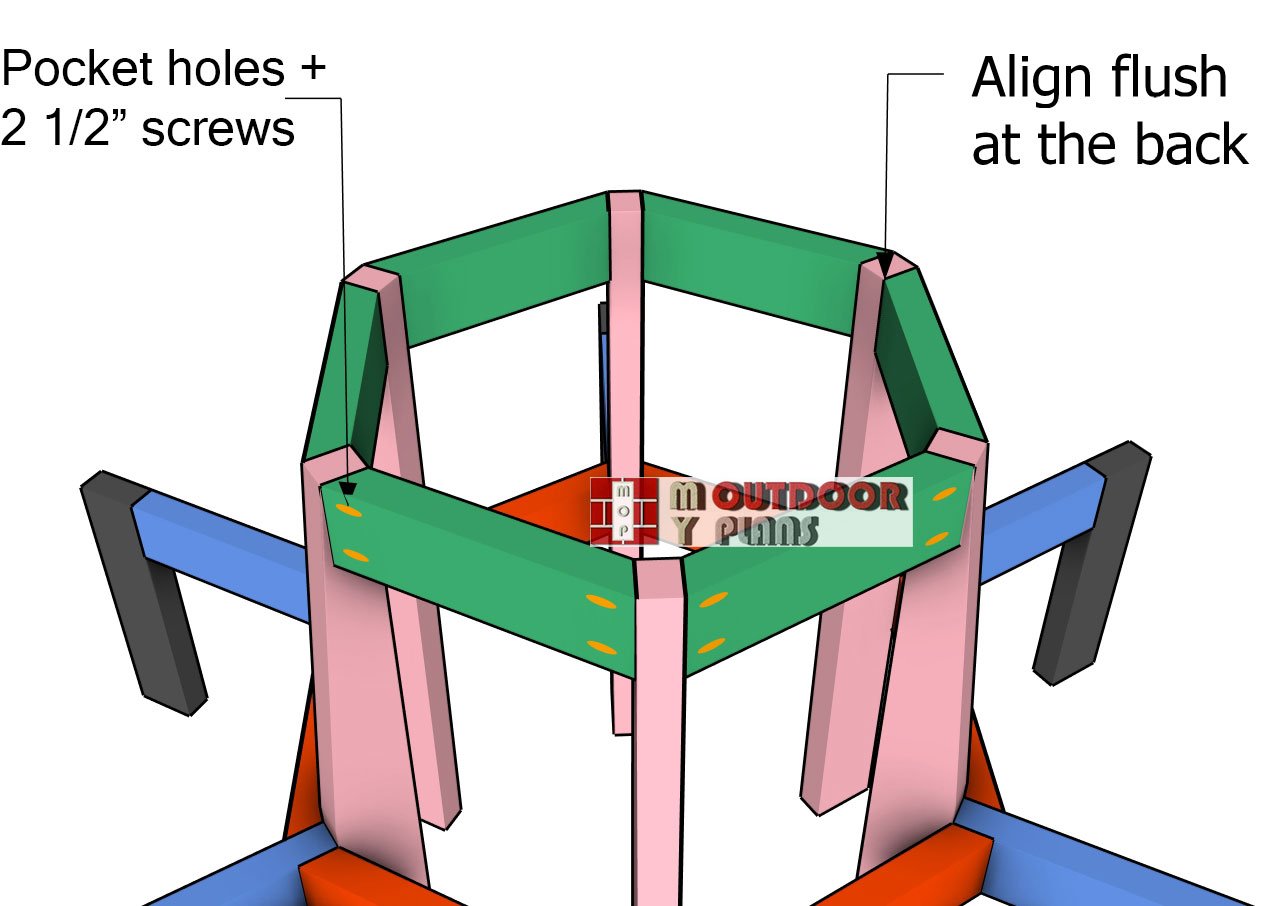
Drill pocket holes at both ends of the 2×4 supports that will connect across the top of the frames. Align the supports flush with the back of the frames, ensuring everything is straight and even. Drive 2 1/2-inch screws through the pocket holes to lock the supports firmly into place. This step ties the frames together, adding strength and stability to the structure.
Step 2: Seat and Backrest
Seat-slats
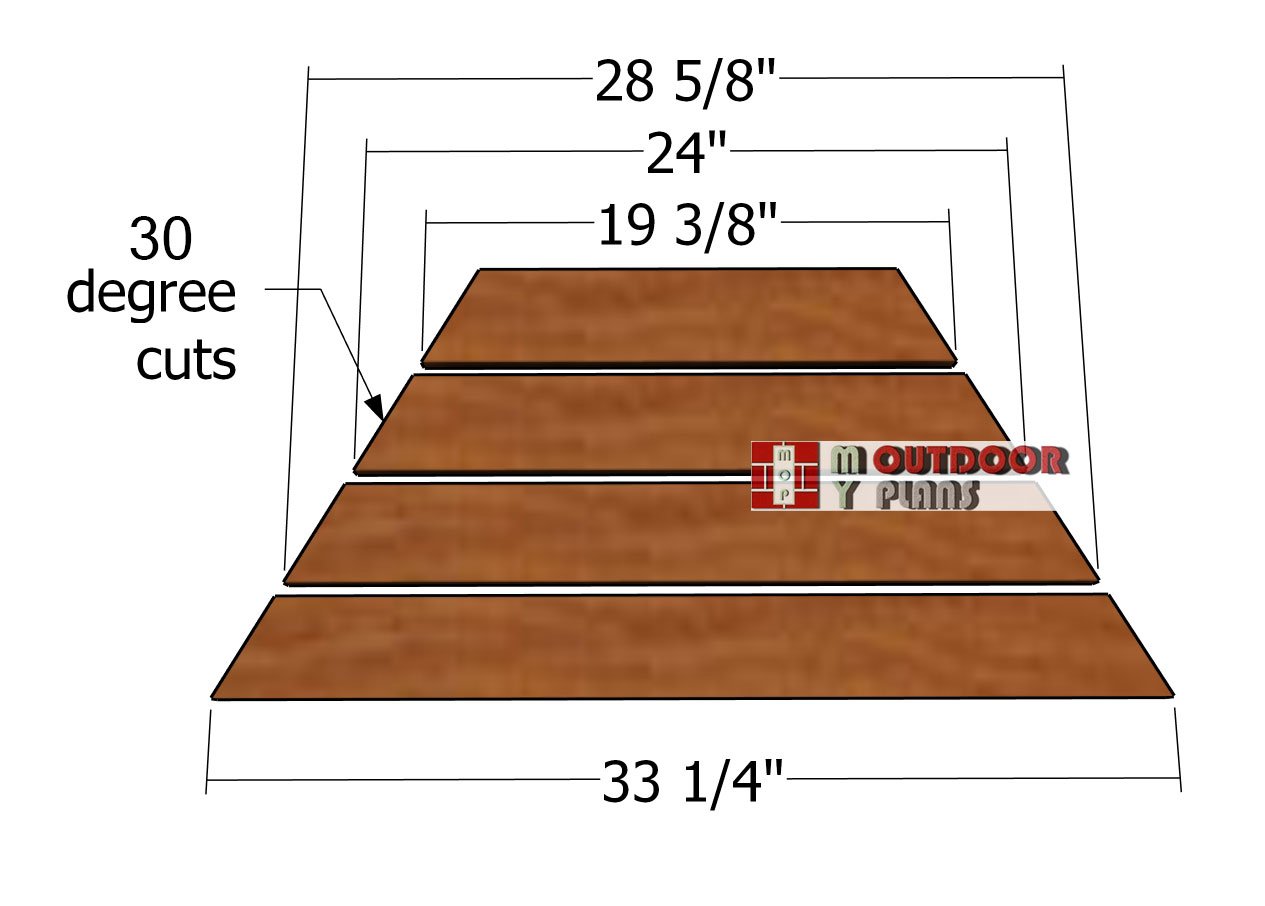
Cut the seat slats from 1×4 boards. Set your miter saw to a 30-degree angle and make the cuts. Repeat this process six times, as you’ll need slats for each side of the tree bench. Once all the pieces are cut, smooth the edges with sandpaper for a clean finish. These slats will form the seating surface, bringing both style and comfort to the bench.
Fitting-the-seat-slats
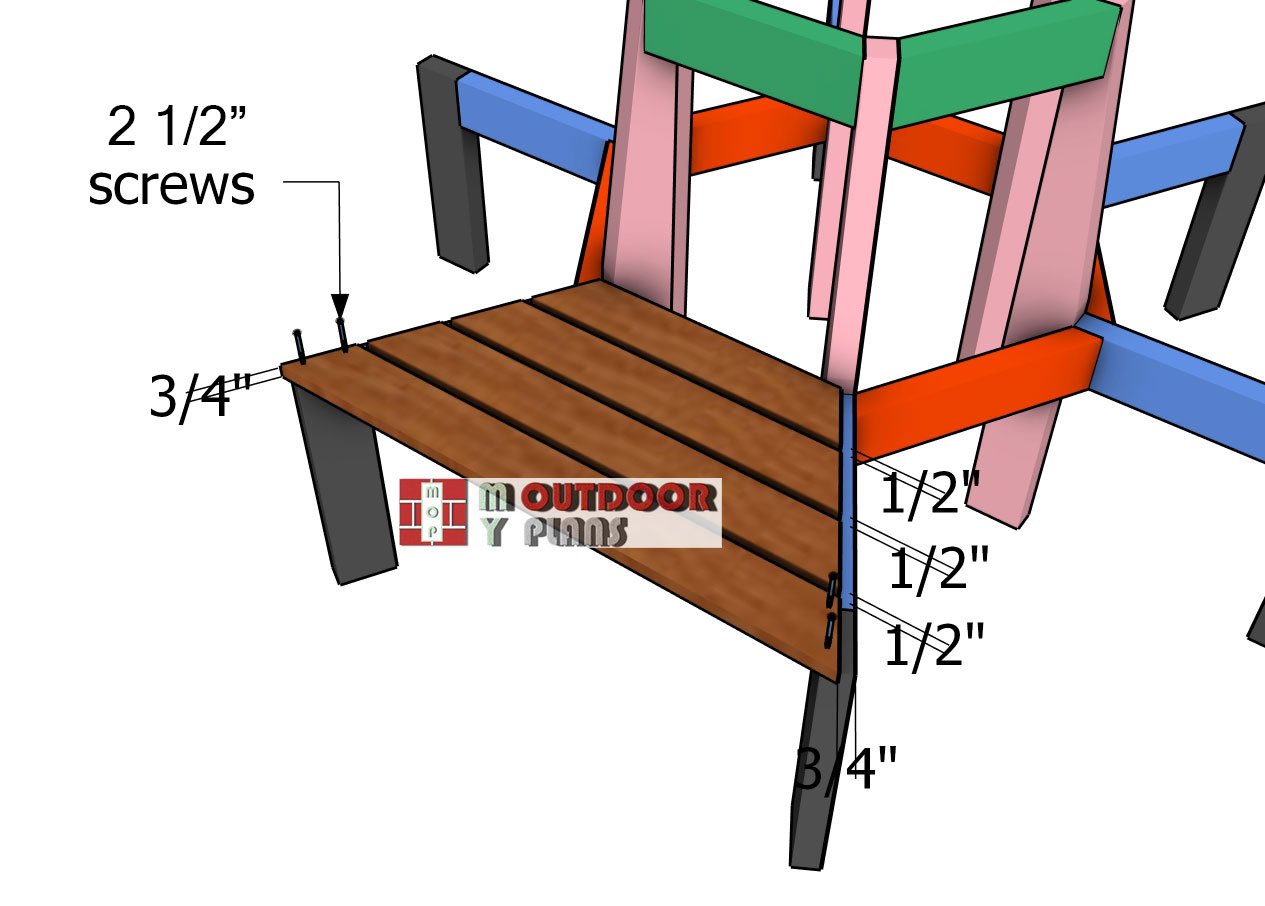
Center the boards on the seat supports, ensuring they are evenly spaced. Drill pilot holes to prevent splitting, then drive 2 1/2-inch screws to lock the slats into place. Use 1/2-inch spacers between the boards to maintain consistent gaps and achieve a clean, uniform look. This step brings the seat together while ensuring proper drainage and ventilation.
Backrest-slats
Now it’s time to cut the backrest slats. Set your miter saw to 3 degrees and make angled cuts on both ends of the 1×4 boards. This slight angle helps the slats fit snugly against the frame for a comfortable and secure backrest. Once all the slats are cut, smooth the edges with sandpaper for a clean finish.
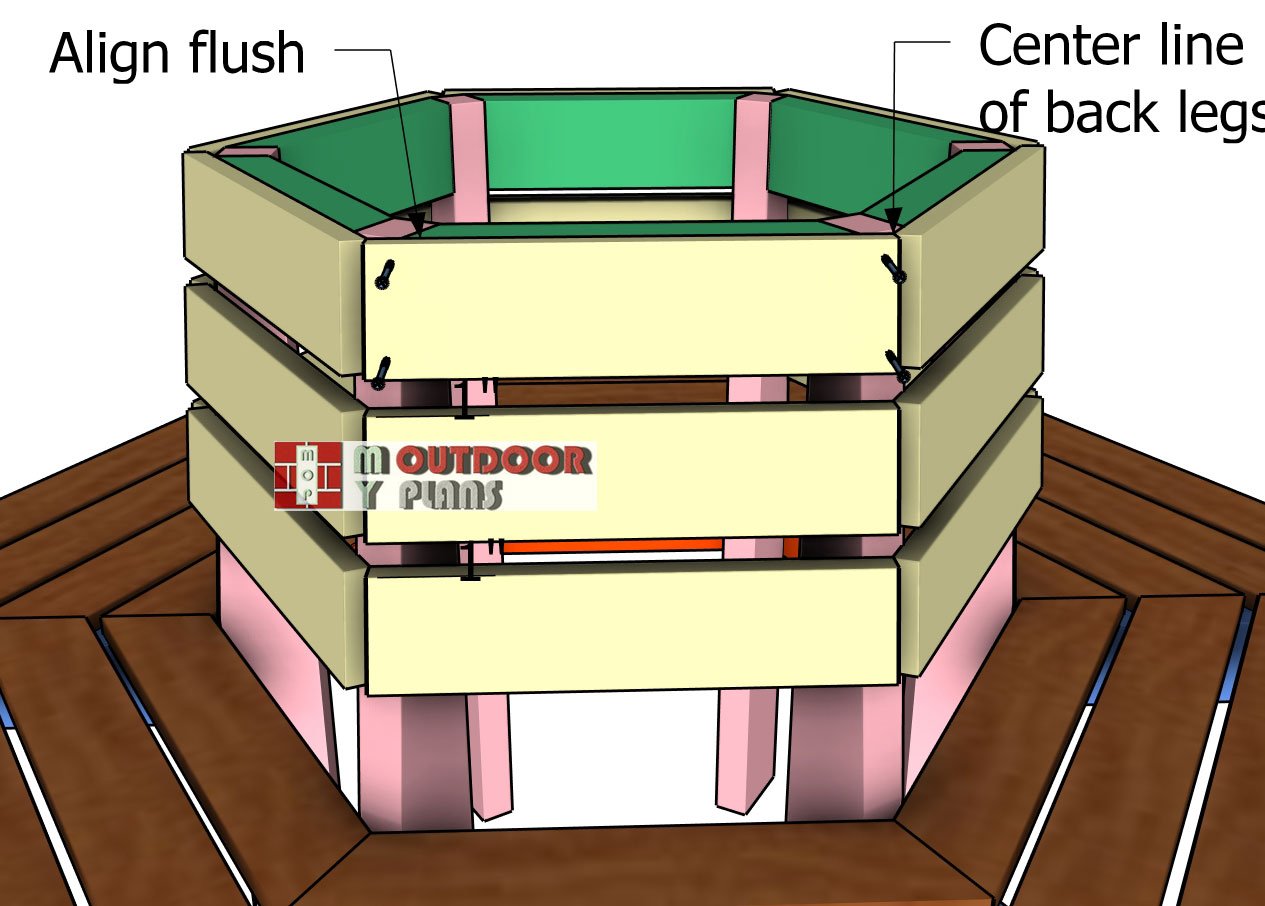
Attaching-the-backrest-slats
Attach the slats to the back legs of the tree bench, centering each slat along the middle of the back legs for a balanced look. Start with the top board, then use 1-inch spacers to ensure even gaps as you secure the remaining backrest slats. Drill pilot holes to prevent splitting, then drive 1 5/8-inch screws to lock the boards in place tightly. This step completes the backrest, adding both comfort and style to your tree bench.
Step 3: Finishing touches
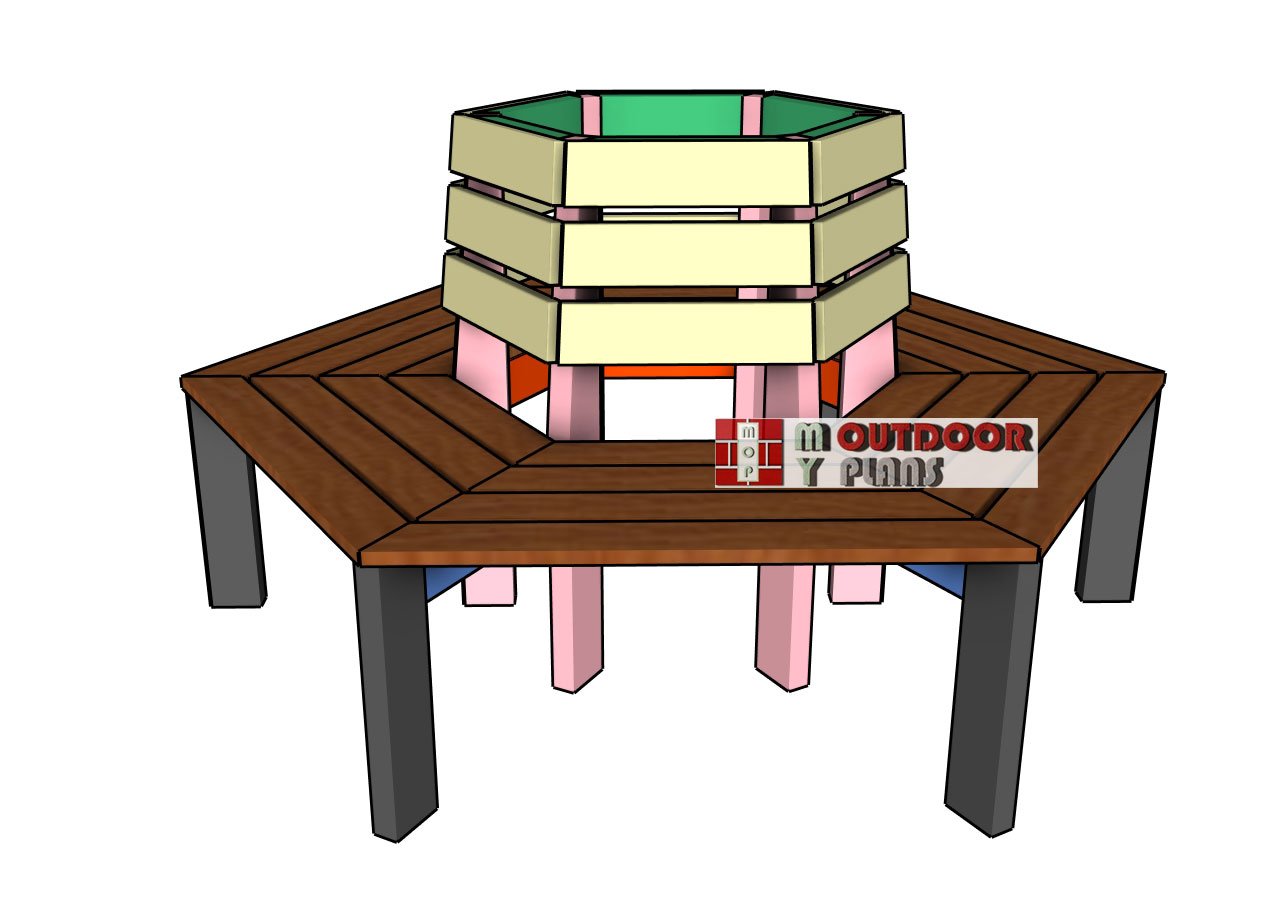
Wooden-wrap-around-tree-bench
For the finishing touches, fill any visible screw holes with wood filler and let it dry completely. Once dry, sand the entire surface with fine-grit sandpaper to smooth out imperfections and ensure a polished look. Pay extra attention to the edges and corners for a soft, splinter-free finish. Wipe the surface clean with a damp cloth to remove all dust before applying your finish.
Now, it’s time to protect and showcase your work. Apply a wood stain of your choice for a natural, warm look or go with an outdoor-rated paint for added protection and a splash of color. Let the first coat dry, then lightly sand and apply a second coat for an even finish. Once the finish is fully dry, consider sealing it with an outdoor polyurethane for added durability. Your wraparound tree bench is now ready to add charm and function to your outdoor space.
Tree bench with backrest plans
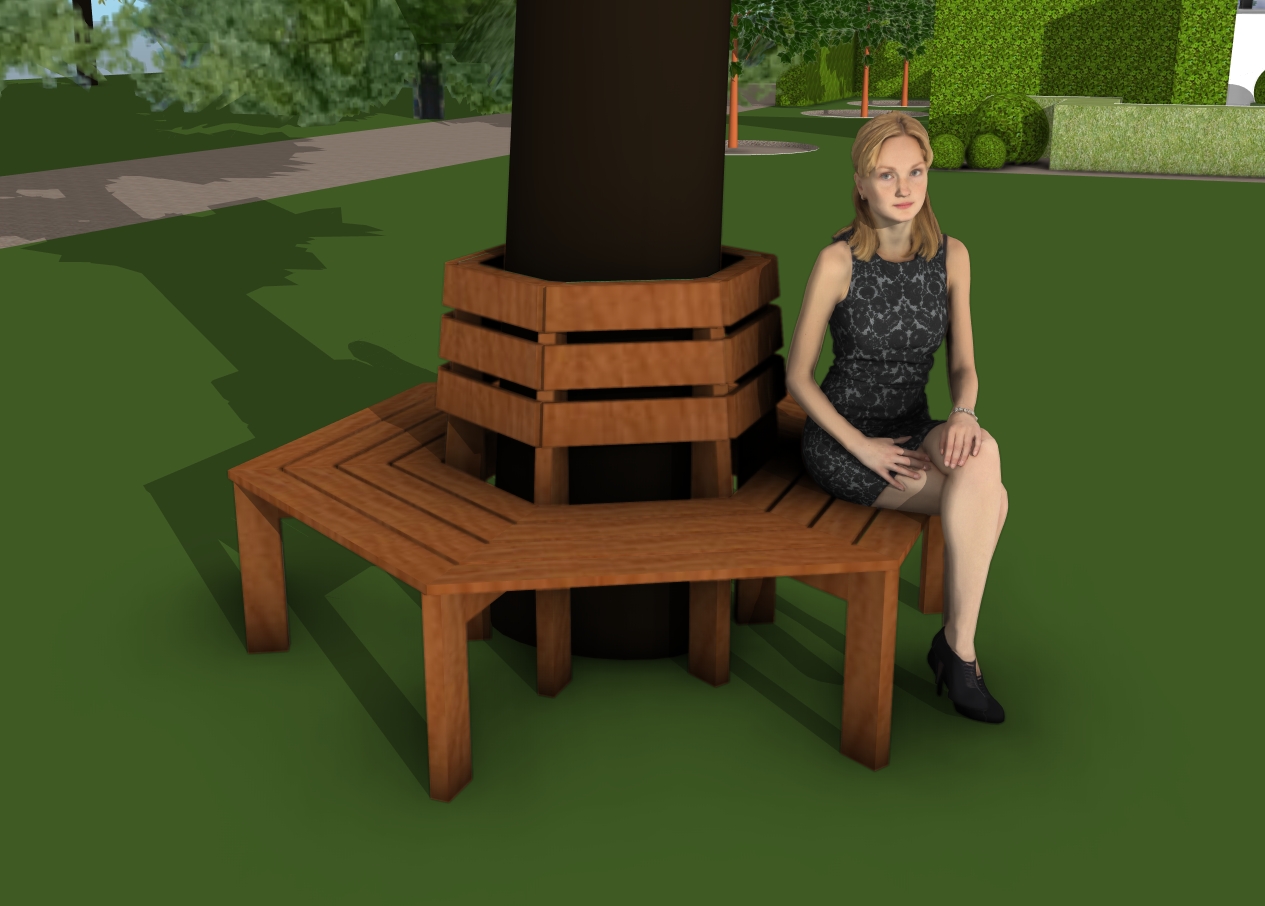
With your tree bench complete, you now have the perfect spot to relax and enjoy the shade while taking in the beauty of your outdoor space. Whether you’re sipping coffee in the morning, reading a book in the afternoon, or gathering with friends around the tree, this bench adds both function and charm to your yard. Its wraparound design not only maximizes seating but also transforms your tree into a focal point, creating a cozy, inviting atmosphere.
How to build a tree bench with backrest
To take this project to the next level, consider adding a weather-resistant cushion for extra comfort or incorporating a matching side table for convenience. If you want even more durability, use cedar or redwood for natural rot resistance, and don’t skip the outdoor sealer to protect your hard work from the elements. Attention to detail, such as precise cuts and even spacing between the slats, will ensure a professional-looking result. With the right care, this bench will be a standout feature in your yard for years to come.
If you want to get the Premium plans with all the extras, just press the GET PREMIUM PLANS button bellow. If you want to get the free plans, just read the blog FAQs.

This woodworking project was about wrap around tree bench with backrest – free DIY plans. If you want to see more outdoor plans, check out the rest of our step by step projects and follow the instructions to obtain a professional result.