Transform your outdoor space with these covered 2-post pergola plans, a sleek and practical addition that blends style with functionality. Designed with a cantilevered roof and a slatted back panel, this project is perfect for creating a cozy retreat that offers shade, privacy, and an inviting ambiance. Whether you’re looking to enhance your backyard for relaxing, entertaining, or simply enjoying the outdoors, this pergola design checks all the boxes.
Plus, its modern two-post structure makes it ideal for smaller spaces or those who prefer a minimalist aesthetic. This project is both beginner-friendly and cost-effective, making it an excellent choice for DIY enthusiasts. You can expect to spend around $600 to $900 on materials, depending on the type of wood and roofing you choose. As for time, plan for a weekend of work—roughly 12-16 hours split between framing, assembling, and finishing. With a bit of effort, you’ll have a stunning pergola that upgrades your backyard while providing a durable, long-lasting structure you can enjoy for years to come.
When buying the lumber, you should select the planks with great care, making sure they are straight and without any visible flaws (cracks, knots, twists, decay). Investing in cedar or other weather resistant lumber is a good idea, as it will pay off on the long run. Use a spirit level to plumb and align the components, before inserting the galvanized screws, otherwise the project won’t have a symmetrical look. If you have all the materials and tools required for the project, you could get the job done in about a day. See all my Premium Plans HERE.
Projects made from these plans
It’s that simple to build a Cantilevered Pergola!
Pin it for Later!

2 Post Pergola with Cantilevered Roof Plans
Building-a-2-post-cantilevered-pergola
Cut & Shopping Lists
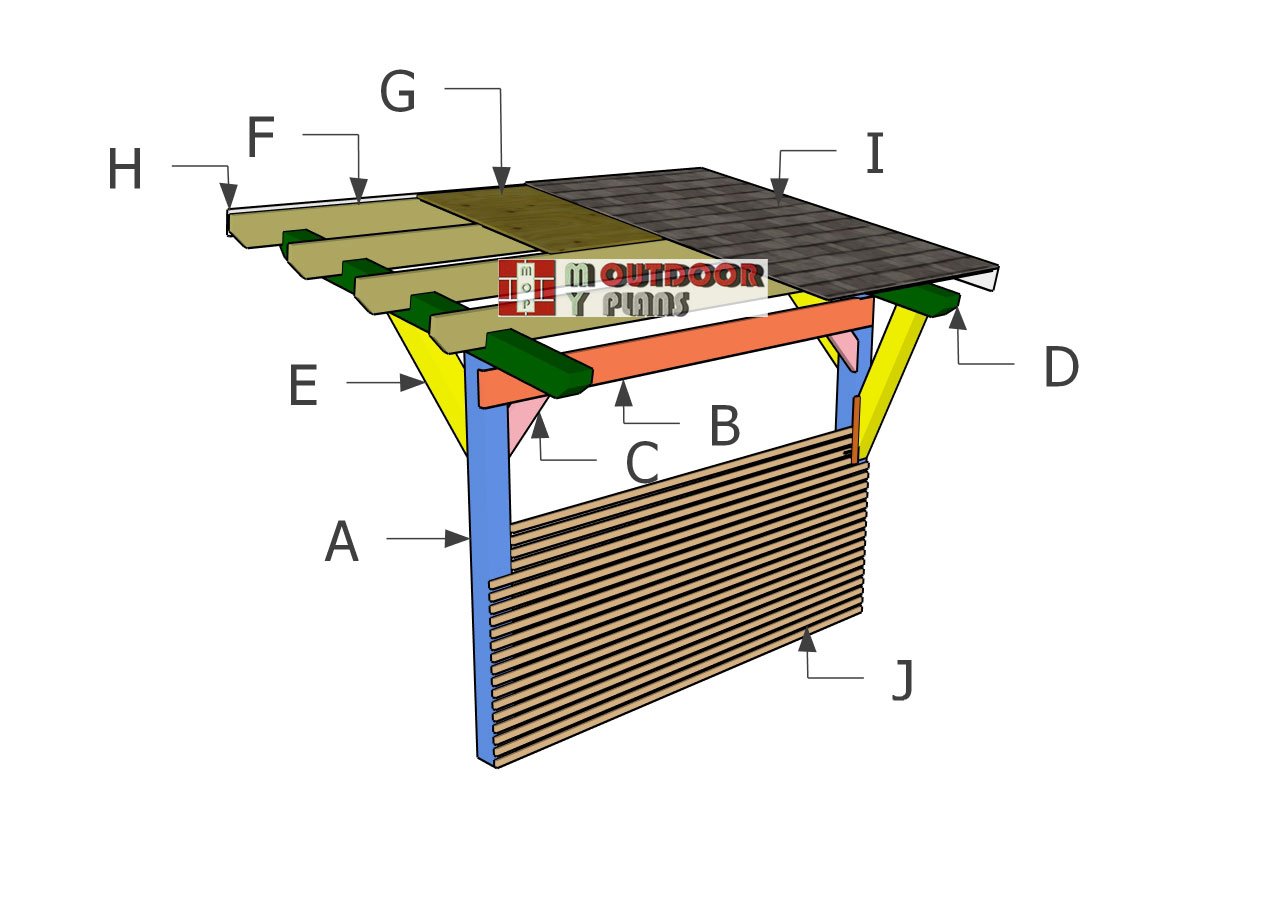
- A – 2 pieces of 6×6 lumber – 10 ft long POSTS
- B – 1 piece of 2×8 lumber – 10 ft long BEAM
- C – 2 pieces of 2×6 lumber – 15 1/4″ long FRAME BRACES
- D – 2 pieces of 6×6 lumber – 8 ft long TOP SUPPORT BEAMS
- E – 2 pieces of 6×6 lumber – 36″ long BRACES
- F – 2 piece of 6×6 lumber – 43″ long BRACES
Tools
![]() Hammer, Tape measure, Framing square, Level
Hammer, Tape measure, Framing square, Level
![]() Miter saw, Drill machinery, Screwdriver, Sander
Miter saw, Drill machinery, Screwdriver, Sander
![]() Safety Gloves, Safety Glasses
Safety Gloves, Safety Glasses
Time
Related
- 2 Post pergola plans
- 10×16 Modern pergola plans
- PART 1: Cantilevered Pergola Plans
- PART 2: Cantilevered Pergola Plans
STEP 1: Setting the posts
Layout-1
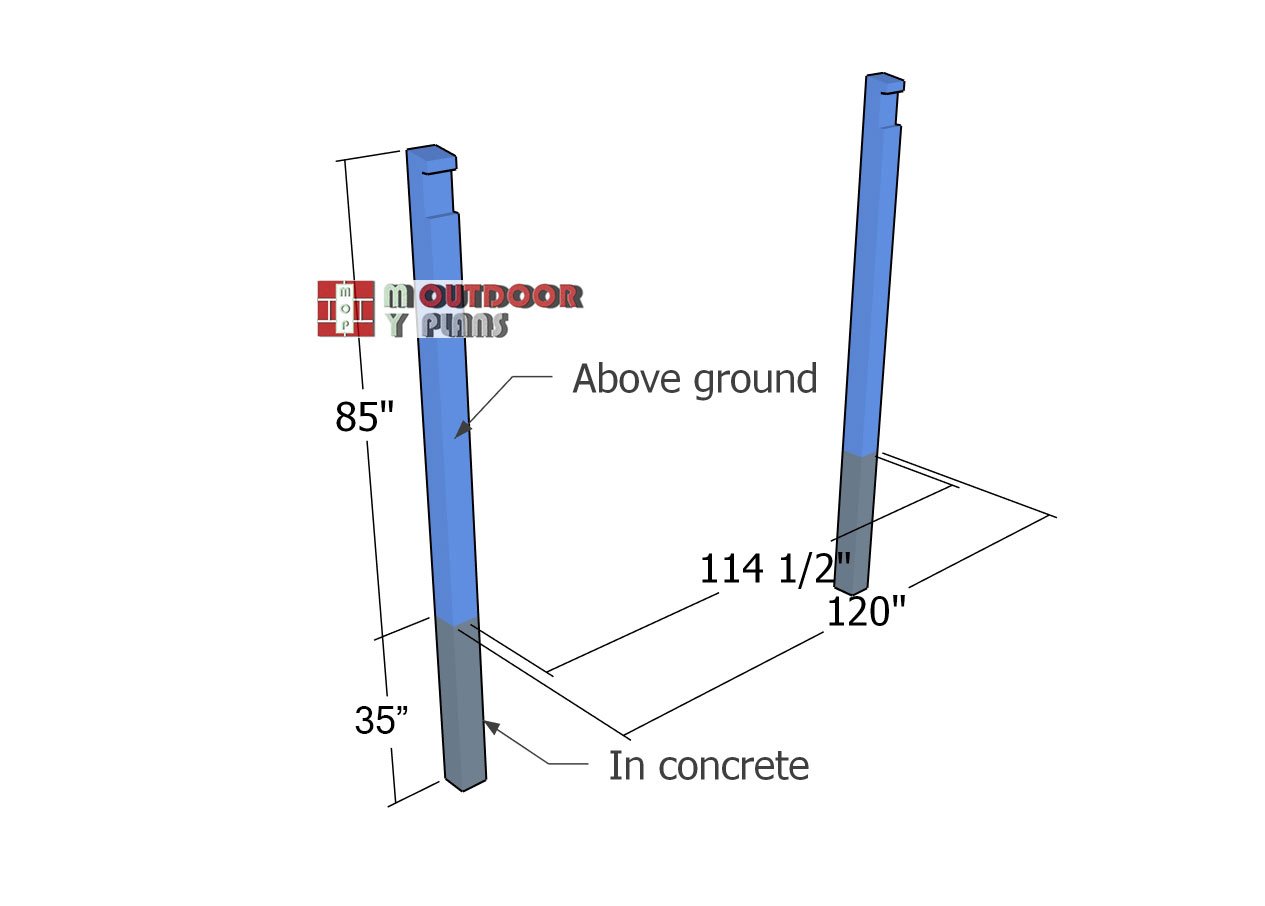
The first step in building your pergola is to lay out the posts. Start by marking their exact locations and leveling the ground to ensure a stable foundation. Be sure to remove the topsoil to create a clean, solid base for the posts. For maximum stability and long-term durability, I recommend setting the posts in concrete. This extra step might take a little more effort, but it will pay off by giving your pergola the support it needs to stand strong for years to come.
Post
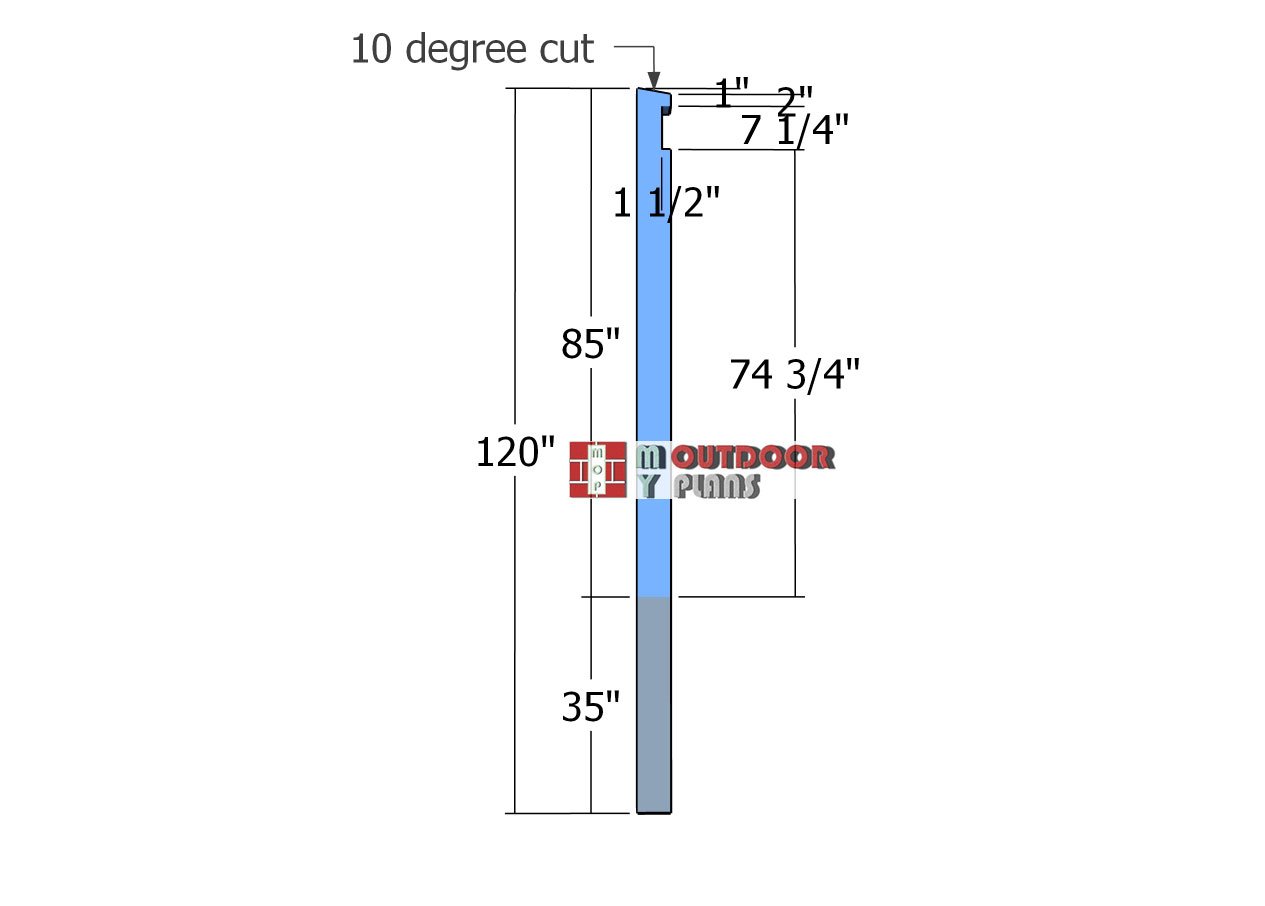
Start by making a 10-degree cut at the top of each 6×6 post to add a professional finish and improve the overall design. Once the cut is made, smooth the edges with sandpaper for a clean, splinter-free surface. Next, you’ll need to create a notch at the top of each post to securely install the crossbeam that ties the posts together. Use a circular saw to make 1 1/2″ deep parallel cuts within the marked area for the notch. After that, remove the excess lumber with a chisel, and smooth the surface with sandpaper to ensure a precise and snug fit for the crossbeam.
Setting-the-post
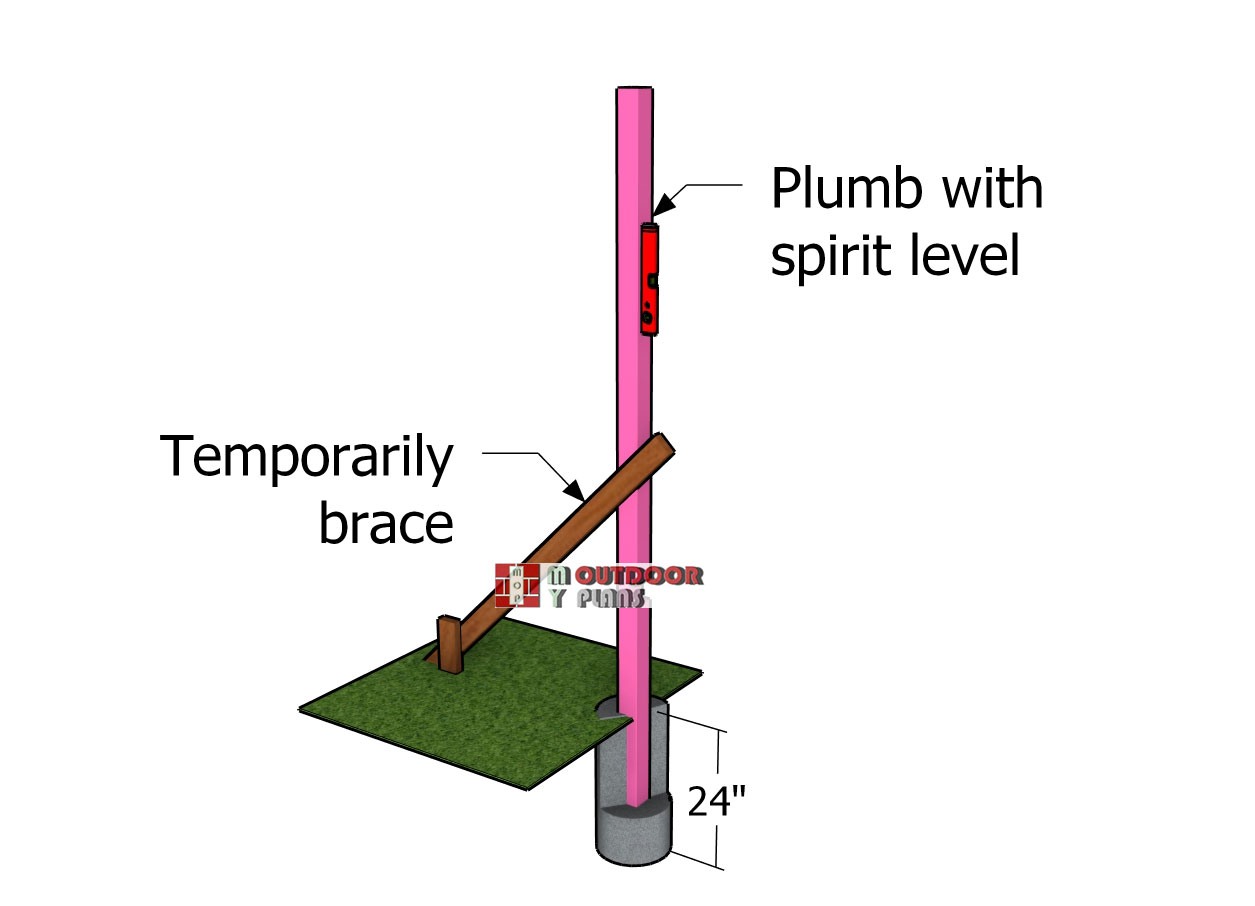
Dig 14-inch diameter holes to a depth of 3 feet to create sturdy foundations for the posts. Place tube forms into the holes, then position the posts inside. Use temporary braces to hold the posts securely in place, ensuring they are perfectly plumb. Once everything is aligned, fill the tube forms with concrete, packing it in tightly for maximum stability. Allow the concrete to cure for at least 24 hours before moving on to the next steps. Keep the braces in place until the structure is further reinforced as you continue with the construction.
STEP 2: Building the frame of the pergola
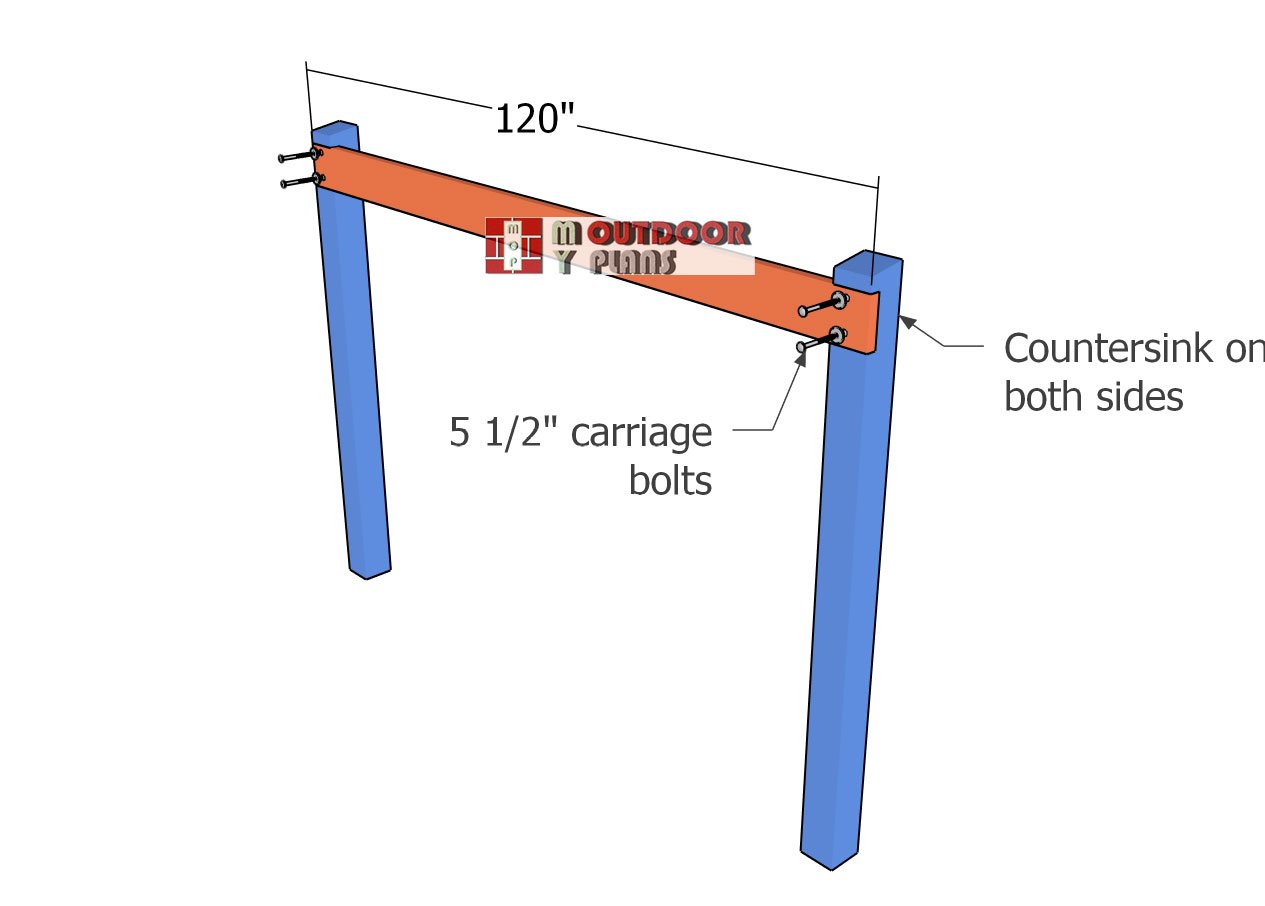
Attaching-the-support-beam
Fit the 2×8 beam into the notches at the top of the posts, ensuring the edges align perfectly on both sides. Double-check that the posts are plumb before proceeding. Once aligned, clamp the beam securely to the posts. Use a drill to make holes through both the beam and posts, making sure to countersink the heads and nuts of the carriage bolts so they sit flush with the structure on both sides. Secure each joint with two carriage bolts to provide maximum strength and stability for the entire structure. This step is key to ensuring your pergola can stand up to the test of time!
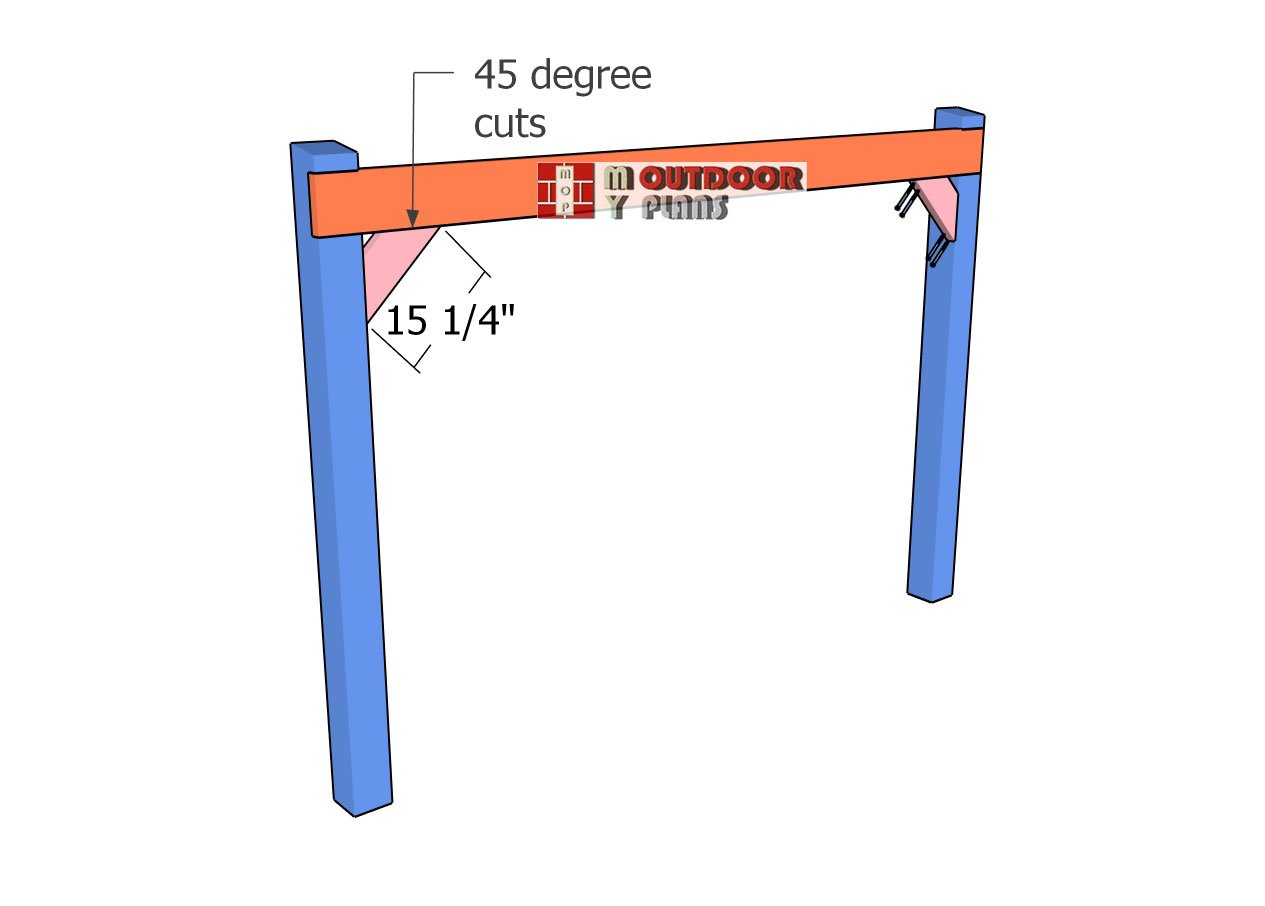
Frame-braces
Cut the 2×6 lumber to size for the braces, making 45-degree cuts at both ends for a clean fit. Position the braces at an angle between the posts and beams to provide additional stability. Drill pilot holes before inserting 5 1/2-inch screws to prevent the wood from splitting and to ensure a strong connection. Secure the braces tightly to the frame, this step is essential for bracing the structure against lateral movement and adding long-term durability.
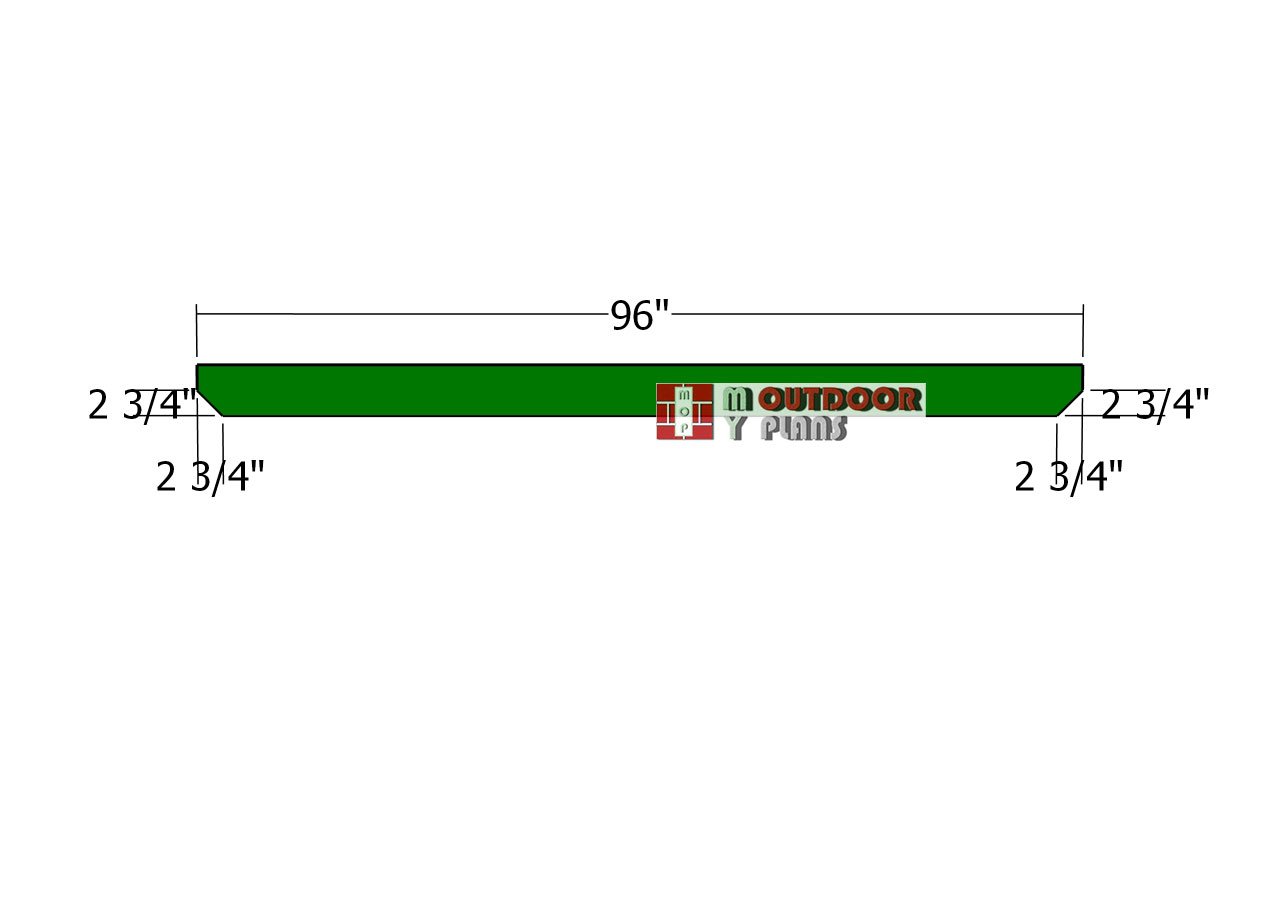
Rafter-support-beams
Move on to the next step by adding a decorative touch to the 6×6 beams that will support the roof. Use a miter saw to make clean 45-degree cuts on both ends of the beams, following the pattern shown in your diagram. These cuts not only enhance the aesthetics of your structure but also ensure a precise fit for the roof supports.
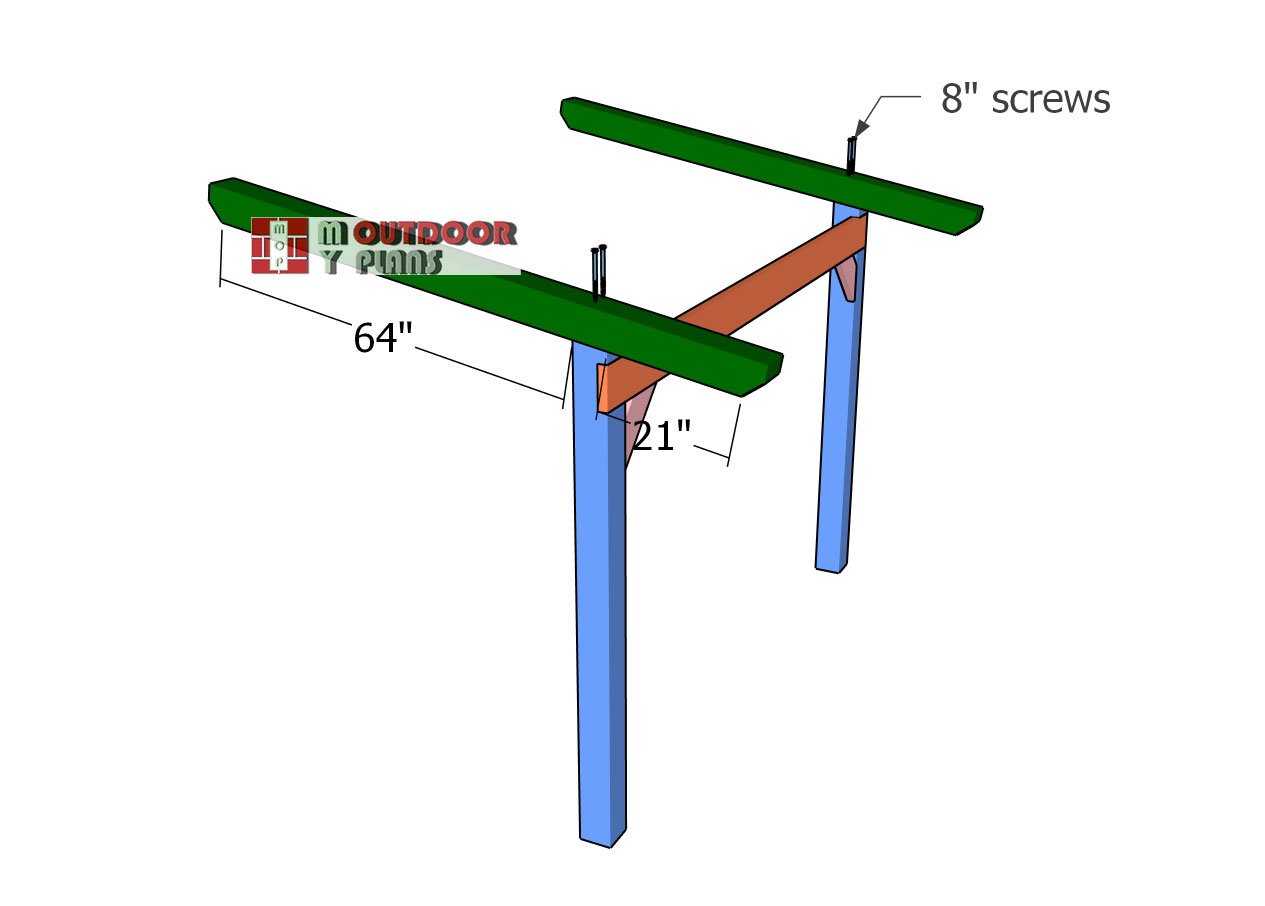
Fitting-the-roof-support-beams
Attach the supports to the top of the posts, ensuring the edges are perfectly aligned for a clean and balanced look. Drill pilot holes through the supports to prevent splitting and make installation easier. Secure each support to the posts with 8-inch screws, using at least two screws per joint for maximum stability. Take your time to ensure everything is tight and properly aligned, as these supports will bear the weight of the roof structure.
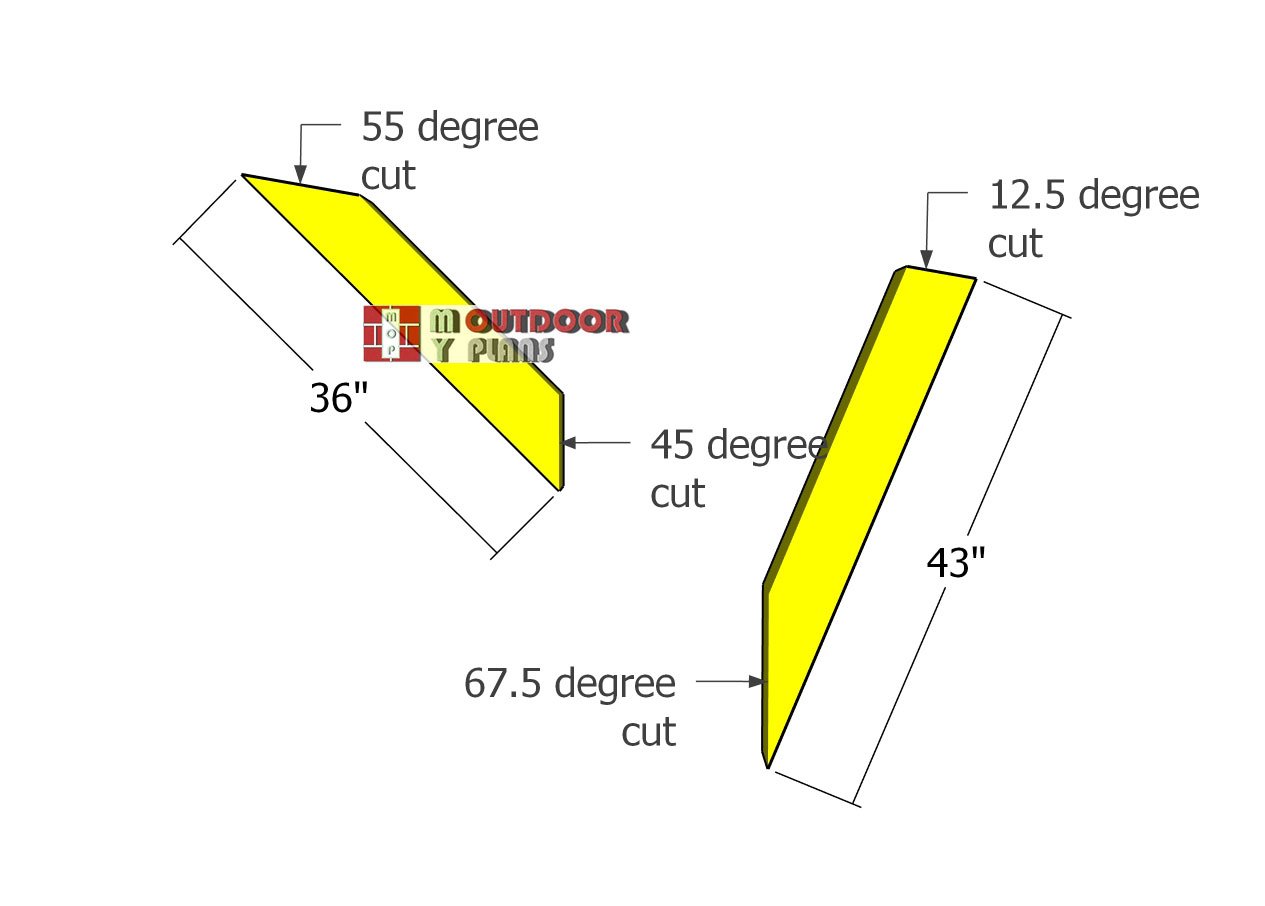
Cutting-the-braces
For the front and back braces of your cantilevered 2-post pavilion, use sturdy 6×6 lumber for maximum support. Cut both ends of the braces at the required angles using a miter saw or circular saw, as shown in the diagram. Keep in mind that the roof has a 10-degree lean, which accounts for the different angle cuts needed for a perfect fit.
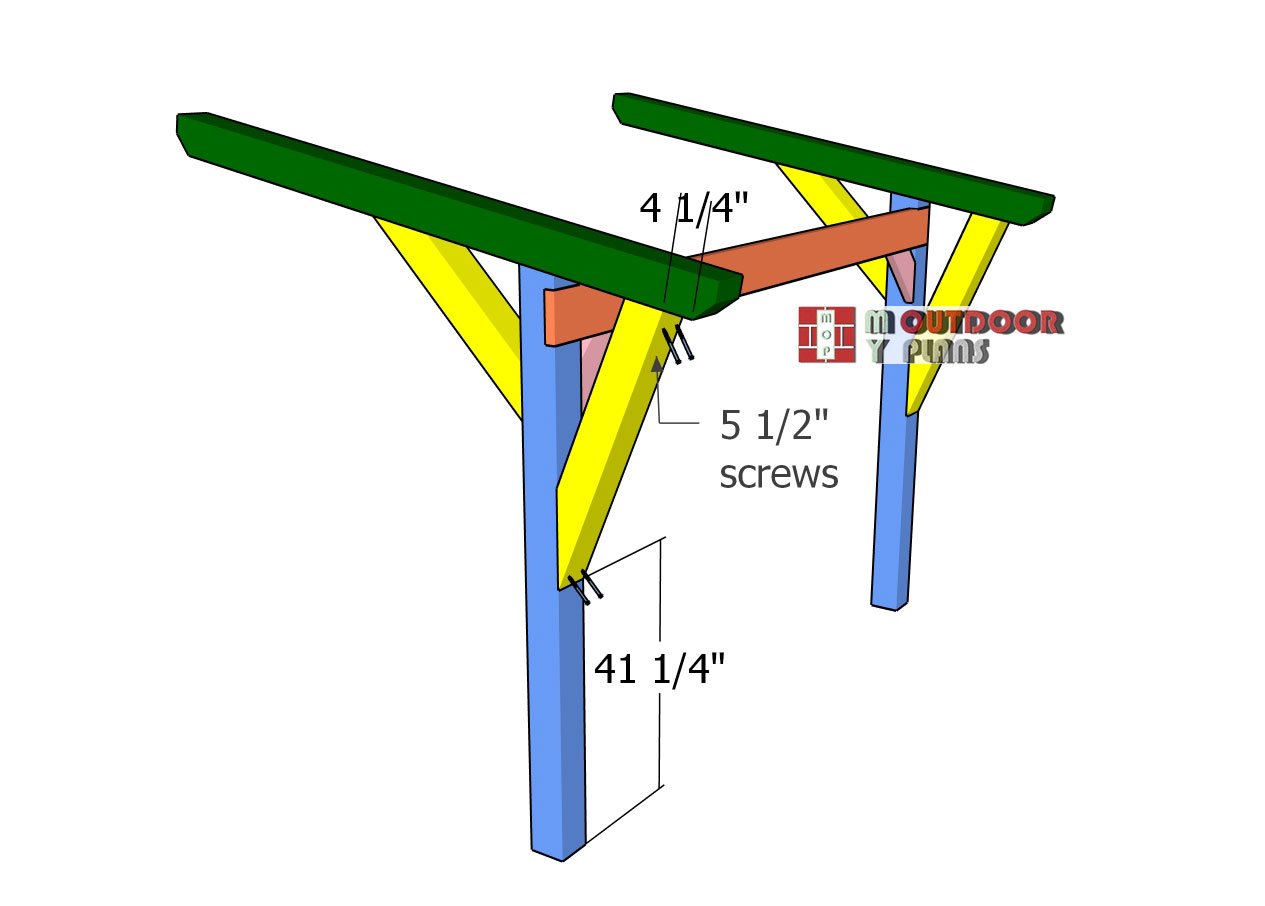
Fitting-the-braces
Position the braces into place, ensuring they fit snugly against both the uprights and the top support beams. Drill pilot holes at each connection point to prevent the wood from splitting and to make the installation smoother. Secure the braces using 5 1/2-inch screws, making sure they are tightly fastened to both the uprights and the beams. This step is critical for reinforcing the structure and ensuring it can handle the stresses of a cantilevered design.
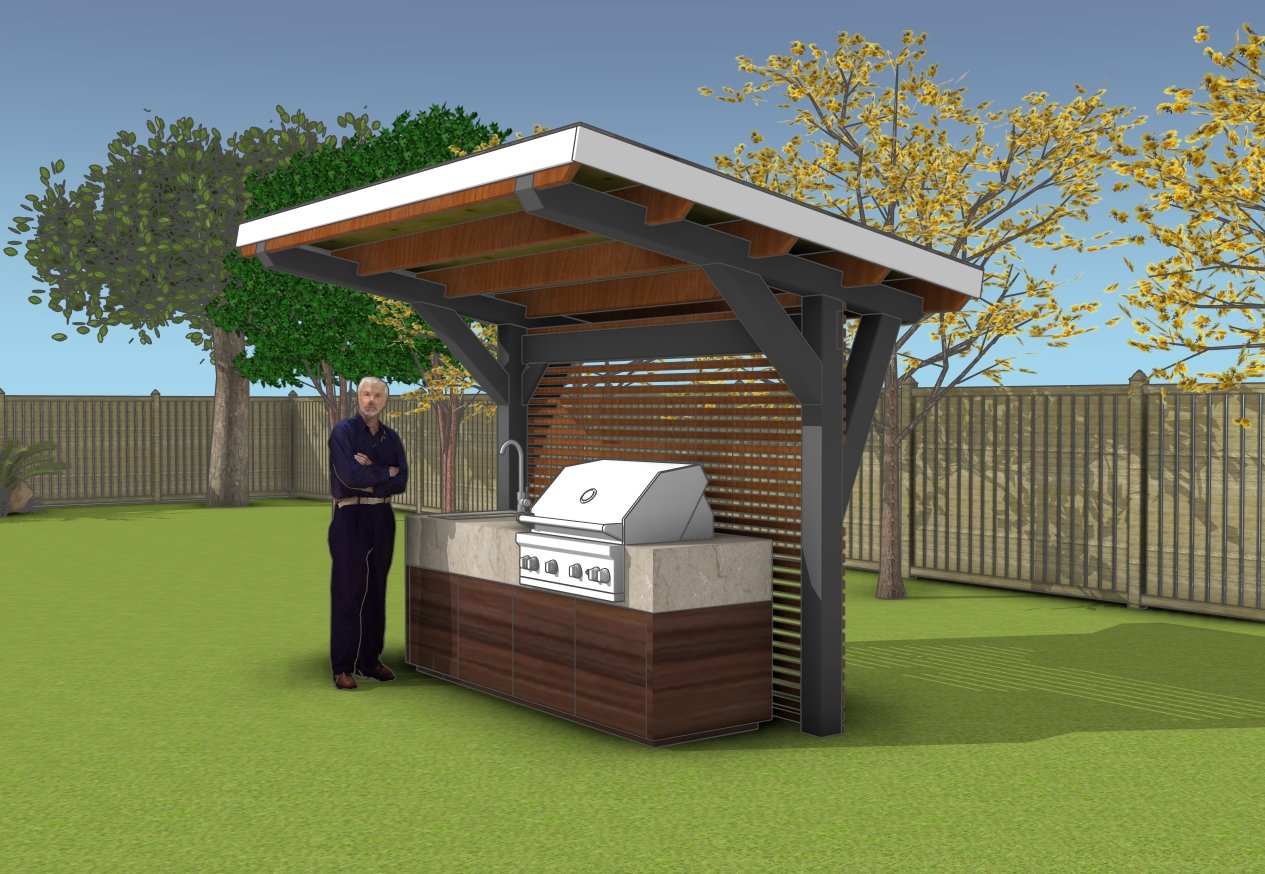
DIY Cantilevered pergola
This covered 2-post pergola with a slatted back panel is a versatile addition to any outdoor space, offering endless possibilities for use. It’s perfect as a cozy seating area where you can relax with a good book or enjoy your morning coffee. The cantilevered roof provides ample shade, making it ideal for hosting outdoor dinners or gatherings, while the slatted back panel adds privacy and a decorative touch.
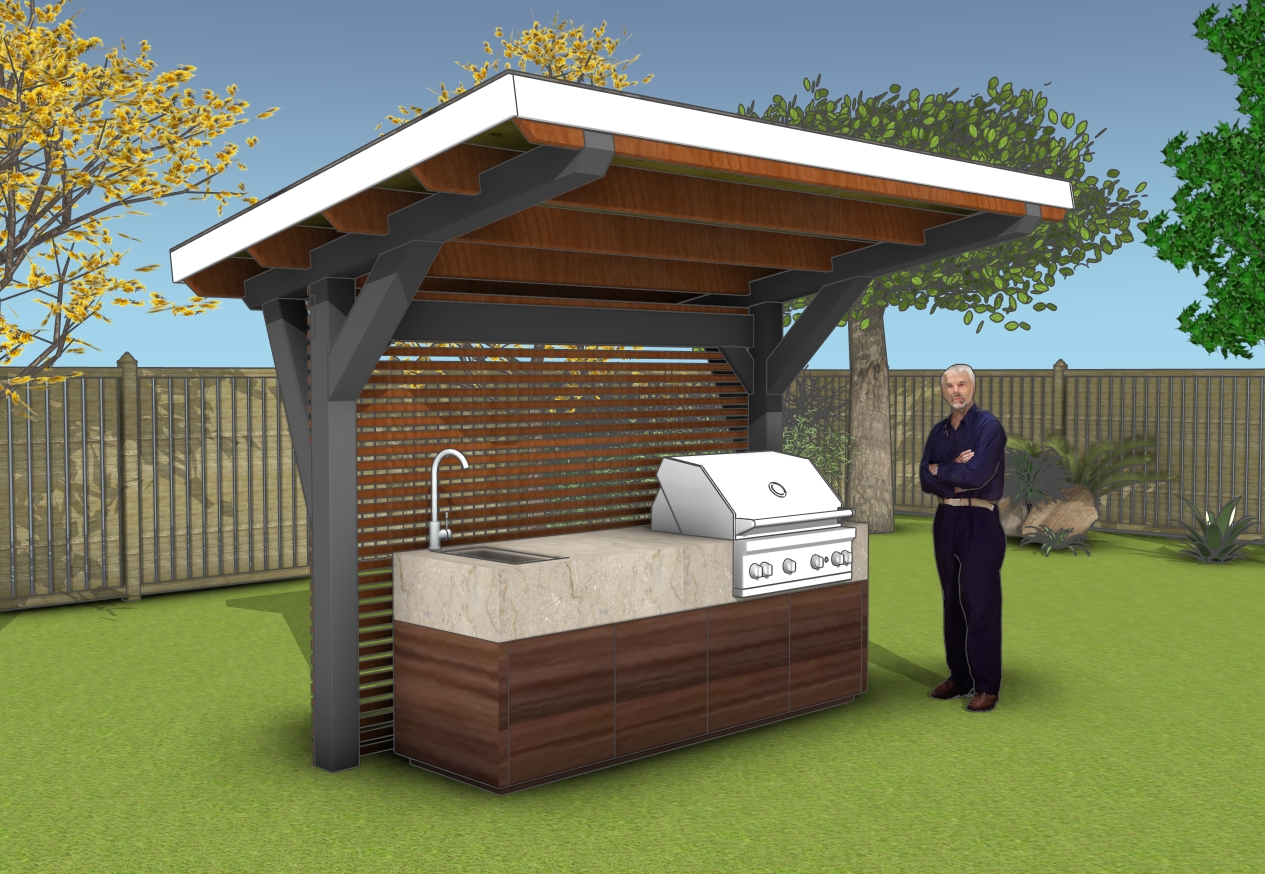
DIY cantilevered pergola plans
You can also use it to display climbing plants, hang string lights, or create a peaceful retreat for yoga or meditation. Whether for relaxation, entertainment, or enhancing your garden’s charm, this pergola is as functional as it is beautiful.
When it comes to the roof for your covered 2-post pergola, you have several great options to suit your style and functional needs. For a sleek and modern look, you can use polycarbonate panels, which allow natural light to filter through while providing excellent protection from UV rays and rain. If you prefer a more rustic or traditional design, consider using corrugated metal sheets, they’re durable, weather-resistant, and easy to install.
For a softer, more natural vibe, a wood slat roof can be a great choice, offering partial shade while letting dappled sunlight shine through. If you want full shade, you could install a solid plywood roof covered with a waterproof membrane or shingles to give it a finished look. Each option comes with its own aesthetic and level of protection, so choose the one that complements your backyard’s style and meets your needs for comfort and durability.
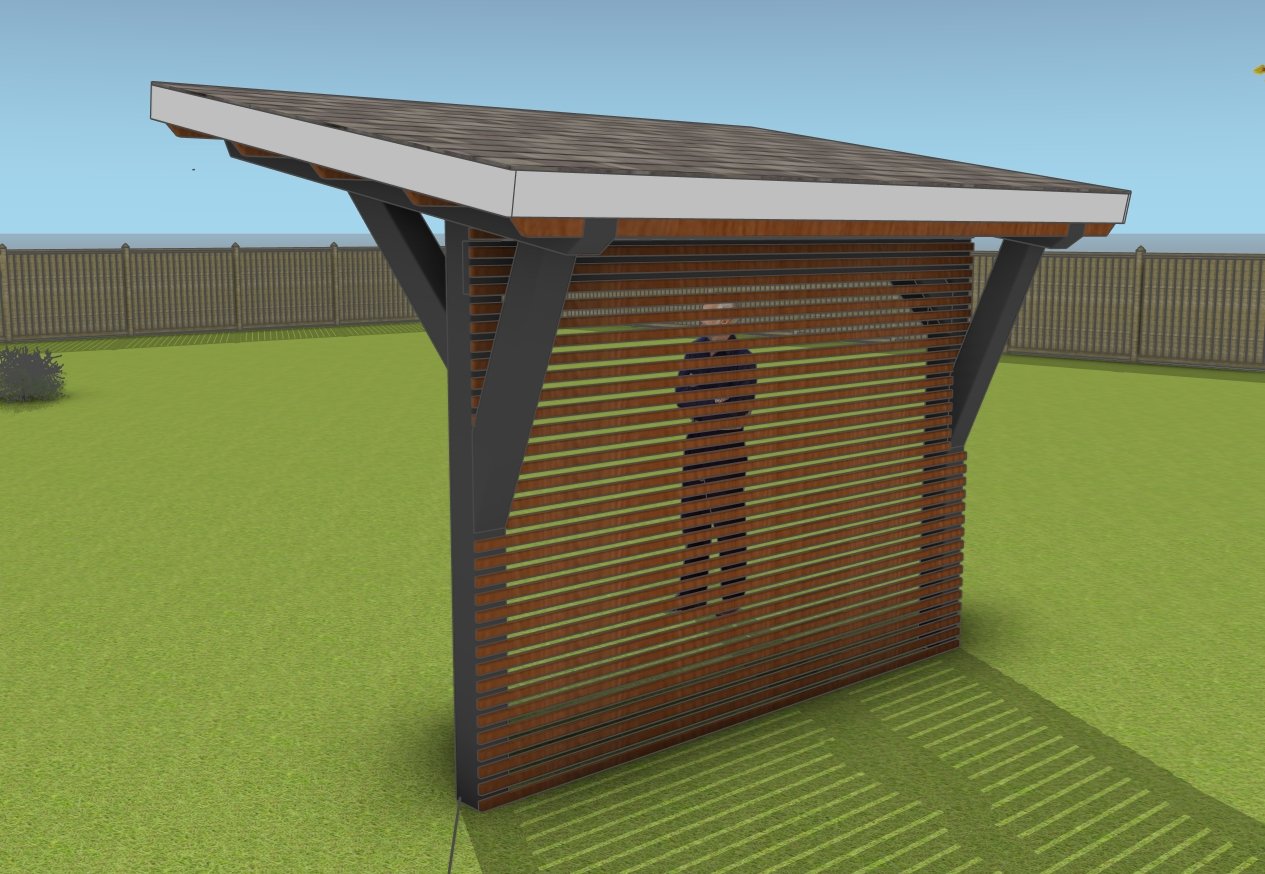
2 post pergola – back view
If you want to get this project as a PDF file, with 1 full cut list and 1 full shopping list, check out the GET PDF PLANS button bellow.
This woodworking project was about DIY two legged cantilevered pergola plans. If you want to see more outdoor plans, check out the rest of our step by step projects and follow the instructions to obtain a professional result.


