Welcome to Part 2 of the DIY 4×8 Outhouse Build! With the main structure complete, it’s time to add those finishing details that take this project from functional to fantastic. In this phase, we’ll tackle the step installation, fine-tune the roof trims, and frame out the door opening. We’ll also discuss those all-important finishing touches to protect your outhouse from the elements while giving it a polished, professional look. Whether it’s sealing the joints, adding a splash of color, or installing some handy accessories, this is where your outhouse truly comes to life. Let’s dive in and wrap up this project in style!
When buying the lumber, you should select the planks with great care, making sure they are straight and without any visible flaws (cracks, knots, twists, decay). Investing in cedar or other weather resistant lumber is a good idea, as it will pay off on the long run. Use a spirit level to plumb and align the components, before inserting the galvanized screws, otherwise the project won’t have a symmetrical look. If you have all the materials and tools required for the project, you could get the job done in about a day. See all my Premium Plans HERE.
Projects made from these plans
DIY Outhouse Plans – PART 2
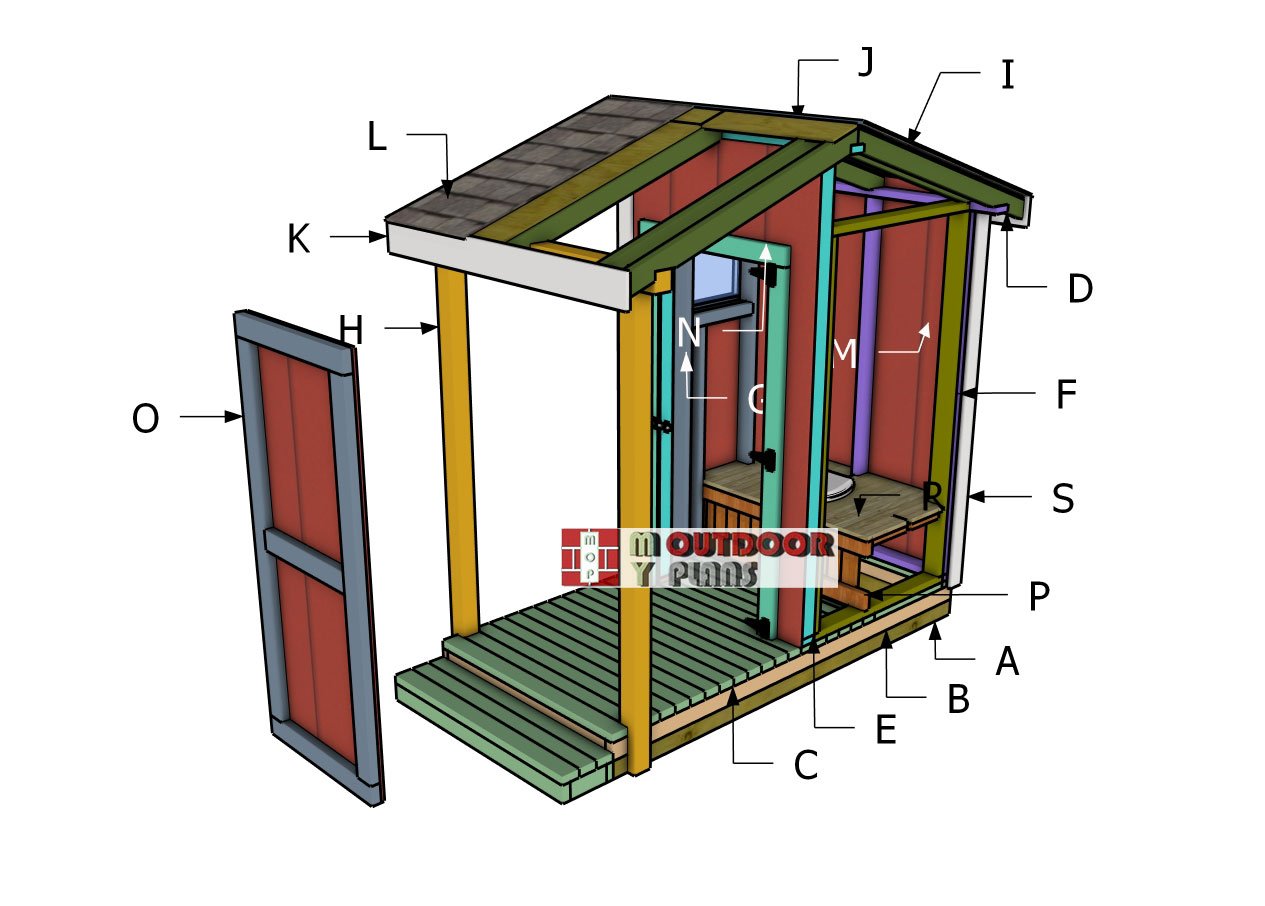
Building-an-outhouse
Cut + Shopping Lists
- C – STEP – 2×4 lumber 48″ – 5 pieces
- C – STEP – 2×4 lumber 8″ – 3 pieces
- J – ROOF SHEETS – 1/2″ plywood 48″x60″ – 2 pieces
- J – ROOF SHEETS – 1/2″ plywood 6 1/2″x30″ – 2 pieces
- K – ROOF TRIMS – 1×6 lumber 56 5/8″ – 4 pieces
- K – ROOF TRIMS – 1×6 lumber 61 1/2″ – 2 pieces
- L – ROOFING – tar paper & asphalt shingles – 60 sq ft
- M – SIDING – 5/8″ T1-11 4’x8′ – 3 pieces
- M – SIDING – 5/8″ T1-11 4’x82 1/2″ – 1 piece
- N – JAMBS – 2×4 lumber 72″ – 2 pieces
- N – JAMBS – 2×4 lumber 37″ – 1 piece
- O – DOOR – 2×4 lumber 30″ – 2 pieces
- O – DOOR – 2×4 lumber 65″ – 2 pieces
- O – DOOR – 2×4 lumber 23″ – 1 piece
- P – SUPPORTS – 2×4 lumber 48″ – 2 pieces
- P – SUPPORTS – 2×4 lumber 23 3/4″ -2 pieces
- P – SUPPORTS – 2×4 lumber 12 5/8″ -2 pieces
- P – SUPPORTS – 2×4 lumber 8 7/8″ -2 pieces
- P – SUPPORTS – 1×4 lumber 16 1/2″ – 12 pieces
- R – SUPPORTS – 1/2″ plywood 24″x29 1/2″ – 2 pieces
- S – CORNER TRIMS – 1×4 lumber 78 1/2″ – 4 pieces
- S – CORNER TRIMS – 1×4 lumber 92 1/4″ – 4 pieces
Tools
![]() Hammer, Tape measure, Framing square, Level, Shovel
Hammer, Tape measure, Framing square, Level, Shovel
![]() Miter saw, Drill machinery, Screwdriver, Sander
Miter saw, Drill machinery, Screwdriver, Sander
![]() Safety Gloves, Safety Glasses
Safety Gloves, Safety Glasses
Time
![]() One weekend
One weekend
Related
- 6×8 Lean to Shed Plans
- Outhouse Plans
- Simple Outhouse Plans
- PART 1: Outhouse plans
- PART 2: Outhouse plans
Step 4: Building the outhouse floor
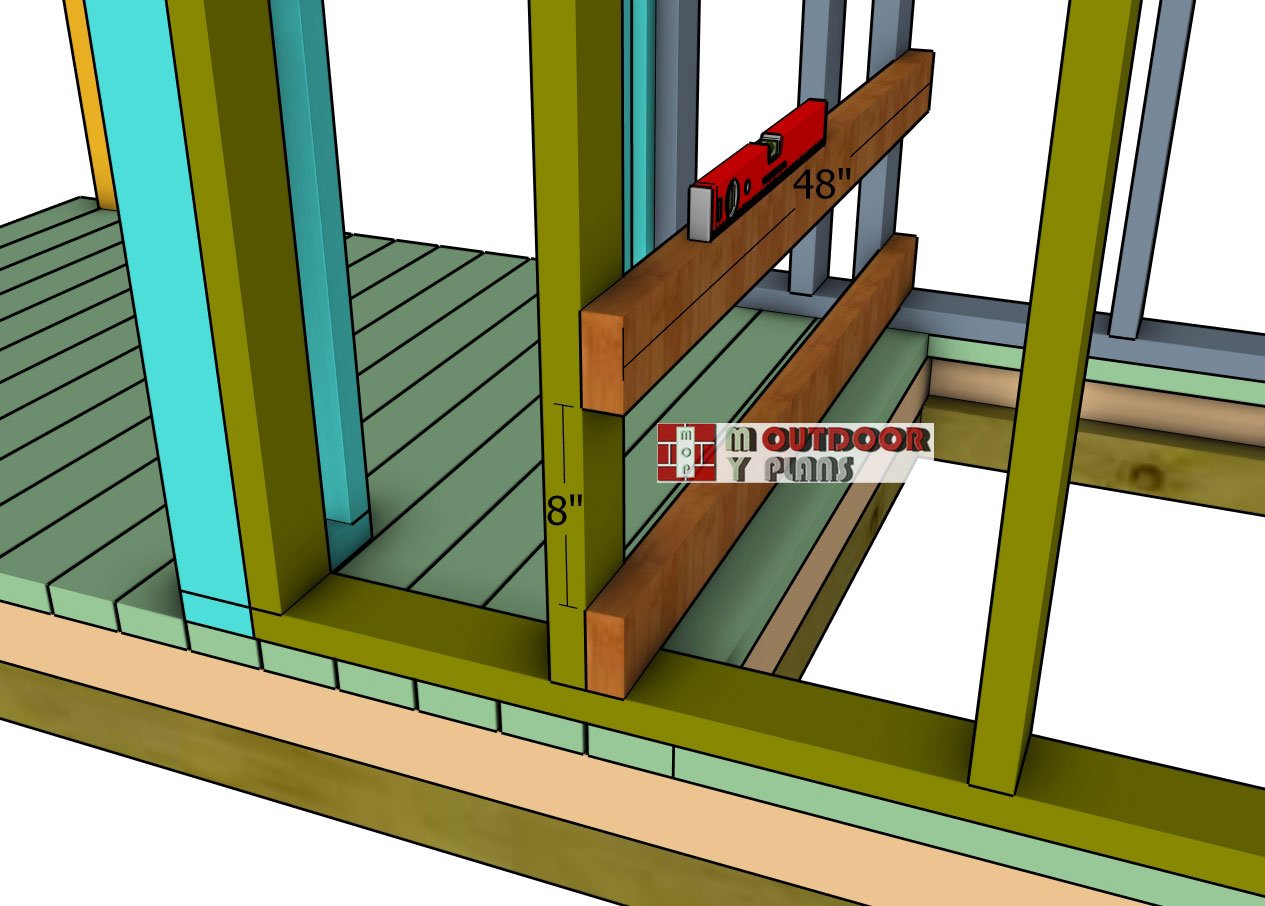
Seat-supports
Attach the 2×4 supports to the outhouse to reinforce its structure and ensure stability. Position each support carefully, aligning it properly with the frame. Drill pilot holes to prevent splitting, and secure the supports with 2 1/2″ screws. Use two screws for each joint, making sure everything is tightly locked into place.
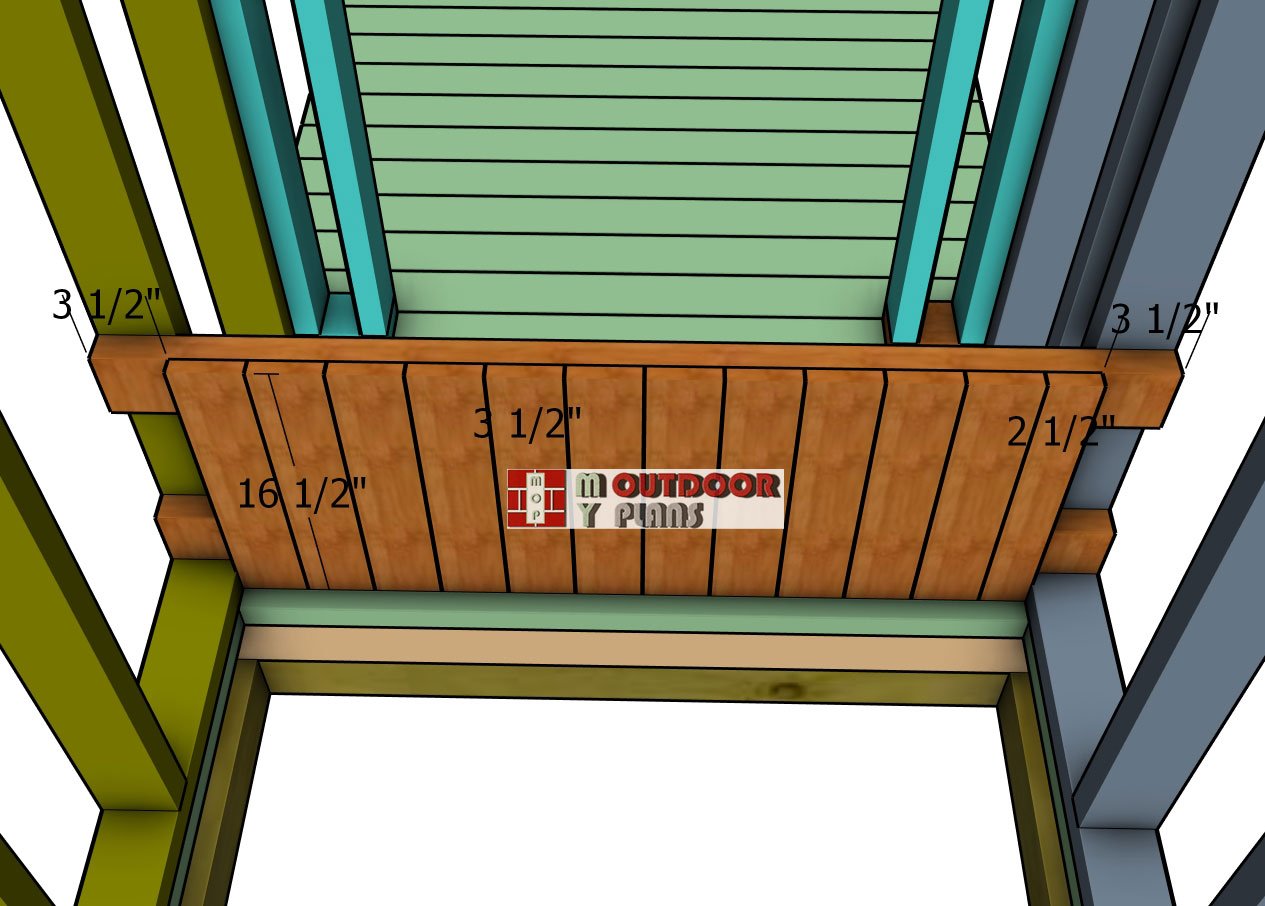
Toilet-seat-front-panel
Secure the 1×4 boards to the supports to form the front panel of the toilet seat area. Position the boards snugly against each other, ensuring there are no gaps for a clean and polished look. Drill pilot holes to avoid splitting the wood, then fasten the boards to the supports using 1 5/8″ screws.
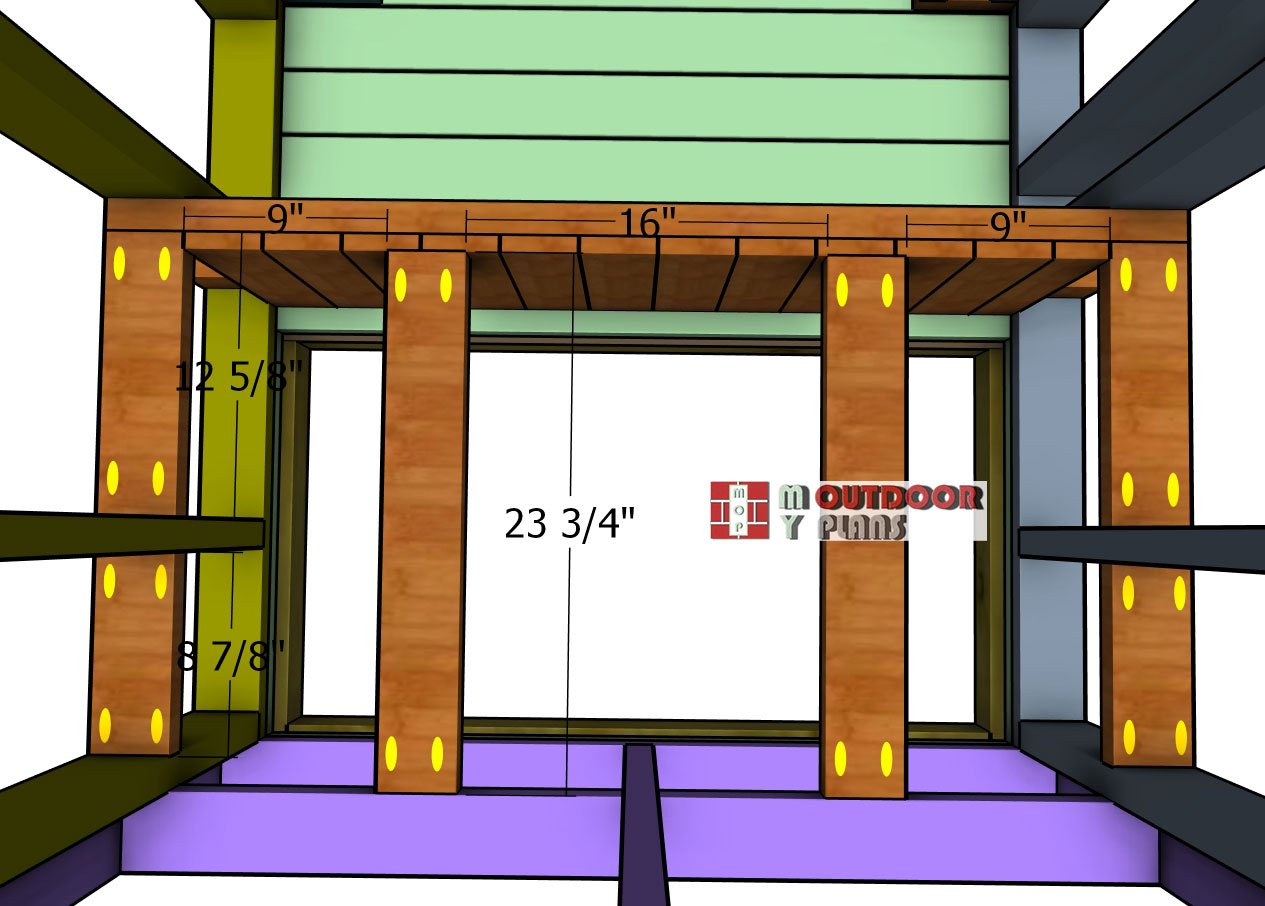
Top-supports-for-toilet-seat
Now it’s time to attach the 2×4 supports to the top of the toilet seat. Start by drilling pocket holes at both ends of each support, ensuring precision for a strong connection. Position the supports on the frame and secure them using 2 1/2″ screws. For a cleaner and more professional look, orient the pocket holes so they face towards the ground, keeping them out of sight.
Toilet-seat-top-panel
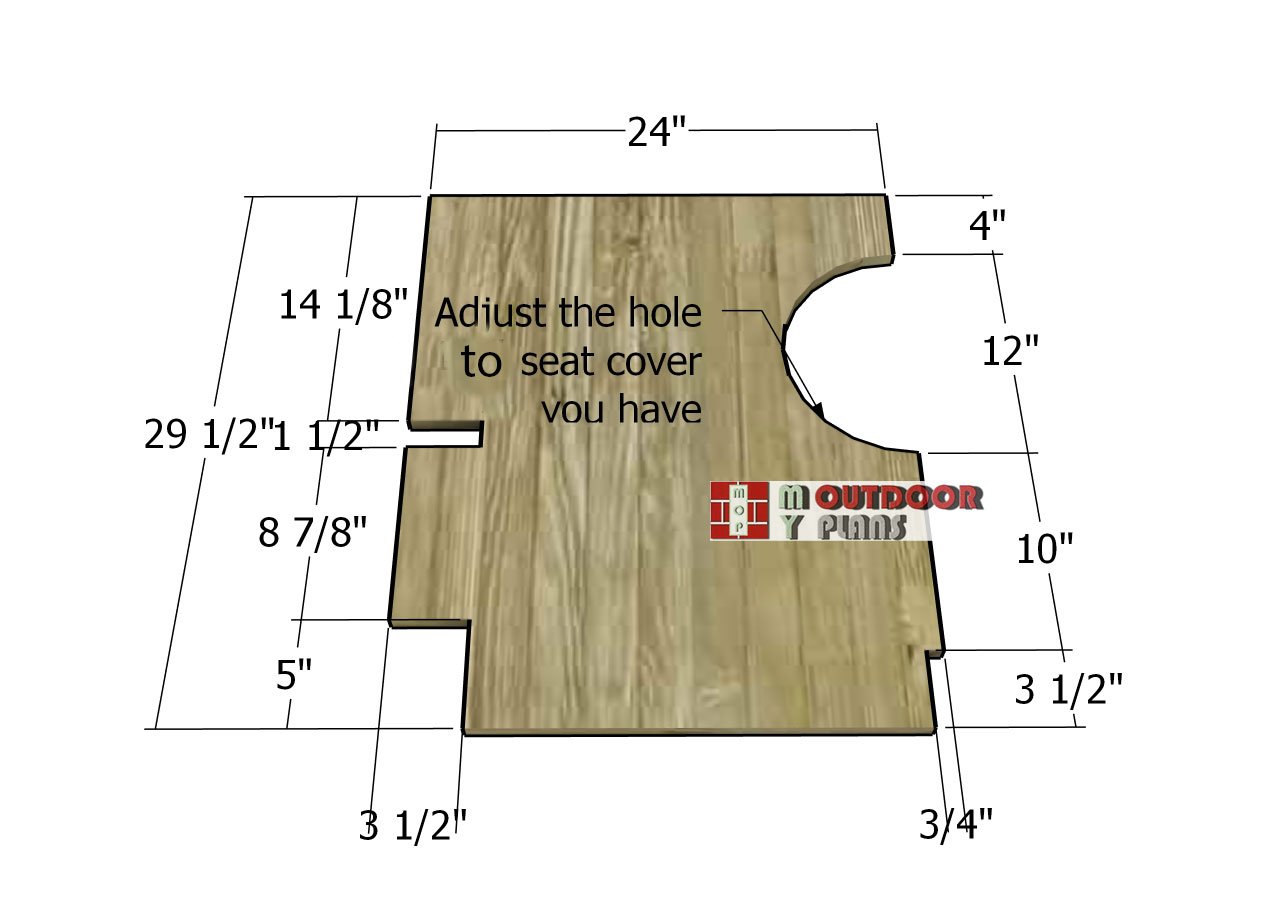
For the top of the toilet seat, you can use 1/2″ plywood for a smooth and sturdy surface. Start by marking the cut lines based on your measurements, ensuring a precise fit. Then, cut along the lines using a jigsaw for clean edges and rounded corners if needed. If you prefer a more decorative look, you can opt for 1×4 boards instead, laying them side by side and securing them to the frame.
Toilet-seat-cover
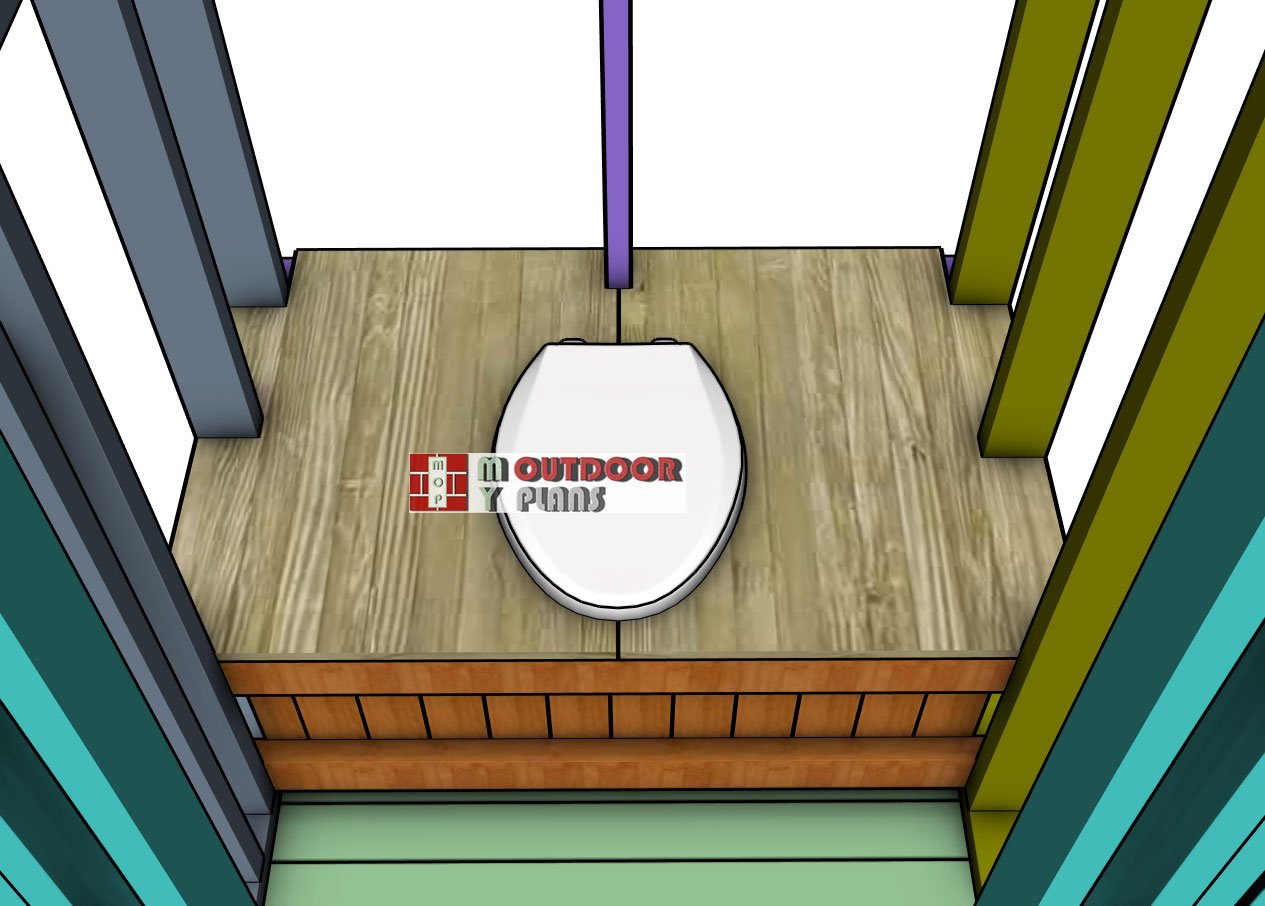
Fit the plywood panels to the top of the seat frame and lock them into place with 1 5/8″, every 8″ along the supports.
Back-and-side-panels
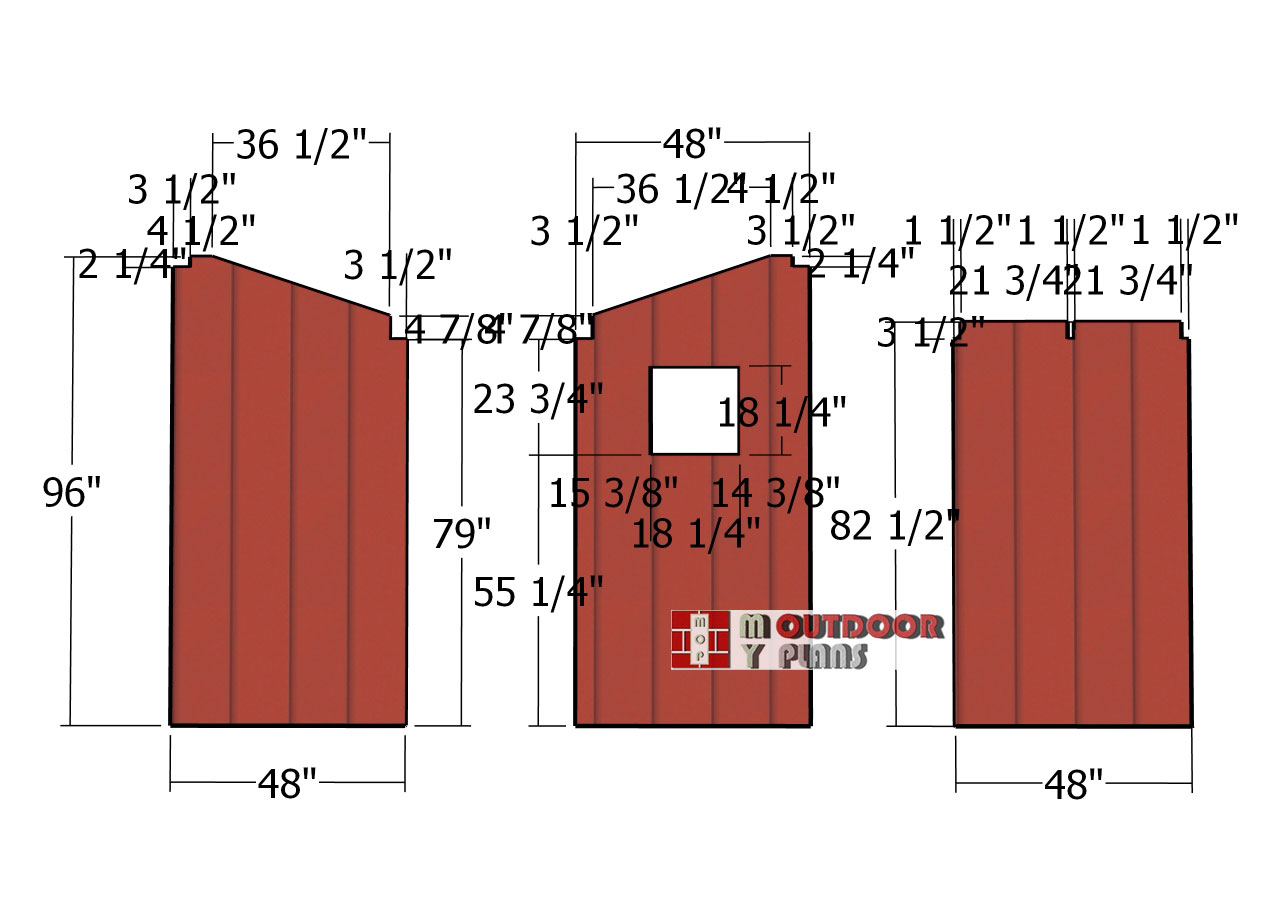
To finish the exterior of your DIY outhouse, we’ll be using 5/8″ T1-11 siding panels for a durable and rustic look. Start by cutting the panels to size according to the dimensions in the diagram. Pay close attention to areas where notches are needed—these will allow the panels to fit snugly around the frame. Don’t forget to account for the side window opening; measure and cut precisely to ensure a clean fit.
Attaching-the-front-siding-panel
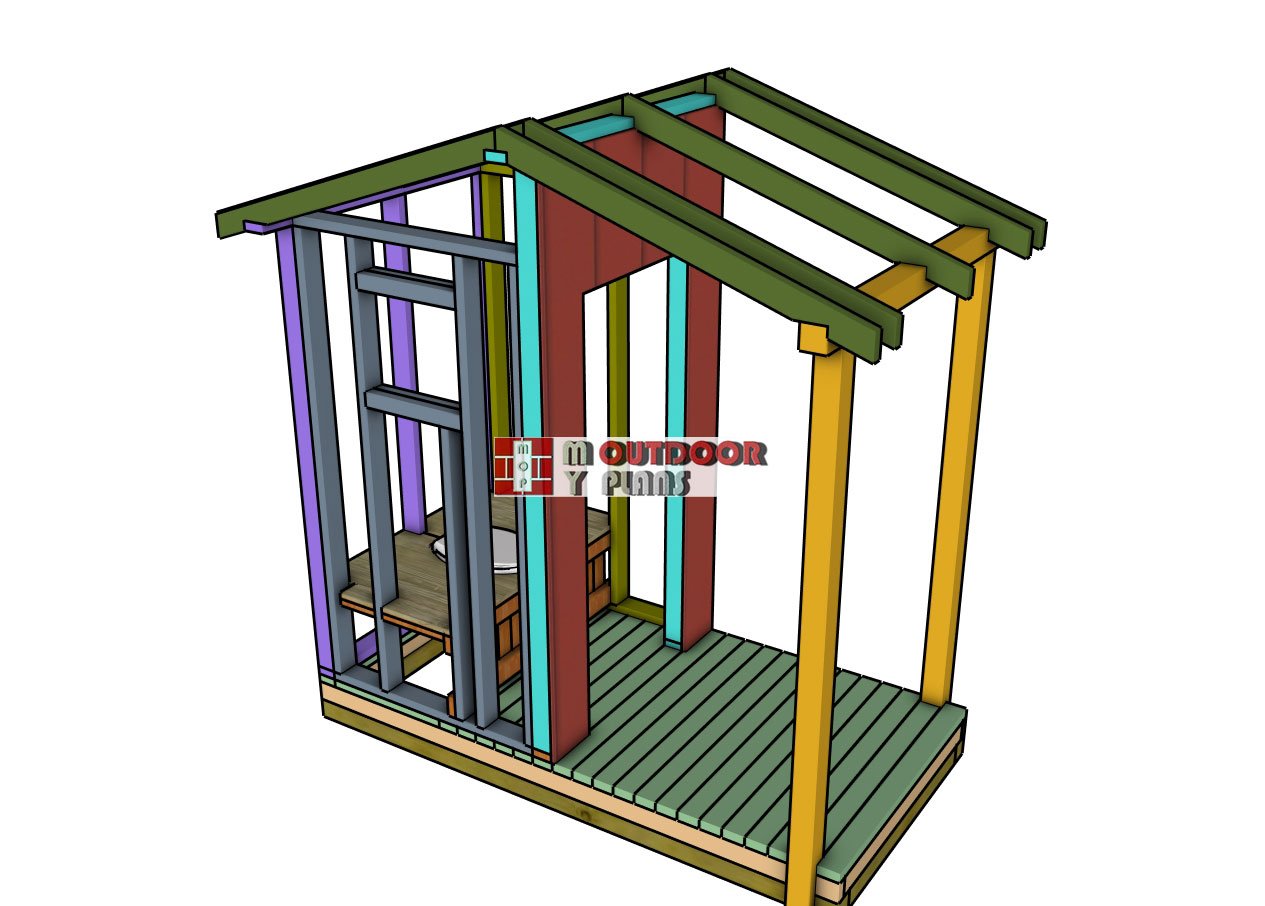
Attach the T1-11 siding panel to the front of the outhouse, making sure to carefully align the edges around the door opening for a precise fit. Once positioned, secure the panel to the front wall frame using 8d nails. Space the nails evenly, about every 8″, along the studs and structure to ensure a sturdy and long-lasting hold.
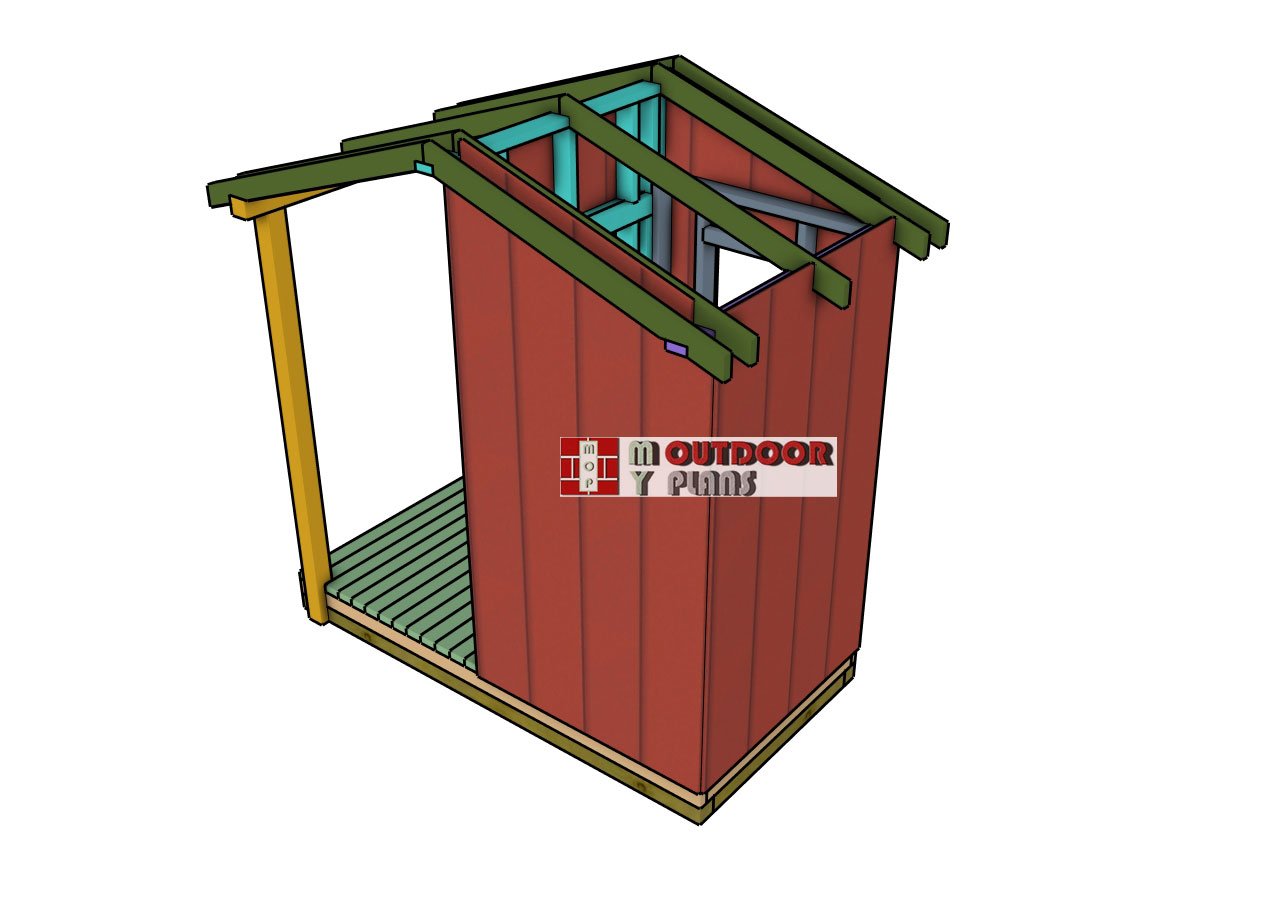
Fitting-the-side-and-back-siding-panels
Attach the siding panels to the sides and back of the outhouse to complete the exterior walls. Carefully align the edges of each panel with the frame, ensuring a snug and precise fit. Once positioned, secure the panels in place using 8d nails, spaced evenly every 8″ along the studs and structural supports.
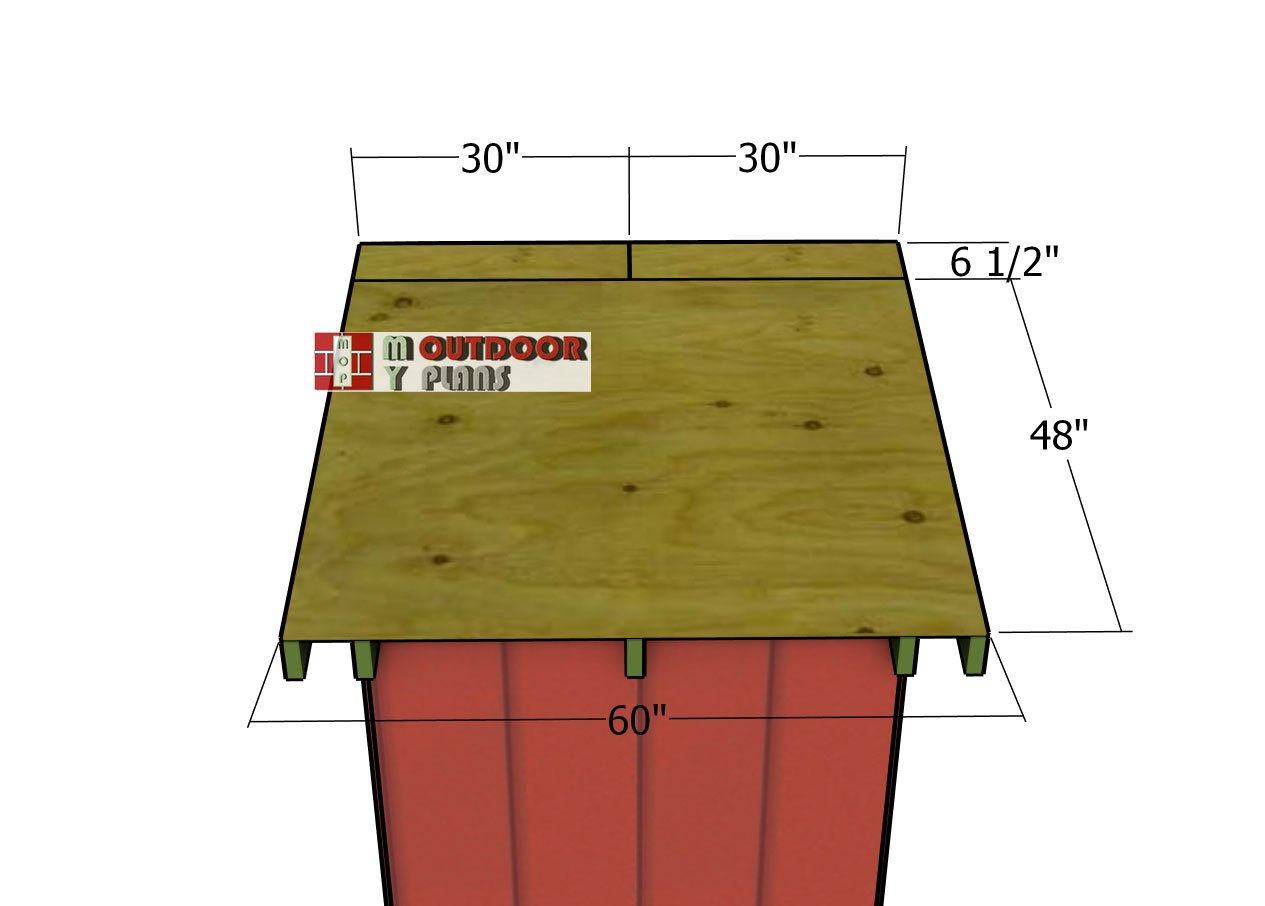
Roof-sheets
Attach the 1/2″ plywood sheets to the top of the outhouse to form the roof deck. Align the edges carefully with the sides and the bottom of the roof structure to ensure a clean and precise fit. Drill pilot holes to prevent splitting, then secure the plywood to the rafters using 1 5/8″ screws, spaced every 8″ along each rafter. Make sure the sheets are tightly joined with no gaps between them for a solid and weatherproof surface.
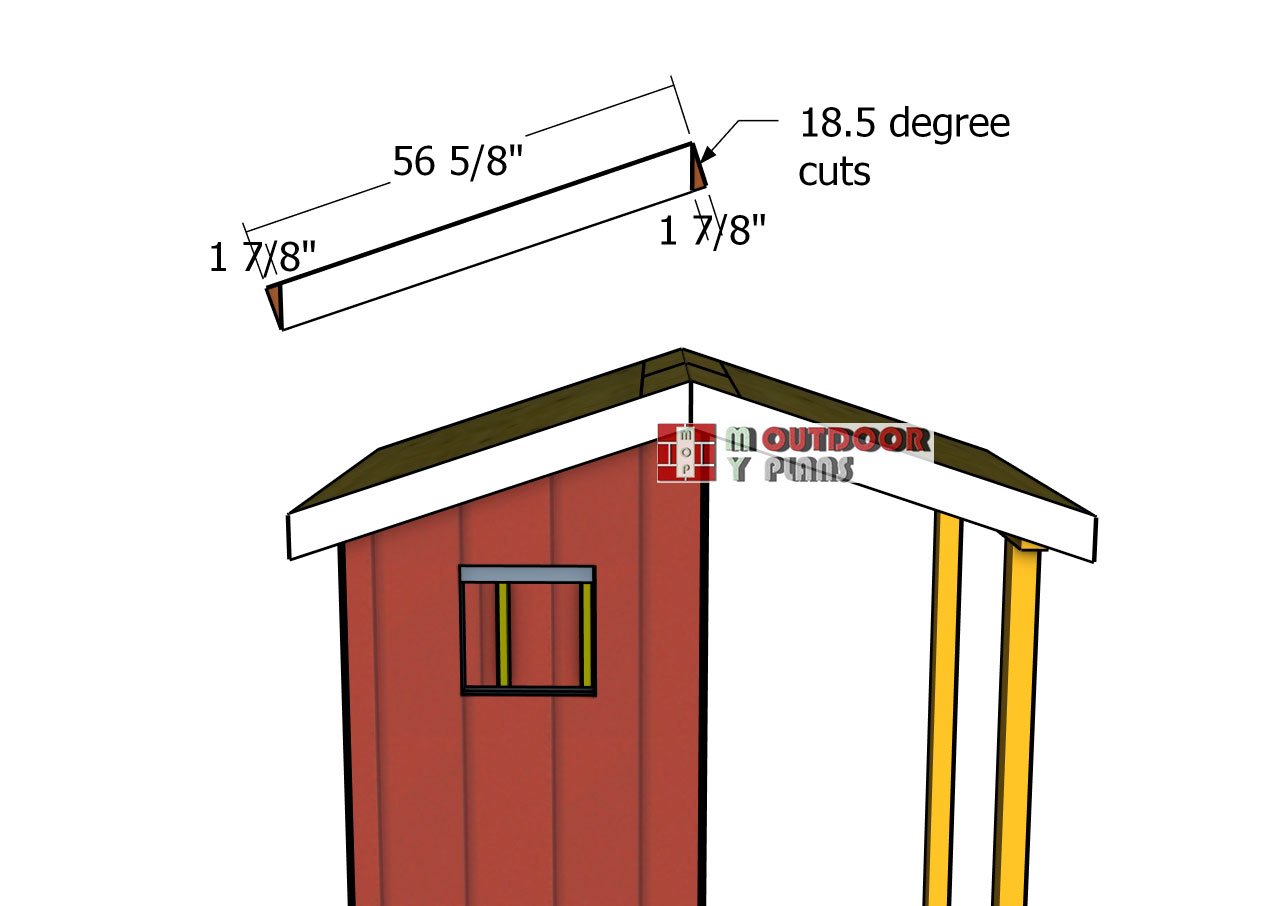
Side-roof-trims
For the roof trims, use 1×6 lumber to add a polished and protective finish. Cut the side trims at 18.5-degree angles on both ends to ensure they fit snugly along the roofline. Carefully position the trims, making sure there are no gaps between them for a seamless look. Secure the trims to the roof structure using 8d nails or 1 5/8″ screws, spacing them evenly for a firm and lasting hold.
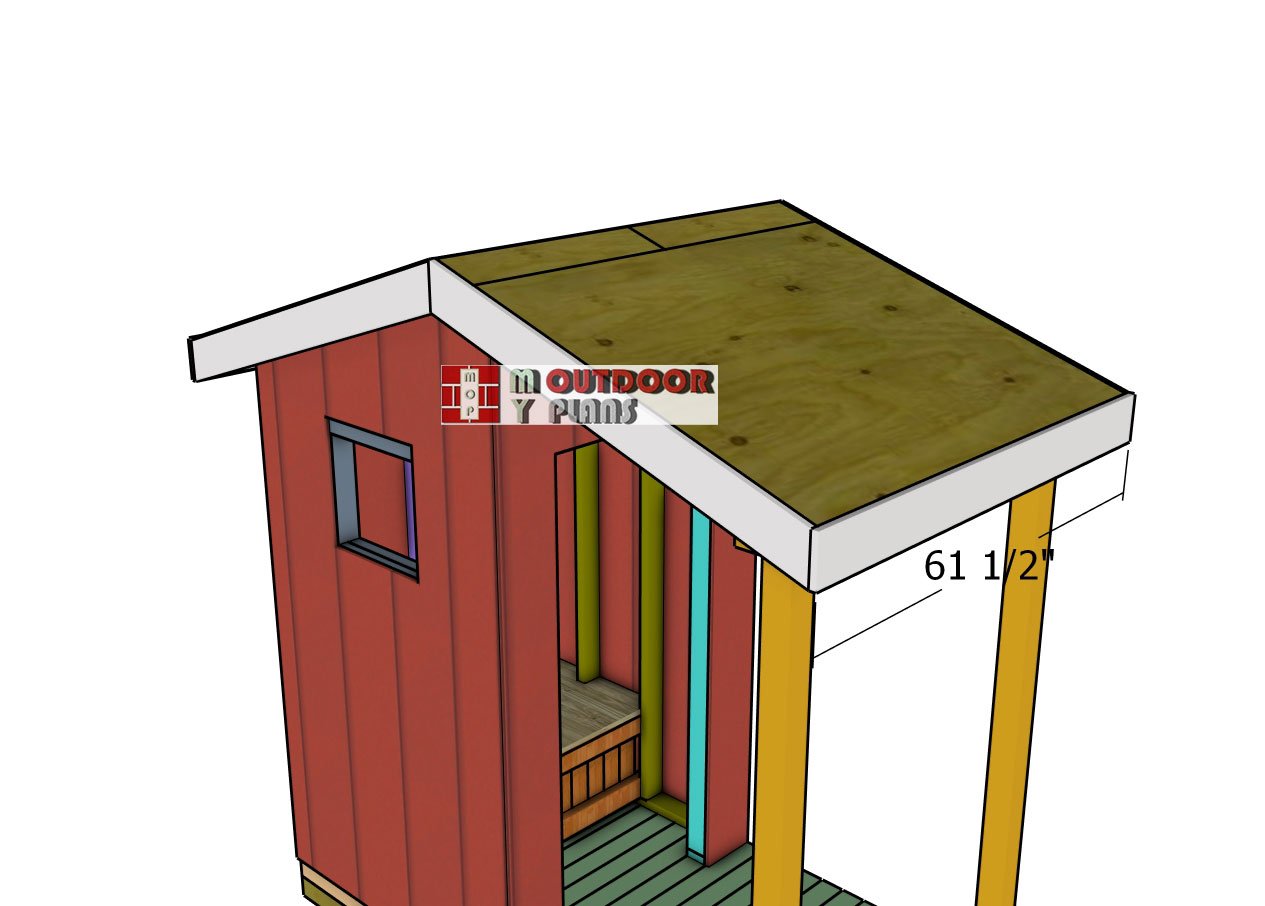
Front-and-back-roof-trims
Don’t forget to attach the 1×6 trims to the front and back of the outhouse to complete the roof detailing. Cut the trims to size, ensuring they align perfectly with the side trims for a cohesive look. Secure them with 8d nails or 1 5/8″ screws, spacing the fasteners evenly for a clean and sturdy finish. Take care to eliminate any gaps between the trims for a seamless and polished appearance.
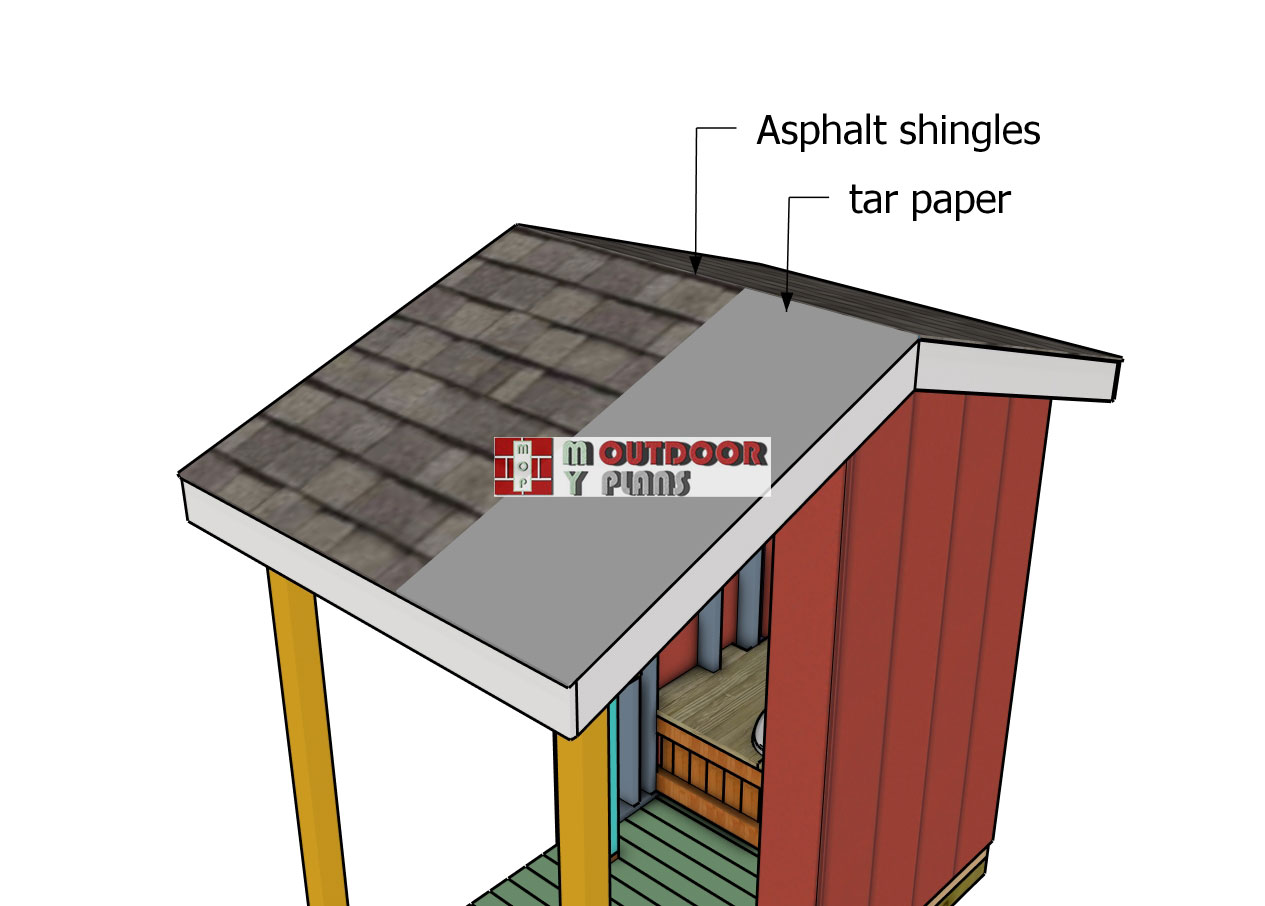
Fitting-the-roofing
Fitting asphalt shingles to the gable roof of your outhouse is the final touch that seals the deal—literally! Start by covering the plywood roof with a layer of tar paper, overlapping the sheets by at least 2″ to create a waterproof barrier. Next, install drip edges along the eaves and gable edges to guide water away and protect the roof structure from moisture damage.
Once the underlayment is set, begin laying the shingles from the bottom up, staggering them for proper coverage and nailing them in place according to the manufacturer’s instructions. At the ridge, cap things off with ridge shingles or a cut section of asphalt shingles, ensuring the top of your outhouse is secure and weather-tight.
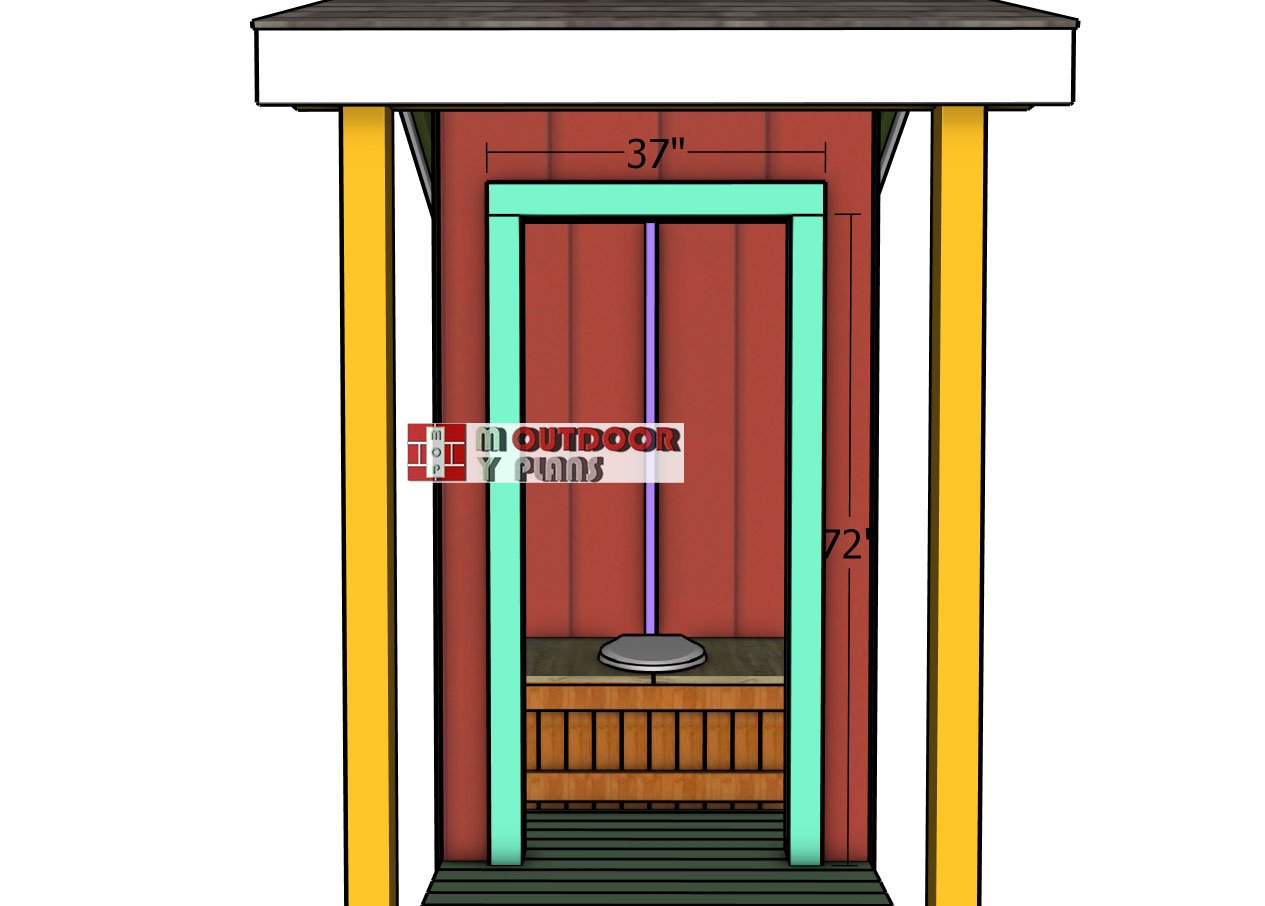
Door-jambs
Frame the door opening by fitting 2×4 boards around it for added structure and durability. Align the boards flush with the edges of the opening, ensuring a clean and precise fit. Secure the boards tightly to the wall frame using 3 1/2″ screws. Space the screws evenly, about every 8″, along the length of the frame to create a strong and stable connection.
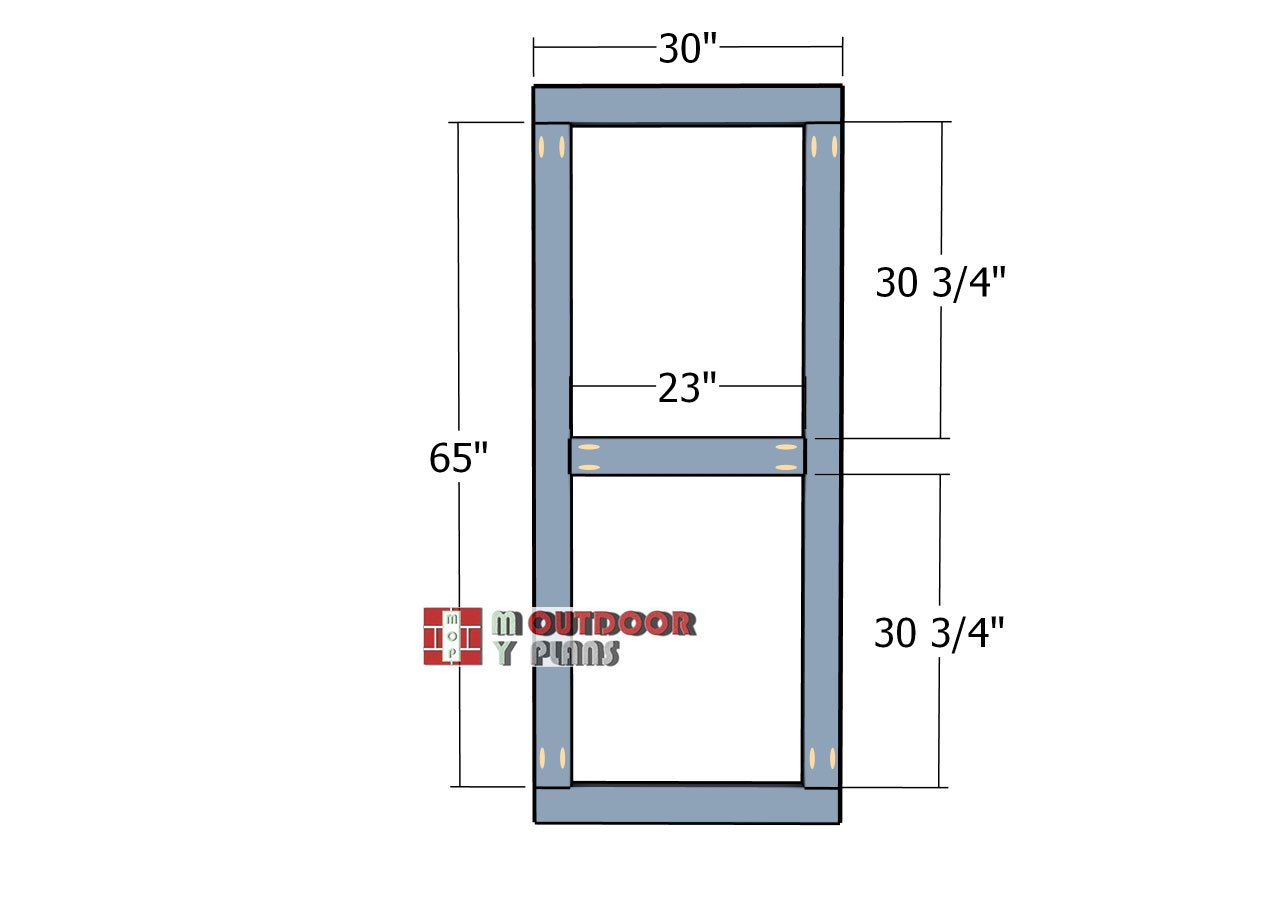
Door-frame
Let’s build the door frame! Cut your 2×4 lumber to size for a sturdy and reliable structure. Drill pocket holes at both ends of the vertical and horizontal pieces to create tight, secure joints. Lay the pieces out on a flat surface, taking care to ensure the corners are perfectly square for a precise fit.
Once everything is aligned, fasten the pieces together by driving 2 1/2″ screws into the pocket holes. This method guarantees a rock-solid frame that’s built to withstand daily use and provide dependable support for your shed door.
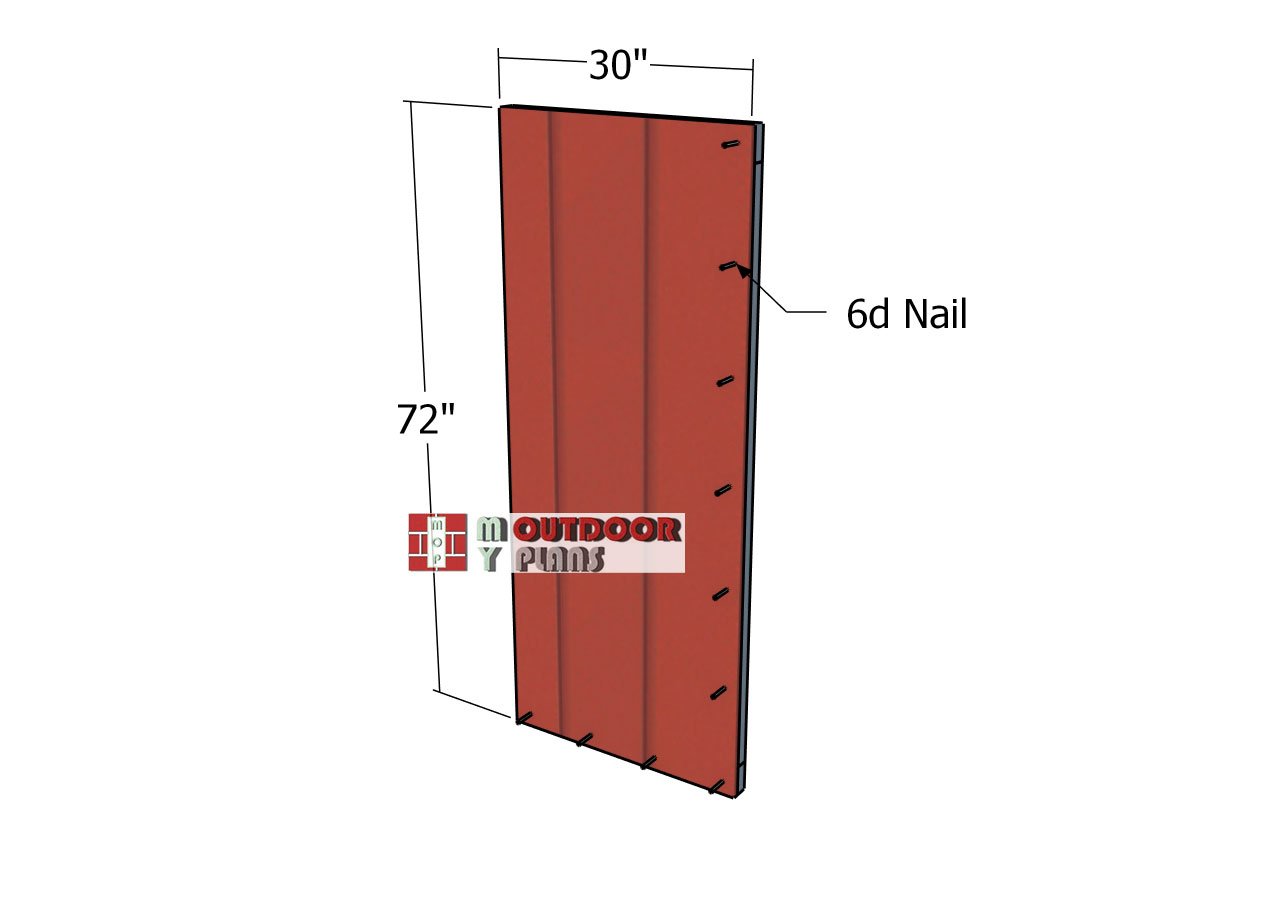
Fitting-the-door-panel
Remember the panel you cut out from the front wall siding? It’s time to bring them back into action! Attach the panel to the door frame, ensuring they’re perfectly aligned for a clean, seamless appearance. Secure them with 8d nails, spacing them evenly along the edges to lock everything together firmly.
This step not only gives your doors a polished, professional finish but also reinforces their strength and durability, making them ready to handle the rigors of daily use.
Fitting-the-door
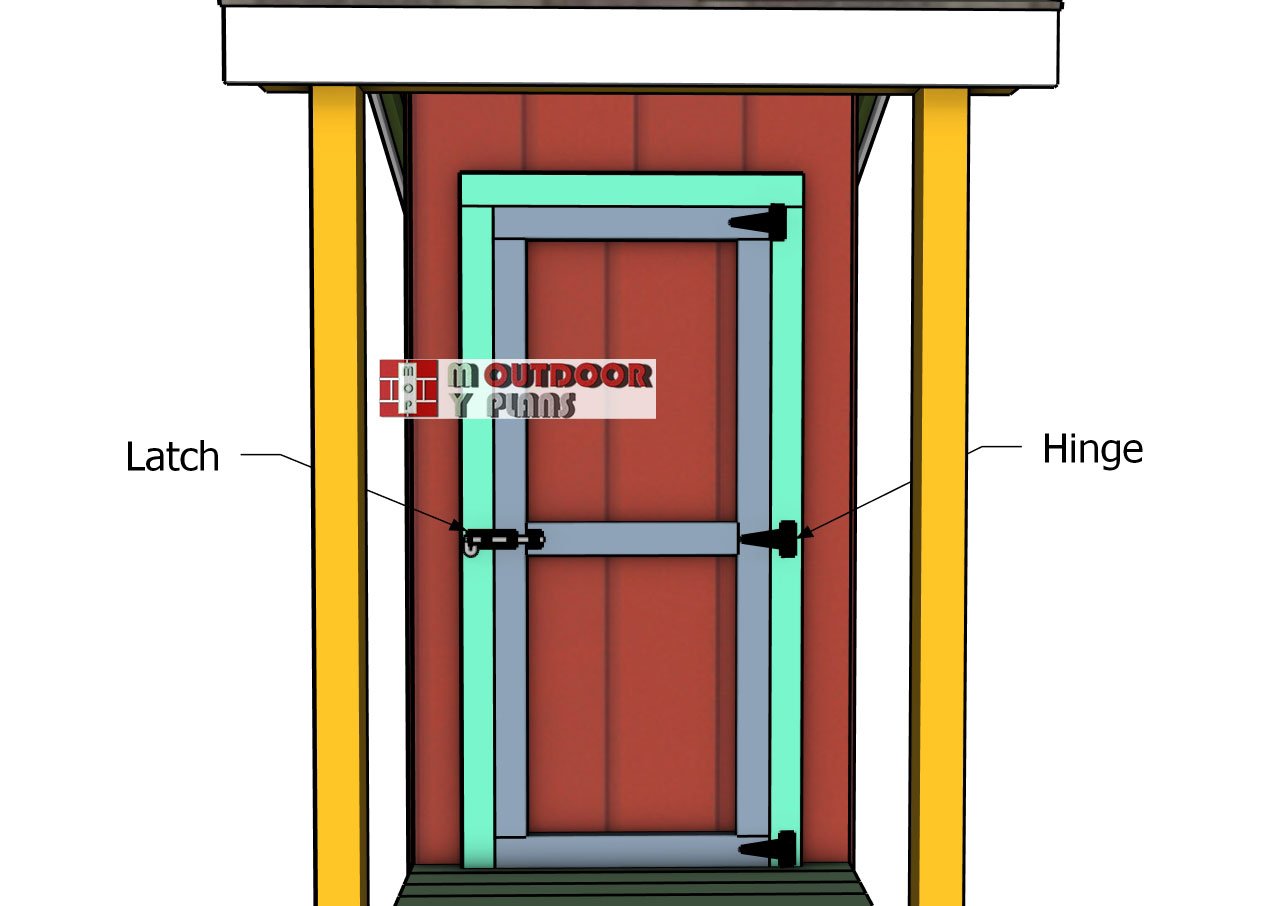
Fit the door into the opening, ensuring it aligns perfectly with the jambs for a smooth, polished look. Attach the door to the jambs using heavy-duty hinges, spacing them evenly along the edges for reliable support and easy operation. Finish up by installing a sturdy latch to keep your door secure and your belongings safe.
Step-frame
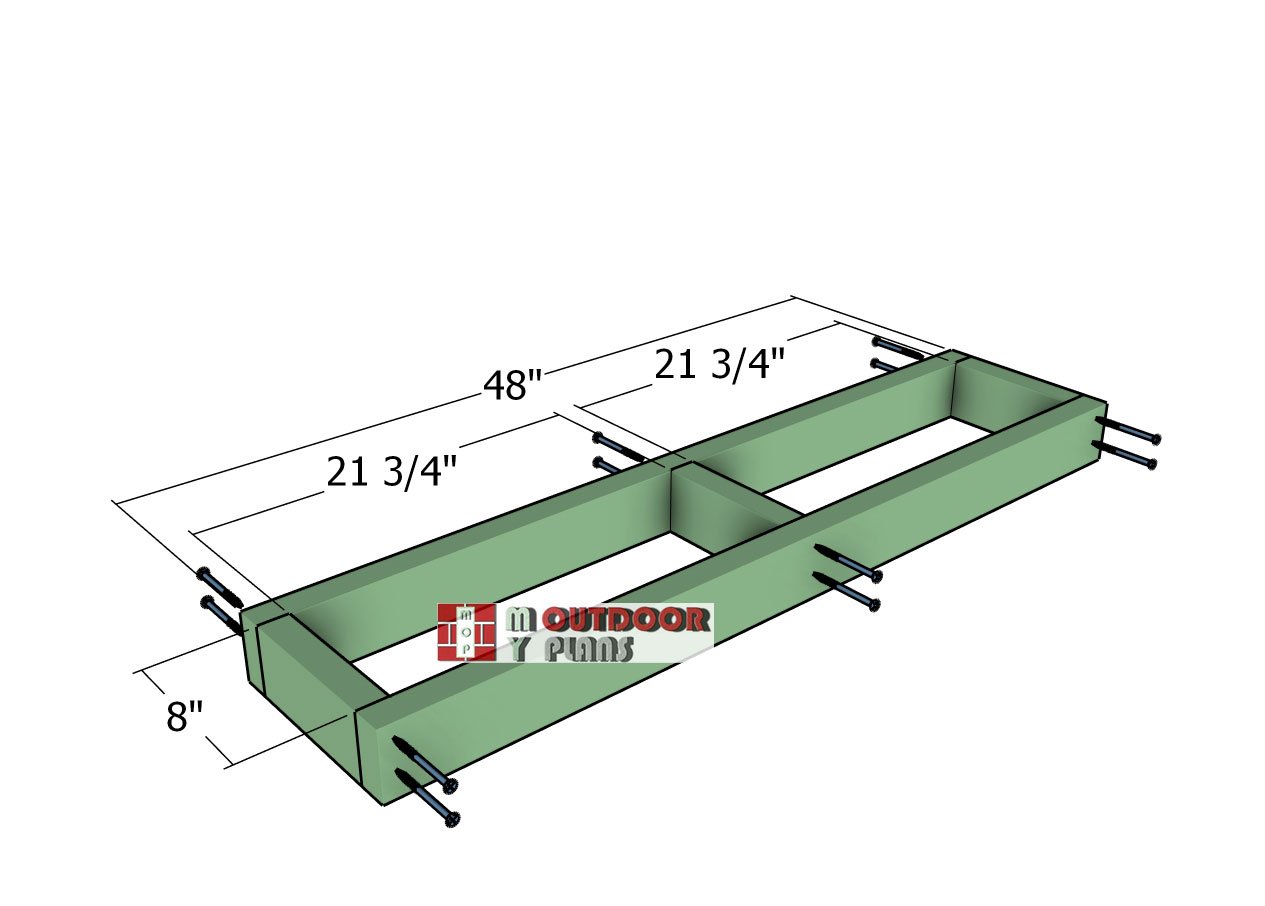
Construct the frame for the front step using 2×4 lumber for a sturdy and reliable base. Start by cutting the components to size and laying them out on a level surface. Position the 48″ long joists and insert the blockings between them for added support. Drill pilot holes through the joists to prevent splitting, then secure the blockings with 3 1/2″ screws. Ensure the edges are flush and the corners are square as you assemble the frame.
Step-slats
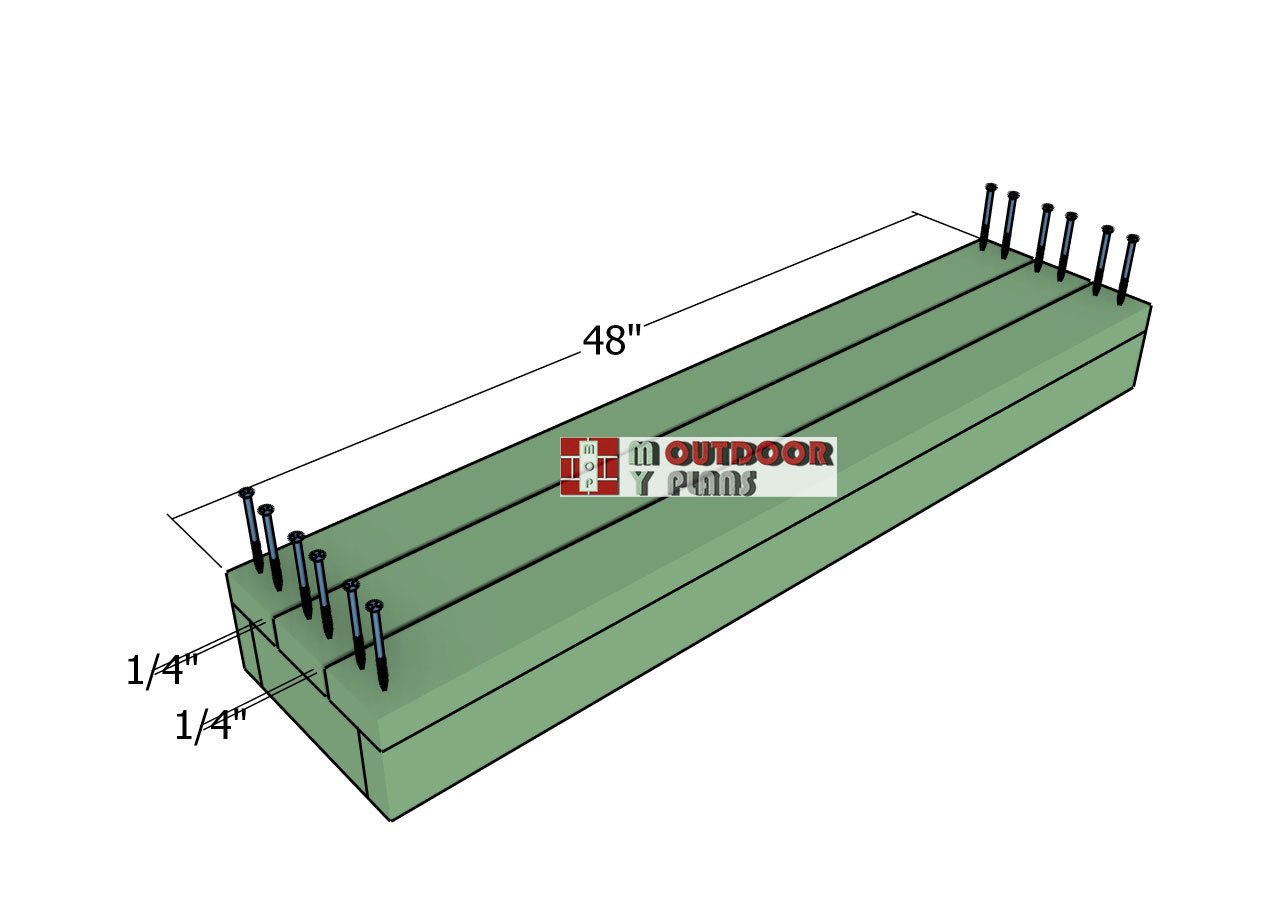
Secure the 2×4 decking boards to the step frame to complete the front step. Position the boards carefully, aligning the edges for a uniform and polished look. Drill pilot holes to prevent splitting, then fasten the boards to the frame using 2 1/2″ screws. Space the screws evenly along each board for a strong and secure fit.
Fitting-the-step
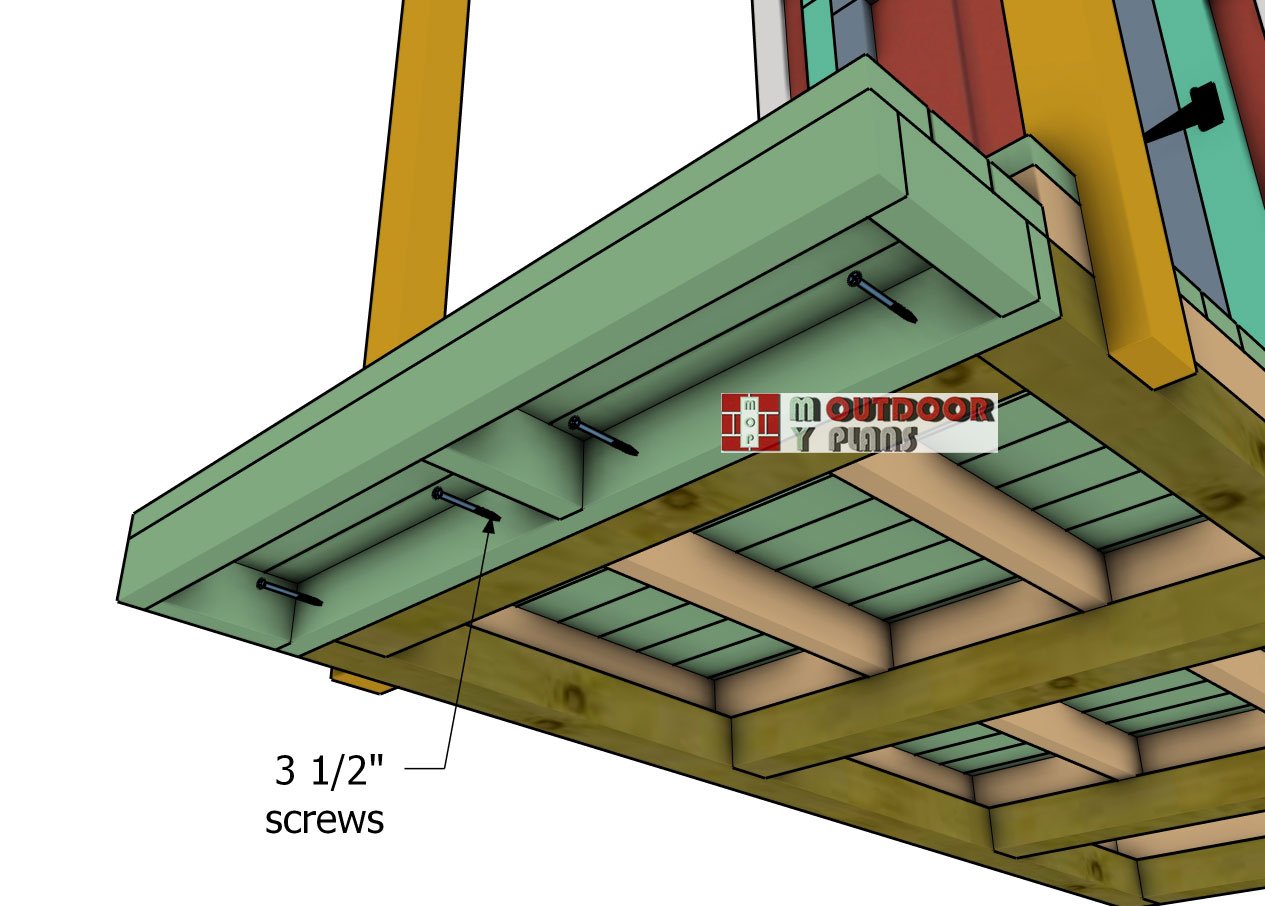
Secure the step frame to the skids using 3 1/2″ screws, ensuring it is firmly anchored for stability. To prevent moisture issues, consider placing gravel or concrete pads underneath the step frame—this will help keep the area dry and extend the lifespan of your step. For easier assembly, it’s a smart move to install the step frame first. Once it’s securely attached, you can add the decking boards, giving you unobstructed access to insert the screws without hassle. This method ensures a durable and professional finish for your outhouse step!
DIY 4×8 Outhouse with Porch
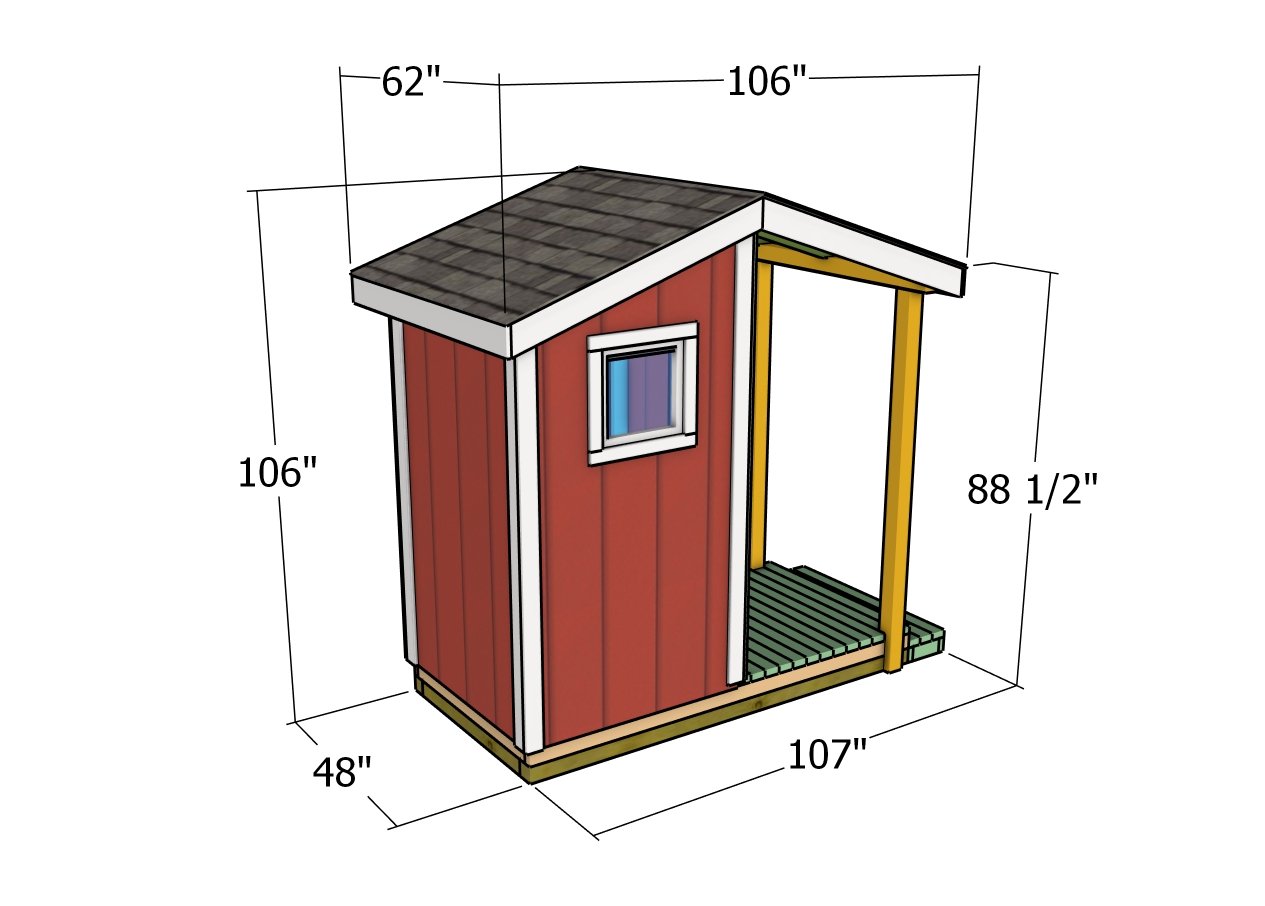
DIY outhouse – dimensions
Finishing touches are where your outhouse project truly comes to life, combining functionality with style. Start by filling any visible gaps or screw holes with wood filler for a seamless look, then sand the entire structure to remove rough edges and prepare it for finishing. Apply a weather-resistant wood stain or exterior-grade paint to protect the outhouse from the elements and give it a polished appearance. Don’t forget to seal all joints and edges with caulk for extra moisture protection.
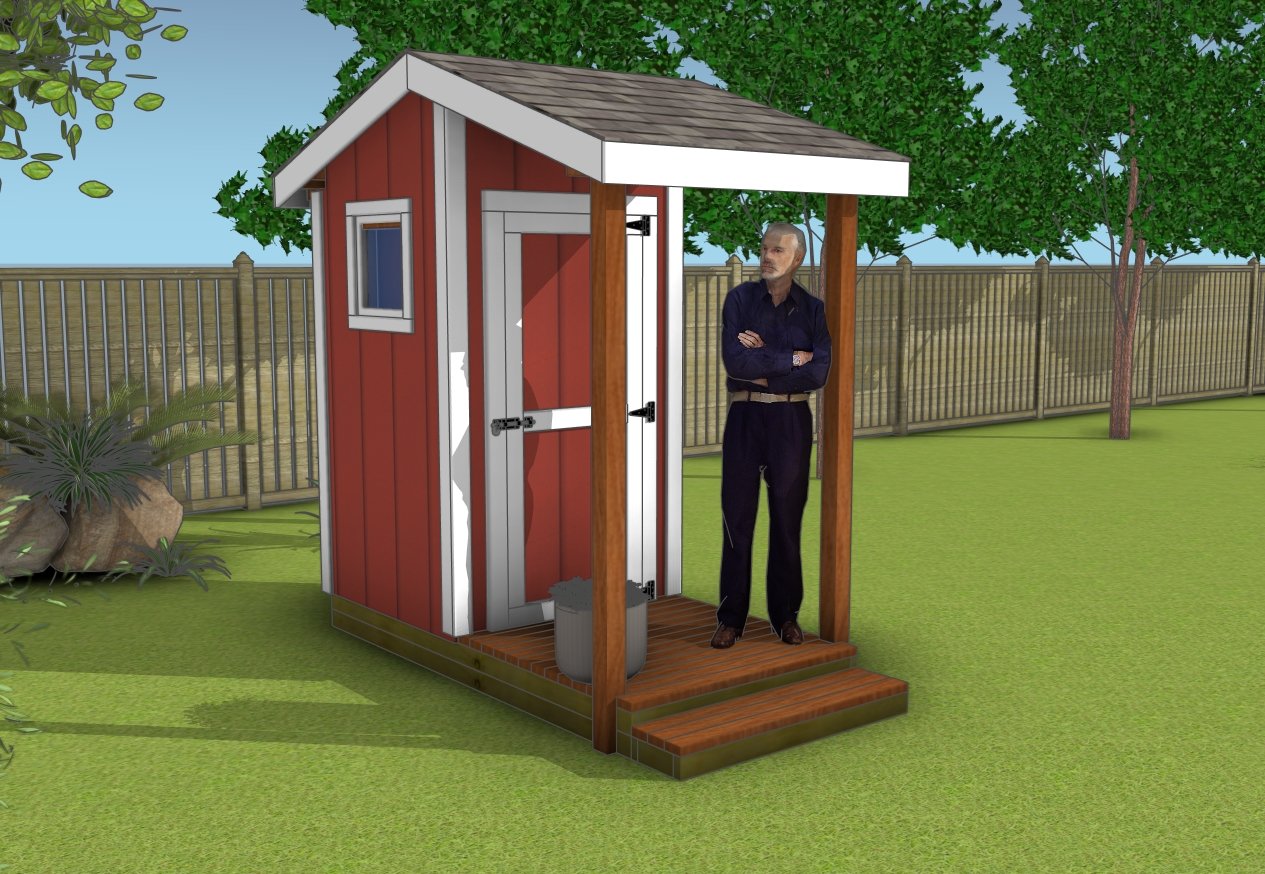
How to build an outhouse
For added charm, consider installing hardware like a decorative door handle or hinges that complement the rustic vibe of the outhouse. Adding a vent or small exhaust fan is another practical upgrade to improve airflow. Finish off the space with thoughtful details like hooks for hanging essentials, a small shelf, or even a solar-powered light to make it more functional. These final touches not only enhance the look but also make your outhouse a standout feature in your outdoor setup!
Before you can start building, it’s crucial to prepare the site for your outhouse properly. Begin by selecting a location that is both accessible and practical, keeping it a safe distance from water sources, as per local regulations. Clear the area of any vegetation or debris, and level the ground to create a stable foundation. For added stability, consider laying a gravel base or concrete pads to prevent shifting and improve drainage. If you’re working on soft or uneven ground, anchoring the base with ground screws or heavy-duty stakes can add extra security. Taking the time to prep the site ensures your outhouse remains sturdy and functional for years to come.
Once the structure is complete, it’s time to make your outhouse operational. If you’re using a composting system, install a proper composting toilet unit and ensure adequate ventilation with a vent pipe or small exhaust fan. For a traditional pit toilet, dig a deep hole beneath the structure, ensuring it complies with local codes and guidelines. Add a layer of gravel to the pit for better drainage. To improve usability, consider adding a small solar-powered light, a toilet paper holder, and even hooks for essentials like sanitizer or a towel. These small additions make the outhouse functional, comfortable, and ready for use in no time!
This woodworking project was about DIY outhouse with porch plans. If you want to see more outdoor plans, we recommend you to check out the rest of our step by step projects. LIKE us on Facebook to be the first that gets out latest projects and to hep us keep adding free woodworking plans for you.

