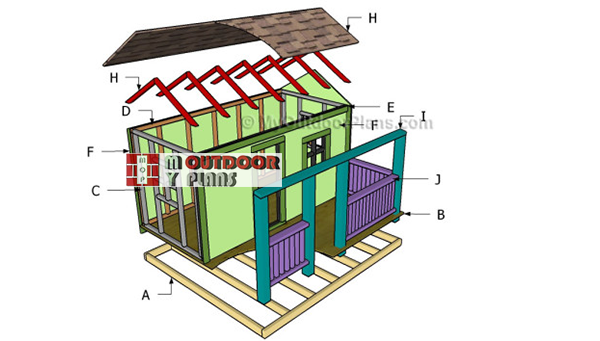
This step by step woodworking project is about playhouse roof plans. After building the frame of the outdoor playhouse, we recommend you to continue the woodworking project by installing the rafters and the roofing sheets. Moreover, don’t forget to enhance the look of the playhouse by attaching the railings to the front and to the sides of the front porch.
Select the materials with great care and attention. Make sure the lumber is perfectly straight and in a good condition, otherwise the end result might not raise up to your expectations. Pre-drill all the wooden components before inserting the screws, to prevent the wood from splitting. In addition, check the corners for squareness, after every step. Check out this article to read more about fitting the shingles on a roof. See all my Premium Plans HERE.
Projects made from these plans
Playhouse Roof Plans
Building-a-kids-playhouse
Cut & Shopping Lists
- H – 14 pieces of 2×2 lumber – 28 1/2” long RAFTERS
- H – 1 sheet of 3/4″ tongue and groove plywood – 33″x83 3/4″, 1 piece – 33″x21 3/4″, 1 piece – 27 3/4″x83 3/4, 1 piece -27 3/4″x21 3/4, 1 piece – 37 3/4″x84 3/4, 1 piece – 37 3/4″x21 3/4 ROOFING
- H – 100 sq dt of roofing felt, 100 sq ft of asphalt shingles ROOFING
- I – 4 pieces of 4×4 lumber – 45 3/4″, 1 piece of 2×4 lumber – 93″ POSTS
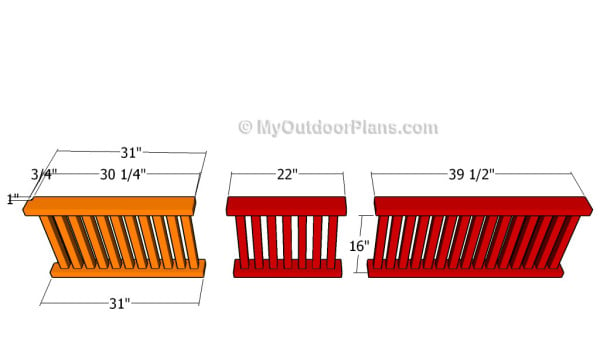
- J – 4 pieces of 2×4 lumber – 31″, 2 pieces – 22″, 2 pieces – 39 1/2″, 45 pieces of 2×2 lumber – 16″ RAILINGS
- 4 pieces of 2×2 lumber – 10′
- 2 pieces of 4×4 lumber – 8′
- 4 piece of 2×4 lumber – 8′
- 3 pieces of 3/4″ plywood – 4’x8′
- 9 pieces of 2×2 lumber – 8′
- 100 sq ft of tar paper, 100 sq ft of asphalt shingles
- 2 1/2″ screws, 1 5/8″ screws
Tools
![]() Hammer, Tape measure, Framing square
Hammer, Tape measure, Framing square
![]() Miter saw, Drill machinery, Screwdriver, Sander
Miter saw, Drill machinery, Screwdriver, Sander
Time
Related
- Part 1: Kids Playhouse Plans
- Part 2: Playhouse Roof Plans
Playhouse Roof Plans
Building-the-rafters
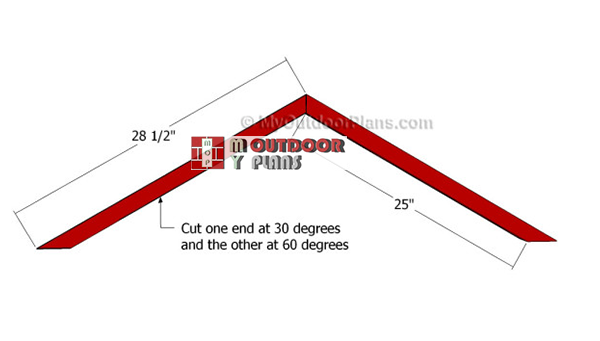
The first step of the woodworking project is to build the rafters for the roof of the playhouse. As you can easily notice in the diagram, we recommend you to build the rafters out of 2×2 lumber. Cut one end of the rafters at 30 degrees and the opposite at 60 degrees.
Take accurate measurements before building the rafters, otherwise the roof won’t have a professional result. Smooth the edges with sandpaper and check if all components are the same.
Fitting the rafters
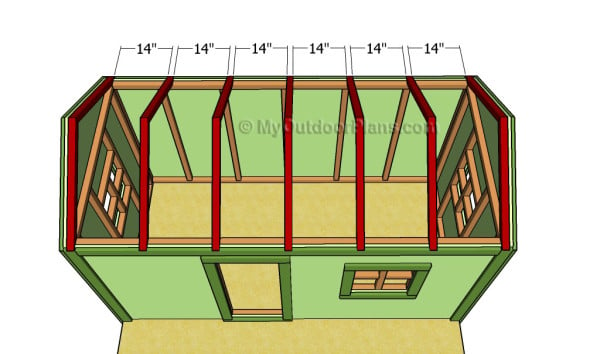
Place the rafters equally-spaced, making sure you leave 14″ between them. Drill pilot holes through the rafters and lock them to the top plates by using 2 1/2″ screws. In addition, lock them together with 2 1/2″ galvanized screws as well. Make sure there are 14″ between the top of the rafters, too.
Fitting-the-support-posts-for-porch
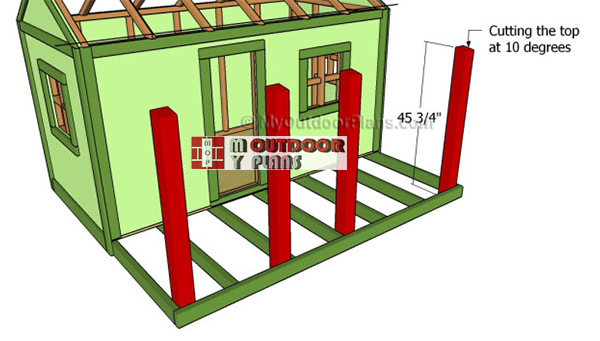
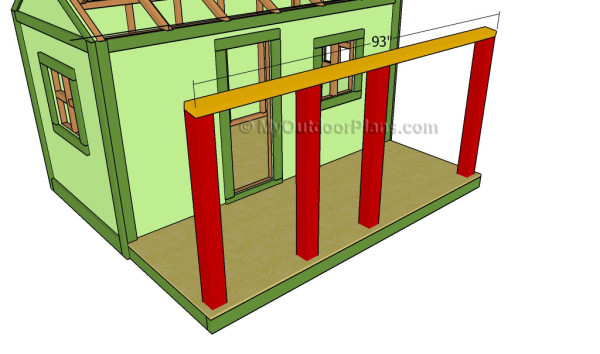
Continue the outdoor playhouse project by attaching the 4×4 posts to the frame of the floor. As you can easily notice in the diagram, we recommend you to cut the top of the posts at 10 degrees, by using a nice miter saw.
Next, drill pilot holes through the bottom of the posts and insert 3 1/2″ screws through the joists into the posts. Plumb the posts with a spirit level before inserting the screws.
Attaching the roof supports
In order to enhance the rigidity of the playhouse structure, we recommend you to place a 2×4 lumber support over the 4×4 posts. Cut the beams at 93″ and align it into place with attention, making sure the edges are flush.
Drill pilot holes through the support beam and insert 2 1/2″ screws into the wooden posts. Make sure the corners are right-angled and leave no gaps between the components. Add glue to enhance the rigidity of the joints.
Fitting the roofing sheets
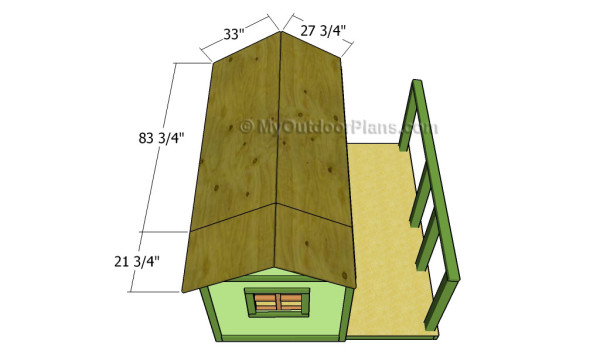
The next step of the project is to attach the plywood sheets to the roof of the playhouse. Mark the cut lines on the sheets of 3/4″ tongue and groove plywood and attach them to the rafters.
Take into account that the roof overhangs 4″ on each side of the playhouse. In addition, make sure the joins between the sheets should be over the middle of a rafter. Drill pilot holes and insert 1 1/4″ screws along the rafters.

Attaching the overhang
One of the last steps of the woodworking project is to attach the plywood sheet over the front porch. Use a a piece 83 3/4″ wide and a piece 21 3/4″ wide. Drill pilot holes and secure them to the rafters and to the support beam by using 1 1/4″ screws. See here more about how to install asphalt shingles over a roof.
Building the railings
Building the railings for the front porch of the playhouse is a straight forward process. Use 2×4 lumber for the rails and 2×2 lumber for the balusters. In order to get a professional result, we recommend you to place the balusters equally space. Leave at most 1 1/2″ between the balusters.
Make sure you create small notches at one end of the rails that are placed on the sides. Insert 2 1/2″ screws into the playhouse and into the posts.
Fitting the railings
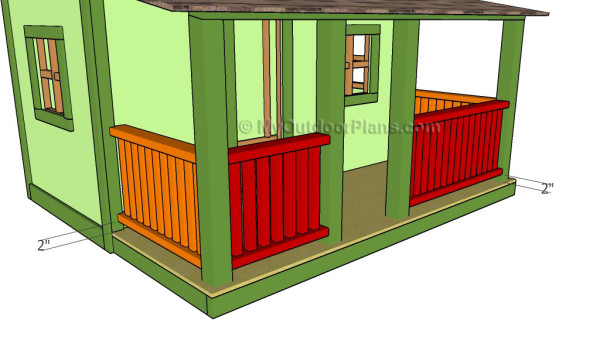
One of the last steps of the project is to attach the attach the railings to the outdoor playhouse. As you can easily notice in the diagram, we recommend you to drill pocket holes at both ends of the rails and to fit them between the posts.
Place a 2″ wood flock under the bottom rails, align the edges with attention and make sure the top rail is perfectly horizontal. Insert 2 1/2′ screws through the rails into the posts and make sure the corners are square.
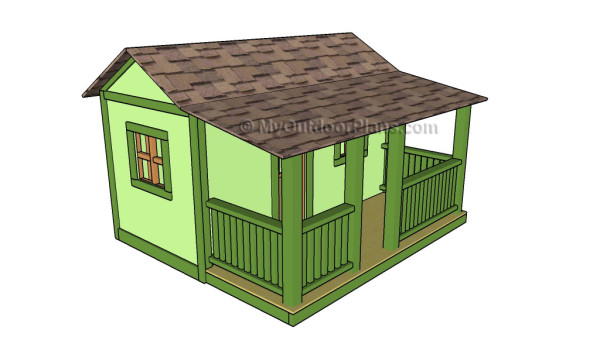
Kids playhouse plans
Last but not least, you have to fill the holes, the head of the screws and the gaps with a good filler or a bead of silicone. Let the compound to dry out for several hours, before sanding the surface with 120-grit sandpaper.Vacuum the surface thoroughly, to remove the residues.
Top Tip: Apply several coats of primer and water-resistant paint, to protect the playhouse from rot . Don’t forget to check out the rest of the project about building the roof.
This article was about playhouse roof plans free. If you want to see more outdoor plans, check out the rest of our step by step projects and follow the instructions to obtain a professional result.


2 comments
Cost for everything????
I don’t have a cost estimate.