This step by step diy project is about 12×12 gable shed roof plans. This is PART 3 of the garden shed project, where I show you how to build the gable roof and how to make sure it will be sturdy enough to withstand rains and moderate snows. You can easily adjust the slope of the roof to suit your needs. Take a look over the rest of my woodworking plans, if you want to get more building inspiration.
When buying the lumber, you should select the planks with great care, making sure they are straight and without any visible flaws (cracks, knots, twists, decay). Investing in cedar or other weather resistant lumber is a good idea. Use a spirit level to plumb and align the components, before inserting the galvanized screws, otherwise the project won’t have a symmetrical look. If you have all the materials and tools required for the project, you could get the job done in a few day. See all my Premium Plans HERE.
Projects made from these plans
12×12 Gable Shed Roof Plans
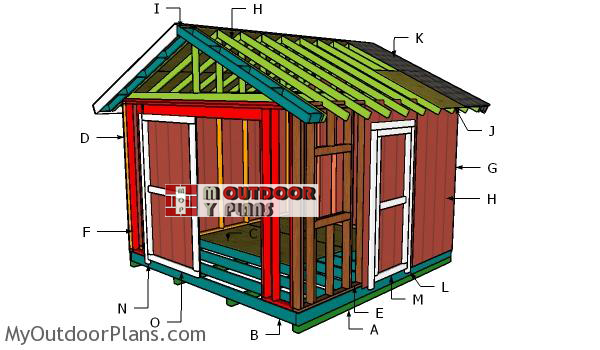
12×12-gable-shed-building-plans
Cut & Shopping Lists
- H – 3 pieces of T1-11 siding – 48″x94 1/2″ long, 4 pieces – 26 1/2″x48″ long, 2 pieces – 37 3/4″x48″ long SIDING
- H – 2 pieces of 2×4 lumber – 96″ long, 1 piece – 137 1/2″ long, 1 piece – 29″ long 10xTRUSS
- I – 4 pieces of 2×4 lumber – 96″ long, 5 pieces – 6 14″ long 2xOVERHANGS
- J – 4 pieces of 1/2″ plywood – 10″x96″ long, 4 pieces – 48″x96″ long, 4 pieces – 48″x48″ long ROOF
- K – 4 pieces of 1×6 lumber – 96 1/4″ long, 2 pieces – 166″ long TRIMS
- K – 275 sq ft of tar paper, 275 sq ft of asphalt shingles ROOFING
- 10 pieces of 2×4 lumber – 12′
- 32 pieces of 2×4 lumber – 8′
- 8 pieces of 1/2″ plywood – 4’x8′
- 4 pieces of 1×6 lumber – 10′
- 4 pieces of 1×6 lumber – 8′
- 275 sq ft of tar paper, 275 sq ft of asphalt shingles
- 2 1/2″ screws, 3 1/2″ screws, 1 5/8″ screws, 1 1/4″ screws
- 6d nails
- rafter ties
- wood filler , wood glue, stain/paint
Tools
![]() Hammer, Tape measure, Framing square, Level
Hammer, Tape measure, Framing square, Level
![]() Miter saw, Drill machinery, Screwdriver, Sander
Miter saw, Drill machinery, Screwdriver, Sander
Time
Related
- PART 1: 12×12 Shed Plans
- PART 2: 12×12 Shed Roof Plans
- PART 3: 12×12 Shed Door Plans
Building 12×12 gable shed roof
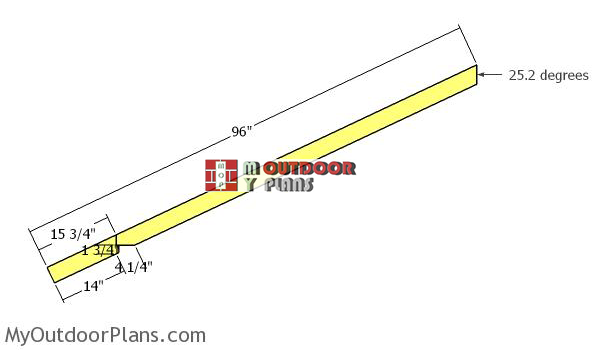
Rafters-for-storage-shed
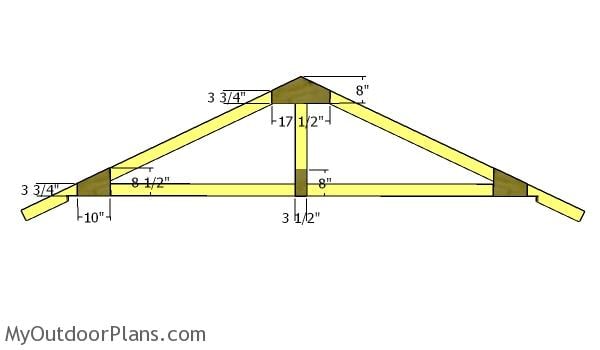
The first step is to build the rafters. Use a miter saw to make a 25.2 degree cut to one end of the rafters. In addition, make the birdsmouth cut to the rafters.
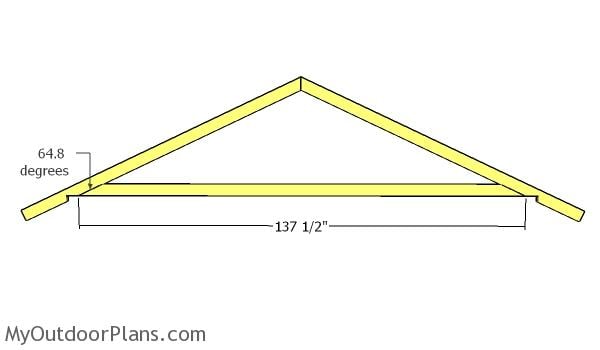
Bottom rafter
Cut the bottom rafters and then lay all the components on a level surface. Align the edges flush
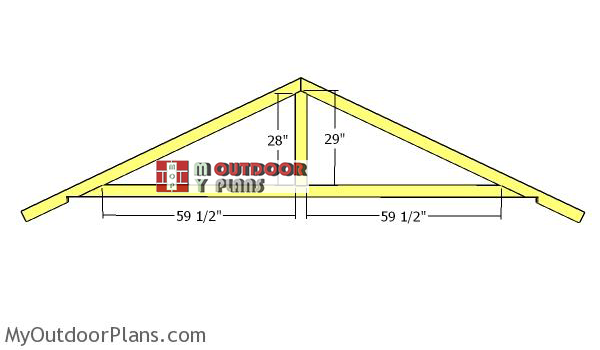
Middle-truss-support-12-ft
Cut and fit the middle support to the trusses.
Fitting the gussets
Use 1/2″ plywood for the trusses. Mark the cut lines on a piece of plywood and then get the job done with a saw. Lay the gussets over the joints and then insert 1 1/4″ screws to lock them into place tightly.
Fitting-the-trusses—12×12-shed
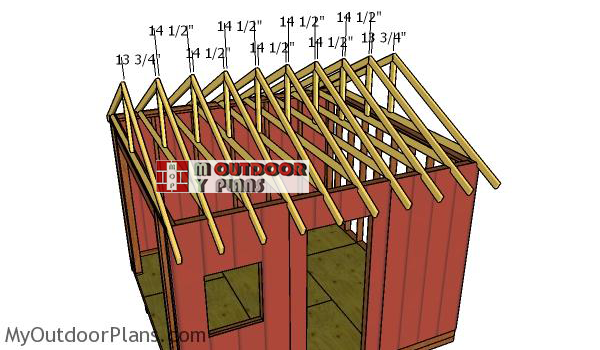
Fit the trusses to the top of the shed, every 16″ on center. Use rafter ties to secure the trusses into place. Plumb the trusses with a spirit level.
Front wall siding panels
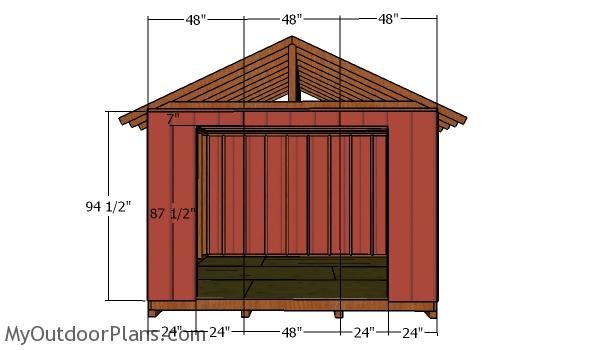
Cut and fit the T1-11 siding sheets to the front of the shed. Make sure you make the cuts around the double door opening.
Gable ends panels
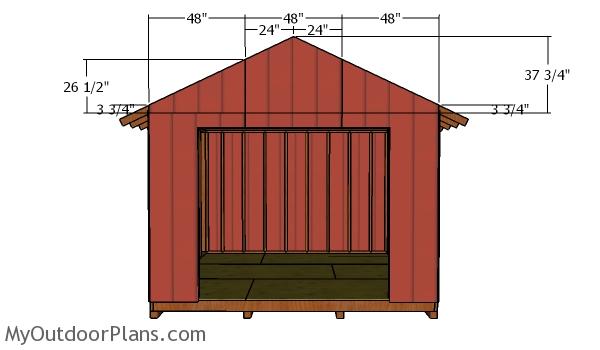
Cut and fit the panels to the gable ends. Align the edges flush and make sure there are no gaps between the panels. Use 8d nails to secure the panels to the framing, every 8″.
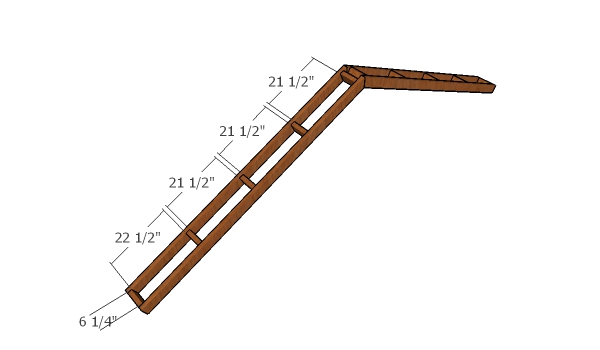
Overhangs – 12×12 Shed
Assemble the overhangs, as shown in the diagram. Drill pilot holes through the rafters and insert 3 1/2″ screws into the blockings.
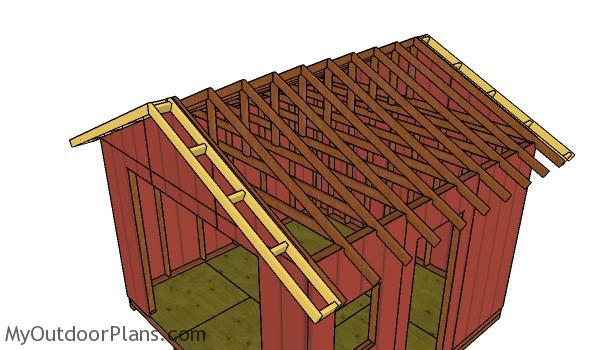
Fitting the overhangs – Shed Plans
Fit the overhangs to the front and back of the storage shed. Align the edges flush, drill pilot holes and insert 3 1/2″ screws to lock them into place tightly.
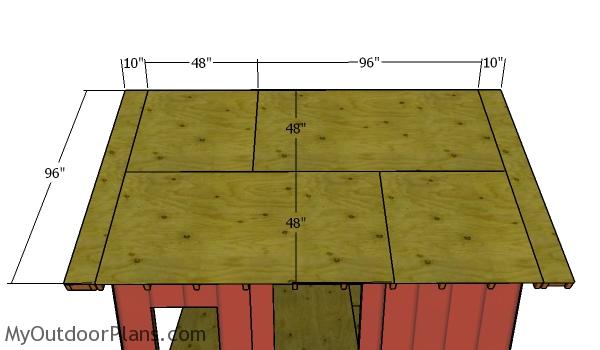
Roof sheets – 12×12 Gable Shed
Use a circular saw to make the cuts to the plywood sheets. Fit the 1/2″ plywood sheets to the roof of the 12×12 shed. Align the edges flush and insert 1 5/8″ screws, every 8″ along the rafters. Leave no gaps between the sheets.
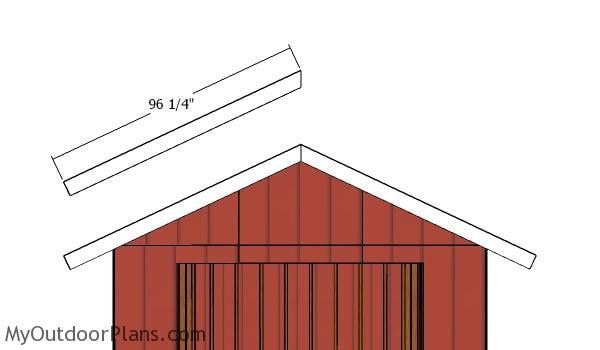
End shed roof trims
Use 1×6 lumber for the gable roof trims. Use a miter saw to make a 25.2 degree cut to one end of the slats. Use 2″ nails to secure the trims into place tightly, after you align the edges flush.
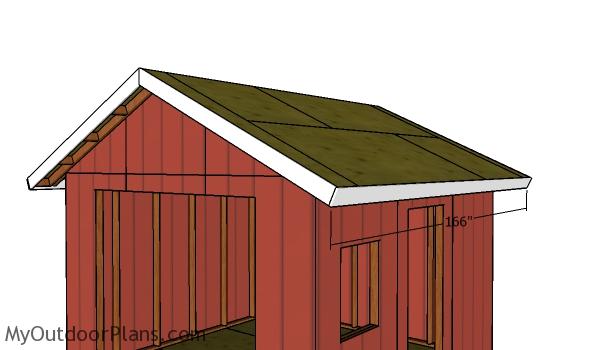
Side roof trims p- 12×12 shed
Fit the 1×6 trims to the sides of the shed roof. Align the edges and insert 2″ nails to secure them into place tightly.
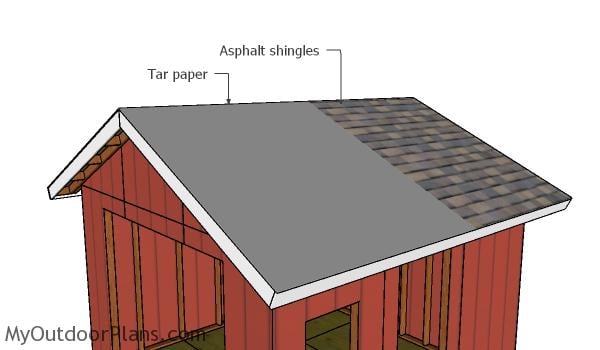
Fitting the roofing – Shed Plans
Build the porch railings from 2×4 lumber and 2×2 lumber. Place the balusters equally spaced. Drill pilot holes through the cleats and insert 2 1/2″ screws into the balusters.

How-to-build-a-12×12-shed-with-gable-roof
This storage shed is compact enough to save space in your backyard, while offering tons of storage space.

12×12 Shed Plans – Side view
Last but not least, you need take care of the finishing touches. Fill the holes with wood putty and then smooth the surface with 120-220 grit sandpaper. Apply a few coats of paint or stain to the components, so you can protect them from decay and so you can enhance the look of the shelter. Check out PART 1 and PART 3 of the shed, so you can learn everything you need to know about building the floor, walls and roof for the shed.
This woodworking project was about 12×12 gable shed roof plans. If you want to see more outdoor plans, check out the rest of our step by step projects and follow the instructions to obtain a professional result.


5 comments
Hi. I am building the 12 x 12 Gable Shed and I am somewhat confused. I opened the page for the 12 x 12 gable shed plans and went down to the related plans tab. The 2nd plan says “PART 2: 12×12 Shed Roof Plans” When that tab opens it clearly says that these are the plans to build a 12 x 12 gable shed roof. But then it says that this is part 3 of the garden shed project. My confusion is that I thought I was building a gable shed and not a garden shed and that these were part 2 of the roof plans. This is a conflicting statement. Which one is it? The next thing is that when I went back to the related plans tab and clicked on the 3rd option for the 12 x 12 shed door plans it opened up and said that theses are the plans for a 12 x 12 shed doors and that this is part 3 of the square shed plans. That says to me that you have 2 step 3’s, and that some of the plans are for a square shed, while the other one is for a garden shed. I am not building those I am building a 12 x 12 GABLE SHED. Before I go out and buy the rest of the materials I want to make sure that what I have printed is for EXACTLY what I am building. This may be silly but I am just repeating what you have typed up for those plans. I apologize if this sounds rude but I just do not want to screw things up. If you can will you please email me all 3 plans for the 12 x 12 GABLE SHED that are correct. Thank you very much for your and have a nice day.
Respectfully,
Heidi Jumel
Well, if you think about a little you will see this is 12×12 Shed AND Square AND Garden Shed. 12×12 Gable Shed is not a “brand” to keep repeating the same formula in every PART of the project. Just follow the NEXT PREVIOUS links and you will go through all the parts of the plans. In addition, I think the shed in each of the 3 Parts looks the same, doesn’t it?
I have looked at multiple sets of your plans but I can’t find where the list the pitch of the roof. I need the rafter layout and the specs for the gussets for a 6/12 pitch gable roof for a 12×12 shed
Is there any reason this shed couldn’t be built with 24in stud spacing? I notice some of the much larger sheds use 24in so im curious as to whether this one required 16in structurally or if that was just a design decision.
I built my shed using your plans thank you for putting them here. My shed is 12 feet long but I used 12′ 2 X 6 for the cement pad so I am actually 141″ wide, how would you adjust for the trusses to keep them relatively the same height and angle? Im assuming take 3″ off middle support? But any math to help figure out the birdsmouth cuts etc would be appreciated. Hope that makes some sense what I’m trying to accomplish.