This step by step diy woodworking project is about diy stuffed animal storage plans. I have designed this wood zoo cage so you can store all the stuffed animals you have laying around in the kids room. This project is super easy to build, so you can get the job done in a few hours without any hurry. Moreover, it would be a lovely idea to involve all your kids in the process so you can let them paint the exterior.
There are so many designs and materials to choose from, that we really recommend you to spend some time researching the most suitable plans for your needs. If you still haven’t found what you are looking for, we strongly recommend you to pay attention to these instructions and to check out the related projects, if you want to get more ideas and potential projects for your home and garden. See all my Premium Plans HERE.
Projects made from these plans
DIY Stuffed Animal Storage Zoo
Building a stuffed animal storage cage
Cut & Shopping Lists
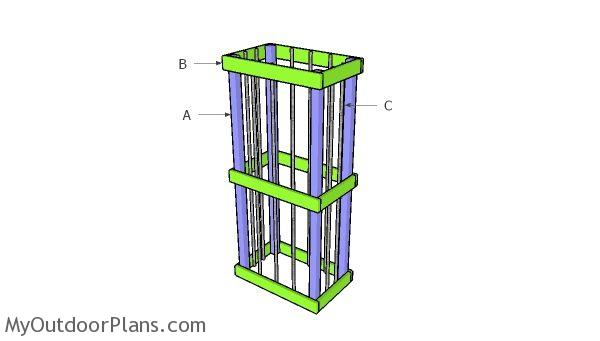
- A – 4 pieces of 2×2 lumber – 48″ long LEGS
- B – 6 pieces of 1×3 – 12″ long, 6 pieces – 21 1/2″ long FRAME
- C – 1/4″ bungee cord STRING
- 2 pieces of 2×2 lumber – 8′
- 3 pieces of 1×3 lumber – 8′
- elastic cord (50 ft long)
- eye screw
- wood filler , wood glue, stain/paint
- 1 5/8″ screws
Tools
![]() Hammer, Tape measure, Framing square, Level
Hammer, Tape measure, Framing square, Level
![]() Miter saw, Drill machinery, Screwdriver, Sander
Miter saw, Drill machinery, Screwdriver, Sander
![]() Post hole digger, Concrete mixer
Post hole digger, Concrete mixer
Time
![]() One day
One day
Related
How to build a stuffed animal storage cage
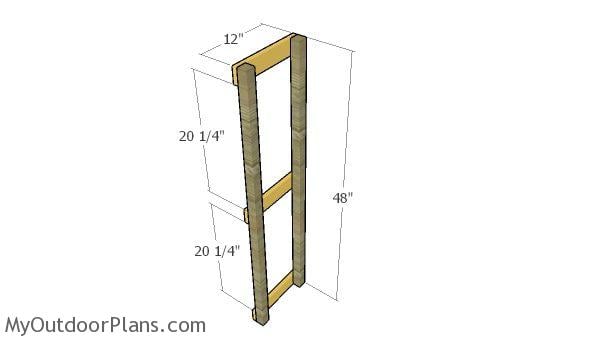
Building the sides of the zoo cage
The first step of the project is to build the sides for the storage cage. Use 2×2 lumber for the legs and 1×3 lumber for the supports. Lay the legs on a level surface and then attach the supports equally spaced. Align the edges flush and make sure the corners are square. Drill pilot holes and insert 1 5/8″ screws to lock them into place tightly.
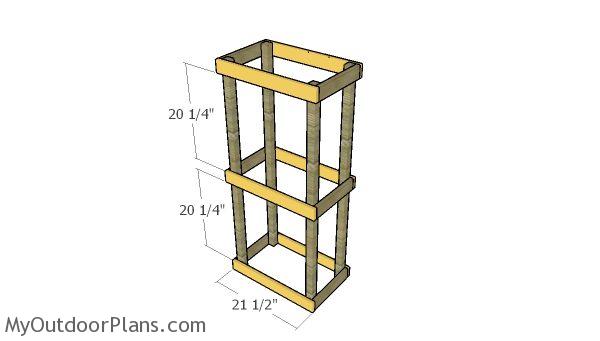
Assembling the frame of the zoo cage
After building the sides for the stuffed animal storage zoo tower you need to assemble the frame together. Therefore, attach the 1×3 supports to the front and to the back of the tower. Align the edges flush, drill pilot holes and insert 1 5/8″ screws to lock them together tightly. Make sure the corners are square, if you aim for a professional result.
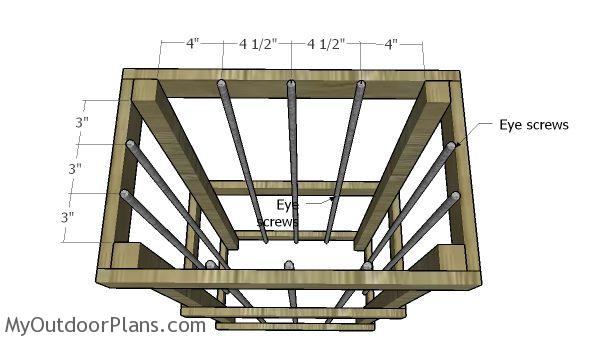
Fitting the strings
Fit the eye screws to the interior of the cage. Place the eye screws equally spaced to the supports (sides, front and front) and then run the bungee cord as shown in the diagram.

DIY Stuffed animal storage cage
This is a super quick project that will organize your kids stuffed animals and help you save space. Moreover, you can involve the kids in the process, as they can paint and decorate the stuffed animal storage cage. Take a look over all my playhouse plans HERE.
This woodworking project was about stuffed animal storage zoo plans. If you want to see more outdoor plans, we recommend you to check out the rest of my step by step projects. LIKE us on Facebook and Google + to be the first that gets out latest projects.
- EXPLORE MORE IDEAS FOR -
 |
 |
 |
 |
2 comments
This is great! I’m going to build with my niece for a school project. I do have a question as to how the bungee cord is attached at the top and bottom. Is it strung through the eye hook and knotted?
One continuous cord that goes through all eye screws.