This step by step diy project is about 12×16 shed roof plans. This is PART 2 of the 12×16 storage shed, where I show you how to build the gable roof. Make sure you check out the first and third part of the project, so you learn how to build the frame of the shed and how to build the double front doors. You can easily adjust the design of this shed and add more doors of windows, to suit your needs. Take a look over the rest of my woodworking plans, if you want to get more building inspiration.
When buying the lumber, you should select the planks with great care, making sure they are straight and without any visible flaws (cracks, knots, twists, decay). Investing in cedar or other weather resistant lumber is a good idea, as it will pay off on the long run. Use a spirit level to plumb and align the components, before inserting the galvanized screws, otherwise the project won’t have a symmetrical look. If you have all the materials and tools required for the project, you could get the job done in about a day. See all my Premium Plans HERE.
Projects made from these plans
Free 12×16 Shed Roof Plans
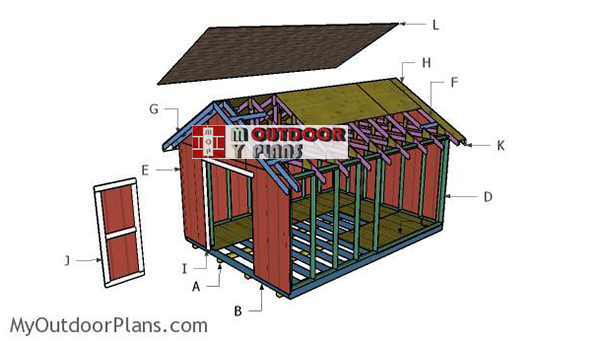
Building-a-12×16-shed
Cut & Shopping Lists
- E – 2 pieces of T1-11 siding – 29 3/4″x48 long, 1 piece – 43 1/2″x48″ long 2xGABLE END
- F – 2 pieces of 2×4 lumber – 96″ long, 1 piece – 137″ long, 2 pieces – 23 1/2″ long, 1 piece – 36″ long 9xTRUSS
- G – 8 pieces of 2×4 lumber – 96″long, 8 pieces – 34″ long 2xOVERHANG
- H – 4 pieces of 3/4″ plywood – 10 3/4″x94″ long, 4 pieces – 48″x96″ long, 4 pieces – 46″x48″ long, 2 pieces – 46″x96″ long ROOF
- K – 2 pieces of 1×6 lumber – 98″ long, 2 pieces – 213 1/2″ long TRIMS
- L – 300 sq ft of tar paper, 300 sq ft of asphalt shingles ROOFING
- 31 pieces of 2×4 lumber – 8′
- 9 pieces of 2×4 lumber – 6′
- 9 pieces of 2×4 lumber – 12′
- 4 pieces of T1-11 – 48″x96″
- 1 piece of 1/2″ plywood – 48″x96″
- 9 pieces of 3/4″ plywood – 48″x96″
- 4 pieces – 1×6 lumber – 10′
- 2 pieces of 1×6 lumber – 20′
- 8d nails, 2 1/2″ screws, 3 1/2″ screws
- wood filler , wood glue, stain/paint
Tools
![]() Hammer, Tape measure, Framing square, Level
Hammer, Tape measure, Framing square, Level
![]() Miter saw, Drill machinery, Screwdriver, Sander
Miter saw, Drill machinery, Screwdriver, Sander
Time
Related
- PART 1: 12×16 Shed Plans
- PART 2: 12×16 Shed Roof Plans
- PART 3: 12×16 Shed door and Trims Plans
Building a 12×16 shed roof plans
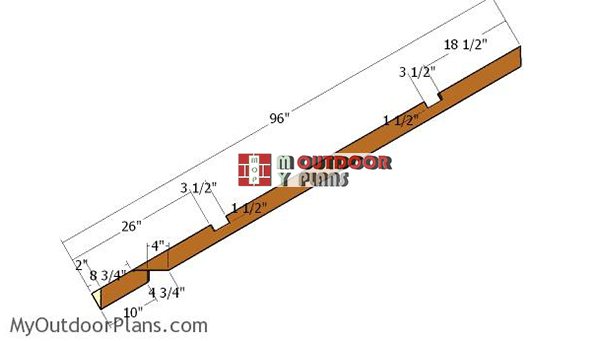
Building-the-rafters
The first step of the project is to build the rafters for the 12×16 shed roof. Mark the cut lines on the rafters and get the job done with a circular saw and with a chisel. Make sure you smooth the recesses for a neat result. In addition cut both ends of the rafters at 60 degrees, by making 30 degree cuts.
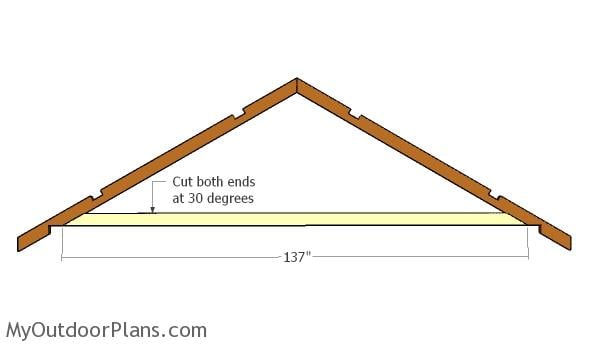
Attaching the bottom truss
Next, you need to attach the bottom rafters to assemble the truss. In order to speed up the process, I recommend you to lay them on a level surface and to make a jig, so you align everything properly and easily. Cut both ends of the 2×4 bottom rafters at 30 degrees, by making 60 degree cuts with a miter saw.
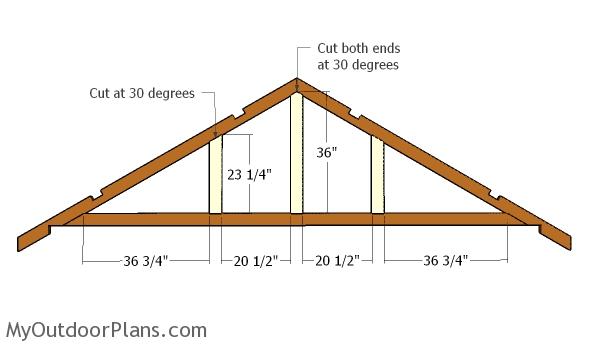
Fitting the trusses supports
Next, fit the supports to the trusses, so you add more strength to the structures. Align everything with attention, so the corners are right-angled.
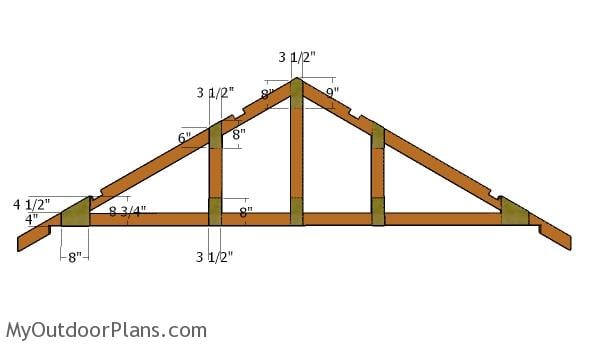
Assembling the trusses
Use 1/2″ plywood for the gussets. Attach the gussets to the joints and lock them into place with 1 1/2″ screws. Attach construction glue to the joints for a professional result.
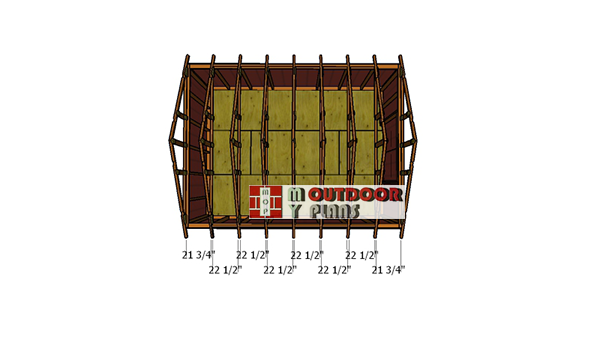
Fitting-the-trusses
Fit the trusses to the top plates of the garden shed, spacing them every 24″ on center. Use a spirit level to plumb the trusses and secure them to the top plates of the walls with nails.
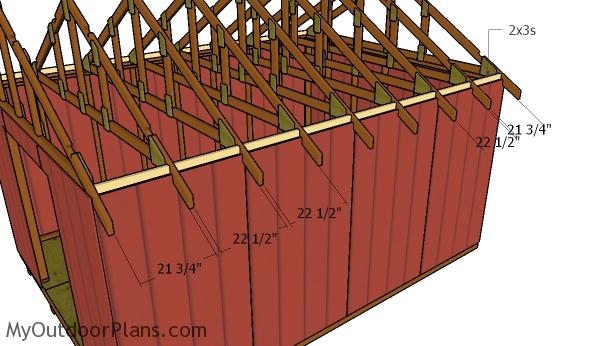
Fitting the roof blockings
Fit 2x3s between the trusses, to seal the roof. Toenail the blockings to the top plates with nails.
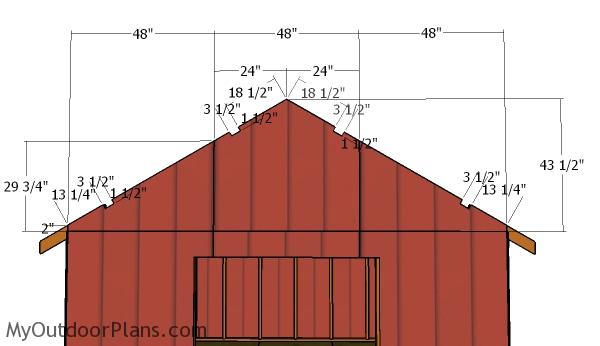
Fitting the gable ends
Attach the T1-11 siding panels to the gable ends. Align the edges with attention and secure them into place with 8d nails. Leave no gaps between the panels for a professional result.
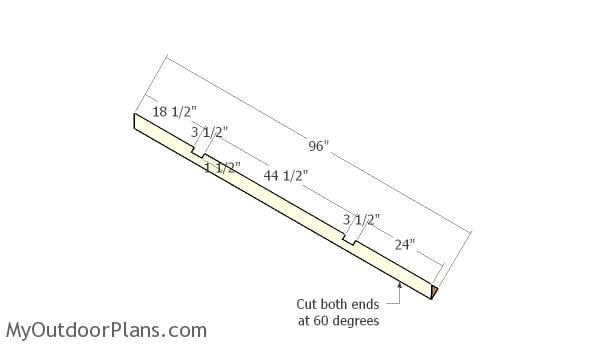
Building the overhangs
In order to create nice overhangs for the front and back faces of the storage shed, I recommend you to build the rafters. Mark the cut lines on the 2×4 beams and get the job done with a circular saw. Clean the recesses with a chisel and smooth them with sandpaper.
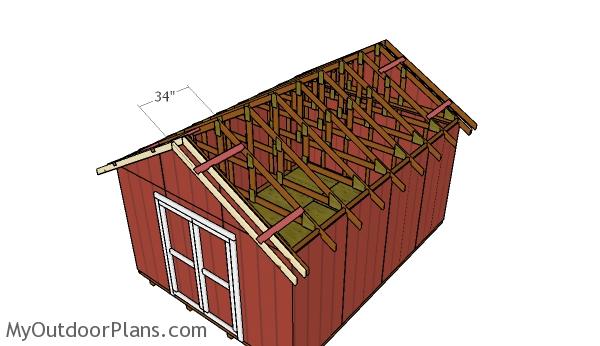
Fitting the overhangs
Fit the rafters to the front and back of the shed, as shown in the diagram. Use 2×4 supports to connect the overhang rafters to the roof of the shed. Drill pilot holes through the supports and insert 2 1/2″ screws into the rafters.
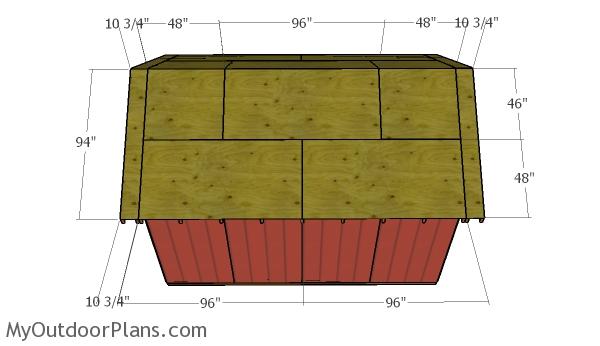
Fitting the roofing sheets
Attach 3/4″ plywood sheets to the roof structure of the 12×16 shed. Cut the sheets at the dimensions shown in the diagram and secure them into place with 1 5/8″ screws, every 8″ along the rafters. Leave no gaps between the sheets and align the edges flush.
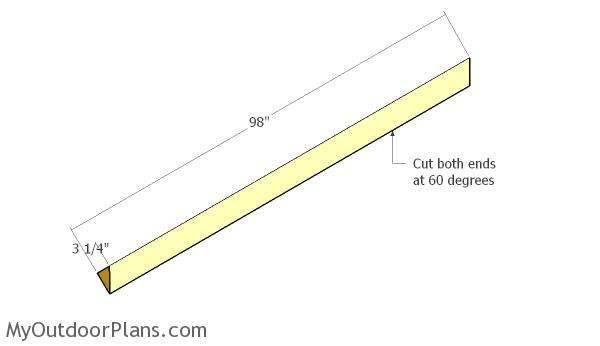
Building the trims
Build the front trims for the roof from 1×6 lumber. Cut both ends at 60 degrees, by making 30 degree cuts.
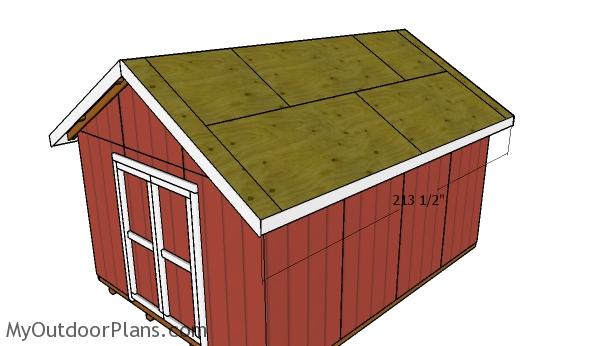
Fitting the trims
Attach the trims to the front and back overhangs and secure them into place with 1 5/8″ brad nails. In addition, fit the side trims to the 12×16 shed. Leave no gaps between the components for a professional result.
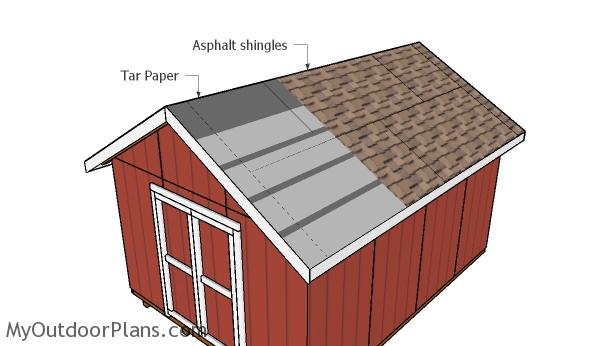
Fitting the roofing
Cover the roof of the shed with roofing felt, making sure the strips overlap at least 2″. Secure the tar paper to the plywood sheets with roofing staples. In addition, cut a 12″ piece for the top ridge. Fit the side drip edges over the roofing felt, while the bottom drip edges should be fit under.
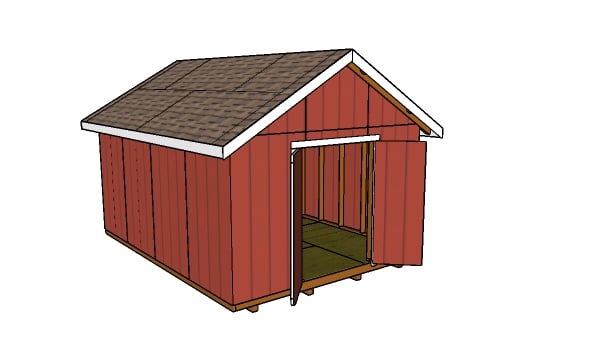
How to build a 12×16 shed
Make sure you check out the rest of the project, so you learn how to frame the 12×16 garden shed and how to build the double doors. In addition, I have lots of other shed projects on the site so I recommend you to browse through all alternatives before starting the building project.
This woodworking project was about 12×16 shed plans free. If you want to see more outdoor plans, check out the rest of our step by step projects and follow the instructions to obtain a professional result.


11 comments
So there are two materials lists. One for the shed and one for the roof?
Yes. Each PART comes with its list.
I would like to build common rafters for this shed…..something where my rafter ties are as high as possible for more ceiling height….what is the roof pitch you have for this, and is there anything i need to keep in mind? (location of ties, ridge beam needed?ect) thanks
Hello, great plans, thanks for sharing. Do you have this plan with a window by chance on the long side? Also, is there one complete lists for this shed complete? Cheers,
I have plans for your requirements on the Shop (full cut and shopping list for the whole project, cut layout diagrams, side window): https://gum.co/oJNkD
Nice looking plans but why bother if they cant be printed,. Waste my time, bad news travels fasst.
Goodbye,
Carl
You can print them. Please read the FAQs: https://myoutdoorplans.com/faq/
WOW Dude — seriously – guy does you a favour and you shit on him because YOU can’t operate a print button
Haha
i am building a 12 x 16 gable shed from your plans. i am trying to build the trusses. i am using the plans for the trusses that use three supports. My question is you show a 137″ bottom rafter piece and a 4″ birdsmouth cutout. That adds up to 145″ for a width that should only be 144″. Is the extra inch to allow some room when installing the trusses.
the extra inch is for the side siding panels