This step by step diy project is about diy outdoor wine caddy with glass supports plans. I have designed this project so you can enjoy a good quality wine with a loved one, while contemplating the beauty of nature. With this wood wine carrier you can sip wine in style. In addition, this project makes for an unique gift for the important persons in your life. Remember that you need to adjust the size and the design of the caddy to suit your needs. Take a look over the rest of my woodworking plans, if you want to get more building inspiration.
When buying the lumber, you should select the planks with great care, making sure they are straight and without any visible flaws (cracks, knots, twists, decay). Investing in cedar or other weather resistant lumber is a good idea, as it will pay off on the long run. Use a spirit level to plumb and align the components, before inserting the galvanized screws, otherwise the project won’t have a symmetrical look. If you have all the materials and tools required for the project, you could get the job done in about a day. See all my Premium Plans HERE.
Projects made from these plans
Building an outdoor wine caddy

Building an outdoor wine caddy
Cut & Shopping Lists
- A – 2 pieces of 1×4 lumber – 16″ long ENDS
- B – 1 piece of 1×4 lumber – 5″ long BOTTOM
- C – 6 pieces of 1×2 lumber – 6 1/2″ long (1/4″ thick) SIDES
- D – 1 piece of 1×4 lumber – 14 1/2″ long SUPPORT
- E – 1 piece of 1/2″ dowel – 6 1/2″ long HANDLE
- 1 piece of 1×4 lumber – 6′
- 1 pieces of 1×2 lumber (1/4″ thick) – 6′
- 3/4″ dowel
- 1 1/2″ brad nails, 3/4″ brad nails
- wood filler , wood glue, stain/paint
Tools
![]() Hammer, Tape measure, Framing square, Level
Hammer, Tape measure, Framing square, Level
![]() Miter saw, Drill machinery, Screwdriver, Sander
Miter saw, Drill machinery, Screwdriver, Sander
Time
![]() One day
One day
Related
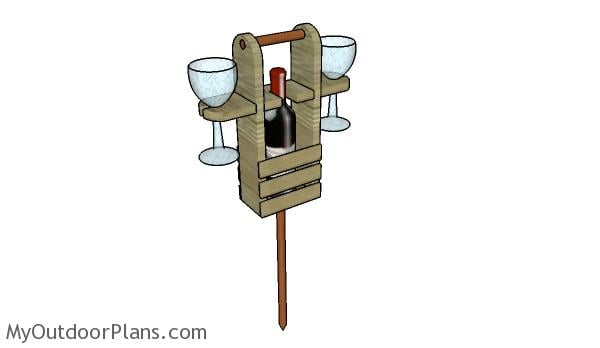
DIY Outdoor Wine Caddy with Glass Supports
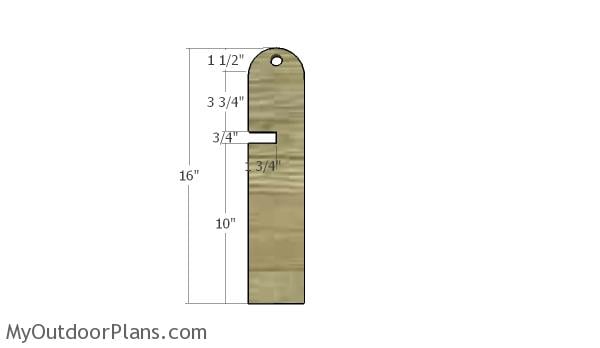
Building the sides
The first step of the project is to build the ends for the wine caddy. As you can easily notice in the diagram, you need to mark the cut lines on the 1×4 slats and get the job done with a jigsaw. Make sure you cut the notches on one side of the slats using a jigsaw. Remove the excess lumber with a chisel and smooth the edges with sandpaper.
If you are going to use the wine caddy outdoors, you would be better off investing in weather resistant lumber, such as redwood or oak. The materials will be more costly, but I reckon the investment will pay off on the long run.

Cutting out the handle holes
In addition, you need to make holes through both sides of the ends for the handle. If you are going to install a 3/4″ dowel, them make corresponding holes through both sides of the caddy. Smooth the edges with sandpaper.
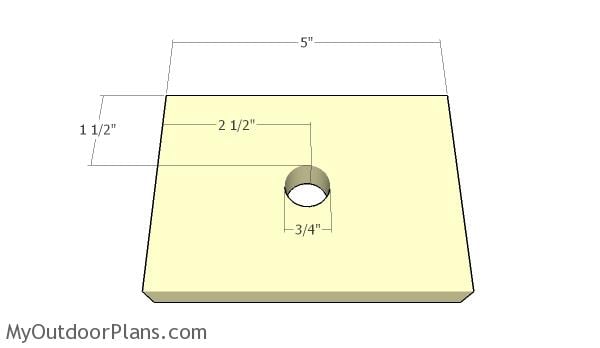
Building the bottom
Build the bottom for the outdoor wine caddy from 1×4 lumber. As you can notice in the image, you need to drill a 3/4″ hole in the bottom slats, so you can fit the spike that will hold the caddy above the ground.
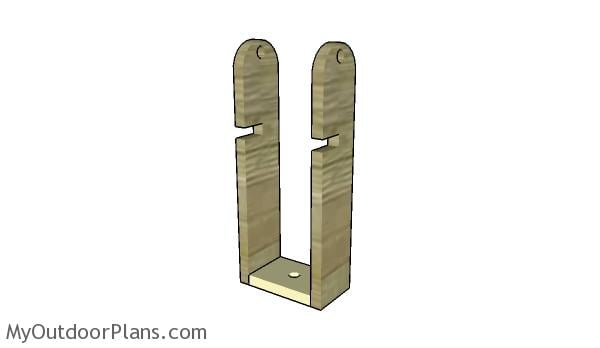
Assembling the wine caddy
Next, you need to assemble the frame of the outdoor wine carrier. Align the edges flush, add glue to the joints and then insert 1 1/2″ brad nails to lock them together tightly. Make sure the corners are right angled before inserting the brad nails.
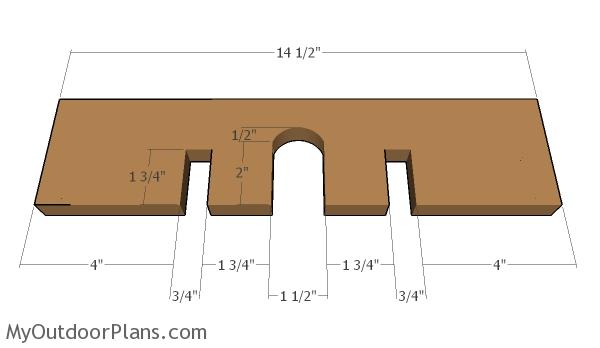
Building the wine glass supports
The next step of the project is to build the supports for the two glasses. Mark the cut lines on the 1×4 slats and cut out the notches with a jig saw. Smooth the edges with sandpaper for a professional result.
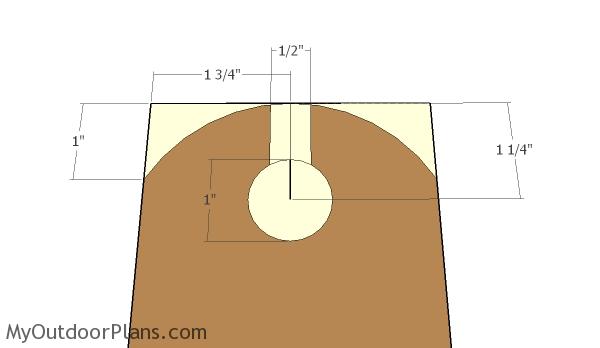
Cutting the glass supports
Next, you need to cut the holes for the wine glasses, using the information from the diagram. Take accurate measurements and use a 1″ hole saw drill bit to get the job done in a professional manner. Keep in mind that you might have to make adjustments to these measurements according to the size of the glasses you are trying to install.

Horizontal support
After cutting out the supports for the wine glasses, the component should look similar to the one in the diagram. If you really want to get the job done in a professional manner, you could round the edges with a router. Alternatively, sandpaper and elbow grease will do the job, as well. Make sure there are no sharp edges and even out ant dents in the material.
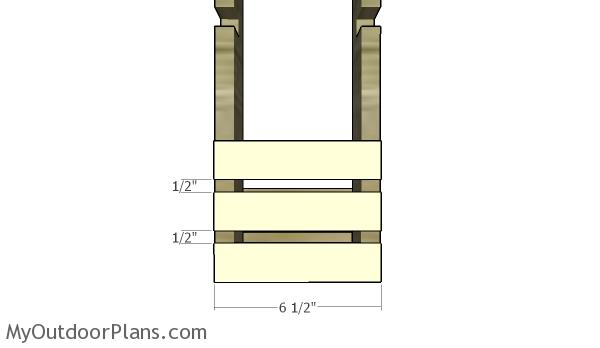
Fitting the side slats
Fit the 1×2 slats to the sides of the wine tote. Make sure you use 1/4″ thick strips of wood for the sides of the wine carrier. Align the slats to the faces of the frame and lock them into place with 3/4″ brad nails and waterproof glue.
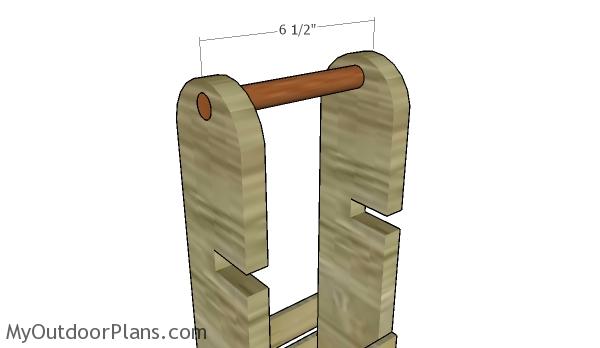
Fitting the handle
Use a piece of 3/4″ dowel to make the handle for the wine caddy. Fit the dowel to the top of the caddy, as shown in the diagram. Use glue and 3/4″ brad nails to secure the handle into place. Afterwards, use 120-grit sandpaper to smooth the surface.

Fitting the support for the glasses
As you can see in the free outdoor wine caddy plans, you need to fit the glass supports to the frame. The idea behind this design is that you remove this component whenever you want to take the wine glass off the caddy and fill the glasses. Then, you fit the support back to the caddy. Although this might look a little bit unnecessary, this is one of those projects where design prevails over functionality.
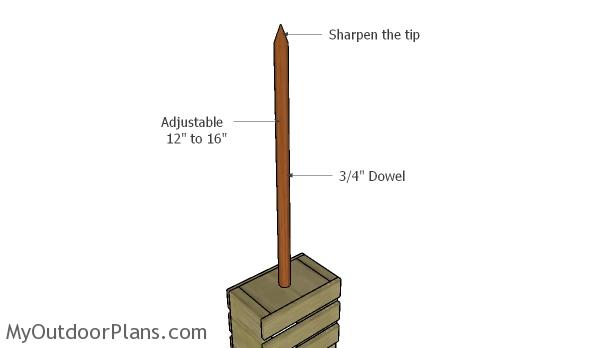
Fitting the spike
Continue the project by fitting the 3/4″ stake to the bottom of the outdoor wine caddy. Sharpen the tip of the dowel, so you fit lock it into the ground, next to your garden chairs. Add glue to the joint to lock the stake to the caddy tightly. In addition, you could also insert a few 1 1/2″ brad nails at angle.
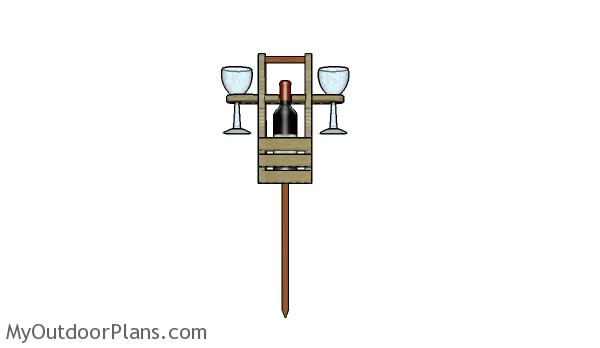
Building an outdoor wine caddy with 2 glass supports
Last but not least, you need to take care of the finishing touches. Smooth the surface with 120-200 grit sandpaper making sure the edges are not sharp and to even out the dents. Next, apply a few coats of stain over the components to enhance the look of the wood and to protect them from decay. Seal the finish with a few coats of lacquer.
Outdoor Wine Caddy with Glass Supports
This is a simple project you should be able to build in a few hours without much effort. Remember that you need to adjust the size of the components so they suit your own needs. If you are trying to surprise a loved one with a handmade gift, this project should be on the top of your list. Check out the rest of the indoor plans on my blog, so you get even more building inspiration.
This woodworking project was about diy wood wine caddy with glass supports plans free. If you want to see more outdoor plans, check out the rest of our step by step projects and follow the instructions to obtain a professional result.