This step by step woodworking project is about rectangular planter box plans. The planters come in many shapes and designs, therefore you should know the features of the plants and the try to harmonize the flower box with the rest of the deck furniture. A rectangular box is one of the most popular planters as it is easy to build and it would enhance the look of your backyard. Before starting the project, we recommend you to assess the needs of the plants you are going to grow, and decide the most appropriate size.
In order to build a durable planter, choose lumber designed for outdoor use, such as cedar, redwood or pressure-treated. These varieties of lumber have a nice appearance and are resistant to water damage and wood decay. Check the lumber condition with great care, making sure the boards are straight and don’t have any kind of visible flaws (knots, decays, twists, wanes). After you get the job done, you can enhance the look of the planter box, by applying several coats of varnish or paint.
Projects made from these plans
[tabs tab1=”Materials” tab2=”Tools” tab3=”Time”]
[tab id=1]
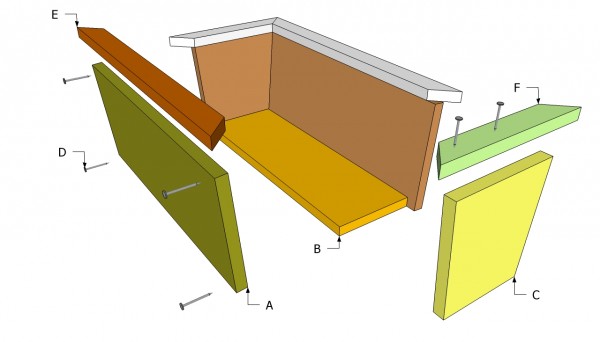
- A – 2 pieces of 1×8 lumber 20” long SIDES
- B – 1 pieces of 1×8 lumber 20” long BOTTOM
- C – 2 pieces of 1×6 lumber 8” long FRONT
- D – 20 pieces of 1 1/2” nails NAILS
- E – 2 pieces of 1×2 lumber 21 1/2” long, cut at 45º at both ends TRIM
- F – 2 pieces of 1×4 lumber 10 1/2” long, cut at 45º at both ends TRIM
[/tab]
[tab id=2]
- Hammer, Tape measure, Framing square
- Miter saw, Drill machinery, Screwdriver, Sander
- Safety Gloves, Safety Glasses
[/tab]
[tab id=3]
- 4 Hours
[/tab]
[/tabs]
Planter Boxes Components
There are many planter box designs, shapes and sizes to choose from, but in this step by step tutorial, we show how how to build simple planter boxes. Before beginning the actual project, you have to plan everything to the littlest detail, making sure the planter box fits you needs and matches the design of your garden.
Top Tip: We recommend you to build the components from 1×8 cedar, as it has a nice appearance and it is resistant to water damage and wood decay. In addition, make window planters, deck planters and trellises to enhance the look of your outdoor landscaping.
Free Planter Box Plans
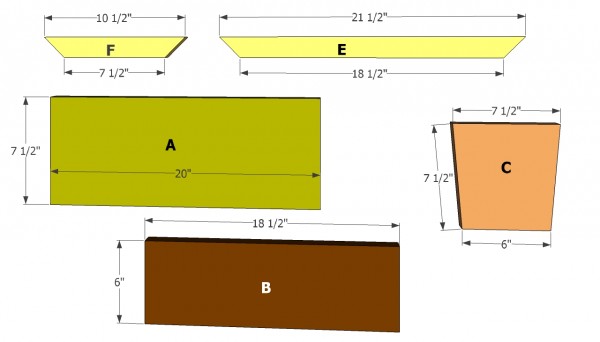
Planter Box Components
First of all, you have to build the components of the planter box, by cutting the 1×8 lumber with a circular saw, along the cut lines. Make sure you pay attention to dimensions of the wooden components, otherwise they won’t fit together easily.
Top Tip: If you want to build the rectangular planter in a professional manner, use a miter saw to cut the sides of the bottom component at 5º.
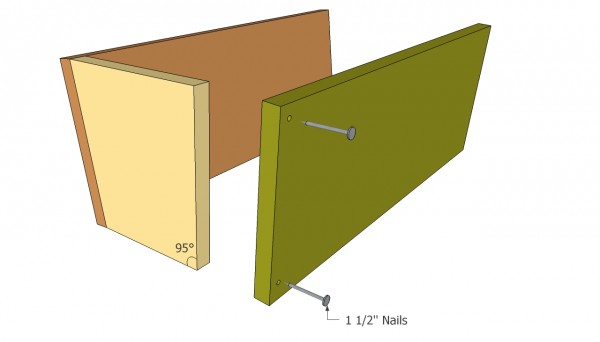
Building the planter box
The first step of the assembly process is to join the sides of the planter with the front component. In order to enhance the bond between the components, apply a good wood glue along their edges.
Top Tip: Drill pilot holes in the lumber before inserting the nails, to prevent the wood from splitting. In addition, align the components with great care, in order to obtain a neat look.
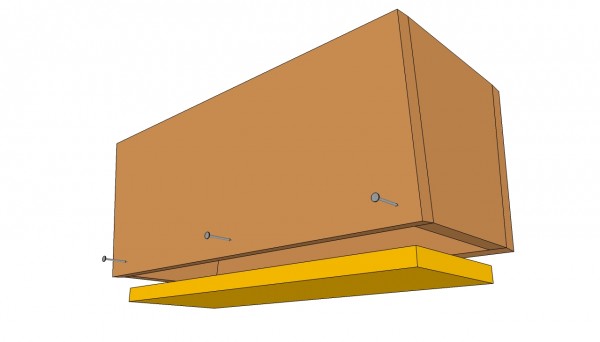
Attaching the bottom of the planter
Next, install the bottom of the planter box, as you can see in the free plans. Drill several holes at the bottom of the planter, on both sides, and insert the 1 1/2” nails. Don’t forget to wear safety gloves and glasses, when working with power tools.
Top Tip: Countersink the head of the screws and fill the holes with a good wood putty. Leave the compound to dry out properly and sand the surface with medium grit.

Installing the trims
After you have assembled the rectangular planter box, you should take care of the finishing touches. Therefore, we recommend you to cut 1×2 wooden trims and to install them into place with finishing nails.
As you can see in the image, you have to miter cut the ends of the trims, in order to get a planter with a nice appearance. The trims should overhang about 3/4” over the exterior edges.
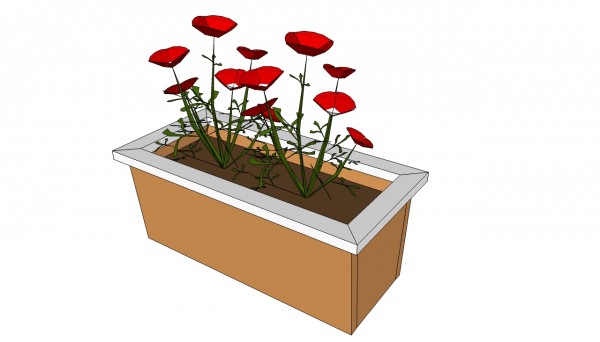
Free Planter Box Plans
Fill the holes and the gaps with wood filler and let the compound to dry out for several hours. Next, sand the surface with medium-grit sandpaper, using a sander or a sand block. Last but not least, you have to finish the wooden boards with fine sandpaper.
Top Tip: In order to protect the wood from water damage and decay, you should apply several coats of an appropriate varnish.
This woodworking project is about free planter box plans. If you need more outdoor plans, we recommend you to check out the rest of our step by step projects.

1 comment
Hi, I wanted the plan for the vegetable trug planter made from timber lengths, not solid panels, is it still available?