This step by step diy woodworking project is about shooting table plans. If you want to learn more about building a basic shooting table from 2×6 lumber and plywood, we suggest you to pay attention to the instructions described in the article. You can build this table in just one weekend with common household tools. Make sure you take a look over the rest of plans to see alternatives and more projects for your garden. Premium Plans for this project available in the Shop.
Work with attention and don’t forget that a good planning will save you from many issues and it will keep the costs withing the total budget. Invest in high quality materials, such as pine, redwood or cedar. Drill pocket holes before inserting the galvanized screws, to prevent the wood from splitting. Add waterproof glue to the joints, in order to enhance the rigidity of the structure. See all my Premium Plans HERE.
Projects made from these plans
It’s this simple to build a shooting bench!
Shooting Table Plans
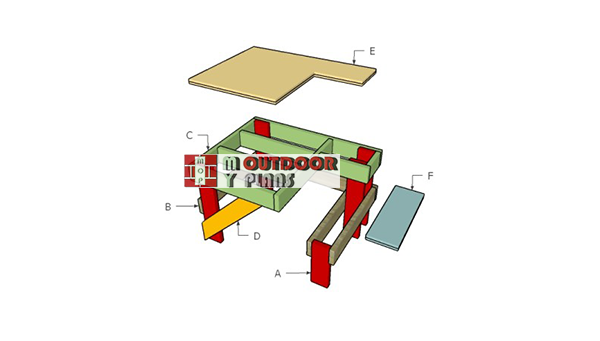
Building-a-shooting-table
Cut & Shopping Lists
- A – 4 pieces of 2×6 lumber – 30″ long, 1 piece – 16″ long LEGS
- B – 1 piece of 2×6 lumber – 48″ long 3 pieces – 33″ long BRACES
- C – 1 piece of 2×6 – 48″ long, 1 piece – 33″ long, 1 piece – 30″ long, 1 piece – 34 1/2″ long, 1 piece – 16 1/2″ long, 1 piece – 9″ long, 2 pieces – 28 1/2″ long FRAME
- D – 1 piece of 2×6 lumber – 34 3/4″ long BRACE
- E – 2 pieces of 3/4″ plywood – 36″x48″ long, 2 pieces – 8 1/2″x24 long TABLETOP
- 6 pieces of 2×6 lumber – 8′
- 2 pieces of 3/4″ plywood – 4’x8′
- 200 pieces of 2 1/2″ screws
Tools
![]() Hammer, Tape measure, Framing square, Level
Hammer, Tape measure, Framing square, Level
![]() Miter saw, Drill machinery, Screwdriver, Sander
Miter saw, Drill machinery, Screwdriver, Sander
Time
Related
How to build a shooting bench
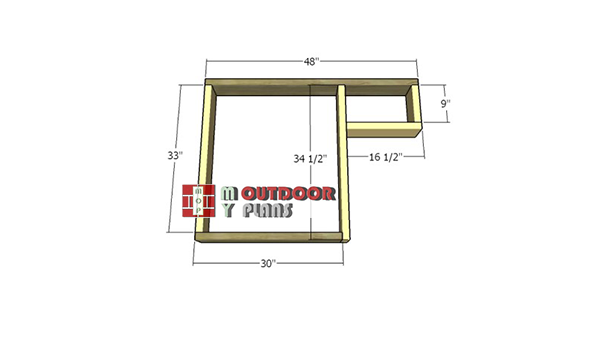
Building-a-tabletop-frame
The first step of the project is to build the frame for the tabletop. Cut the components from 2×6 lumber and align the edges with attention. You can drill pilot holes and insert 2 1/2″ screws, or you can drill pocket holes. Make sure the corners are square and check if the edges are flush.
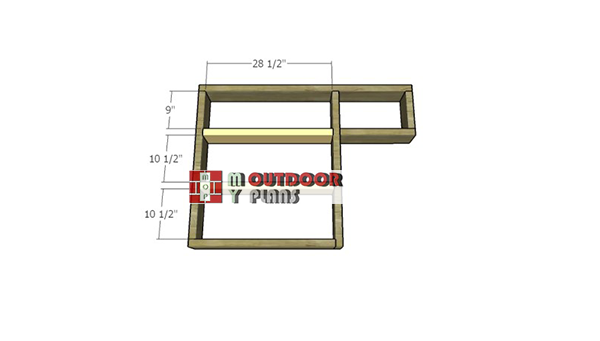
Fitting-the-middle-supports
Next, fit the rest of the components to the frame. Drill pocket holes at both ends of the components and secure them to the frame with 2 1/2″ screws.

Attaching the legs
Next, attach the legs to the shooting table frame. Use 2×6 lumber for the legs. Drill pilot holes through the legs and insert 2 1/2″ screws into the frame. Make sure the corners are square.
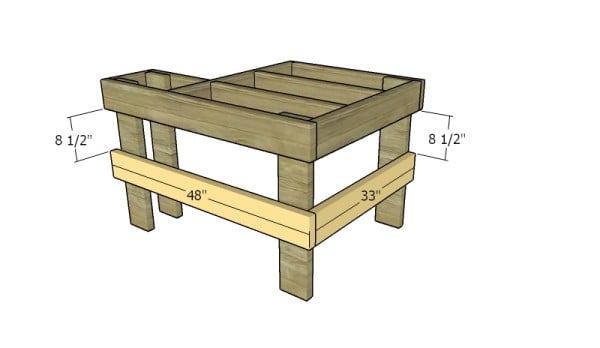
Fitting the bottom supports
Attach the 2×6 braces to the base of the legs, as shown in the diagram. Drill pilot holes through the legs and insert 2 1/2″ screws into the horizontal braces.
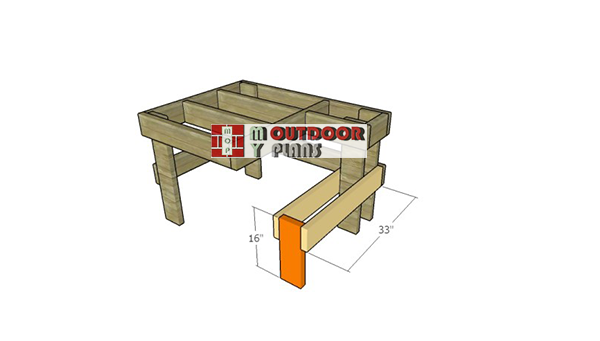
Attaching-the-seat-supports
Next, frame the seat for the shooting table. Use 2×6 lumber for the components. Use a spirit level to make sure the leg is plumb and to check if the supports are horizontal. Drill pilot holes and insert 2 1/2″ screws to lock the components together tightly.
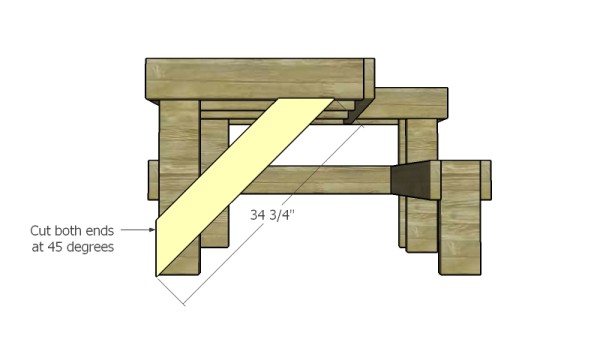
Attach the brace
Build the brace from 2×6 lumber. Cut both ends at 45 degrees. Attach the brace to the table, as shown in the diagram. Drill pilot holes and insert 2 1/2″ screws to lock into into place.
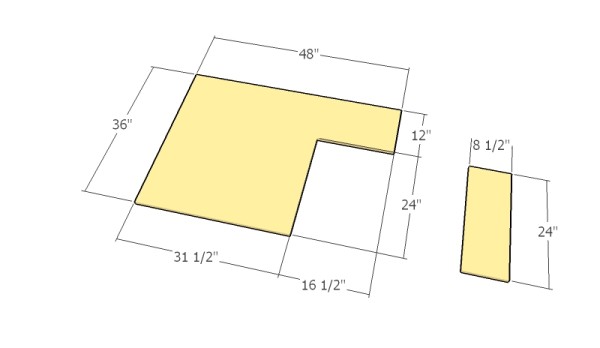
Building the tabletop and the seat
Build the tabletop from 3/4″ plywood, as well as the seat. Cut two pieces of each component, as you need to double the thickness by gluing them together. Align the edges with attention and leave no gaps between the components for a professional result.
Finishing touches
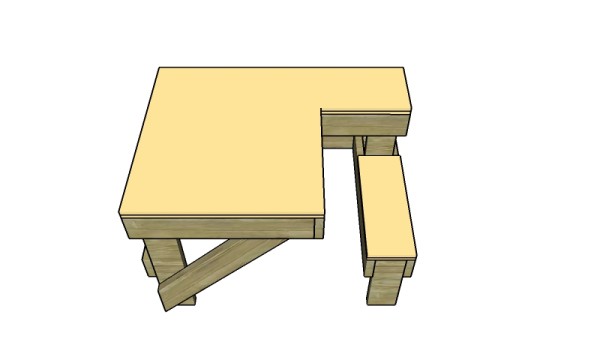
Fitting the tabletop and seat
Lay the tabletop and the seat to the frames and lock them into place with 2 1/2″ screws, after drilling pilot holes. Make sure the edges are flush, before inserting the screws.

How to build a shooting bench
If you’re thinking about building a shooting bench, let’s talk about the time and cost. You can expect to spend around $50 to $100 on materials, depending on the type of wood and hardware you choose. As for the time commitment, this project should take about one weekend to complete, making it a perfect DIY project to tackle in a couple of days. Happy building!

DIY Shooting bench – free plans
Building a shooting bench provides a stable and comfortable platform for improved accuracy and enjoyment during shooting sessions. It’s a cost-effective solution compared to purchasing a pre-made bench, giving you the flexibility to customize it to your needs. Plus, it’s a rewarding DIY project that enhances your shooting range setup and adds value to your outdoor space.
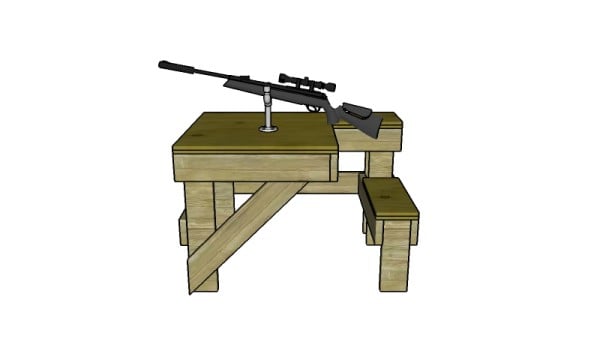
Free shooting bench plans
You can also use 1×6 slats for the tabletop and for the seat, if you want a better protection against the elements. Smooth the edges with sandpaper.
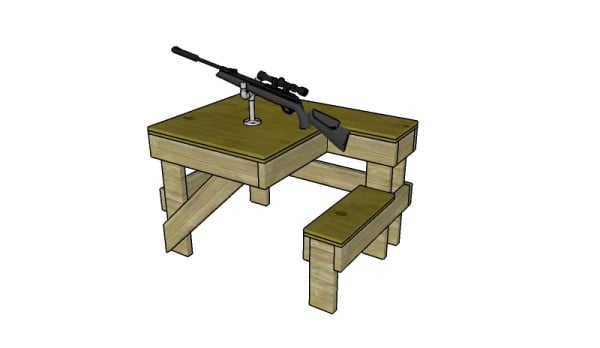
Shooting table plans
One of the last steps of the woodworking project is to take care of the finishing touches. Therefore, fill the pilot holes with wood putty and smooth the surface with 120-150 grit sandpaper.
Top Tip: If you want to enhance the look of the woodworking project and to protect the shooting table from decay, we recommend you to cover the components with paint or stain. Premium Plans for this project available in the Shop.
If you want to get PREMIUM PLANS for this project, in a PDF format, please press GET PDF PLANS button bellow. If you want to get the free plans, just read the blog FAQs. Thank you for the support.
This woodworking project was about shooting table plans. If you want to see more outdoor plans, we recommend you to check out the rest of our step by step projects. LIKE us on Facebook and Google + to be the first that gets out latest projects.


2 comments
How do I download your plans.
Thanks
Read this: https://myoutdoorplans.com/faq/