This step by step woodworking project is about large shed plans. Building a large shed (12×16) is a great project, if you need a huge storage surface in your backyard. Moreover, if you design the shed with wide double door, you can even deposit a large garden tractor or other large items. Although the constructions techniques are similar to building other sheds, you should be aware that the wall frames and the trusses are heavier, thus harder to install into place.
After deciding the plans you are going to use, we recommend you to set a proper location. Therefore, the area should be perfectly level and in accordance with the local building codes. Taking into account this project is about a light construction, we recommend you to lay the floor frame on several 4×4 skids. In addition, make sure you lay the skids on several concrete footing, equally spaced, as to protect them from excessive moisture and to distribute the weight efficiently. See all my Premium Plans HERE.
Projects made from these plans
Cut & Shopping Lists
- A – 4 pieces of 4×4 lumber – 192” long SKIDS
- B – 2 pieces of 2×6” lumber – 192” long, 13 pieces of 2×6 lumber – 141” long JOISTS
- C – 6 sheets of 3/4” tongue and groove plywood, 48 x 96” FLOORING
- D – 2 pieces of 2×4 lumber – 192” long, 2 pieces of 2×4 lumber – 137” long BOTTTOM PLATES
- E – 36 pieces of 2×4 lumber – 90”, 2 pieces – 40”, 2 pieces – 36”, 2 pieces – 76 1/2, WALL STUDS
- F – 2 pieces of 2×4 lumber – 192”, 2 pieces – 185”, 2 pieces – 144”, 2 pieces – 137” TOP PLATES
- G – 5 pieces of 2×4 lumber – 9”, 5 pieces of 10 1/4”, 3 pieces – 39”, 2 pieces – 53” CRIPPLE STUDS
- H – 14 sheets of T1-11 – 48×96” EXTERIOR SIDING
Tools
![]() Hammer, Tape measure, Framing square, Level
Hammer, Tape measure, Framing square, Level
![]() Miter saw, Drill machinery, Screwdriver, Sander
Miter saw, Drill machinery, Screwdriver, Sander
Time
![]() One weekend
One weekend
Related
- Part 1: Large Shed Plans
- Part 2: Large Shed Roof Plans
- Part 3: Double Shed DoorPlans
Free Large Shed Building Plans
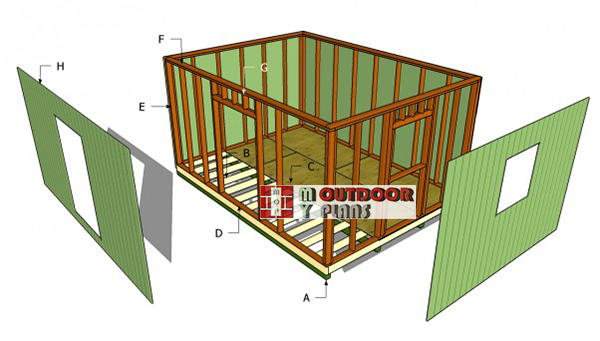
Large-shed-components
Building a large shed is a straight forward job even for a beginner, if the right plans, tools and woodworking techniques are used. Before starting the actual project, we recommend you to study the local building codes, as there are many legal requirements you have to comply with.
Top Tip: We have divided the project in three parts, as to cover all the details. Therefore, we strongly recommend you to check out all the parts of this project and to follow the detailed instructions.
Large shed plans
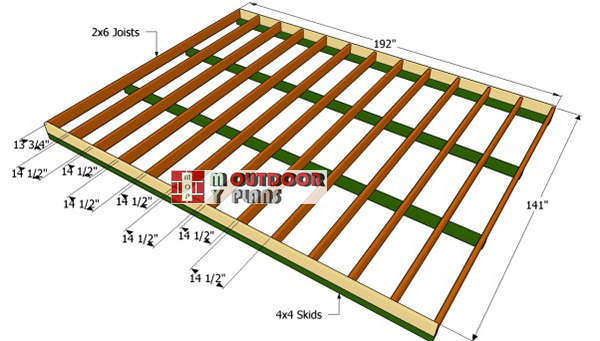
Shed-floor-frame
First, build the floor of the large shed. Therefore, as you can see in the image, you should lay the 4×4 skids first, making sure they are equally spaced, the corners are square and the diagonals equal. Afterwards, cut the rafters at the right size and assemble them together with 3” screws.
Drill pilot holes trough the frame, before driving in the galvanized screws. Place the frame on the skids and toe-nail it with 3 1/2” screws.
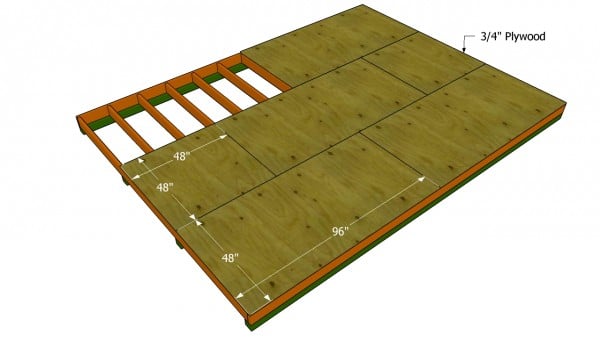
Attaching the plywood sheets
Use a carpentry square to check if the corners are right-angled. In addition, measure the diagonal and make the necessary changes until they are equal. Next, lay the plywood sheets on the frame and align them, as to be flush with the edges of the rim joists.
Top Tip: Use tongue and groove 3/4” plywood, as the sheets will connect easier. Secure the sheets to the joists by driving in 2” nails every 6”.

Front-wall-plans
Next, build the wall frames. In order to get the job done accurately, follow our plans and work on a level surface. Every time you add a component, check the corners for squareness. Pre-drill the bottom and top plates before driving in the 3” galvanized screws into the studs.
You could adjust the size of the door according to your needs: if you will store large items, make it larger otherwise you could fit a 3′ wide door.

Back wall plans
Building the back wall is an easier task, as you don’t have to frame a door opening. Therefore, all you need to do is to follow the plans and to to work with attention. If you really want to get a professional result, we recommend you to take accurate measurements and to use a carpentry square every time you add a wooden component.
Top Tip: Using two top plates is not compulsory, but it will most certainly increase the rigidity of the frame and the durability of the shed.
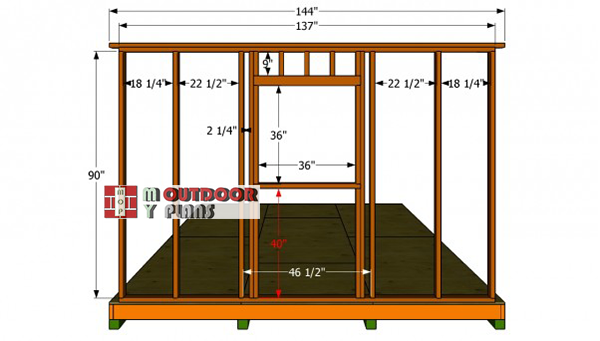
Wall-with-window-plans
If you want to enhance the look of your shed and to let more light to get in, you should fit a 3×3′ window on one side of the shed. As you can see in the image, you need to frame the window properly, otherwise it will move from position over time.
In order to increase the rigidity of the frame, we recommend you to fit several intermediate studs under the window sill. Use Place the studs equally spaced, for a professional result.
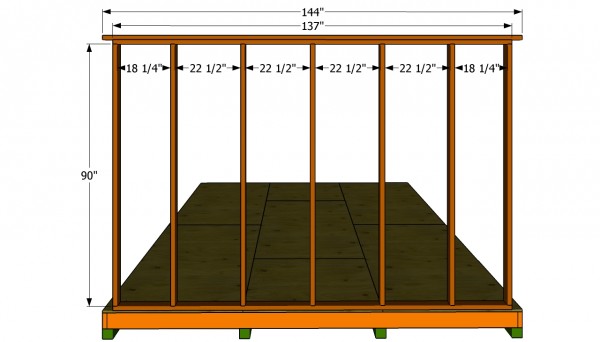
Plain side wall
The opposite side wall should look as in the image, if you don’t want to install another window. As you can notice in the plans, you should place the studs equally spaced and secure them to the plates with 3” screws. Work with great attention and good judgement, if you want to get a professional result.
If the diagonals of the frame are not equal, you need to adjust the wall until they match perfectly. Ask a skilled friend to give you hand, it this is the first project of this kind.
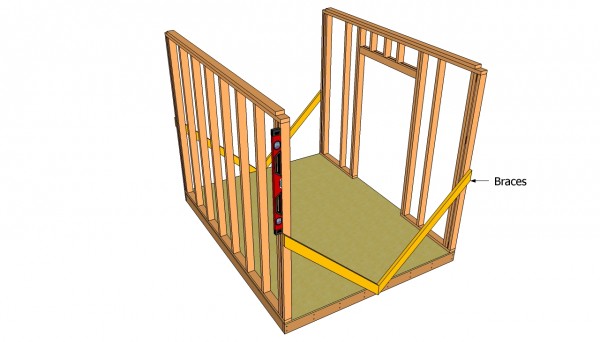
Installing the shed walls
After building the wall frames, you need to place them in top of the floor and secure to the joists with galvanized screws. As you can see in the image, you should just fit them from the ground and lay them into place, making sure the bottom plate is flush with the exterior edges of the floor.
Top Tip: Use several 2×4 braces to temporarily secure the frames to the floor. Make sure the walls are plumb by using a spirit level.
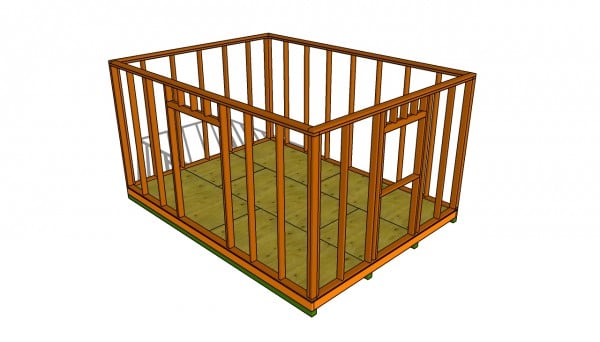
Installing the wall frames
Afterwards, place the side walls and secure them into place tightly. In order to get a rigid structure, you need to drill pilot holes trough the bottom plate and drive 3 1/2” screws into the joists. Use a spirit level to make sure the top plates are level and the walls perfectly plumb.
Top Tip: In addition lock the adjacent wall together, by driving in 3” screws trough the perimeter studs in the other walls.
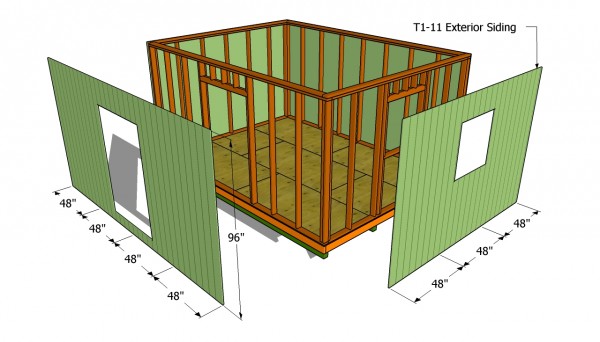
Attaching the exterior siding
After building the main structure of the shed, you need to attach the exterior siding. We recommend you to use 5/8” grooved plywood. Place the sheets to the exterior of the frame and lock it into place with 1 1/4” galvanized nails, every 6” along the rafters.
Top Tip: Use a circular saw with a sharp blade to make the straight cuts. The bade should have fine teeth, to prevent the edges from tearing.
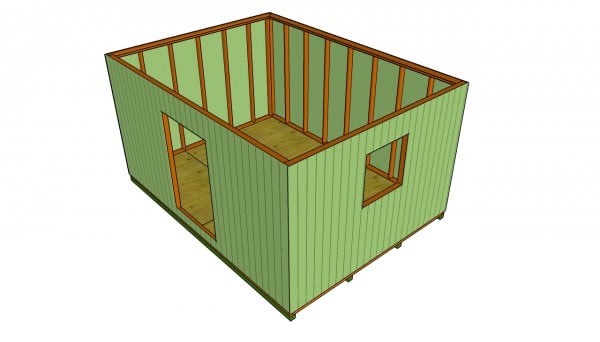
Large shed plans
Last but not least, you should take care of the finishing touches, as to be able to continue the process with the rest of the steps. Therefore, we recommend you to check if all the components are installed properly into place. Use a spirit level to make sure the walls and the top plates are level.
Top Tip: Check out the rest of the project, to see how we build and fit the trusses, as well as how to make the double doors and secure them to the walls.
This woodworking project was about large shed plans. If you want to see more outdoor plans, check out the rest of our step by step projects and follow the instructions to obtain a professional result.


