This step by step diy project is about generator shed plans. Building a generator shed is a straight-forward project, but it will create great value for your property, as it will protect the generator from bad weather. If you want to get the job done in a professional manner, we recommend you to use quality materials and to align all the components, before driving the screws in. I have also designed another generator shed, with a top lid and double doors, for easy access. See the plans for the generator enclosure.
It is essential to adjust the size of the generator shed to your needs, if the generator doesn’t fit in a 4×4′ construction. Work with attention and plan everything from the very beginning, if you want to get the job done as a professional from the very first attempt. In addition, we recommend you to take a look on the second part of the project, if you want to learn how to build the door and how to attach the siding. See all my Premium Plans HERE.
Projects made from these plans
Cut & Shopping List
- A – 2 pieces of 2×4 lumber – 48″ long, 4 pieces – 45″ long FLOOR
- B – 1 pieces of 3/4″ plywood – 48″x48″ long FLOORING
- C – 3 pieces of 2×4 lumber – 45” long, 3 pieces – 41″, 1 piece – 42 1/4″ WALLS
- D – 4 pieces of 2×4 lumber – 48 “, 4 pieces – 45″, 4 pieces – 56 3/4 1/4” SIDE WALLS
- E – 4 pieces of 2×4 lumber – 50 3/4″ long RAFTERS
Tools
![]() Hammer, Tape measure, Framing square, Level
Hammer, Tape measure, Framing square, Level
![]() Miter saw, Drill machinery, Screwdriver, Sander
Miter saw, Drill machinery, Screwdriver, Sander
![]() Post hole digger, Concrete mixer
Post hole digger, Concrete mixer
Time
Related
- Part 1: Generator Shed Plans
- Part 2: Building a generator shed door
Generator Shed Plans

Building-a-generator-shed
Top Tip: Building a shed for a generator is the best thing you could do, if you want to protect it from bad weather. As you can see in the image, the best shape for the shed is a lean to structure.
Building a generator shed
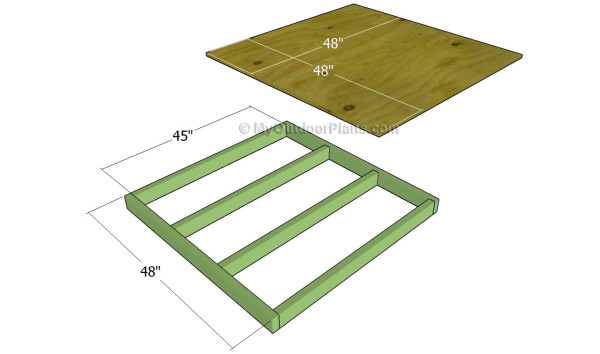
Building the floor
The first step of the project is to build the floor. As you can see in the plans, we recommend you to use 2×4 lumber for the frame. Cut the components at the right size and lock them together with galvanized screws.
Top Tip: Check if the corners are right-angled, by using a a carpentry square. Attach a piece of 4’x4′ plywood over the structure and lock it with 1 1/4″ screws.
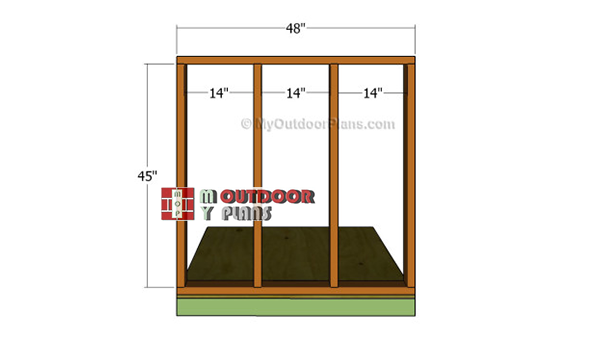
Building-the-side-wall-frame
The next step of the woodworking project is to build the walls of the generator shed. As you can see in the image, you need to cut the components from 2×4 lumber and to lock them tightly with screws.
Top Tip: Drill pilot holes trough the plates and insert the screws into the studs. Check if the corners are right-angled after installing every component. Drive screws trough the bottom plate into the floor.
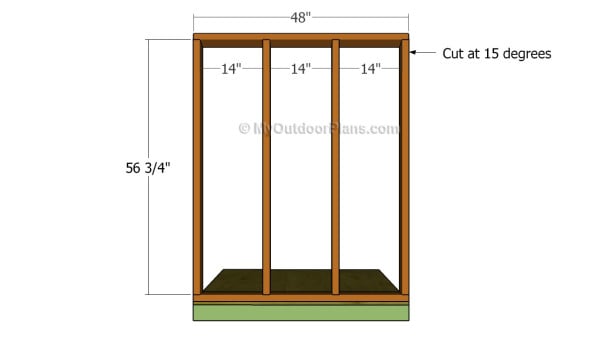
Side wall plans
Building the opposite wall is a more complex process, as you have to cut the top of the studs at 15 degrees, before locking them into place.
Follow the same steps described above, in order to get a professional result.
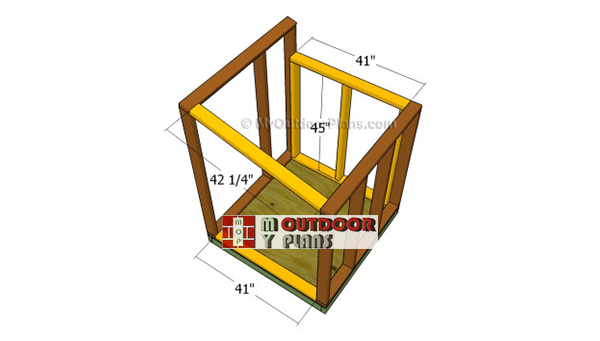
Building-the-end-frames
In order to create a rigid structure, we recommend you to build the front and the back faces of the generator shed. Therefore, you need to build a simple wall for the back face and lock it to the floor and to the adjacent walls with screws.
Top Tip: Plumb the side walls with a spirit level and place 2×4 slats between them, as in the image. Make sure you pre-drill the components before inserting the galvanized screws into the walls.
Fitting the rafters
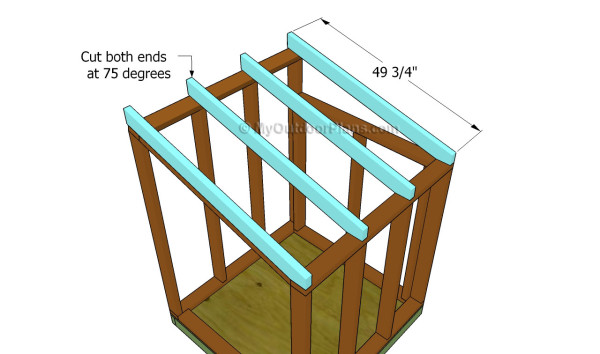
The next step of the project is to build the roof for the generator shed. As you can easily notice in the plans, we recommend you to build the rafters from 2×4 lumber. Align them at both ends, drill pilot holes and insert 3 1/2″ screws into place.
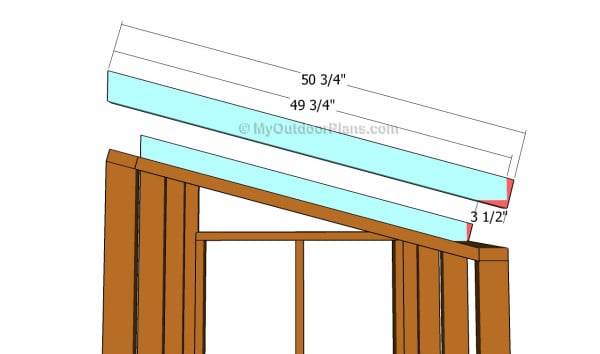
Top Tip: It is essential to check if the rafters are equally spaced and if they are flush with the side walls of the shed. Cut one end at 15 degrees and the opposite end at 75 degrees, by using a miter saw.
In order to build the rafters, we recommend you to pay attention to the information from the image. Mark the cut lines on the rafters before adjusting their size and shape properly.

Making the notches to the rafters
Making the cuts to the end of the rafters. Mark the cut lines on the rafters and get the job done with a circular saw.
Generator shed plans
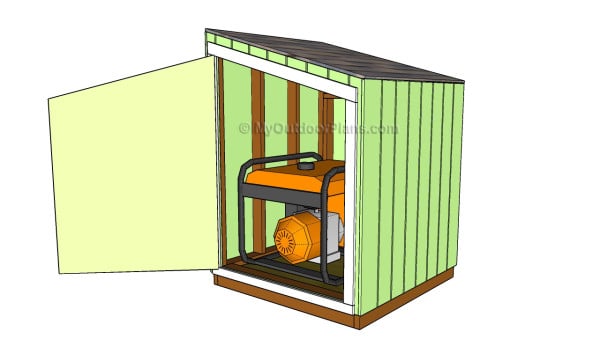
After building the frame of the shed we recommend you to install the exterior siding and the roofing components. Last but not least, you have to build the door and to attach it to the frame with metal hinges.
Top Tip: Don’t forget to take a look over the rest of the project, if you want to learn how to build the door and how to take care of the final touches. Make any necessary adjustments to the shed, as to suit your needs.
This woodworking project was about generator shed plans. If you want to see more outdoor plans, we recommend you to check out the rest of our step by step projects.


4 comments
working through the floor step of this project yesterday.
i believe step A: needs to be modified:
A – 2 pieces of 2×4 lumber – 48″ long, 3 pieces – 45″ long FLOOR
it states 3 pieces of 2×4 45″ long floor. But its actually 4 looking at the picture
Thanks for pointing that out. Make sure you take a look over the diagrams before making the cuts, because they never lie. The typing errors in the cut lists are inherent. I’m looking forward to seeing your project completed. Let me know if you have other questions.
How do your shed plans provide air flow? My understanding is that generator require air flow two-way air flow.
Read the generator’s instructions and install the appropriate vents.