This step by step woodworking project is about free lean to shed plans. If you need extra storage space, but you don’t have a large backyard, you can still build a proper shed, that fits your needs. A lean to shed is a project that can be done by any amateur builder, as it doesn’t require a significant expertise in the field. Moreover, you can save a significant amount of money, as you only have to attach siding to three walls. If you want a larger lean to shed that is as easy to build, check out my 8×12 shed plans.
There are certain building regulations you have to comply with, that vary according to your residence. Therefore, we recommend you to go to the local building department and study the legal requirements, before choosing the shed plans and its location. Make sure you by the best materials you can afford and check if they are in a good condition. Align all the components at both ends and plumb them with a spirit level, before inserting the screws. See all my Premium Plans HERE.
Projects made from these plans
Cut Lists
- A – 2 pieces of 4×4 lumber, 72” long SKIDS
- B – 2 pieces of 2×4” lumber 72” long, 6 pieces of 2×4 lumber 45” long JOISTS
- C – 1 sheet of 3/4” tongue and groove plywood, 48 x 72” FLOORING
- D – 8 pieces of 2×4 lumber 96” – one end cut at 19º, 16 pieces of 2×4 lumber 81” WALL STUDS
- D – 3 pieces of 2×4 lumber 72”, 4 pieces of 2×4 lumber 41”, 2 pieces of 2×4 lumber 12” PLATES
- E – 150 sq ft of 5/8” grooved plywood SIDING
- F – 6 pieces of 2×4 lumber, 50 3/4” long RAFTERS
- G – 1 piece of 3/4” plywood 74 3/4” x 48”, 1 piece of 3/4” plywood 74 3/4 x4 1/4” ROOFING
- H – 30 sq ft of roofing felt ROOFING FELT
- I – 30 sq ft of asphalt shingles ASPHALT SHINGLES
- J – 2 pieces of 1×3 lumber – 55″ long, 2 pieces – 72″ long DOOR JAMBS
- J – 1 piece of T1-11 siding – 24″x72″ long, 2 pieces of 1×3 lumber – 67″ long, 2 pieces – 24″ long, 1 piece – 19″ long 2xDOORS
- hinges, latch, handle
- tar paper, asphalt shingles
- 500 pieces of 2 1/2″ screws
- 100 pieces of 1 1/4″ screws
- wood glue, stain/paint
- wood filler
Tools
![]() Hammer, Tape measure, Framing square
Hammer, Tape measure, Framing square
![]() Miter saw, Drill machinery, Screwdriver, Sander
Miter saw, Drill machinery, Screwdriver, Sander
Time
![]() One weekend
One weekend
Build an Attached Shed

Attaching-shed-plans-free
Building a lean to shed, attached to an existing building, is a straight forward project, if you use the right plans and needs for your needs. You can place the wooden shed on several skids, on a concrete foundation or you can just pour several concrete footings.
Top Tip: You should adjust the size of the construction as to fit your needs, but use the same techniques to get the job done. Leave enough space for a large door opening, as to have a good access to the attached shed.
Free Lean To Shed Plans
Floor-frame-plans
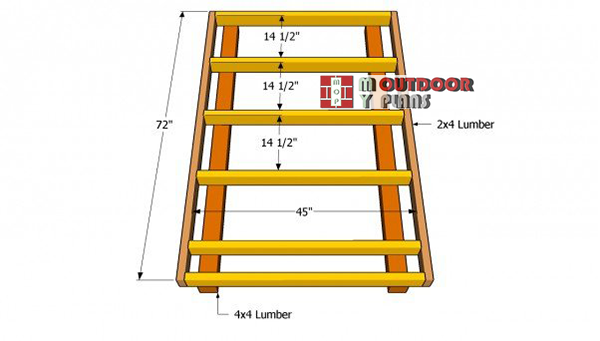
First, build the floor of the shed. Therefore, level the location and install several concrete slabs, under the 4×4 skids. Afterwards, build the frame of the flooring from 2×4 or 2×6 lumber, as in the free plans. Cut the components at the right size and lock them together with 3” screws.
Pre-drill pilot holes in the rim joists, to prevent the wood from splitting. Make sure the corners are right angles, using a carpentry square.
Attaching the flooring
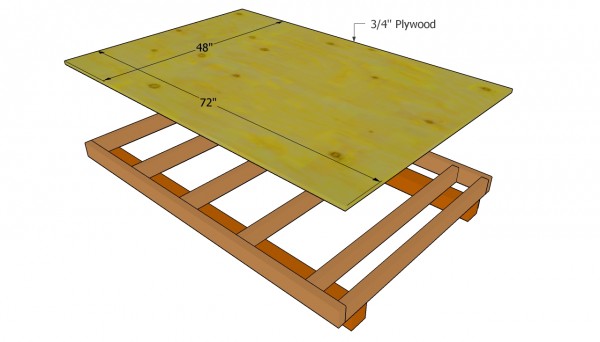
The next step of the woodworking project is to attach the 3/4” plywood flooring to the joists and to secure it into place with screws. Make sure the piece of plywood is flush with the edges of the frame, before inserting the 2” screws. Drive the nails in in the joists, every 8”.
Top Tip: Before attaching the flooring, you have to toe-nail the frame to the skids. Drill pilot holes and insert the 3 1/2” wood screws.
Back-wall-plans
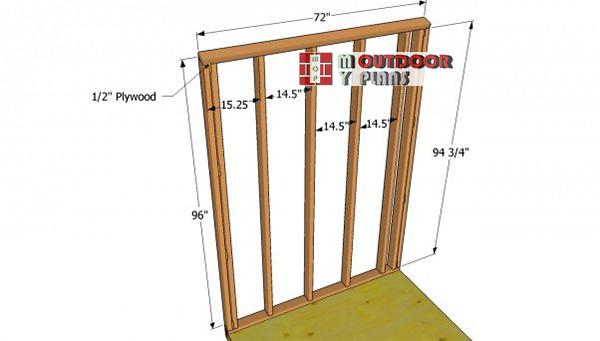
Afterwards, you have to build the back wall secure it to the floor joists. Work on a level surface, if you want to obtain an accurate result. As you can see in the image, drive pilot holes trough the bottom and top plates, before inserting the 3” screws into the studs.
Cut the top of the studs at 19º. On both sides of the frame, double the studs and fit 1/2” plywood filler blocks. Place the studs every 16” O.C.
Installing the side walls
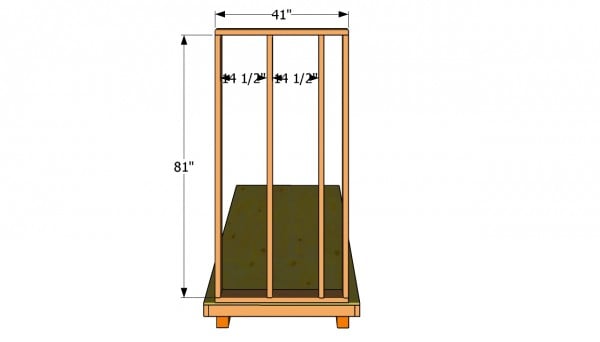
Building the side walls of the lean-to shed is a straight-forward process, if you use the techniques described above. Build the frames on a level surface, before securing them with 3 1/2” screws to the flooring. Drill pilot holes trough the plates, before inserting the screws in the wooden studs.
Place the studs every 16” O.C. if you want to increase the rigidity of the shed. Make sure both side walls have the same size and shape, if you want to obtain a construction with a neat look.
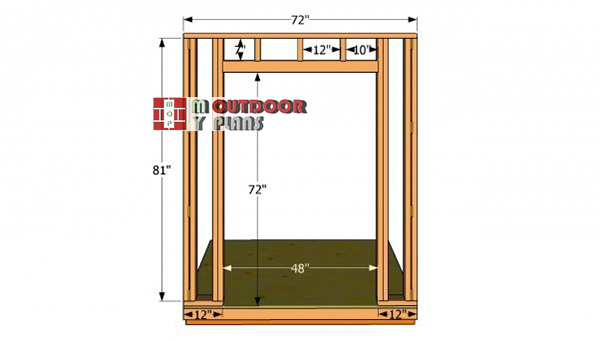
Front-wall-plans
Building the front face of the attached shed is one of the most important steps of the woodworking project, therefore make sure you pay attention to the process. Leave enough space to fit a large door, in order to have a good access to the interior.
Install a double header and several cripple studs, as well as trimmer studs, in order to make the frame rigid. Use a carpentry square to ensure the corners are right-angled.
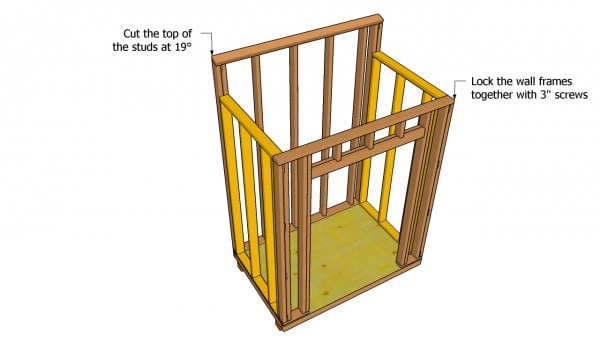
Lean-to shed plans
After building the frames of the shed, you should place them into place and lock them thoroughly. First of all fit the front and the back faces: align them properly, plumb them with a spirit level and secure them with 2×4 braces. Afterwards, drill pilot holes trough the bottom plates and insert 3 1/2” screws in the joists.
Install the side walls and lock the whole frame together with 3” nails. Make sure the components are aligned and properly secured.
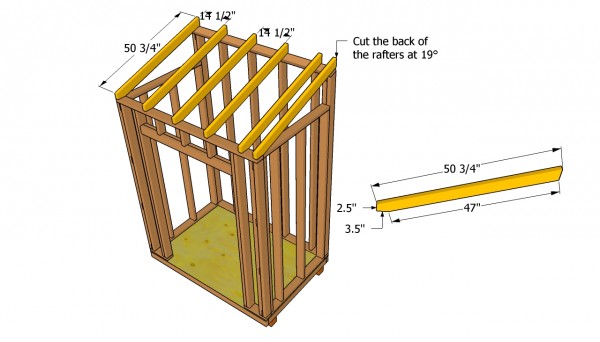
Installing the rafters
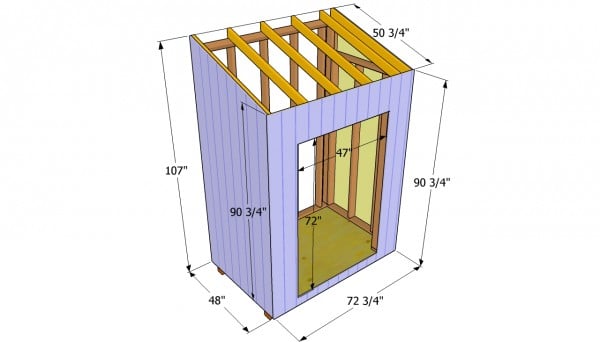
Build the wooden rafters from 2×4 lumber and lock them into place with 3” screws. Taking into account the top plate of the back wall is 19º angled, you have to adjust the ends of the rafters at the same angle.
Top Tip: Use a miter saw to cut the rafters at the right angle. Place them at about 16” O.C. and drive in the 3” nails at angle. Make sure the end rafters are flush with the frame.
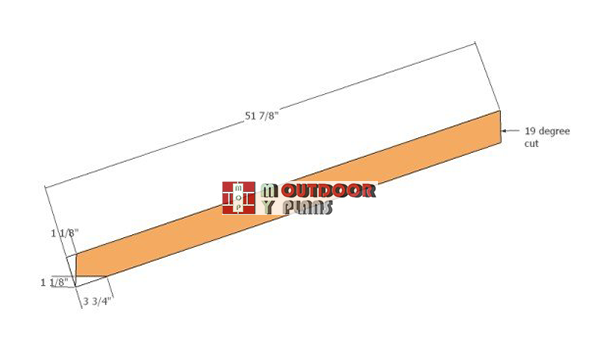
Building-the-rafters
Build the rafters for the shed using the information from the diagram.
Attaching the exterior siding
If you are going to attach the lean to shed to an existing construction, you should attach the exterior siding to only three walls. In order to get the job done in a professional manner, you should use 5/8” grooved plywood. Mark the cut lines on the plywood sheets, before adjusting them to the right size with a circular saw.
Top Tip: Attach the sheets into place, align them at both ends and drive in the 1 1/4” nails into the wooden studs.
Fitting the roofing sheets
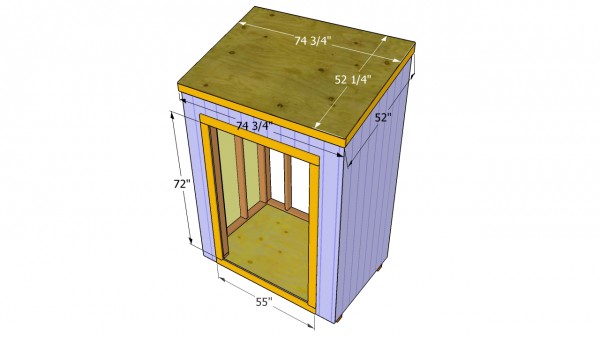
Continue the project by fitting the 3/4” plywood sheets to the rafters, as well as the 1×3” trims. Buy tongue and groove 3/4” plywood, as the sheets would connect together a lot easier. Align the sheets into place, making sure they are flush with the trims, before inserting the 2” nails.
Before fitting the roofing sheets, we recommend you to install the 1×3 trims around the door opening and around the top of the walls.
Installing the shingles
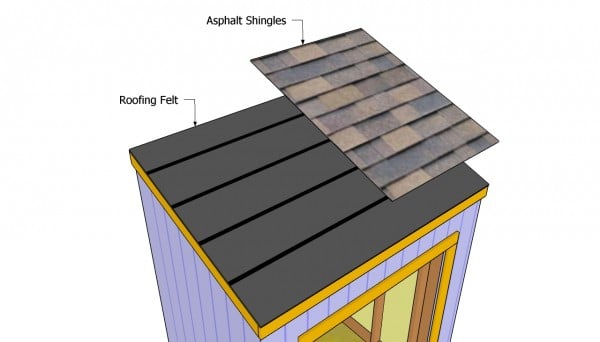
Install the roofing felt to the roofing, starting from the bottom part up to the top. Secure the tar paper to the roofing, using a good stapler. The tar paper has to overlap at least 2”. Cut a 14” strip of roofing paper and cover the top ridge in a professional manner.
Top Tip: Place the side drip edges at the bottom of the roof under the tar paper. Oppositely, fit the front and the back drip edges over the roofing felt.
Shed Door Plans
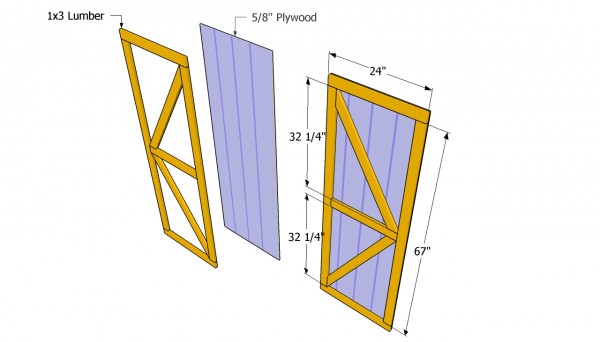
Build the doors from 5/8” plywood and 1×3 trims. Cut the door panels using a good circular saw with a fine blade. Afterwards attach the trims to the plywood pieces and secure them into place with 1 1/4” nails.
Use a carpentry square to make sure the corners are right-angled. Fit the doors into place and lock them with a couple of hinges. Don’t forget to install a latch.
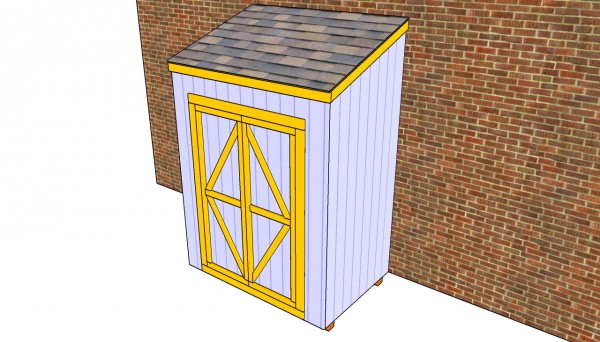
Attached shed plans
Last but not least, you have to take care of the finishing touches. Therefore, fill the holes and the cracks with wood filler and let it dry out for several hours, before sanding the surface with 120-grit sandpaper.
Top Tip: Protect the wooden components from rot by applying several coats of paint. Choose colors that match the design of the rest of your property, as to enhance the look of the shed. If you need more space, then I recommend you to check out plans for a 8×12 lean to shed on GardenPlansFree.com
This woodworking project is about free lean to shed plans. If you want to see more outdoor plans, we recommend you to check out the rest of our step by step projects. SHARE our projects and follow us on the social networks to help us keep adding free woodworking plans LIKE us on Facebook to be the first that gets our latest updates and submit pictures with your DIY projects.
