This step by step diy project is about 8×16 shed roof plans. This is PART 2 of the shed project, where I show you how to build the lean to roof for this garden shed. Take a look over the rest of my woodworking plans, if you want to get more building inspiration. Remember that you need to select the site for the shed with attention and that you have to comply with a few legal regulations.
When buying the lumber, you should select the planks with great care, making sure they are straight and without any visible flaws (cracks, knots, twists, decay). Investing in cedar or other weather resistant lumber is a good idea, as it will pay off on the long run. Use a spirit level to plumb and align the components, before inserting the galvanized screws, otherwise the project won’t have a symmetrical look. If you have all the materials and tools required for the project, you could get the job done in about a day. See all my Premium Plans HERE.
8×16 Lean to Shed Roof Plans

Building-a-8×16-lean-to-shed
Cut & Shopping Lists
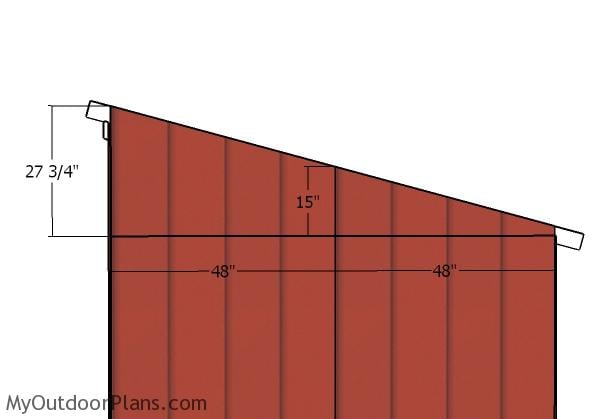
- G – 2 pieces of T1-11 siding – 27 3/4″x48″ long, 2 pieces – 15″x48″ long SIDING
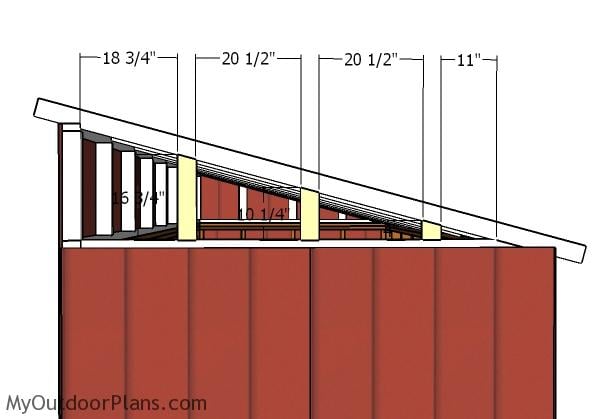
- I – 2 pieces of 2×4 lumber – 16 3/4″ long, 2 pieces – 10 1/4″ long, 2 pieces – 4″ long SIDE SUPPORTS
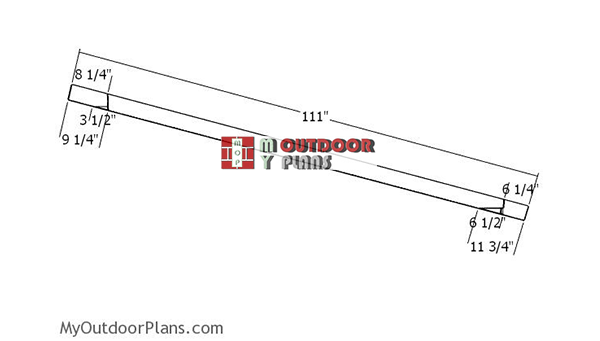
- J – 9 pieces of 2×4 lumber – 111″ long RAFTERS
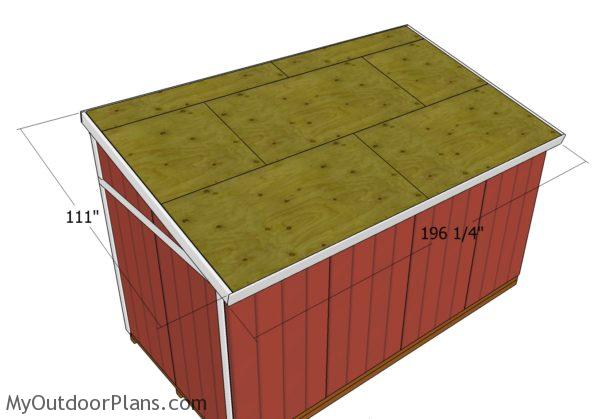
- K – 3 pieces of 3/4″ plywood – 48″x96″ long, 2 pieces – 48″x48″ long, 2 pieces – 15″x96″ long ROOF
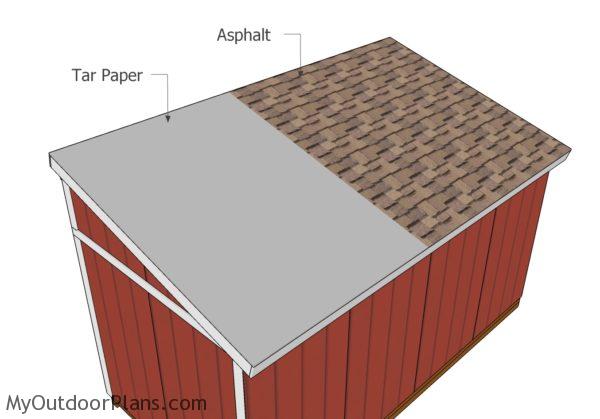
- L – 200 sq ft of tar paper, 200 sq ft of asphalt shingles ROOFING
- M – 2 piece of 2×6 lumber – 111″ long, 2 pieces of 1×6 lumber – 196 1/4″ long TRIMS
- 2 pieces of 2×6 lumber – 10′
- 2 pieces of 1×6 lumber – 18′
- 5 pieces of 3/4″ plywood – 48″x96″
- 9 pieces of 2×4 lumber – 10′
- 4 pieces of 2×4 lumber – 8′
- 2 pieces of T1-11 5/8″ siding – 4’x8′
- 2 1/2″ screws, 3 1/2″ screws, 1 5/8″ screws
- 200 sq ft of tar paper, 200 sq ft of asphalt shingles
- 4d nails, 16d nails
- wood filler , wood glue, stain/paint
Tools
![]() Hammer, Tape measure, Framing square, Level
Hammer, Tape measure, Framing square, Level
![]() Miter saw, Drill machinery, Screwdriver, Sander
Miter saw, Drill machinery, Screwdriver, Sander
Time
Related
- PART 1: 8×16 Shed Plans
- PART 2: 8×16 Shed Roof Plans
- PART 3: Shed Doors Plans
Building a 8×12 shed roof plans
Building-the-rafters
First of all, you need to make the rafters for the lean to shed. As you can easily notice in the plans, you need to mark the cut lines on the beams and get the job done with a circular saw. Smooth the edges with sandpaper, for a neat result.
Top-end-wall-plates
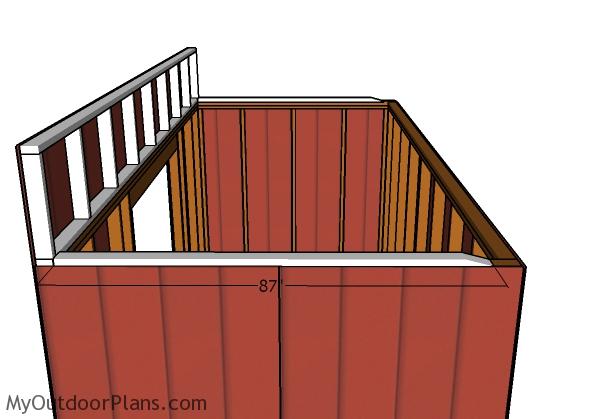
Fit the supports to the sides of the shed.
Fitting-the-rafters
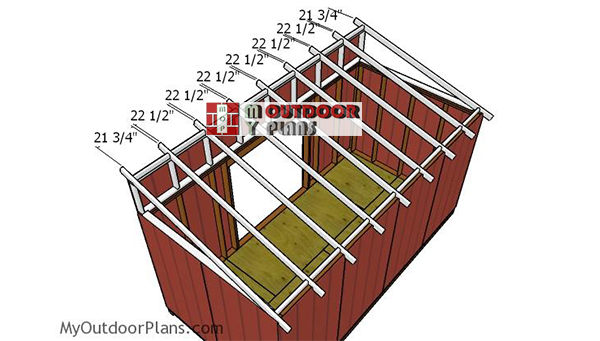
Fit the rafters to the top of the shed, making sure you space them every 24″ on center. Use metal ties, to secure the rafters into place with attention.
Roof-blockings
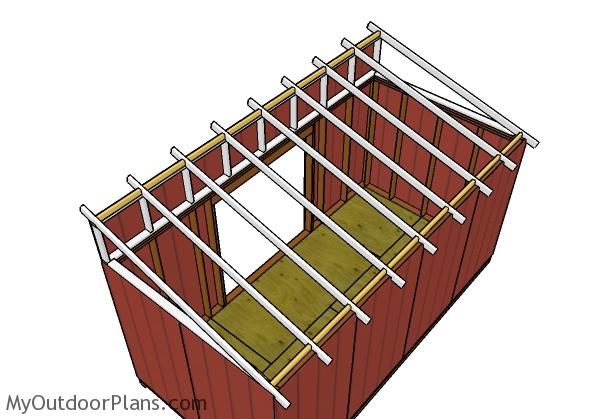
Optionally, you can fit 2×3 blocking between the rafters, so you seal the shed. Drill pocket holes at both ends of the blockings and insert 2 1/2″ screws into the rafters.
Roof-end-supports
Fit the 2×4 supports to the sides of the roof. Drill pocket holes at both ends of the supports and insert 2 1/2″ screws to lock them to the frame of the shed.
Fitting-the-roof-end-panels
Fit the siding panels to the sides of the roof. Use 4d nails to lock the panels into place.

Fitting-the-roof-sheets
Use 3/4″ tongue and groove plywood sheets for the roof of the barn shed. Drill pilot holes and insert 1 5/8″ screws, every 8″ along the rafters. Leave no gaps between the tongue and groove sheets.
Fitting-the-roof-trims
Attach 2×6 trims to the sides of the roof and lock them into place with 2 1/2″ screws. Attach 1×6 trims to the ends of the rafters. Align the trims with attention and secure them into place with 1 1/2″ brad nails.
Fitting-the-roofing
Cover the roof of the shed with roofing felt, making sure the strips overlap at least 2″. Secure the tar paper to the plywood sheets with roofing staples. In addition, cut a large piece for the top ridge. Fit the side drip edges over the roofing felt, while the bottom drip edges should be fit under. Read the instructions labeled on the asphalt shingle packs before installing them into place tightly. Start with the bottom left side of the roof and install them all the way to the top.
8×16-shed-plans
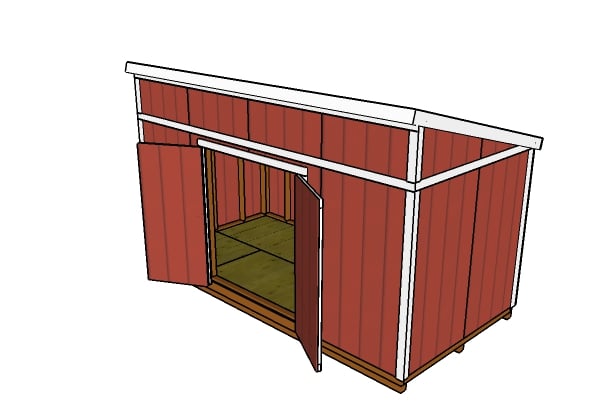
This shed is roomy enough for lots of items, so if you are looking for a cheap and straight-forward way of keeping your things protected from the elements, this shed is one good choice. Don’t forget to take a look over PART 2 and PART 3 to learn how to build the roof for the shed, as well as how to frame the double front doors.
This woodworking project was about 8×16 shed plans free. If you want to see more outdoor plans, check out the rest of our step by step projects and follow the instructions to obtain a professional result.


18 comments
Hi There,
I am looking through your plan and the materials listed are not accurate. It’s missing the 111″ 2×4’s.
Thank you for the feedback. I have updated the list.
Do you have more detailed instructions on building the double doors for the 8×16 foot shed. Thanks!
That’s all I have got.
Hey, i was wondering why you state to use nails for the siding rather than screws?
Im building this shed in south florida, and being that we are hurricane prone (wind shear), i would think screws would be a better option?
Correct me if im wrong please.
The nails looks better, because you don’t see them, but the screws definitely make a stronger bond. Therefore, you can use screws if you like in a hurricane prone area.
Could you please give me more information on the top end wall plates for roofing? There isn’t much detail. Thank you, Tad.
We don’t understand the cut we need to make to make the rafter. I feel like we need an angle or one more measurement in order to know how to cut.
You should use a carpentry square. That already has the right angled, so with the info already on the diagram, you should do the job on a few seconds.
Would a metal roof be easier than the shingles and would I still need to use plywood with that?
Metal roof is easier. No plywood needed. Just horizontal 1×4 purlins, every 12″
Got it, thanks
Hello,
how do i get a specific pdf plan sent to my email?
would like the 8×16 lean to shed so i can extrapolate dimensions to create a 10×12 bunkhouse
Hello, you need to read the FAQs: https://myoutdoorplans.com/faq/
On the birds mouth cut you have listed the length and width of the cut but not how deep to cut in. What would that measurement be? All the other plans list it except this one. Thanks!
You don’t need that. Just use a carpentry square because that angle is 90 degrees.
The plans are perfect the way they are.
Just finished up the roof rafters. The square works the best to connect the dots.
Very easy to understand, can’t wait to get the roof on and start storing my stuff.
Thansk for the plans
Kelly
What metal ties do we need for the rafters?