Finding the right wooden planter plans for your needs might be a true challenge, if you don’t have expertise in woodworking. There are many designs, shapes and sizes to choose from, therefore you need to study the pros and cons of each alternative and choose the plans that fit your needs and tastes best. On one hand, you have to ensure the wooden box is appropriate for the plants you are going to grow, while on the other hand it has to harmonize with the design of your garden or deck.
Plan everything from the very beginning, otherwise you could be taken aback by issues that require time and money to be fixed. In addition, select the lumber with great care and good judgement, if you want to build a durable planter with a nice appearance. Don’t be afraid to invest in quality materials (redwood, cedar), as you will see the difference over time, not to speak about the superior look.
Projects made from these plans
Cut & Shopping Lists
- A – 4 pieces of 2×2 lumber 15” long, 4 pieces of 2×2 lumber 13 1/2” long FRAME
- B – 8 pieces of 2 1/2” wood screws SCREWS FOR FRAME
- C – 3 pieces of 1×6 lumber 16 1/2” long FLOOR
- D – 12 pieces of 2 1/2” wood screws SCREWS FOR FLOOR
- E – 12 pieces of 1×6 lumber 16 1/2” long SIDES
- F – 2 pieces of 1×3 lumber 18” long, cut at 45º at both ends, 2 pieces – 19 1/2″ SIDE TRIMS
- G – 2 pieces of 1×4 lumber 19” long, cut at 45º at both ends, 2 pieces – 20 1/2″ TOP TRIMS
- H – varnish or paint resistant to water VARNISH
- I – 24 pieces of 1” finishing nails FINISHING NAILS
- 3 pieces of 1×6 lumber – 8′
- 2 pieces of 2×2 lumber – 8′
- 1 piece of 1×3 lumber – 8′
- 1 piece of 1×4 lumber – 8′
- 25 pieces of 2 1/2″ screws
- 100 pieces of 1 1/4″ screws
- 2″ brad nails
- glue, stain
Tools
- Hammer, Tape measure, Framing square
- Miter saw, Drill machinery, Screwdriver, Sander
- Safety Gloves, Safety Glasses
Time
- 4 Hours
Related
Garden Planter Components
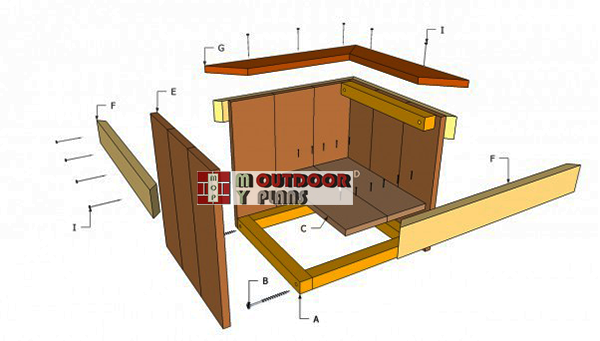
Wooden-box-plans
A wooden planter would enhance the look of your garden or deck, adding a little color to the decor. From a technical point of view, any amateur handyman can build a planter box, taking into account that the project requires only basic woodworking techniques.
Our Tip: In order to obtain a professional result, buy lumber designed for outdoor use, such as cedar, redwood or pine. Select the slats with attention, making sure they are in a good condition (search for twists, cracks, chops, wanes, knots or decay).
Wooden Planter Plans
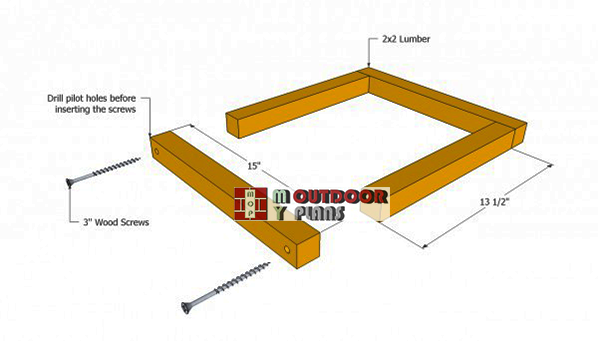
Planter-box-frame
First, build the frame of the wooden planter, from 2×2 lumber. Therefore, cut the 2×2 at the right size and joint the pieces together with 3” screws. We recommend you to use a framing square (in this manner the corners would be right-angled).
Top Tip: Use a drill machinery to make pilot holes in the wooden components, before driving n the screws. In addition, don’t over-tighten the screws, to prevent the wood from splitting.
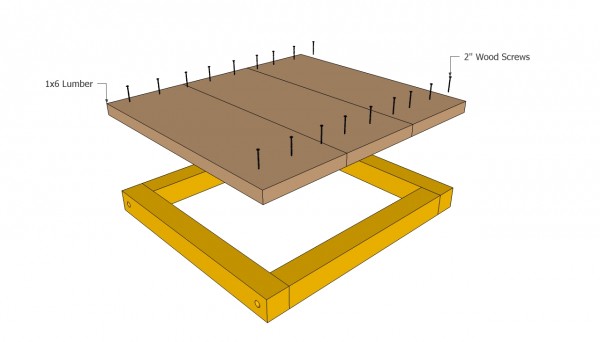
Planter bottom plans
After building the base frame of the wooden planter, install the flooring. Therefore, use a miter saw to cut the 1×6 slats at 15” and attach them into place, by using 2” galvanized screws. Pre-drill holes in the slats before driving in the screws, otherwise the wood would split.
Top Tip: Smooth the cut edges of the slats with a sand block and average grit sandpaper, to obtain a neat look.
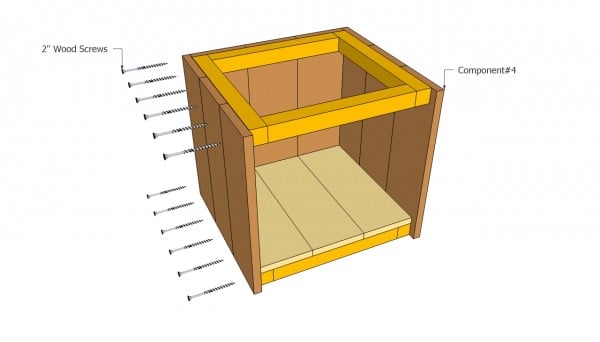
Installing the sides of the planter
The next step of the woodworking project is to attach the sides of the wooden planter plans. Therefore, cut the 1×6 lumber at 16 1/2” and attach them to the base and top frames.
Top Tip: You could adjust the size of the walls according to your needs, making sure it doesn’t affect the appearance of the planter. Study carefully the needs of the plants and design the wooden box in an appropriate manner.
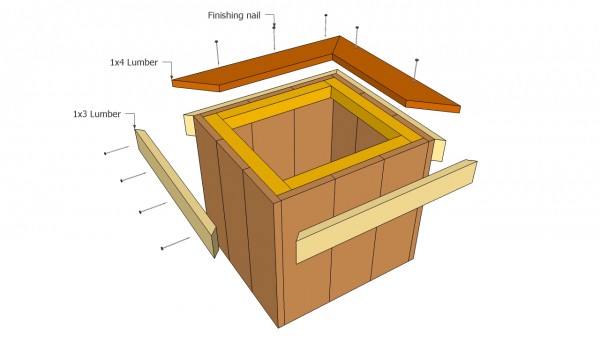
Installing the trims
One of the last steps of this project is to install the trims, in order to conceal the edges of the wooden planter. Therefore, we suggest you to attach 1×3 or 1×4 trims to the sides of the planter, by using finishing nails.
Top Tips: Install the top trims (made of 1×4 lumber) into place, using finishing nails. Cut the ends of the trims at 45º with a miter saw, as to get a accurate joints with a nice appearance.
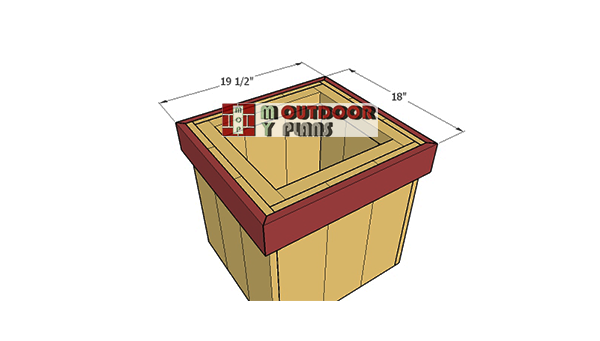
Side-trims-planter
Fit the side trims from 1×3 trims. Miter cut both ends at 45 degrees and lock them to the walls with 2″ brad nails.

Fitting-the-top-trims
Cut both ends of the top trims at 45 degrees. Fit the trims into place and lock them to the frame using 2″ brad nails.

Wooden planter box
Fill the head of the screws or the holes with wood putty and leave it to harden for several hours. Next, smooth the surface with a sander and 120- grit sandpaper, making sure you move it along the wood grain.
Top Tip: In order to protect the planter from wood decay and water damage, apply several coats of varnish or protective paint. Make sure you don’t use substances that might affect the plants.
This woodworking project is about wooden planter plans free. If you need more outdoor plans, we recommend you to check out the rest of our step by step projects. LIKE us on Facebook to be the first that gets our latest updates and submit pictures with your DIY projects.

4 comments
I left the bottom out and made the tops so a flower pot, (Square works best) can be dropped into the planter. This makes it easy to move around just by taking the weight out by removing the pot before putting it back in in the new location.
Thank you for sharing your idea with us. Your solution is clever and I would like to see how it looks like. You should send a few images so that we can all appreciate your project!
I will, the planters look just like yours but without the bottoms and the square top is made to size to fit the size pot I want, this saves soil and makes it easy to move, I built the bench this morning and put it between two of them so each piece is separate, again for easy moving to new locations. I finished mine with a redwood stain.
It sounds really interesting. Looking forward to seeing the completed project!