This step by step diy project is about how to build a picnic shelter. If you enjoy spending time in your garden, we strongly recommend you to consider building a picnic shelter. There are many plans and designs to choose from, so don’t forget to take a look over several alternatives before starting the actual construction of the woodworking project. In most cases the structure requires a building permit, so read the local building codes.
There are many plans and designs to choose from, so we recommend you to study the alternatives before starting the construction project. In addition, you have to plan the shelter according to the size of the picnic table. Set the posts into concrete, if you want to create a rigid construction and to build a permanent and versatile shelter. Adjust the slope of the roof according to the area where you live and to your needs. See all my Premium Plans HERE.
Projects made from these plans
How to Build a Picnic Shelter
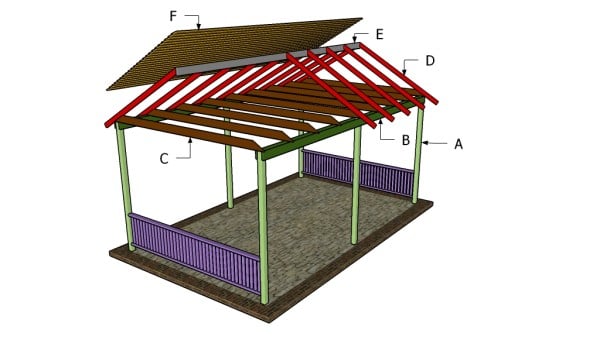
Building a picnic shelter
Cut & shopping lists
- A – 6 pieces of 4×4 lumber – 108′ long POSTS
- B – 4 pieces of 2×6 lumber – 240″ long SUPPORT BEAMS
- C – 6 pieces of 2×6 lumber – 147” long BOTTOM RAFTERS
- D – 12 pieces of 2×4 lumber – 99” long RAFTERS
- E – 1 piece of 2×6 lumber – 240″ long TOP RIDGE
- F – 50 pieces of 1×6 lumber – 240″ long ROOFING
- G – 4 pieces of 2×4 lumber – 137″ long, 80 pieces of 2×2 lumber – 24″ long RAILINGS
- 6 pieces of 4×4 lumber – 10 ft
- 5 pieces of 2×6 lumber – 20 ft
- 6 pieces of 2×6 lumber – 14 ft
- 12 pieces of 2×4 lumber – 10 ft
- 100 pieces 1×6 lumber – 10 ft
- 20 pieces of 2×2 lumber – 8 ft
- 4 pieces of 2×4 lumber – 12 ft
- tube forms, post anchors
- 500 pieces of 2 1/2″ screws
- 500 pieces of 1 1/4″ screws
- 2″ brad nails
- tar paper, asphalt shingles
- wood glue, stain/paint
- wood filler
Tools
![]() Hammer, Tape measure, Framing square, Level
Hammer, Tape measure, Framing square, Level
![]() Miter saw, Drill machinery, Screwdriver, Sander
Miter saw, Drill machinery, Screwdriver, Sander
![]() Post hole digger, Concrete mixer
Post hole digger, Concrete mixer
Time
Building a picnic shelter
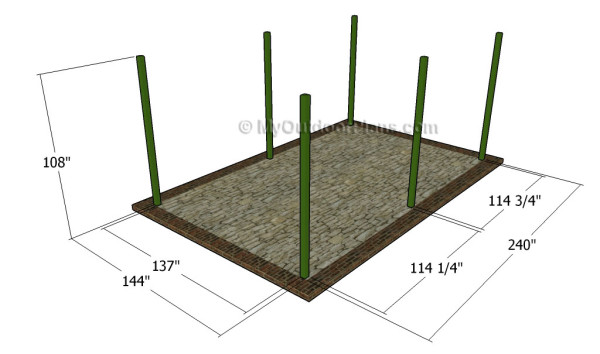
Fitting the posts
The first step of the woodworking project is to lay out the picnic shelter in a professional manner. As you can easily notice in the plans, we recommend you to build the posts out of 4×4 lumber. Use batter boards and strings to lay out the posts in a professional manner.
Top Tip: Apply the 3-4-5 rule to every corners of the structure, otherwise the corners won’t be right-angled.

Anchoring the posts of the anchor
The next step of the project is to set the wooden posts into place. Therefore, you can choose from several options: setting the posts into concrete or using post anchors. In the first case, you need to 3′ deep holes and fit tube forms. Set the posts into place, plumb them and secure them temporarily with braces.
Top Tip: Fill the tube forms with concrete and let it dry out. In the second case, fit the anchors into concrete and fit the posts with spirit level. Check out the local building codes, so you find out the right depth for your footings.
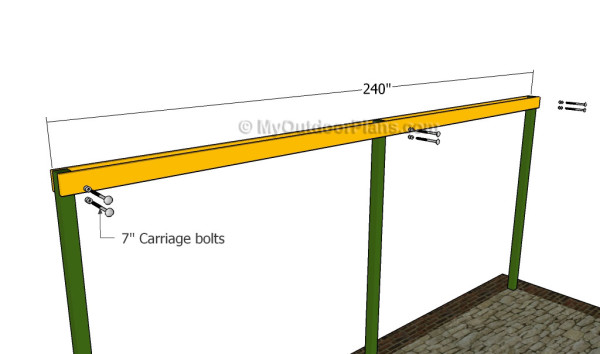
Fitting the support beams
The next step of the woodworking project is to attach the 2×6 support beams to the top of the posts. Use a spirit level to make sure the beams are horizontal and clamp them to the posts tightly. Drill pilot holes through the beams and through the posts. Then, insert 7″ carriage bolts and leave no gaps between the components.
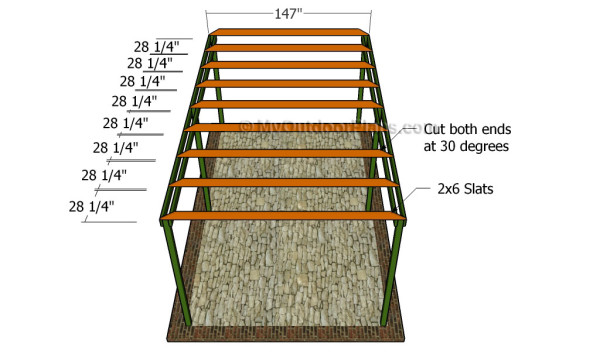
Fitting the bottom rafters
Building the roof of the picnic shelter is a straight-forward process, but you need to pay attention to several aspects, in order to prevent the wood from splitting. Cut the bottom rafters out of 2×6 lumber, making sure you cut both ends at 30 degrees.
Place the bottom rafters equally-spaced, drill pilot holes and secure them to the support beams with 2 1/2″ galvanized screws. Make sure the beams are plumb and leave no gaps between the components.
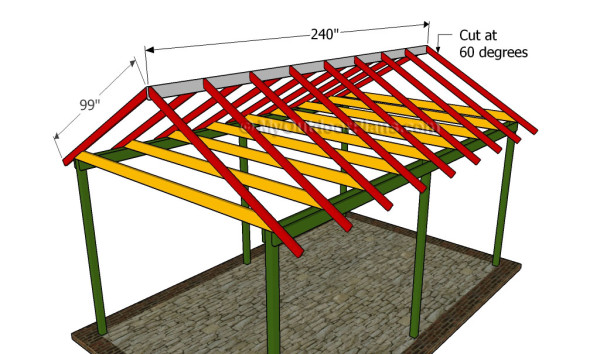
Building the rafters
Next, you need to build the top ridge out of 2×6 lumber and the rafters out of 2×4 lumber. Cut the components at the right size and cut one end of the regular rafters at 60 degrees.
Attach the rafters to the top ridge and to the bottom rafters, at the other end. Drill pilot holes through the rafters and secure the structure using 5″ galvanized screws. Place the rafters equally-spaced and make sure the joints are rigid.
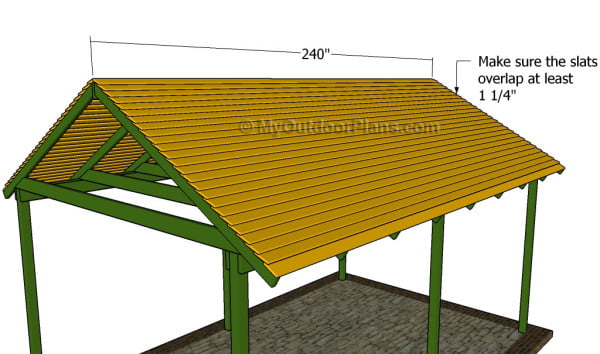
Fitting the roofing slats
One of the last steps of the project is to attach the roofing slats into place. Therefore, use 1×6 lumber and start the installation from the bottom. Make sure the slats overlap at least 1 1/2″, in order to drain the water efficiently.

Fitting the handrail and bottom rail
If you want to enhance the look of the picnic shelter, we strongly recommend you to build railings on the faces of the structure. In order to get the job done in a professional manner, we recommend you to attach the top and the bottom rails to the legs.
Drill pocket holes at both ends of the components and secure them to the legs using 2 1/2″ screws. Make sure the corners are right angled and leave no gaps between the components.
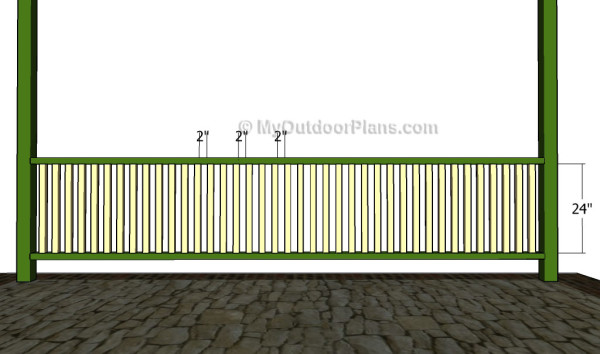
Fitting the balusters
Continue the woodworking project by a attaching the 2×2 balusters to the top and bottom rails. Cut the balusters at the right size and drill pocket holes at both ends of the components. Fit the balusters into place and place them equally-spaced.
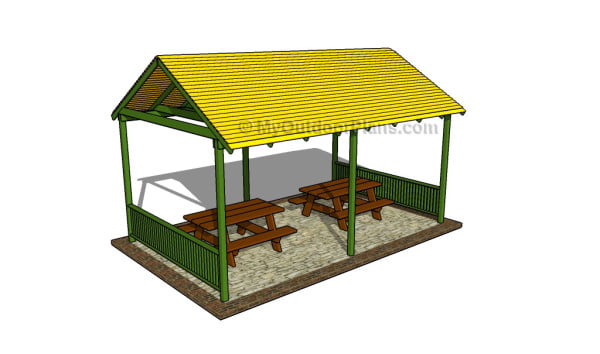
How to build a picnic shelter
Lastly,pay attention to the finishing touches. Insert all the screws at the same level with the wooden surface and smooth the sharp edges. Apply a few coats of protective paint to prevent the wooden components from decay.
Top Tip: Smooth the surface with medium-grit sandpaper along the wood grain and clean the residues. Afterwards, apply a few coats of paint or stain to the structure.
This woodworking project was about how to build a picnic shelter. If you want to see more outdoor plans, we recommend you to check out the rest of our step by step projects.

1 comment
60X30 Church picnic shelter