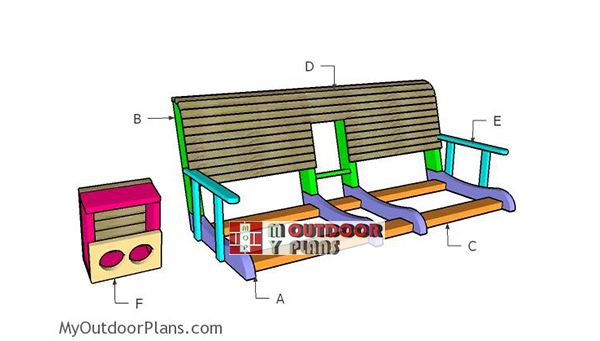
This step by step diy woodworking project is about a porch swing with center console plans. I have designed this porch swing with center console with cupholders, as a add up to my already popular porch swing plans, which you can see here. However, this design features the center console and a lot sturdier structure. Take a look over the rest of our woodworking plans, if you want to get more building inspiration.
When buying the lumber, you should select the planks with great care, making sure they are straight and without any visible flaws (cracks, knots, twists, decay). Investing in cedar or other weather resistant lumber is a good idea, as it will pay off on the long run. Use a spirit level to plumb and align the components, before inserting the galvanized screws, otherwise the project won’t have a symmetrical look. If you have all the materials and tools required for the project, you could get the job done in about a day. See all my Premium Plans HERE.
Projects made from these plans
Porch Swing with Center Console Plans
Building-a-porch-swing-with-center-console
Cut & Shopping Lists
- A – 4 pieces of 2×4 lumber – 24″ long SEAT SUPPORTS
- B – 4 pieces of 2×4 lumber – 21″ long, 1 piece of 1×6 lumber – 8 3/4″ long BACK SUPPORTS
- C – 3 pieces of 2×4 lumber – 57″ long STRETCHERS
- D – 22 pieces of 1×2 lumber – 60″ long, 14 pieces – 25 3/4″ long SLATS
- 5 pieces of 2×4 lumber – 8′
- 1 pieces of 1×4 lumber – 4′
- 29 piece of 1×2 lumber – 6′
- 2 1/2″ screws, 1 1/4″ screws
- wood glue, stain/paint
Tools
![]() Hammer, Tape measure, Framing square, Level
Hammer, Tape measure, Framing square, Level
![]() Miter saw, Drill machinery, Screwdriver, Sander
Miter saw, Drill machinery, Screwdriver, Sander
Time
Related
- PART 1: Porch swing with center console plans
- PART 2: Wood center console cup holders plans
How to build a porch swing bench
Base-supports—porch-swing
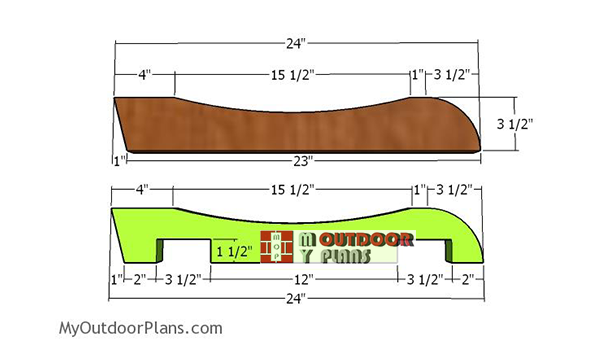
The first step of the project is to build the supports for the seats. As you can easily see in the diagram, you first need to make the curved cuts to the 2×4 slats using a jigsaw. To draw the curve you should use a round object you has in the household (lid, and so on).
Make two pieces of each support seen in the diagram. The green supports will fall to the middle of the seat. As seen in the diagram, you need to make notches to the supports, so you can fit the stretchers. Mark the cut lines on the beams and then make parallel cuts inside the marked areas. Use a chisel to remove the excess and then smooth it with sandpaper.
Backrest-supports
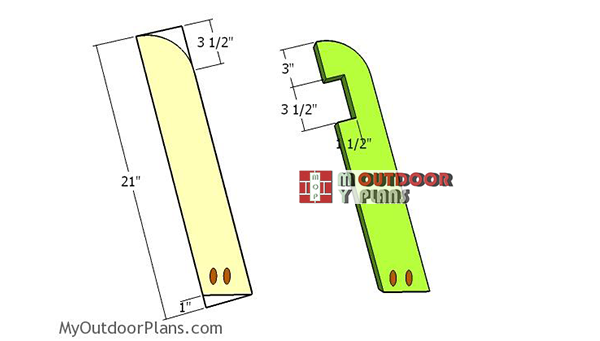
Continue the project by cutting the backrest supports from 2×4 lumber. Make the curved cuts with a jigsaw and then smooth the edges with sandpaper. Next, you need to make the notches, so you can fit the stretchers that will hold the porch swing bench together tightly. Build two pieces of each component shown in the diagram.
Assembling the frames
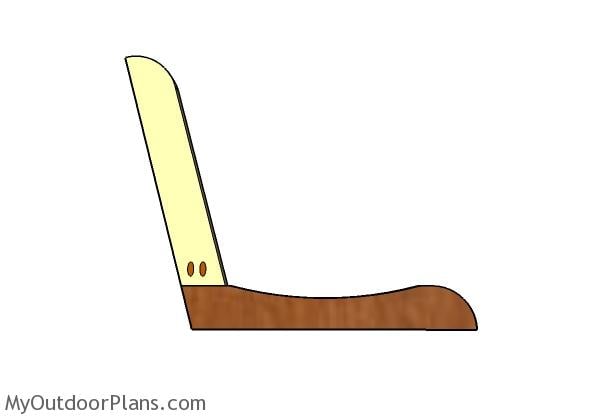
After you cut the seat and the backrests, you need to lock them together tightly. Drill pocket holes through the backrests and then insert 2 1/2″ screws into the seat supports. Add glue to the joints and make sure you align the edges flush.
Assembling-the-swing-frame
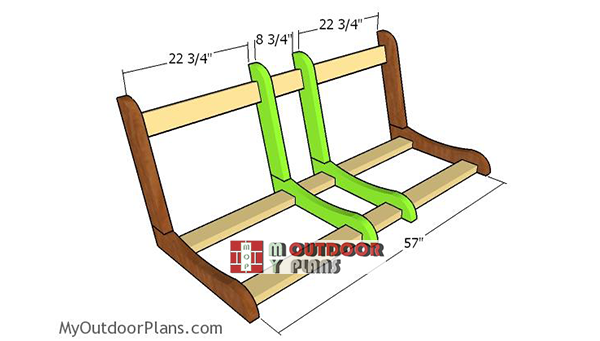
Lay the supports on a level surface and then you need to fit the 2×4 stretcher into place tightly. Drill pocket holes at both ends of the supports and then insert 2 1/2″ screws into the end supports. Drill pilot holes though the stretchers and insert 2 1/2″ screws into the middle supports.
The distance you leave between the middle supports will determine the width of the center console, so if you want to make adjustments, now it is the right time to do it.
Framing the central console support
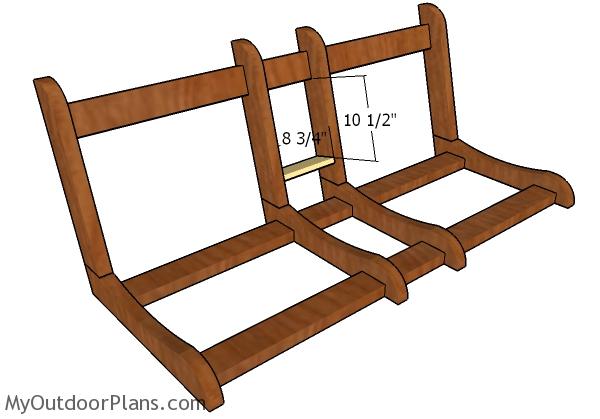
Fit the support for the center console to the frame of the porch swing. Cut the piece from 1×6 lumber and drill pilot holes at both ends. Insert 1 1/4″ screws to lock the supports into place tightly.

Fitting the seat slats
Next, fit the 1×2 slats to the seat of the porch swing. Align the edges with attention, drill pilot holes and insert 1 1/4″ screws to lock them into place tightly. You can leave space between the slats or you could just place them one next to the other.
Attaching the backrest slats
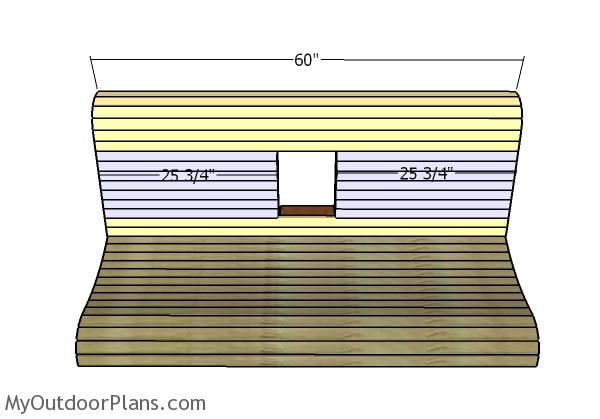
Fit the 1×2 slats to the backrest of the porch swing. As you can easily notice in the diagram, you need to make some cuts to the slats, so you can fit them around the center console. Align the edges flush, drill pilot holes and insert 1 1/4″ screws to secure them to the supports.

Building a wood porch swing with center console
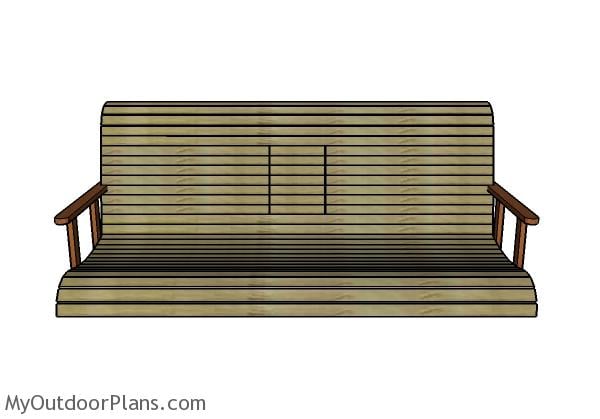
Make sure you take a look over PART 2 of the project, so you learn how to build the center console with cupholders, or how to build the side armrests.
Porch swing plans
You need to take care of the finishing touches. Fill the holes with wood putty and then smooth the surface with 120-220 grit sandpaper. Moreover apply a few coats of paint or stain to enhance the look of the porch swing and to protect the components from decay.
If you want to get this plans as a PDF file with 1 full Cut list and 1 full Shopping list (plans revised), please take a look over the GET PDF PLANS button bellow. Thank you for your support!
This woodworking project was about porch swing plans free. If you want to see more outdoor plans, check out the rest of our step by step projects and follow the instructions to obtain a professional result.


27 comments
Correct me if I am missing something…..A 57″ stretcher with 2×4 (Roughly 3.5″ wide) seats supports comes out to 64″. So the slats would need to be 64″ or longer and not 60″
You are wrong. The seat supports are set vertically, so their thickness is 1 1/2″ and not 3 1/2″.
I believe the stretchers all end against the flat side of the 2×4 back and seat supports and a 2×4 is around 1-1/2 inches thick. 1 in each end would make 3″+57″ long stretchers = 60″
What type of wood would you recommend? This swing will sit through 4 season of weather.
Cedar.
Do you have any printable templates for the seat and back supports?
No, I don’t have that.
Would it be better to lengthen the back supports and do a 1/2 lap. Also could this be lengthen to 72″?
You can do a 1/2 lap, if you make the back supports longer. Also, you can make the bench wider to 72″, with minimum modifications.
Is that cross piece for the fold down 1×4 or 1×6?
See plans for the fold down here: http://myoutdoorplans.com/furniture/wood-center-console-with-cupholders-plans/ You have there all the materials and a cut list.
Made the console as shown and it fits in the hole however i can not get it to flip down properly! How high do u put the bolts or where do I put the hinge. Put bolts in already and can’t seem to get it to clear no matter what I do! Please help!!!
You place the hinges at the bottom of the console, so it can flip down, as shown in the diagram.
We are having the same issue were you able to figure anything out on it not flipping down? Do we need to use shorter boards than 8 3/4
Great looking swing. Is there any way to get the Sketchup plans for it?
No. I don’t share the models.
Where do you put the eye bolts for the chains? Is it 3 inches?
The hooks go on the seat frame and on the backrest frame. I recommend these: https://amzn.to/2MrpfIs Make sure you check out PART 2 of this project, as well.
Where do the chain hooks attach to the seat and back frame? Will the chains be interfering with the (use of) armrests?
See the brag projects, you will have to get the chain / rope through the armrests
What’s the measurements for the upper curve of the seat supports?
Hey Ovidiu, I just bought some of your plans on your site and was wondering if it is possible to build this swing using 2” X 2” lumber instead of 1” X 2” lumber for the slats? Thanks, Paul
Yes, you can use that, it doesn’t change much.
We are building this swing from your plans but we are having trouble with the support for the console. Is it suppose to stick out in the front or the back?
I have the plans for the console but there isn’t enough info or pics for attaching. Also what is the height of the armrests?
Hi I love this pla.and was hoping to modify it for my old patio swing which has a metal frame (replacing the canvas seat).
Do you think it’s possible to do?
I’m going to try to build my mom a porch swing for Christmas, but am a college student on a budget haha. How much does this cost to make?