This step by step diy woodworking project is about chaise lounge chair plans. If you want to add character to your patio or deck, a lounge chair is perfect, as it is a straight forward project that doesn’t require a large investment. Choose the chair design that fits your needs and tastes, before buying quality materials for the job. Cedar, redwood or pine are great choices, as these components would look great and be highly durable.
You should also remember that you could adjust the size of the wooden chaise lounge chair, in order to suit your needs and tastes. Nevertheless, you should still use the same woodworking techniques described in this project, even if the components would have other dimensions. Sand the edges of the components with a sand-block and 120-grit sandpaper, or round them with a router and a 1/4” bit. Pre-drill the wooden components before inserting the screws, to prevent the wood from splitting. Sand the lateral edges of the backrest or make it 1/4” narrower, in order to fit properly inside the frame. See all my Premium Plans HERE.
Projects made from these plans
Cut & Shopping Lists
- A – 4 pieces of 2×4 lumber 6” long LEGS
- B – 2 pieces of 1×4 lumber 76 1/2” long SIDES
- C – 3 pieces of 1×2 lumber 22 1/2” long SUPPORTS
- D – 2 pieces of 1×1 lumber 56 1/2” long SEAT CLEATS
- E – 19 pieces of 1×3 lumber 22 1/2” long SEAT SLATS
- F – 2 pieces of 1×2 lumber 18 1/2”, 2 pieces of 1×1 lumber 21”, 8 pieces of 1×3 lumber 21” BACKREST
- G – 2 pieces of 1×2 lumber 14 1/2” long, 4 pieces of 1×2 lumber 2 1/2” long BACKREST CLEATS
- H – 2 pieces of 1×1 lumber 6 1/2” long, 1 piece of lumber 19 1/2” PROP UP
- 1 piece of 2×4 lumber – 6′
- 2 pieces of 1×4 lumber – 8′
- 7 pieces of 1×3 lumber – 8′
- 2 pieces of 1×2 lumber – 8′
- 2 pieces of 1×1 lumber – 8′
- glue, stain
- wood filler
- 1 1/4″ screws
Tools
![]() Hammer, Tape measure, Framing square
Hammer, Tape measure, Framing square
![]() Miter saw, Drill machinery, Screwdriver, Sander
Miter saw, Drill machinery, Screwdriver, Sander
Time
Wooden chaise lounge chair plans

Wood-chaise-lounge-plans
A wooden chaise lounge is a great example of a diy project that doesn’t require a large investment, but change dramatically the look of any patio or deck. There are many designs and shapes you could choose from, but in this article we show you plans for a simple lounge chair, that can be built in just a weekend.
Top Tip: Adjust the size of the chair to your needs, but use the same carpentry techniques described in this guide. Add wood glue to the joint, in order to enhance the bond.
Outdoor lounge chair plans
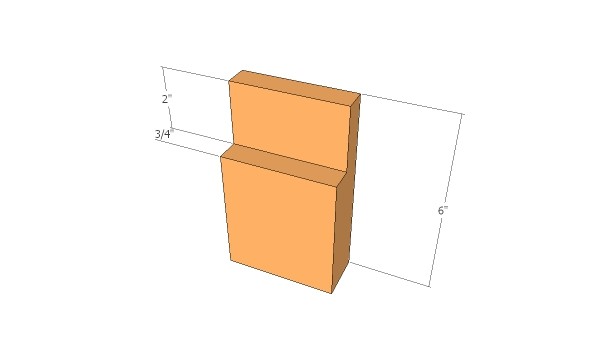
Building the legs
Build the legs for the lounge chair from 2×4 lumber. As you can easily notice in the diagram, you need to make a 3/4″ deep notch to the top of the legs. Make multiple parallel cuts and remove the excess with a chisel. Smooth the recess with sandpaper.
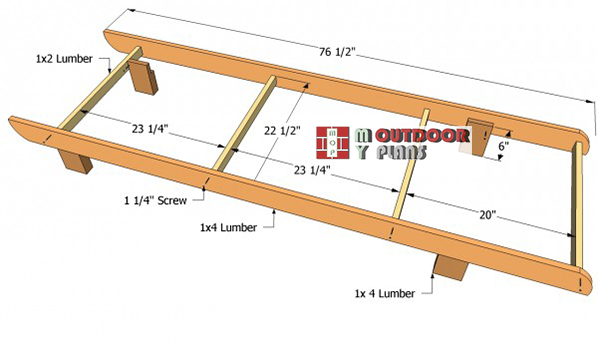
Lounge-chair-frame-plans
First, build the frame of the chaise lounge chair. Therefore, build the sides from 1×4 lumber, the legs from 2×4 lumber and the supports from 1×2 lumber. In order to secure the legs to the frame, you should notch the top part with a circular saw.
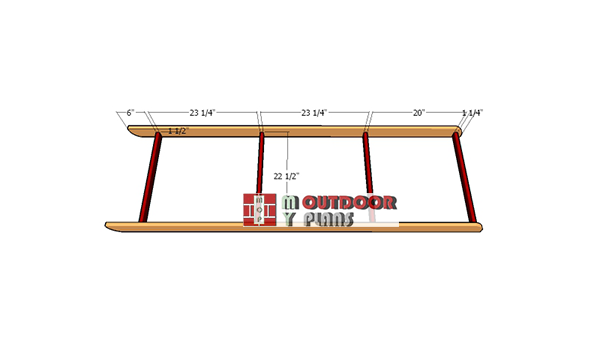
Assembling-the-frame-for-the-lounge-chair
Top Tip: Drill pilot holes trough the sides, countersink them and drive in 2 1/2” screws in the supports. Work on a level surface, making sure the corners are right-angled.
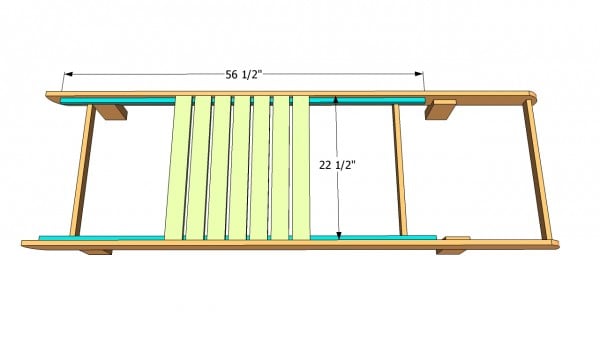
Installing the seat slats
The next step of the project is to attach the seat slats. In order to install the 1×3 boards into place, we recommend you to fit the 1×1 cleat first. Level the cleats using a hand level, drill pilot holes and insert 1 1/4” wood screws.
Afterwards, you should cut the 1×3 slats at the right size and secure them into place with 1 1/4” screws. Place the slats equally spaced, leaving about 1/2” between them. Don’t forget to countersink the head of the screws.
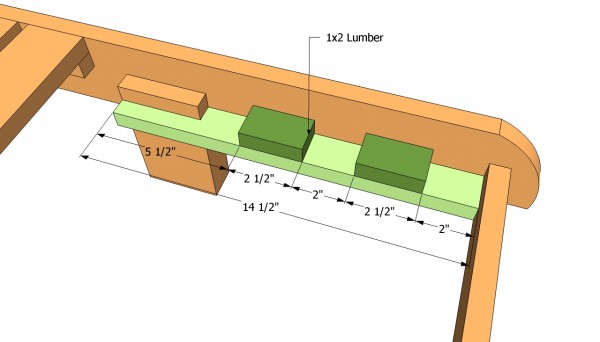
Installing the cleats
Afterwards, you should install the cleats for the prop up, as in the free plans. First, install the bottom cleat, made of 1×2 lumber, using 2” screws. Secure the cleat to the frame of the lounge chair, as well as to front the legs.
Top Tip: Next, you should install the 1×2 pieces to the bottom cleat, as in the image. Place the pieces every 2”, using 1 1/4” screws and glue. Make sure the cleats are level, using a spirit level.
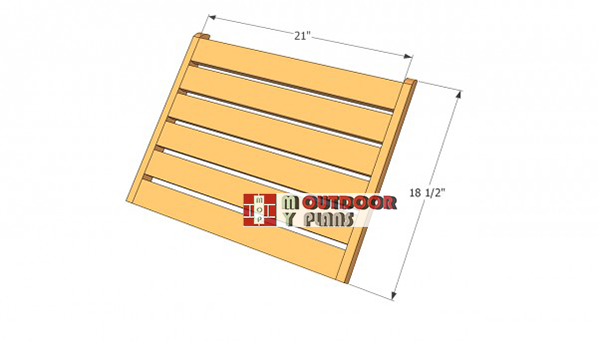
Backrest-plans
Continue the project by building the backrest, from 1×2 lumber and 1×3 slats. First of all, you should build the frame of the backrest, in the following manner: the sides of the frame should be made of 1×2 lumber, while the bottom and top components from 1×1 lumber.
Top Tip: Secure the slats with 1 1/4” pocket screws or drill pilot holes trough the frame and insert 2” in the 1×3 boards. Place the slats equally spaced, leaving between them about 1/2”.
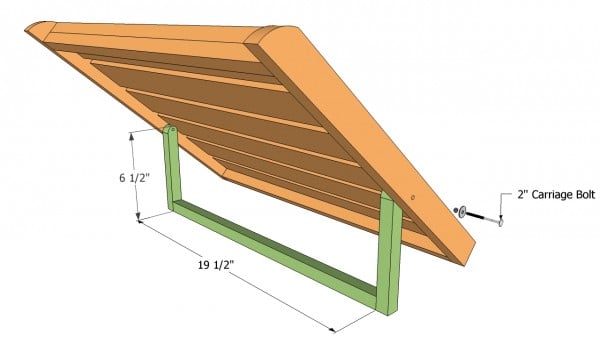
Prop up plans
Afterwards, build the prop up from 1×1 lumber. As you an see in the image, you should round the top ends of the side braces, in order to flip properly. Assemble the components together with 2” screws, after drilling pilot holes in the lumber.
Top Tip: Drill pilot holes in the frame of the backrest, as well in the prop up. Next, install the prop up into place with 2” carriage bolts. Place a washer between the frame and the prop-up.
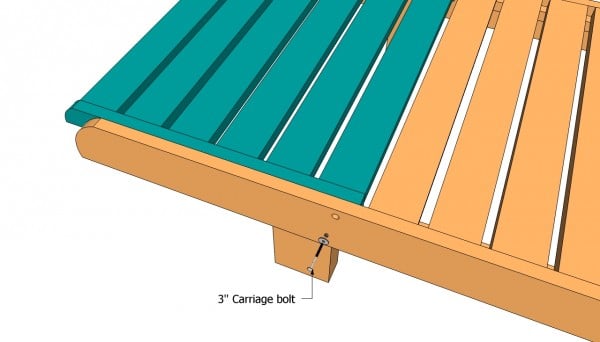
Installing the backrest
After building the backrest, as well as the prop-up you should fit it into place and lock it with one carriage bolt on both sides. In order to get the job done in a professional manner, you should make sure the backrest is horizontal, when drilling the pilot holes. Fit a washer between the frame and the backrest.
Top Tip: Drill pilot holes both trough the frame of the lounge chair and trough the back rest. Insert the bolts and tighten the nuts properly, making sure you don’t damage the lumber.
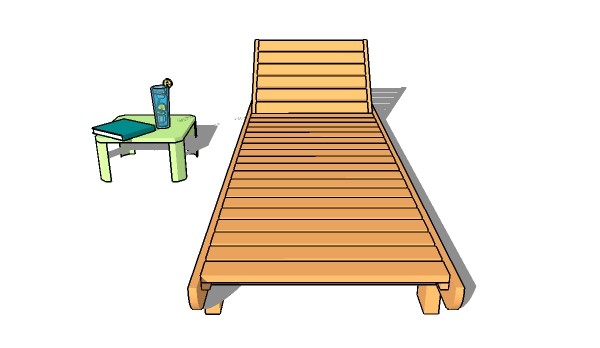
Chaise Lounge Chair Plans
I personally love this design, as it is both simple and elegant. The straight lines create harmony and enhance the look of any deck or patio.
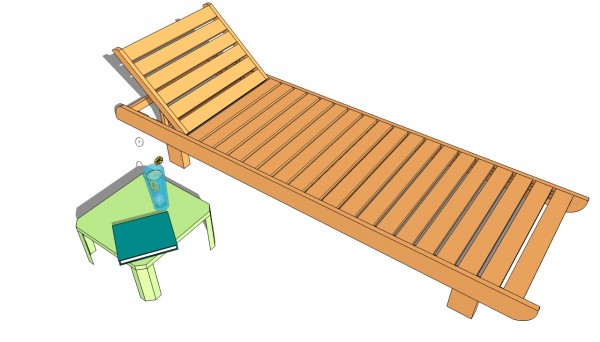
Lounge chair plans
After building the lounge chair, you should fill the heads of the screws with wood putty. Leave the compound to dry out for several hours, before sanding the wooden surface with a sander (use 120- sander), along the wood grain.
To Tip: If you will place the chair in the garden, you have to apply several coats of wood stain, in order to protect it from rot. Round the exposed edges with a router and a 1/4” bit.
This woodworking project was about lounge chair plans. If you want to see more outdoor plans, check out the rest of our step by step projects and follow the instructions, in order to obtain a professional result.

9 comments
hardware use and placement is very nonspecific. I like the design but could you please indicate how the support rails are attached? Measurements would not hurt either.
Can you be more specific? What support rails? Do you mean the prop up supports for the backrest?
What is the measurement from the bottom of the back rest to the holes for the prop up? It’s hard to tell from the drawing but it looks like 6-8″. Thanks.
Can you convert these into mm
Please refer to this table: http://myoutdoorplans.com/imperial-to-metric-conversion/
I’m thinking of making this for my father, but he is a big man. What kind of weight will this lounge support?
Probably in the range of 200 lbs.
I’m going to make a version of these plans, thanks. I would like to make the backrest longer (30″) and the seated (45″) portion shorter, with more area on the backrest do you think carriage bolts can support the extra weight? If not, do you think a 3/4″ wooden dowels would work? Nice job, look forward to your comments!
What measurements did you use for the carriage bolts? TIA