This step by step woodworking project is about free arbor plans. There are many designs and shapes to choose from when building a garden arbor, starting with a simple construction up to complex pergolas with decorative shading elements and benches. If you are looking for simple arbor plans for a weekend project, just follow the step by step instructions and pay attention to our tips. Cut the lumber with good judgement and use only the pieces that are perfectly straight and don’t have any visible flaws.
We designed the free arbor plans in such a manner, that any amateur handyman who masters the basic woodworking techniques could get the job done in just a weekend. Therefore you have to measure the components with great attention, use proper tools to drill the holes and join them together properly. You can place the arbor on a level surface or you could secure it into place with several metal anchors. If you live in a windy area, we highly recommend you to anchor the outdoor arbor to a concrete slab or to pour footings, otherwise the wind might damage your construction over time.
Projects made from these plans
[tabs tab1=”Materials” tab2=”Tools” tab3=”Time”]
[tab id=1]
- A – 4 pieces of 4×4 lumber 90” long, WOODEN POSTS
- B – 4 pieces of 1×3 lumber 87” long, SUPPORT BEAMS
- C – 8 pieces of 7” carriage bolts CARRIAGE BOLTS
- D – 4 pieces of 2×4 lumber 30” long CROSSPIECE
- E – 16 pieces of 3-4” long SCREWS
- F – 8 pieces of 1×1 lumber 67” long TRIM
- G – 2 30×67” redwood lattice panels of LATTICE
- H – 7 pieces of 2×4 lumber 50” long SHADE ELEMENTS
- I – 14 pieces of 4 1/2” galvanized wood screws SCREWS
[/tab]
[tab id=2]
![]() Hammer, Tape measure, Framing square, Level
Hammer, Tape measure, Framing square, Level
![]() Miter saw, Drill machinery, Screwdriver, Sander
Miter saw, Drill machinery, Screwdriver, Sander
![]() Safety Gloves, Safety Glasses
Safety Gloves, Safety Glasses
[/tab]
[tab id=3]
![]() One weekend
One weekend
[/tab]
[/tabs]
Outdoor Arbor Components
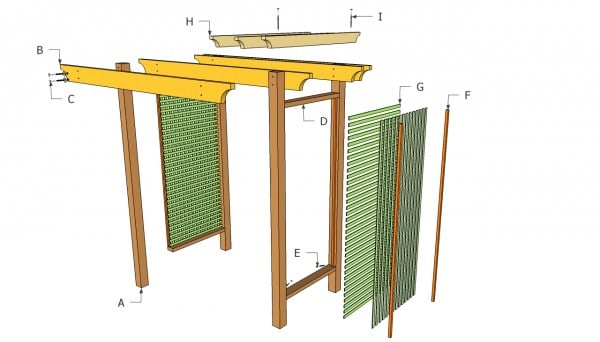
Free Arbor Plans
Building a simple arbor is one of those projects that require a small amount of money and work, but change dramatically the look of your backyard. The outdoor arbor is 60” wide and has a 30” depth, making its a great place to relax or to read a good book in the hot summer afternoons.
Top Tip: Measure the components accurately before cutting them with a miter saw, in order to obtain a professional result. Countersink the head of the screws and either fill the holes with wood putty or install end caps, to build an arbor with a neat appearance.
Free Arbor Plans

Anchoring the posts of the anchor
First of all, you have to decide the anchoring system of the pergola. Therefore, you should remember there are several alternatives and choose the one that fit your needs best. You could dig 2′ holes, install a tube form and fit the posts in concrete. This method would provide a high rigidity, but you won’t be able to move it in the future.
Top Tip: The best choice would be to install post anchors in concrete footings or on a concrete slab.
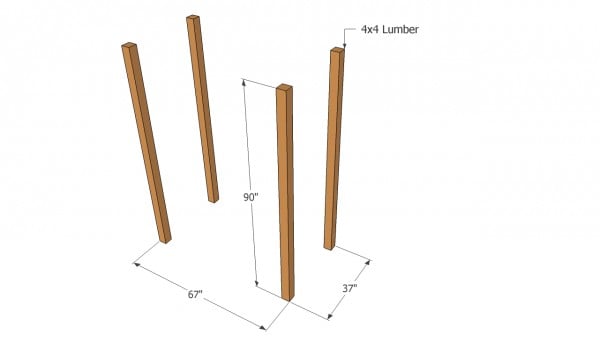
Arbor Layout
Next, you have to cut the 4×4 posts from pressure-treated lumber, cedar or redwood, at about 90”. Plumb the posts with a spirit level and lock them into position with several 2×4 braces and C-clamps. Pre-drill the lumber, before inserting the screws, to prevent the wood from splitting.
Top Tip: Measure the diagonals of the rectangle and adjust their position if necessary. Check the corners for squareness, by applying the 3-4-5 rule.
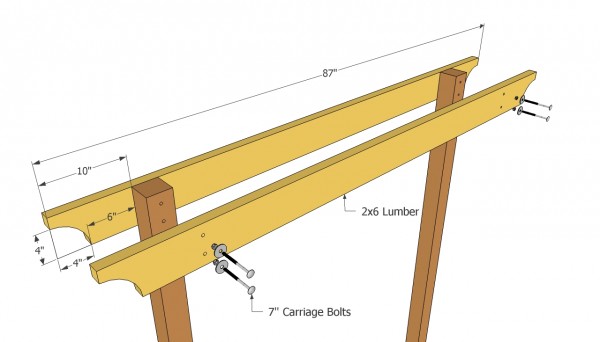
Installing the cross beams
Afterwards, install the 2×6 crossbeams into place, by inserting 7” carriage bolts. Use a spirit level to make sure the supports are horizontal and lock the components with several C-clamps, before tightening the bolts.
Top Tip: Drill several pilot holes trough the supports and trough the wooden posts, before inserting the bolts. In addition, countersink the head of the bolts to obtain a neat look.
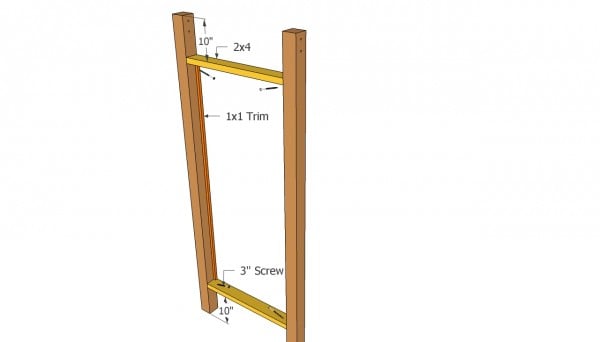
Building the sides of the arbor
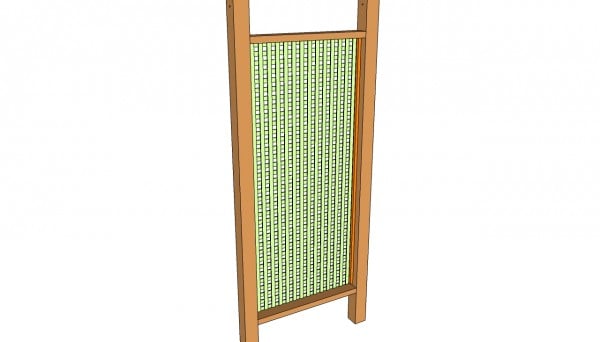
In order to install the sides of the arbor, you have to fit two 2×4 crosspieces, as in our free plans. Drill several pilot holes in the 2×4 lumber and toe-nail the components with 3-4” wood screws. Countersink the head of the screws and fill the holes with wood putty.
Top Tip: In addition, you have to secure 1×1 trims on both sides of the posts, by using 2” screws. In this manner, it would be a lot easier to fit the redwood lattice panels into place.
Installing the lattice
Cut the lattice panels to fit between the crosspieces and install the lattice panels into place, between two pairs of 1×1 trims. Secure the trims to the posts, by inserting finishing nails every 15”. Plumb the trims and the lattice before driving in the finishing nails.
Top Tip: The best way to get the 1×1 trims is to cut them of a 1×4 board. After you have made the cuts, sand the edges with a sand block.
Installing the shade elements
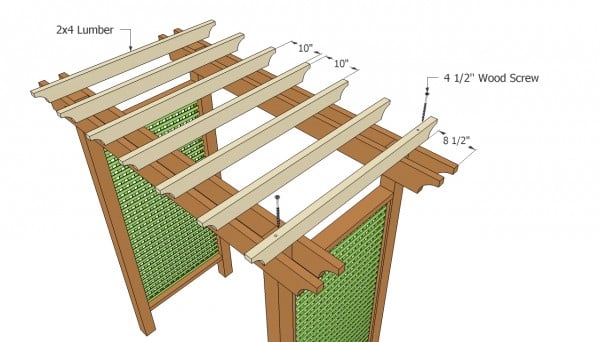
Afterwards, you have cut the 2×4 shade elements and to install them into place. As you probably imagine, there are many designs and shapes to choose from, therefore you should choose the size of the shade elements that fit your needs and tastes.
Top Tip: In order to obtain a nice appearance, cut the ends of the shed elements with a jigsaw. Sand the cut edges with medium-grit sandpaper, in order to get the job done like a pro.
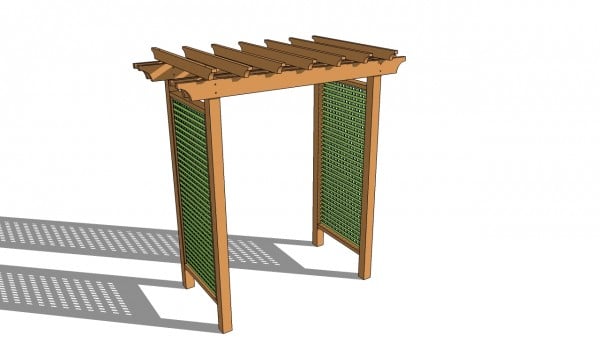
Free Garden Arbor Plans
After you have built the wooden arbor, you should take care of the finishing touches. Therefore, sand the wooden surfaces with average grit sandpaper (except the lattice) and remove the residues, before applying several coats of waterproof varnish or paint.
Top Tip: Fill the holes and the cracks with wood putty and let the compound dry out, before sanding the surfaces along the wood grain.
This woodworking project is about free arbor plans. If you need more outdoor plans, we recommend you to check out the rest of our step by step projects.


