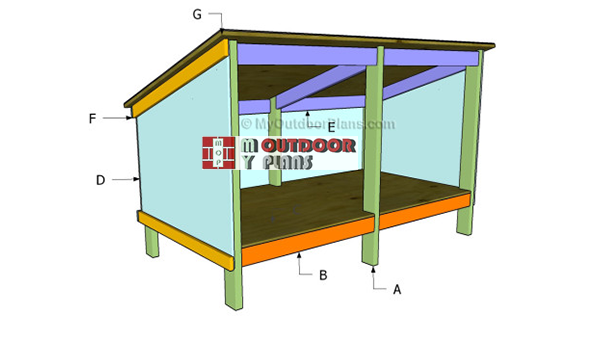
This step by step diy woodworking project is about double dog house plans. Building a large dog house for your pets is a complex project that requires a proper planning. Therefore, you should select the woodworking plans that come with detailed instructions and that suit your budget and the size of your pets. Make sure you plan every aspect of the project from the very beginning, as to keep the costs under control.
Building a sturdy frame for your dog house is essential, especially that it has to support two pets. Therefore, adjust the size of the components with a circular saw before locking them together with galvanized screws. Plumb the sides of the dog house with a spirit level and make sure the floor frame is perfectly horizontal. Choose a proper location for the dog house before taking care of the finishing touches. See all my Premium Plans HERE.
Projects made from these plans
Materials
- A – 3 pieces of 2×4 lumber – 36 1/2″ long, 3 pieces – 48″ long LEGS
- B – 3 pieces of 2×4″ lumber – 32 1/4″ long, 4 pieces of 4×4 lumber – 34 1/2″ long FRAME
- C – 1 piece of 3/4″ plywood – 73 1/2″x39 1/2″ long FLOOR
- D – 1 piece of 3/4″ plywood – 40″x74 1/2″ long, 1 piece – 27″x74 1/2″ long, 2 pieces – 35 3/4″x39 1/2″ long, 2 pieces – 39 1/2″x40″ long WALLS
- E – 4 pieces of 2×4 lumber – 34″ long, 3 pieces – 35 1/4″ long RAFTERS
- F – 4 pieces of 1×3 lumber – 76″, 3 pieces 35 1/4″, 2 pieces – 42 1/2″ TRIMS
- G – 1 piece of 3/4″ plywood – 45 1/2″ x 78 1/2″, 30 sq ft of tar paper, shingles ROOFING
Tools
![]() Hammer, Tape measure, Framing square, Level
Hammer, Tape measure, Framing square, Level
![]() Miter saw, Drill machinery, Screwdriver, Sander
Miter saw, Drill machinery, Screwdriver, Sander
Time
Related
Building a double house
Building-a-double-carport
Top Tip: Make sure you adjust the size of the double dog house to the needs of your pets, while using the instructions and techniques described in the project.
Double dog house
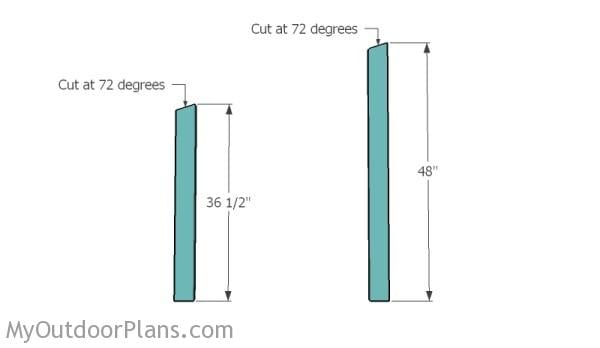
Building the posts
Build the posts for the double dog house using 2×4 lumber. Cut the top of the posts at 72 degrees.
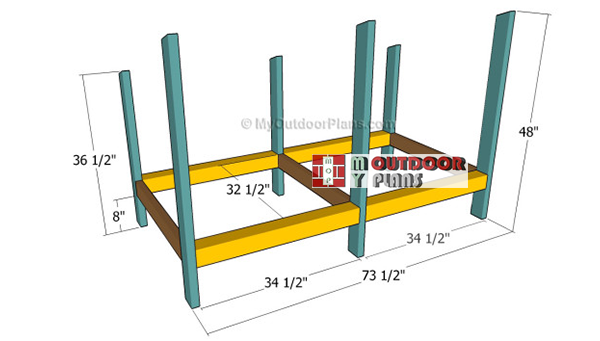
Building-the-frame-of-the-dog-house
The first step of the woodworking project is to build the frame of the double dog house. As you can see in the free plans, you need to assemble the frame using 2×4 lumber and 4×4 lumber.
Top Tip: Cut the components at the right size and lock them together with galvanized screws. Drill pilot holes through the components before inserting the screws, in order to prevent the wood from splitting.
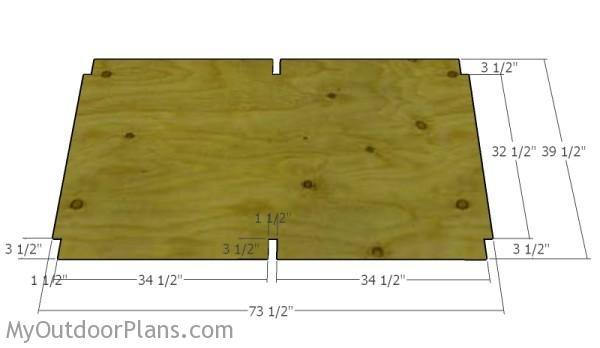
Building the floor
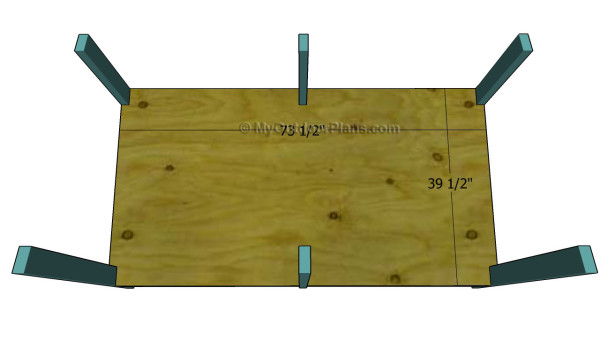
Build the floor from 3/4″ plywood. Use a circular saw to cut the plywood panel at the right dimensions. Make the notches to the sheet, as shown in the diagram.
Attaching the plywood floor
After aligning the floor into place, we recommend you to insert 1 1/4″ galvanized screws into the frame of the floor. Countersink the head of the screws, if you want to get a professional result.
Building the partition
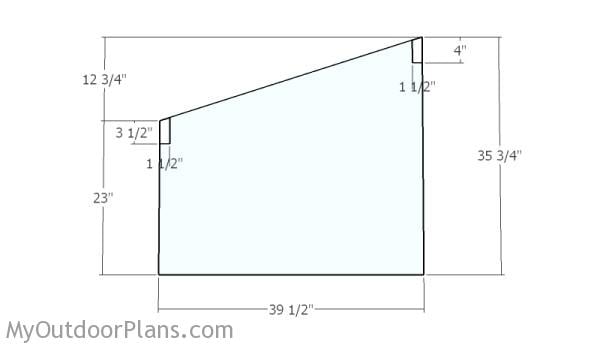
Build the partitions from 3/4″ plywood. Make the notches with a saw to fit the panel into place.
Building-the-rafters
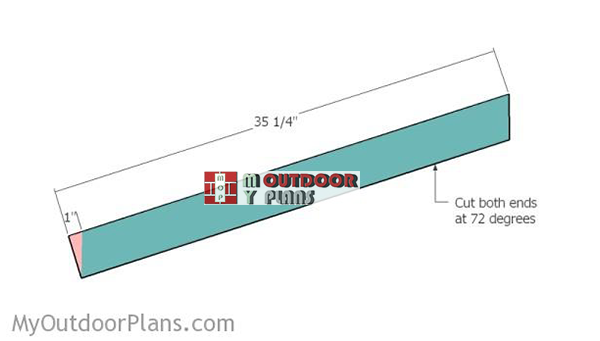
Build the rafters for the dog house, as shown in the diagram. Cut both ends of the rafters at 72 degrees.
Installing the rafters
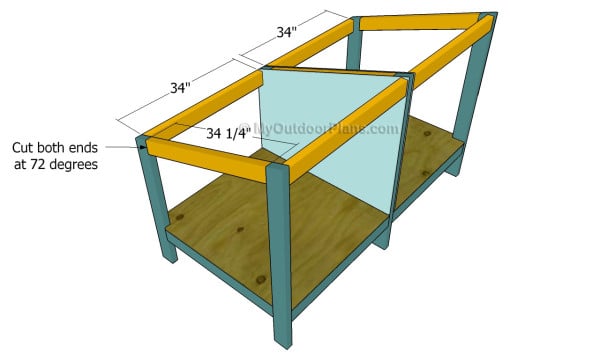
Installing the roof structure is a straight-forward procedure, as you need to build the components from 2×4 lumber. Follow the instructions described in the free plans and secure them into place with galvanized screws.
Before fitting the rafters between the legs of the double dog house, we recommend you to fit the interior wall. As you can see in the image, you have to cut two pieces of 1/2″ plywood and to attach them to the frame.
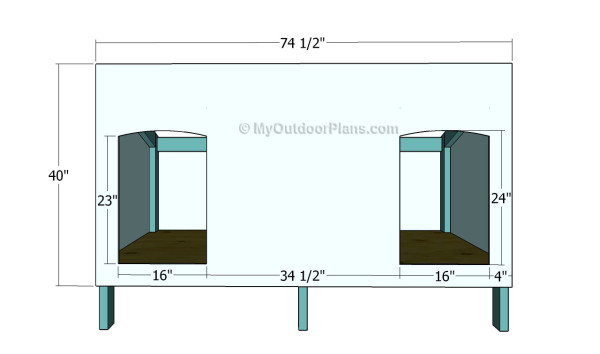
Attaching the siding
The next step of the project is to attach the exterior walls of the dog house. As you can notice in the plans, we recommend you to cut a small piece of 1/2″ plywood and to make two openings.
Make sure you adjust the size of the opening according to the size of your pets. Mark the cut lines on the plywood sheet and get the job done with a jigsaw. Smooth the cut edges with a block of sandpaper.
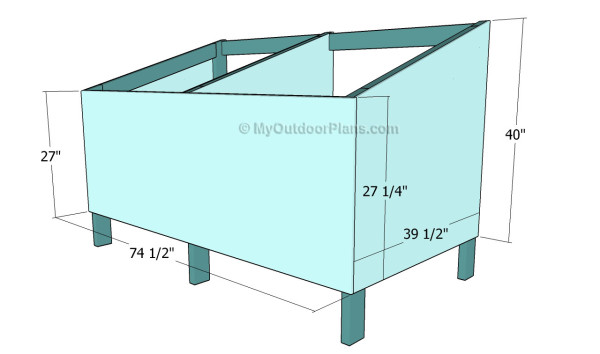
Attaching the exterior walls
Continue attaching the exterior walls to the structure in the same manner described above. Use finishing nails to lock the plywood sheets to the frame, after aligning them at both ends.
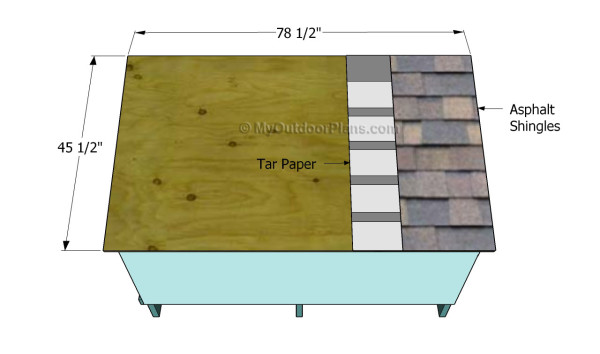
Building the roof
The next step of the woodworking project is to attach the roofing for the wooden structure. First of all, you should cut a small piece of 1/2″ or 3/4″ plywood and lock it to the rafters with screws. It is essential to center the plywood sheet to the rafters before driving the screws in.
Cover the roof with tar paper and start installing the asphalt shingles, by using the manufacturer’s instructions. Work with attention and secure the shingles into place with galvanized staples. See here more about how to install the drip edges and the shingles.
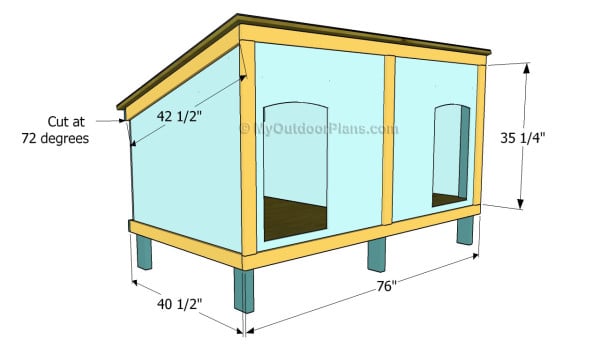
Installing the trims
If you really want to enhance the look of the dog house, you should consider adding 1×3 trims to the exterior walls. Cut the trims at the right size and attach them to the dog house faces with finishing nails and waterproof glue.
Top Tip: Work with attention and with great care, if you want to build the dog house for your pets in a professional manner. Moreover, adjust the pattern of the trims in order to fit your needs.

Double dog house plans
After placing the double dog house into its location, we recommend you to continue the project by taking care of the finishing touches. Fill the pilot holes with wood putty and smooth the surface with 120-grit sandpaper.
Top Tip: In order to protect the lumber from water damage, we recommend you to cover the wooden box with several coats of paint. Select products that are nontoxic to the birds. If you want to get this plans as a PDF file with full Cut list and full Shopping list, please take a look over the GET PDF PLANS button bellow.
This woodworking project was about double dog house plans. If you want to see more outdoor plans, we recommend you to check out the rest of our step by step projects.

4 comments
If you put a few hinges on the back edge of the roof, this design also makes for a great little chicken coop after the dogs have moved out. All it takes is adding some shelves for the nests and voila!
If you want to get really fancy, you can make the floor in each section removable, then later you can swap out the solid flooring for mesh wire.
Great idea. Thank you for the feedback.
I’m in the middle of this build right now…-WHY does it seem like 72 degrees is the WRONG ANGLE to cut the top of the legs and the rafters at?
72 is the degree the rafters have after the cuts. You need to set the miter at 18 degrees