This step by step diy woodworking project is about a 8×10 catio plans. I have designed this large catio so you can keep your favorite pets safe from the predators. This catio features a lean to roof with covered with polycarbonate sheets, so the cats can enjoy the fresh air even when it’s rainy. If your cats are too aggressive with the birds in your backyard, this catio will keep them healthy and entertained but protect the rest of the creatures. Take a look over the rest of our woodworking plans, if you want to get more building inspiration.
When buying the lumber, you should select the planks with great care, making sure they are straight and without any visible flaws (cracks, knots, twists, decay). Investing in cedar or other weather resistant lumber is a good idea, as it will pay off on the long run. Use a spirit level to plumb and align the components, before inserting the galvanized screws, otherwise the project won’t have a symmetrical look. If you have all the materials and tools required for the project, you could get the job done in about a day. See all my Premium Plans HERE.
Projects made from these plans
8×10 Catio Plans
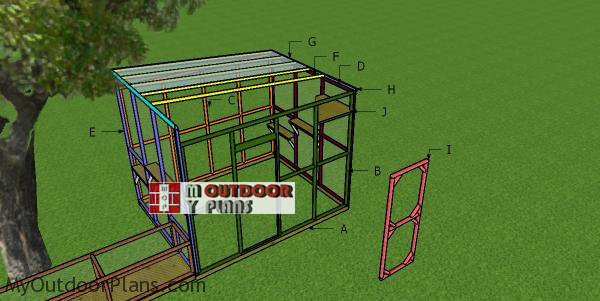
Building-a-8×10-catio
Materials
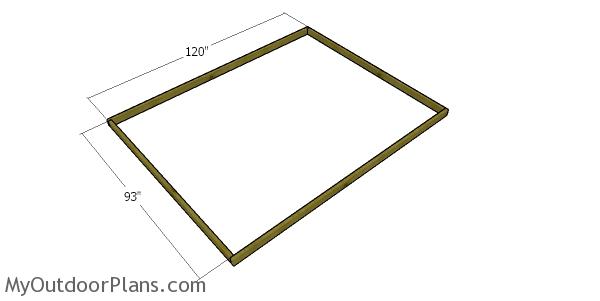
- A – 2 pieces of 2×4 lumber – 93″ long, 2 pieces – 120″ long BASE
- B – 2 pieces of 2×2 lumber – 117″ long, 5 pieces – 85″ long, 4 pieces – 27 1/2″ long, 1 piece of 2×4 lumber – 27 1/2″ long FRONT WALL
- C – 2 pieces of 2×2 lumber – 117″ long, 5 pieces – 85″ long, 3 pieces – 27 1/2″ long BACK WALL
- D – 2 pieces of 2×2 lumber – 96″ long, 4 pieces – 85 1/2″ long, 4 pieces – 30″ long SIDE WALL
- E – 2 pieces of 2×2 lumber – 96″ long, 4 pieces – 95 1/2″ long, 5 pieces – 30″ long, 1 piece – 22″ long SIDE WALL
- F – 7 piece of 2×2 lumber – 120 5/8″ long RAFTERS
- G – 100 sq ft of policarbonate ROOF
- H – 2 pieces of 1×3 lumber – 122 1/4″ long, 2 pieces – 96″ long TRIMS
- I – 2 pieces of 2×2 lumber – 69″ long 2 pieces – 27 1/2″ long, 8 pieces – 8 3/4″ long DOOR
- J – 4 pieces of 2×2 lumber – 30″ long, 8 pieces – 14 1/2″ long, 4 pieces of 3/4″ plywood – 7 1/4″x30″ long, 1 piece – 30 3/8″x31 1/2″ long SHELVES
- 2 pieces of 2×4 lumber – 8′
- 2 pieces of 2×4 lumber – 10 ft
- 4 pieces of 2×2 lumber – 10 ft
- 33 pieces of 2×2 lumber – 8 ft
- 2 pieces of 1×3 lumber – 8′
- 2 pieces of 1×3 lumber – 12′
- 7 pieces of 2×2 lumber – 12′
- 3/4″ plywood – 4’x8′
- 100 sq ft of policarbonate
- 50 pieces of 3 1/2″ screws, 300 pieces of 2 1/2″ screws
- hinges, latch
- hardware cloth
- wood glue, stain/paint
Tools
![]() Hammer, Tape measure, Framing square, Level
Hammer, Tape measure, Framing square, Level
![]() Miter saw, Drill machinery, Screwdriver, Sander
Miter saw, Drill machinery, Screwdriver, Sander
![]() Safety Gloves, Safety Glasses
Safety Gloves, Safety Glasses
Time
Related
How to build a 8×10 catio
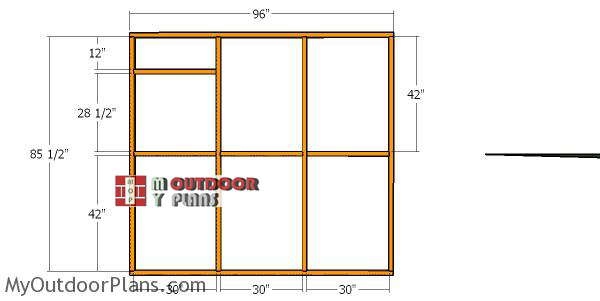
Side-wall-frame-1
The first step of the large catio project is to assemble the wall frames. Therefore, cut the components from 2×2 lumber and assemble the side wall, as shown in the diagram. Drill pilot holes through the plates and insert 3 1/2″ screws into the studs. Make sure the corners are square and align the edges flush.
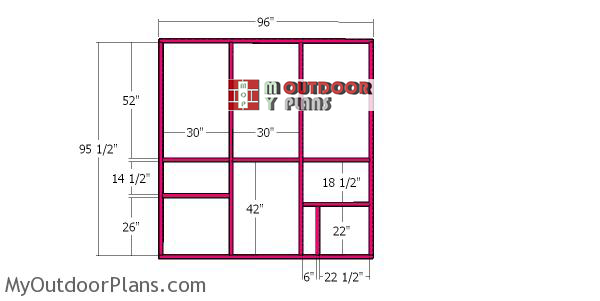
Back-wall-frame-large-catio
Next, build the opposite side wall for the catio. Use 2×2 lumber, as well, and the same techniques described above. You should notice in the bottom right of the frame, the opening for the cat tunnel. You can adjust the size of the tunnel.

Side-wall-frame-8×10
Assemble the front wall for the catio, as shown in the image. Notice the opening for the door. You need to add a door to the catio, so you can have an easy access to the inside and clean it when needed.
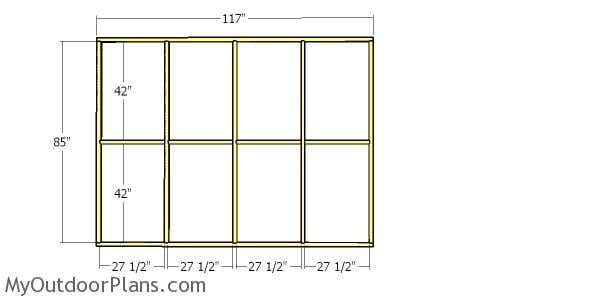
Back wall frame – 8×10 catio
.Assemble the back wall for the catio using the info from the diagram. Drill pilot holes through the plates and insert 3 1/2″ screws into the studs. Add the blockings to the middle of the wall frame for enhanced rigidity.
Base for the catio
Use 2×4 pressure treated lumber for the base of the catio. Drill pilot holes and insert 3 1/2″ screws to lock them together. Make sure the corners are square and align the edges flush. Select the location for the catio and level the ground thoroughly. You can pave the are under the catio. Measure the diagonals and make adjustments if needed.
Assembling the frame of the 8×10 catio
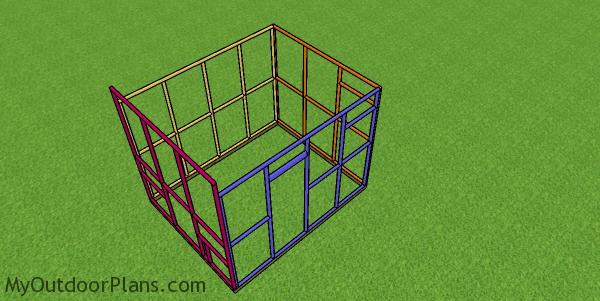
Next, you need to assemble the catio. Align the bottom plates to the base of the catio, making sure the edges are flush. Drill pilot holes through the plates and insert 3 1/2″ screws into the base. Check if the corners are square and align the edges. Drill pilot holes and insert 2 1/2″ screws to lock the adjacent walls together.
Building the roof

Rafters – 8×10 catio
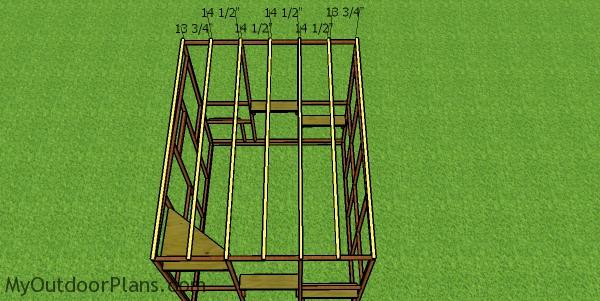
Build the rafters for the catio roof using 2×2 lumber. Make the 5 degree cuts to both ends of the rafters using a miter saw.
Fitting the rafters – 8×10 catio
Fit the rafters to the top of the catio and place them every 16″ on center. Drill pilot holes and insert 3 1/2″ screws to lock them into place tightly.
Roof sheets
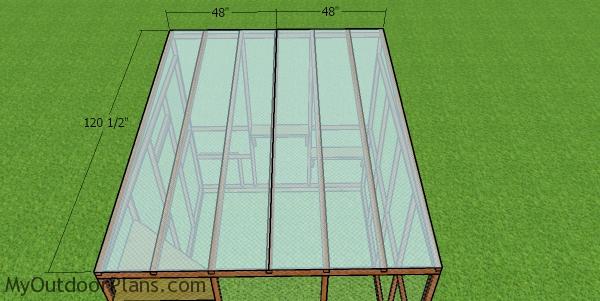
Fit the policarbonate sheets to the top of the catio. Align the edges and insert the appropriate screws to lock the sheets to the rafters. The policarbonate sheets will protect the catio from the elements, but in the same time it will let the light get through.
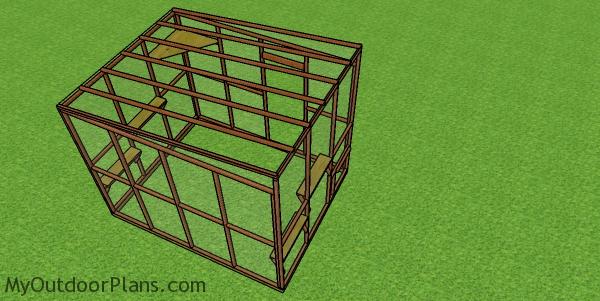
Fitting the wire to the exterior of the catio
Attach the wire mesh to the exterior of the catio. Make sure you staple the mesh to the frame of the cation thoroughly.
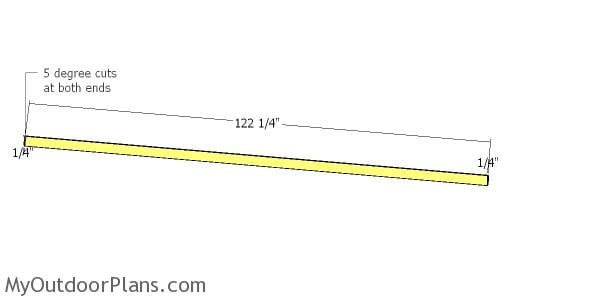
Side roof trims
Use 1×3 lumber for the roof trims. Make the angle cuts at both ends of the front and back trims using a miter saw.
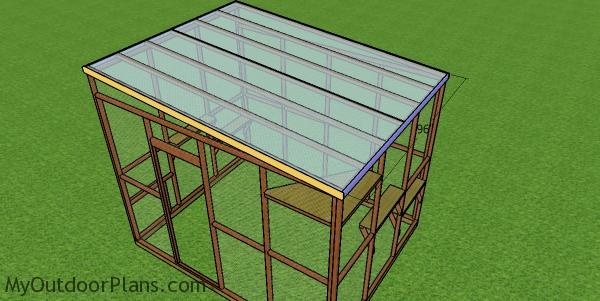
Fitting the roof trims
Fit the trims to the front and sides of the catio. Align the edges flush, drill pilot holes and insert 2 1/2″ screws to lock them into place tightly.
Building the catio shelves
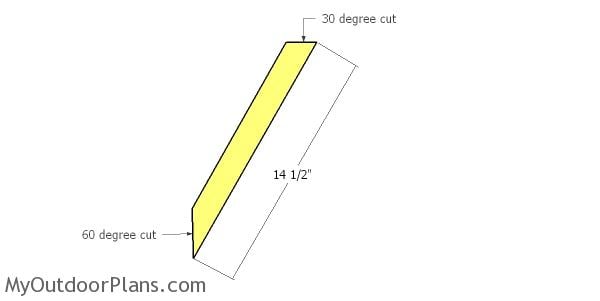
Shelf supports
Make angle cuts to the diagonal braces that will support the shelves.
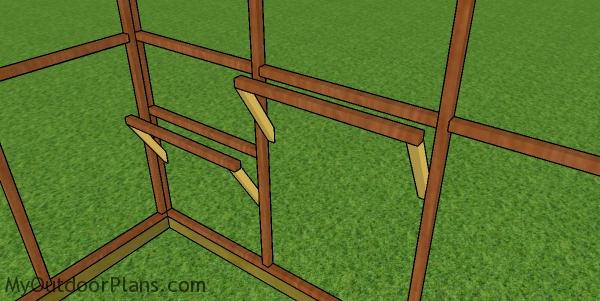
Fitting the diagonal braces
Drill pilot holes and insert 2 1/2″ screws to lock the braces to the supports. Fit the horizontal supports, as shown in the diagram.
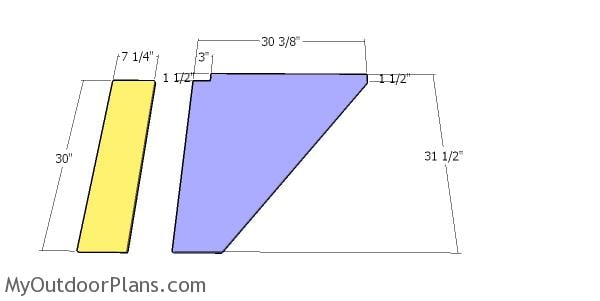
Fitting the shelves – 8×10 catio
Use 3/4″ plywood for the shelves. Fit the shelves to the frames and lock them into place with 2 1/2″ screws, after drilling pilot holes.
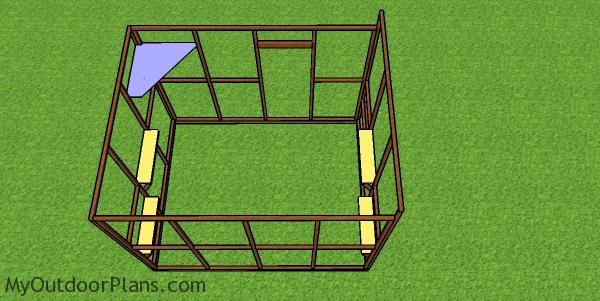
Fitting the shelves – catio
Fit the shelves to the supports. Remember that you can place this shelves however you want. There is no rule and you should use your imagination so you make interesting contraptions for the cats.
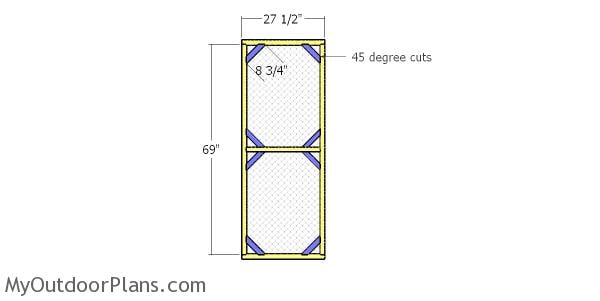
Building the door for the 8×10 catio
Use 2×2 lumber for the door frame. Assemble the frame by drilling pilot holes and insert 2 1/2″ screws. Reinforce the door frame with diagonals. Make 45 degree cuts at both ends of the diagonals and secure them to the door with 2 1/2″ screws. Make sure the corners of the door are right angled. Cover the door with wire mesh.

Fitting the door to the catio
Fit the door to the opening and lock it to the frame with hinges. Install a latch so you keep the catio closed.
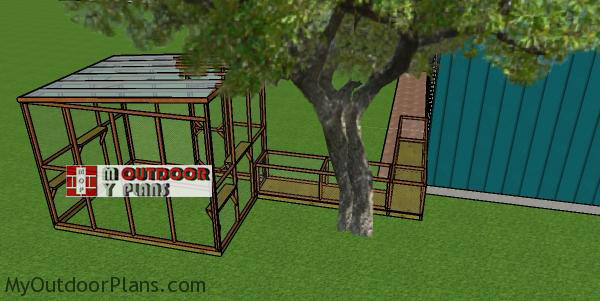
How-to-build-a-8×10-catio
Last but not least, take care of the finishing touches. Therefore, smooth the edges and make sure there are no wire exposed to injure your pets. Apply a few coats of paint / stain to enhance the look of the catio and to protect the components from the elements.
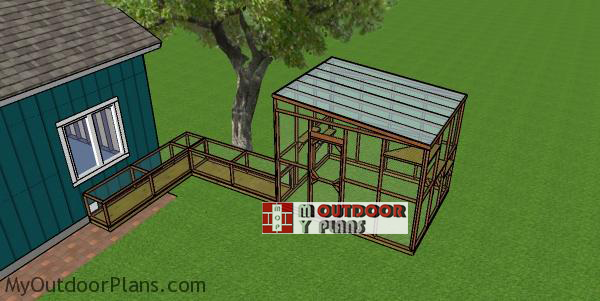
8×10-catio-plans-with-tunel
Make sure you take a look over the rest of my cat project plans HERE. I have tons of designs covering everything you need to keep you cat healthy and happy: insulated cat houses, window catio, large catio and cat trees. If you like my approach to designing woodworking plans, make sure you check out the list of all my free designs HERE.

8×10 Catio Plans
You can expect to spend about 1 to 2 weekends constructing your 8×10 catio with a lean-to polycarbonate roof. The build is straightforward, but ensuring the structure is secure and weatherproof will require careful attention to detail. By the end, you’ll have a sturdy, well-designed catio that offers plenty of space for your cats to explore safely.

How to make a 8×10 catio
Building an 8×10 catio with a lean-to polycarbonate roof will likely cost you between $1,000 and $2,500, depending on the materials and finishes you choose. The polycarbonate roof adds to the cost but offers excellent protection while allowing natural light to filter through, creating a comfortable outdoor space for your cats. This investment provides a safe, durable, and weather-resistant structure where your feline friends can enjoy the outdoors.

8×10 Catio Plans – dimensions
In addition, if you want to build a simple tunnel for the cats to have access from the house to the cation, check out PART 2 of the project. The tunnel is easy to build and it will make the cats run toward the catio.
This woodworking project was about 8×10 catio plans free. If you want to see more outdoor plans, check out the rest of our step by step projects and follow the instructions to obtain a professional result.


1 comment
I understand why I cannot design plans on my own, because you guys have experience. I write this comment to acknowledge my limits and to highlight your talent. Worth every penny…