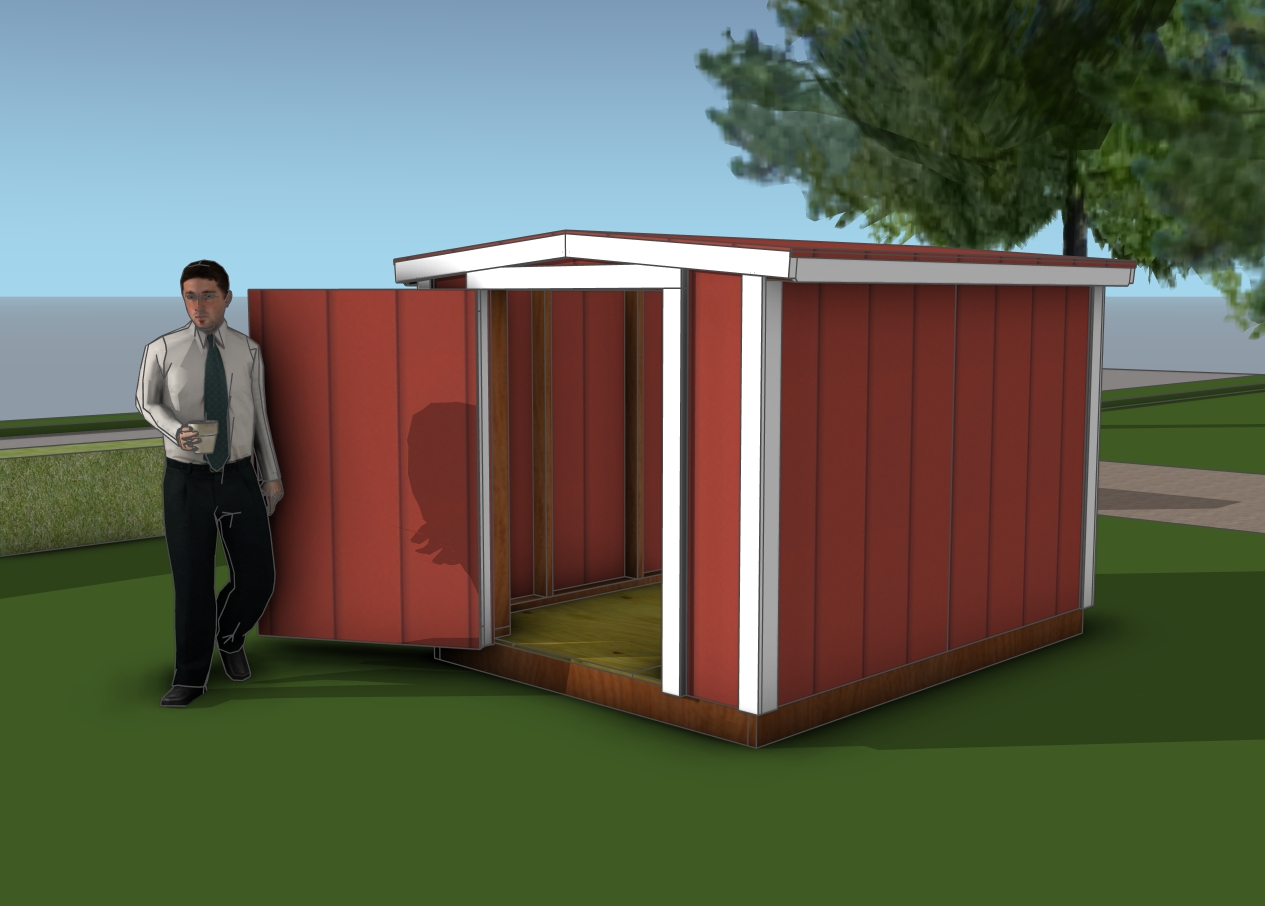
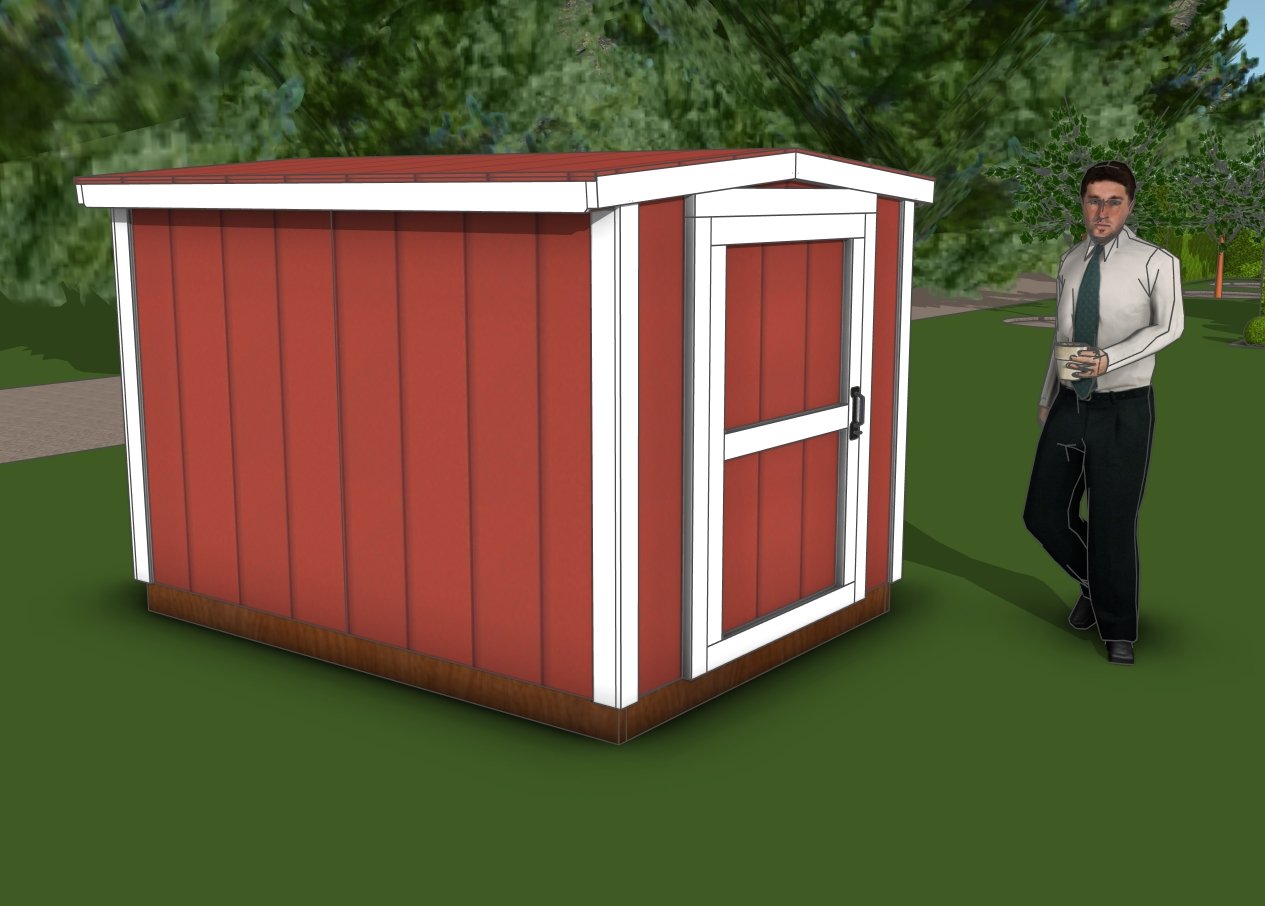
Building a 6×8 short shed is a great way to add functional storage space to your backyard while keeping costs low. Whether you need a place to store garden tools, firewood, or seasonal equipment, this compact shed offers a sturdy and efficient solution. In this step-by-step guide, I’ll walk you through the entire process, from building the floor frame to assembling the walls and preparing for the roof installation. With a simple yet durable design, this shed maximizes interior space while maintaining a clean and modern look.
This DIY shed project is designed to be beginner-friendly, using affordable materials like 2×4 framing and T1-11 siding while maintaining structural integrity. The layout is optimized for easy construction, with 24-inch stud spacing to keep material costs down. Plus, by prioritizing interior height over roof slope, this shed makes the most of its six-foot total height. Whether you’re a DIY enthusiast or looking for a weekend project, this guide will help you build a sturdy and practical shed step by step.
The estimated cost of building this 6×8 gable shed with a metal roof ranges between $700 and $1,250, depending on material prices in your area. The biggest expenses include lumber for the framing and floor, T1-11 siding for the walls, and metal roofing panels. Additional costs come from fasteners, hinges, and optional wood sealer or paint for weather protection. Prices can vary based on lumber quality and roofing type, so shopping around for deals or using materials you already have on hand can help keep costs down.
When buying the lumber, you should select the planks with great care, making sure they are straight and without any visible flaws (cracks, knots, twists, decay). Investing in cedar or other weather resistant lumber is a good idea, as it will pay off on the long run. Use a spirit level to plumb and align the components, before inserting the galvanized screws, otherwise the project won’t have a symmetrical look. If you have all the materials and tools required for the project, you could get the job done in about a day.
Projects made from these plans
Pin it for later!
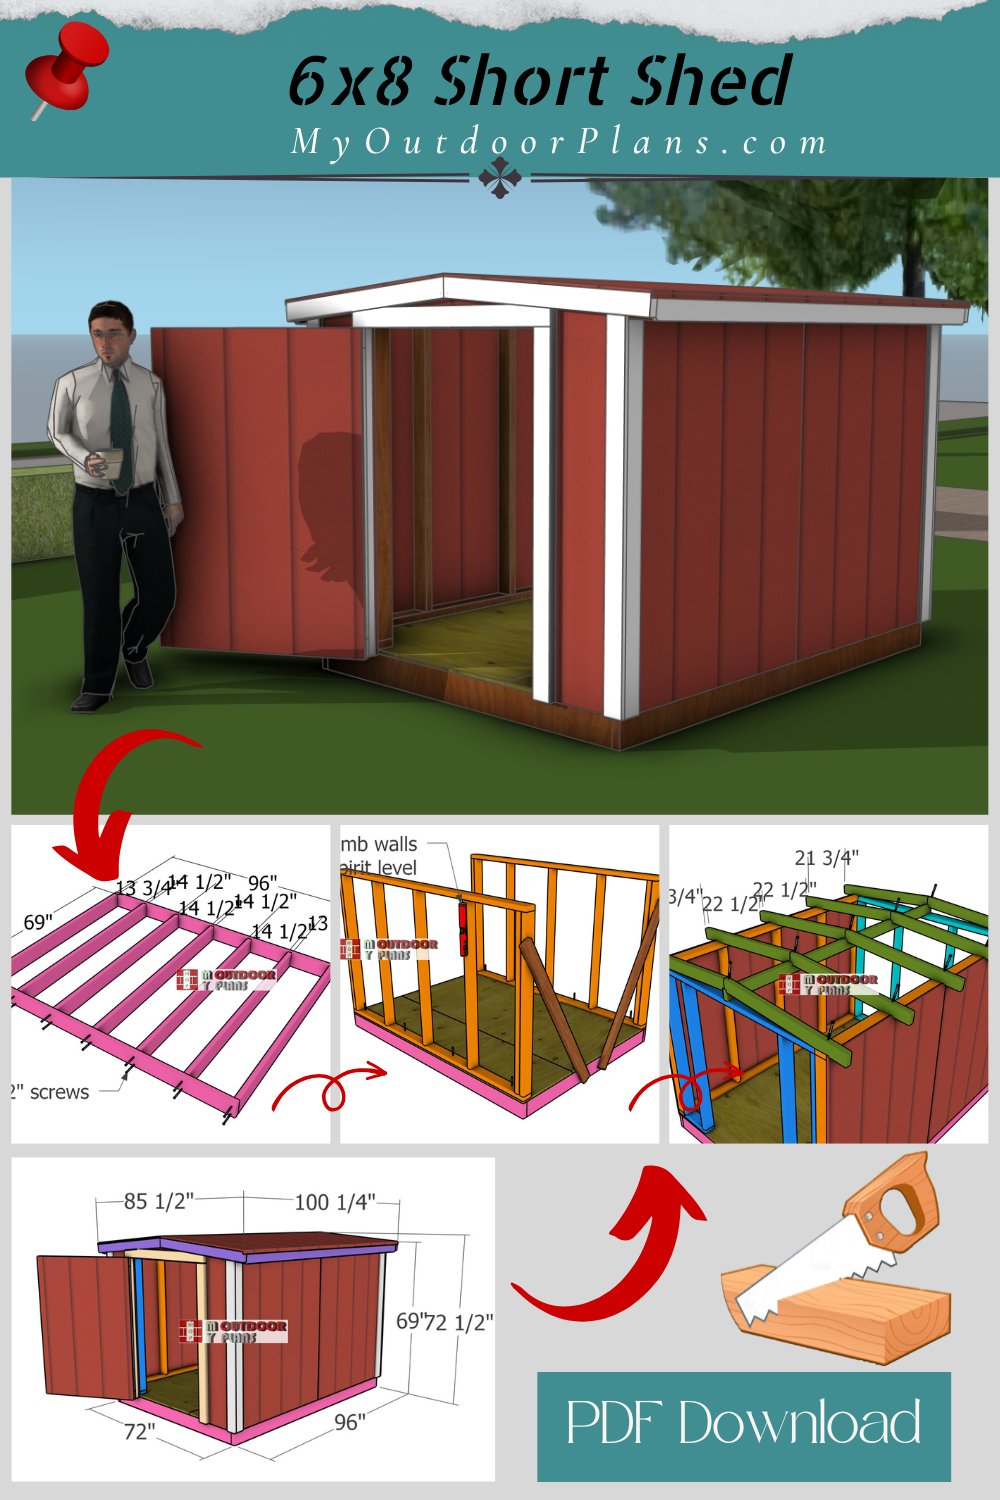
Short Height 6×8 Storage Shed – DIY Plans
Building-a-6×8-short-shed
Cut and Shopping Lists
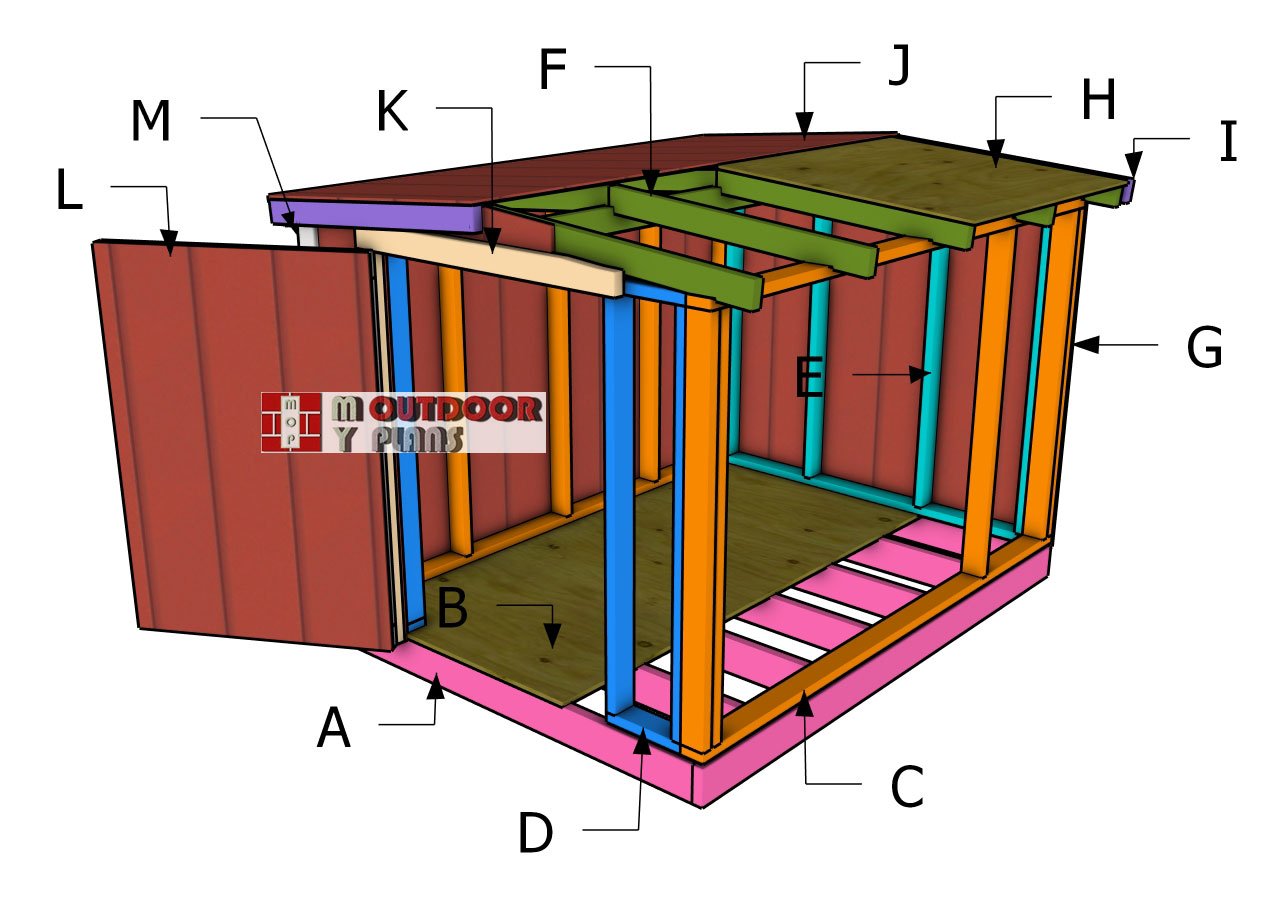
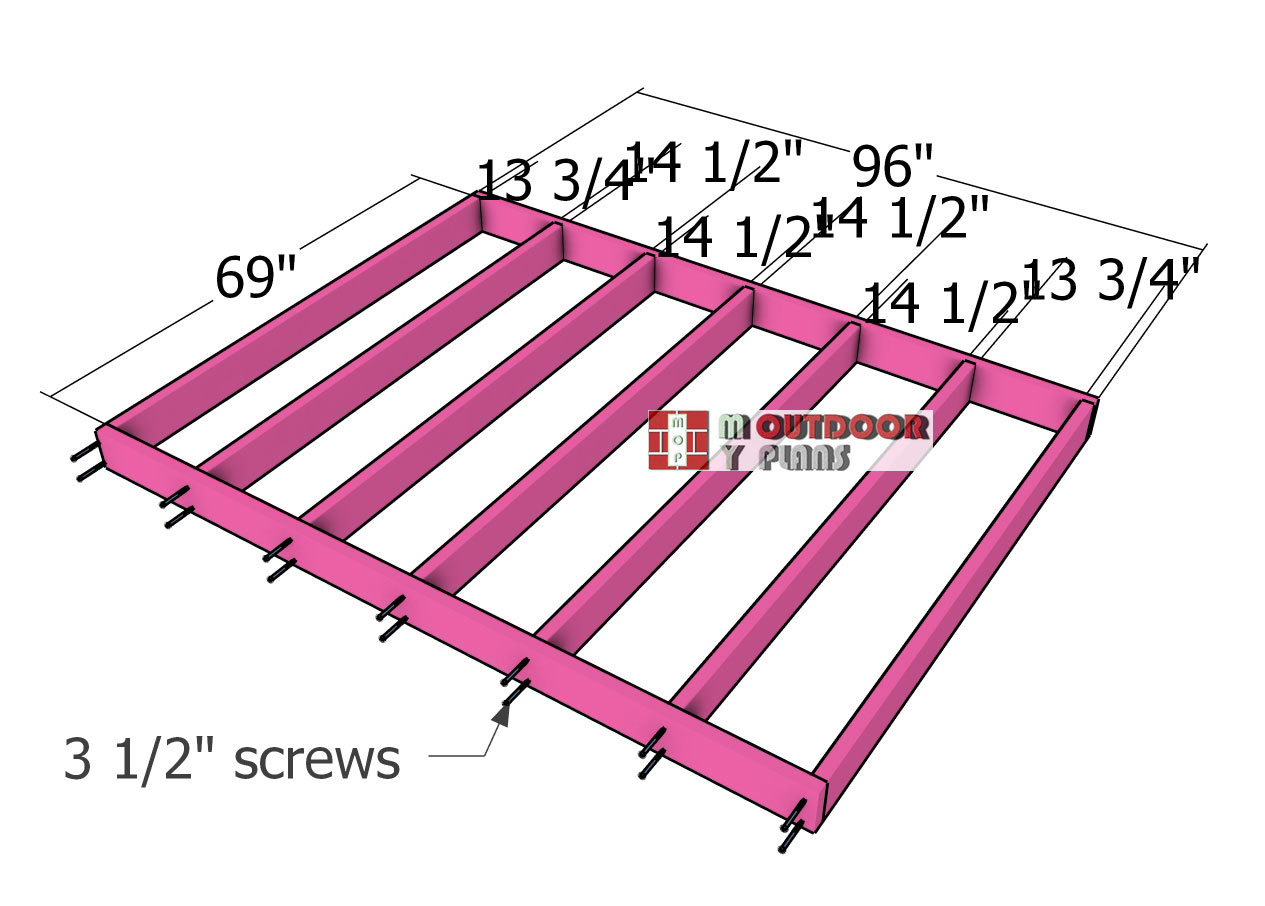
A – 2 pieces of 2×6 lumber – 8 ft FLOOR FRAME
A – 7 pieces of 2×6 lumber – 69″ FLOOR FRAME
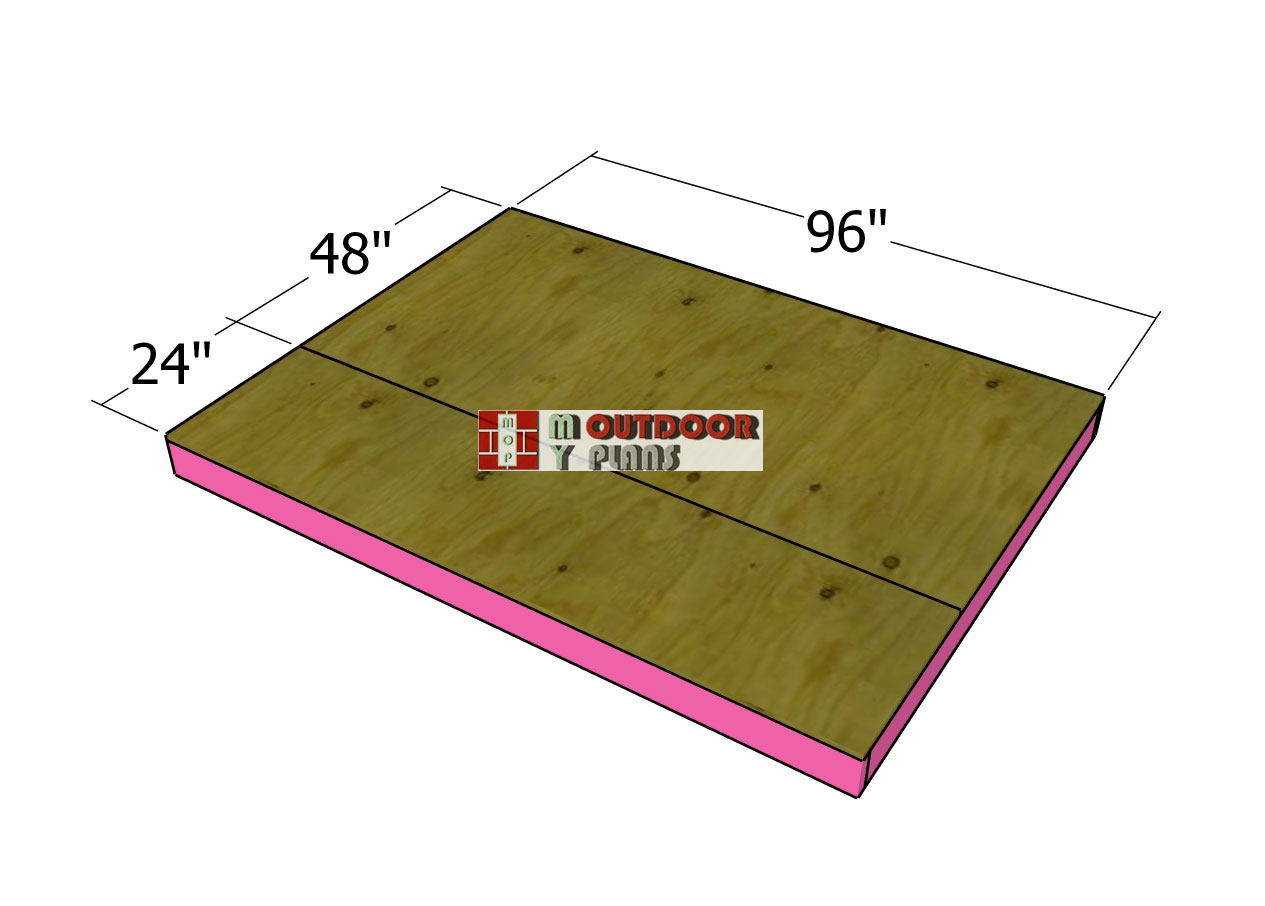
B – 1 pieces of 3/4″ plywood – 4’x8′, 1 piece – 2’x8′ FLOOR
C – 2 pieces of 2×4 lumber – 96″, 7 pieces – 56″ 2xSIDE WALL
D – 2 pieces of 2×4 lumber – 12 1/2″, 1 piece – 65″, 4 pieces – 56″ FRONT WALL
E – 2 pieces of 2×4 lumber – 65″, 4 pieces – 56″ long BACK WALL
F – 1 piece of 2×4 lumber – 8 ft RIDGE BEAM
G – 4 piece of 5/8″ T1-11 siding – 48″x60″ SIDING
Tools
![]() Hammer, Tape measure, Framing square, Level
Hammer, Tape measure, Framing square, Level
![]() Miter saw, Drill machinery, Screwdriver, Sander
Miter saw, Drill machinery, Screwdriver, Sander
![]() Safety Gloves, Safety Glasses
Safety Gloves, Safety Glasses
Time
![]() One week
One week
Related
- 8×10 short shed plans
- PART 1: 6×8 Short Shed Plans
- PART 2: 6×8 Short Shed Gable Roof + Door Plans
It’s that easy to build a short shed!
Step 1: Building the shed floor
Floor-frame
The project starts with assembling the floor frame for the 6×8 gable shed. Cut the 2×6 joists to size according to the diagram, then lay them on a level surface. Space the joists 16 inches on center for proper support, ensuring a sturdy base for the structure. Drill pilot holes through the rim joists and secure them to the perpendicular joists using 3 1/2-inch screws. Measure the diagonals and adjust the frame until they are equal, ensuring a perfectly square foundation.
Since this is a compact shed, maximizing interior height is key, so the design skips traditional skids. Instead, protect the floor frame from moisture by spreading a layer of gravel underneath to improve drainage and prevent water buildup. This simple yet effective solution helps extend the life of the shed while keeping construction straightforward.
Floor-sheets
Position the 3/4″ plywood sheets onto the floor frame, ensuring the edges align flush with the structure. Press the sheets tightly together, leaving no gaps between them for a seamless surface. Drill pilot holes to prevent splitting, then secure the plywood to the floor frame using 1 5/8″ screws, spacing them every 8 inches along the joists. This will create a strong and durable base, ready to support the rest of the shed.
Step 2: Building the shed walls
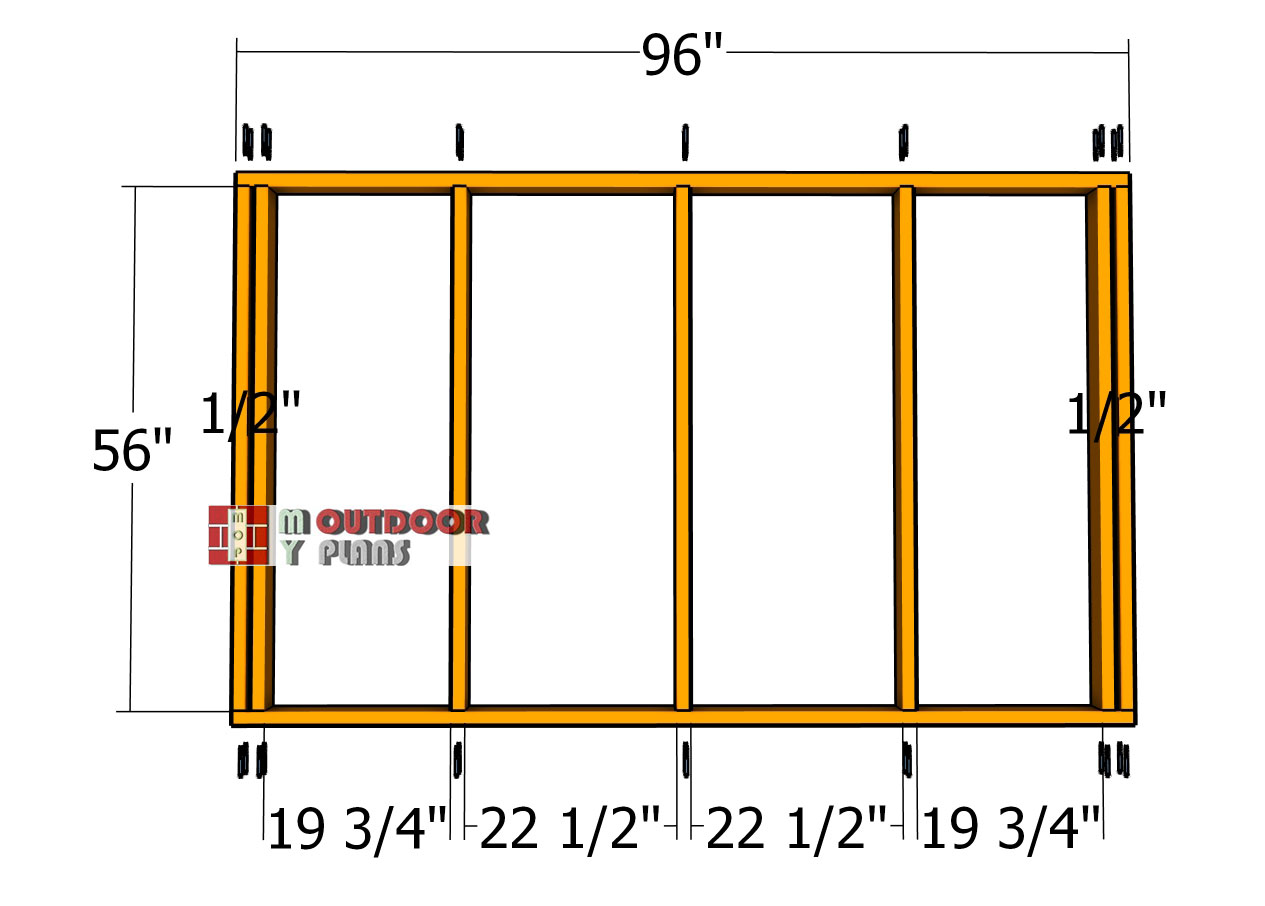
Side-wall-frame
Begin by assembling the side wall frames using 2×4 lumber, cutting the components according to the diagram. Space the studs 24 inches on center to keep material costs down, as this is a small storage shed. However, if you live in an area prone to strong winds, consider reducing the spacing to 16 inches on center for added structural strength.
Drill pilot holes through the top and bottom plates, then secure the studs using 3 1/2-inch screws, driving two screws into each joint for a solid connection. Pay attention to the double studs positioned at both ends of the wall frames, which provide extra support for the structure. Place 1/2-inch plywood spacers between the double studs to improve stability and create a uniform nailing surface. Taking the time to align everything properly now will ensure the shed’s walls are strong and well-constructed.
Fitting-the-side-wall-frames
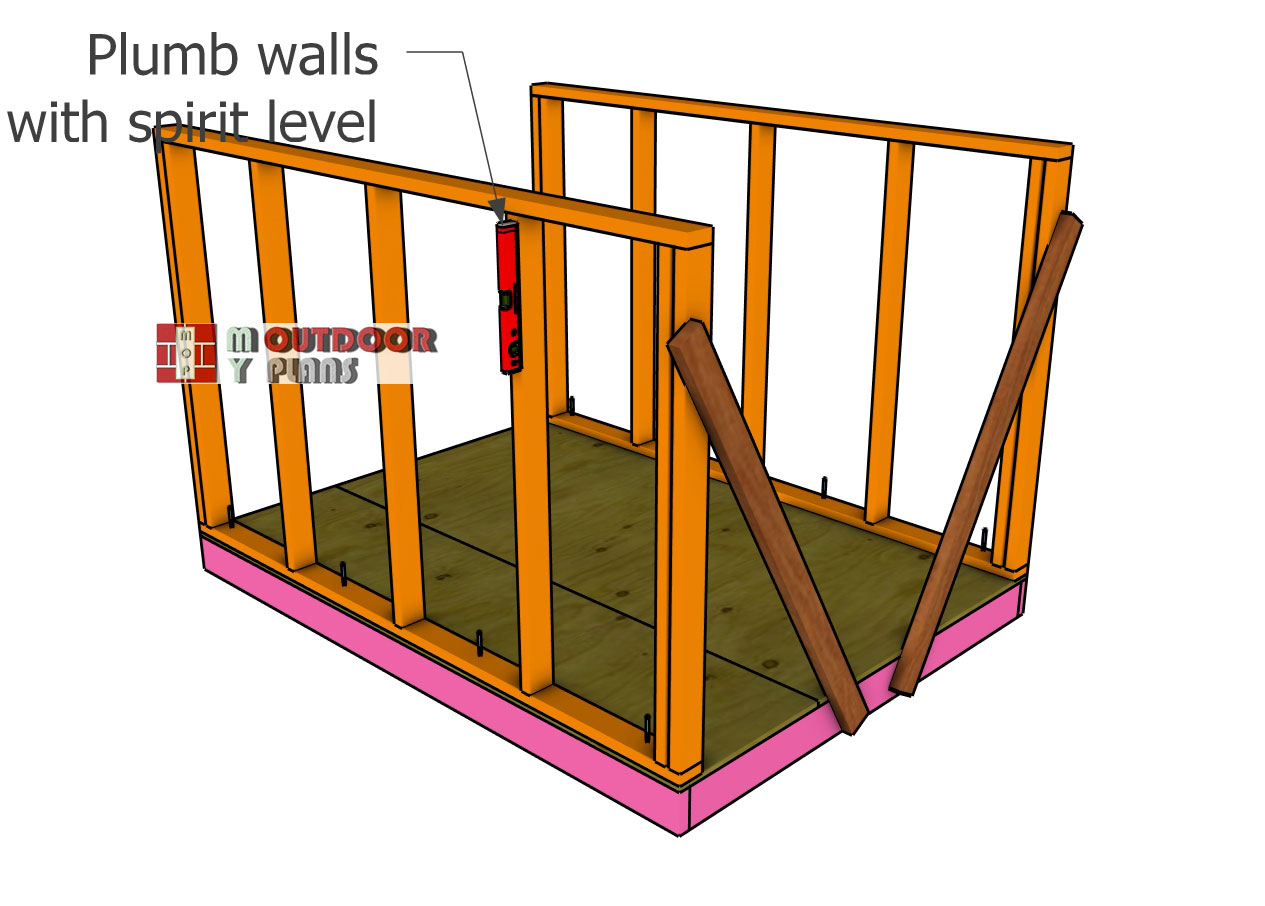
Lift the wall frames and position them along the sides of the shed floor. Align the bottom plates flush with the edges of the floor to ensure a precise fit. Use a spirit level to check that the walls are perfectly plumb before securing them.
To keep the frames steady during installation, attach temporary braces at an angle, anchoring them to the floor for added stability. Drill pilot holes through the bottom plates to prevent splitting, then drive 3 1/2-inch screws into the floor frame to lock the walls into place. Double-check alignment and adjust as needed before moving on to the next steps.
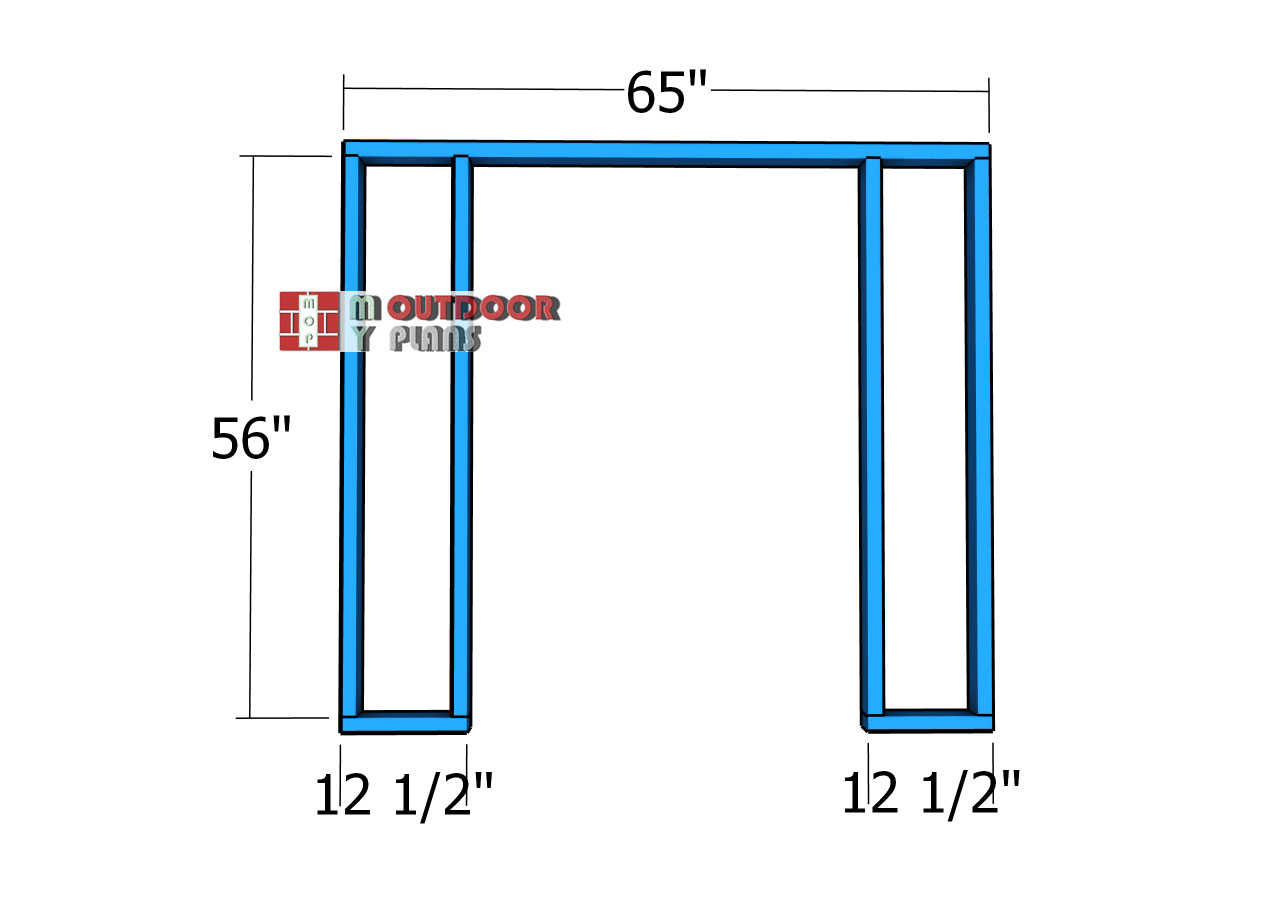
Front-wall-frame
Assemble the front wall frame for the small backyard shed by cutting the 2×4 components to size. Drill pilot holes through the top and bottom plates, then secure the studs with 3 1/2-inch screws, ensuring a strong and stable structure.
The frame includes a 40-inch-wide door opening, which provides easy access to the shed. If needed, you can adjust the width to accommodate a different door size. Make sure to reinforce the door opening with a proper header and jack studs for added strength and durability. Double-check all measurements and alignment before moving on to installation.
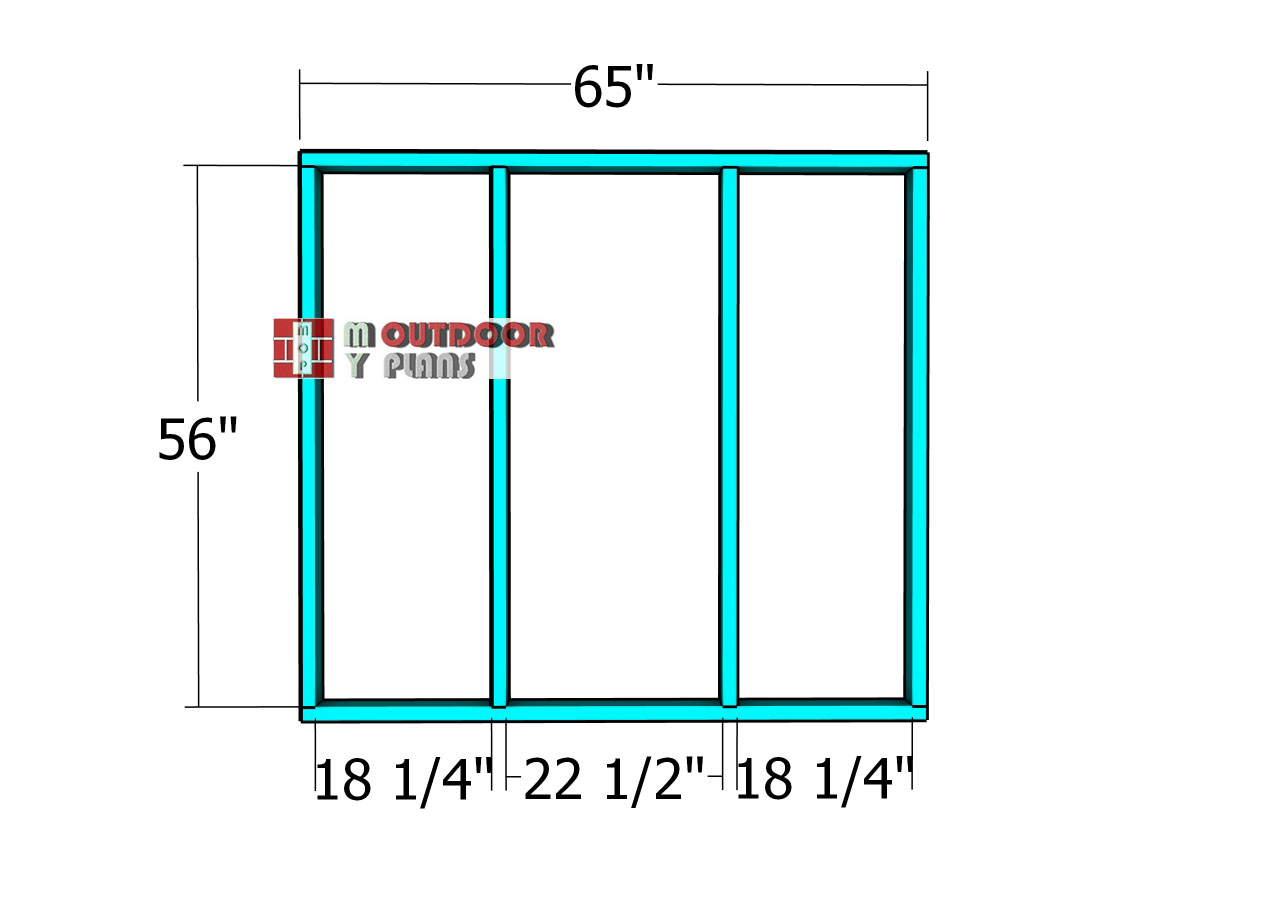
Back-wall-frame
Build the back wall frame using the same method as the other walls. Cut the 2×4 components to size and lay them out on a flat surface. Drill pilot holes through the top and bottom plates, then secure the studs with 3 1/2-inch screws to ensure a strong connection.
Make sure the studs are evenly spaced according to the plans, maintaining proper alignment for a sturdy structure. Once assembled, check that the frame is square before moving on to installation.
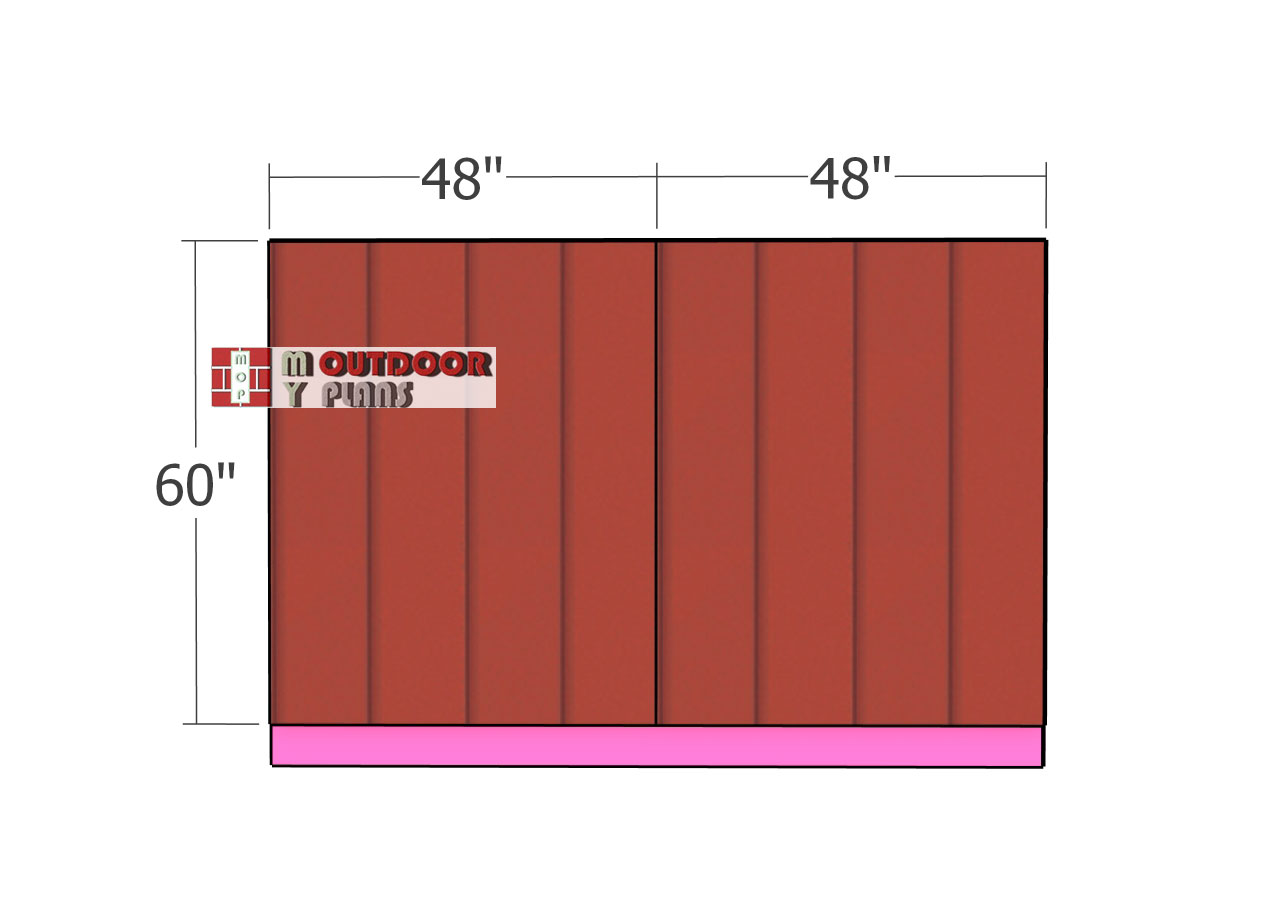
Side-panels
Attach the 5/8-inch T1-11 siding sheets to the side walls to enclose the structure. Cut the sheets to 60 inches in height, ensuring they fit properly before installation. Align the edges flush with the framing and check for a uniform layout.
Secure the siding to the wall frames using 6-8d nails, spacing them every 8 inches along the studs and edges. Make sure the sheets cover the bottom plate of the walls for added strength and protection against moisture. Repeat the process for the other side, ensuring all panels are installed straight and evenly.
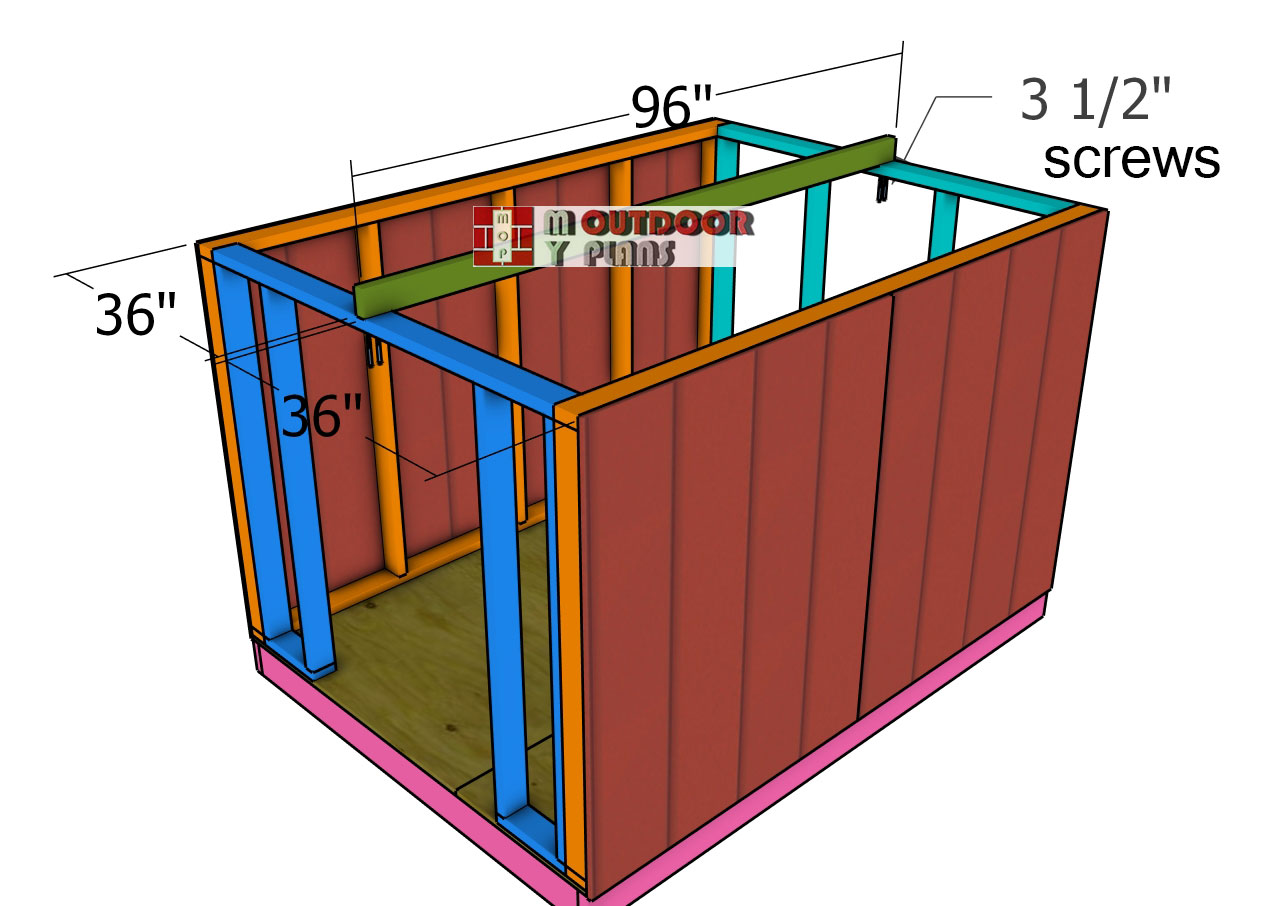
Ridge-beam
Position the 2×4 ridge beam at the center of the shed, aligning it properly along the top of the structure. Drill pilot holes through the top plates to prevent splitting, then secure the ridge beam in place using 3 1/2-inch screws, driving two screws into each joint for a solid connection.
This design creates a roof with a 5-degree slope, which is lower than standard but necessary to maximize the interior space within the shed’s 6-foot total height. While the slope is minimal, it still allows for adequate water runoff while prioritizing headroom inside the shed. Ensure the ridge beam is level and securely fastened before moving on to installing the rafters.
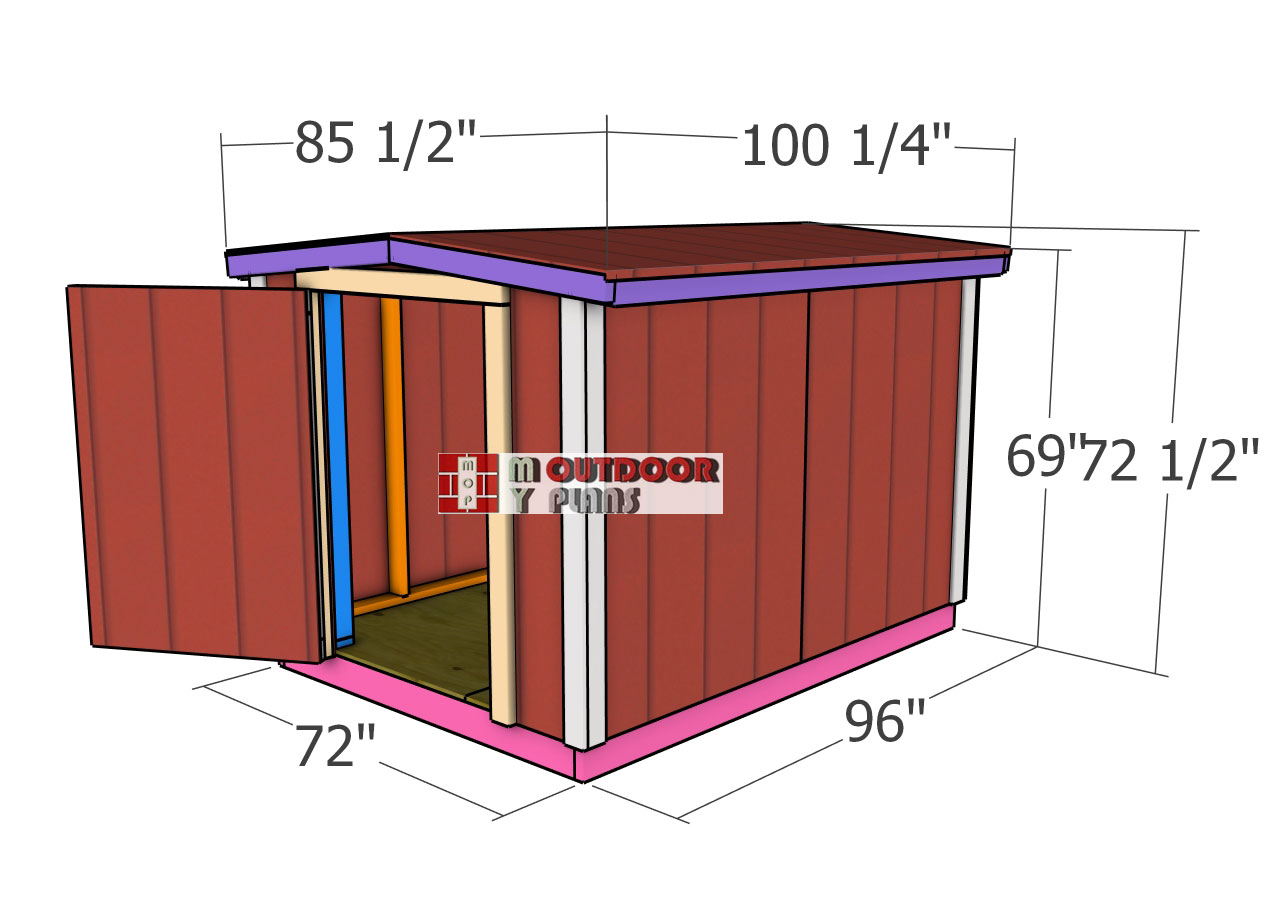
6×8-short-shed-plans—dimensions
6×8 short shed plans
6×8 short shed plans DIY
With the ridge beam in place, the main structure of the shed is coming together. In Part 2, I will show you how to build the roof and install the front door, completing the shed with a functional and weather-resistant design. Stay tuned for the next steps!
If you want to get Premium Plans, just press the GET PDF PLANS bellow. If you want to get the free version, please read the blog FAQs.

This woodworking project was about 6×8 short shed plans. If you want to see more outdoor plans, check out the rest of our step by step projects and follow the instructions to obtain a professional result.
