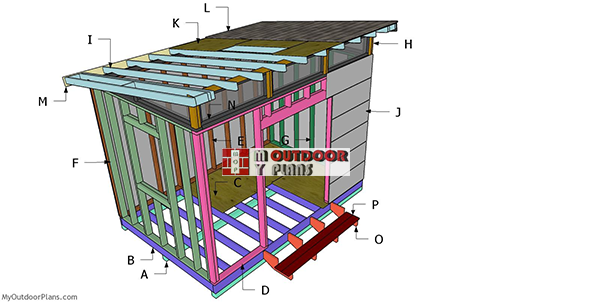
This step by step diy project is about 8×12 modern office shed plans. I have designed this 8×12 lean to shed so you can finally have that cozy place where you can work, read and relax. This shed features double front doors to the front and a side window. Of course, you will need to insulate the walls and install drywall to the inside of the shed. Read the local building codes to understand what are the requirements you need to comply with. Take a look over the rest of my woodworking plans, if you want to get more building inspiration.
When buying the lumber, you should select the planks with great care, making sure they are straight and without any visible flaws (cracks, knots, twists, decay). Investing in cedar or other weather resistant lumber is a good idea, as it will pay off on the long run. Use a spirit level to plumb and align the components, before inserting the galvanized screws, otherwise the project won’t have a symmetrical look. If you have all the materials and tools required for the project, you could get the job done in about a day. See all my Premium Plans HERE.
Projects made from these plans
8×12 Modern Office Shed Plans – Free PDF Download
8×12-modern-shed-plans—building
Cut & Shopping Lists
- A – 3 pieces of 4×4 lumber – 144″ long SKIDS
- B – 2 pieces of 2×6 lumber – 144″ long, 10 pieces – 93″ long FRAME
- C – 2 pieces of 3/4″ plywood – 48″x96″ long, 2 pieces – 48″x48″ long FLOOR
- D – 2 pieces of 2×4 lumber – 42″ long, 1 piece – 137″ long, 1 piece – 144″ long, 10 pieces – 91 1/2″ long, 2 pieces – 78 1/2″ long, 6 pieces – 7 1/2″ long, 2 pieces of 2×6 lumber – 63″ long FRONT WALL
- E – 2 pieces of 2×4 lumber – 144″ long, 1 piece – 137″ long, 12 pieces – 91 1/2″ long BACK WALL
- F – 2 pieces of 2×4 – 89″ long, 1 piece – 96″ long, 6 pieces – 91 1/2″ long, 3 pieces – 9 1/2″ long, 3 pieces – 35″ long, 2 pieces – 40″ long, 4 pieces – 33″ long SIDE WALL
- G – 2 pieces of 2×4 – 89″ long, 1 piece – 96″ long, 7 pieces – 91 1/2″ long SIDE WALL
- H – 1 piece of 2×4 lumber – 144″ long, 8 pieces – 14 1/2″ long TOP FRONT WALL
- 3 pieces of 4×4 lumber – 12 ft
- 2 pieces of 2×6 lumber – 12 ft
- 12 pieces of 2×6 lumber – 8 ft
- 3 pieces of 3/4″ plywood – 4’x8′
- 6 pieces of 2×4 lumber – 12 ft
- 52 pieces of 2×4 lumber – 8 ft
- 1/2″ plywood – 4’x8′
- 2 1/2″ screws, 3 1/2″ screws, 1 5/8″ screws
- wood filler , wood glue, stain/paint
- joist hangers
- rafter ties
Tools
![]() Hammer, Tape measure, Framing square, Level
Hammer, Tape measure, Framing square, Level
![]() Miter saw, Drill machinery, Screwdriver, Sander
Miter saw, Drill machinery, Screwdriver, Sander
![]() Safety Gloves, Safety Glasses
Safety Gloves, Safety Glasses
Time
Related
- PART 1: 8×12 Modern Lean to shed plans
- PART 2: Modern Lean to shed roof plans
It’s that easy to build an office shed!
Building a 8×12 modern office

Floor frame – shed diy
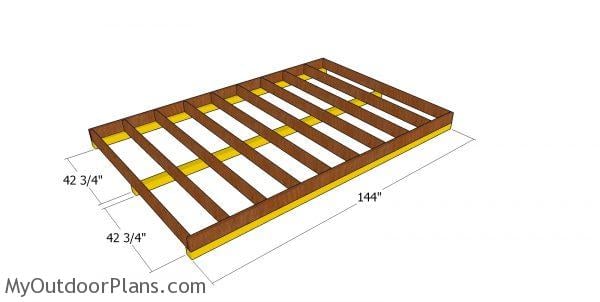
The first step of the project is to assemble the floor frame using 2×6 lumber. Cut the joists at the right dimensions and lock them together with 3 1/2″ screws. Drill pilot holes through the rim joists and insert the screws into the perpendicular components. Align the edges flush and check if the corners are square. Alternatively, you can use joist hangers to assemble the frame for the shed.
Fitting the skids to the shed floor
The nest step of the project is to attach the 4×4 skids to the frame of the shed. Align the beams at both ends, using the information in the diagram. Use rafter ties and 2 1/2″ screws to lock the skids to the floor frame.

Fitting the floor sheets
Attach 3/4 tongue and groove sheets to the floor frame. Align the edges flush, drill pilot holes and insert 1 5/8″ screws every 8″ along the joists. I recommend you to invest in pressure treated plywood for the floor, because they will be exposed to the elements.
Building the wall frames
Front-wall-frame-for-small-modern-shed
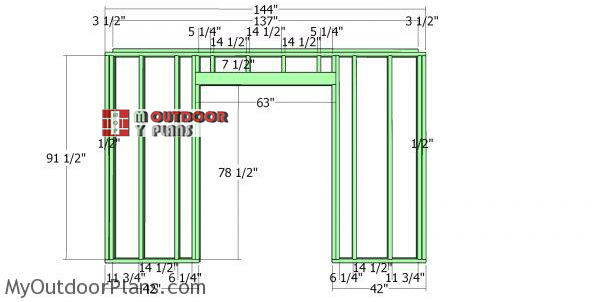
The next step of the office shed project is to build the front wall frame. Cut the components at the right dimensions, drill pilot holes through the plates and insert 3 1/2″ screws into the studs. Make sure the corners are square and align everything flush. As you can easily notice in the diagram, you need to double the ends studs and attach cripple studs for the 5 ft double doors opening. Notice the double header.
End posts
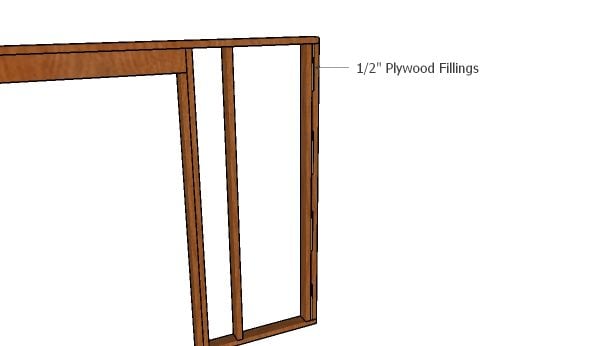
As you can see in the plans, you need to fit 1/2″ plywood fillings between the double end studs. Build the double header for the door from 2×6 lumber and 1/2″ plywood. Align the edges with attention, add glue to the joints and insert 2 1/2″ screws from both sides to lock everything together tightly.
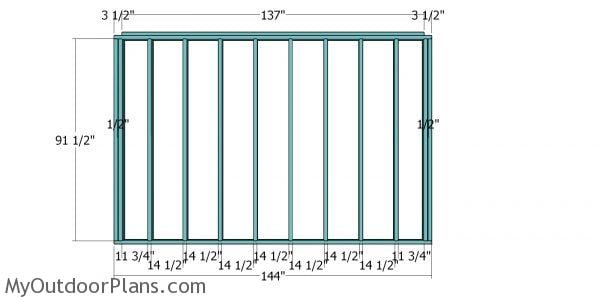
Back wall frame
Next, build the back wall from 2×4 lumber. Drill pilot holes through the plates and insert 3 1/2″ screws into the studs. Make sure the corners are square and align the edges flush for a professional result.
Fit the front and the back walls to the shed floor. Use a spirit level to plumb the walls, drill pilot holes through the bottom plates and insert 3 1/2″ screws into the floor.
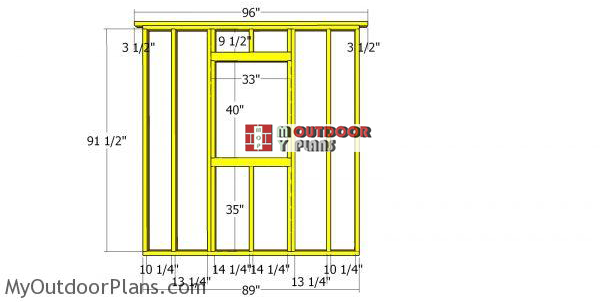
Side-wall-with-window—8×12-modern-shed
Build the side wall from 2×4 lumber, using the same techniques described above. I frames an opening for a 30″x40″ window, so you have plenty of light inside the office shed.
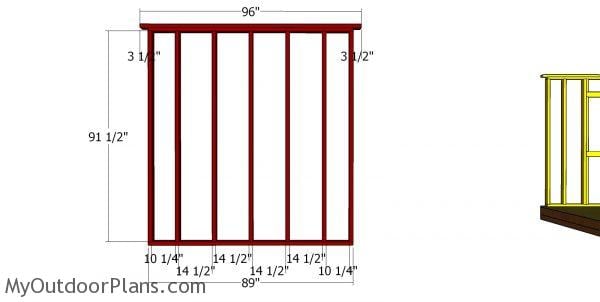
Side wall frame for modern shed
Build the opposite side wall for the garden shed. Drill pilot holes through the plates and insert 3 1/2″ screws into the studs. You can use a nail gun and nails, as well.
Assembling the shed frame
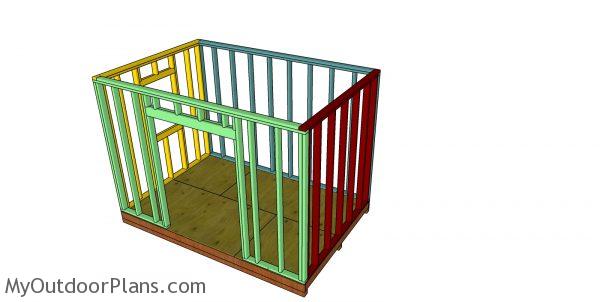
Assembling the 8×12 shed frame
Fit the side walls to the floor of the shed and align the edges flush. In addition, drill pilot holes through the bottom plates and insert 3 1/2″ screws into the floor. Make sure the corners are right-angled and lock the adjacent walls together by inserting drill pilot holes and inserting 2 1/2″ screws.
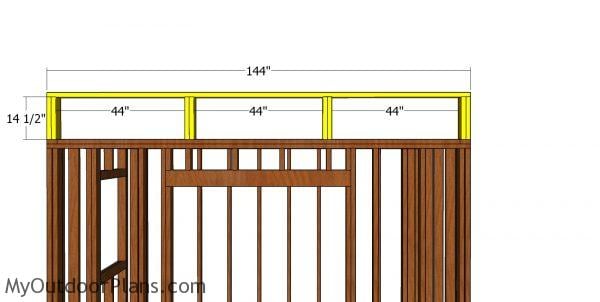
Top front wall frame – 8×12 lean to shed
Next, we need to build the top wall frame, so we can create the lean to for the roof of the modern office. Therefore, use 2×4 lumber for the studs and for the top plate. Drill pocket holes at one end of the studs and secure them with 2 1/2″ screws to the wall frame. Install the top plate to the studs with 3 1/2″ screws. You can play with the distance between the studs, if you want more windows or you are trying to fit some windows that you already have. For this project, I will show you in PART 2 how to build windows with plexiglass.
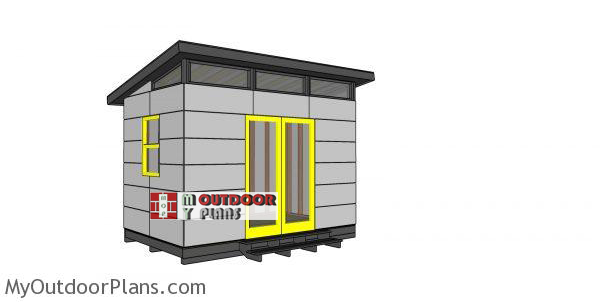
8×12-modern-office-shed-plans
This is modern office shed that can be built in a few weeks and save tons of money, as compared to buying one. You can play with the location and size of the window and double doors. As you can see the shed also comes with basic stairs to the front, so you can access the shed with ease.
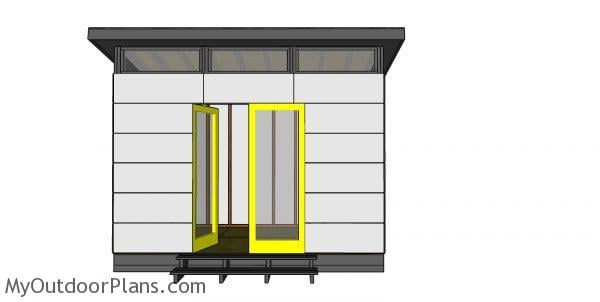
8×12 Modern Office Shed Plans – front view
This is a simple project you should be able to build in a few days without much effort. This 8×12 lean to shed is ideal if you need a dedicated area in your garden, where you can work or just have a retreat place to come at peace with your thoughts. Check out my plans for a basic 8×12 lean to shed and for a gable 8×12 lean to shed.

8×12 Modern Office Shed – dimensions
Building an 8×12 modern office shed will set you back around $2,000 to $4,000, depending on the materials and finishes you choose. You can expect to dedicate about 3 to 4 weekends to get it done, with some extra time for those sleek, modern touches. It’s an investment in both time and money, but the end result is a stylish, functional workspace that’s all your own, right in your backyard.

8×12 office shed – free plans
Imagine stepping out into your backyard and walking just a few steps to your own personal office—no commute, no distractions, just a modern, stylish space where you can focus and be productive. An 8×12 modern office shed isn’t just about adding square footage; it’s about creating a dedicated environment that boosts your creativity and work-life balance. Plus, with its sleek design, it enhances the look of your yard, making it not just a practical addition but a beautiful one that reflects your personal style.

How to build a small office shed
If you want to get PREMIUM PLANS for this project, in a PDF format, please press GET PDF PLANS button bellow. Thank you for the support.
This woodworking project was about 8×12 modern office shed plans free. If you want to see more outdoor plans, check out the rest of our step by step projects and follow the instructions to obtain a professional result.


5 comments
what does this mean?
The nest step of the project is to attach the 4×4 skids to the frame of the shed. Align the beams at both ends, using the information in the diagram. Use rafter ties and 2 1/2″ screws to lock the skids to the floor frame.
It means exactly what it says. Use rafter ties to secure the skids to the floor frame.
how can i buy this?
why is it advertised as free plans, and then trying to charge me for a download? that’s pretty shady
There is a START HERE button in the Menu bar, where it shows how to download the free version.