In part 2 of this project, we’ll focus on building the saltbox-style roof and adding the finishing touches to complete the firewood shed. We’ll install the rafters, secure the purlins, and lay down the roofing materials to ensure maximum protection from the elements. After that, we’ll go over important details like sanding, filling gaps with wood putty, and applying a protective stain or paint to enhance durability and weather resistance. These final steps will not only make the shed more functional but also give it a polished look that blends well with your outdoor space. Let’s get to work and bring this project to completion!
When buying the lumber, you should select the planks with great care, making sure they are straight and without any visible flaws (cracks, knots, twists, decay). Investing in cedar or other weather resistant lumber is a good idea, as it will pay off on the long run. Use a spirit level to plumb and align the components, before inserting the galvanized screws, otherwise the project won’t have a symmetrical look. If you have all the materials and tools required for the project, you could get the job done in about a day.
Projects made from these plans
6×8 Saltbox Wood Shed Plans – PART 2
Building-a-6×8-firewood-shed
Cut and Shopping Lists
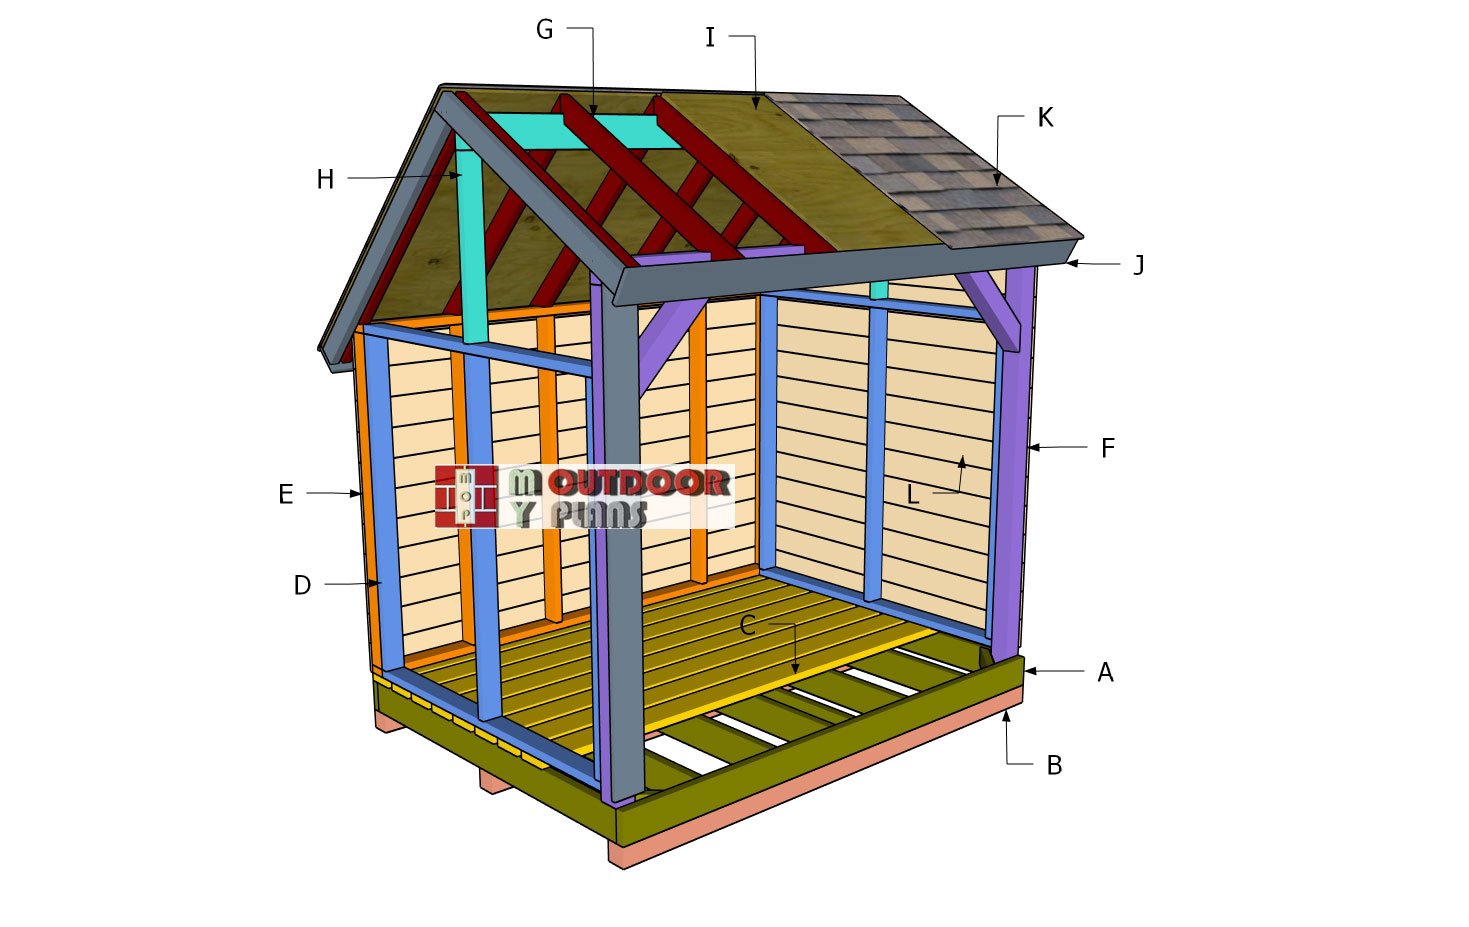
- G – 5 pieces of 2×4 lumber – 60″, 5 pieces – 48″ RAFTERS
- H – 2 pieces of 2×4 lumber – 29″ RIDGE BEAM
- H – 1 piece of 2×6 lumber – 8 ft RIDGE BEAM
- I – 1 piece of 3/4″ plywood – 4’x8′, 2 pieces – 2 1/4″x48″, 1 piece – 48″x74 1/4″, 1 piece – 26 1/4″x48″, 1 piece – 12″x74 1/4″, 1 piece – 12″x26 1/4″ ROOF SHEETS
- J – 2 pieces of 1×6 lumber – 76″, 2 pieces – 100 1/2″ TRIMS
- J – 2 pieces of 2×4 lumber – 57 1/2″, 2 pieces – 49″ SIDE TRIMS
- K – 100 sq ft of tar paper, 100 sq ft of asphalt shingles ROOFING
- L – 12 pieces of 1×6 lumber – 8 ft, 24 pieces – 71 1/4″, 2 pieces – 69 3/4″, 2 pieces – 64 1/4″, 2 pieces – 58 3/4″, 2 pieces – 49 1/2″, 2 pieces – 34 1/4″, 2 pieces – 19 1/4″ SLATS
Tools
![]() Hammer, Tape measure, Framing square, Level
Hammer, Tape measure, Framing square, Level
![]() Miter saw, Drill machinery, Screwdriver, Sander
Miter saw, Drill machinery, Screwdriver, Sander
![]() Safety Gloves, Safety Glasses
Safety Gloves, Safety Glasses
Time
![]() One week
One week
Related
- Firewood Shed Plans
- PART 1: 6×8 Firewood Saltbox Shed Plans
- PART 2: 6×8 Saltbox Wood Shed
Step 3: Building the saltbox roof
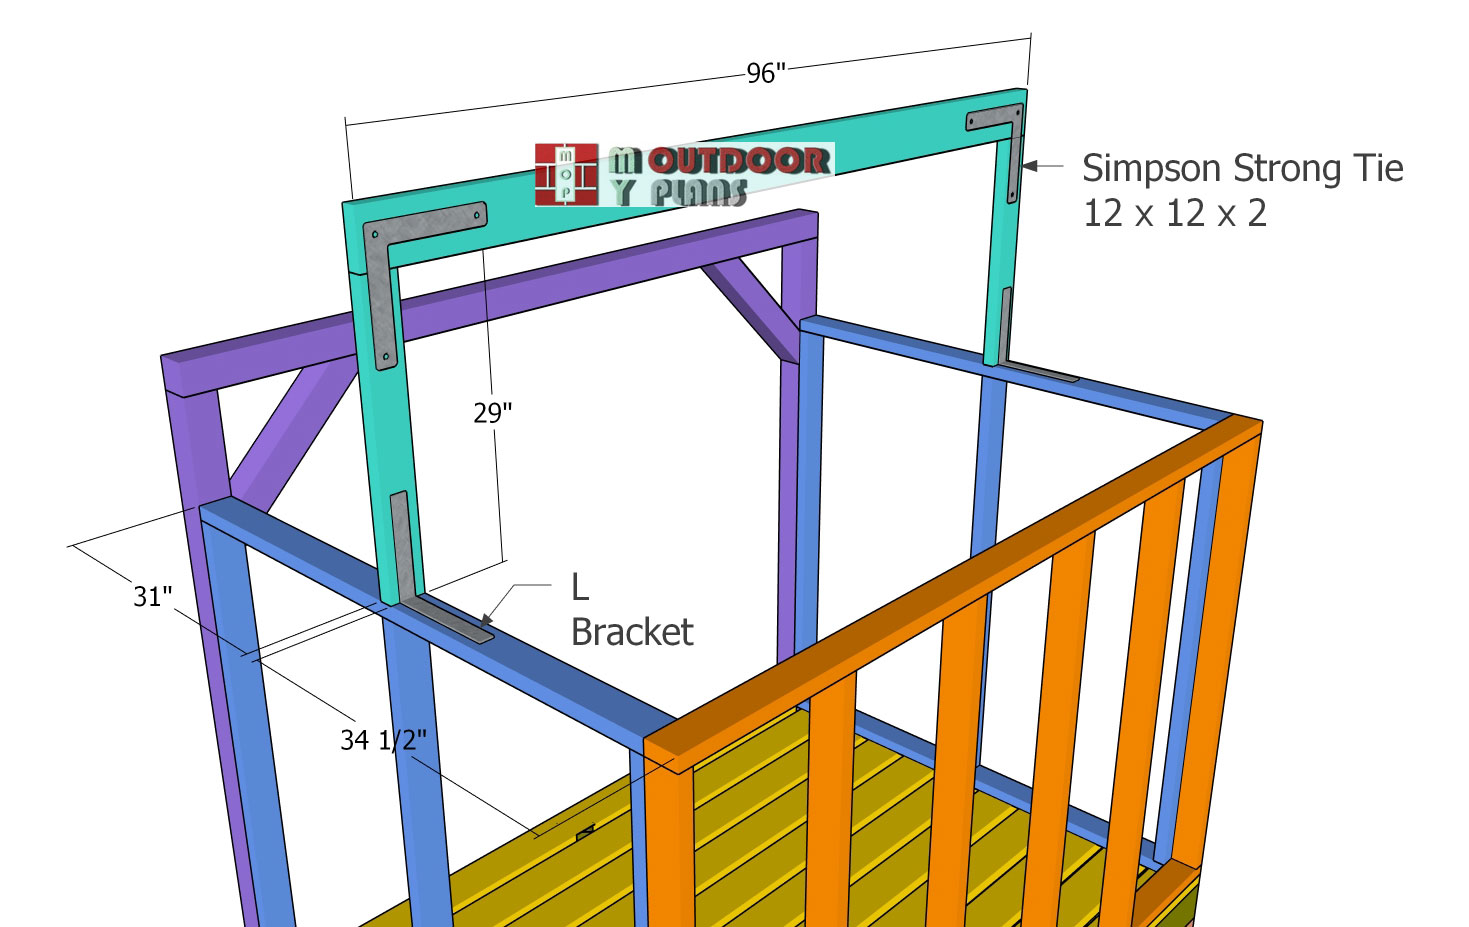
Fitting-the-ridge-beam
Cut the ridge beam supports from 2×4 lumber and the ridge beam from 2×6 lumber, ensuring they match the dimensions shown in the plans. Position the supports along the centerline of the shed, securing them to the side walls with L brackets and L ties for added stability. Use a spirit level to check that the supports are perfectly plumb before fastening them in place. Secure the connectors using 1 1/2″ structural screws or nails, ensuring a strong and reliable connection. This step is crucial for supporting the rafters and maintaining the structural integrity of the saltbox roof.
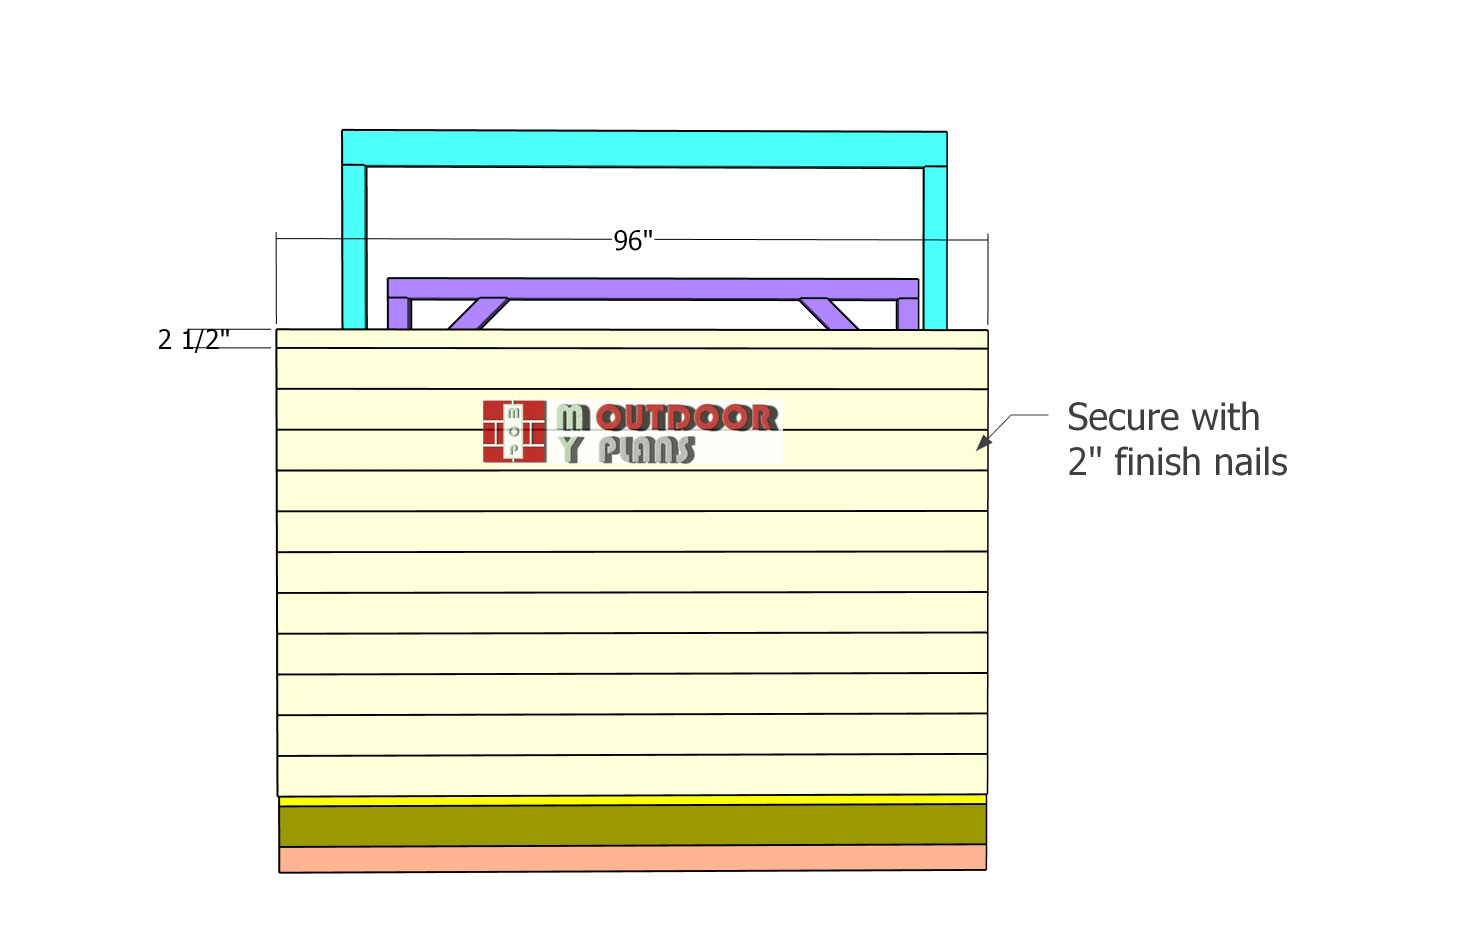
Back-slats
Install the 1×6 boards on the back of the firewood shed, aligning them flush with the sides for a clean and uniform look. Start from the bottom and work your way up, ensuring each board is level before securing it. Use 2″ finish nails, driving two nails into each joint where the boards meet the vertical supports. Take your time to maintain even spacing and a consistent layout, as this will improve both the durability and appearance of the shed.
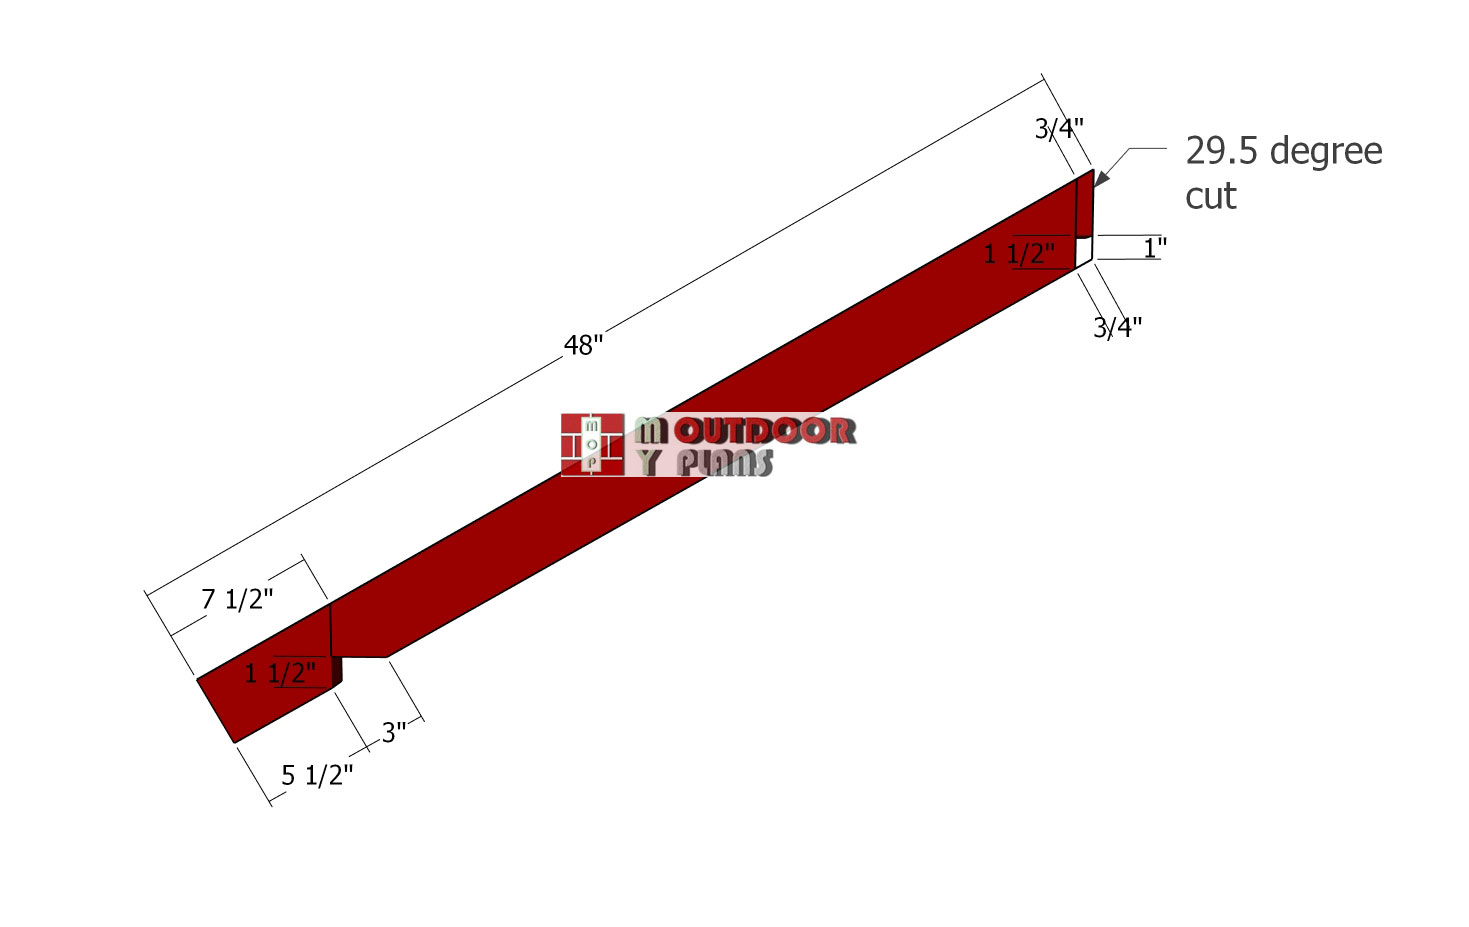
Front-rafters
Cut the saltbox shed rafters from 2×4 lumber, starting with the front rafters. Measure and mark the cut lines carefully to ensure a precise fit. Use a circular saw to make a 29.5-degree cut at one end of each rafter, following the markings accurately. Double-check each cut before proceeding to ensure consistency, as properly cut rafters are essential for a strong and well-aligned roof structure.
Back-rafters
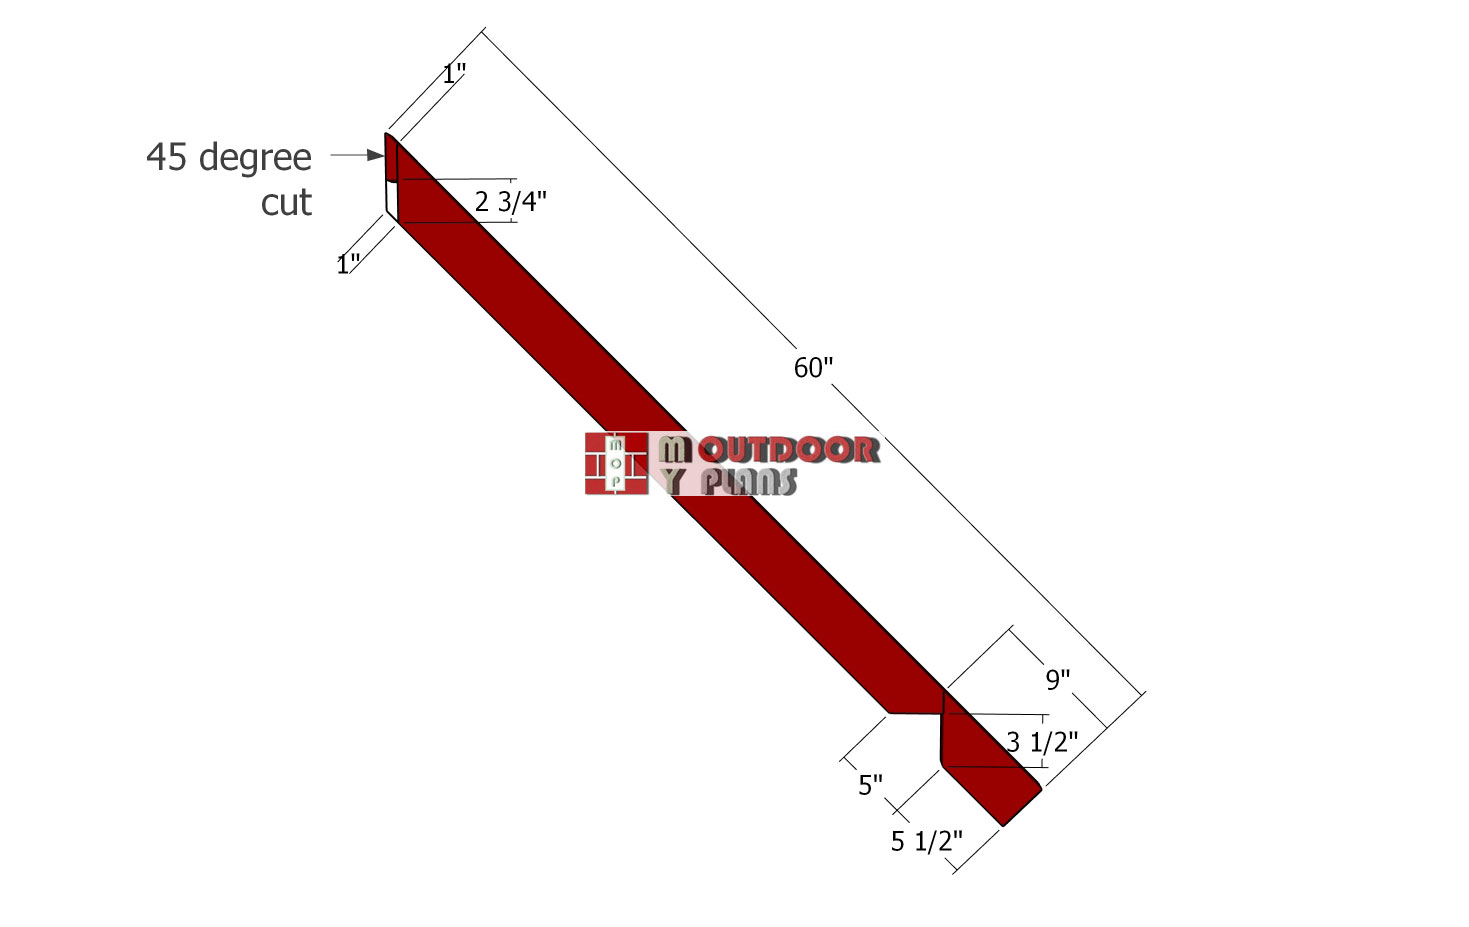
Next, move on to the back rafters, following the same process. Make the angle cut at one end of each rafter, ensuring it matches the specified measurements in the diagram. After that, mark the birdsmouth cuts carefully, using the diagram for reference to ensure accuracy. Use a circular saw for the initial cuts and finish them with a handsaw or chisel if needed for a precise fit. Properly cut birdsmouths will allow the rafters to sit securely on the top plates, providing a strong and stable roof structure for the shed.
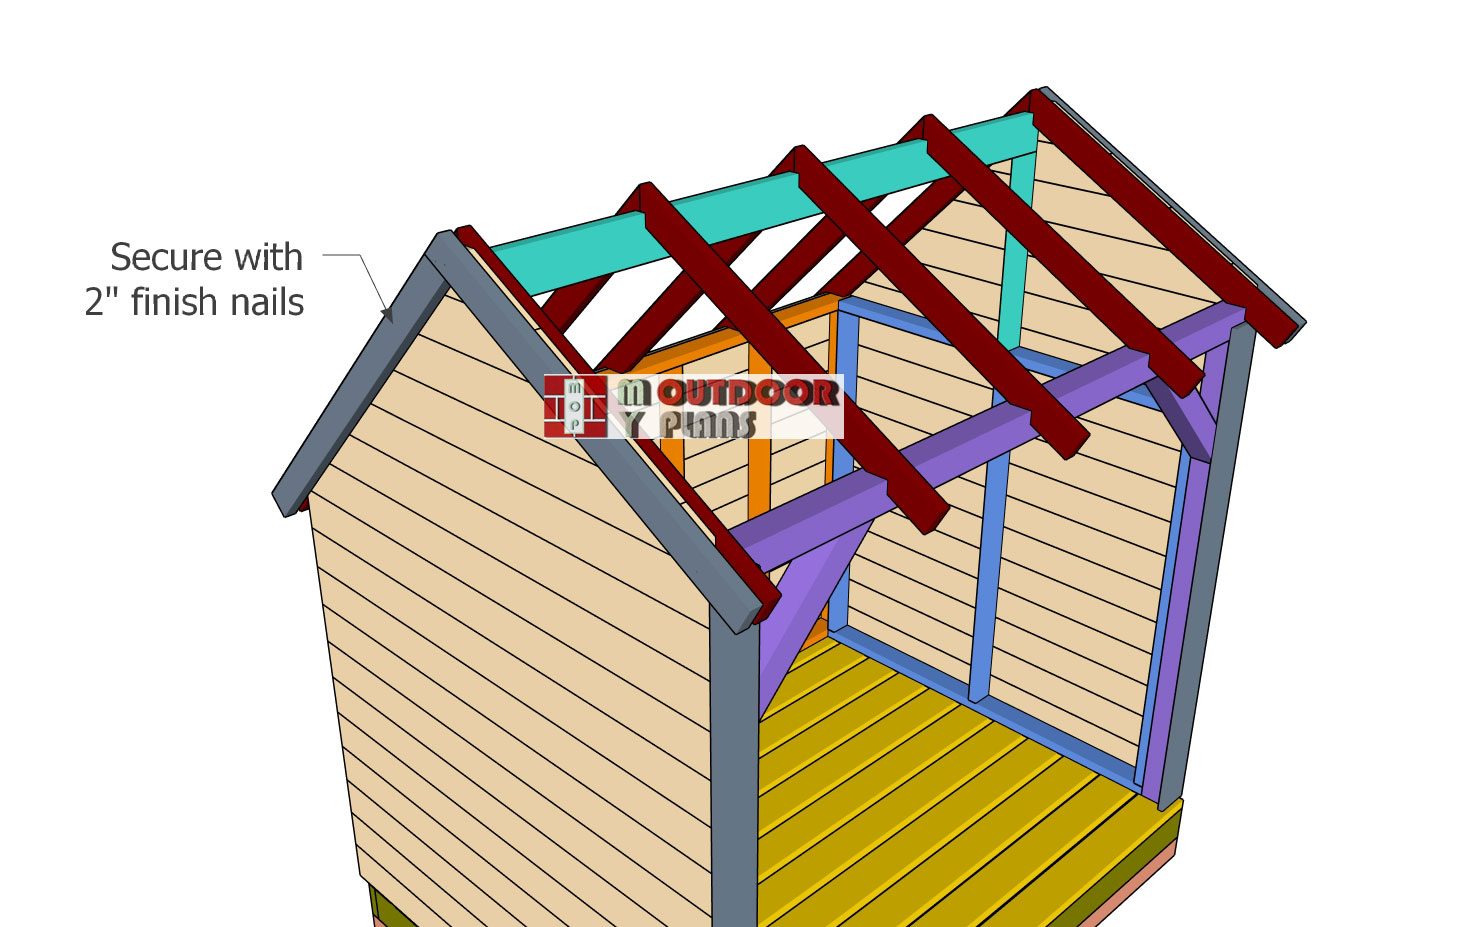
Fitting-the-rafters
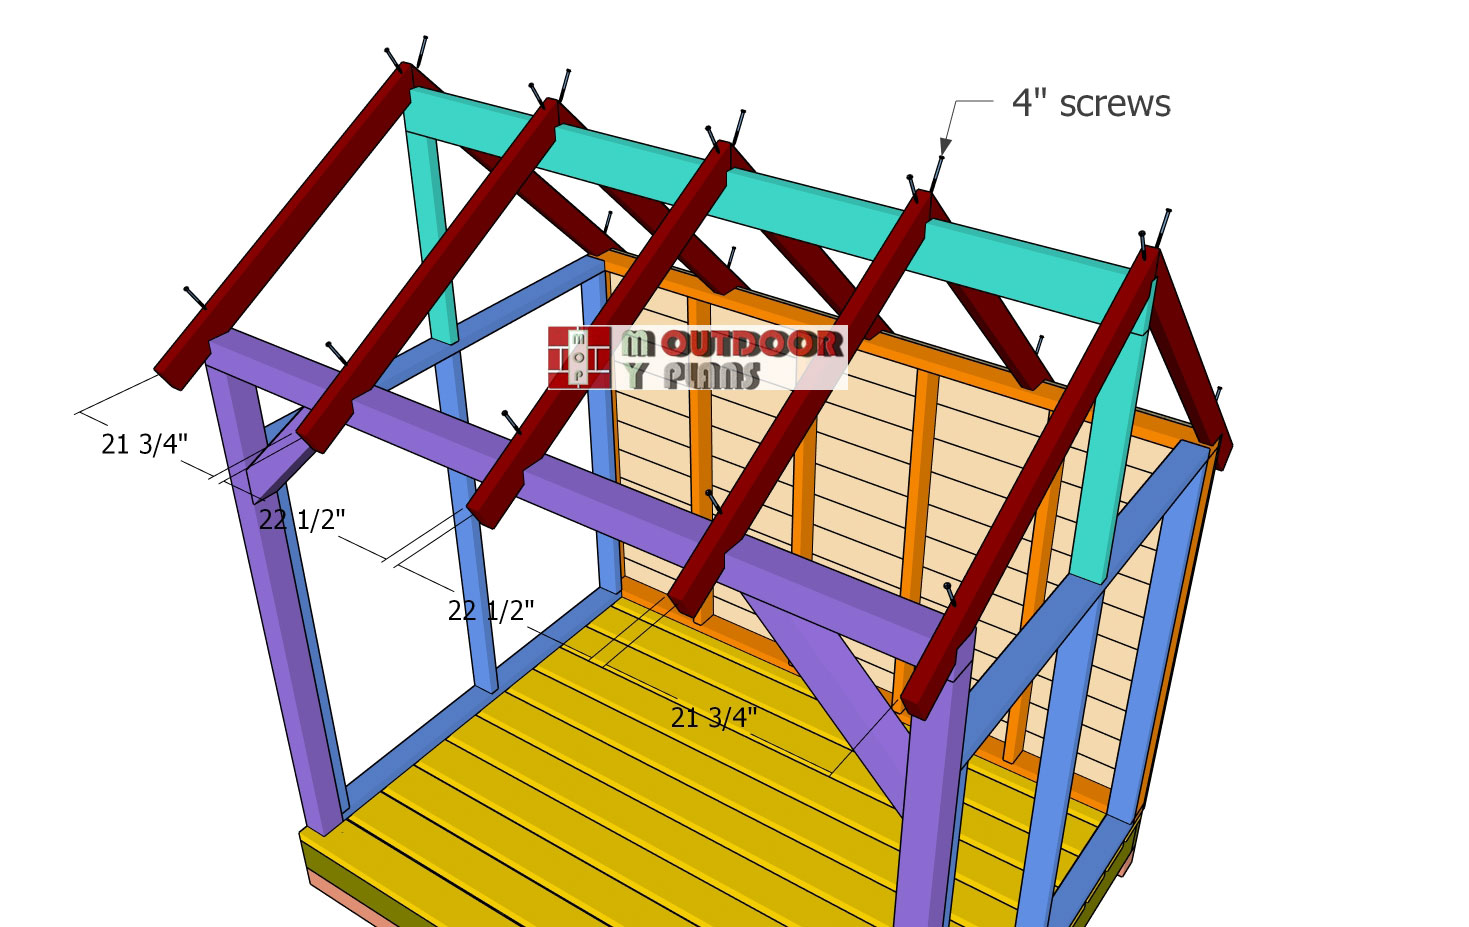
Install the rafters on top of the saltbox shed, spacing them 24 inches on center for proper support. Position each rafter so that the angled cuts fit snugly against the ridge beam and the top plates of the wall frames. Drill pilot holes to prevent splitting, then secure the rafters using 4-inch screws, fastening them both to the ridge beam and the wall frames. Double-check that all rafters are properly aligned and plumb before moving on, as this step is crucial for ensuring a strong and well-structured roof.
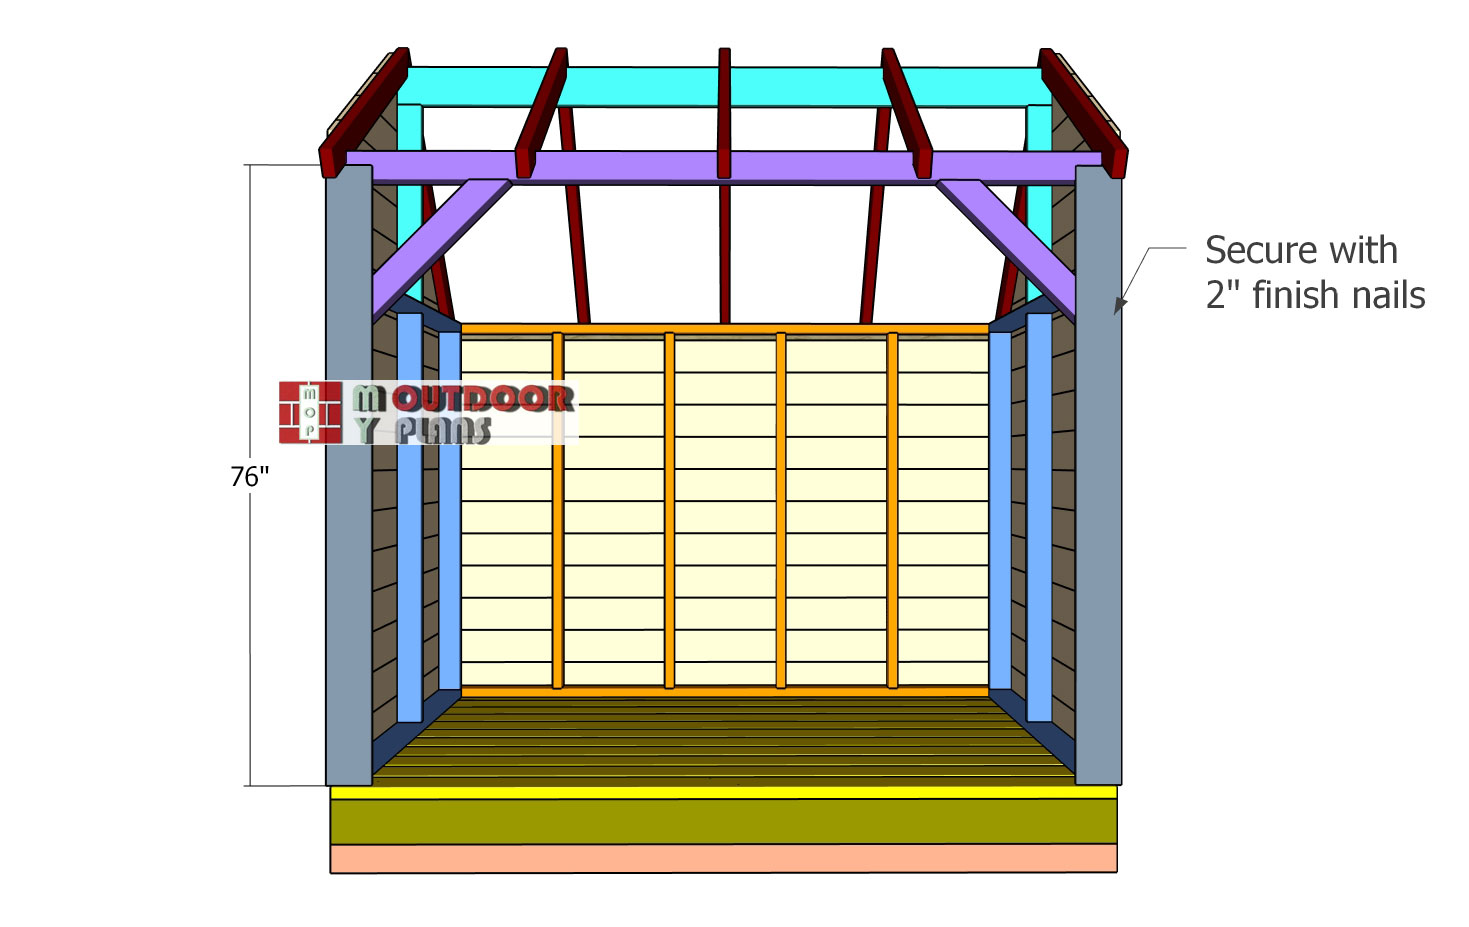
Side-wall-slats
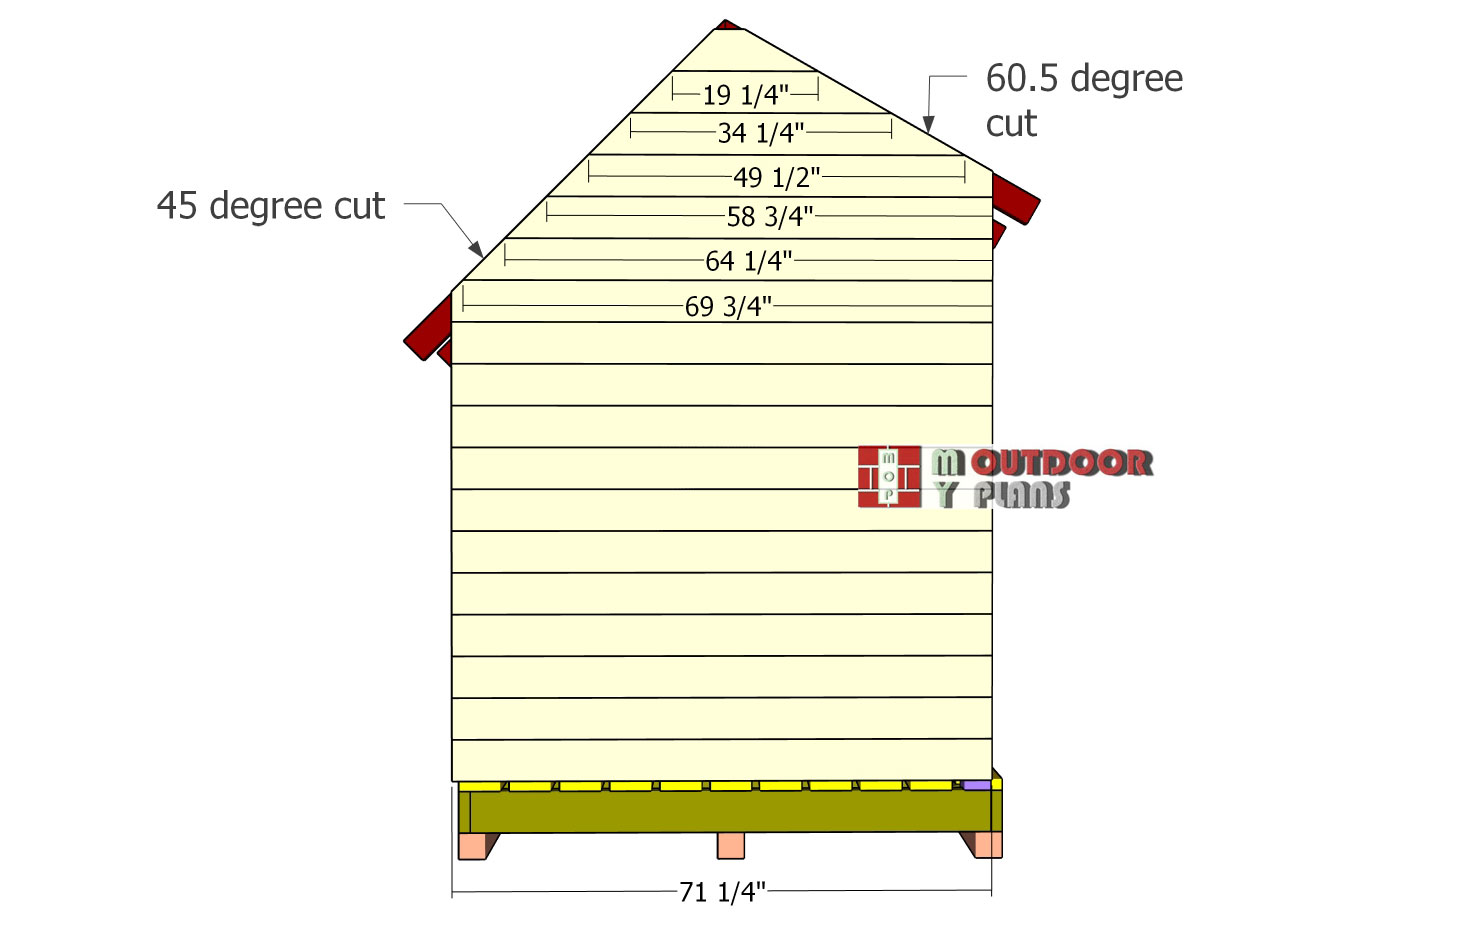
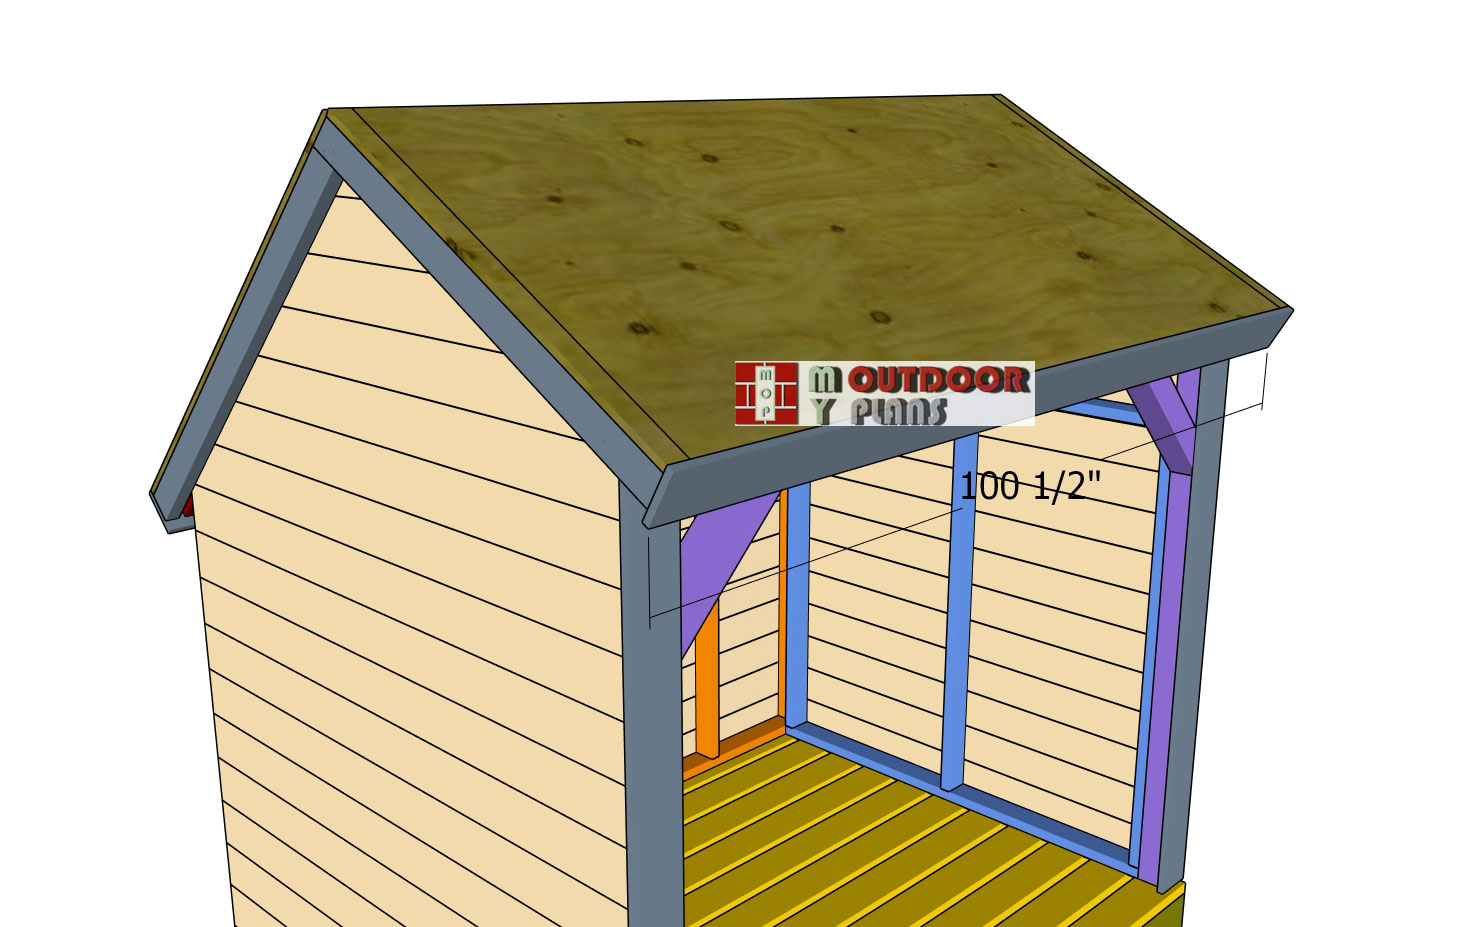
Attach the 1×6 boards to the sides of the firewood shed, making sure the edges are flush with the frame for a clean and uniform look. Secure the boards with 2″ finish nails, driving them into the shed frame for a strong hold. Measure the top slats carefully, then use a miter saw to make the necessary angle cuts to ensure a precise fit along the sloped roofline. Fit the slats into place tightly, double-checking the alignment before securing them. Taking the time to get accurate cuts and proper spacing will give the shed a professional and polished finish.
Side-roof-trims
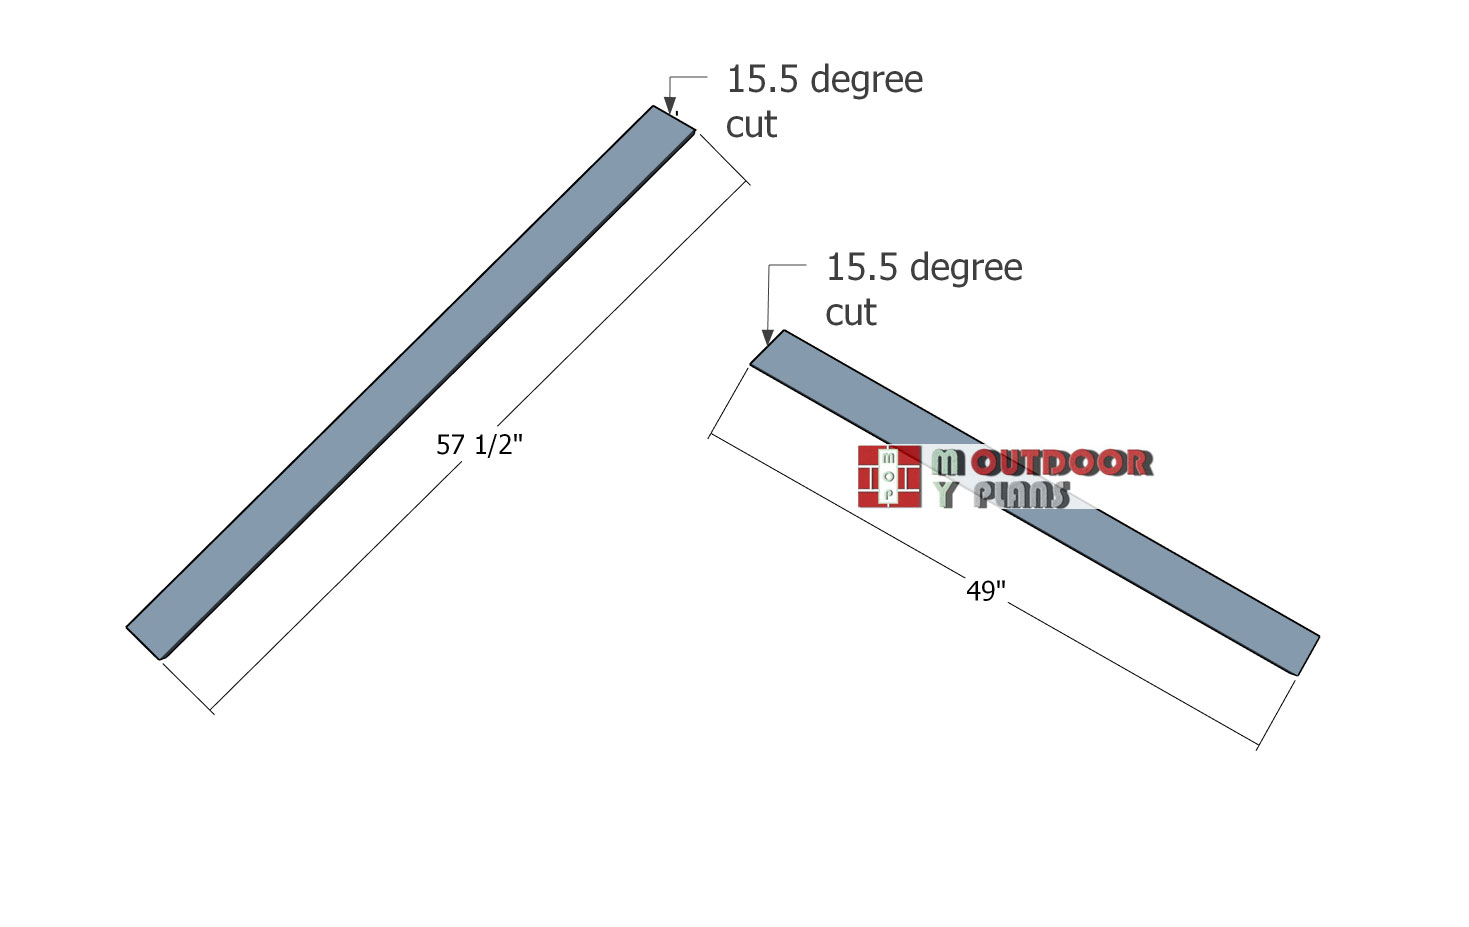
Cut the side roof trims from 2×4 boards, following the angle measurements shown in the diagram for a precise fit along the roofline. Use a miter saw to make clean and accurate cuts, ensuring the trims align properly with the slope of the saltbox roof. Double-check each cut before securing the boards to the shed to maintain a professional and polished look.
Roof-trims
Attach the trims to the sides of the shed, making sure they align flush with the top of the side slats for a clean finish. Secure them in place using 2″ finish nails, spacing the nails every 8 inches for a strong and even hold. Double-check the alignment as you go to ensure a uniform look along the roofline. Properly installed trims will not only enhance the shed’s appearance but also provide extra protection to the edges of the roof structure.
Front-wall-trims
Attach the 1×6 trims to the front of the firewood shed, making sure they align with the side boards for a seamless look. Secure the trims with 2″ finish nails, spacing them every 8 inches to ensure a firm and even hold. Check for proper alignment as you work, adjusting if necessary to maintain a clean and polished appearance. These trims will add a finished look to the shed while also providing extra protection to the front edges.
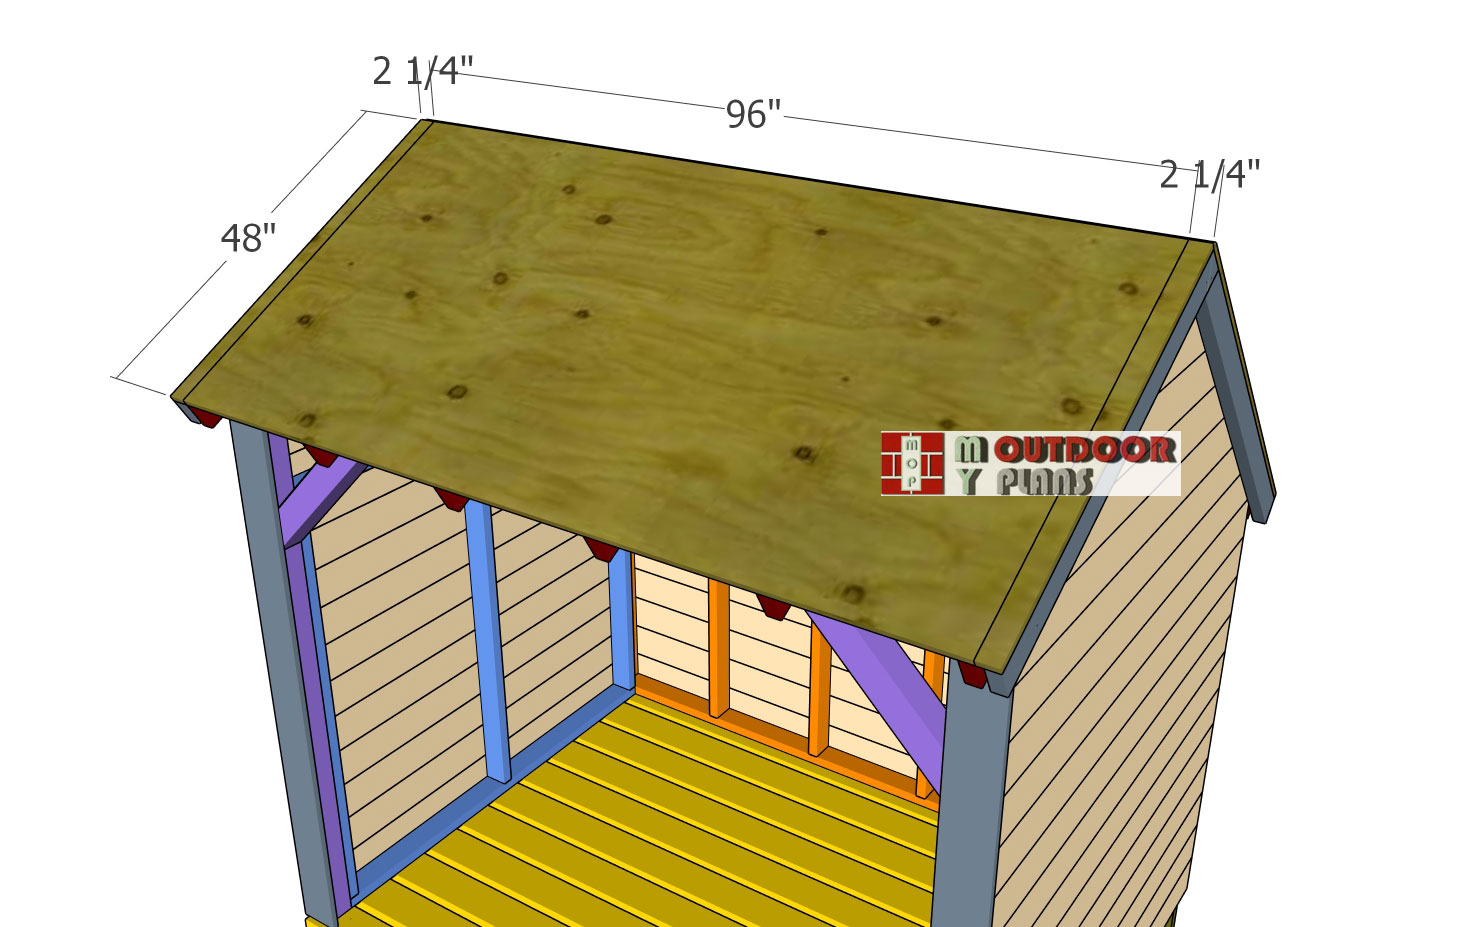
Roof-sheets-front
Cut the 3/4″ plywood panels to fit the top of the roof frame, ensuring they cover the entire surface. Position the panels so the edges align flush with the sides and front of the shed for a clean and uniform look. Secure the panels in place using 1 5/8″ screws, spacing them every 8 inches along the framing for a strong and stable attachment. Double-check alignment before fastening everything down to ensure a smooth and even roof surface.
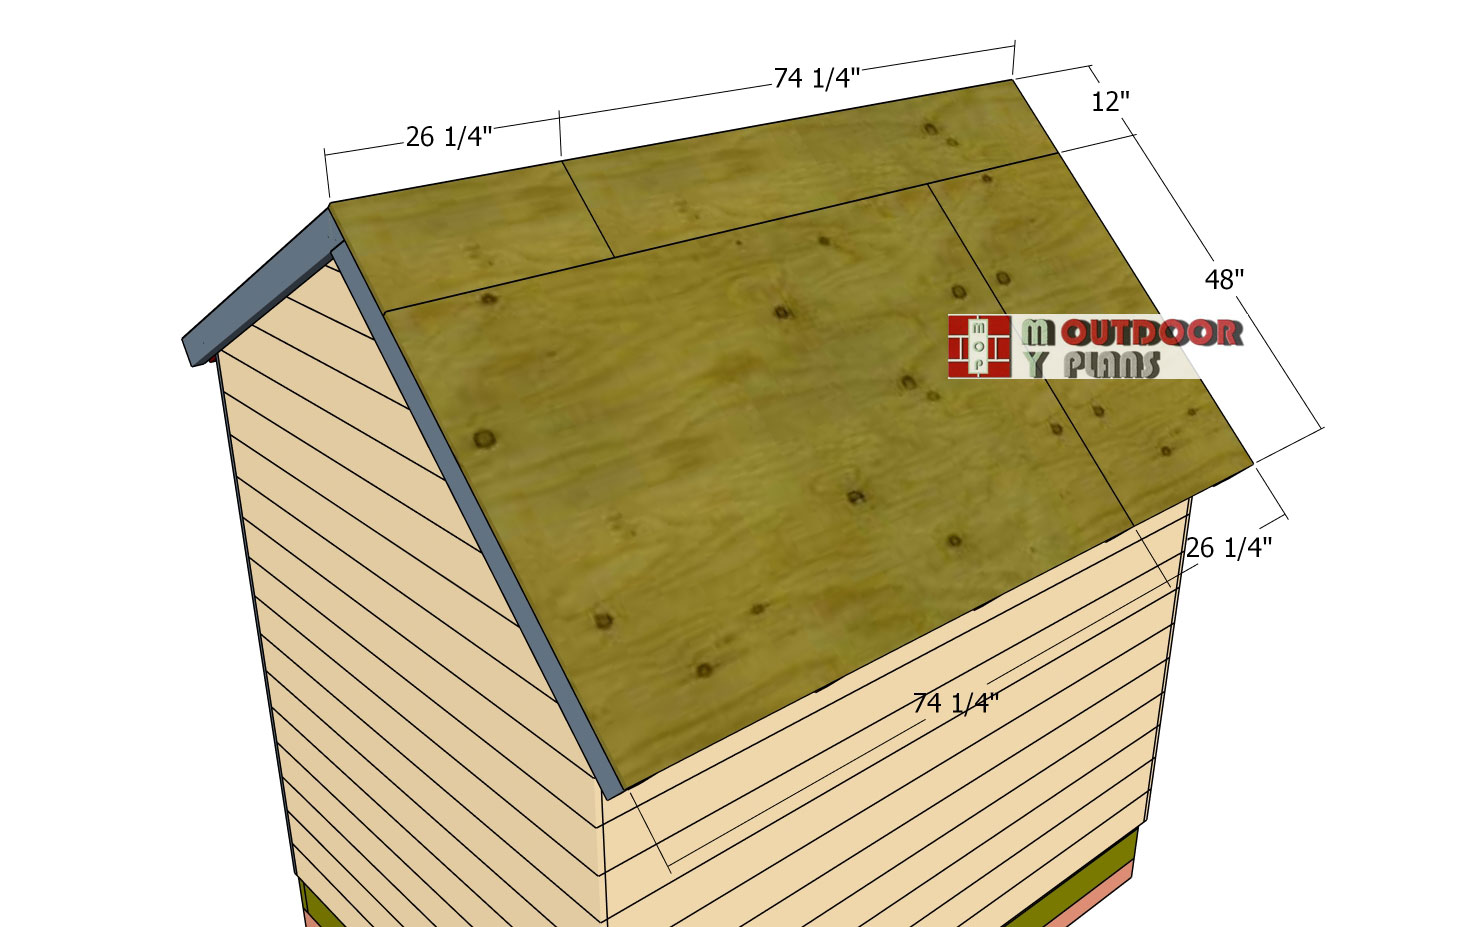
Roof-sheets—back
Secure the 3/4″ plywood sheets to the back of the shed roof, ensuring they align properly with the existing panels. Position them flush with the edges for a seamless fit. Fasten the sheets with 1 5/8″ screws, spacing them every 8 inches along the framing for a strong and durable hold. Double-check that the panels are level and properly secured before moving on to the next step.
Front-and-back-roof-trims
Attach the 1×6 trims to the front and back of the saltbox shed, making sure they align flush with the edges of the roof sheets for a clean and finished look. Secure the trims to the rafters using 2″ finish nails, spacing them evenly for a strong hold. Double-check the alignment as you work to ensure a uniform and polished appearance. These trims will not only enhance the shed’s design but also provide extra protection to the roof edges.
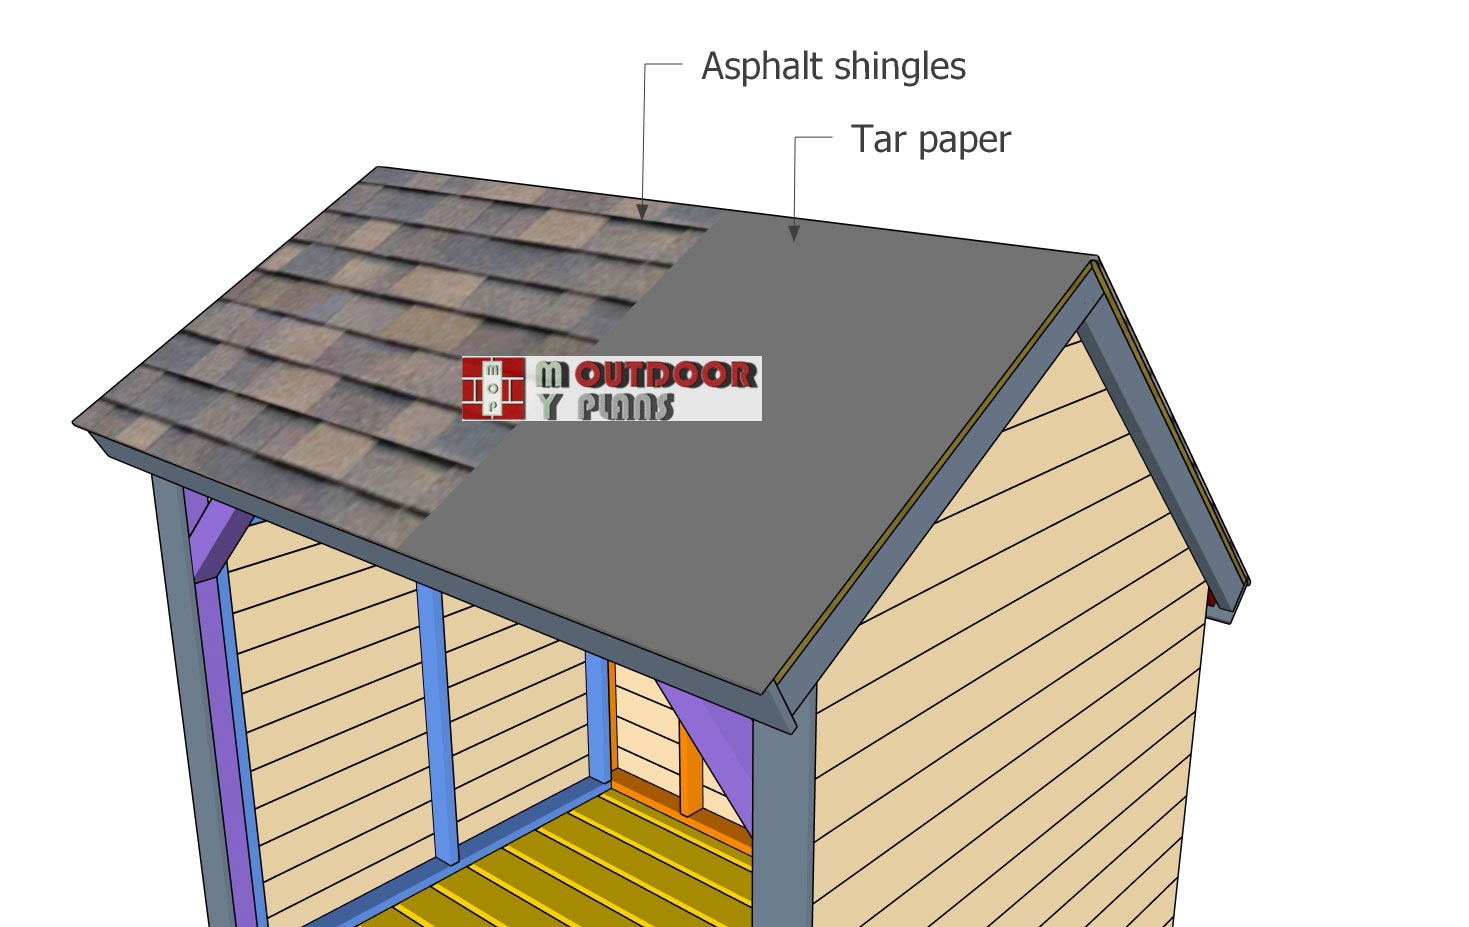
Fitting-the-roofing
Start by installing the drip edge along the lower eave of the roof. Cut the metal drip edge to size and secure it with roofing nails every 8 to 10 inches, ensuring it overlaps at the corners for proper water runoff. Next, roll out the roofing underlayment starting from the bottom edge, overlapping each row by at least 4 inches as you work your way up. Secure the underlayment with staples or roofing nails, making sure it lays flat without wrinkles. Once the underlayment is in place, install the drip edge along the sloped edges (rakes) of the roof, positioning it over the underlayment for maximum protection.
Now, it’s time to install the asphalt shingles. Start with a starter strip, cutting the tabs off a shingle and nailing it along the bottom edge of the roof, with a slight overhang past the drip edge. Lay the first row of shingles directly over the starter strip, aligning the bottom edges, and secure them with roofing nails, placing four to six nails per shingle just below the adhesive strip. Continue installing shingles in a staggered pattern, overlapping each row by about half a tab width. Work your way up the roof, ensuring each row covers the nails of the row below for proper waterproofing.
For the top ridge of the saltbox roof, cut shingles into ridge caps and bend them over the peak, securing each one with two nails on each side. Overlap the ridge caps as you go, working from the lower sloped side to the steeper side for better water shedding. Once all the shingles are installed, check for any loose nails and seal them with roofing cement if necessary. With the shingles in place, your shed roof is now fully protected from the elements, ensuring your firewood stays dry year-round.
Step 5: Finishing touches
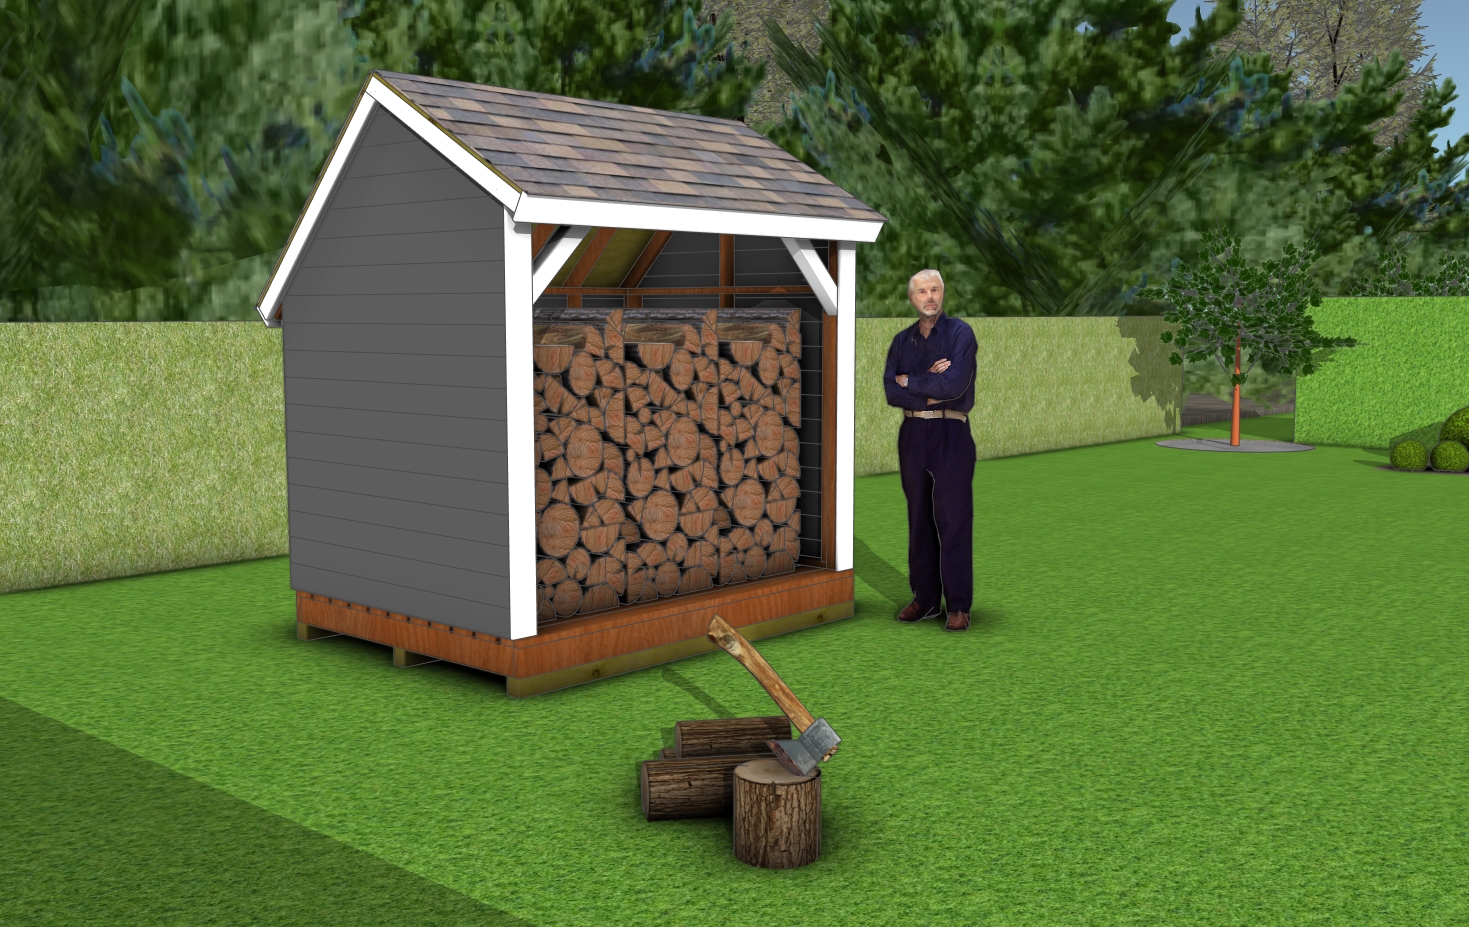
6×8 firewood shed
To give your firewood shed a clean and polished look, start by sanding any rough edges or splinters on the exposed wood surfaces. Use medium-grit sandpaper to smooth out the framing, slats, and any areas where the wood may have imperfections. Pay extra attention to the corners and edges to ensure a refined finish. This step not only enhances the appearance but also helps prevent splinters when handling firewood.
Next, inspect the wood for any visible gaps, knots, or screw holes that may need filling. Use an exterior-grade wood putty or filler to patch up these areas, allowing it to dry completely before sanding it smooth. This step helps create a more uniform surface, especially if you plan to paint or stain the shed. If desired, you can also apply a weather-resistant caulk along joints and seams for added protection against moisture.
For the final touch, apply a coat of exterior wood stain, paint, or sealant to protect the shed from the elements. Choose a weatherproof finish suited for outdoor structures to ensure durability. If using paint, consider applying a primer first for better adhesion and longevity. A natural wood stain will highlight the grain while adding a protective layer, while a solid-color paint can complement your outdoor space. Once dry, your firewood shed will not only look great but will also be well-protected for years to come.
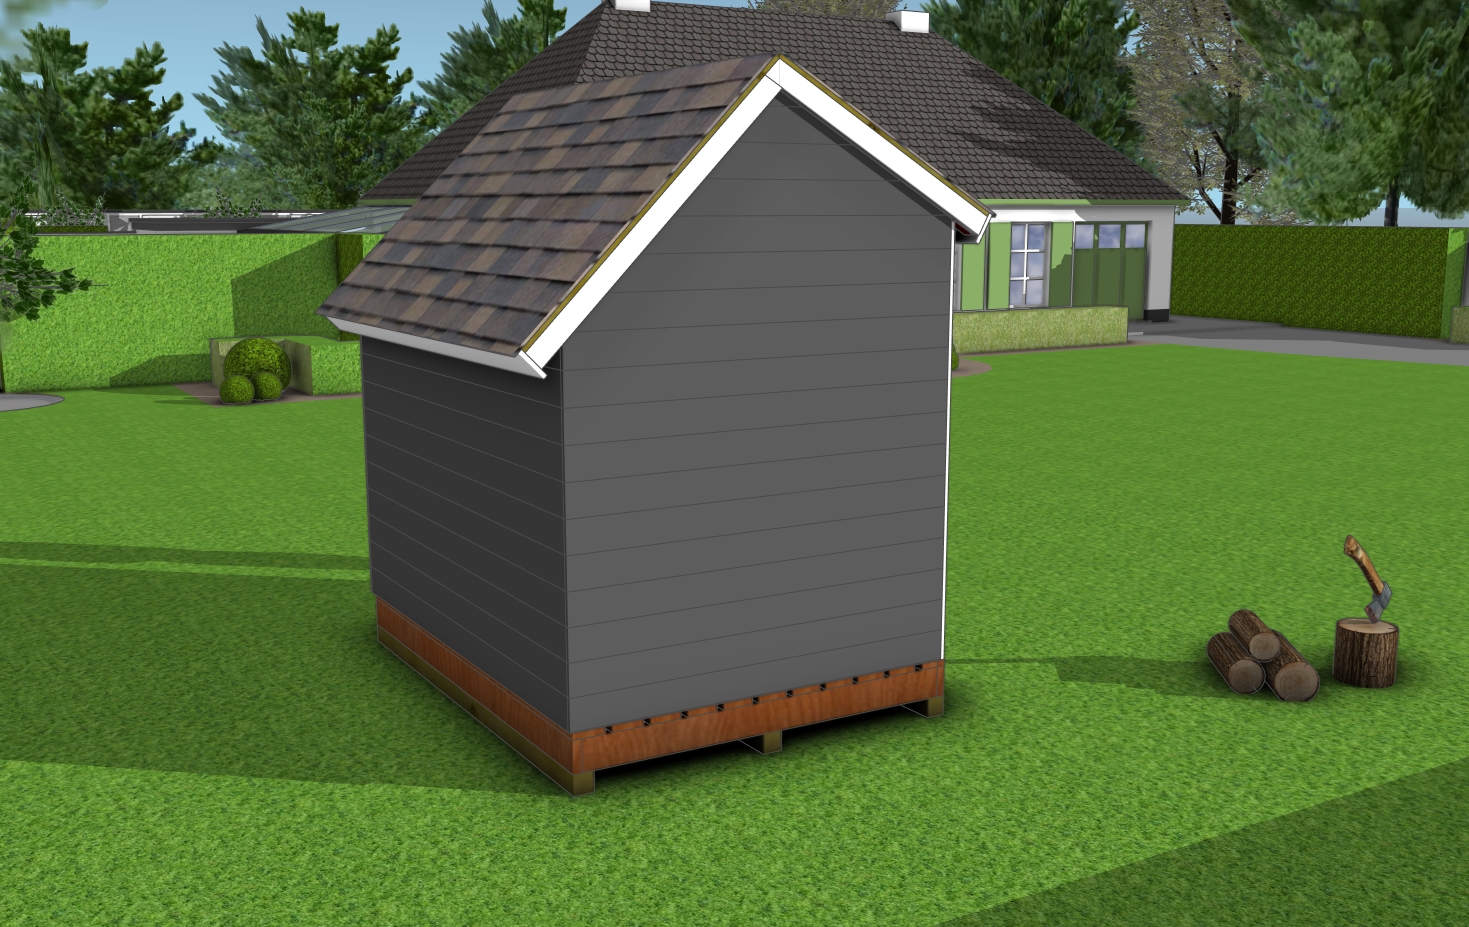
Firewood shed – back view
This 6×8 firewood shed is the perfect solution for keeping your firewood dry, organized, and easily accessible year-round. With its saltbox-style roof, open front design, and slatted walls, it allows for proper airflow while shielding the wood from rain and snow. Whether you rely on firewood for heating, outdoor bonfires, or backyard grilling, this shed ensures that your wood stays seasoned and ready to use whenever you need it.
To take this shed to the next level, consider adding a gravel base or concrete pavers underneath for better drainage and stability. You could also install hooks or small shelves inside to store kindling, fire-starting supplies, or even tools. For added weather protection, upgrading to a premium stain or sealant will extend the lifespan of the wood. No matter how you customize it, this firewood shed is a practical and stylish addition to any outdoor space, built to serve you for years to come.
If you enjoyed this build, be sure to check out PART 1, where I walk you through the step-by-step process of constructing the floor and roof. It’s the foundation that set the stage for this entire project, and you won’t want to miss those key details!
This woodworking project was about 6×12 modern wood shed roof plans. If you want to see more outdoor plans, check out the rest of our step by step projects and follow the instructions to obtain a professional result.
