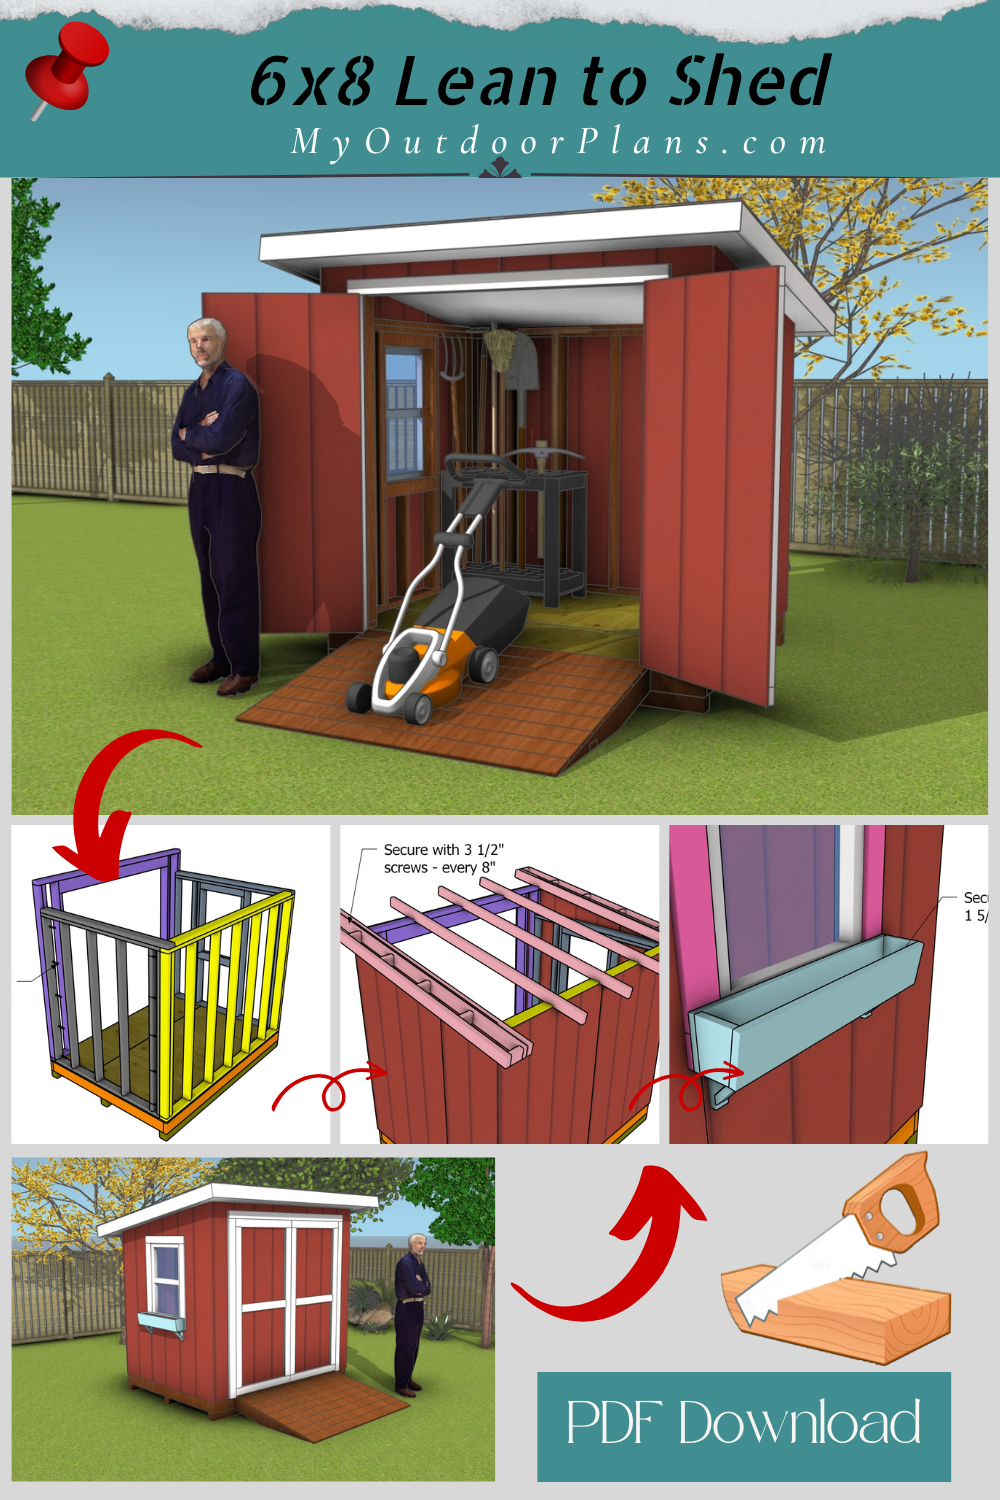
Looking to maximize your storage space with a compact yet functional shed? These 6×8 lean-to shed plans has you covered! Featuring a sleek design, double 6-foot-wide doors for easy access, and a side window to let in natural light, this shed is as practical as it is stylish. Whether you need a place to store garden tools, outdoor equipment, or seasonal items, this build strikes the perfect balance between efficiency and aesthetics.
Designed for DIYers of all skill levels, this project is straightforward to build, and its lean-to design makes it perfect for tight spaces. With detailed instructions and a clean layout, you’ll have a sturdy and attractive shed ready to serve your needs in no time!
Building this 6×8 lean-to shed is not only a rewarding DIY project but also a smart investment for your property. With materials like lumber, hardware, siding, and roofing, the total cost can range from $500 to $1,000, depending on local prices and the finishes you choose. In terms of time, most DIYers can complete this project over a weekend, with 10–15 hours of focused work. The addition of this shed provides valuable storage space, keeping your yard organized while protecting tools and equipment from the elements. Plus, its stylish design and practical features, like double doors and a window, enhance the functionality and curb appeal of your property, making it a win-win for homeowners.
When buying the lumber, you should select the planks with great care, making sure they are straight and without any visible flaws (cracks, knots, twists, decay). Investing in cedar or other weather resistant lumber is a good idea, as it will pay off on the long run. Use a spirit level to plumb and align the components, before inserting the galvanized screws, otherwise the project won’t have a symmetrical look. If you have all the materials and tools required for the project, you could get the job done in about a day. See all my Premium Plans HERE.
Projects made from these plans
6×8 Lean to Shed Plans
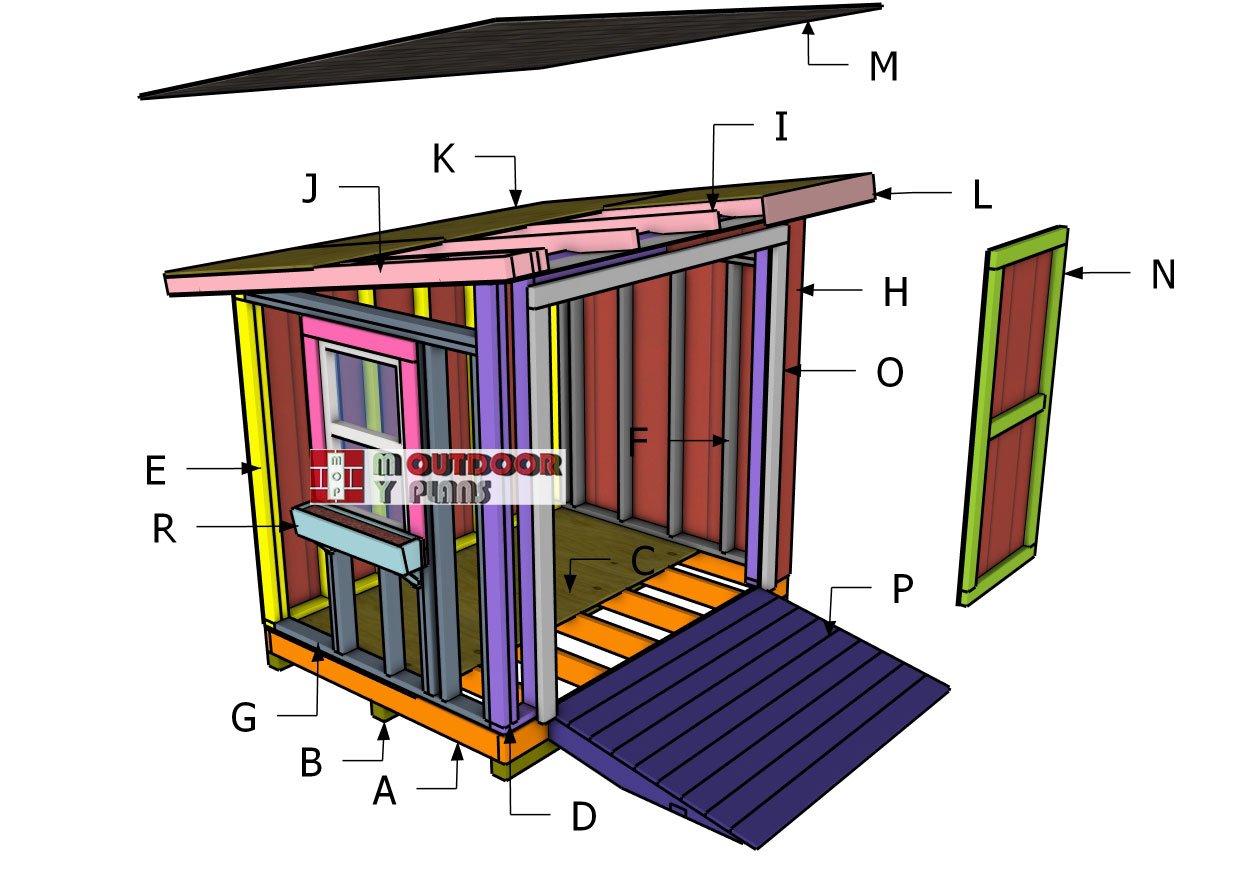
Building-a-6×8-lean-to-shed
Cut + Shopping Lists
- A – FLOOR FRAME – 2×6 lumber 96″ – 2 pieces
- A – FLOOR FRAME – 2×6 lumber 69″ – 7 pieces
- B – SKIDS – 4×4 lumber 96″ – 3 pieces
- C – FLOOR – 3/4″ plywood 4’x8′ – 1 piece
- C – FLOOR – 3/4″ plywood 2’x8′ – 1 piece
- D – FRONT WALL – 2×4 lumber 96″ – 1 piece
- D – FRONT WALL – 2×4 lumber 12″ – 2 pieces
- D – FRONT WALL – 2×4 lumber 84″ – 6 pieces
- D – FRONT WALL – 2×4 lumber 78 1/2″ – 2 pieces
- D – FRONT WALL – 2×6 lumber 75″ – 2 pieces
- E – BACK WALL – 2×4 lumber 96″ – 2 pieces
- E – BACK WALL – 2×4 lumber 71 1/8″ – 9 pieces
- E – BACK WALL – 2×4 lumber 89″ – 1 piece
- F – SIDE WALL – 2×4 lumber 65″ – 2 pieces
- F – SIDE WALL – 2×4 lumber 68 1/2″ – 1 piece
- F – SIDE WALL – 2×4 lumber 71 1/8″ – 6 pieces
- G – SIDE WALL 2 – 2×4 lumber 65″ – 2 pieces
- G – SIDE WALL 2 – 2×4 lumber 68 1/2″ – 1 piece
- G – SIDE WALL 2 – 2×4 lumber 71 1/8″ – 6 pieces
- G – SIDE WALL 2 – 2×4 lumber 28 1/8″ – 3 pieces
- G – SIDE WALL 2 – 2×4 lumber 36″ – 2 pieces
- G – SIDE WALL 2 – 2×4 lumber 27″ – 4 pieces
- H – SIDING – 5/8″ T1-11 siding sheets 4’x75″ – 2 pieces
- H – SIDING – 5/8″ T1-11 siding sheets 4’x91 1/4″ – 2 pieces
- H – SIDING – 5/8″ T1-11 siding sheets 4’x83 1/4″ – 2 pieces
- H – SIDING – 5/8″ T1-11 siding sheets 4’x87 3/4″ – 2 pieces
- I – RAFTERS – 2×4 lumber 96″ – 5 pieces
- 4×4 lumber 8 ft – 3 pieces
- 2×6 PT lumber 8 ft – 2 pieces
- 2×6 lumber 8 ft – 2 pieces
- 2×6 PT lumber 10 ft – 1 piece
- 2×6 PT lumber 12 ft – 4 pieces
- 2×4 lumber 8 ft – 27 pieces
- 2×4 lumber 10 ft – 2 pieces
- 2×4 lumber 12 ft – 16 piece
- 1×6 lumber 8 ft – 3 pieces
- 1×6 lumber 10 ft – 3 pieces
- 1×6 lumber 12 ft – 4 pieces
- 1×4 lumber 12 ft – 1 piece
- 1×2 lumber 4 ft – 1 piece
- 5/8″ T1-11 siding 4’x8′ – 7 pieces
- 3/4″ plywood 4’x8′ – 4 pieces
- 3/4″ plywood 2’x8′ – 1 piece
- 1/2″ plywood 4’x8′ – 1 piece
- 2×6 joist hanger – 3 pieces
- rafter ties – 12 pieces
- double shed door hardware – 1 kit
- tar paper, asphalt shingles – 100 sq ft
- drip edges – 40 ft
- 16″x16″x1 3/4″ concrete pad block – 3 pieces
- 1 box of 1 1/2″ structural screws / nails
- 3 1/2″ screws – 500 pieces
- 2 1/2″ screws – 200 pieces
- 1 5/8″ screws – 500 pieces
- 8d nails – 200 pieces
- 12d nails – 10 pieces
- 1 can of outdoor glue
- 1 can of wood putty
- 2 cans of paint / stain
- shed window – 24″x36″
Tools
![]() Hammer, Tape measure, Framing square, Level, Shovel
Hammer, Tape measure, Framing square, Level, Shovel
![]() Miter saw, Drill machinery, Screwdriver, Sander
Miter saw, Drill machinery, Screwdriver, Sander
![]() Safety Gloves, Safety Glasses
Safety Gloves, Safety Glasses
Time
![]() One weekend
One weekend
Related
- PART 1: 6×8 Lean to Shed Plans
- PART 2: 6×8 Lean to Shed Roof Plans
- 4×8 Lean to Shed Plans
- 16×20 Lean to Shed Plans
It’s that easy to build a garden shed – Video!
Pin it for later!
Step 1: Building the shed floor
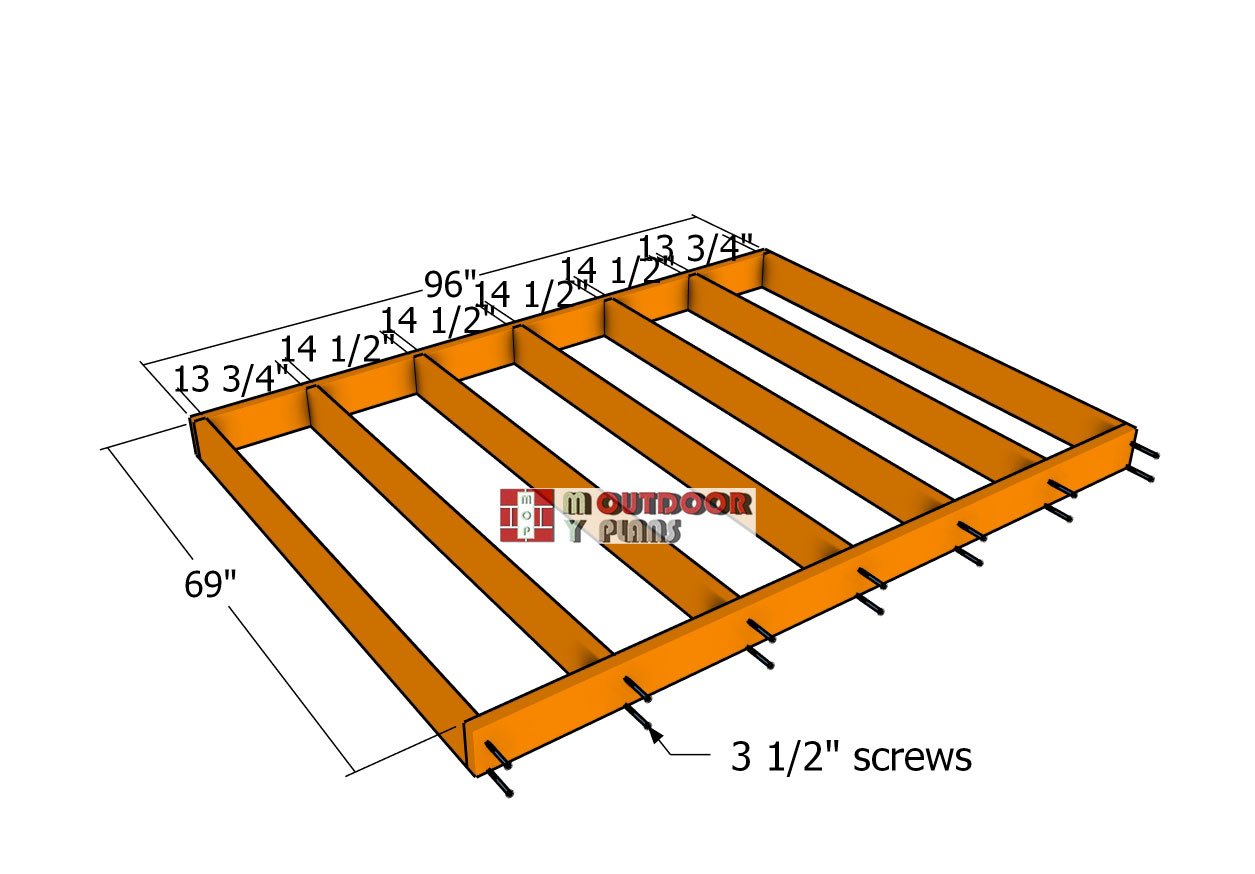
Floor-frame
The first step in building your shed is crafting a sturdy floor frame, it’s the foundation of your project, so let’s get it done right. Start by cutting the joists from 2×6 lumber and laying them out on a nice, level surface. Drill pilot holes through the rim joists and attach them to the perpendicular joists using 3 1/2″ screws. This will lock everything together nice and snug.
Make sure to space the joists 16 inches apart, on center, to provide solid support. Here’s a pro tip: measure the diagonals to check for square, and adjust until they’re equal. Taking the time to square up now will save you headaches later and set you up for success in the next steps.
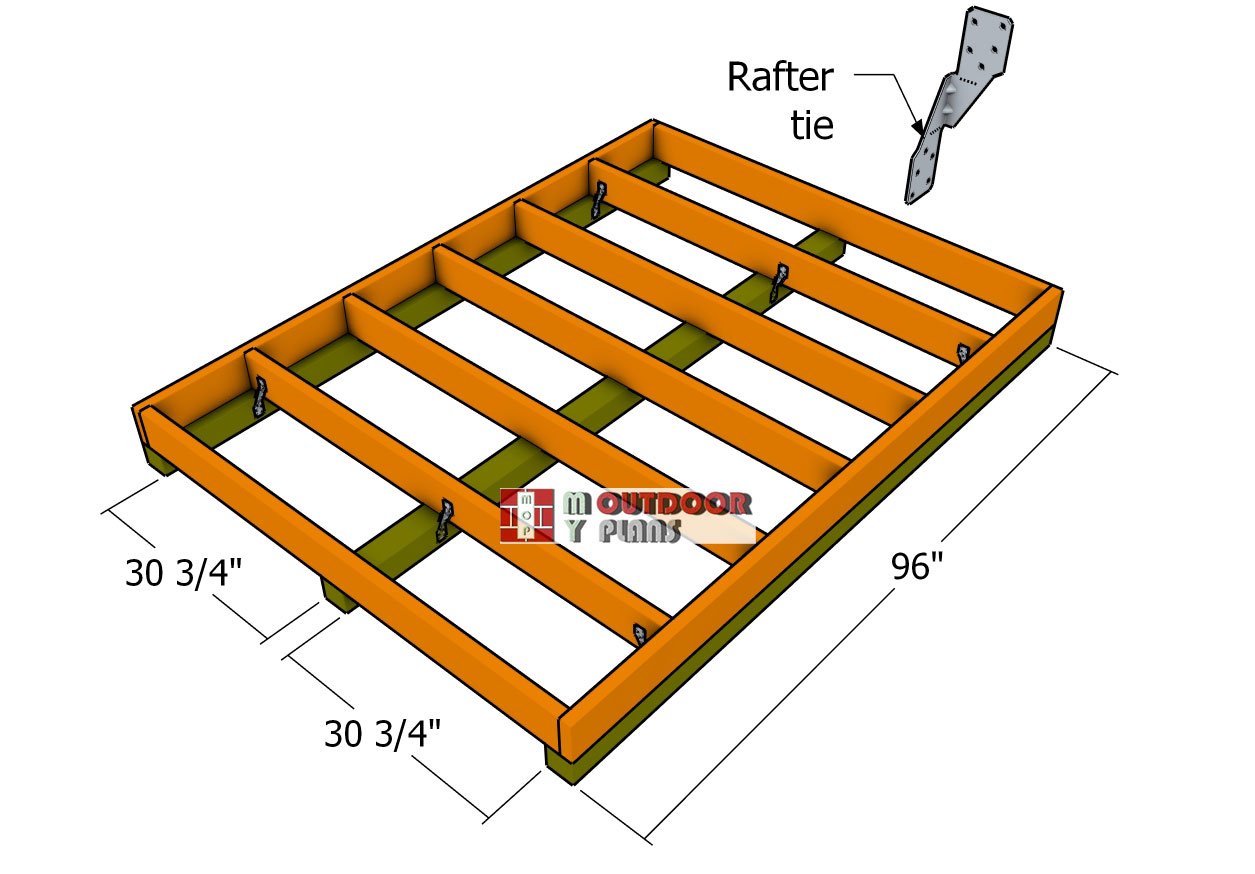
Fitting-the-skids
Next up, it’s time to install the 4×4 skids beneath the floor frame—these will give your shed a rock-solid foundation. Slide the skids into position, making sure they’re aligned properly, and secure them in place with rafter ties and 1 1/2″ structural screws.
For maximum stability, attach two ties to each skid, one at each end, following the layout shown in your diagram. This step is key to ensuring your shed has a stable and durable foundation that’s built to last. Take your time here, and you’ll set the stage for a structure that can handle anything Mother Nature throws its way!
Floor-sheets
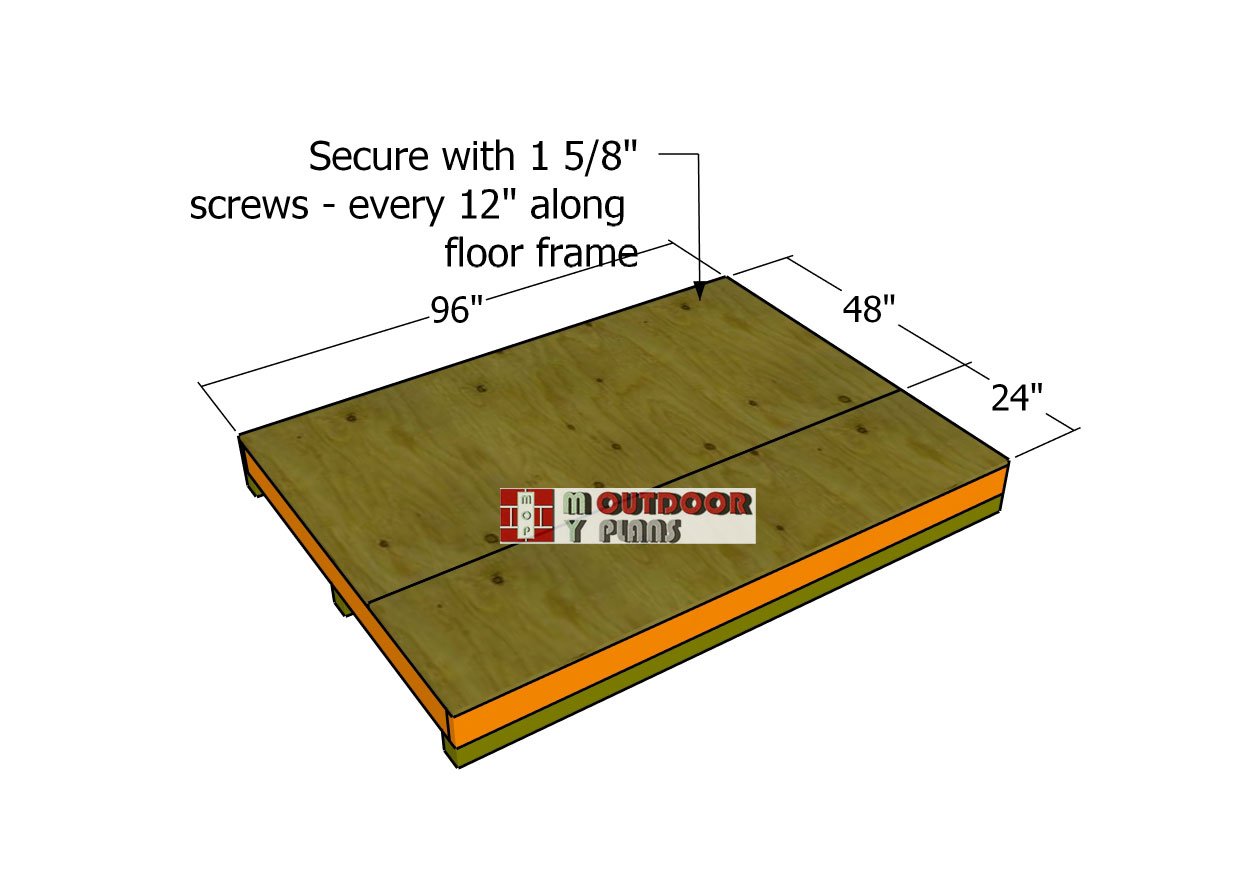
Now it’s time to deck out the floor frame with a 3/4″ plywood sheet to create a rock-solid base. Position the plywood carefully, ensuring the edges are perfectly flush with the frame. Once it’s lined up, secure the plywood using 1 5/8″ screws, spaced about 8 inches apart along the framing.
This step not only locks everything together but also gives you a durable and smooth platform to build on. A sturdy floor now means a reliable foundation for the rest of your shed—time well spent!
Step 2: Building the shed walls
Front wall frame
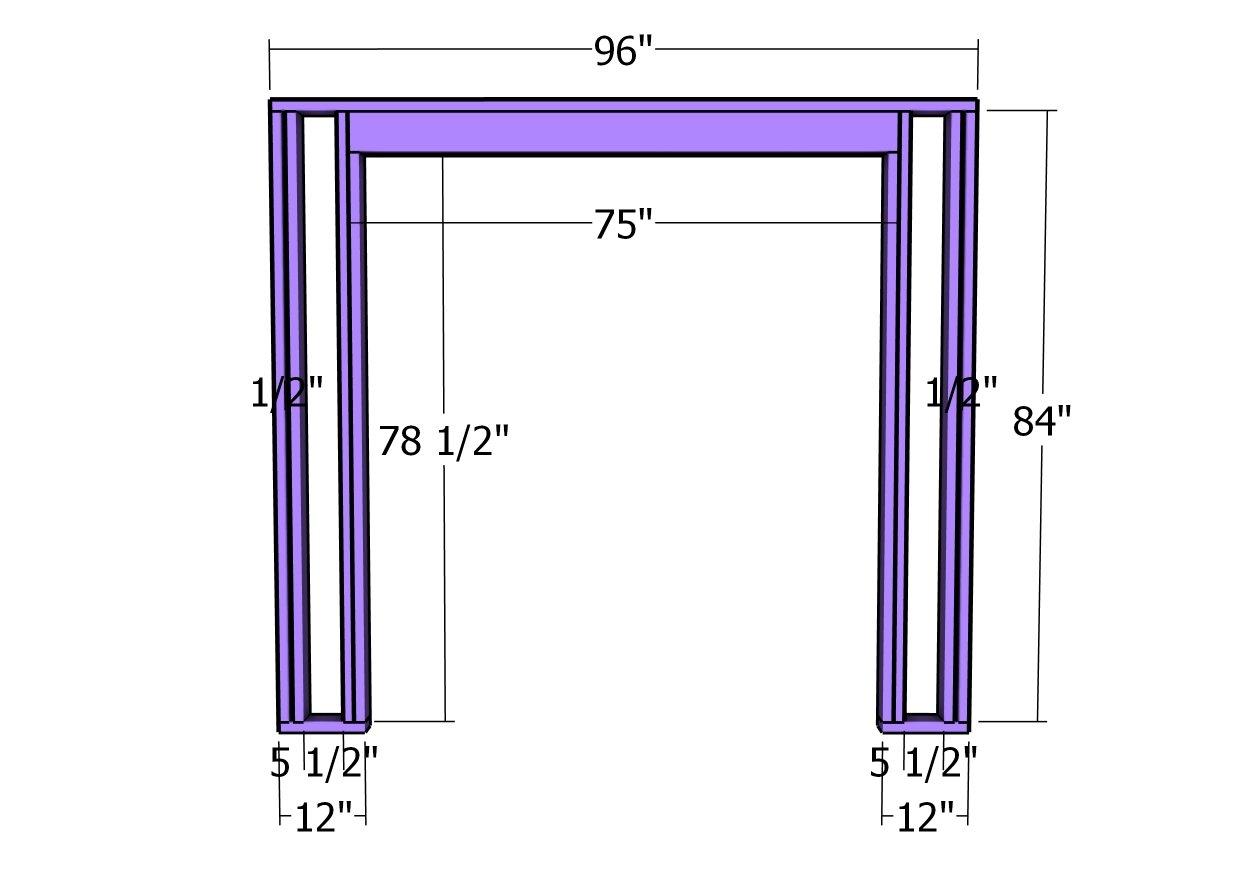
Next, let’s move on to assembling the wall frames, starting with the front wall. Use 2×4 lumber for the plates and studs, and 2×6 lumber for the double header to ensure added strength. Drill pilot holes through the plates and secure the studs with 3 1/2″ screws. This keeps everything nice and tight for a solid frame. Notice the 1/2″ gaps between the double studs. You can fit pieces of 1/2″ plywood to make sure you keep the gaps even.
Once the frame is assembled, fit the double header into position at the top of the wall and toenail it into place using 12d nails. This extra reinforcement sets the stage for a sturdy structure that’s built to last!
Double-header—doors
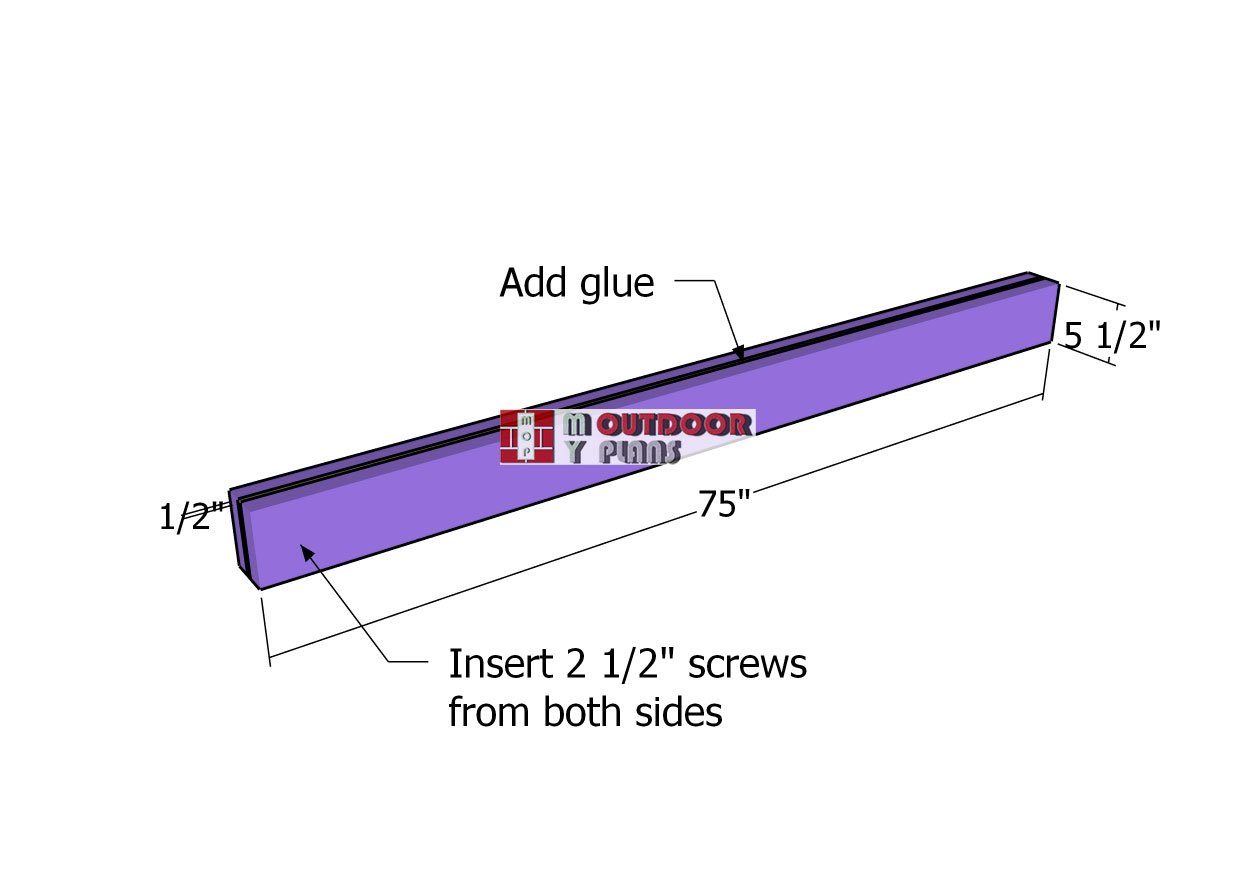
To assemble the double header, sandwich a piece of 1/2″ plywood between two 2×6 beams for added strength and stability. Apply a generous amount of wood glue to the joints to create a solid bond, then secure the layers together by driving 2 1/2″ screws through both sides.
This method ensures the header is tightly joined and ready to handle the load above it, giving your shed a strong and reliable frame.
Back-wall-frame
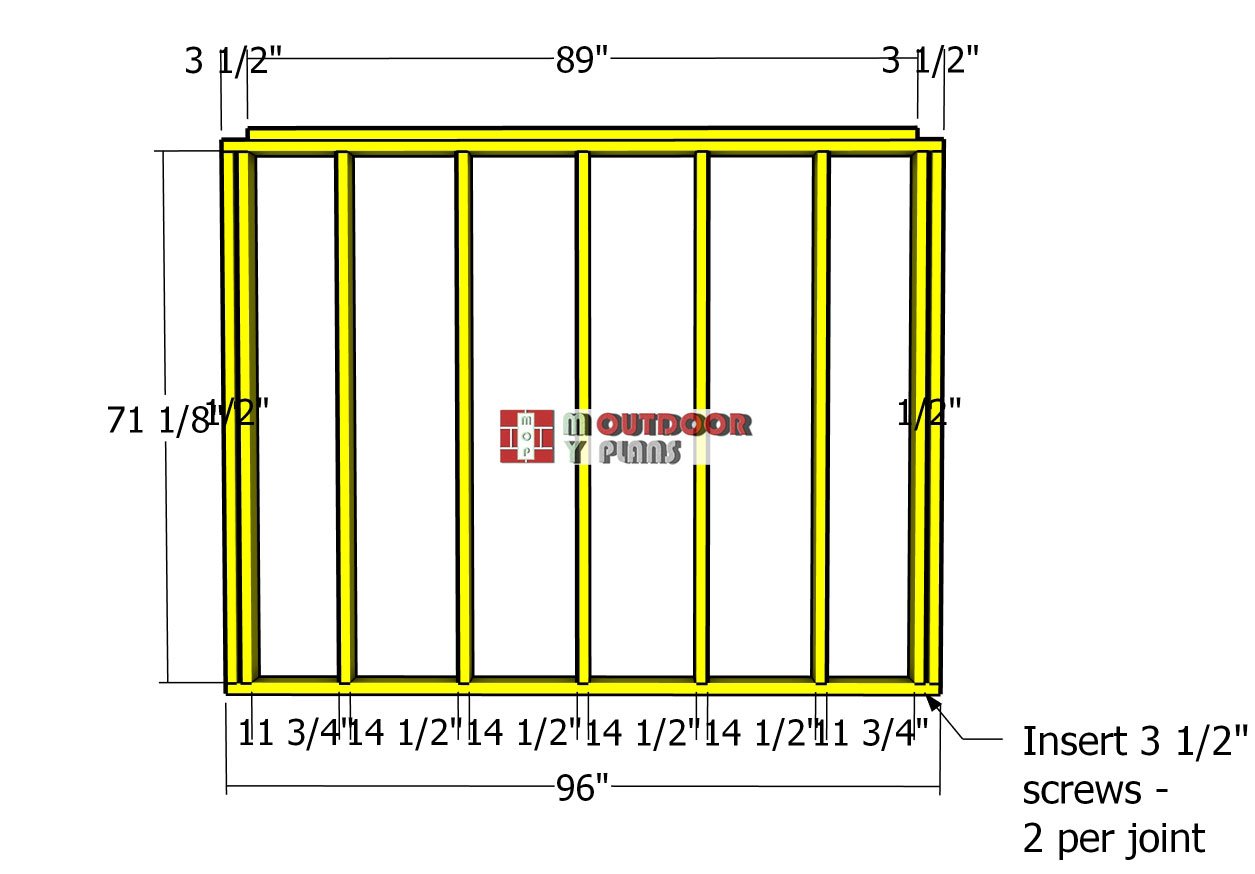
Next, let’s tackle the opposite wall for your lean-to storage shed. Begin by cutting and laying out the studs, ensuring they’re spaced 16 inches on center to maintain proper support. Use the same process as before: drill pilot holes through the top and bottom plates, and attach the studs securely with 3 1/2″ screws. Notice the 1/2″ gaps between the double studs. You can fit pieces of 1/2″ plywood to make sure you keep the gaps even.
Once the frame is complete, add a double top plate to reinforce the structure and distribute weight evenly. This consistent spacing and solid construction will give your shed a sturdy, reliable framework that’s ready for the next steps.
Fitting the wall frames
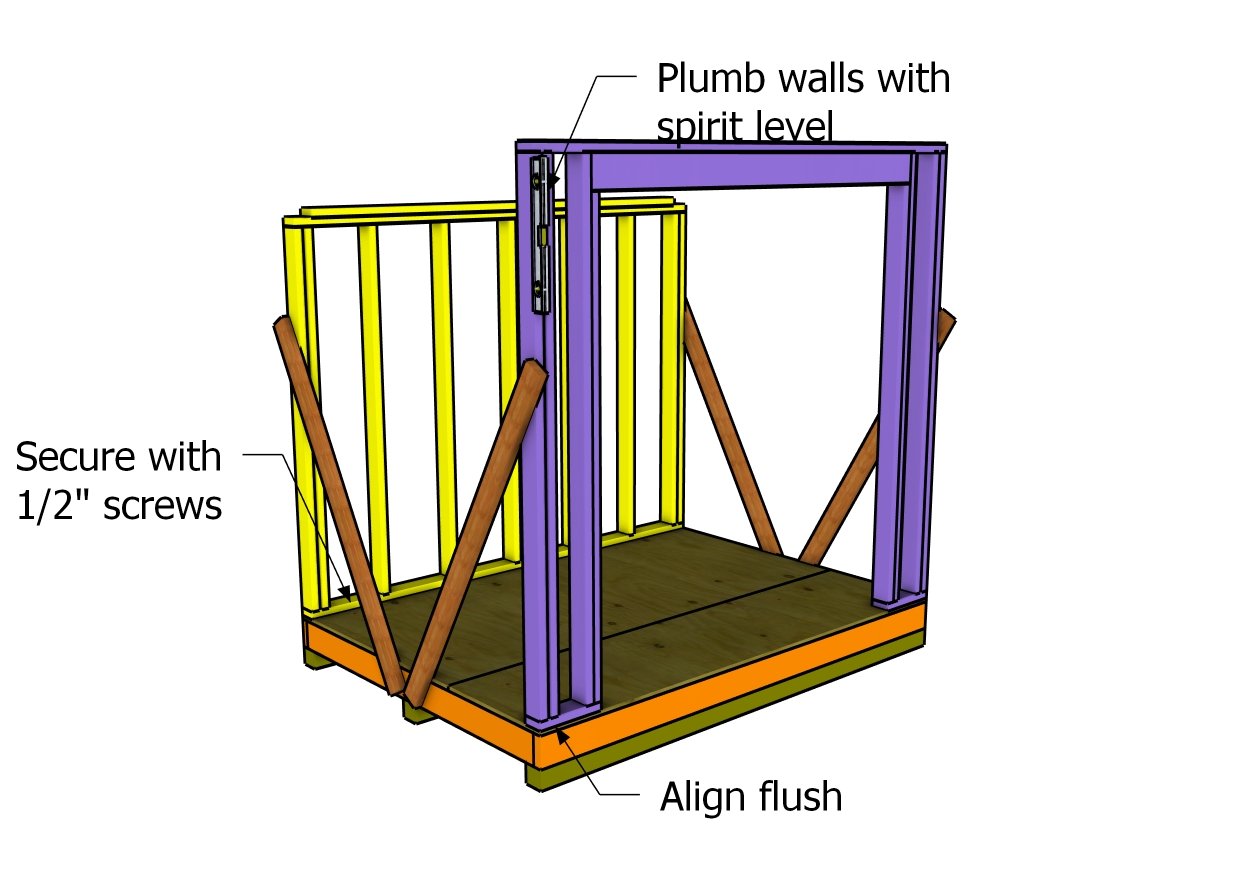
Now it’s time to raise the wall frames and set them in position on the shed’s floor. Carefully align the edges of each wall so they’re flush with the exterior edges of the floor frame. Use a spirit level to make sure the walls are plumb—this step is crucial for a straight and sturdy structure.
Once everything is lined up perfectly, drill pilot holes through the bottom plates and secure the walls in place with 3 1/2″ screws. This will lock the frames tightly and ensure your shed’s walls are stable, secure, and ready for the next phase of construction.
Side-wall-with-window-frame
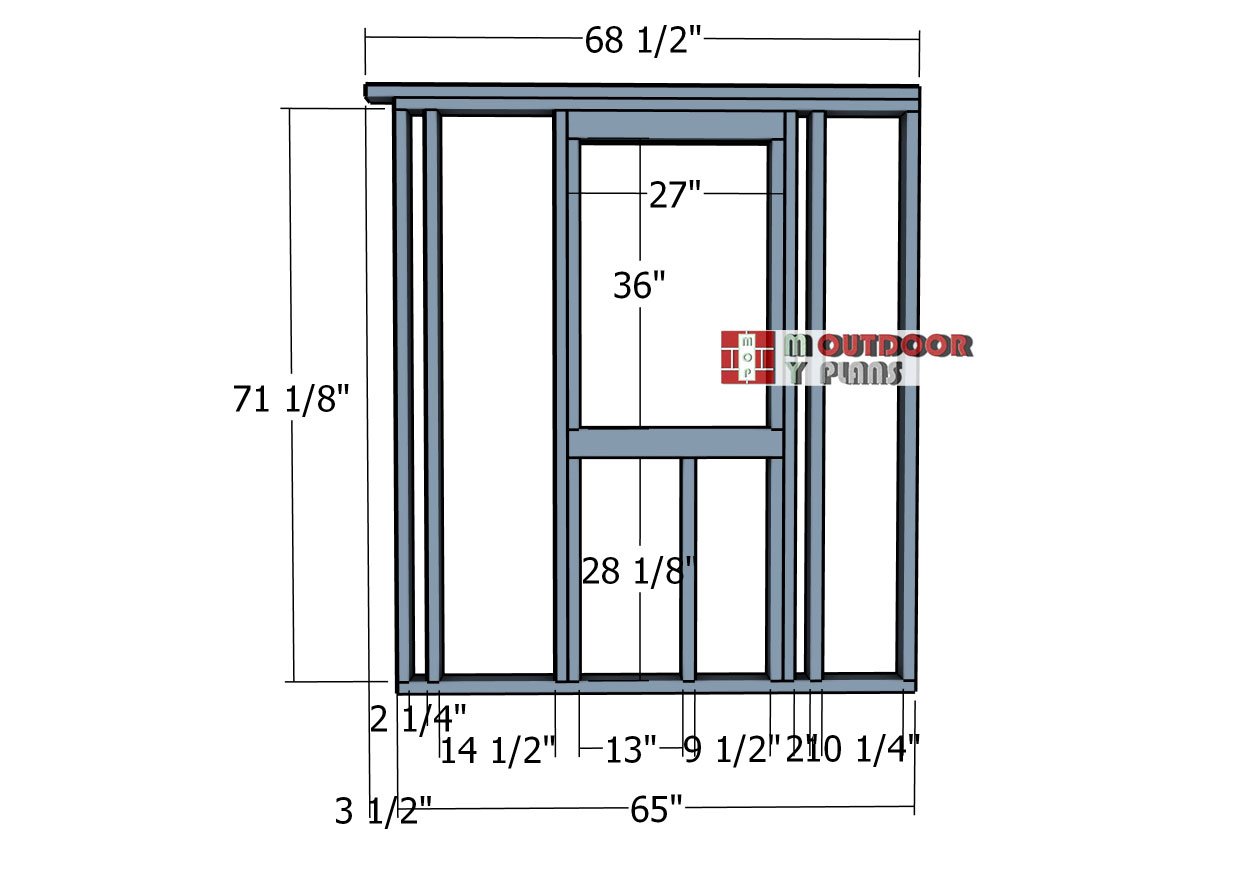
Next, let’s assemble the side wall with a window for your shed. Use 2×4 lumber for the studs and plates, and lay out the components on a level surface to ensure accuracy. Drill pilot holes through the top and bottom plates, then secure the studs with 3 1/2″ screws for a strong connection.
When framing the window opening, adjust its size to fit your specific needs or window dimensions. This customization gives you flexibility while maintaining a solid structure that’s ready for the next steps.
Double-header-for-window
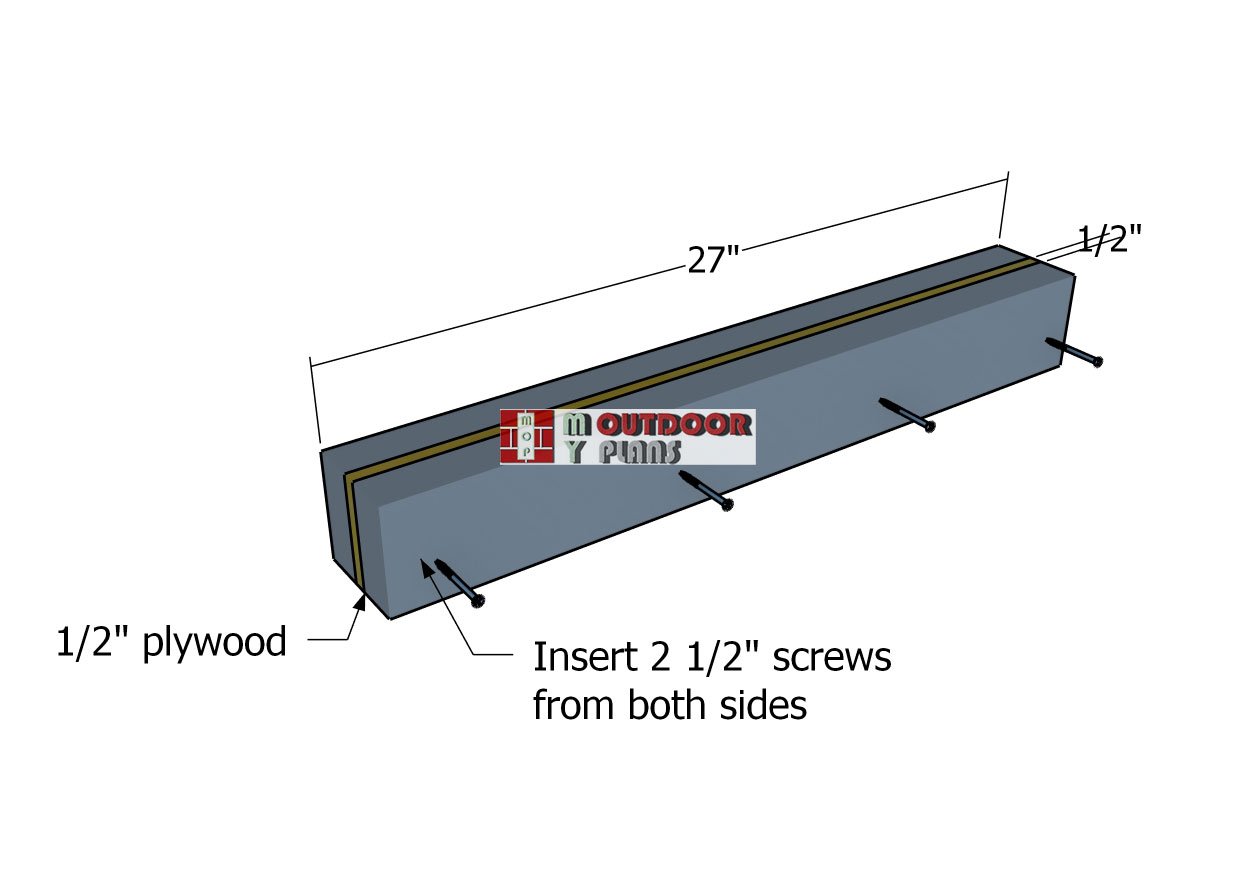
To construct the double headers, sandwich a piece of 1/2″ plywood between two 2x4s to create a strong and sturdy beam. Apply wood glue along the joints for extra strength, and carefully align the edges to ensure everything is perfectly even.
Secure the layers by driving 2 1/2″ screws through both sides of the double header. This reinforced design is built to handle the load above and will provide reliable support for the opening in the front wall of your shed.
Side-wall-frame
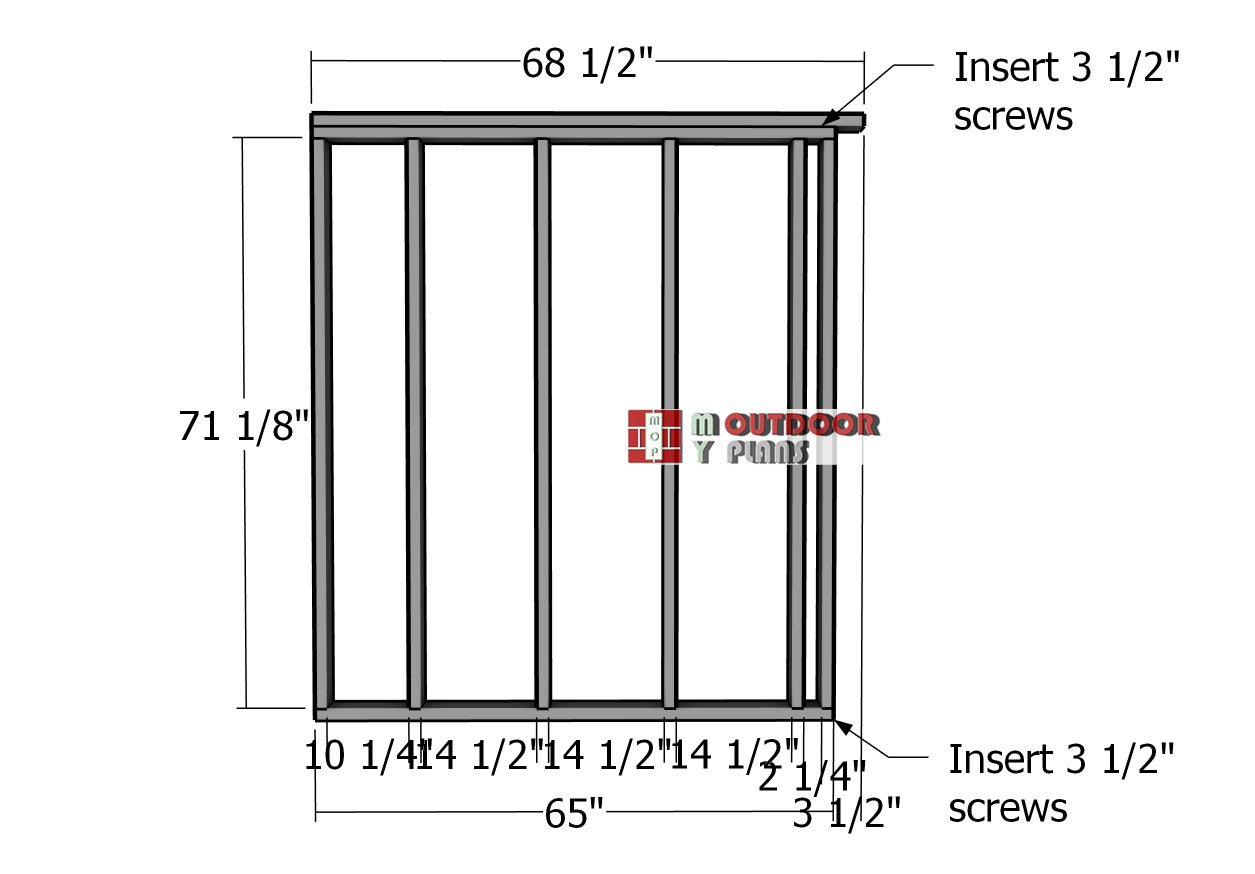
Next, it’s time to build the opposite side wall. This wall frame follows the same construction process as the other side wall but without a window opening. Use 2×4 lumber for the studs and plates, and assemble the frame on a level surface. Drill pilot holes through the plates and secure the studs with 3 1/2″ screws.
If you’d like to let more natural light into the shed, you can easily add a window here by adjusting the framing to include an opening. This flexibility allows you to customize the shed to better suit your needs!
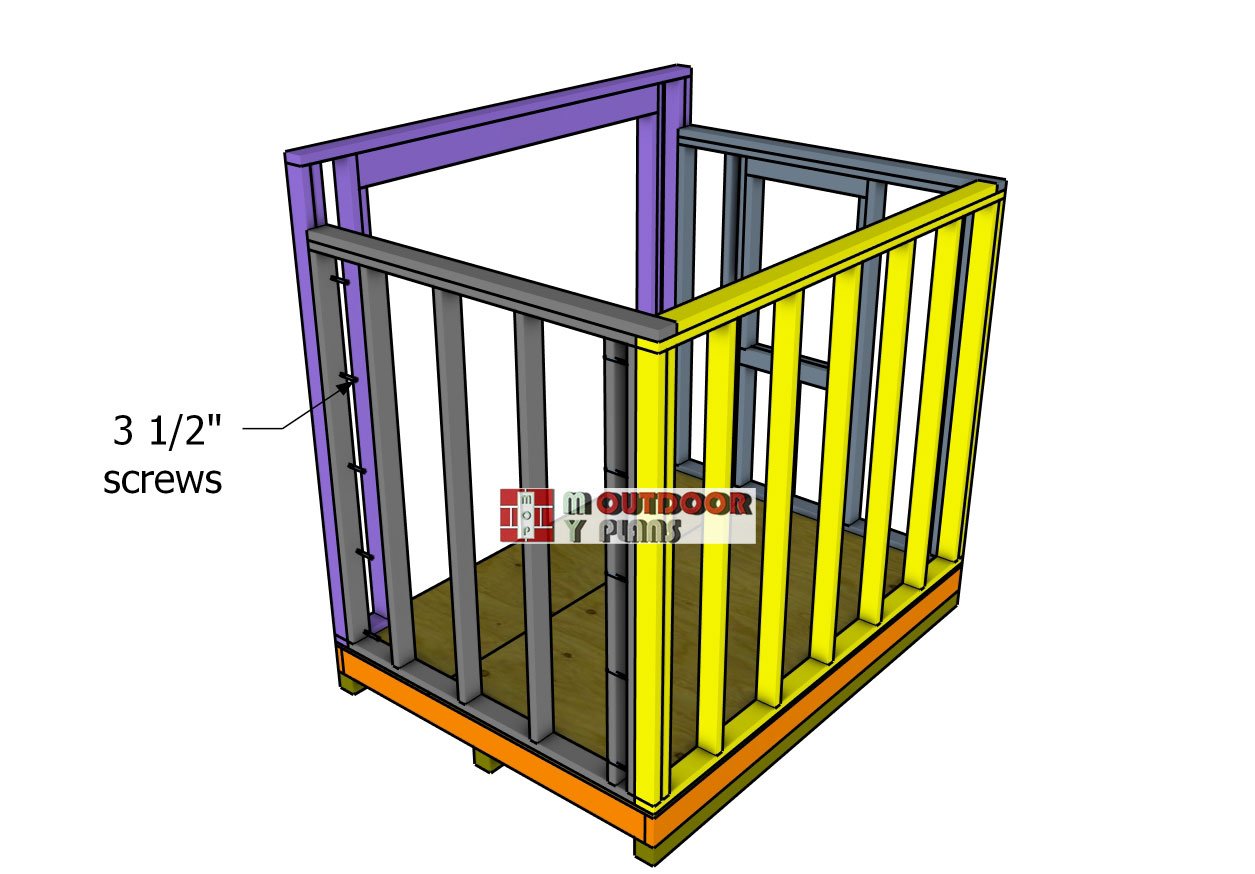
Fitting-the-side-frames
Lay the side wall frames onto the shed floor, making sure the edges align perfectly with the floor and the adjacent walls. Take your time to double-check the positioning for accuracy.
Once everything is properly aligned, drill pilot holes through the bottom plates and into the floor frame. Secure the walls firmly using 3 1/2″ screws, attaching them both to the floor and the neighboring wall frames. This step locks everything together, creating a solid and secure structure that’s ready to stand the test of time.
Step 3: Building the roof
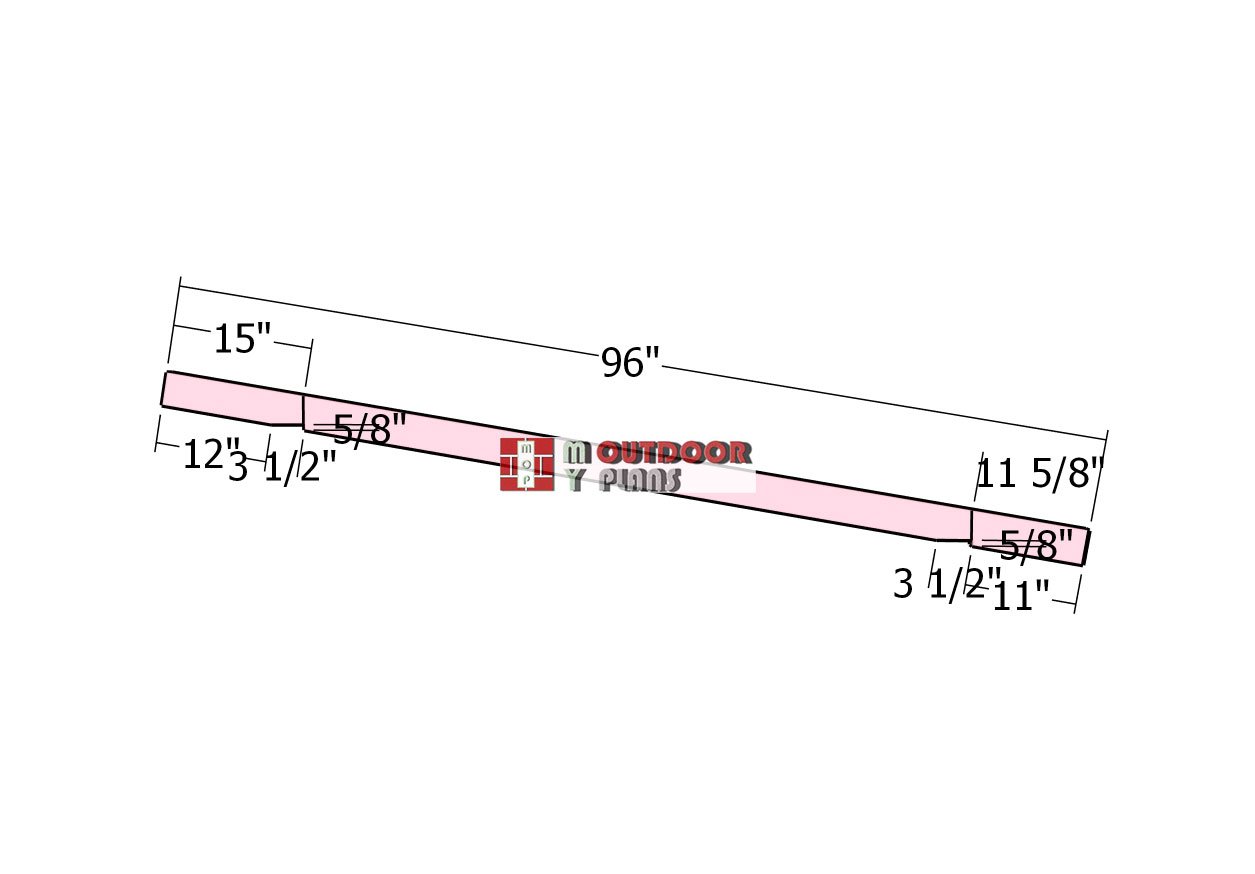
Rafters
Use 2×4 lumber to craft the rafters for your small garden shed. Begin by marking the cut lines on the boards according to your measurements, ensuring precision for a perfect fit. Once marked, make the cuts using a circular saw, taking care to follow the lines closely.
After cutting, smooth the edges with sandpaper to remove splinters and create a clean, flush finish. This attention to detail will make assembly easier and ensure the rafters fit together seamlessly for a polished, professional result.
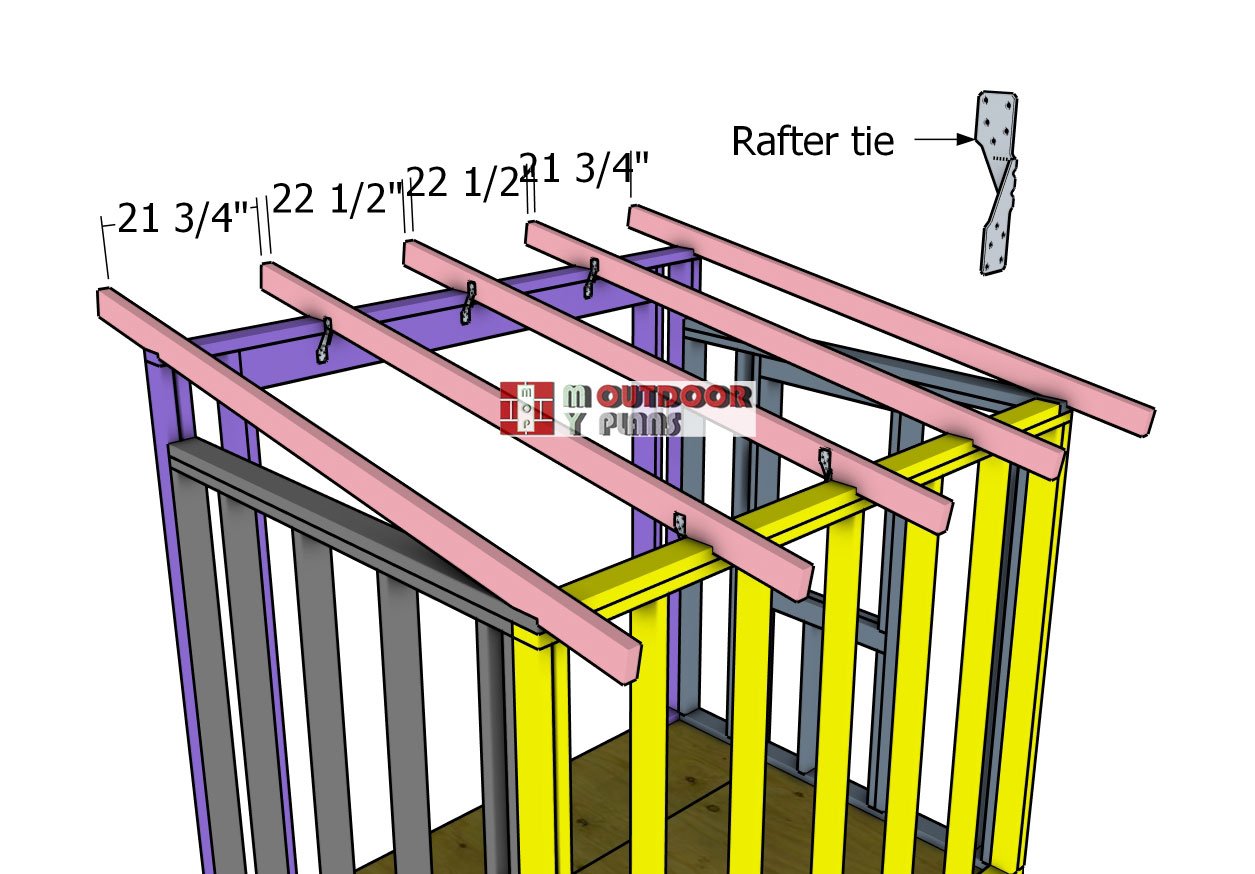
Fitting-the-rafters
Attach the rafters to the top of the shed, spacing them 24″ on center (OC) for proper support. Use rafter ties to secure the rafters to the top plates, fastening them with 1 1/2″ structural nails or screws to ensure a strong connection.
For the end rafters, take extra care to reinforce the attachment. Drill pilot holes through the rafters and drive in 5 1/2″ screws to lock them firmly in place. This method ensures the entire roof structure is sturdy, durable, and ready to handle the elements.
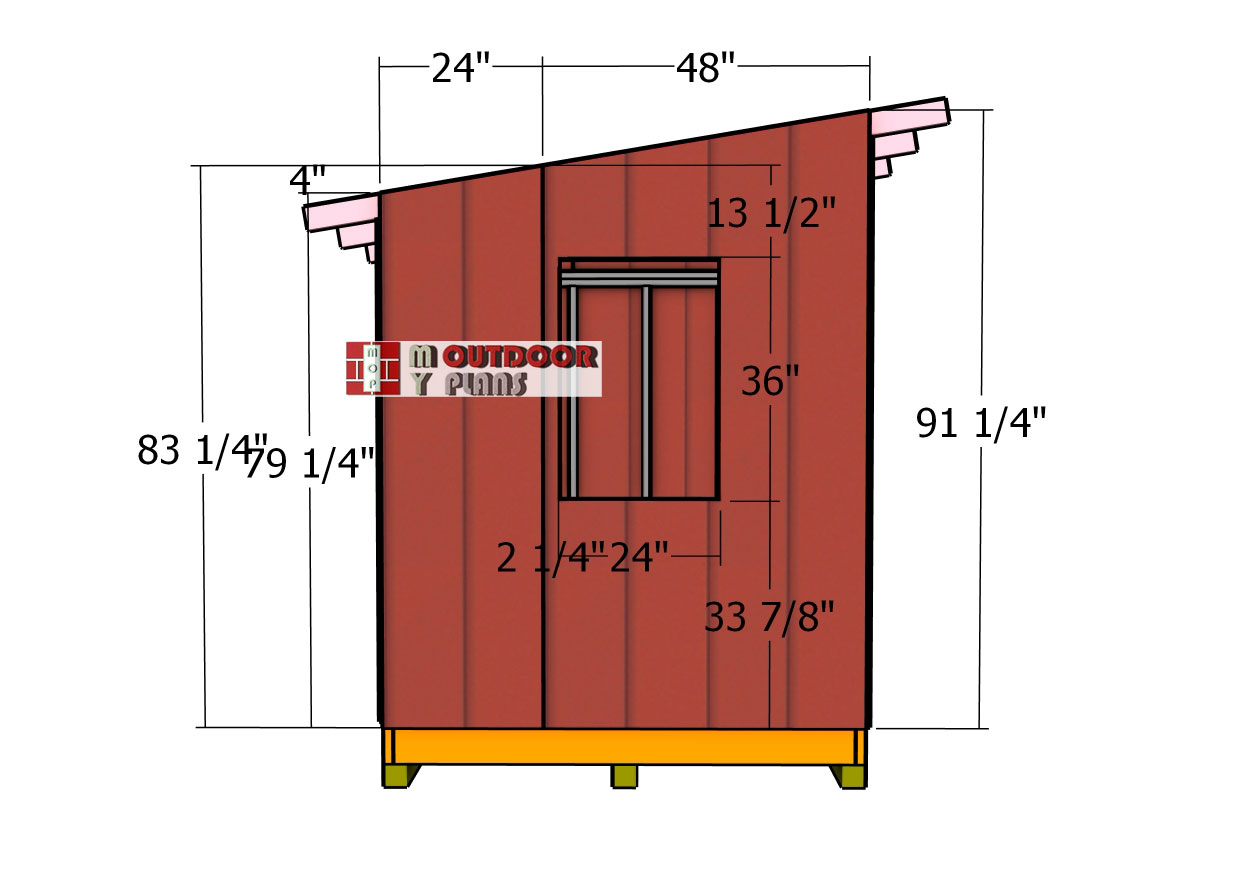
Side-panels
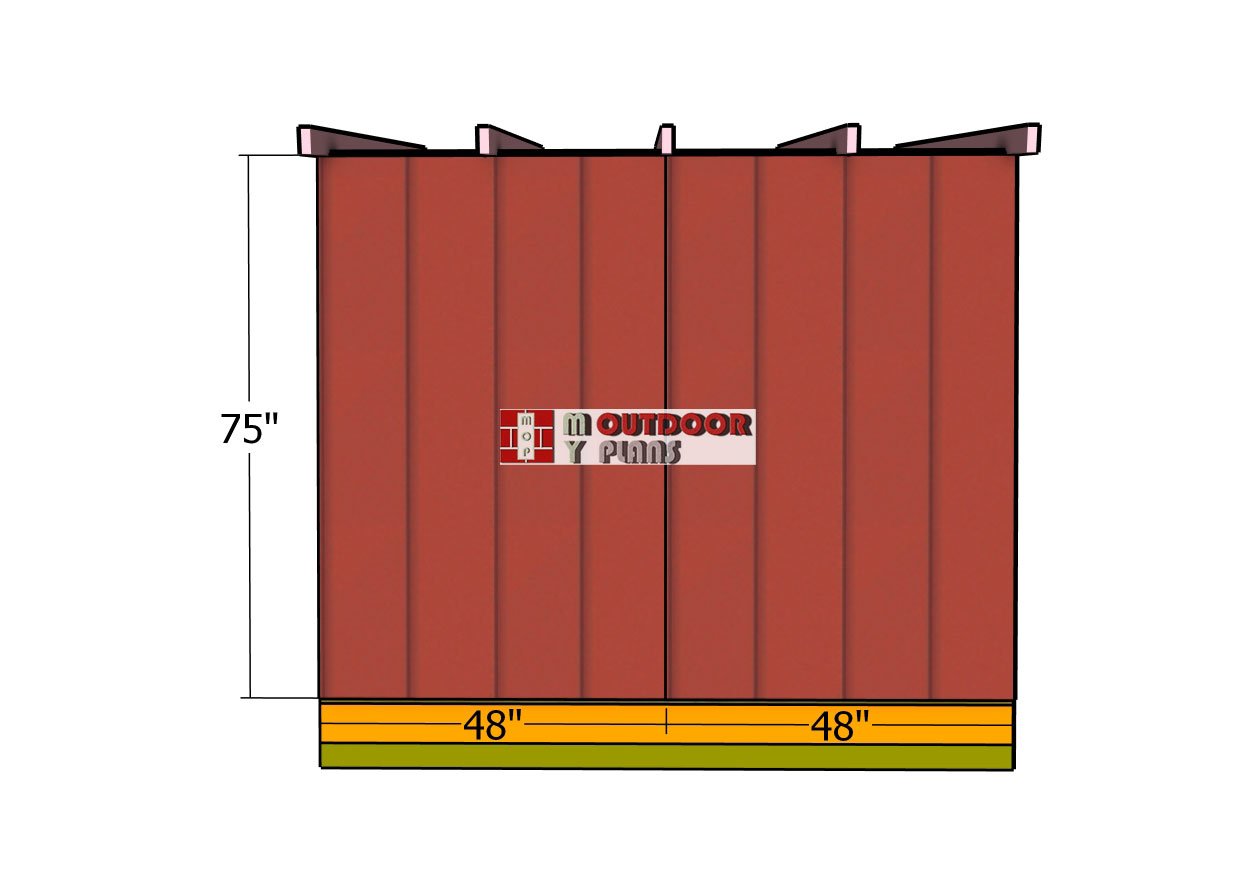
Installing T1-11 siding sheets on the side walls of your shed is a straightforward process that enhances both durability and style. Start by cutting the sheets to fit the dimensions of the walls, ensuring precise cuts for a clean look. Align the siding panels so the grooves run vertically, and make sure the edges are flush with the corners of the frame. Secure the siding with 1 5/8″ galvanized screws or 8d nails, spacing them every 8 inches along the framing for a tight hold.
Before attaching the panels, mark and cut out the opening for the window using a jigsaw for clean edges.
Back-wall-panels
Fit the panels to the back of the shed as well. T1-11 siding is an excellent choice for small sheds because it’s durable, cost-effective, and easy to install, making it perfect for DIY projects. Its vertical grooves give the shed a clean, rustic look while also providing reliable protection against the elements when properly sealed and maintained.
Front-wall-panels
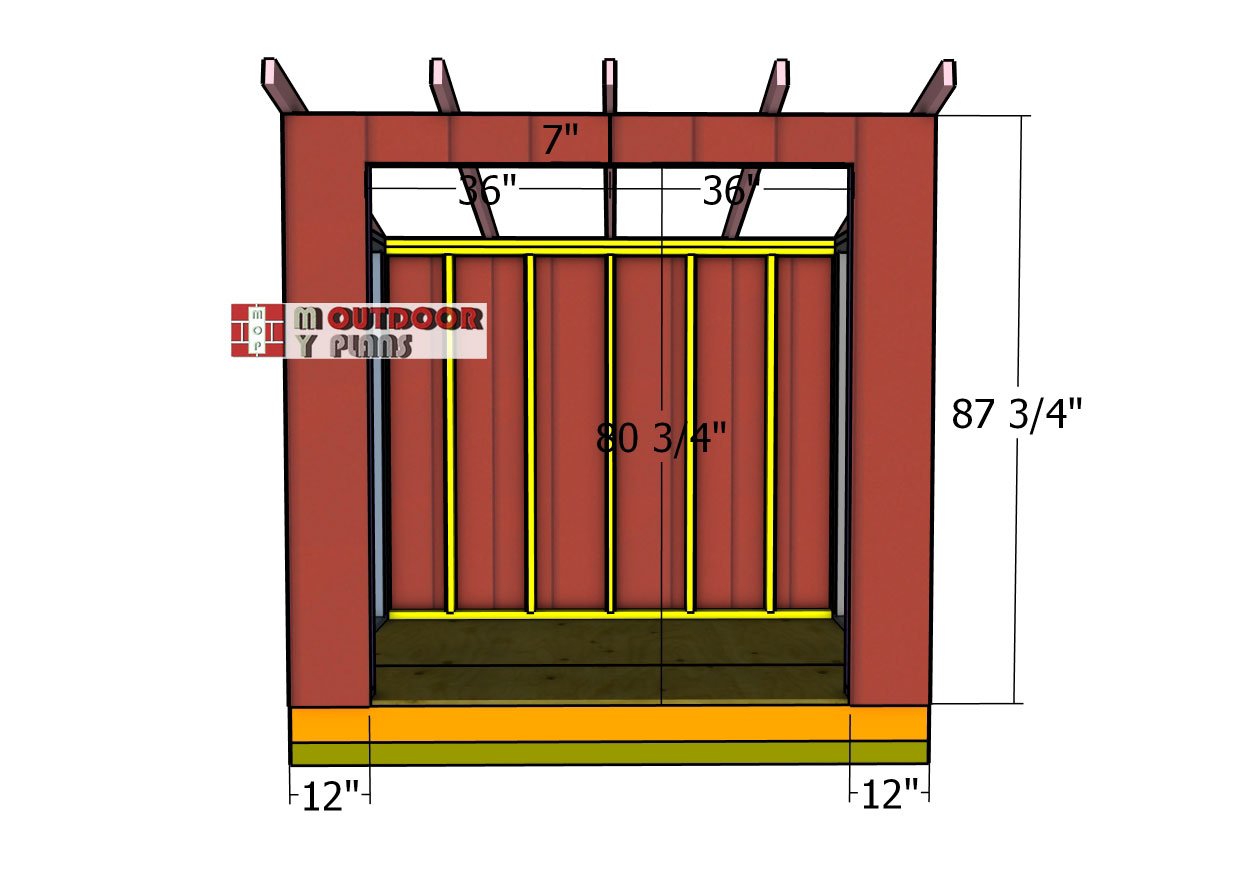
Adding the T1-11 siding sheets to the front wall around the double 6-foot doors requires careful measurement and precise cuts. Start by cutting the siding sheets to size, making sure to account for the door opening. Position the panels so the grooves align for a seamless look, and mark the areas to cut out for the doors. Use a circular saw or jigsaw to carefully make these cuts, ensuring clean edges.
Save the cut-out panels, as these will be used to create the doors, providing a perfect match to the siding for a cohesive look. Align the sheets with the edges of the wall frame and secure them in place with 1 5/8″ galvanized screws or nails, spaced every 8 inches along the framing. Double-check that the siding is flush around the door opening for a polished finish. This step not only reinforces the front wall but also ensures the doors blend seamlessly with the shed’s design.
DIY 6×8 Garden Shed
DIY 6×8 lean to shed plans
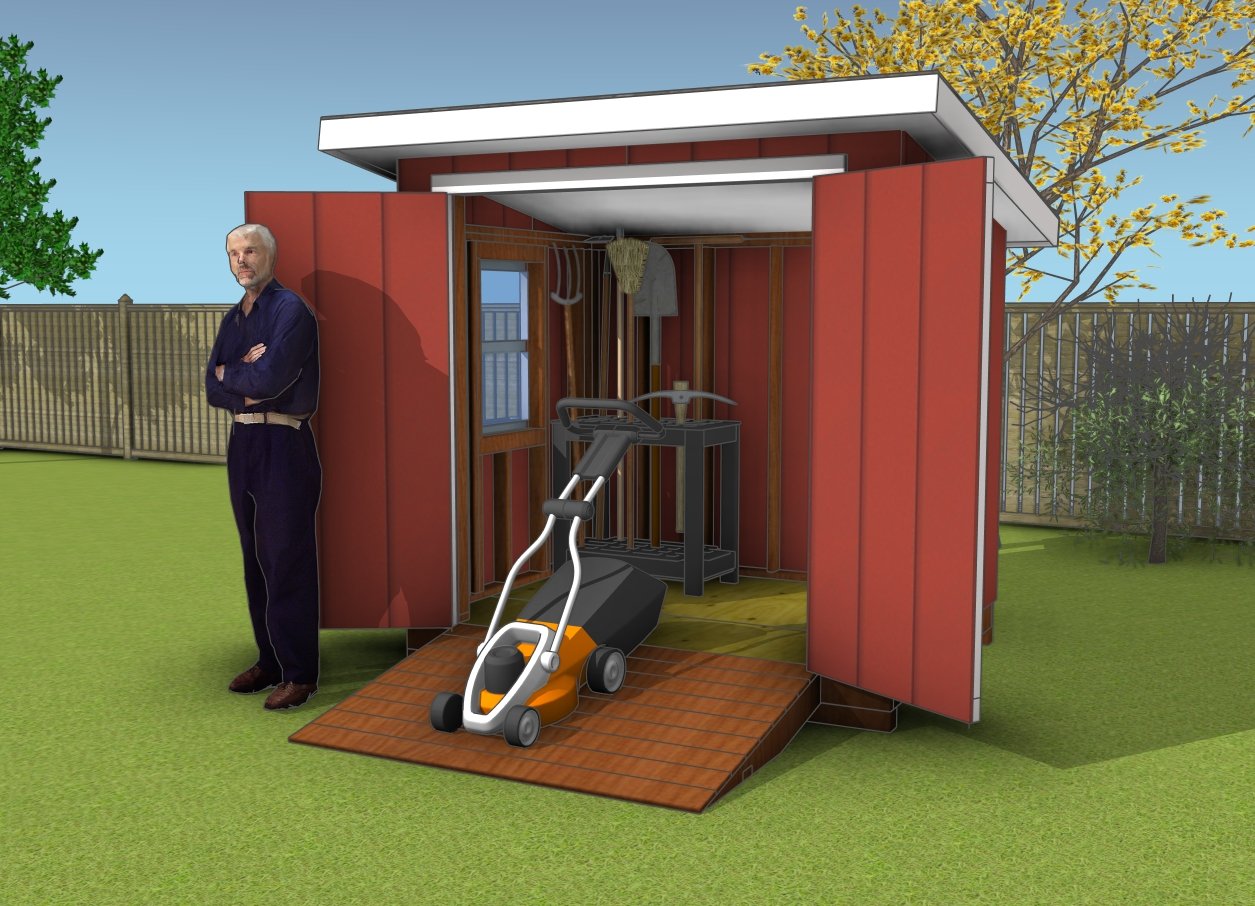
Adding a 1/4″ plywood soffit under the overhangs enhances the shed’s appearance and provides a finished, polished look. It also helps protect the roof structure from pests and weather while improving ventilation if paired with vents.
6×8 lean to shed plans
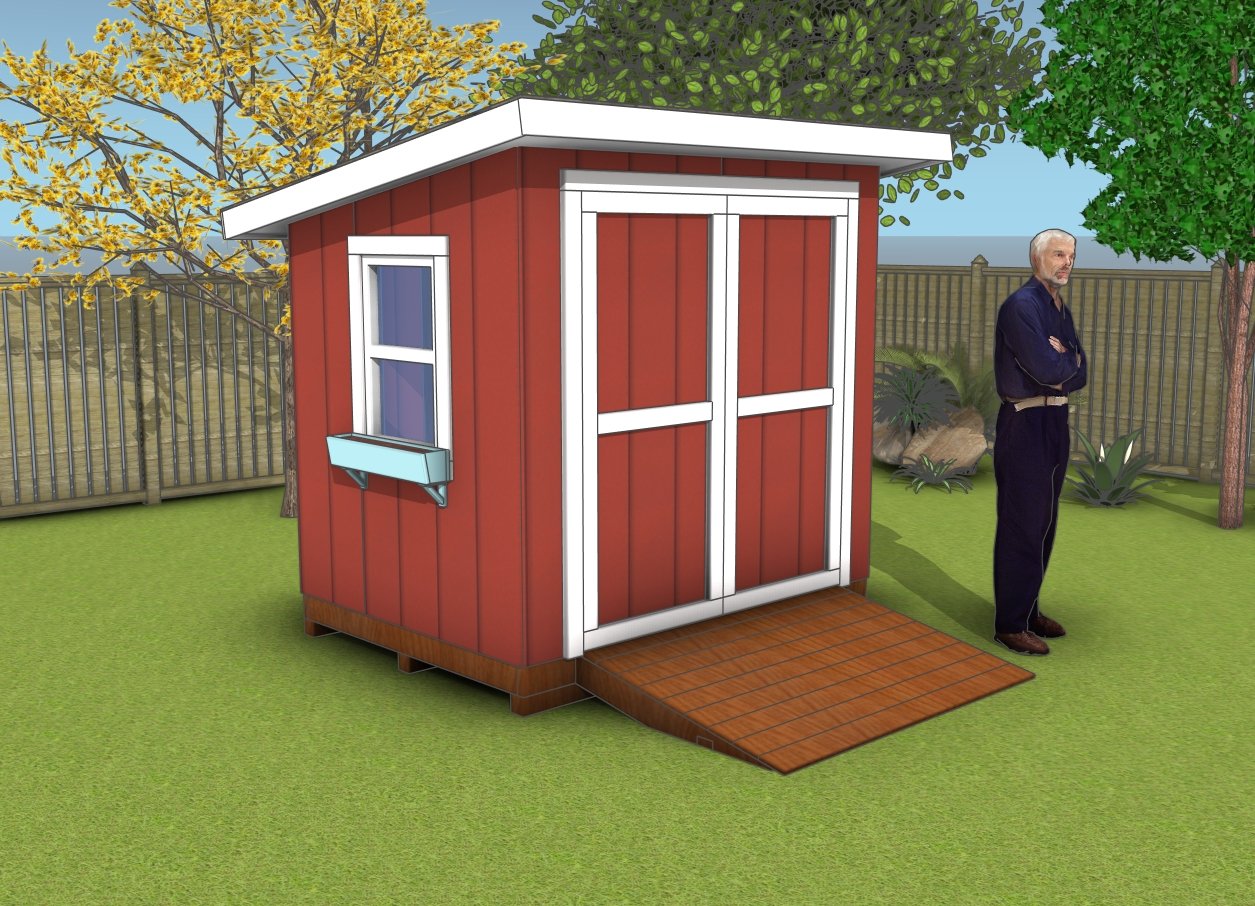
Adding air vents to your shed is a smart way to improve ventilation and prevent moisture buildup inside. You can install small soffit vents along the 1/4″ plywood soffit under the overhangs, keeping the shed interior dry and extending its lifespan.
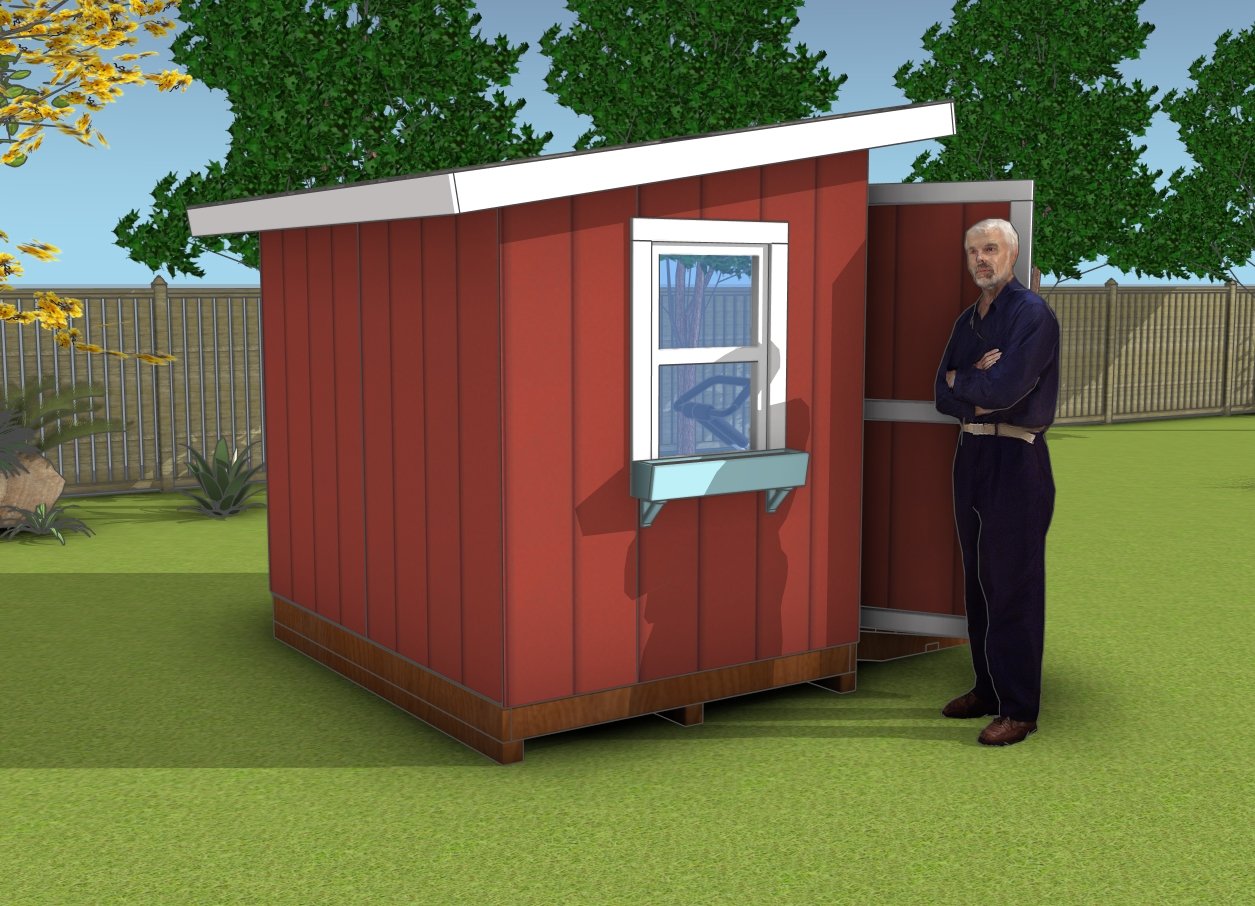
How to make a 6×8 shed
From the sturdy double doors to the functional side window, this shed is as practical as it is visually appealing. Whether you’re storing tools, equipment, or seasonal items, this structure offers a durable and stylish solution that will enhance your property for years to come. Now, it’s time to put your new shed to good use and enjoy the added organization and utility it brings to your space!
If you’re ready to take your build to the next level, click the GET PDF PLANS button below! If you want to get the free version, just read the blog FAQs.
This woodworking project was about 6×8 lean to shed plans. If you want to see more outdoor plans, we recommend you to check out the rest of our step by step projects. LIKE us on Facebook and Google + to be the first that gets out latest projects and to hep us keep adding free woodworking plans for you.


