Looking to maximize your storage space without sacrificing style? These DIY 6×12 lean-to shed plans are the perfect solution! With its compact design and straightforward construction, it’s ideal for keeping your tools, gardening gear, and outdoor essentials organized and protected. Whether you’re a beginner or a seasoned builder, this project is both achievable and rewarding. In this blog post, I’ll guide you step-by-step through building a sturdy, functional, and visually appealing shed that fits seamlessly into your backyard. Let’s get started and turn your outdoor clutter into a thing of the past!
The estimated total cost for building this shed, based on the shopping list, is approximately $2000. This includes all the lumber, hardware, siding, roofing materials, and finishing supplies needed for the project. The estimated cost is for the shed ramp, as well. To keep costs down, consider sourcing materials locally or looking for sales on lumber and hardware at your nearby home improvement store. You can also repurpose leftover materials from previous projects or opt for budget-friendly alternatives like OSB instead of plywood for non-visible areas.
When buying the lumber, you should select the planks with great care, making sure they are straight and without any visible flaws (cracks, knots, twists, decay). Investing in cedar or other weather resistant lumber is a good idea, as it will pay off on the long run. Use a spirit level to plumb and align the components, before inserting the galvanized screws, otherwise the project won’t have a symmetrical look. If you have all the materials and tools required for the project, you could get the job done in about a day. See all my Premium Plans HERE.
Projects made from these plans
6×12 Lean to Shed Plans
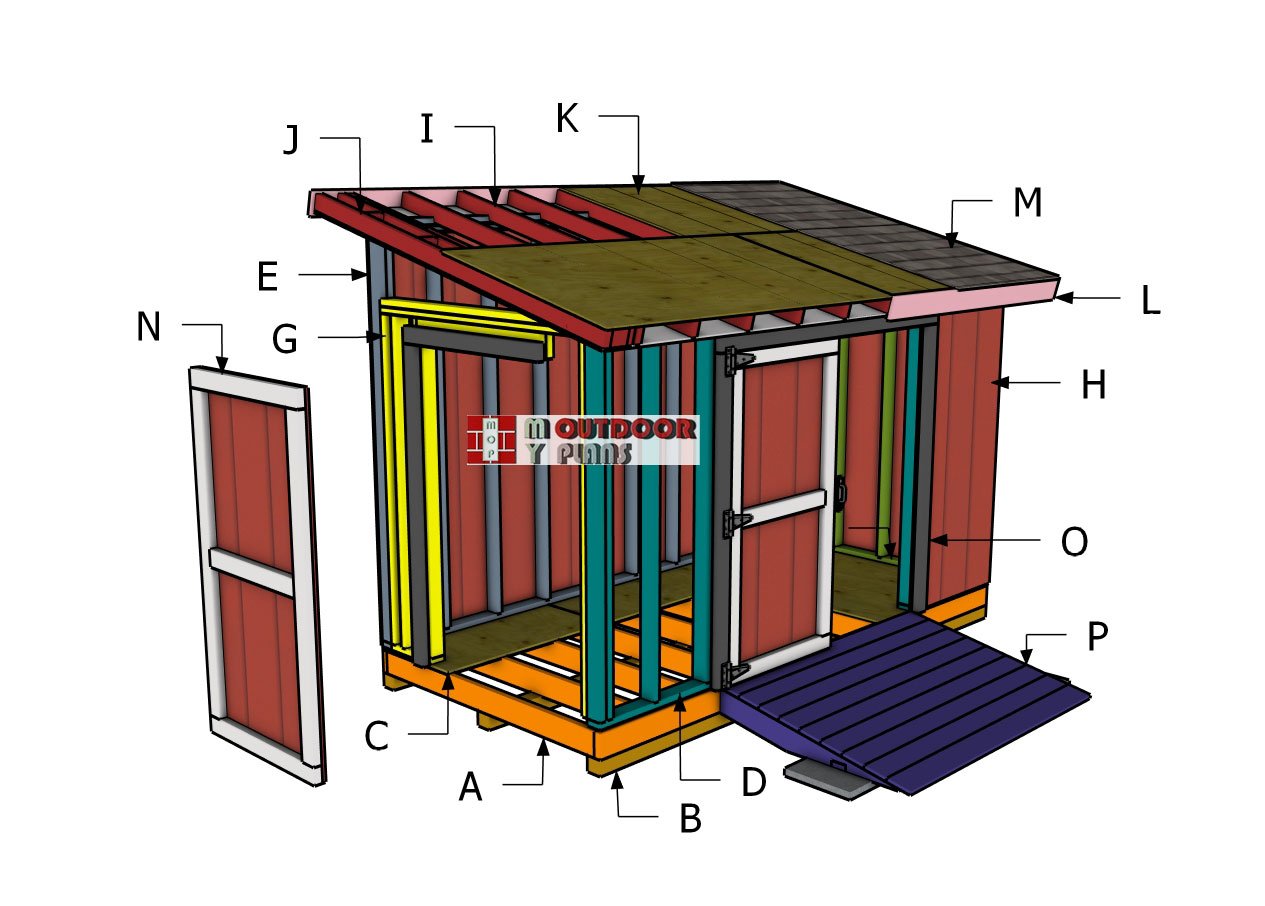
Building-a-6×12-lean-to-shed
Cut + Shopping Lists
- A – FLOOR FRAME – 2×6 lumber 12′ – 2 pieces
- A – FLOOR FRAME – 2×6 lumber 69″ – 10 pieces
- B – SKIDS – 4×4 lumber 12′ – 3 pieces
- C – FLOOR – 3/4″ plywood 4’x8′ – 1 piece
- C – FLOOR – 3/4″ plywood 4’x8′ – 1 piece
- C – FLOOR – 3/4″ plywood 2’x8′ – 1 piece
- C – FLOOR – 3/4″ plywood 2’x4′ – 1 piece
- D – FRONT WALL – 2×4 lumber 36″ – 2 pieces
- D – FRONT WALL – 2×4 lumber 12′ – 1 piece
- D – FRONT WALL – 2×4 lumber 137″ – 1 piece
- D – FRONT WALL – 2×4 lumber 76″ – 10 pieces
- D – FRONT WALL – 2×4 lumber 70 1/2″ – 2 pieces
- D – FRONT WALL – 2×6 lumber 75″ – 2 pieces
- E – BACK WALL – 2×4 lumber 12′ – 3 pieces
- E – BACK WALL – 2×4 lumber 93 1/4″ – 12 pieces
- F – SIDE WALL – 2×4 lumber 65″ – 2 pieces
- F – SIDE WALL – 2×4 lumber 68 1/2″ – 1 piece
- F – SIDE WALL – 2×4 lumber 76″ – 6 pieces
- G – SIDE WALL 2 – 2×4 lumber 14 1/2″ – 2 pieces
- G – SIDE WALL 2 – 2×4 lumber 68 1/2″ – 1 piece
- G – SIDE WALL 2 – 2×4 lumber 65″ – 1 piece
- G – SIDE WALL 2 – 2×4 lumber 70 1/2″ – 2 pieces
- G – SIDE WALL 2 – 2×4 lumber 76″ – 5 pieces
- G – SIDE WALL 2 – 2×6 lumber 39″ – 2 pieces
- H – SIDING – 5/8″ T1-11 siding sheets 4’x8′ – 3 pieces
- H – SIDING – 5/8″ T1-11 siding sheets 4’x95 1/4″ – 2 pieces
- H – SIDING – 5/8″ T1-11 siding sheets 2’x8′ – 2 pieces
- H – SIDING – 5/8″ T1-11 siding sheets 4’x79 3/4″ – 2 pieces
- H – SIDING – 5/8″ T1-11 siding sheets 4’x7 1/2″ – 1 piece
- H – SIDING – 5/8″ T1-11 siding sheets 4’x1 3/4″ – 3 pieces
- H – SIDING – 5/8″ T1-11 siding sheets 21″x5 1/4″ – 2 pieces
- I – RAFTERS – 2×4 lumber 93″ – 10 pieces
- 4×4 PT lumber 12 ft – 3 pieces
- 2×6 PT lumber 12 ft – 7 pieces (floor frame)
- 2×6 PT lumber 10 ft – 1 piece (ramp)
- 2×4 lumber 12 ft – 10 pieces
- 2×4 lumber 10 ft – 3 pieces
- 2×4 lumber 8 ft – 59 pieces
- 2×6 lumber 8 ft – 3 pieces
- 1×6 lumber 12 ft – 4 pieces
- 1×6 lumber 8 ft – 7 pieces
- 5/8″ T1-11 siding 4’x8′ – 11 pieces
Tools
![]() Hammer, Tape measure, Framing square, Level, Shovel
Hammer, Tape measure, Framing square, Level, Shovel
![]() Miter saw, Drill machinery, Screwdriver, Sander
Miter saw, Drill machinery, Screwdriver, Sander
![]() Safety Gloves, Safety Glasses
Safety Gloves, Safety Glasses
Time
![]() One weekend
One weekend
Related
- 6×8 Lean to Shed Plans
- 16×20 Lean to Shed Plans
- PART 1: 6×12 Lean to shed plans
- PART 2: 6×12 Lean to shed plans
It’s that easy to build a garden shed – Video!
Pin it for later!
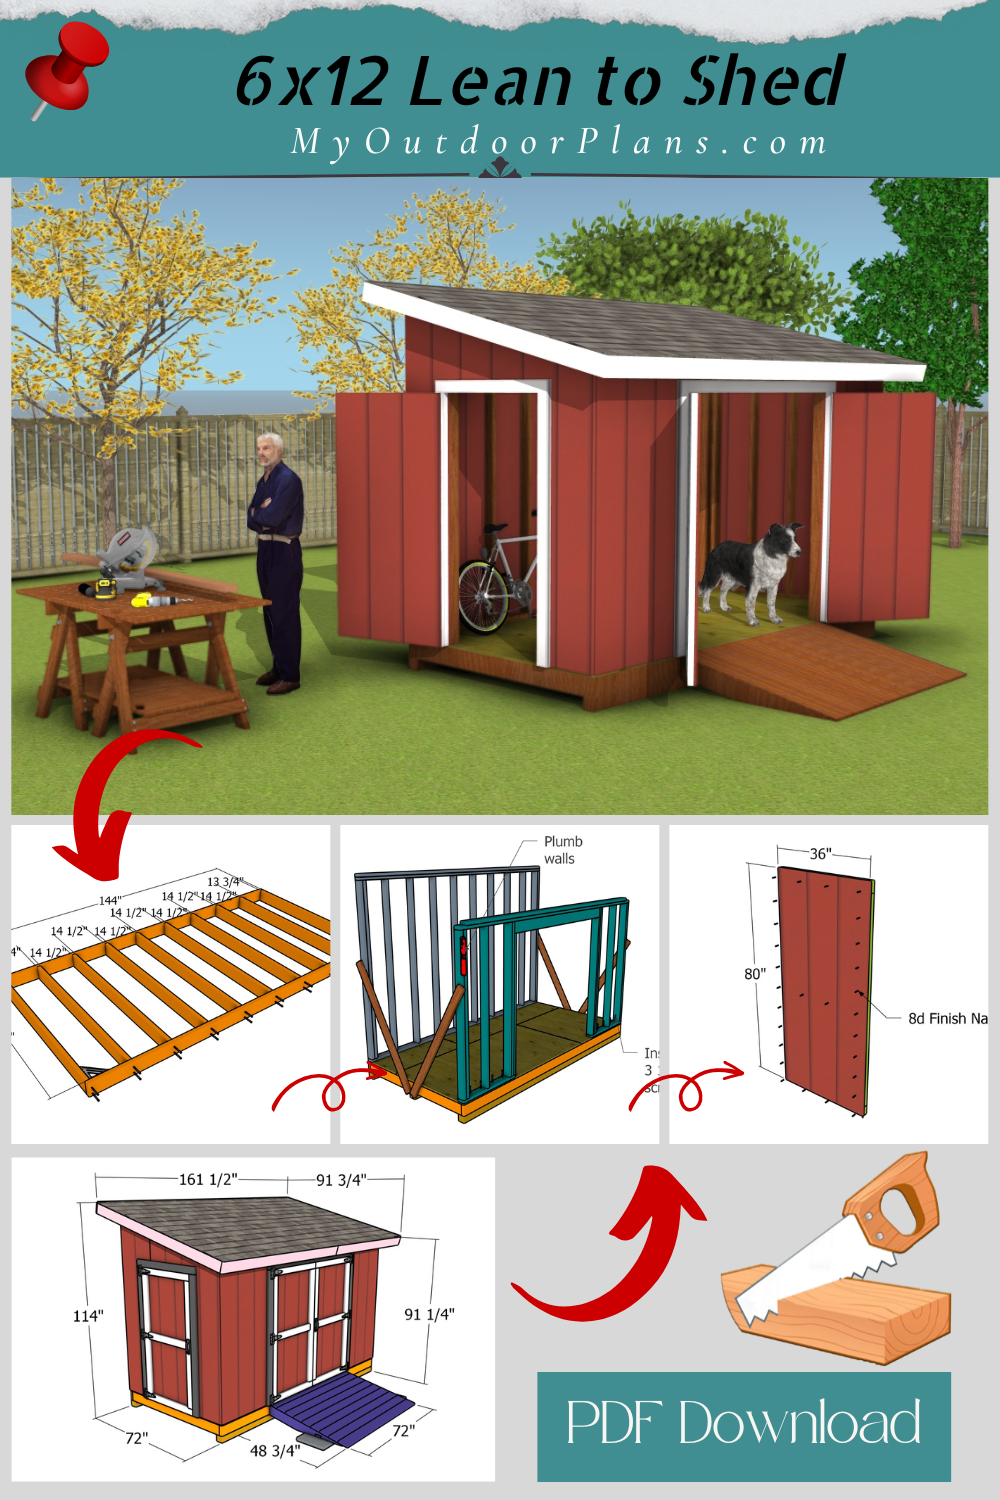
Step 1: Building the shed floor
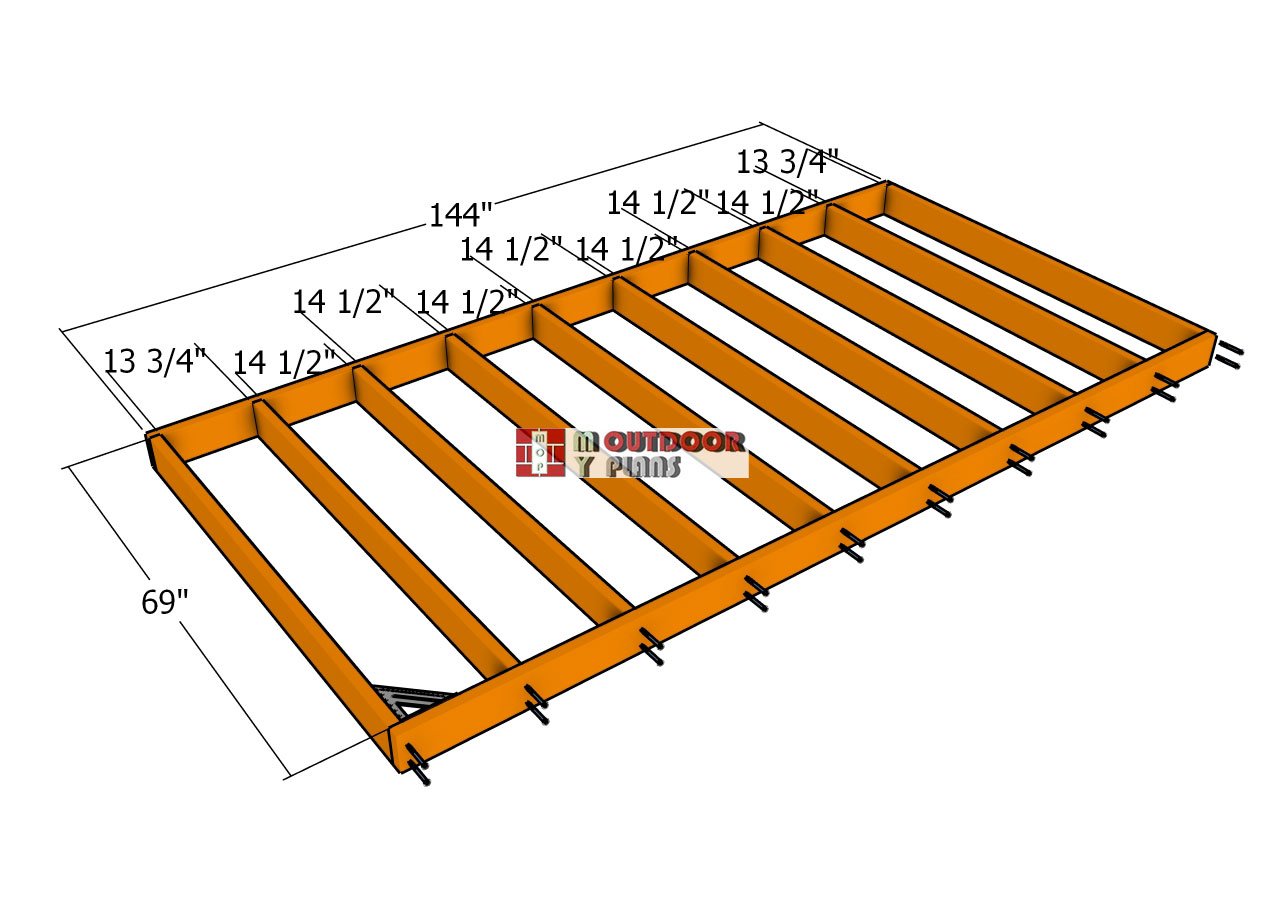
Building-the-floor-frame
The first step in building your shed is nailing down a rock-solid floor frame—literally and figuratively. This is the foundation of your project, so let’s get it right the first time. Grab your 2×6 lumber and cut the joists to size. Lay them out on a nice, level surface like you mean business. Then, drill pilot holes through the rim joists and secure them to the perpendicular joists with 3 1/2″ screws. Boom—your frame is coming together nice and snug.
Now, here’s where the magic happens: space those joists 16 inches apart, on center, to ensure top-notch support for your floor. And here’s a pro tip to keep you ahead of the game—measure the diagonals to check if the frame is square. If they’re not equal, give it a little tweak until it’s just right. Trust me, this step will save you from a world of headaches later on.
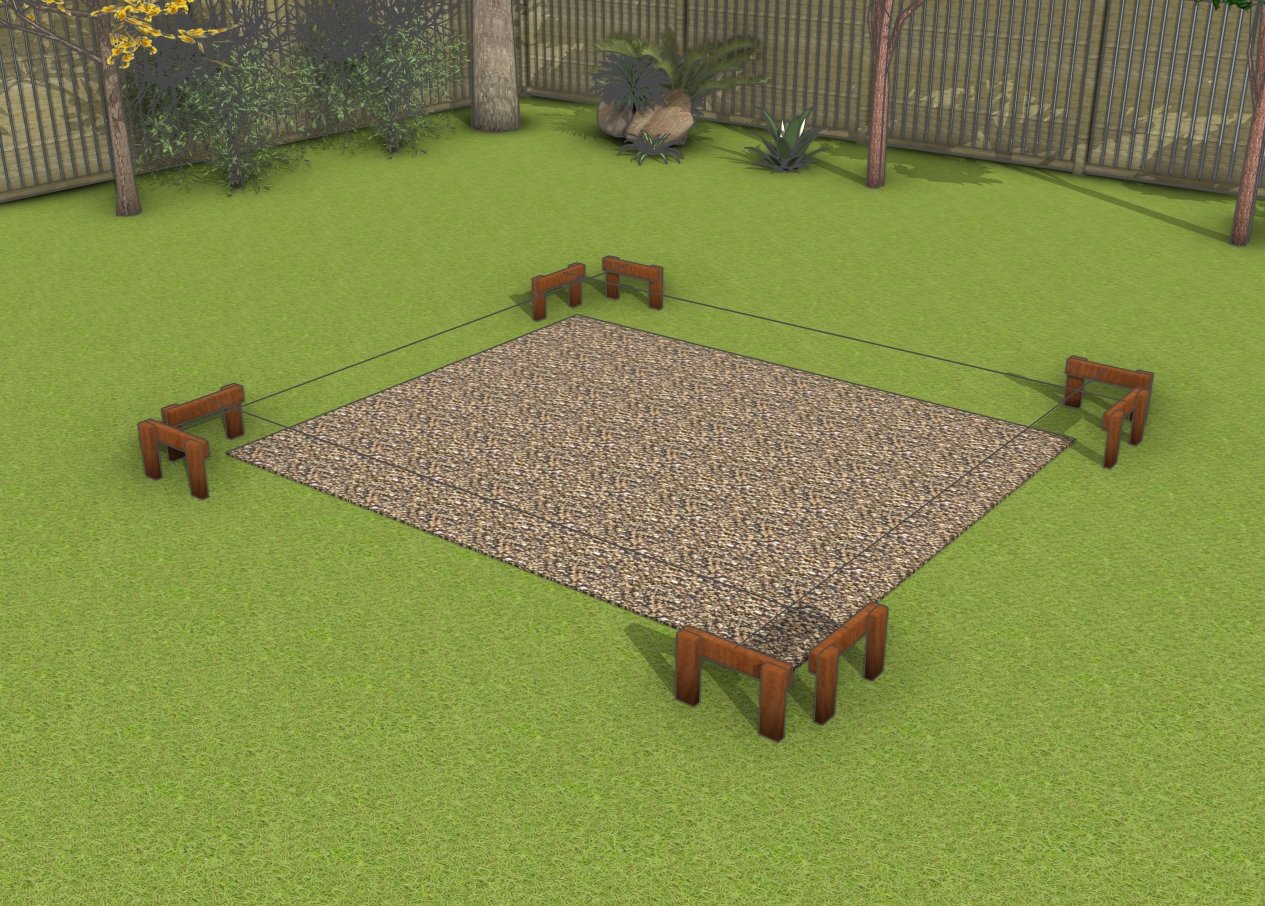
Laying out the shed location
Preparing the ground for your lean-to shed is a crucial first step to ensure a stable and long-lasting foundation. Start by selecting a level area and clearing it of any grass, debris, or rocks. Once cleared, measure and mark the footprint of your shed using stakes and string to keep everything aligned. For added stability and durability, lay down a layer of landscaping fabric to prevent weeds, then spread 3–4 inches of compacted gravel across the area.
Gravel provides excellent drainage, prevents water pooling, and keeps your shed stable while deterring pests. Taking the time to prep the site properly will set the stage for a smooth construction process and a shed that stands strong for years to come.
Setting-the-skids
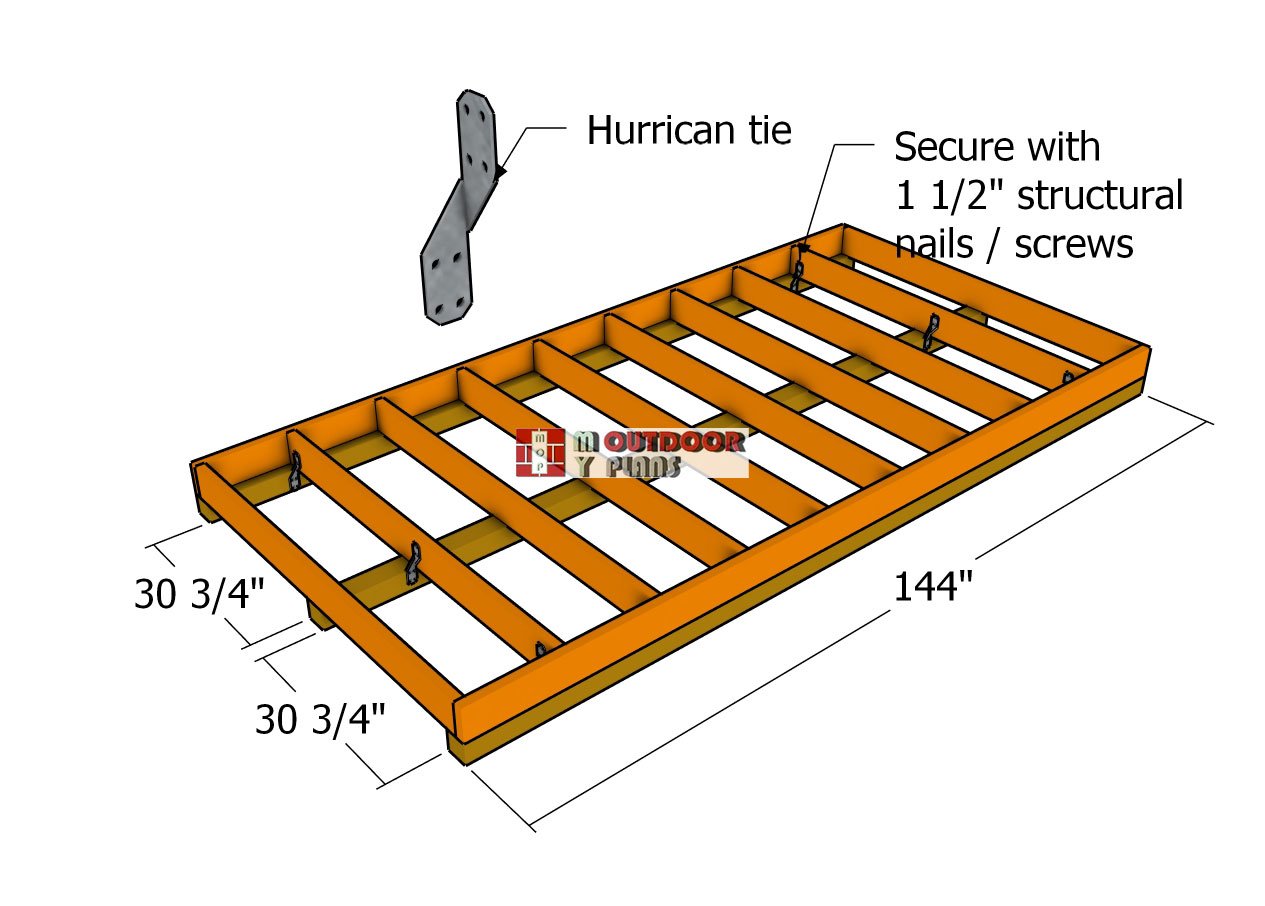
Next up, let’s get those 4×4 skids into place to give your shed a rock-solid foundation. Think of these skids as the backbone of your structure—they’ve got to be strong and perfectly positioned. Slide them beneath the floor frame, making sure they’re lined up like a pro. Then, lock them down with rafter ties and 1 1/2″ structural screws or nails. Trust me, these bad boys aren’t going anywhere.
For ultimate stability, attach two ties to each skid—one at each end—following the layout in your diagram. This step is crucial for a foundation that’s tough enough to handle whatever Mother Nature dishes out. Take your time and get it just right—this is where you’re laying the groundwork (literally) for a shed that’ll stand the test of time.
Plywood-flooring
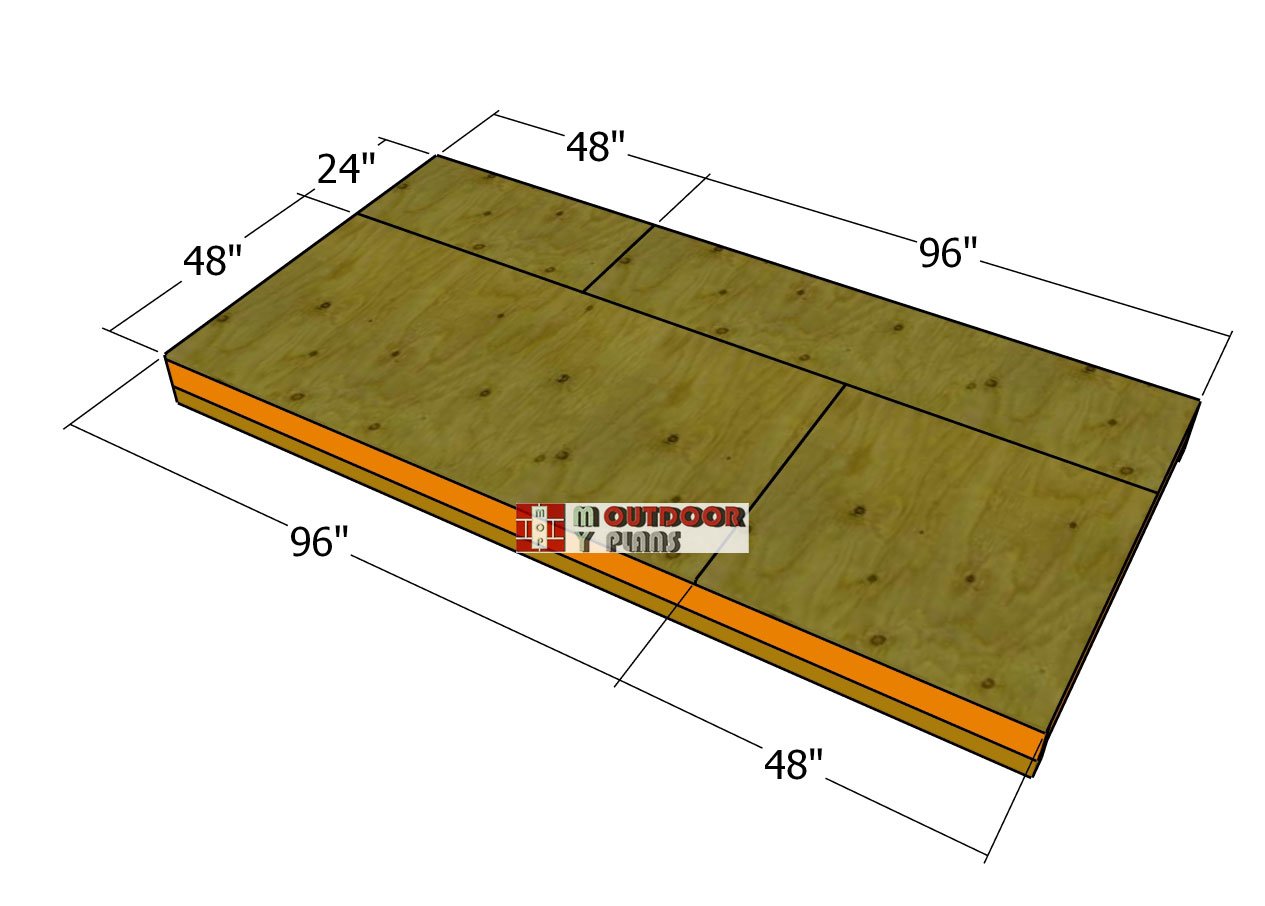
Now it’s time to transform that floor frame into a rock-solid base that means business. Start by grabbing a 3/4″ plywood sheet and carefully positioning it on the frame. Take your time here—make sure the edges are perfectly flush, no overhangs, no awkward gaps. Precision is key!
Once you’ve got everything lined up like a pro, it’s time to secure it. Use 1 5/8″ screws, spacing them about 8 inches apart along the framing. Don’t underestimate this step—it might seem straightforward, but nailing (or screwing) it just right sets the tone for the rest of your shed. A strong base equals a structure that’s built to last.
Step 2: Building the shed walls
Front-wall-frame
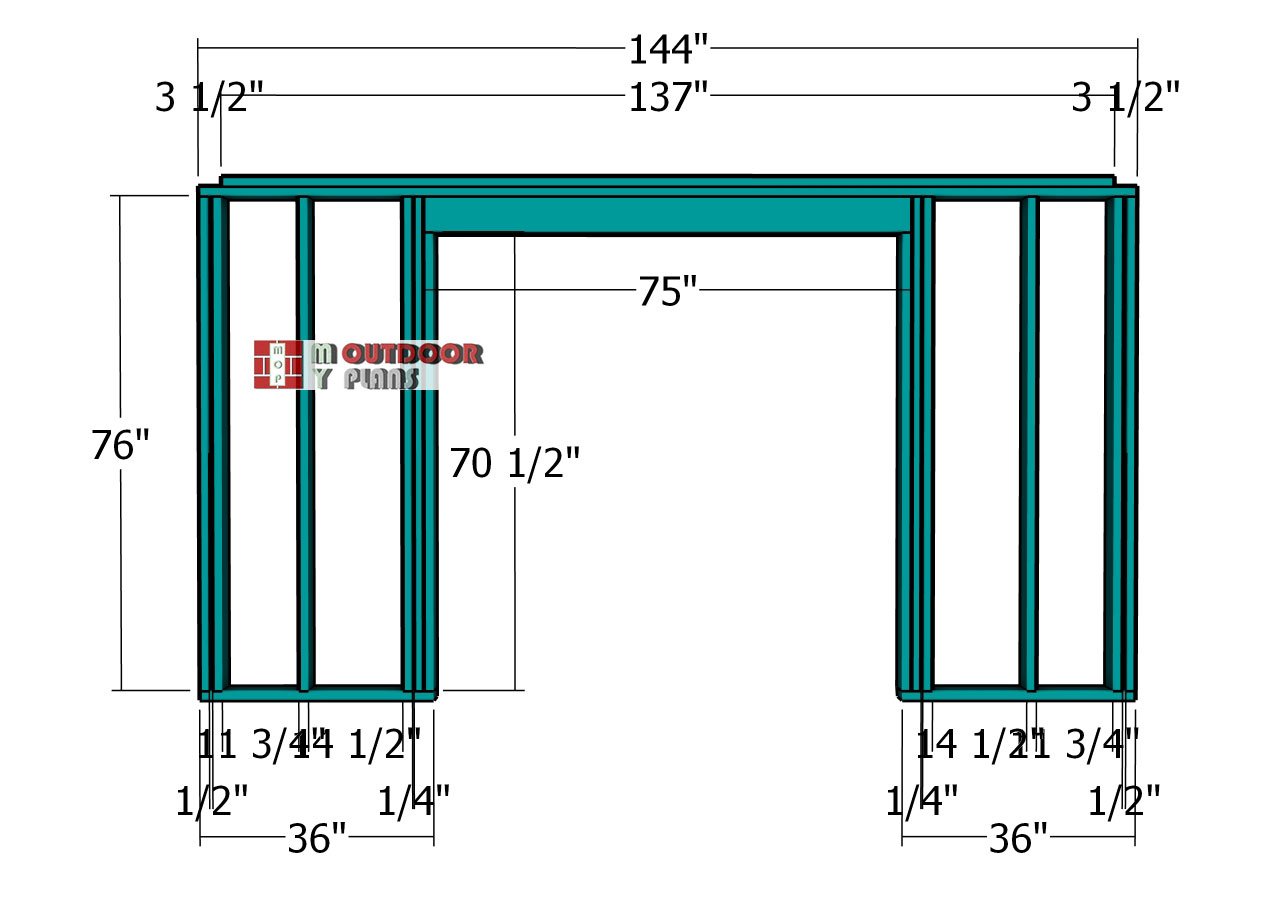
Next up, let’s tackle the wall frames, starting with the front wall—it’s where the magic begins! For this, you’ll need 2×4 lumber for the plates and studs, and 2×6 lumber for the double header because strength is the name of the game. Drill pilot holes through the plates, then secure the studs with 3 1/2″ screws to keep everything snug and solid. Pay attention to the 1/2″ gaps between the double studs—they’re there for a reason. To keep them consistent, slide in pieces of 1/2″ plywood as spacers.
Once you’ve got the frame all squared away, it’s time to fit the double header at the top of the wall. Toenail it into place using 12d nails for that extra stability. This step is critical—it’s like adding the backbone to your shed. With a frame this strong, you’re setting yourself up for a structure that’ll stand tall for years to come!
Large-double-header
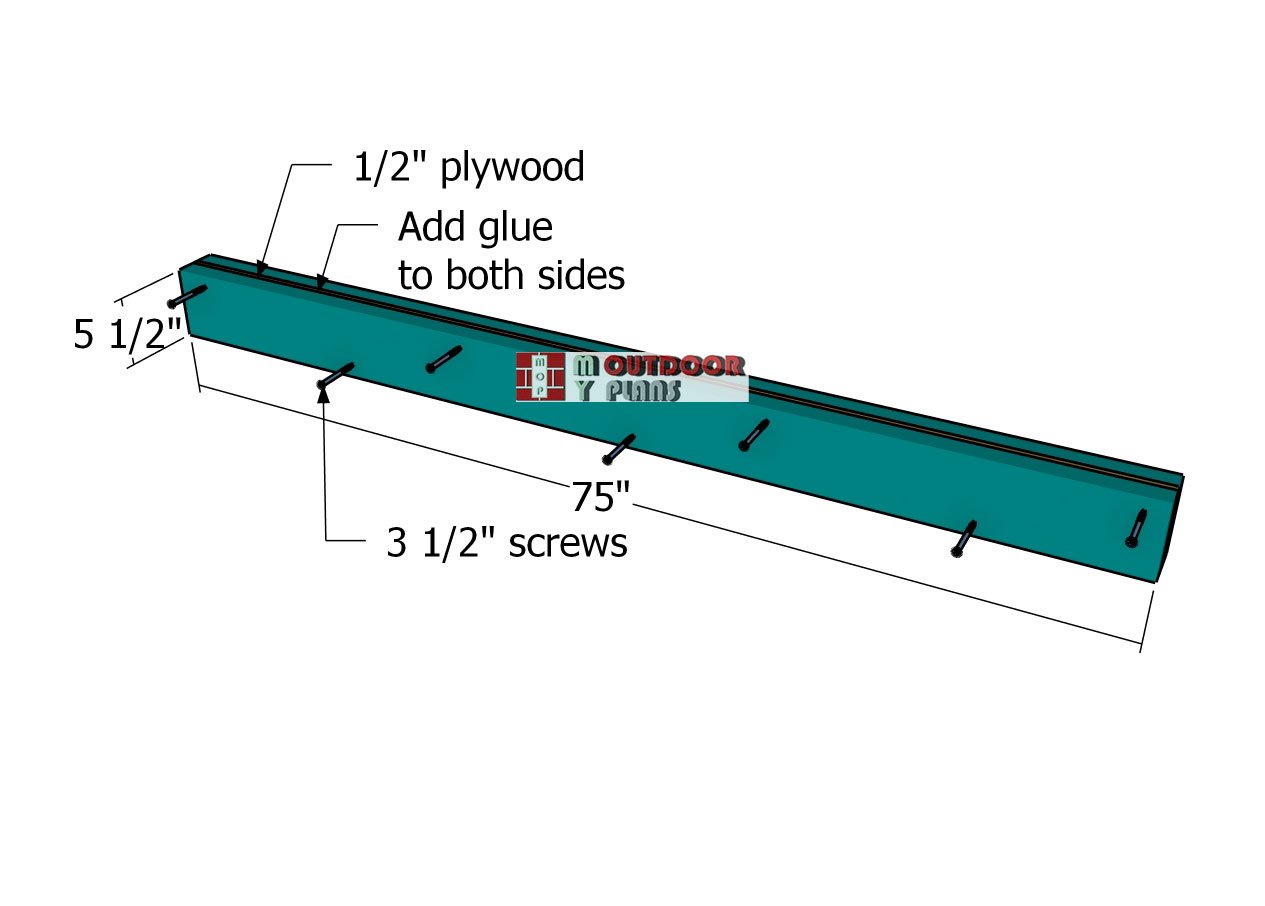
To assemble the double header, you’ll want to create a sturdy sandwich—no lunchtime jokes here! Take two 2×6 beams and place a 1/2″ plywood sheet right in between them for extra strength and stability. Apply a generous amount of wood glue to the joints to ensure a rock-solid bond that won’t let you down.
Once everything is aligned, secure the layers together by driving 2 1/2″ screws through both sides. Space the screws evenly for maximum hold, this isn’t just about strength; it’s about durability too. With this double header, you’re building a foundation that can handle the load like a champ!
Back-wall-frame
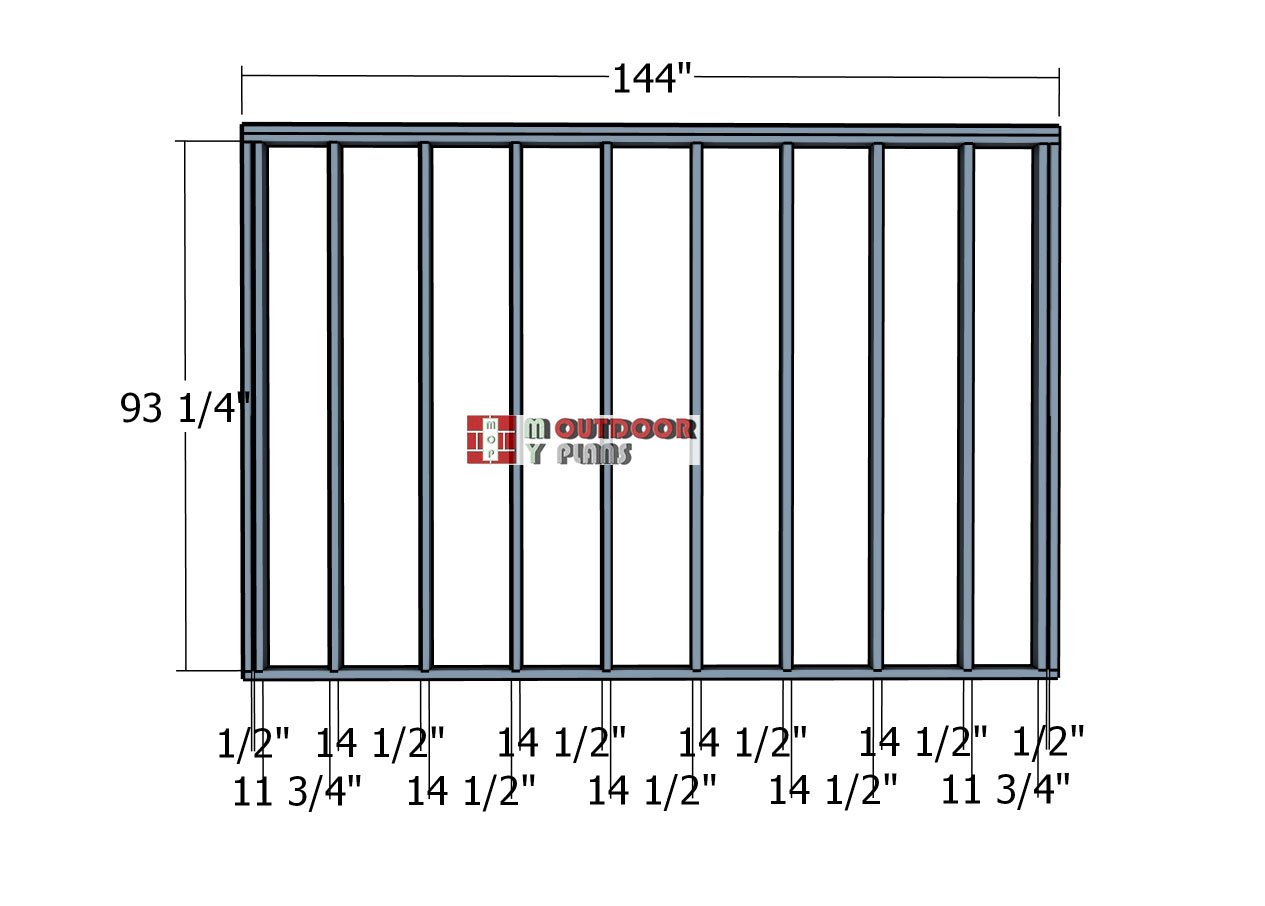
Now, let’s move on to the opposite wall of your lean-to storage shed. Start by cutting and laying out the studs, making sure they’re spaced 16 inches on center to maintain strong, even support. Stick to the same game plan as before: drill pilot holes through the top and bottom plates, and fasten the studs securely with 3 1/2″ screws. Pay close attention to those 1/2″ gaps between the double studs—slip in pieces of 1/2″ plywood as spacers to keep everything consistent and perfectly aligned.
Once the frame is squared away, it’s time to add a double top plate. This extra layer not only reinforces the structure but also helps distribute the weight evenly, setting the stage for a shed that’s built to handle the elements. With this kind of solid, consistent construction, your shed is shaping up to be a rock-solid addition to your space!
Plywood-blockings
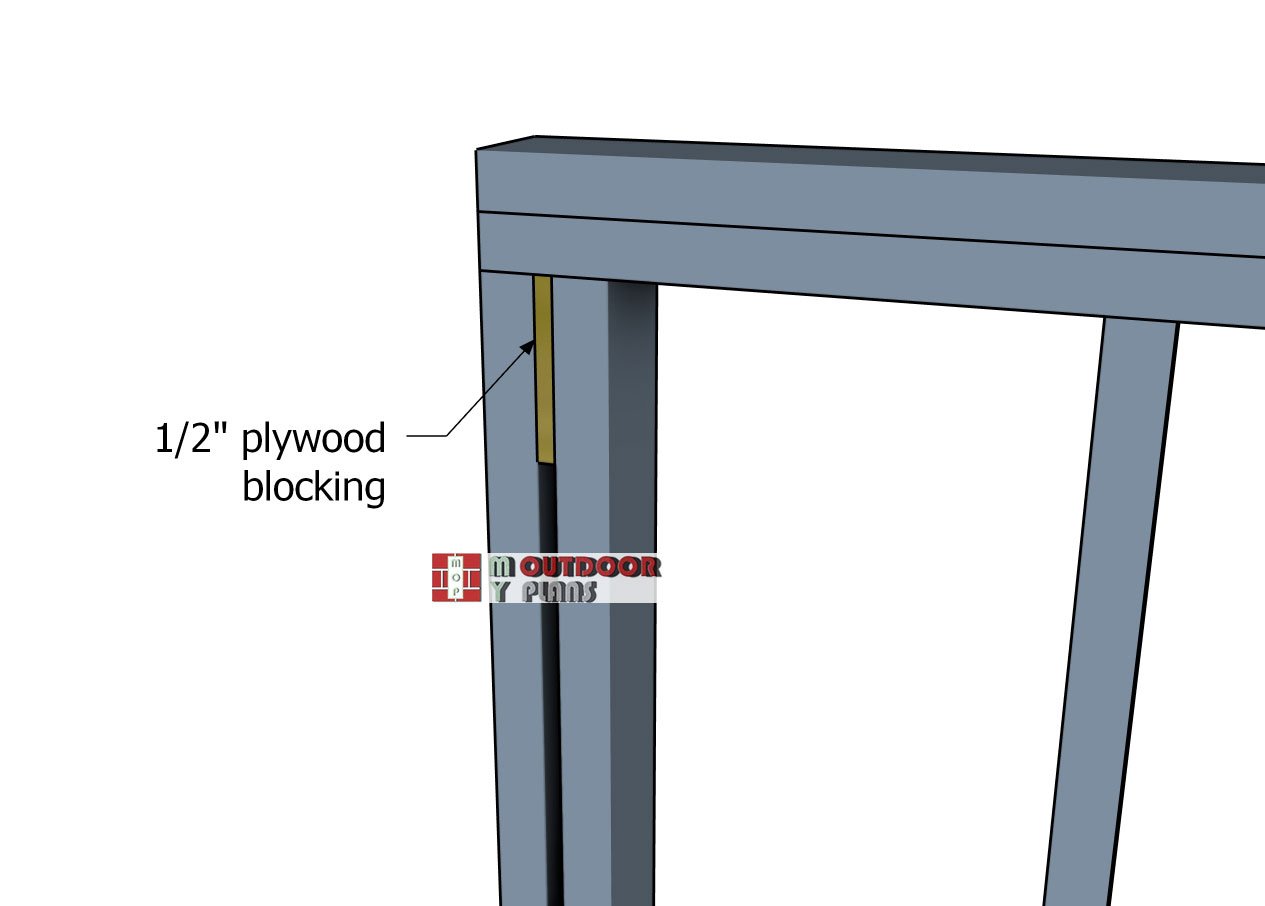
Take note of the 1/2″ plywood sandwiched between the end double studs. This small but mighty detail ensures consistent spacing and adds extra stability to the frame. It’s one of those subtle touches that make a big difference in the overall strength and precision of your shed’s construction. Keep an eye on those gaps and make sure everything stays snug and aligned!
Fitting-the-front-and-back-walls-frames
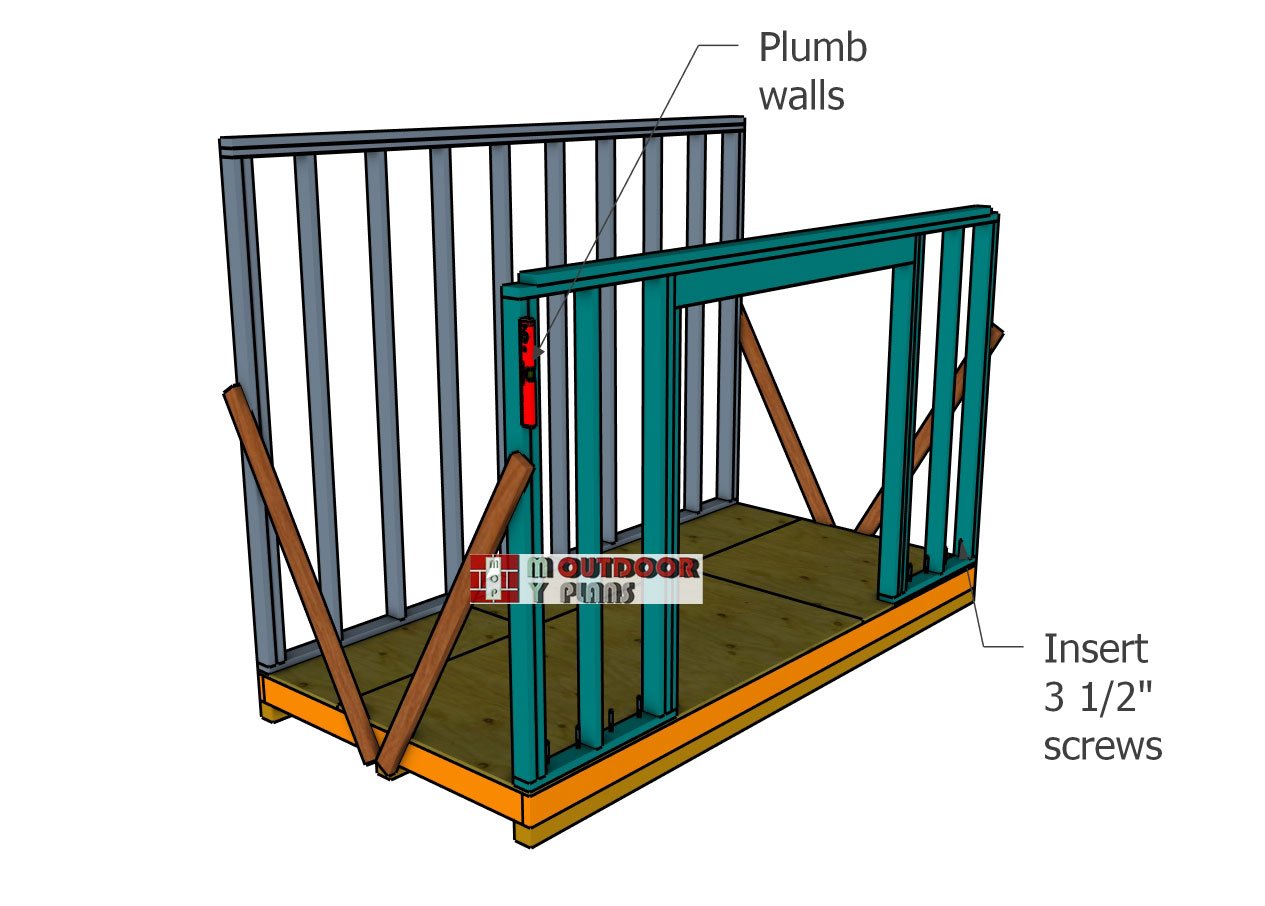
Now it’s time to bring your shed to life, let’s raise those wall frames and set them in position on the floor! Carefully align the edges of each wall so they sit flush with the exterior edges of the floor frame. Precision is key here, so grab a spirit level and double-check that the walls are plumb. This step is absolutely crucial for ensuring your shed is straight, sturdy, and ready to stand tall.
Once everything is perfectly aligned, drill pilot holes through the bottom plates and secure the walls to the floor frame using 3 1/2″ screws. With the walls locked in place, your shed is starting to take shape—and it’s looking solid!
Side-wall-frame
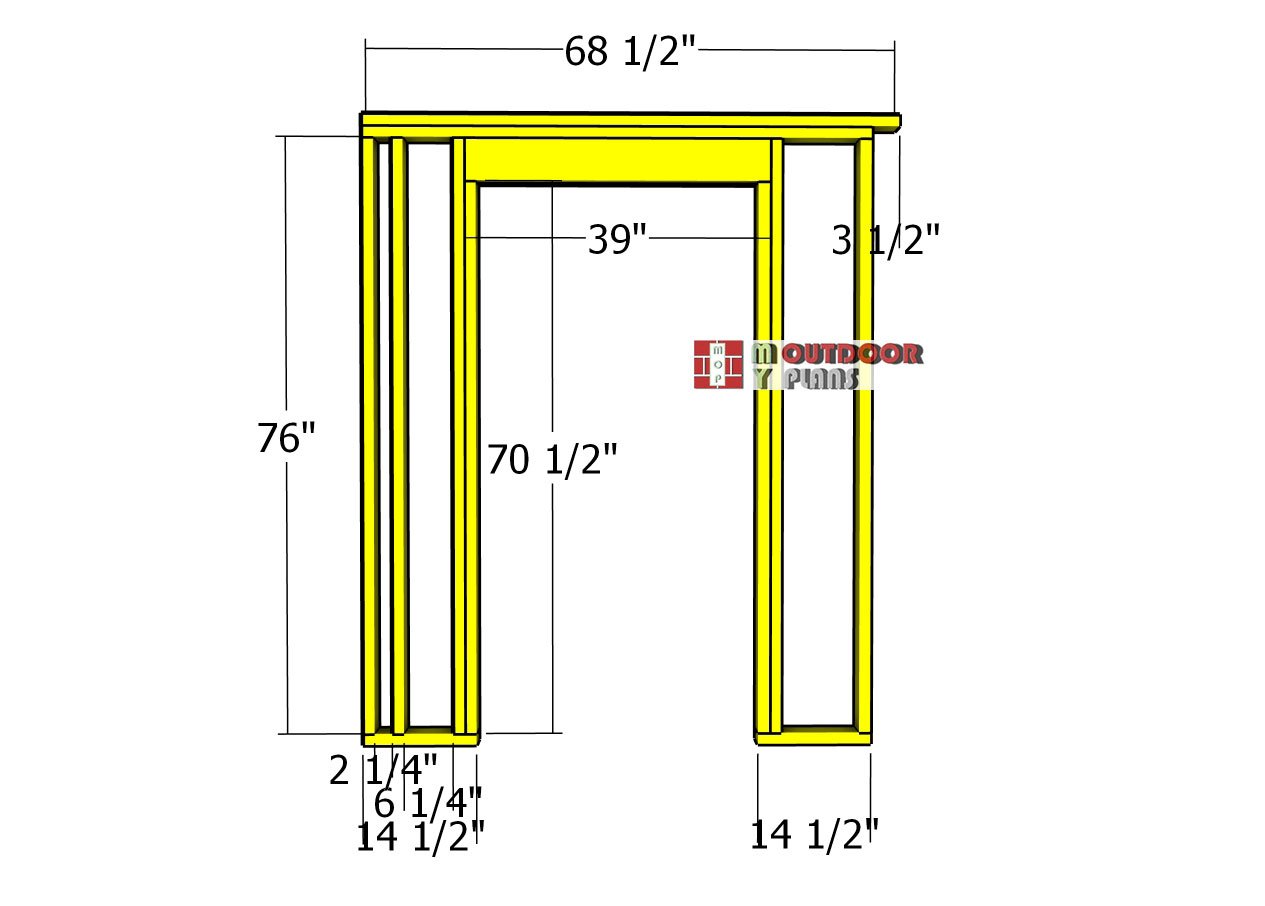
Next, let’s tackle the side wall with a door, it’s all about form and function here. Start by using 2×4 lumber for the studs and plates. Lay everything out on a level surface to keep your measurements precise and your frame square. Drill pilot holes through the top and bottom plates, then fasten the studs securely with 3 1/2″ screws. A solid connection here sets the stage for a durable and reliable wall.
When framing the door opening, take a moment to adjust the size to suit your specific needs or door dimensions. This little bit of customization gives you the flexibility to match your shed’s purpose while keeping the structure strong and ready for the next phase. Your shed’s getting closer to prime time!
Double-header
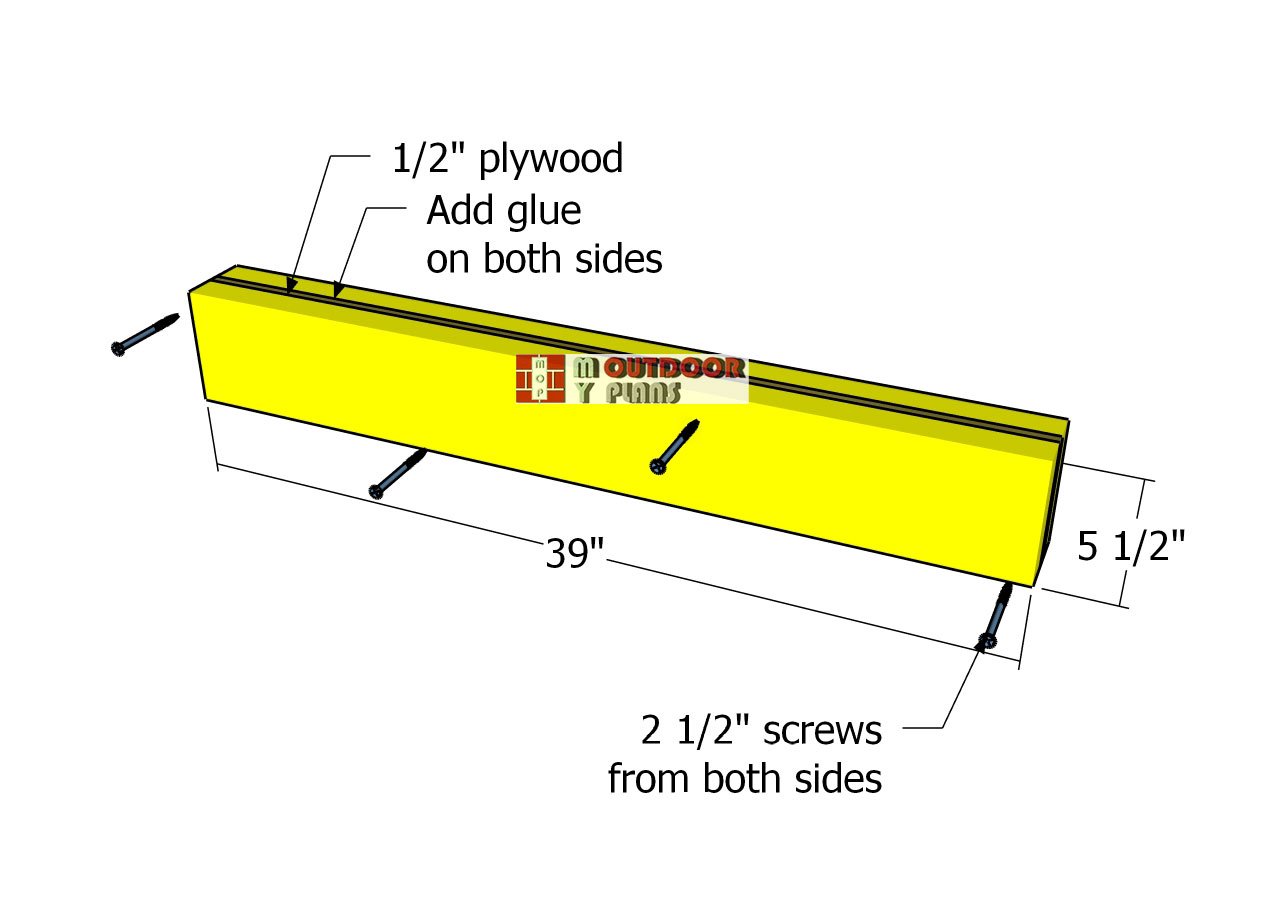
To build the double header, combine strength and precision by sandwiching a 1/2″ plywood sheet between two 2x4s. This creates a beam that’s tough enough to handle the job. Apply a generous layer of wood glue along the joints for added strength, and make sure the edges are perfectly aligned for a clean, professional finish.
Secure the layers by driving 2 1/2″ screws through both sides of the double header, spacing them evenly for maximum hold. This reinforced design isn’t just strong—it’s rock-solid and ready to support the load above the front wall opening of your shed. It’s all about building with confidence!
Plain-side-wall-frame
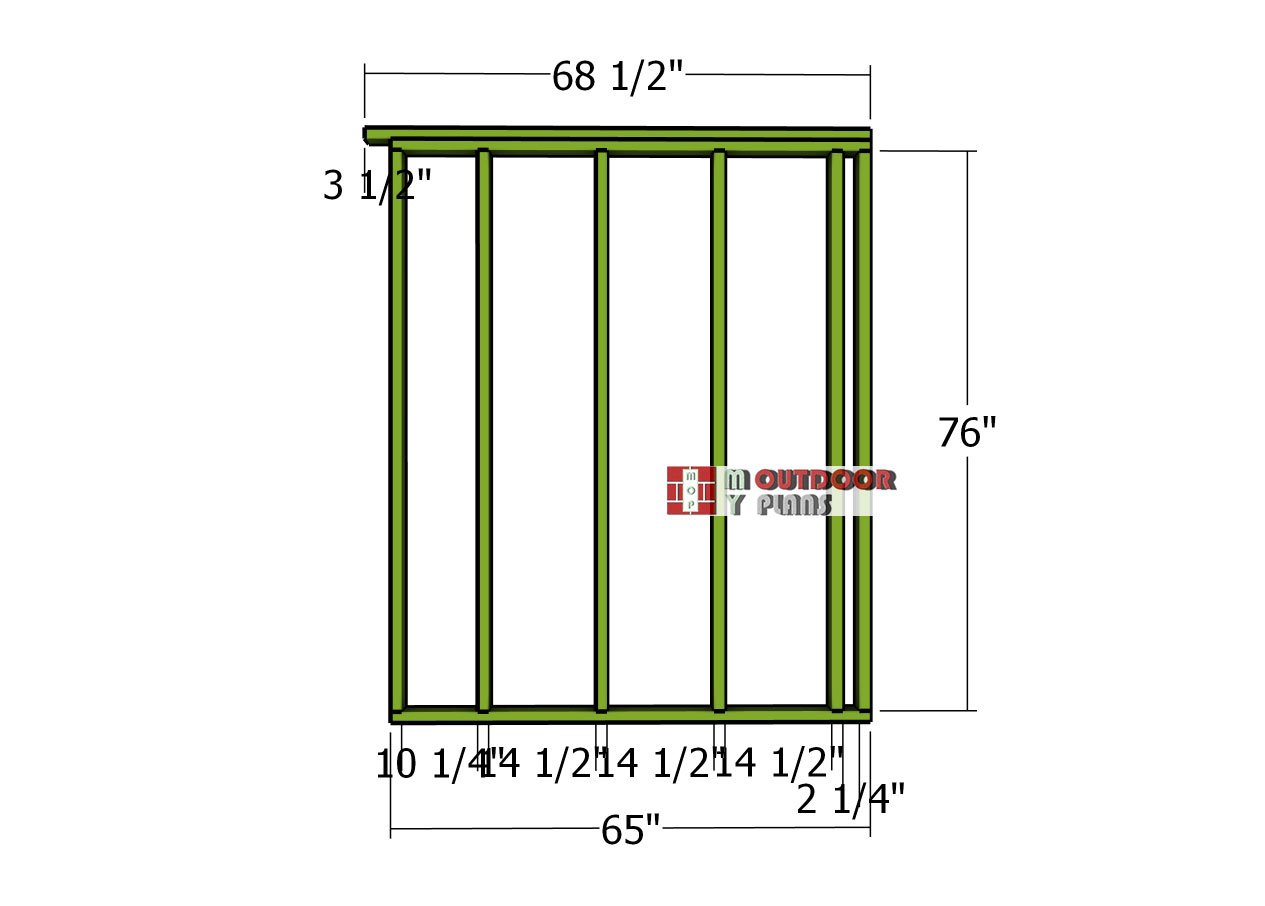
Next, let’s move on to building the opposite side wall. The construction process is the same as the other side wall—consistency is key! Use 2×4 lumber for the studs and plates, and lay everything out on a level surface for accuracy. Drill pilot holes through the plates, then secure the studs using 3 1/2″ screws to create a sturdy and reliable frame.
If you want to brighten up your shed, this is the perfect opportunity to add a window. Simply adjust the framing to include an opening that fits your desired window size. This customization lets you bring in natural light and tailor the shed to your needs, making it as functional as it is solid.
Assembling-the-small-shed-frame
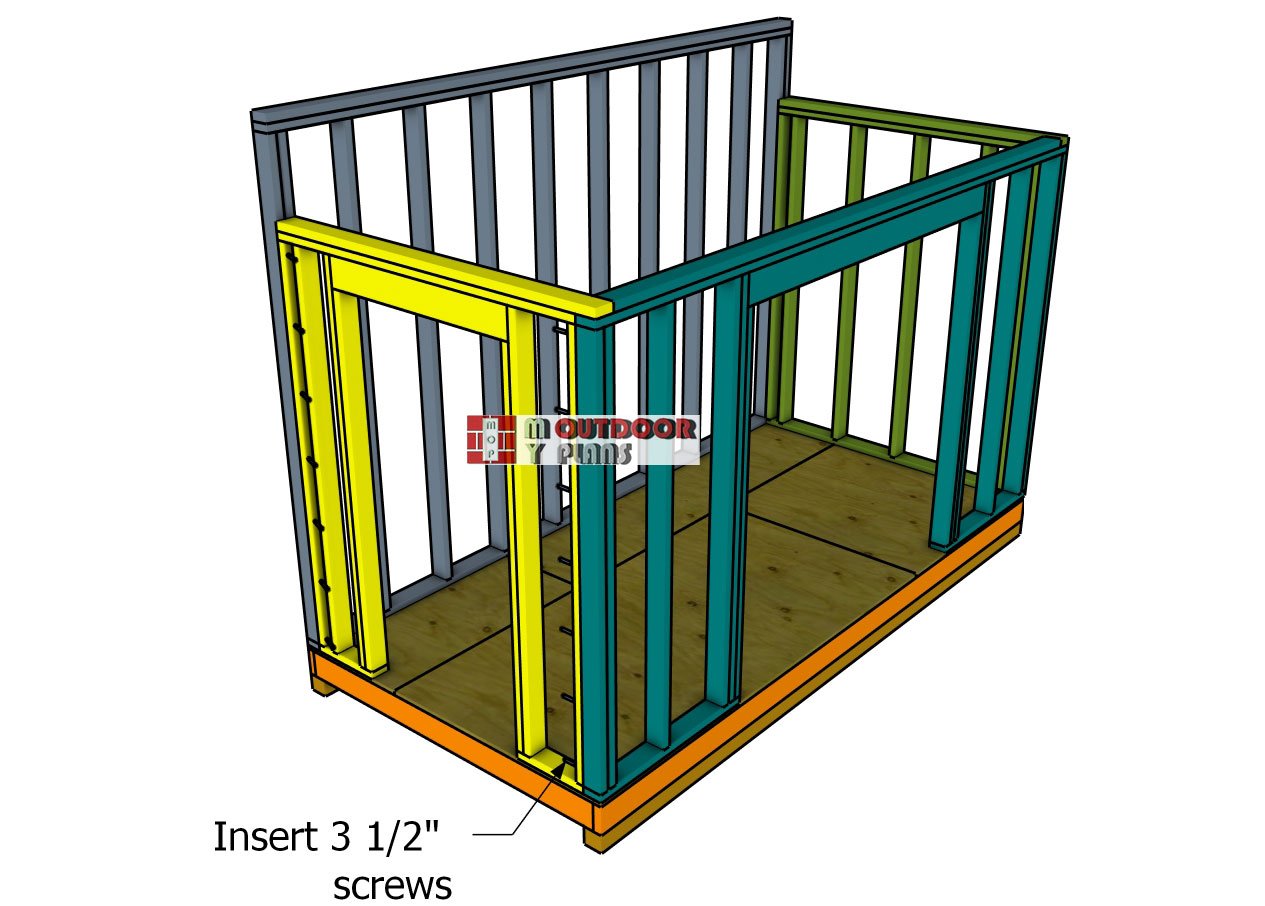
Lay the side wall frames onto the shed floor, ensuring the edges align perfectly with both the floor and the adjacent walls. Accuracy matters here, so take a moment to double-check the positioning before moving on—it’s worth the extra effort to get it just right.
Once everything is perfectly aligned, drill pilot holes through the bottom plates and into the floor frame. Secure the walls firmly with 3 1/2″ screws, fastening them to both the floor and the neighboring wall frames. This step locks your structure together, creating a sturdy, unified frame that’s ready to stand strong for years to come.
Step 3: Building the roof
Rafters
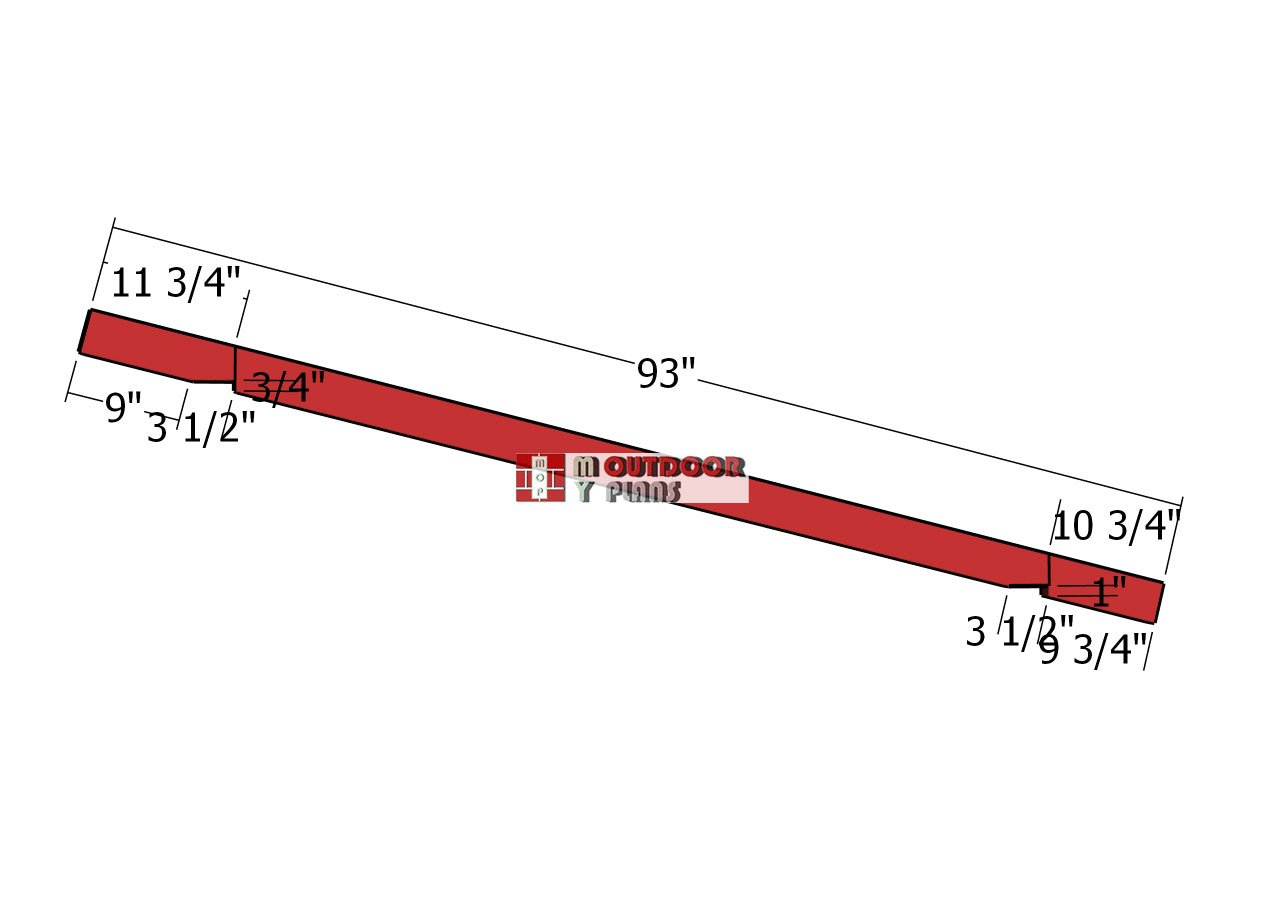
Use 2×4 lumber to craft the rafters for your small garden shed—these are the backbone of your roof, so precision is key. Start by marking the cut lines on the boards according to your measurements, ensuring each piece is tailored for a perfect fit. Take your time here, a little extra effort now will save you headaches later.
Once your lines are marked, cut along them using a circular saw, following the marks closely for accuracy. After cutting, smooth the edges with sandpaper to remove any splinters and achieve a clean, flush finish. This extra bit of care not only makes assembly easier but also ensures the rafters fit together seamlessly, giving your shed a polished, professional look.
Attaching-the-rafters
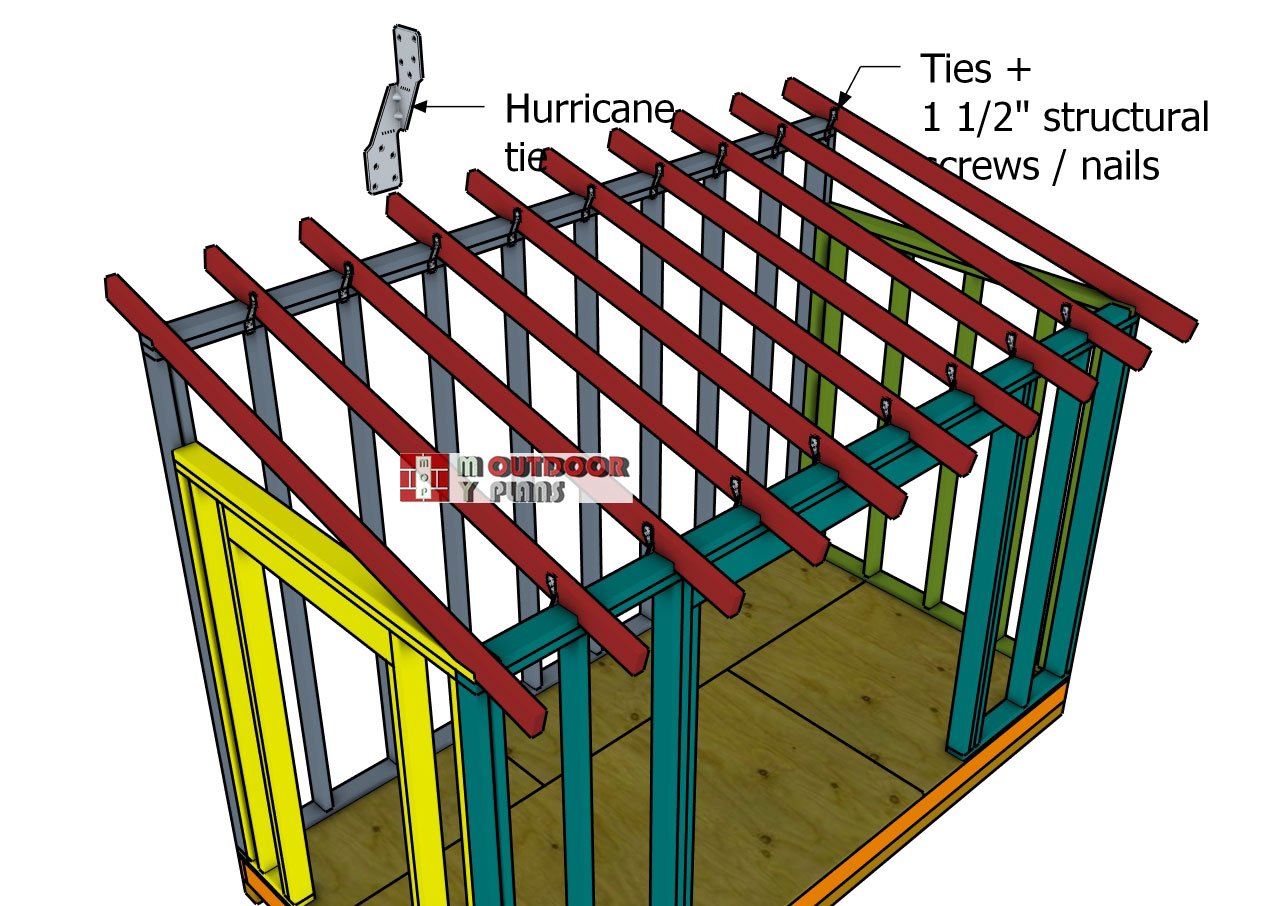
Attach the rafters to the top of the shed, spacing them 16 inches on center (OC) to provide optimal support and stability. Secure each rafter to the top plates using rafter ties, fastening them with 1 1/2″ structural nails or screws for a solid and reliable connection.
When it comes to the end rafters, give them some extra attention for reinforcement. Drill pilot holes through the rafters, then drive in 5 1/2″ screws to lock them securely in place. This added strength ensures that your entire roof structure is rock-solid, durable, and ready to stand up to whatever Mother Nature throws its way.
Side-wall-panels
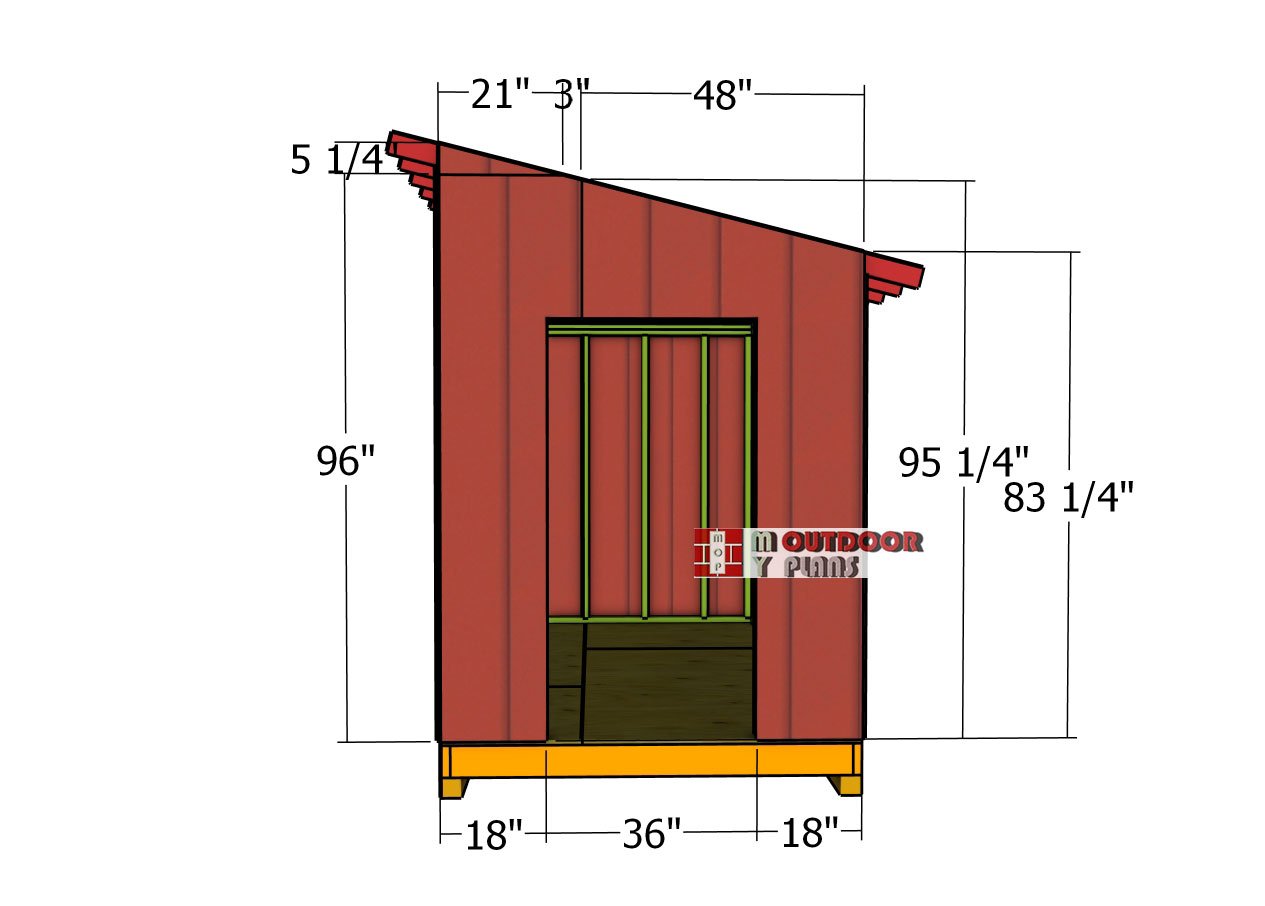
Installing T1-11 siding on your shed’s side walls is a simple yet impactful step that adds both durability and style. Begin by cutting the siding sheets to match the exact dimensions of the walls—precision is key here for a polished finish. Align each panel so the grooves run vertically, and ensure the edges are flush with the corners of the frame for a seamless look.
Secure the siding with 1 5/8″ galvanized screws or 8d nails, spacing them about 8 inches apart along the framing. This spacing ensures a strong, long-lasting hold.
Before attaching the panels, mark and cut out the door opening. Use a jigsaw to make clean, precise cuts, giving your shed a professional, finished appearance.
Plain-side-wall-panels
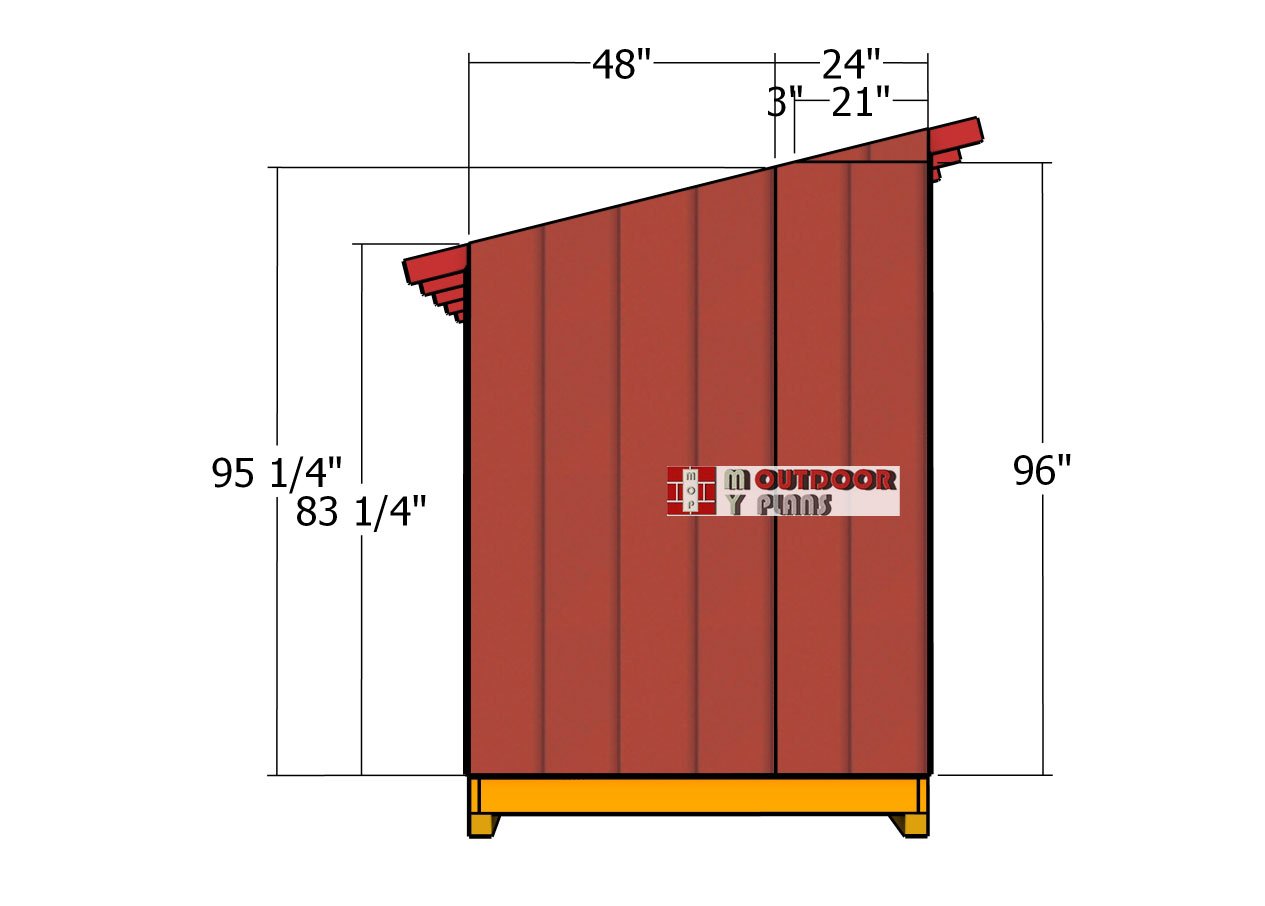
Attach the siding panels to the opposite side of the garden shed—this wall’s smooth and straightforward since there’s no opening to worry about. Simply cut the panels to the wall’s dimensions for a perfect fit, ensuring the grooves run vertically for a clean, uniform look.
Align the edges flush with the corners of the frame, then secure the panels using 1 5/8″ galvanized screws or 8d nails, spaced every 8 inches along the framing. With no door or window to cut out, this step is quick and hassle-free, giving you more time to admire your progress!
Front-wall-panels
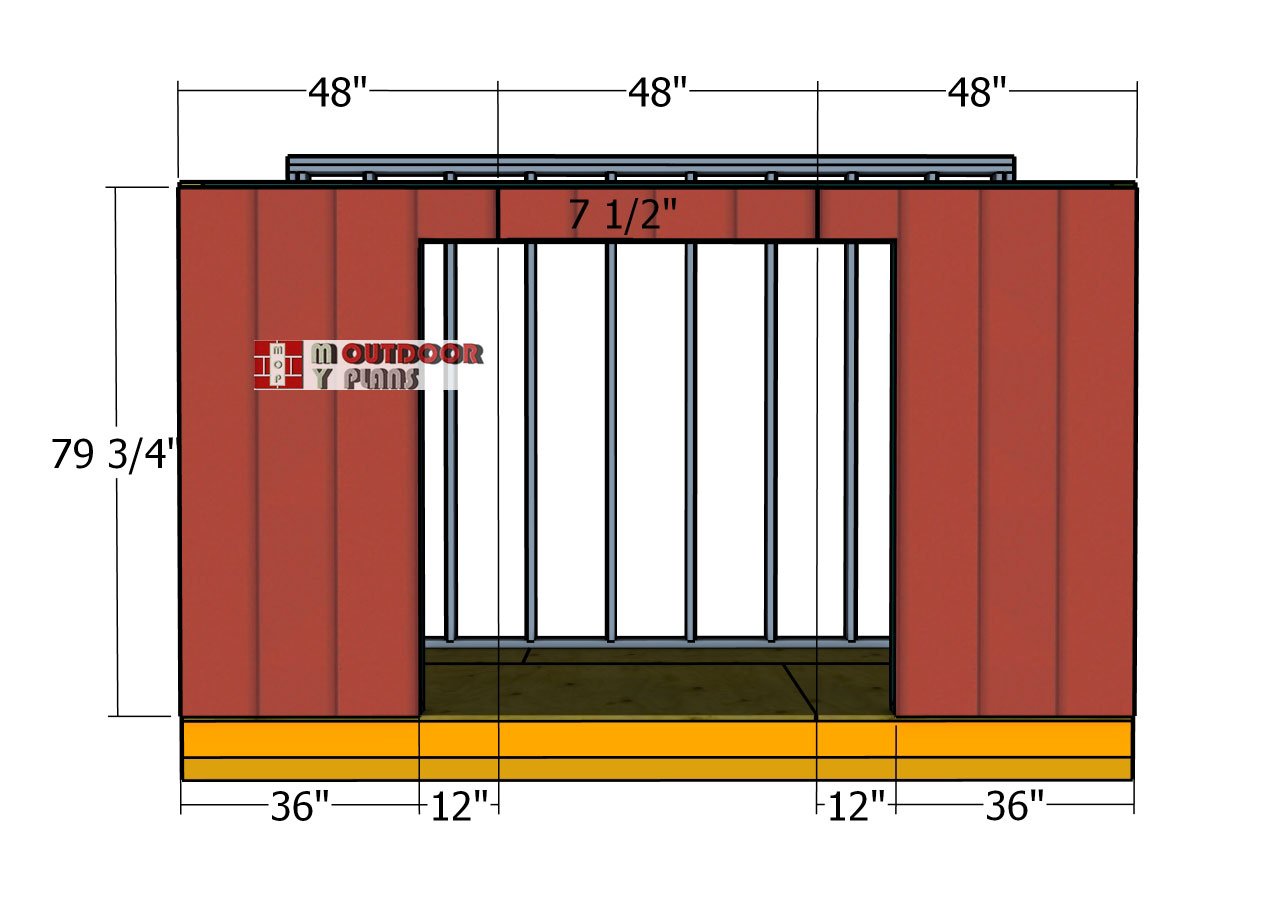
Adding T1-11 siding to the front wall around the double 6-foot doors requires precision. Cut the siding to size, accounting for the door opening. Align the panels so the grooves match, and mark the door areas. Use a circular saw or jigsaw for clean cuts, and save the cutouts to use as doors for a perfect match.
Align the sheets with the wall frame, securing them with 1 5/8″ galvanized screws or nails spaced 8 inches apart. Ensure the siding is flush around the door opening for a seamless, polished look that blends durability with design.
Back-wall-panels
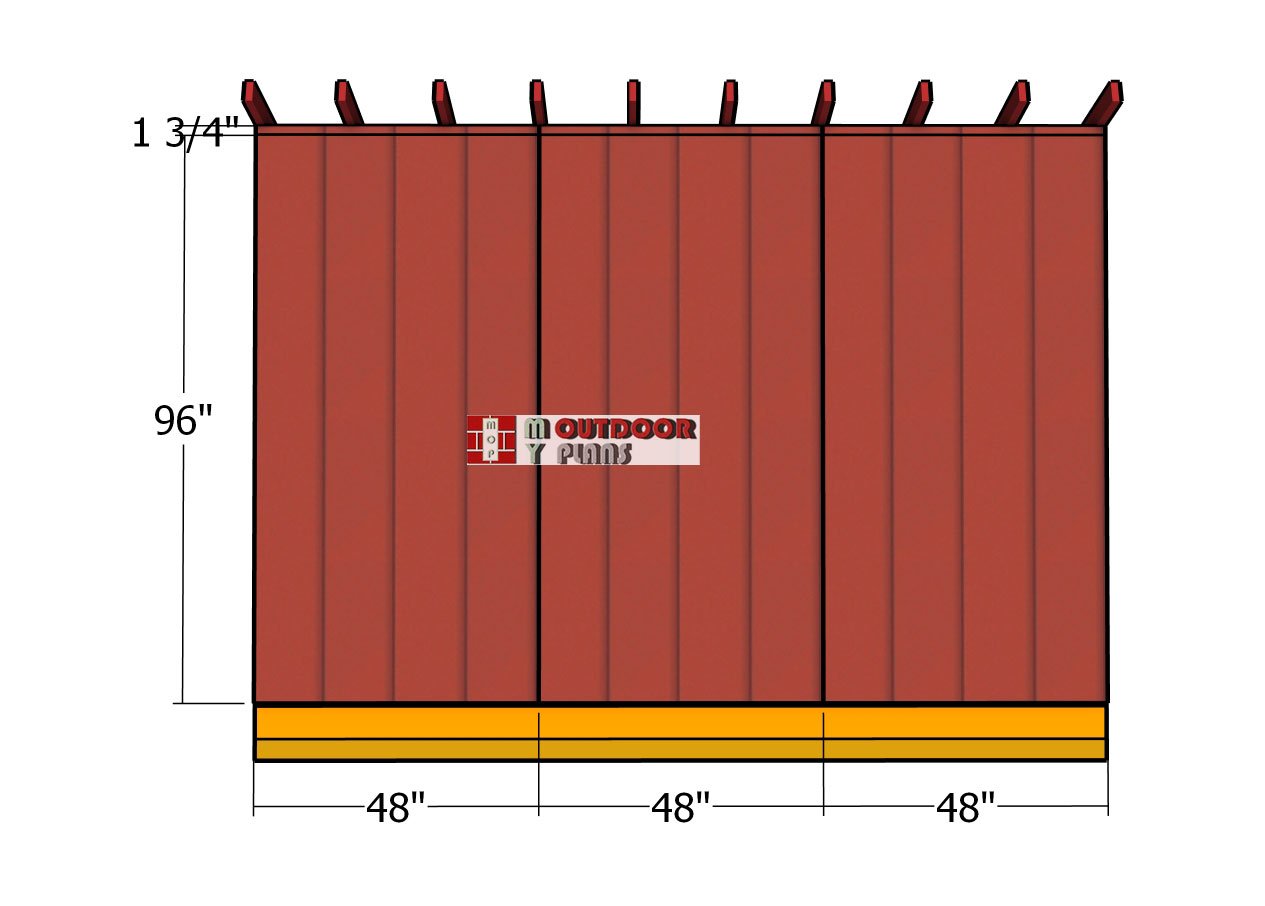
Attach the siding sheets to the back of the shed, aligning the edges flush for a seamless fit. Ensure there are no gaps between the panels. Secure the sheets using 1 5/8″ screws or 8d nails, spaced evenly along the framing for a sturdy hold.
DIY 6×8 Garden Shed
How to build a 6×12 shed
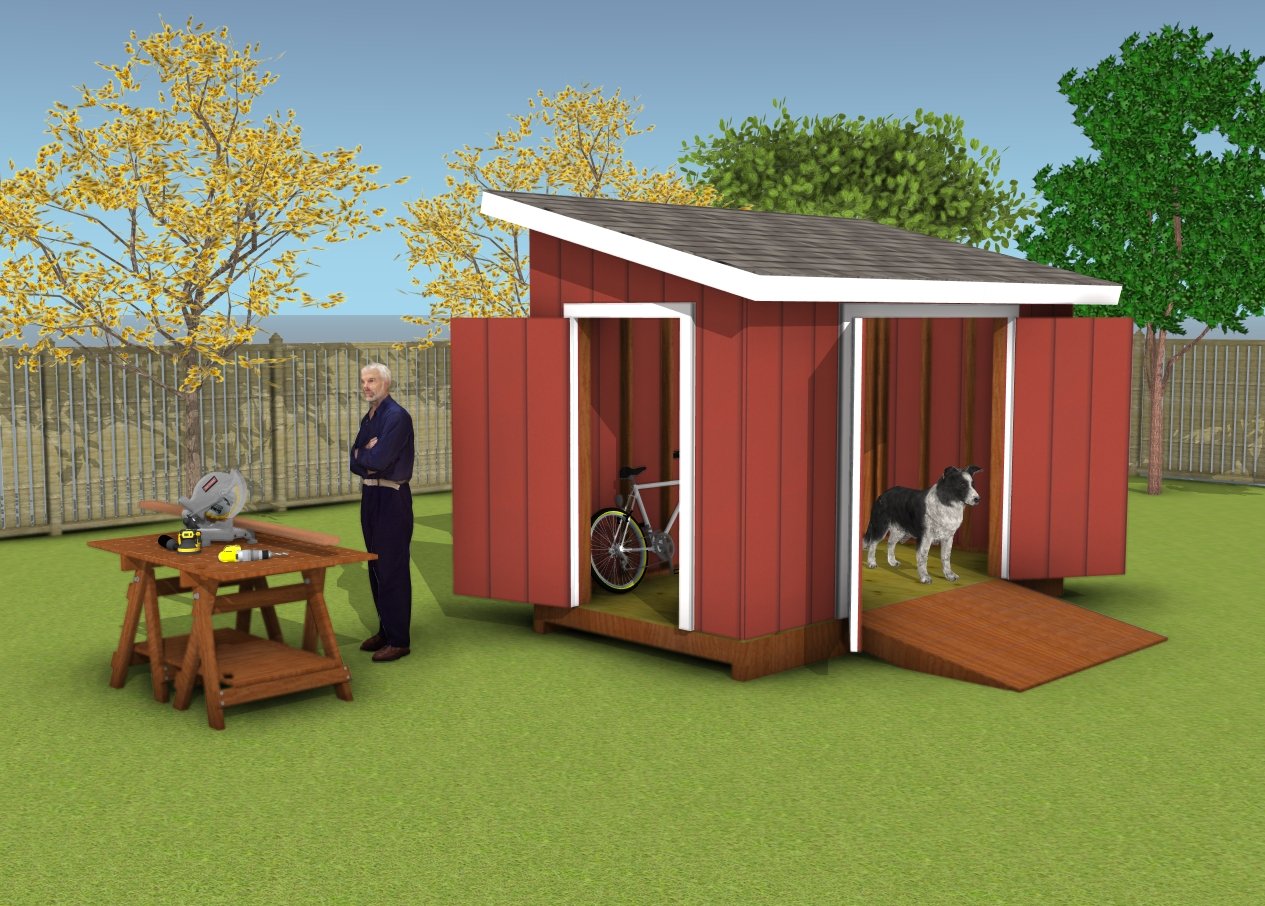
Adding a 1/4″ plywood soffit under the overhangs enhances the shed’s appearance and provides a finished, polished look. It also helps protect the roof structure from pests and weather while improving ventilation if paired with vents.
DIY 6×12 shed plans
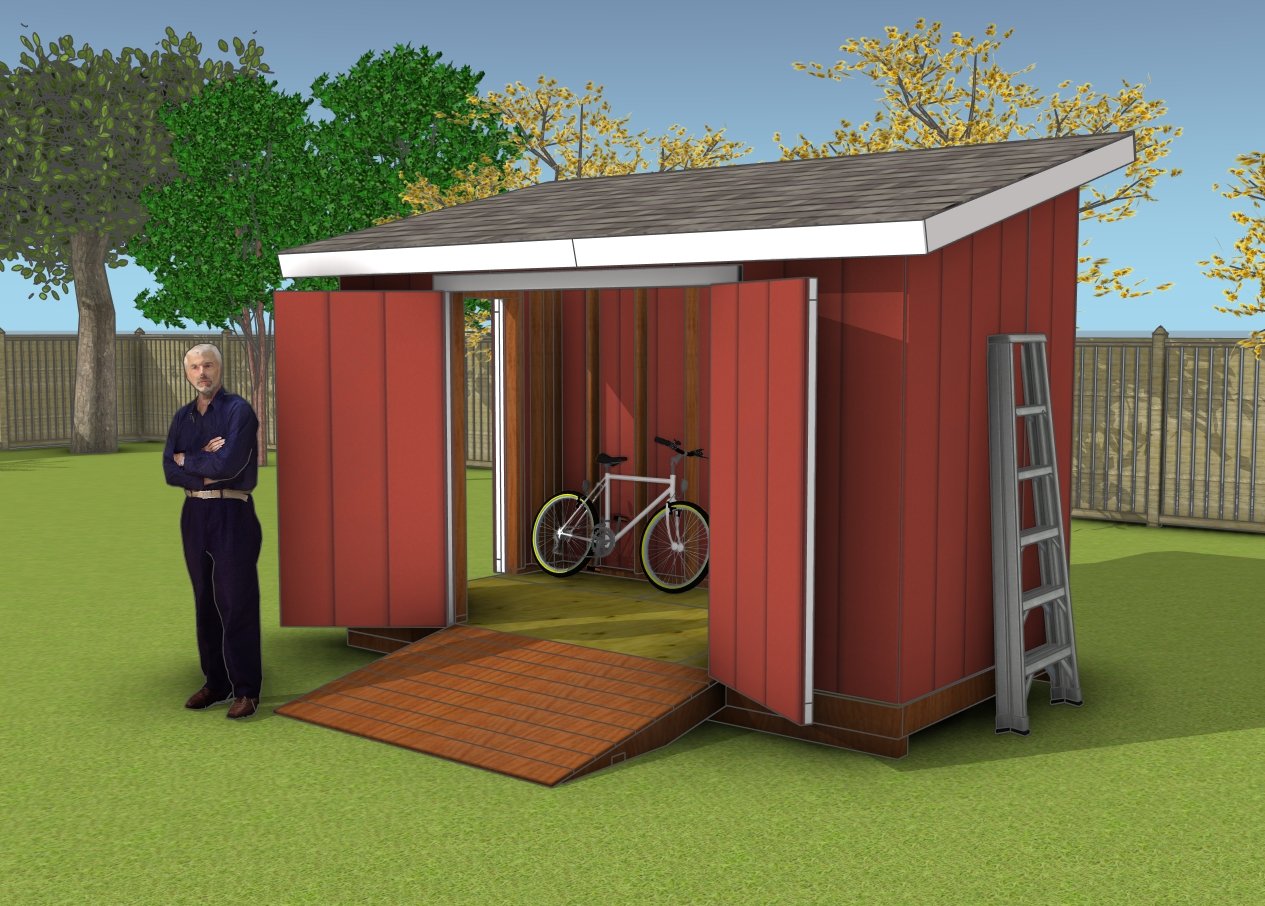
Adding air vents to your shed is a smart way to improve ventilation and prevent moisture buildup inside. You can install small soffit vents along the 1/4″ plywood soffit under the overhangs, keeping the shed interior dry and extending its lifespan.
6×12 lean to shed plans
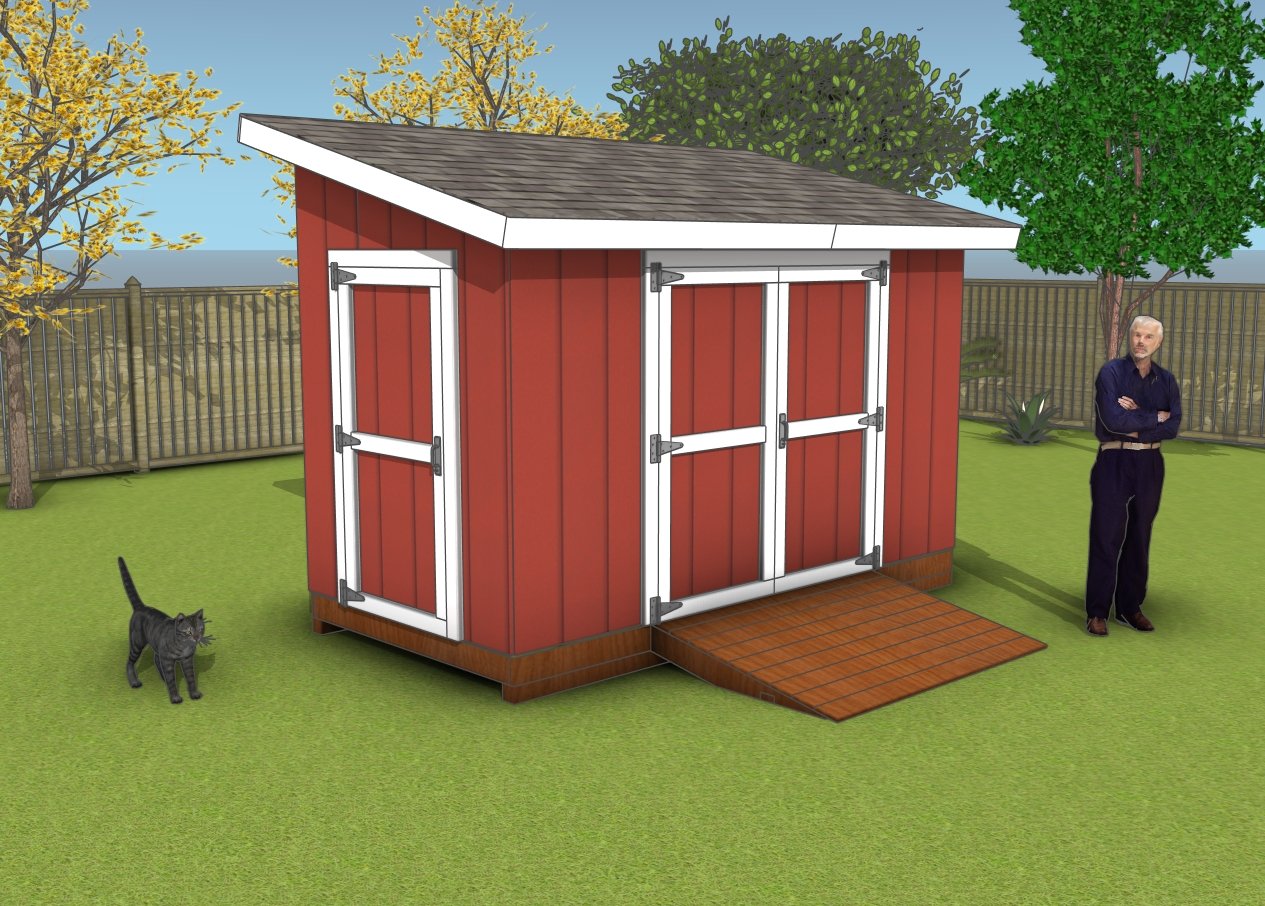
Built with sturdy T1-11 siding and a solid framework, this shed is perfect for storing tools, equipment, or even seasonal decorations. The double 6-foot doors not only provide easy access but also blend seamlessly with the overall design, giving it a polished and cohesive look. Whether you’re a seasoned DIYer or just starting your woodworking journey, this shed project strikes the perfect balance between simplicity and durability, making it an essential addition to your outdoor space.
For a complete guide to building this shed, including detailed plans for a front ramp, check out our premium plans for the ultimate step-by-step experience! If you’re ready to take your build to the next level, click the GET PDF PLANS button below! If you want to get the free version, just read the blog FAQs.
This woodworking project was about 6×12 lean to shed plans. If you want to see more outdoor plans, we recommend you to check out the rest of our step by step projects. LIKE us on Facebook to be the first that gets out latest projects and to hep us keep adding free woodworking plans for you.


