This step by step diy project is about 6×12 firewood shed plans. If you have an already existing building on your property, this attached shed is a great project because it will save space and money. In addition, this shelter can hold up to 2 and a half cords of firewood. See the rest of my firewood shed free plans HERE. Take a look over the rest of my woodworking plans, if you want to get more building inspiration.
When buying the lumber, you should select the planks with great care, making sure they are straight and without any visible flaws (cracks, knots, twists, decay). Investing in cedar or other weather resistant lumber is a good idea, as it will pay off on the long run. Use a spirit level to plumb and align the components, before inserting the galvanized screws, otherwise the project won’t have a symmetrical look. If you have all the materials and tools required for the project, you could get the job done in about a day. See all my Premium Plans HERE.
Projects made from these plans
6×12 Attached Firewood Shed Plans – 2 1/2 Cord Storage
Building a 5 cord wood shed
Cut & Shopping lists
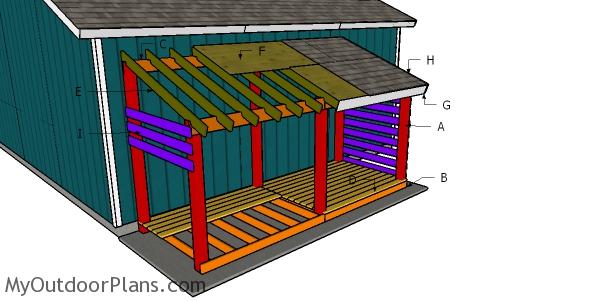
A – 2 pieces of 2×6 lumber – 12 ft, 10 pieces – 69” FLOOR FRAME
B – 3 pieces of 4×4 lumber – 12 ft SKIDS
C – 15 pieces of 2×4 lumber – 12 ft FLOOR BOARDS
D – 2 pieces of 2×6 lumber – 89 1/4”, 2 pieces – 66 3/4”, 2 pieces – 57”, 2 pieces – 81” POSTS
E – 2 pieces of 2×6 lumber – 12 ft TOP BEAMS
F – 7 pieces of 2×4 lumber – 88 ¾” RAFTERS
G – 7 pieces of 1×4 lumber – 156” PURLINS
H – 5 pieces of metal roofing – 3’x89” ROOFING
I – 14 pieces of 1×6 lumber – 6 ft ENCLOSURE
Tools
![]() Hammer, Tape measure, Framing square, Level
Hammer, Tape measure, Framing square, Level
![]() Miter saw, Drill machinery, Screwdriver, Sander
Miter saw, Drill machinery, Screwdriver, Sander
Time
![]() One day
One day
Related
It’s that easy to build a shed!
How to build a 6×12 wood shed

Framing-the-floor-frame
The first step of the project is to build the frame for the shed floor. We are going to use 2×6 boards because they are rigid enough to support the weight of the firewood. Cut the boards as in the diagram and lay them on a level surface.
Align the edges, making sure the corners are square, drill pilot holes through the perimeter joists and insert 3 12″ screws into the regular joists. Measure the diagonals and make adjustments if needed, because they must be perfectly equal.

Fitting-the-4×4-skids
Fit the 4×4 skids under the floor frame. Place the skids equally spaced, as show in the diagram. Use 3 rafter ties to secure each skid to the floor frame. Insert 1 1/2″ structural screws to lock the ties to the floor frame.

Attaching-the-floor-slats
Attach the 2×4 boards to the floor frame. Place blocks between the boards to create even gaps. Drill pilot holes and insert 2 1/2″ screws to lock the boards to the floor frame. You don’t have to secure the boards to all joists. Just alternate them, as you insert the screws.

Assembling-the-corner-posts
Assemble the corner posts for the firewood shed from 2×6 lumber. Cut the boards as shown in the diagram. Drill pilot holes and insert 2 1/2″ screws, every 8″, to assemble the corner posts.

Fitting-the-corner-posts
Attach the posts to the corner of the firewood shed. Plumb the posts with a spirit level on both directions, drill pilot holes and insert 3 1/2″ lag screws to lock them to the floor frame.

Setting-the-top-supports-beams
Next, we have to install the top support beams to the front and back of the shed. As you can see in the plans, you need to use 12×12 T strong ties with 1 1/2″ structural screws to secure the beams to the front and back vertical posts.
In addition, insert 3 1/2″ lag screws through the side posts into the top beams.
Building the lean to roof

Installing-the-rafters
Fit the 2×4 rafters to the top of the shed. Place the rafters every 24″ on center. The dimensions from the diagram represent the distance between the rafters, corresponding to 24″ OC. Use rafter ties and 1 1/2″ structural screws to lock the rafters to the support beams, at both ends.
* The premium plans include a detailed diagram on how to cut the rafters (dimensions for rafters and dimensions with location for the birdsmouth cuts).
Attaching-the-side-slats
Attach the 1×6 boards to the sides of the firewood shed. Place a spacer between the boards to create even gaps between the boards. In addition, use a spirit level to make sure the boards are perfectly horizontal.

Fitting-the-purlins
Fit the 1×4 purlins to the top of the shed, every 16″ on center. Notice the 6″ overhangs on both sides. Insert 1 5/8″ screws to lock the purlins to the rafters.

Fitting-the-roof-sheets
Attach the 3’x8′ roofing sheets to the top of the shed. Use tin snips or a metal nibbler to adjust the length of the sheets. Fit drip edges along the side and lower edges of the roof. Install a metal flashing against the wall, to make the line waterproof.

6×12 attached firewood shed plans
Fill the holes with wood putty and smooth the surface with fine-grit sandpaper for a professional result. Apply a few coats of stain or paint to enhance the look of the shelter and to protect the components from decay.

6×12 attached firewood shed plans – front view
If you want to build a firewood shed but you are narrow on space, you can just attach to an already existing building on your property. This shed can hold up to 2 1/2 cords of firewood. This shed features a simple but durable structure, so once built, you don’t have to worry about it for a long time. The lean to roof will drain the water to the front.

This woodworking project was about 6×12 wood shed plans. If you want to see more outdoor plans, check out the rest of our step by step projects and follow the instructions to obtain a professional result.