In this post, we’re diving into two key parts of building the 4×8 lean-to shed: the door and the roof. These elements are not only essential for protecting your storage but also for giving the shed its final, polished look. I’ll walk you through building a sturdy, functional door and guide you step-by-step in creating a durable, weatherproof roof. Whether you’re looking to boost your DIY skills or just wrap up your shed project, this guide has you covered! Let’s get started!
Building a 4×8 lean-to shed with a side door offers numerous benefits for homeowners. It provides a compact yet highly functional storage solution for tools, garden equipment, or seasonal items, helping to declutter your garage or yard. With its efficient design, it maximizes space without overwhelming your backyard, making it perfect for smaller areas. Plus, taking on this DIY project adds value to your home while allowing you to customize the shed to match your style and needs. Not only will you save money compared to buying a pre-made shed, but you’ll also gain the satisfaction and confidence of having built something practical and long-lasting with your own hands.
When buying the lumber, you should select the planks with great care, making sure they are straight and without any visible flaws (cracks, knots, twists, decay). Investing in cedar or other weather resistant lumber is a good idea, as it will pay off on the long run. Use a spirit level to plumb and align the components, before inserting the galvanized screws, otherwise the project won’t have a symmetrical look. If you have all the materials and tools required for the project, you could get the job done in about a day. See all my Premium Plans HERE.
Projects made from these plans
4×8 Lean to Shed Roof Plans
Building-a-4×8-lean-to-shed
Cut + Shopping Lists
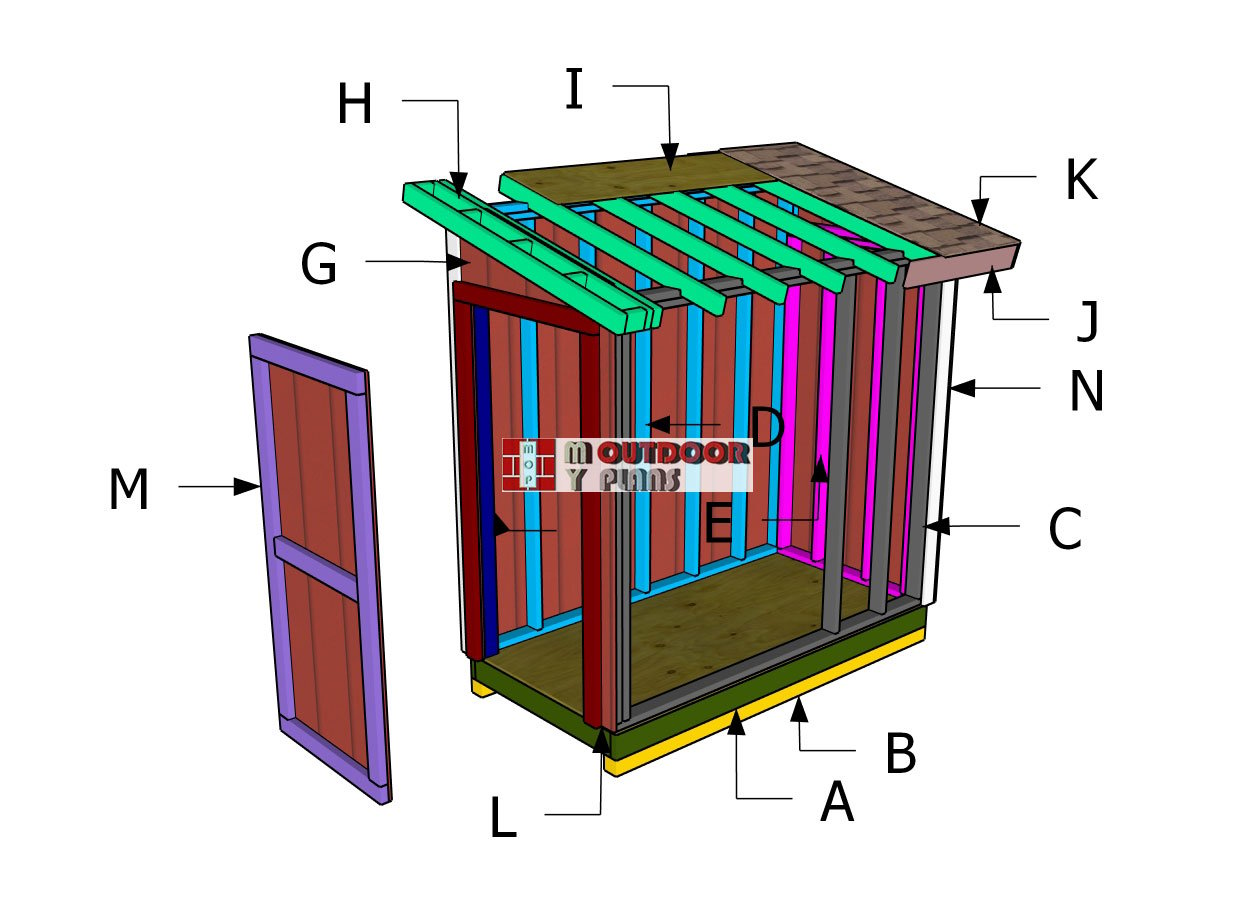
- G – SIDING – 5/8″ T1-11 siding 4’x8′ – 2 pieces
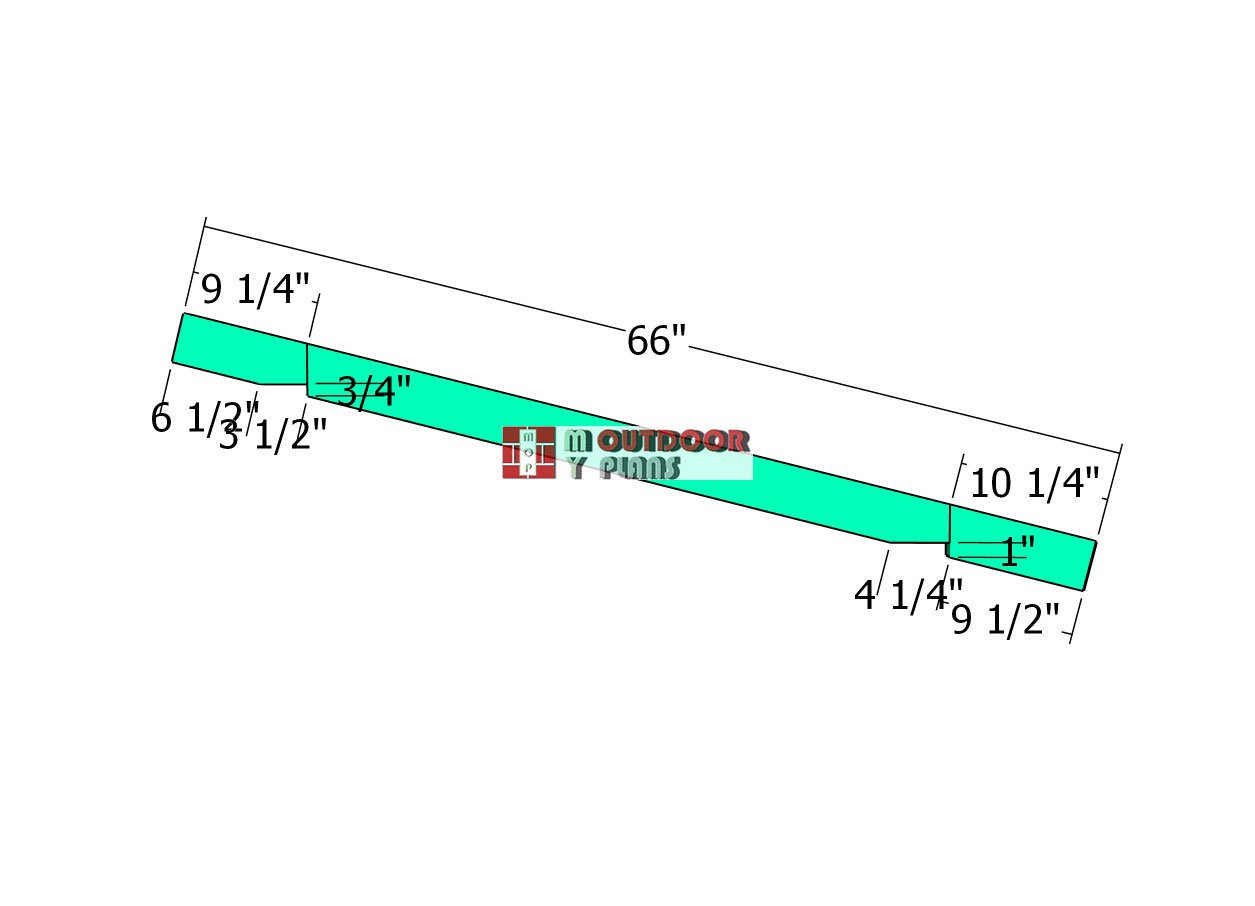
- H – RAFTERS – 2×4 lumber 66″ – 11 pieces
- H – RAFTERS – 2×4 lumber 4 1/2″ – 10 pieces
- I – ROOF – 3/4″ plywood 4’x8′ – 1 piece
- I – ROOF – 3/4″ plywood 2’x4′ – 1 piece
- I – ROOF – 3/4″ plywood 18″x88″ – 1 piece
- I – ROOF – 3/4″ plywood 18″x24″ – 1 piece
- J – ROOF TRIMS – 1×6 lumber 112″ – 2 pieces
- J – ROOF TRIMS – 1×6 lumber 67 1/2″ – 2 pieces
- K – ROOFING – 60 sq ft of tar paper, 60 sq ft of asphalt shingles
- L – JAMBS – 2×4 lumber 77 1/2″ – 2 pieces
- L – JAMBS – 2×4 lumber 43″ – 1 piece
- M – DOOR – 2×4 lumber 36″ – 2 pieces
- M – DOOR – 2×4 lumber 70 1/2″ – 2 pieces
- M – DOOR – 2×4 lumber 29″ – 1 piece
- M – DOOR – 5/8″ T1-11 siding 3’x77 1/2″ – 1 piece
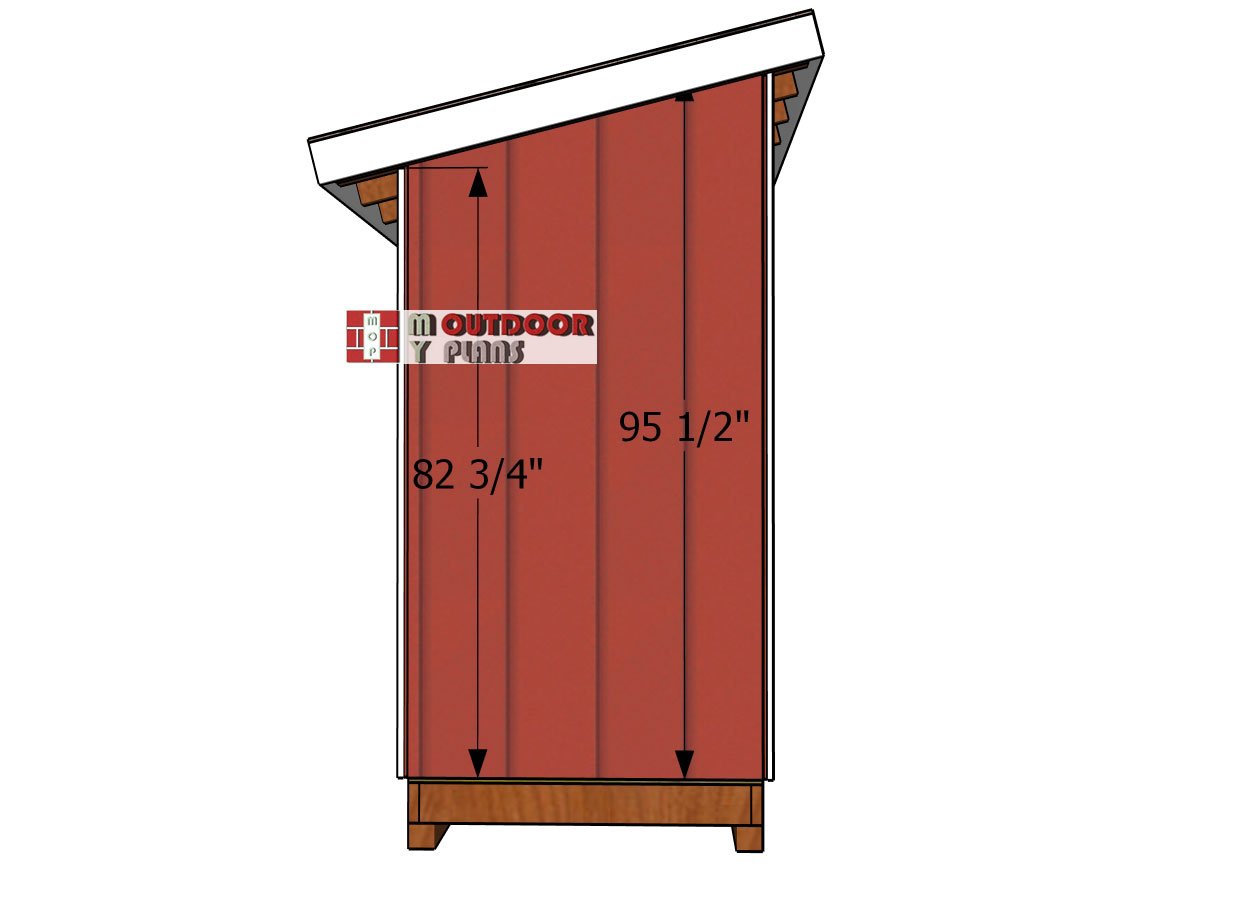
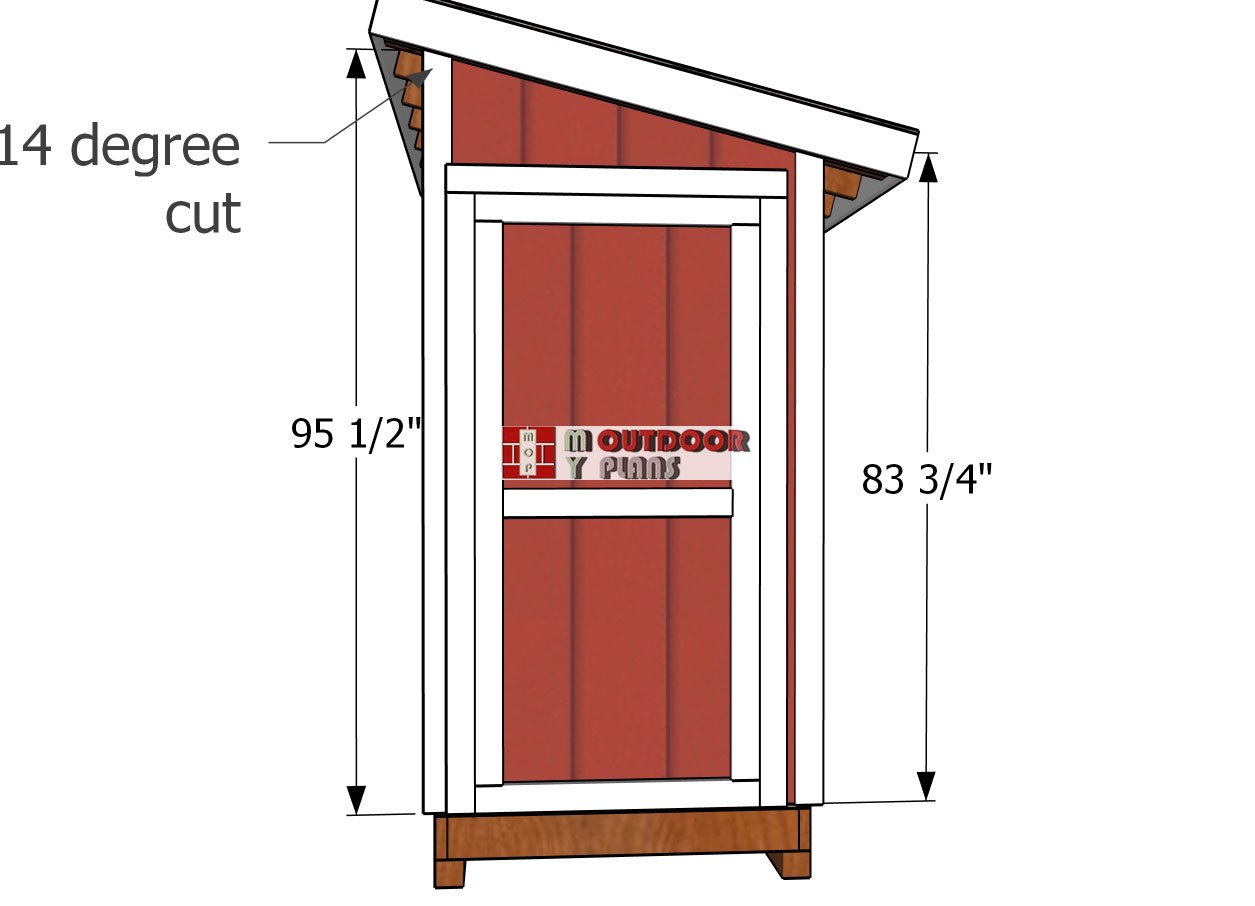
- N – TRIMS – 1×4 lumber 95 1/2″ – 4 pieces
- N – TRIMS – 1×4 lumber 82 3/4″ – 2 pieces
- N – TRIMS – 1×4 lumber 83 3/4″ – 2 pieces
- 2×4 lumber 8 ft – 6 pieces
- 2×4 lumber 12 ft – 6 pieces
- 2 pieces of 5/8″ T1-11 siding – 4’x8′
- 2 pieces of 3/4″ plywood – 4’x8′
- 1×6 lumber 8 ft – 2 pieces
- 1×6 lumber 10 ft – 2 pieces
- 1×4 lumber 8 ft – 8 pieces
- 60 sq ft of tar paper, 60 sq ft of asphalt shingles
- 200 pieces of 6d nails
- 50 pieces of 4 1/2″ screws
- 100 pieces of 3 1/2″ screws
- 100 pieces of 2 1/2″ screws
- 200 pieces of 1 5/8″ screws
- 1 piece of shed door hardware
Tools
![]() Hammer, Tape measure, Framing square, Level
Hammer, Tape measure, Framing square, Level
![]() Miter saw, Drill machinery, Screwdriver, Sander
Miter saw, Drill machinery, Screwdriver, Sander
![]() Safety Gloves, Safety Glasses
Safety Gloves, Safety Glasses
Time
![]() One weekend
One weekend
Related
- PART 1: 4×8 Lean to Shed Plans
- PART 2: 4×8 Lean to Shed Roof Plans
- Trash shed plans
- 4×4 Lean to shed plans
Step 1: Building the roof
Rafters
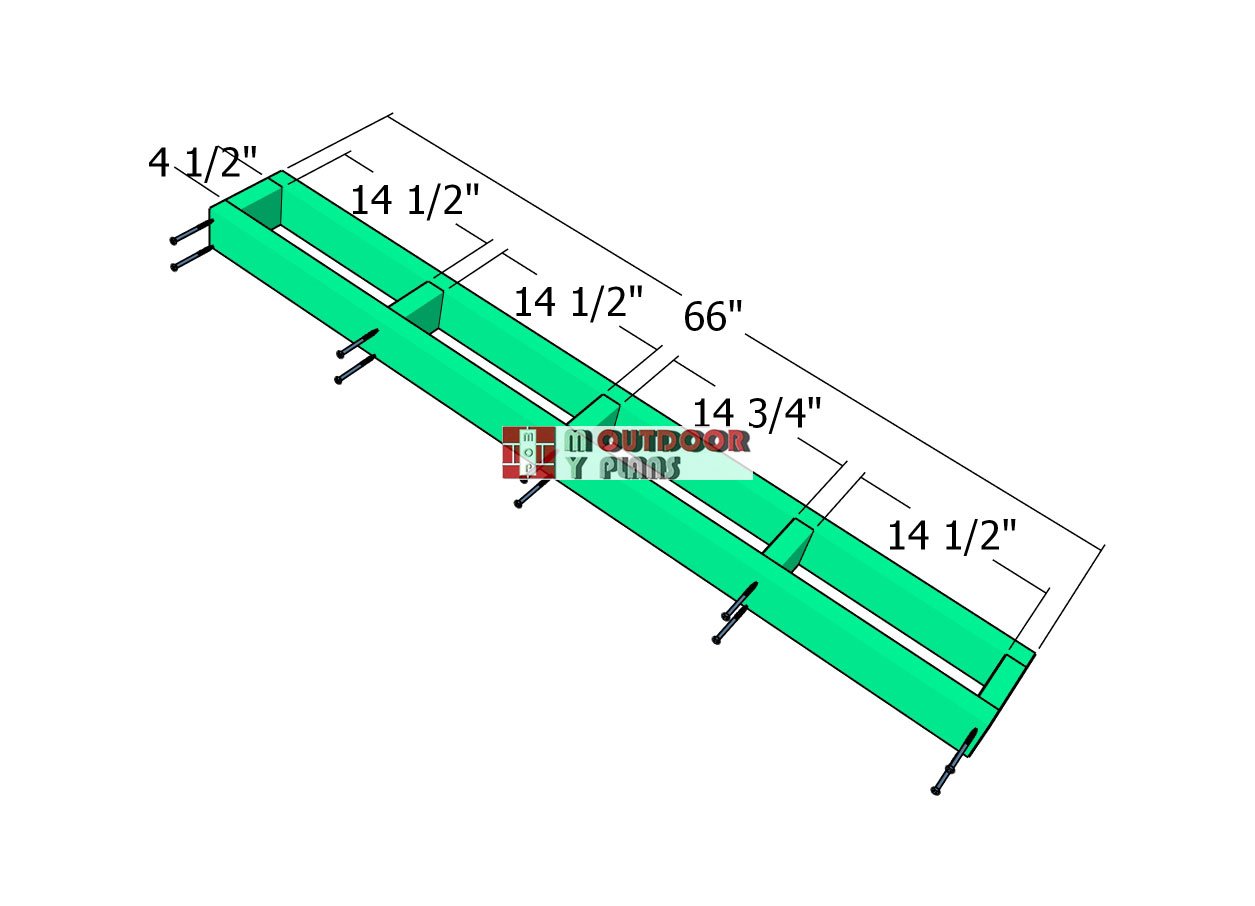
The first step in this project is to build the rafters for your lean-to shed. Grab some 2×4 lumber and follow the measurements in the diagram to make the birdsmouth cuts.
Mark the cut lines on your boards, then use a circular saw to get those clean cuts. The birdsmouth cut will allow the rafters to sit snugly on top of the shed walls, ensuring a sturdy and secure roof frame. It’s a simple but important step to get your roof structure ready to go!
Fitting-the-rafters
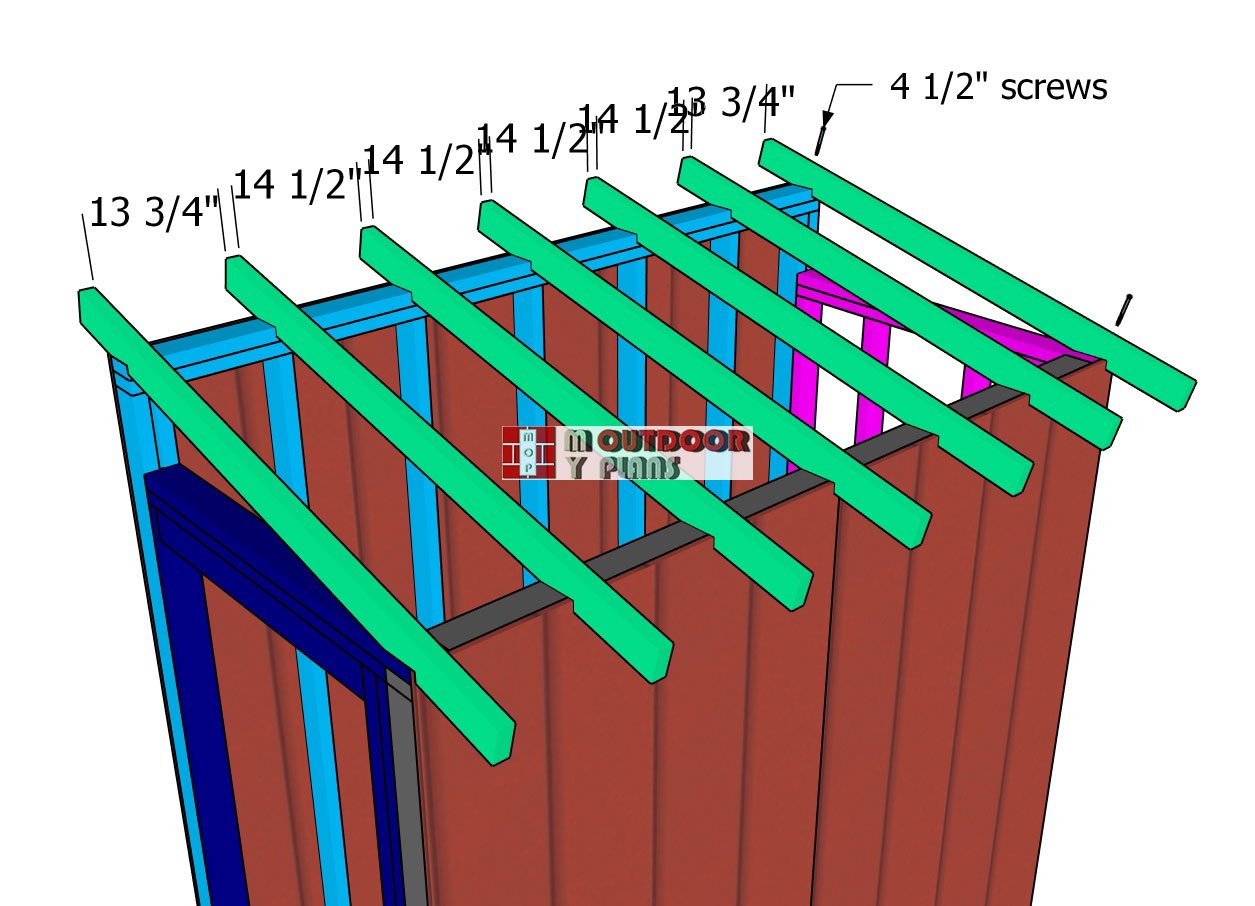
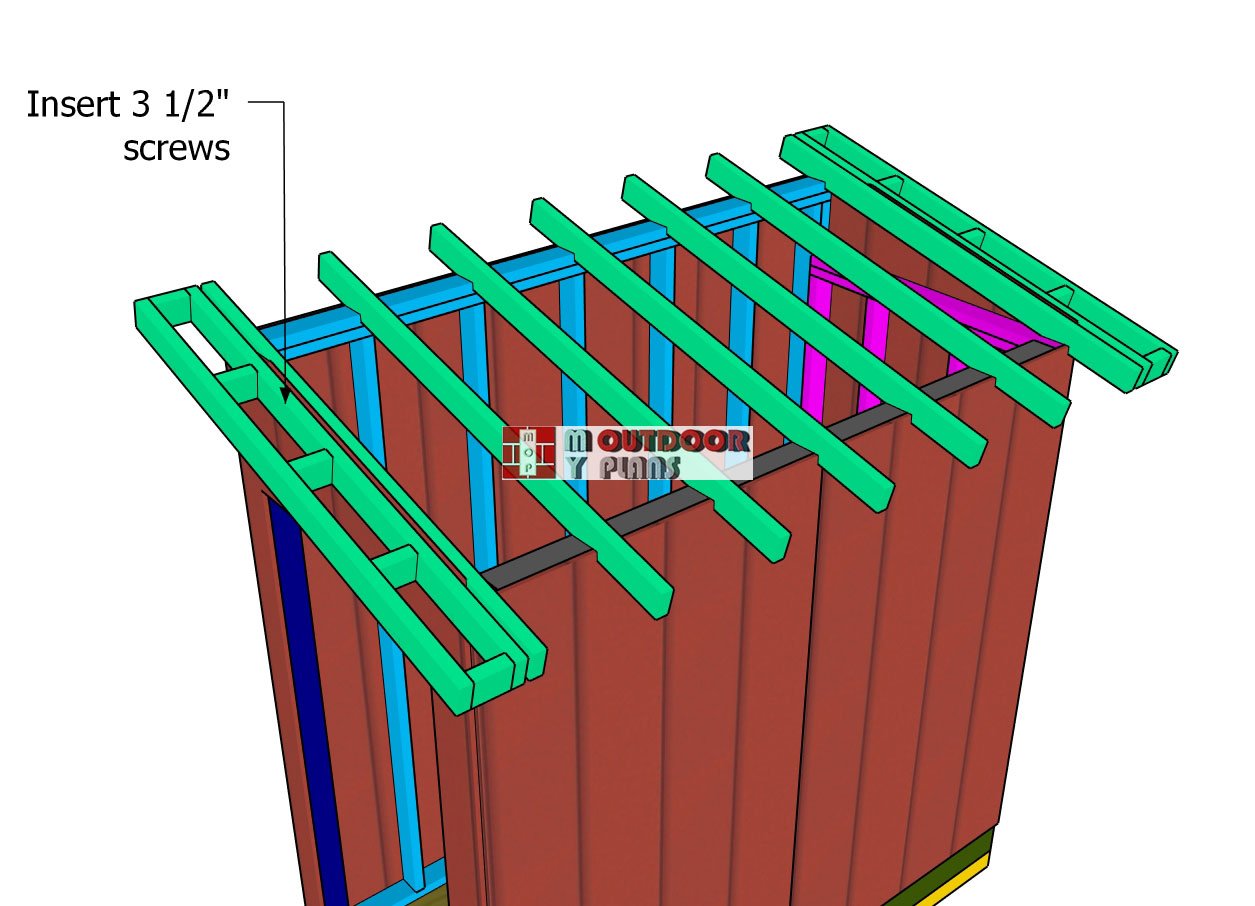
Next, fit the rafters to the top of the lean-to shed, spacing them 16 inches on center for proper support. Drill pilot holes through the rafters and into the top plates, then secure each rafter with 4 1/2″ screws. Be sure to use two screws for each joint to ensure a strong, stable connection. This will lock the rafters in place and create a solid foundation for your roof.
Front-wall-siding
Attach the 5/8″ T1-11 siding sheets to both the front and back of the garden shed, making sure the edges are aligned flush. For the top edge, cut the angles to match the roof slope, as shown in the plans.
Don’t forget to cut out the door opening—make sure to save the cutout piece, as we’ll use it for the door later on. Secure the siding to the framing using 6d nails, spaced every 8 inches, for a strong and durable finish. This step will give the shed a clean, finished look while adding structural support.
Assembling-the-overhangs
Next, let’s assemble the overhangs for the shed. Using 2×4 boards, lay out the components and secure them together with 3 1/2″ screws. Be sure to drill pilot holes first to prevent the wood from splitting.
As you assemble, take your time to align all the components properly before inserting the screws to ensure a clean, sturdy finish. The overhangs will not only add a nice architectural touch but also provide additional protection for your shed’s walls.
Fitting-the-overhangs
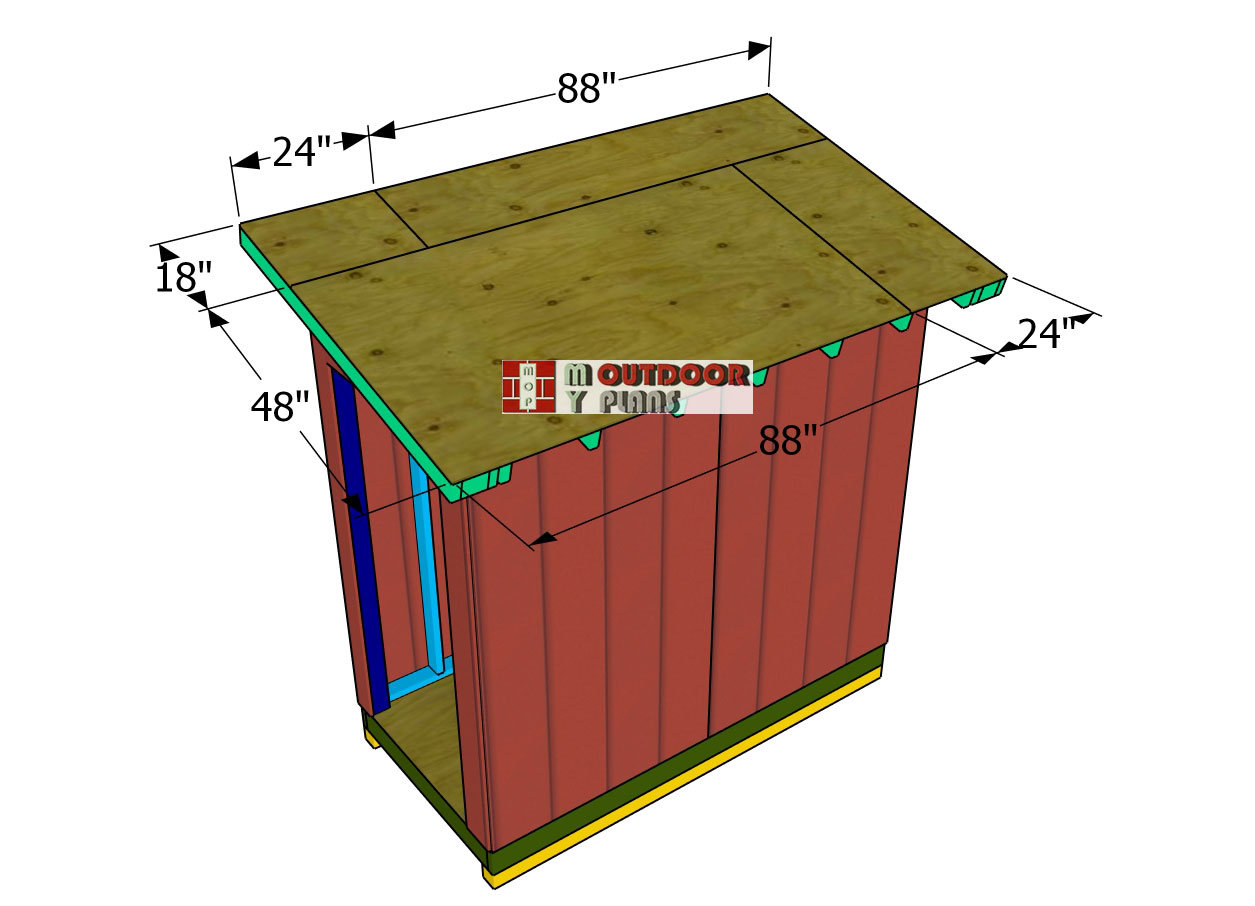
Now it’s time to fit the overhangs to the front and back of the shed. Align the edges flush with the roofline to ensure a snug fit, then secure the overhangs in place using 3 1/2″ screws. This will add extra protection from the elements and give your shed a more polished, finished look. Be sure to double-check that everything is properly aligned before locking it in with screws.
Fitting-the-roof-sheets
Attach the 3/4″ plywood sheets to the top of the shed roof, making sure the edges are aligned flush with the base structure. Secure the plywood using 1 5/8″ screws, spaced every 8 inches along the rafters for a strong hold. Ensure there are no gaps between the plywood sheets for a seamless and sturdy roof base. This will create a solid foundation for the next steps of the roofing process.
Side-roof-trims
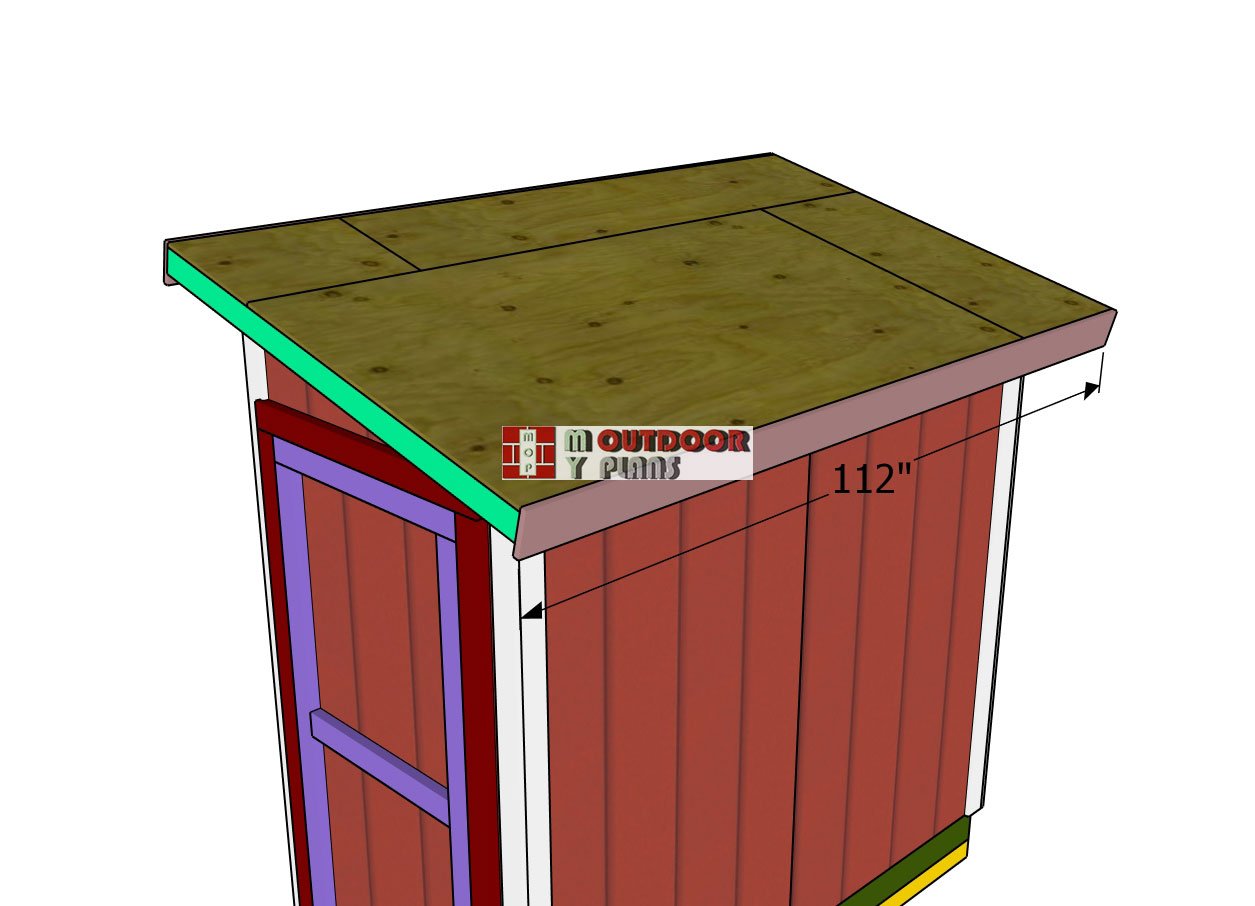
Fit the 1×6 trims to the sides of the roof, aligning them with the roof edges for a clean finish. Secure the trims to the rafters using 6d nails, ensuring everything is flush and evenly spaced. These trims will add a nice finished look to the shed while providing additional weather protection for the roof edges.
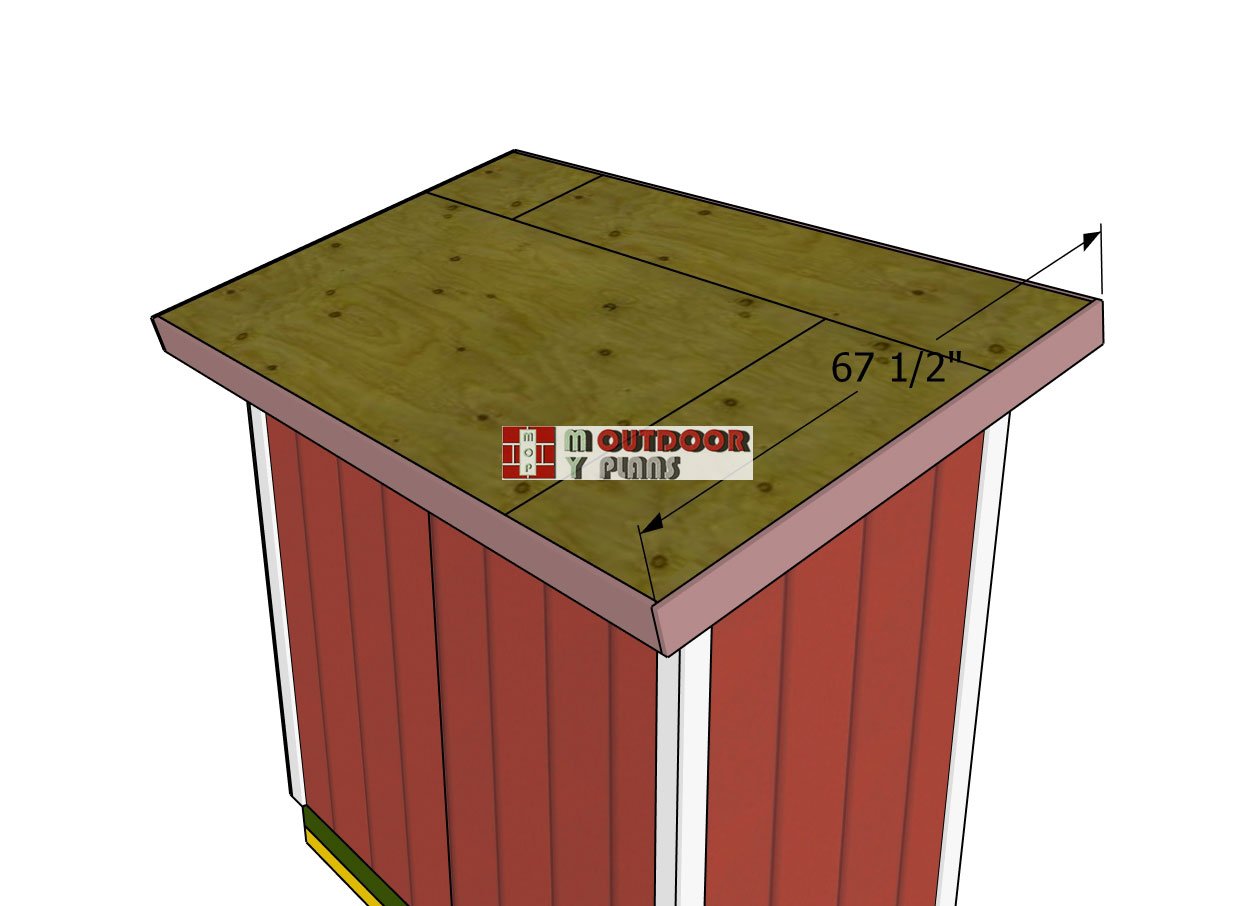
Fitting-the-roof-trims
Attach the 1×6 trims to the front and back of the roof, ensuring they are aligned with the edges just like on the sides. Secure them in place with 6d nails, driving the nails into the rafters for a strong hold. These trims will complete the roof’s clean, polished look and provide added protection for the front and back edges of the shed.
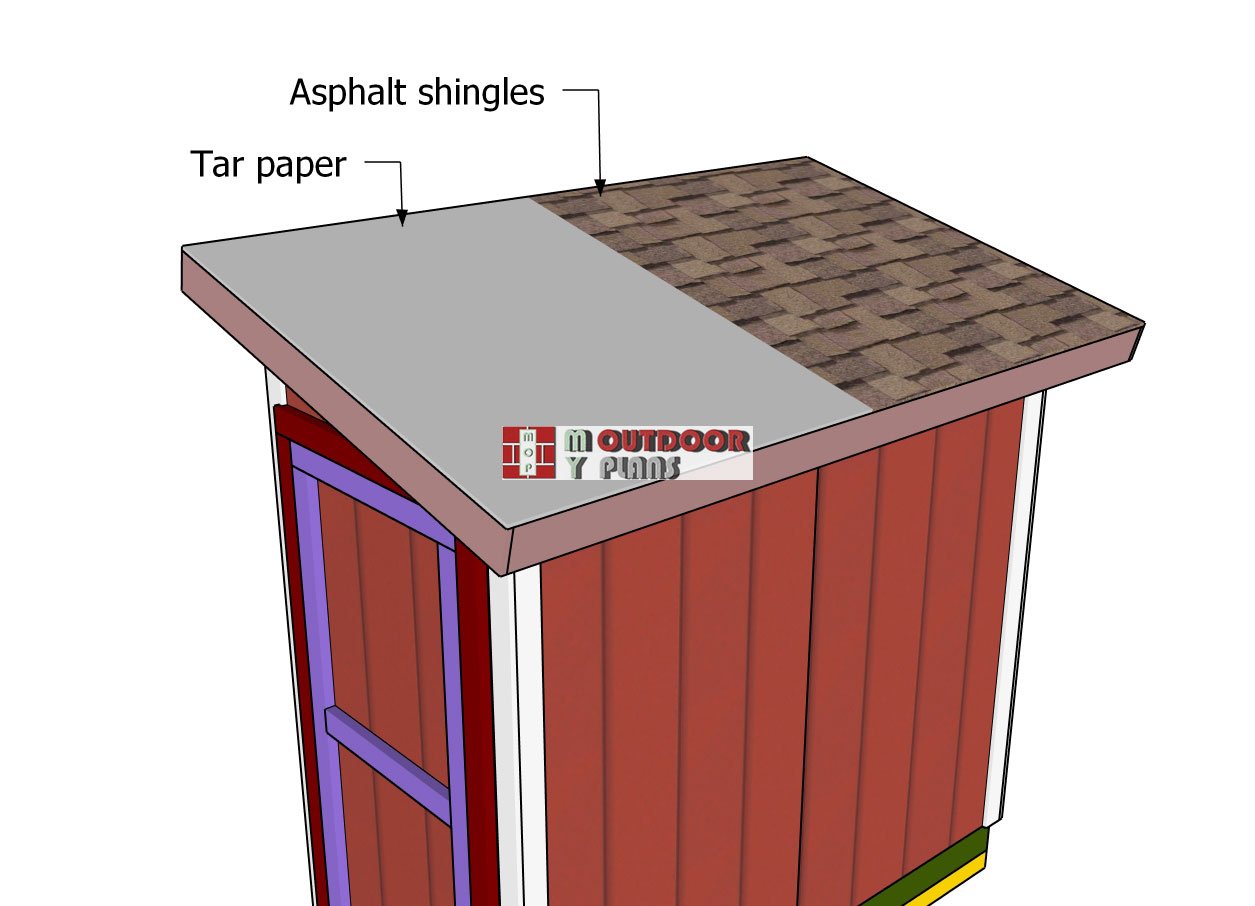
Fitting-the-roofing
Installing asphalt shingles on your shed roof is a straightforward process that will ensure a durable and weather-resistant finish. Start by laying down a layer of roofing felt or underlayment over the roof decking to provide a moisture barrier. Then, install the starter strip of shingles along the bottom edge of the roof, making sure they overhang slightly to guide water away.
Working your way up, stagger the shingles to cover the seams and secure them with roofing nails placed just below the tar line. Finish off the top with ridge cap shingles to cover the peak and ensure everything is sealed tightly. This will leave your shed roof not only functional but also looking great!
Step 2: Building the shed door
Door-frame
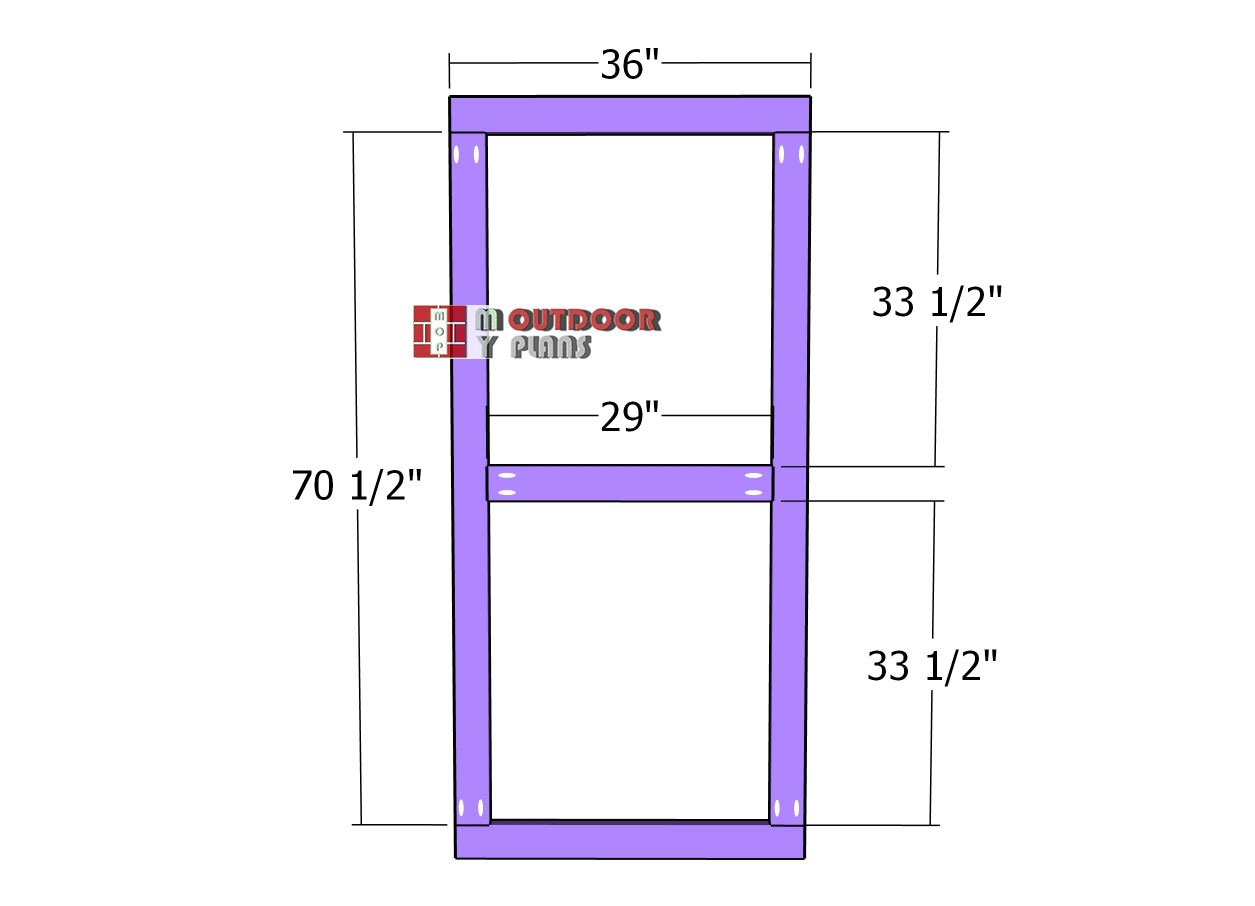
To build the door frame, use 2×4 lumber and cut the components to the dimensions specified in the diagram. Drill pocket holes at both ends of the vertical and middle components to prepare for assembly.
Lay all the parts on a level surface, ensuring proper alignment. Secure the frame together using 2 1/2″ screws, making sure the joints are tight and the frame is square. This solid door frame will provide the foundation for a sturdy and functional shed door.
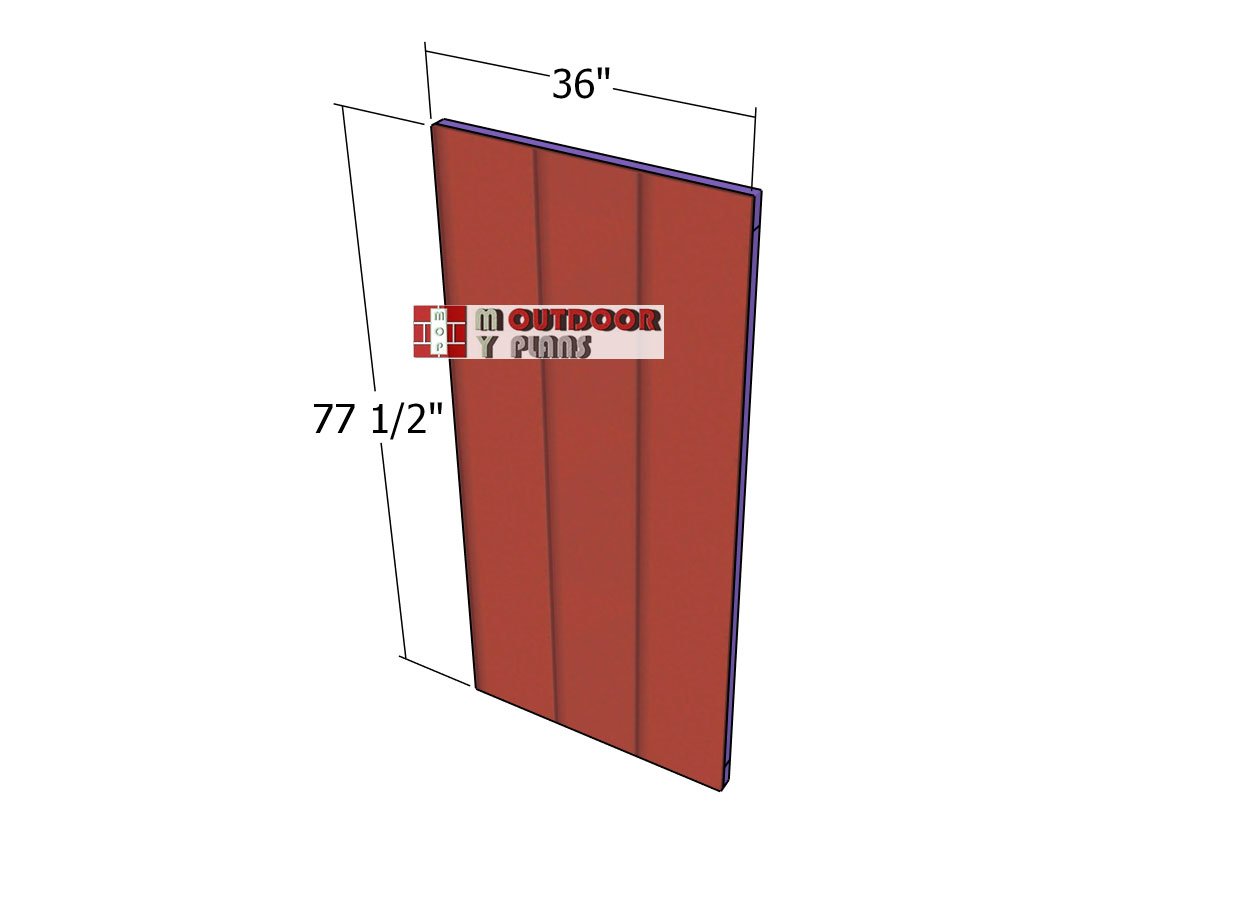
Door-panel
Attach the siding panel to the door frame, ensuring that the edges are aligned flush for a neat finish. Apply wood glue to the frame for added strength, then secure the panel using 1 5/8″ screws. Insert the screws through the panel into the frame, spacing them every 8 inches to ensure the panel is tightly locked in place. This will create a sturdy and well-fitted door for your shed.
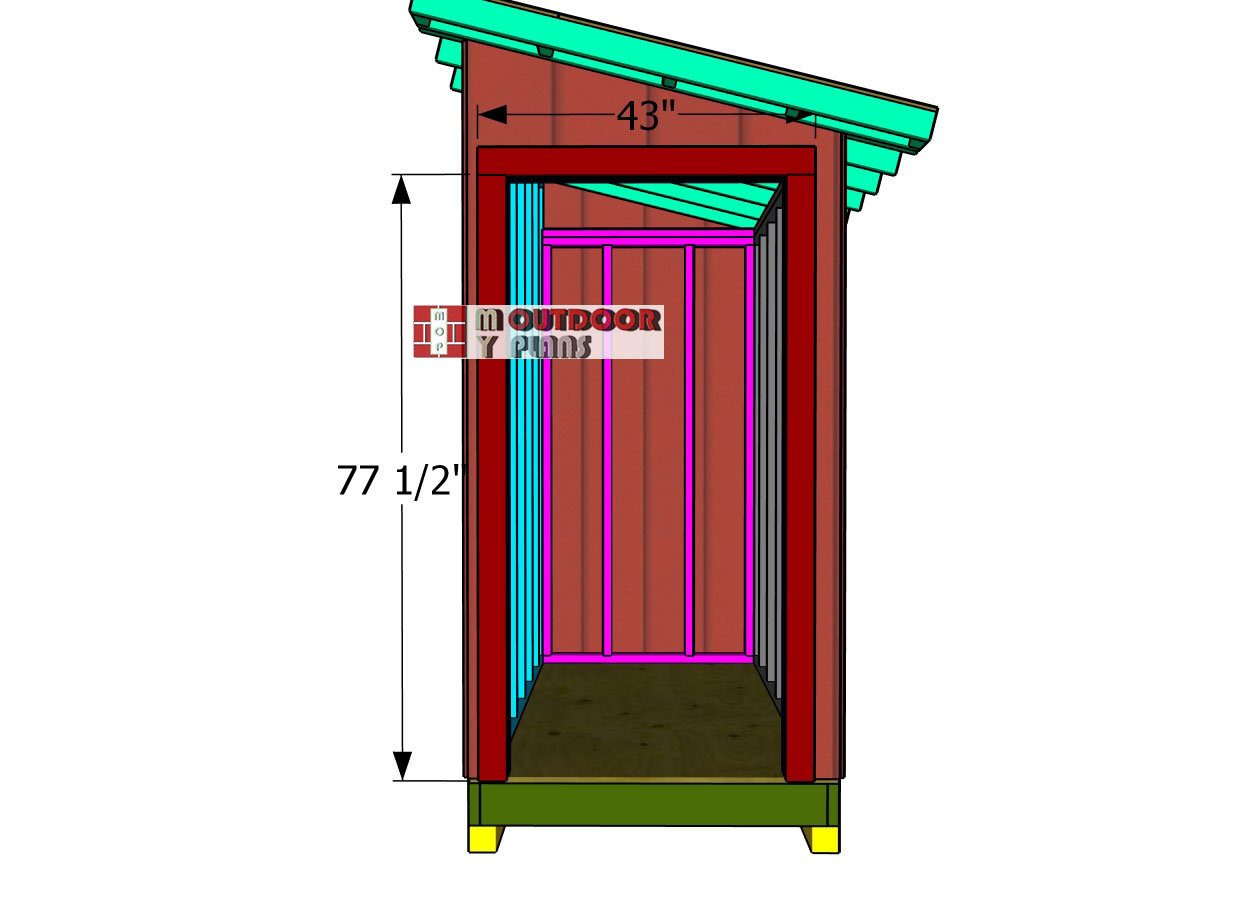
Fitting-the-door-jambs
Attach the 2×4 jambs around the door opening, making sure the edges are flush with the framing. Drill pilot holes to prevent splitting, and then secure the jambs using 2 1/2″ screws. This will lock the jambs in place and provide a solid frame for the door to be installed securely, ensuring smooth operation and durability.
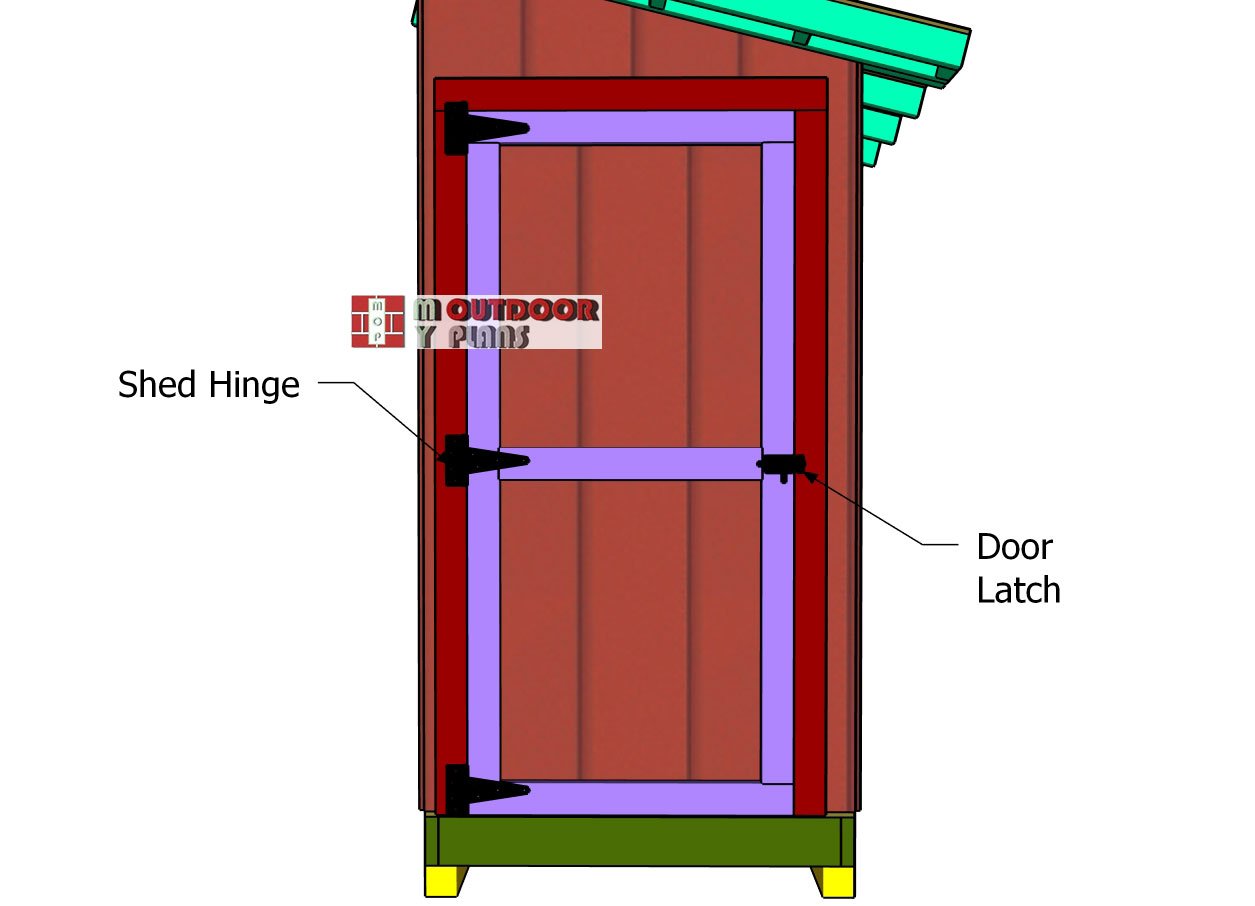
Shed-door-hardware
Fit the door into the opening and align it with the jambs. Attach the door to the jambs using sturdy hinges, ensuring they are evenly spaced for smooth movement. Once the door is securely hinged, install a latch to keep the door tightly closed when not in use. This will complete the installation, giving your shed a functional and secure door.
Step 3: Finishing touches
Side-trims
Fit the 1×4 trims to the sides of the shed, ensuring the edges are aligned flush for a clean, professional look. Secure the trims in place using 6d nails, spacing the nails evenly to lock them tightly against the shed. These trims will add a polished finish and additional weather protection to the sides of your shed.
Front-trims
Attach the 1×4 trims to the front and back of the garden shed, aligning the edges flush for a neat appearance. Secure the trims with 6d nails, making sure they are evenly spaced. These trims will not only enhance the overall look of the shed but also provide additional protection for the edges, giving your shed a finished and polished appearance.
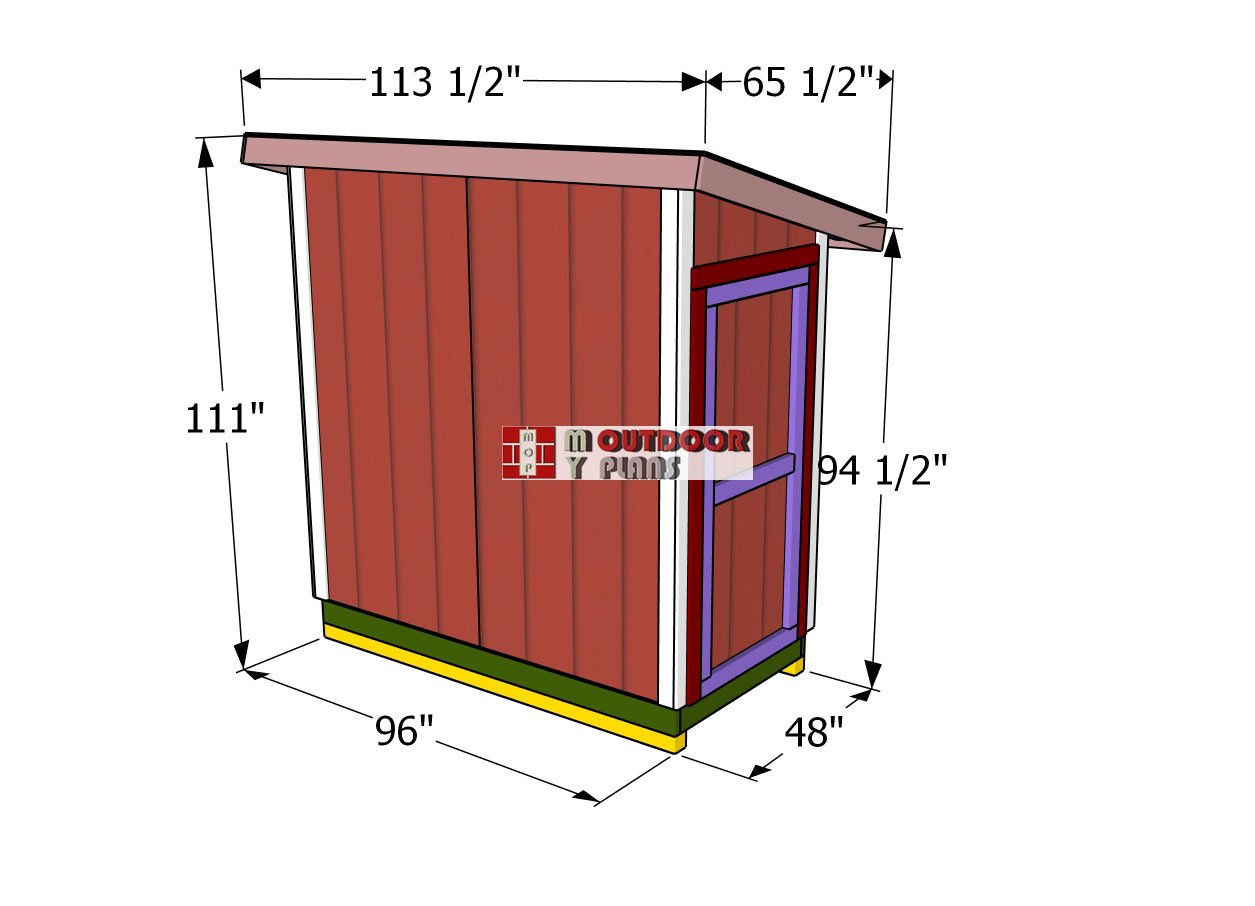
4×8-lean-to-shed-plans—dimensions
Now that the shed is fully assembled, it’s time for the finishing touches to bring everything together. Start by sanding any rough edges or surfaces to ensure a smooth finish. Once sanded, you can choose to stain or paint the shed to match your outdoor space, protecting the wood from the elements while enhancing its appearance.
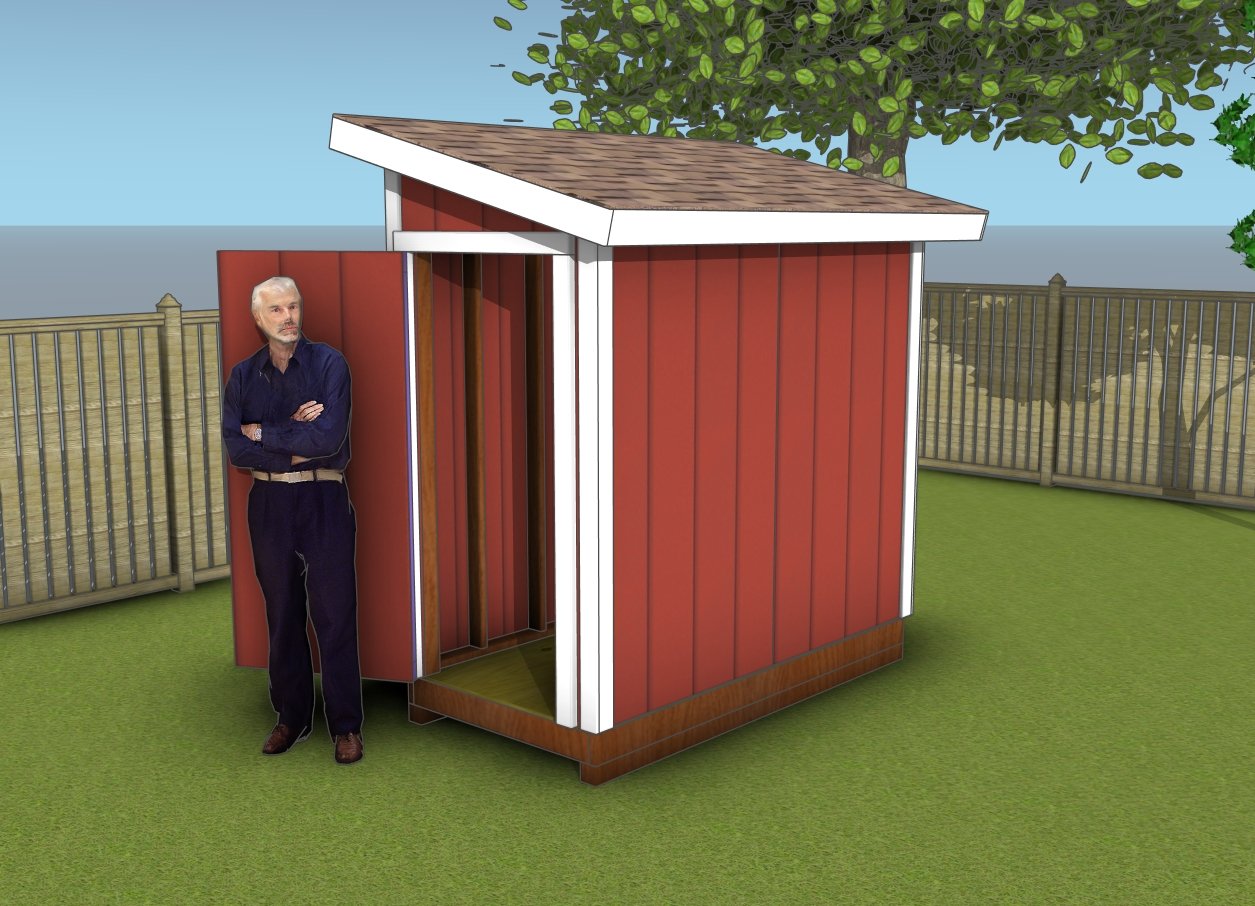
How to build a 4×8 lean to shed
Don’t forget to seal the edges and corners with caulk for added weatherproofing. Finally, add any hardware or accessories, like handles or decorative accents, to personalize the shed. These finishing steps will not only improve the look but also ensure your shed is durable and long-lasting.
Top Tip: If you want to enhance the look of the project and to protect the project, we recommend you to cover the components with paint or stain. Check out PART 1 of the project, where I show you how to build the frame for the shed.
This woodworking project was about 4×8 lean to shed plans. If you want to see more outdoor plans, we recommend you to check out the rest of our step by step projects. LIKE us on Facebook and Google + to be the first that gets out latest projects and to hep us keep adding free woodworking plans for you.
