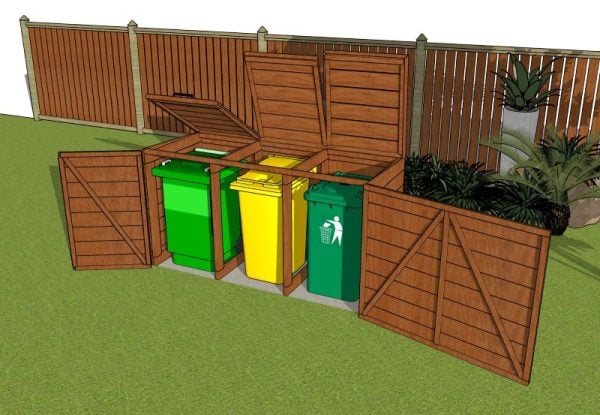
This step by step diy project is about a 3 unit trash bin shed plans. This project is perfect for hiding those unsightly trash bins and transforming your backyard into a beautiful, organized space. With this shed, you’ll have super easy access thanks to the front doors and the three lids on top. Plus, it’s sturdy and weather-resistant, ensuring your bins stay protected all year round. By the end of this project, you’ll have a functional and stylish addition to your backyard that you can be proud of.
The cost for materials, including lumber, hardware, roofing, and paint, is around $500. Planning and design will take approximately 2 hours. The construction process, including cutting, assembly, and installation, will take roughly 13 hours. In total, expect the entire project to take about 15 hours to complete. Take a look over the rest of my woodworking plans, if you want to get more building inspiration.
When buying the lumber, you should select the planks with great care, making sure they are straight and without any visible flaws (cracks, knots, twists, decay). Investing in cedar or other weather resistant lumber is a good idea, as it will pay off on the long run. Use a spirit level to plumb and align the components, before inserting the galvanized screws, otherwise the project won’t have a symmetrical look. If you have all the materials and tools required for the project, you could get the job done in about a day.
Projects made from these plans
3 Unit Trash Bin Shed Plans – PDF Download
Building a trash bin shed
Cut & Shopping List
A – Frame – 2×4 lumber 38″ long – 4 pieces
A – Frame – 2×4 lumber 35″ long – 4 pieces
B – Frame – 2×4 lumber 38″ long – 4 pieces
B – Frame – 2×4 lumber 35″ long – 4 pieces
C – Supports – 2×2 lumber 84″ long – 2 pieces
C – Supports – 2×2 lumber 87″ long – 1 piece
D – Side Boards – 1×6 lumber 35 3/4″ long – 8 pieces
E – Back Boards – 1×6 lumber 87″ long – 8 pieces
F – Door Frame- 1×2 lumber 43 1/2″ long – 2 pieces
F – Door Frame – 1×2 lumber 29 1/4″ long – 2 pieces
F – Door Brace – 1×2 lumber 29 1/4″ long – 1 piece
F – Door Slats – 1×6 lumber 29 1/4″ long – 8 pieces
G – Door Frame- 1×2 lumber 57 3/4″ long – 2 pieces
G – Door Frame- 1×2 lumber 43 1/2″ long – 3 pieces
G – Door Brace – 1×2 lumber 51″ long – 2 pieces
G – Door Slats – 1×6 lumber 57 3/4″ long – 8 pieces
H – Lid Frame – 1×2 lumber 29 1/4″ long – 4 pieces
H – Lid Frame – 1×2 lumber 32 3/4″ long – 4 pieces
H – Lid Slats – 1×6 lumber 29 1/4″ long – 12 pieces
H – Lid Trims – 1×2 lumber 30″ long – 2 pieces
H – Lid Trims – 1×2 lumber 36 1/2″ long – 2 pieces
I – Lid Frame – 1×2 lumber 28 1/2″ long – 4 pieces
I – Lid Frame – 1×2 lumber 32 3/4″ long – 2 pieces
I – Lid Slats – 1×2 lumber 28 1/2″ long – 6 pieces
I – Lid Trim – 1×2 lumber 28 1/2″ long – 1 piece
Tools
![]() Hammer, Tape measure, Framing square, Level
Hammer, Tape measure, Framing square, Level
![]() Miter saw, Drill machinery, Screwdriver, Sander
Miter saw, Drill machinery, Screwdriver, Sander
![]() Concrete mixer, Post hole digger
Concrete mixer, Post hole digger
Time
![]() One week
One week
Related
Pin for Later

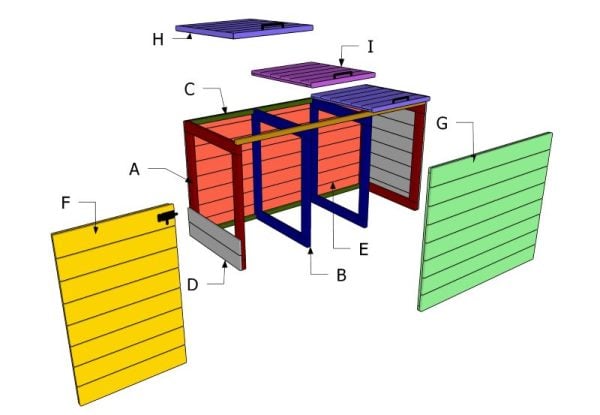
How to make a trash shed – DIY Plans
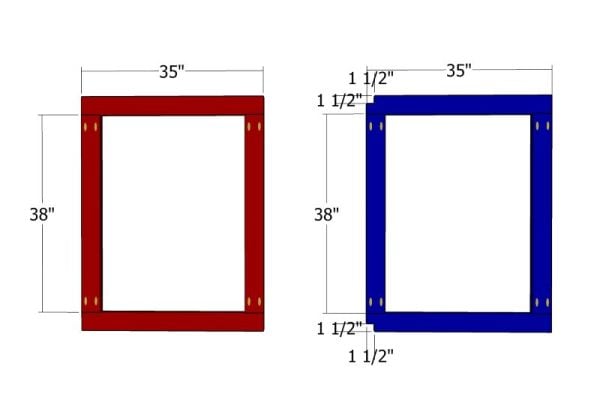
Frames
First up, we’re going to assemble the frames for our trash bin shed. Start by cutting the components from 2x4s according to the diagram. Then, drill pocket holes at both ends of the vertical boards and secure them together using 2 1/2″ screws. Make sure to align the edges flush and double-check that the corners are square. Make notches to the back of the middle frames. This is the foundation, so let’s make it solid!
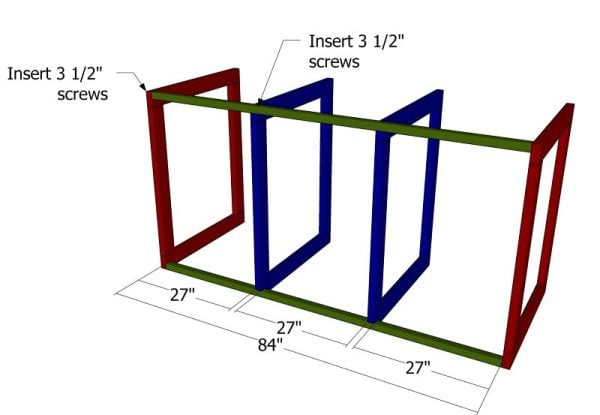
Assembling the frame of the shed
Now, let’s assemble the frame of the shed by attaching the horizontal supports. Drill pilot holes through the end frames and secure them with 3 1/2″ screws. Be sure to use a spirit level to plumb the frames before inserting the screws.
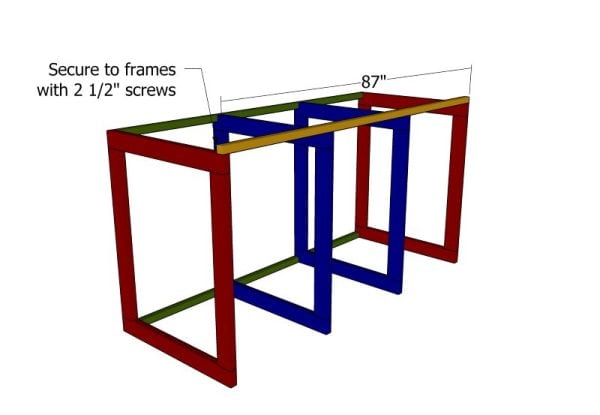
Front support
Next up, we’re going to fit a 2×2 board to the front of the shed. This support adds rigidity to the frame and creates the slope for the lids. Drill some pilot holes through the 2×2 board and secure it to the frames with 2 1/2″ screws.

Back slats
Now we’re going to attach the 1×6 boards to the back of the shed. To get those even gaps, place pieces of 3/8″ wood between the boards. Then, drill pilot holes and use 1 5/8″ screws to secure them to the shed frame. This will give us a nice, professional look while keeping everything sturdy.
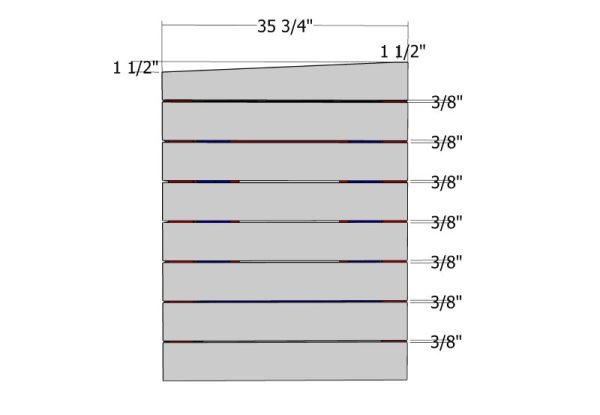
Side slats
Next, we’re fitting the 1×6 boards to the sides of the shed. You’ll need to make an angle cut on the top board, so mark your cut lines and take care of that with a circular saw. Once you’ve got that done, secure the boards to the side frames with 1 5/8″ screws. Keep it precise and solid, and you’re good to go.
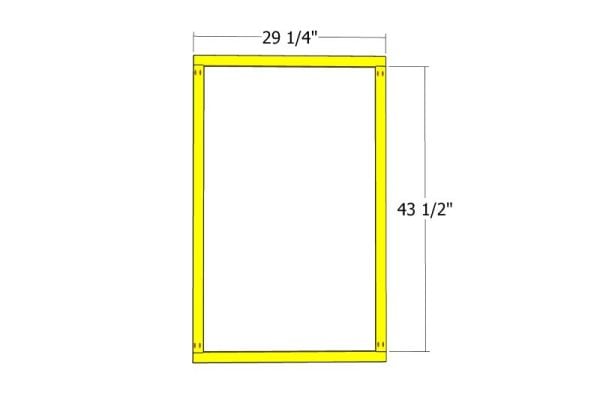
Small door frame
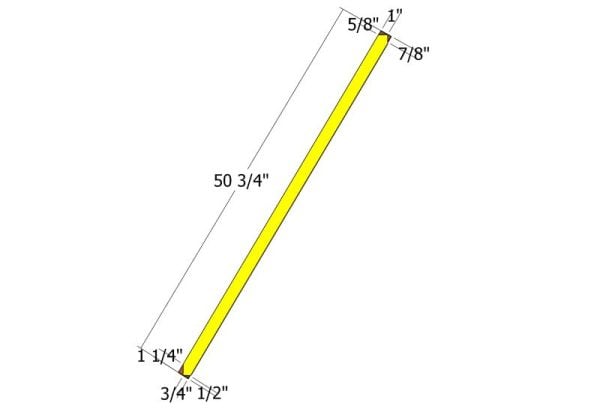
Diagonal – small door
Next up, we’re assembling the door frames using 1×2 lumber. Cut the diagonal brace according to the diagram. Put the door frame together with 1 1/4″ pocket screws. Drill pocket holes at both ends of the vertical pieces and make sure those corners are square. Keep it tight and accurate, and you’ll have solid door frames ready to go.
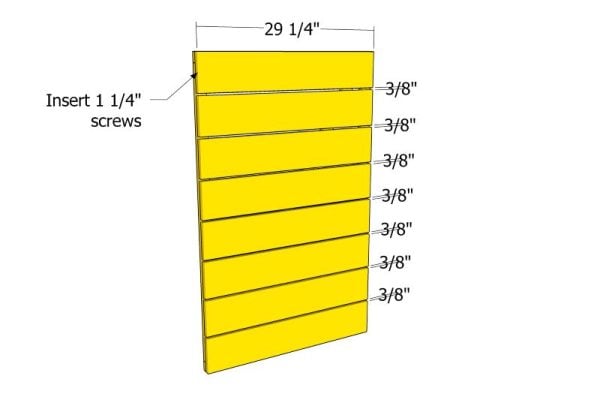
Small door slats
Now, we’re fitting the 1×6 boards to the door frame. Drill some pilot holes and use 1 1/4″ screws to secure them to the frames. Make sure to place 3/8″ wood blocks between the boards to keep those gaps even. Keep it precise, and you’ll have some great-looking doors for your shed.
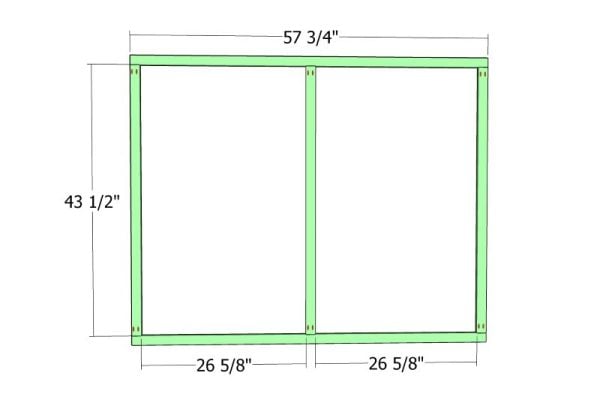
Large door frame
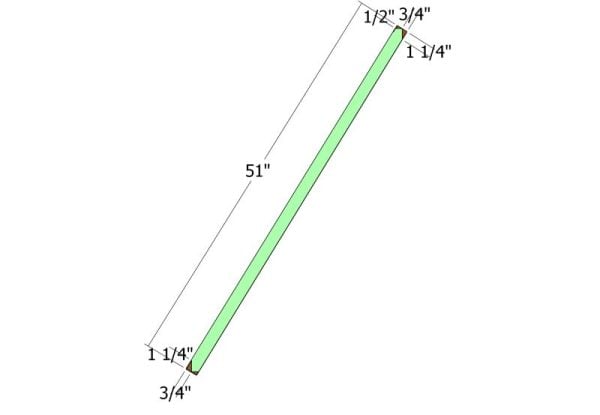
Large door diagonals
Let’s build that double door using 1×2 lumber. Follow the diagram to assemble the door frame, using pocket holes and 1 1/4″ screws to put it all together. Once the frame is solid, attach the two diagonal braces.
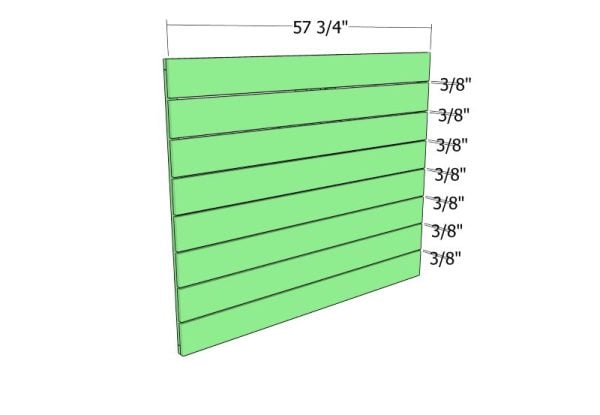
Large door slats
Time to attach the boards to the door frame, just like in the image. Drill some pilot holes and drive 1 1/4″ screws through the boards into the frame. Keep everything lined up and secure.
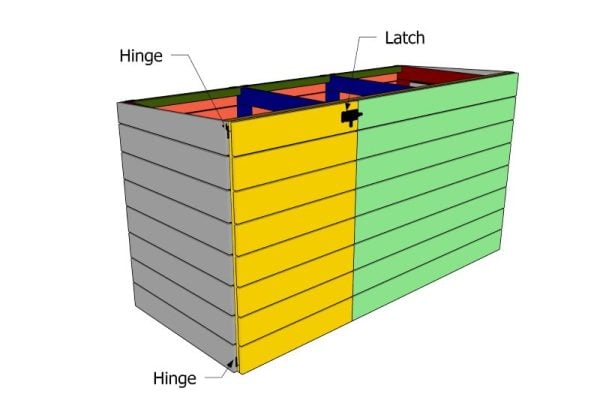
Fitting the doors
Now we’re going to attach the front doors to the trash bin shed. Align the doors in place and secure them to the shed frame with hinges. Then, attach a latch to keep those doors locked together nice and tight.
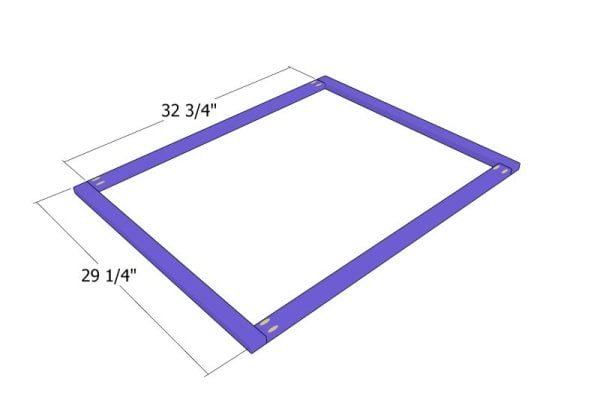
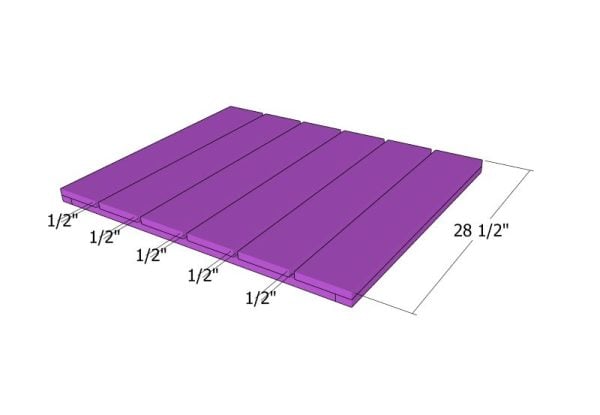
Lid frame
Now let’s assemble the lids for the shed. Use 1×2 lumber for the frame and drill pocket holes at both ends of the 32 3/4″ boards. Secure them with 1 1/4″ screws. Measure the diagonals and tweak the frame until they’re equal.
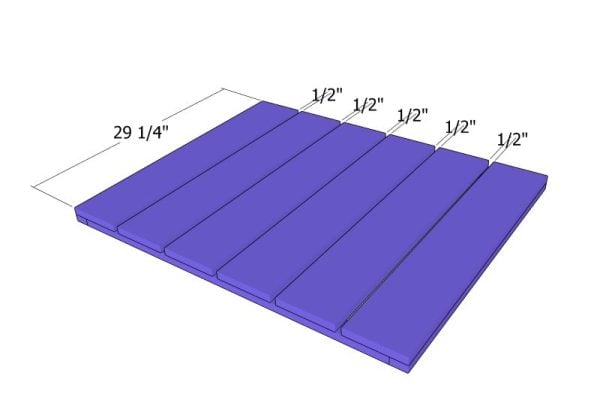
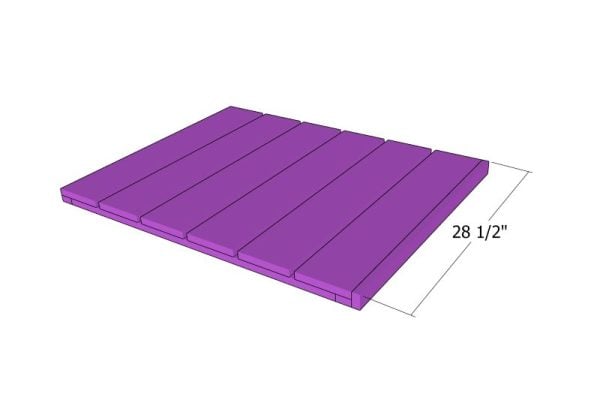
Lid slats
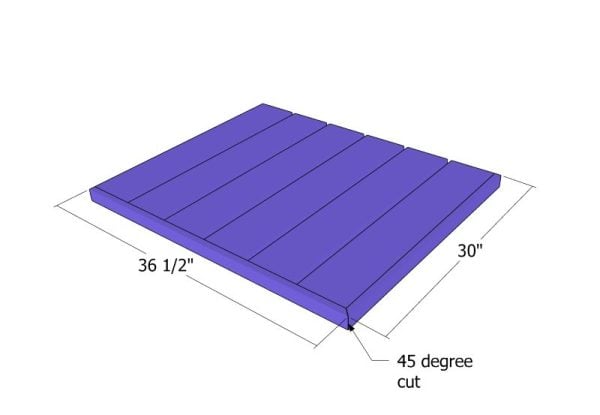
Lid trims
Let’s get those 1×6 boards attached to the lid. Use 1/2″ spacers to keep the gaps even, then drill pilot holes and secure the boards with 1 1/4″ screws. For the trims, grab some 1×2 lumber and make 45-degree cuts to join them together, just like in the diagram. Secure the trims to the lids with 2″ nails and some glue.
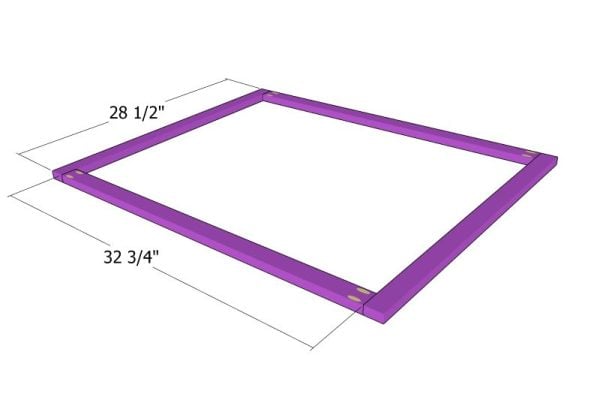
Middle trim frame
Middle trim slats
Middle lid trim
Repeat the process for the middle lid. Attach the 1×6 boards to the lid frame. Attach the 1×2 trim to the front of the lid.

Fitting the lids
Now it’s time to attach the lids to the top of the shed. Align the edges flush and secure them to the frame with hinges, just like in the diagram. Install some latches on the lids so you can open and close them easily.
trash bin shed
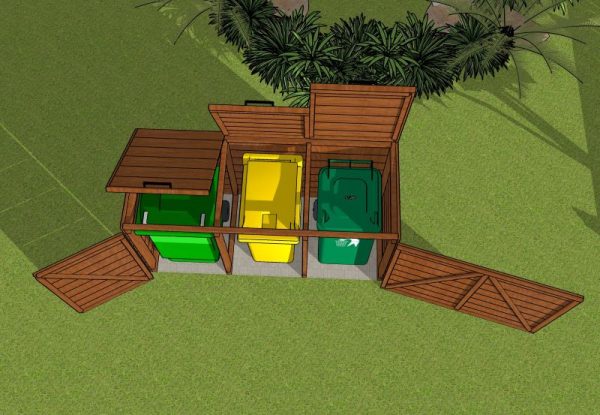
Trash bin shed plans – top view
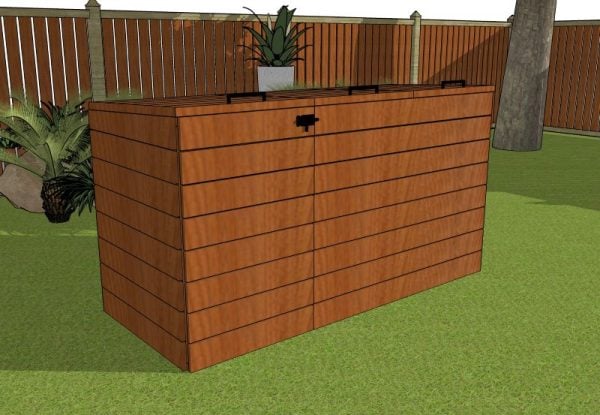
For the finishing touches, sand down any rough edges and give the whole shed a good coat of exterior paint or stain to protect it from the elements. Finally, add any hardware or decorative elements to make your shed both functional and stylish.
How to build a trash bin shed
With the final touches complete, you’ve transformed a simple DIY project into a practical and stylish addition to your backyard. The sturdy construction and efficient design not only hide those unsightly trash bins but also enhance the overall aesthetic of your space. You can built something solid, functional, and unique with your own two hands.
If you’re ready to take your project to the next level, hit the “GET PDF PLANS” button below for the Premium Plans. You’ll get detailed Cut & Shopping Lists, plus a Cut Layout Diagram to help you stay organized and efficient from start to finish. Let’s make this project a breeze!

This woodworking project was about 3 unit trash bin shed plans. If you want to see more outdoor plans, check out the rest of our step by step projects and follow the instructions to obtain a professional result.
2 comments
needs sloping roof anywhere that gets snow
That is correct