In PART 2 of our modern firewood shed build, we’re diving into the details that bring this project together. This time, we’ll focus on fitting the 1×2 slats to the exterior, giving the shed its sleek, contemporary look while allowing airflow to keep your firewood dry. Then, we’ll move on to building and fitting the door, adding both style and functionality. These finishing touches are what make this shed not just practical, but a standout feature in any backyard. Let’s get started!
When buying the lumber, you should select the planks with great care, making sure they are straight and without any visible flaws (cracks, knots, twists, decay). Investing in cedar or other weather resistant lumber is a good idea, as it will pay off on the long run. Use a spirit level to plumb and align the components, before inserting the galvanized screws, otherwise the project won’t have a symmetrical look. If you have all the materials and tools required for the project, you could get the job done in about a day.
Projects made from these plans
2 Cord Modern Firewood Shed – PART 2
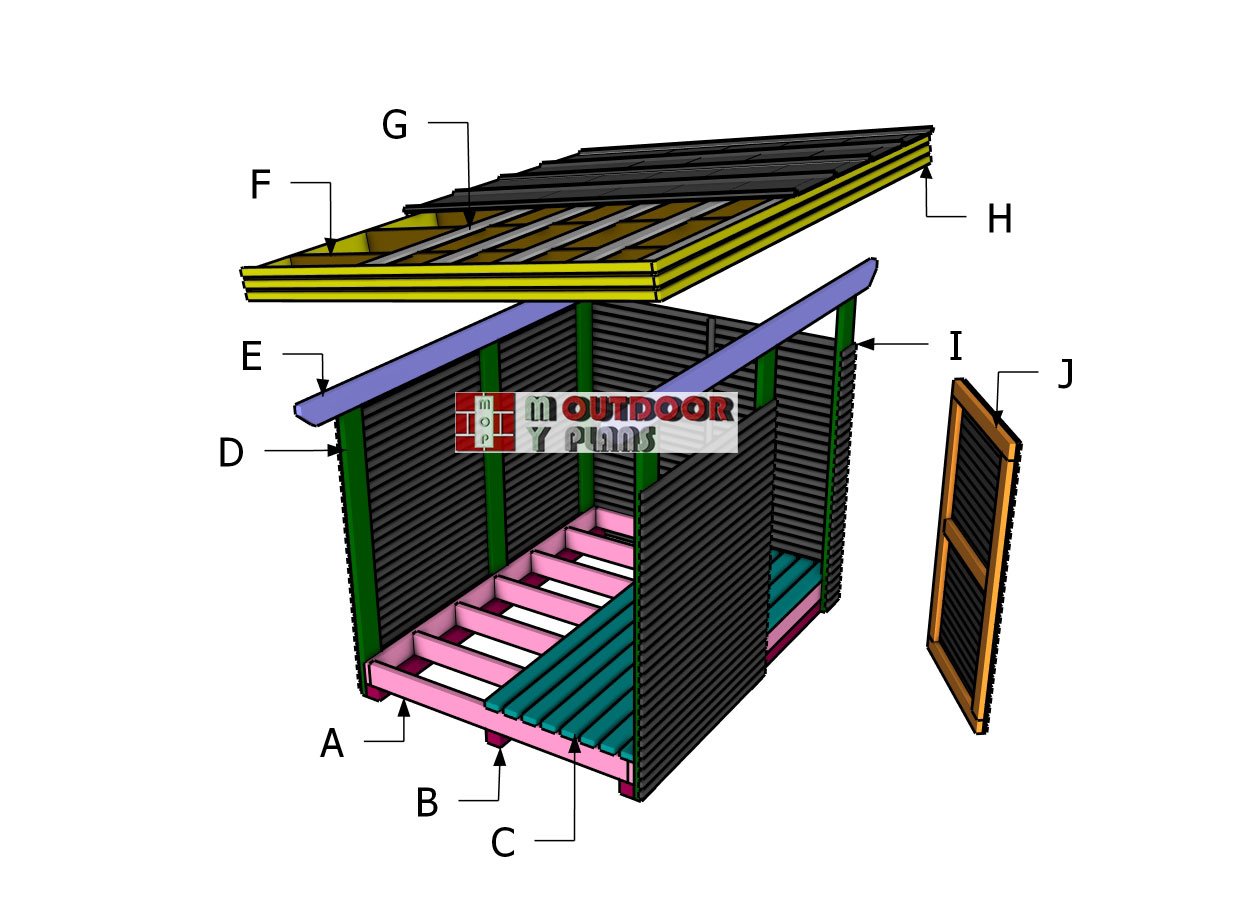
Building-a-6×8-wood-shed
Cut and Shopping Lists
- I – 28 pieces of 1×2 lumber – 8 ft SLATS
- I – 56 pieces of 1×2 lumber – 75 3/4″ SLATS
- I – 2 pieces of 1×2 lumber – 59 3/4″ SLATS
- I – 28 pieces of 1×2 lumber – 55 1/4″ SLATS
- I – 28 pieces of 1×2 lumber – 6 1/4″ SLATS
- J – 2 pieces of 2×4 lumber – 62″ FRAME
- J – 2 pieces of 2×4 lumber – 36″ FRAME
- J – 2 pieces of 2×4 lumber – 29″ FRAME
- J – 28 pieces of 1×2 lumber – 36″ SLATS
- 1 piece of 2×4 lumber – 8 ft
- 1 piece of 2×4 lumber – 12 ft
- 15 pieces of 1×2 lumber – 10 ft
- 84 pieces of 1×2 lumber – 8 ft
- 10 pieces of 1×2 lumber – 12 ft
- 20 pieces of 1 1/4″ screws
- 500 pieces of 1 5/8″ screws
- 100 pieces of 2 1/2″ screws
- 1 kit of shed door hardware
Tools
![]() Hammer, Tape measure, Framing square, Level
Hammer, Tape measure, Framing square, Level
![]() Miter saw, Drill machinery, Screwdriver, Sander
Miter saw, Drill machinery, Screwdriver, Sander
![]() Safety Gloves, Safety Glasses
Safety Gloves, Safety Glasses
Time
Related
- Firewood Shed Plans
- PART 1: Modern 6×8 Firewood Shed Plans
- PART 2: Door Plans for 6×8 Wood Shed
Step 4: Attaching the slats
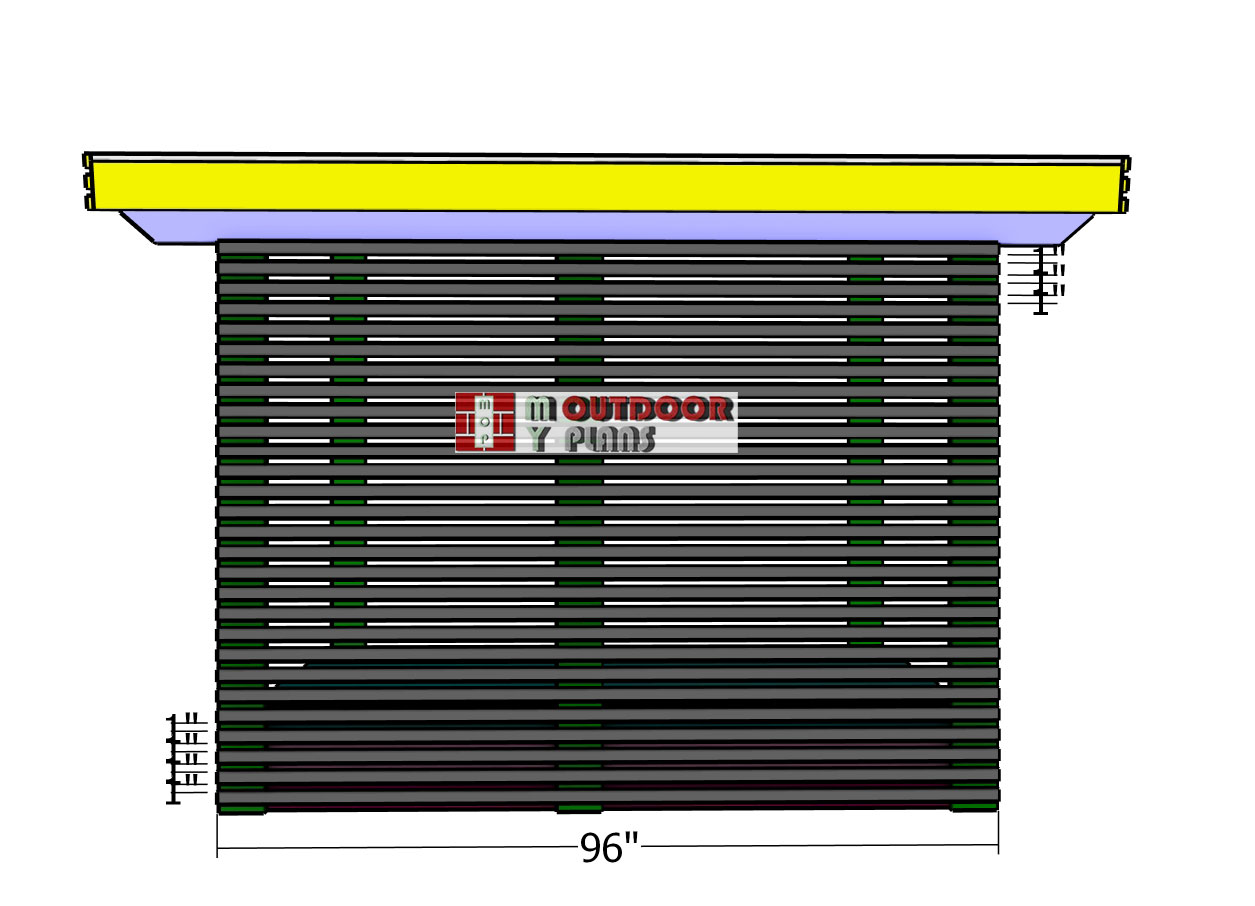
Back-wall-slats
To attach the 1×2 slats to the back of the firewood shed, begin by aligning the edges flush with the frame for a clean, uniform look. Use 1″ spacers between each slat to create even gaps that allow for proper airflow. Once everything is positioned, drill pilot holes to prevent the wood from splitting, then secure each slat with 1 5/8″ screws. This not only ensures a solid fit but also adds to the modern, sleek design of your firewood shed.
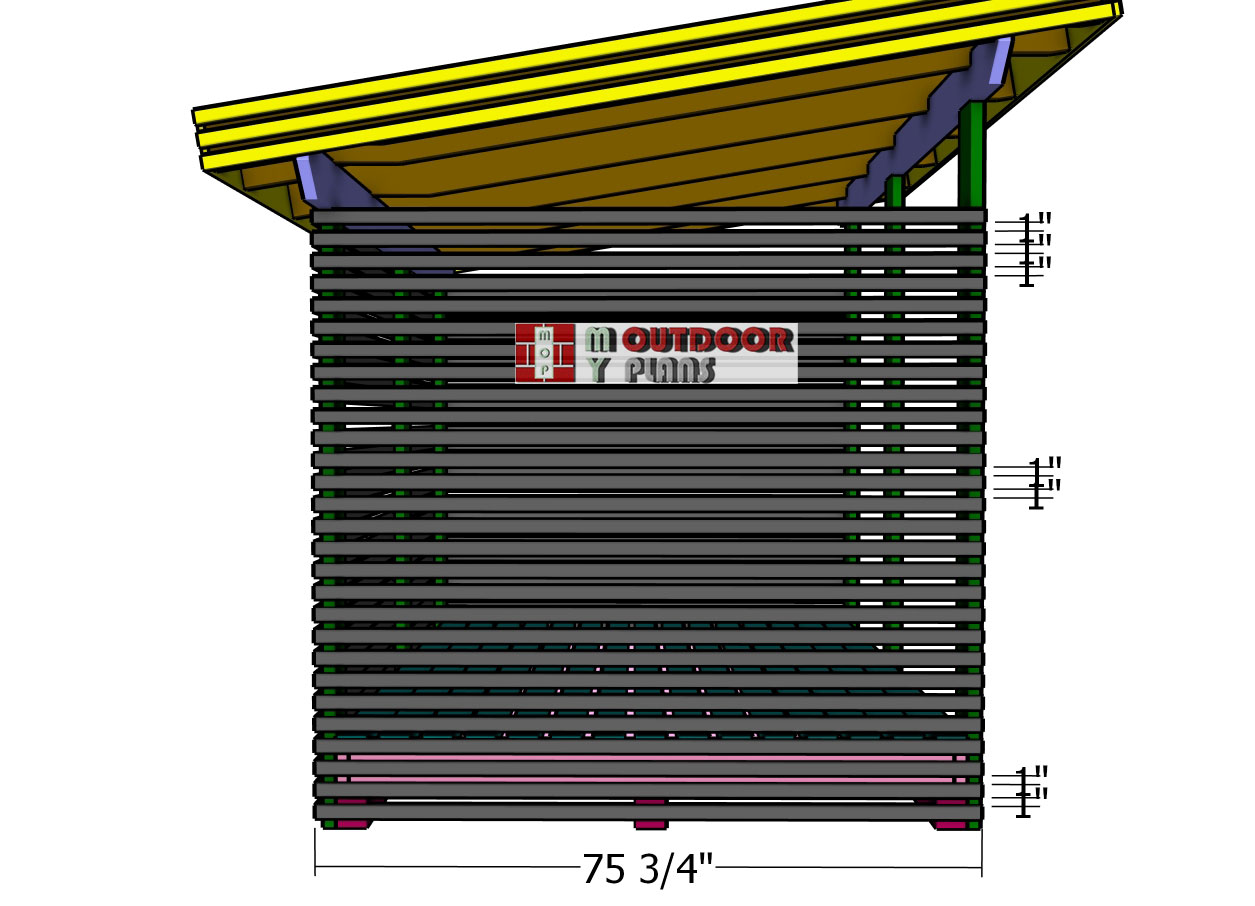
Side-wall-slats
Fit the slats to the sides of the modern shed, ensuring the edges are flush with the front wall for a seamless look. Maintain even spacing, just like on the back, and use 1 5/8″ screws to securely fasten each slat to the frame. This will tie the whole structure together, giving your shed a modern, consistent finish that’s both functional and visually appealing.
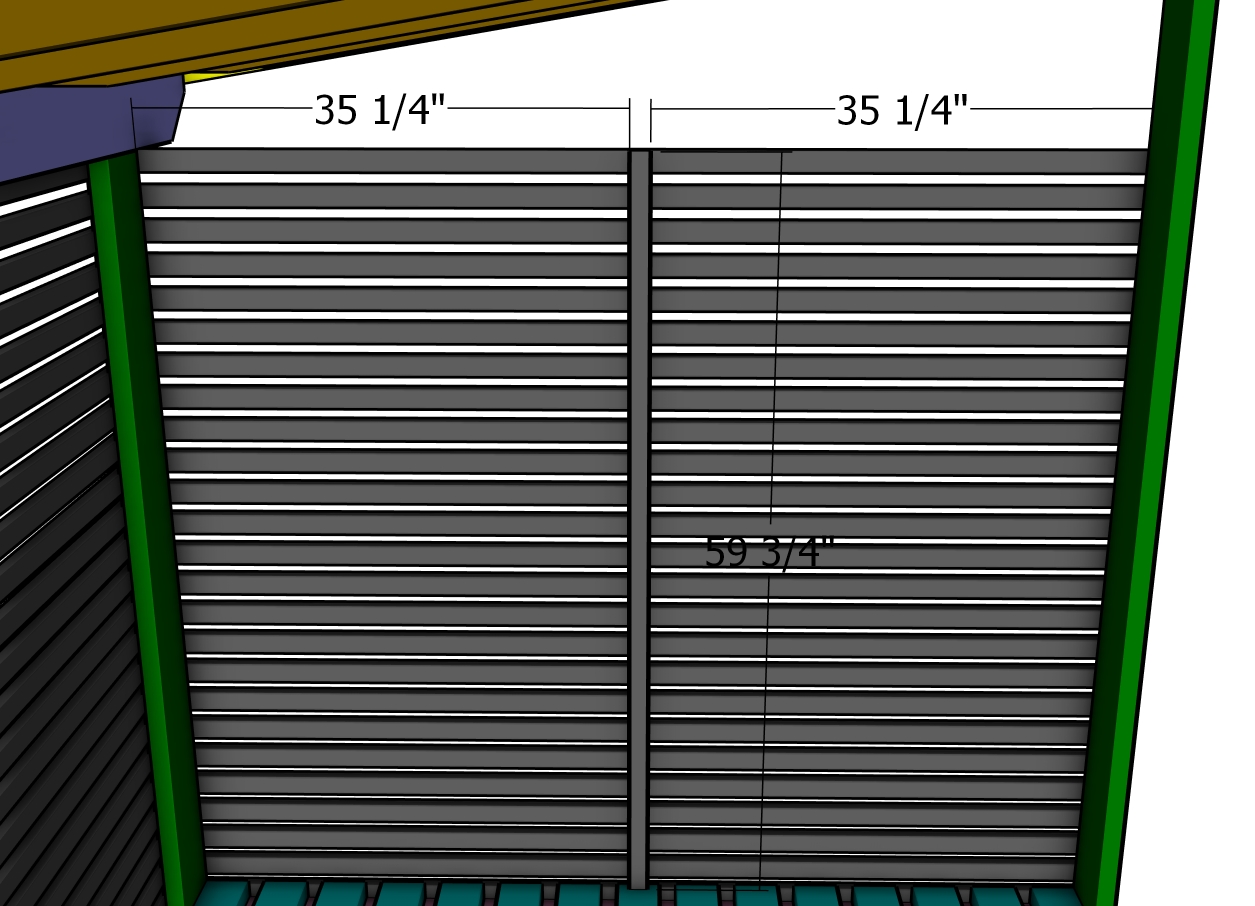
Side wall supports
Attach a 1×2 board to the inside of each side wall for added support. Position the board centrally along the slats, ensuring it’s plumb using a spirit level for accuracy. Once aligned, use 1 1/4″ screws to secure the board to the side slats, locking it in place. This extra support will strengthen the structure of the side walls, ensuring they remain sturdy and durable over time.
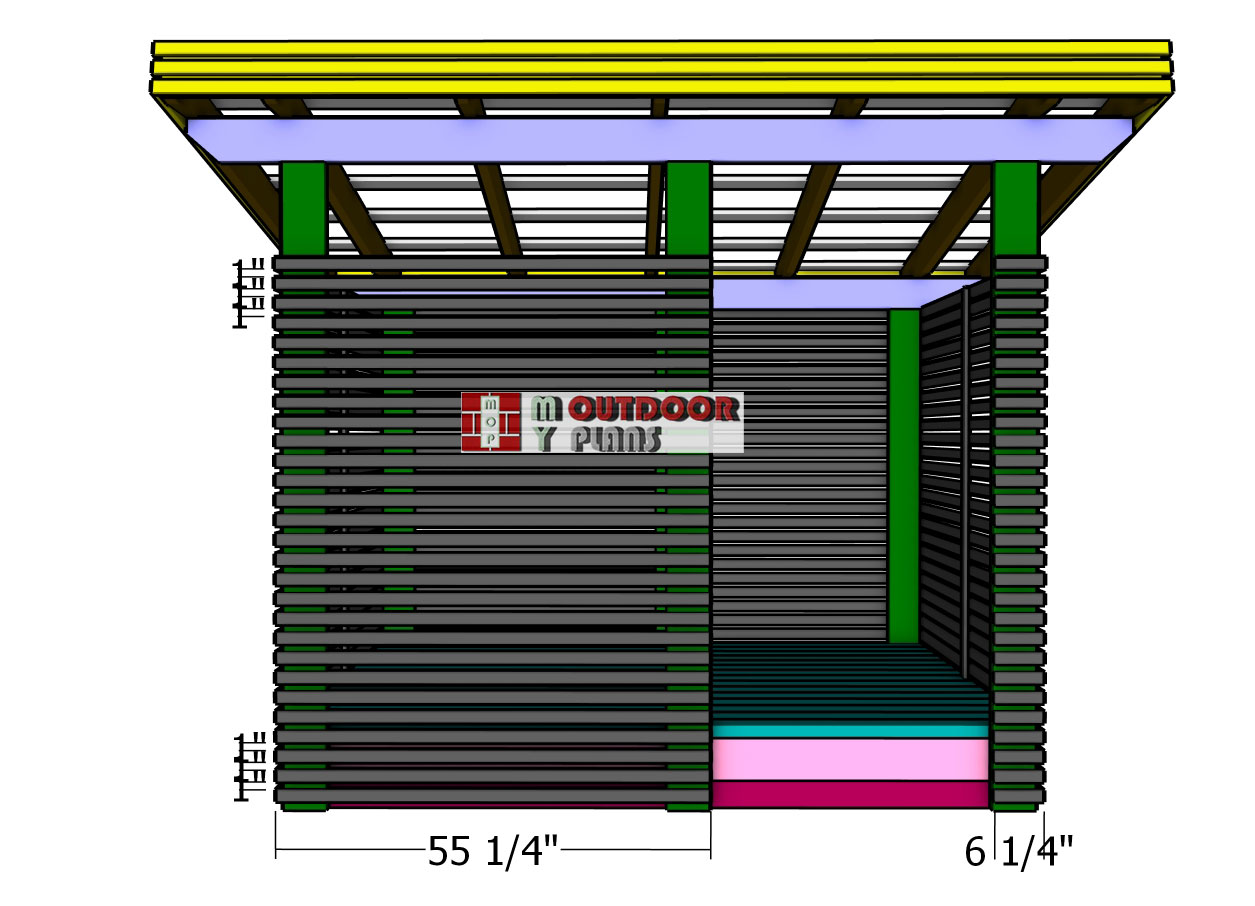
Fitting-the-front-wall-slats
Attach the 1×2 slats to the front of the shed, taking care to align the edges flush with the frame for a uniform look. As you work, leave space for the door opening on the right side, following your shed’s layout. Use 1 5/8″ screws to securely fasten the slats in place, ensuring the gaps are even and the design flows seamlessly with the rest of the shed. This step will give the front a clean, modern finish while maintaining proper airflow.
Step 5: Building the Door
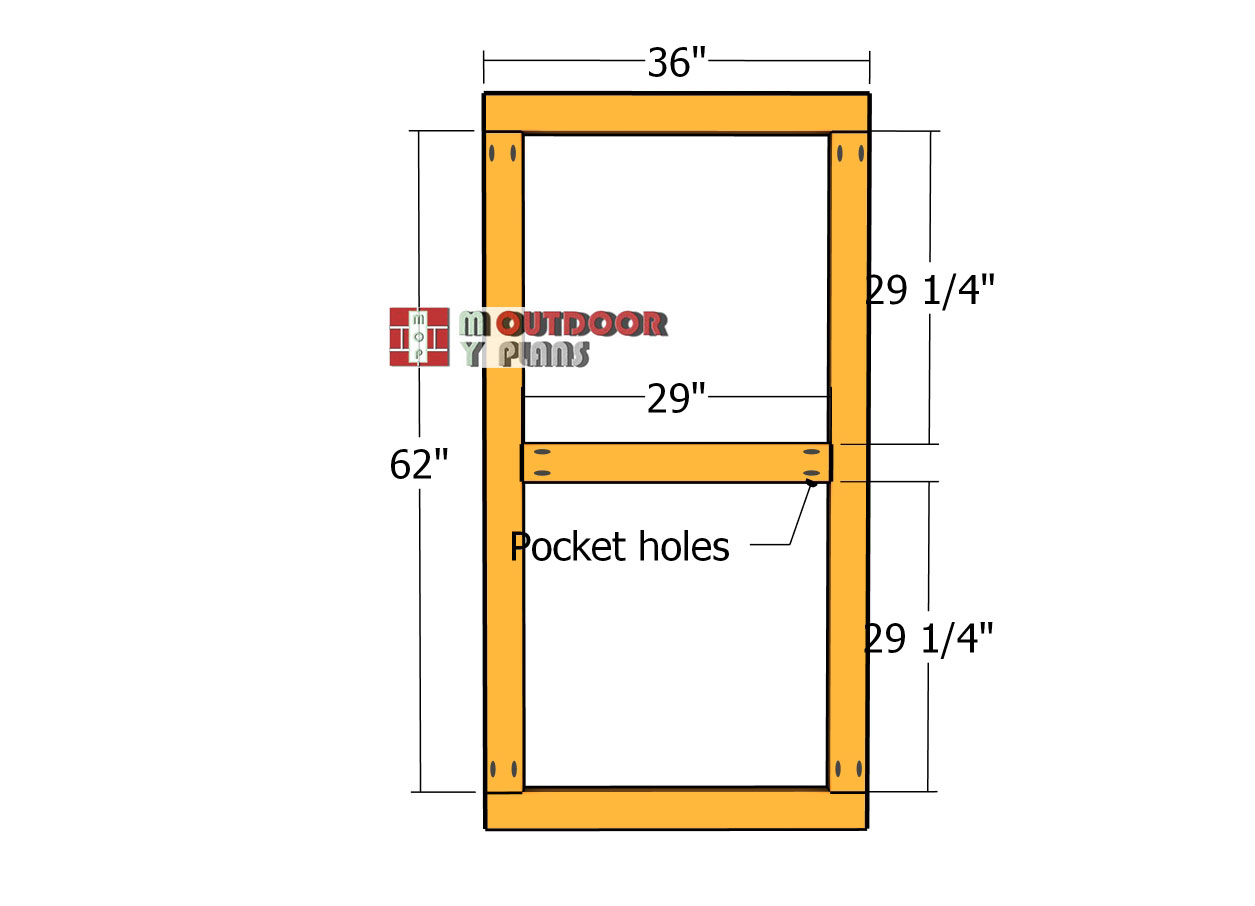
Door-frame-for-shed
Construct the door frame using 2×4 lumber. Cut the pieces according to the dimensions provided in the diagram, and drill pocket holes as outlined in the plans. Lay all components on a flat, level surface, making sure the edges are flush and the corners are square. Once everything is aligned, insert 2 1/2″ screws into the pocket holes to securely assemble the door frame. Ensuring the frame is square will make for a smooth door installation later on.
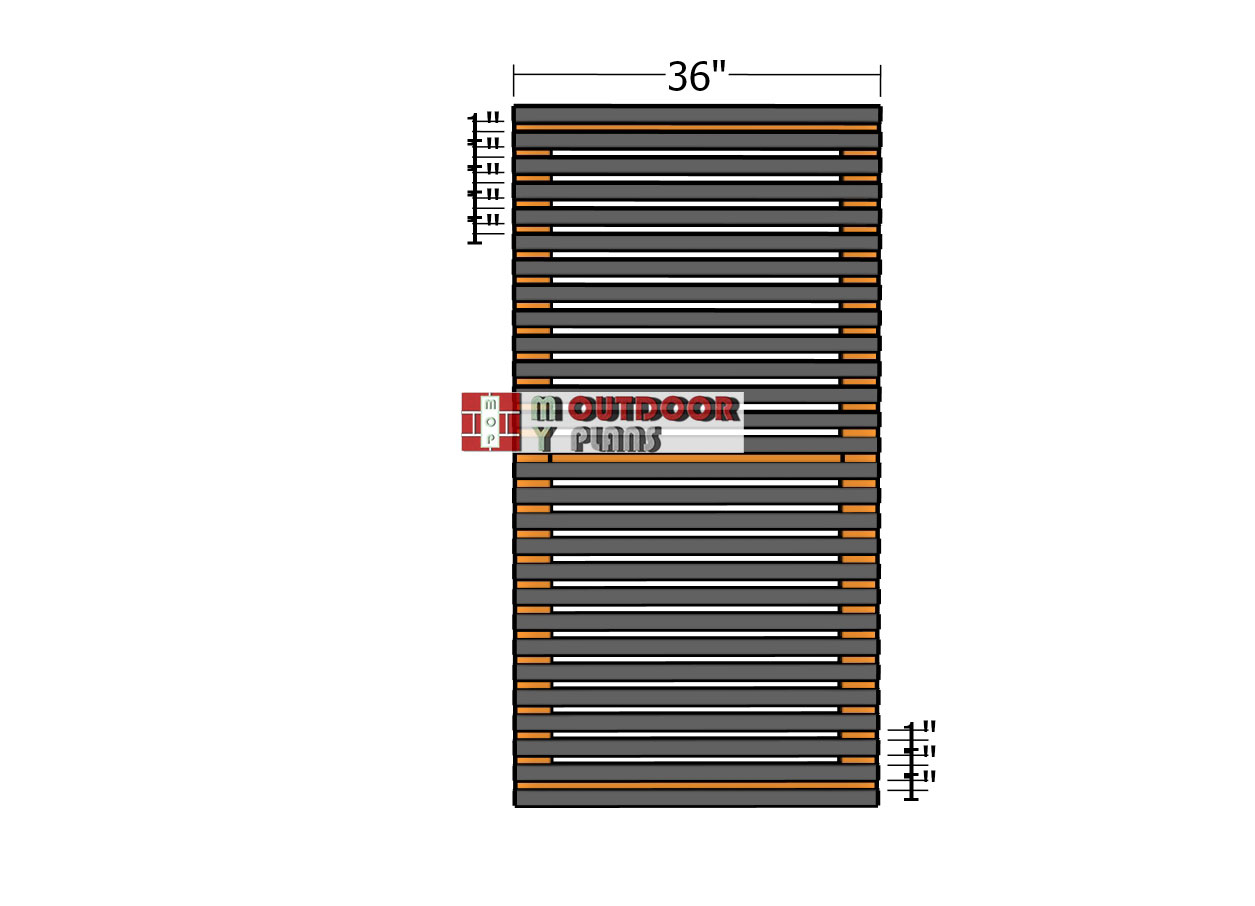
Door-slats
Attach the 1×2 slats to the door frame, making sure the edges are flush with the sides of the frame for a clean, even finish. Use 1 5/8″ screws to securely fasten each slat into place, ensuring they’re evenly spaced and properly aligned. This step will give the door a cohesive look that matches the rest of the shed, while also maintaining a strong and durable structure.
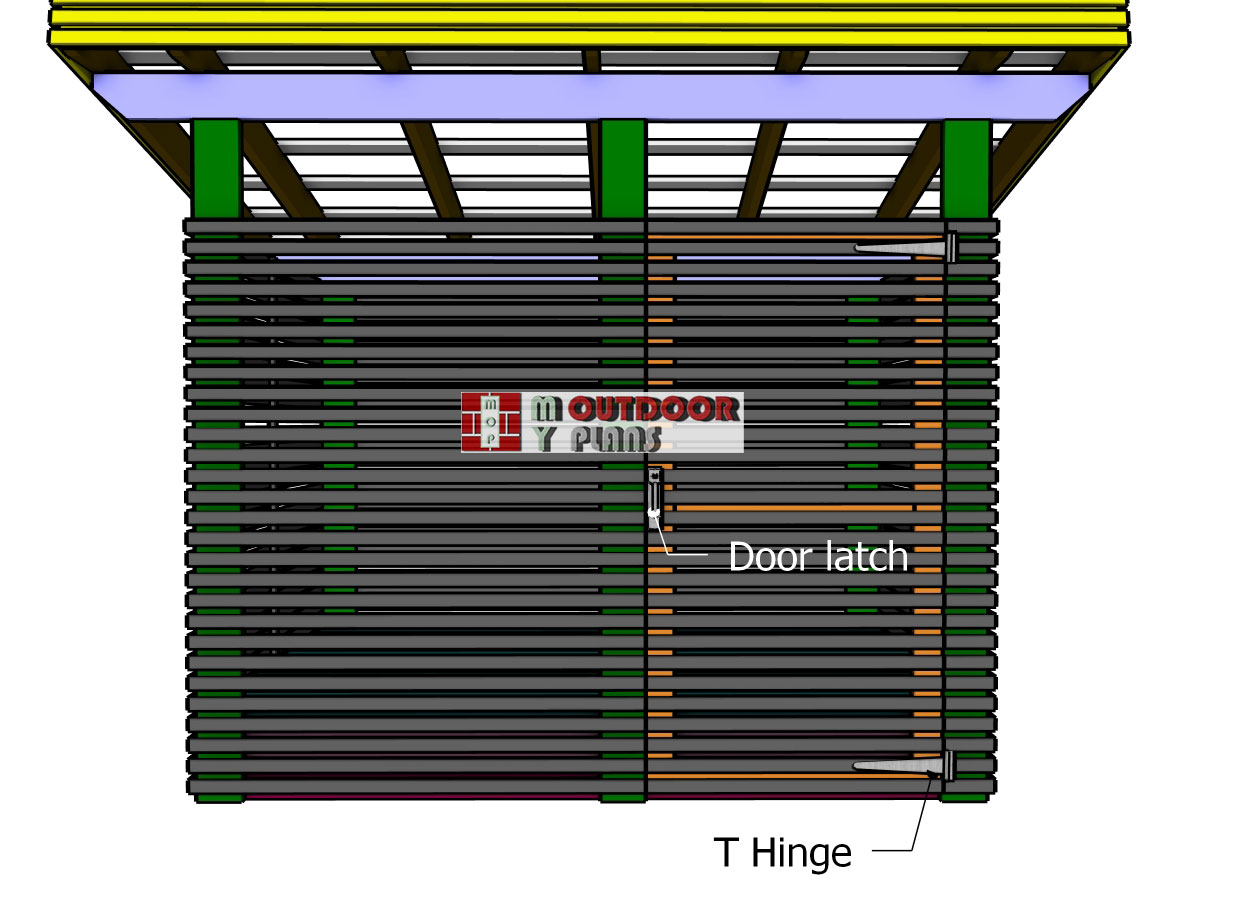
Attaching-the-door-to-the-shed
To finish the door installation, position the door in the opening, ensuring it’s aligned and level. Attach the door to the frame using sturdy shed hinges, placing one near the top and another near the bottom for solid support. Once the door is securely hinged, install a door latch to keep it closed when not in use. Make sure the latch is aligned correctly so the door closes smoothly and stays firmly shut. Now your shed has a fully functional door that complements the overall design!
Step 6: Finishing touches
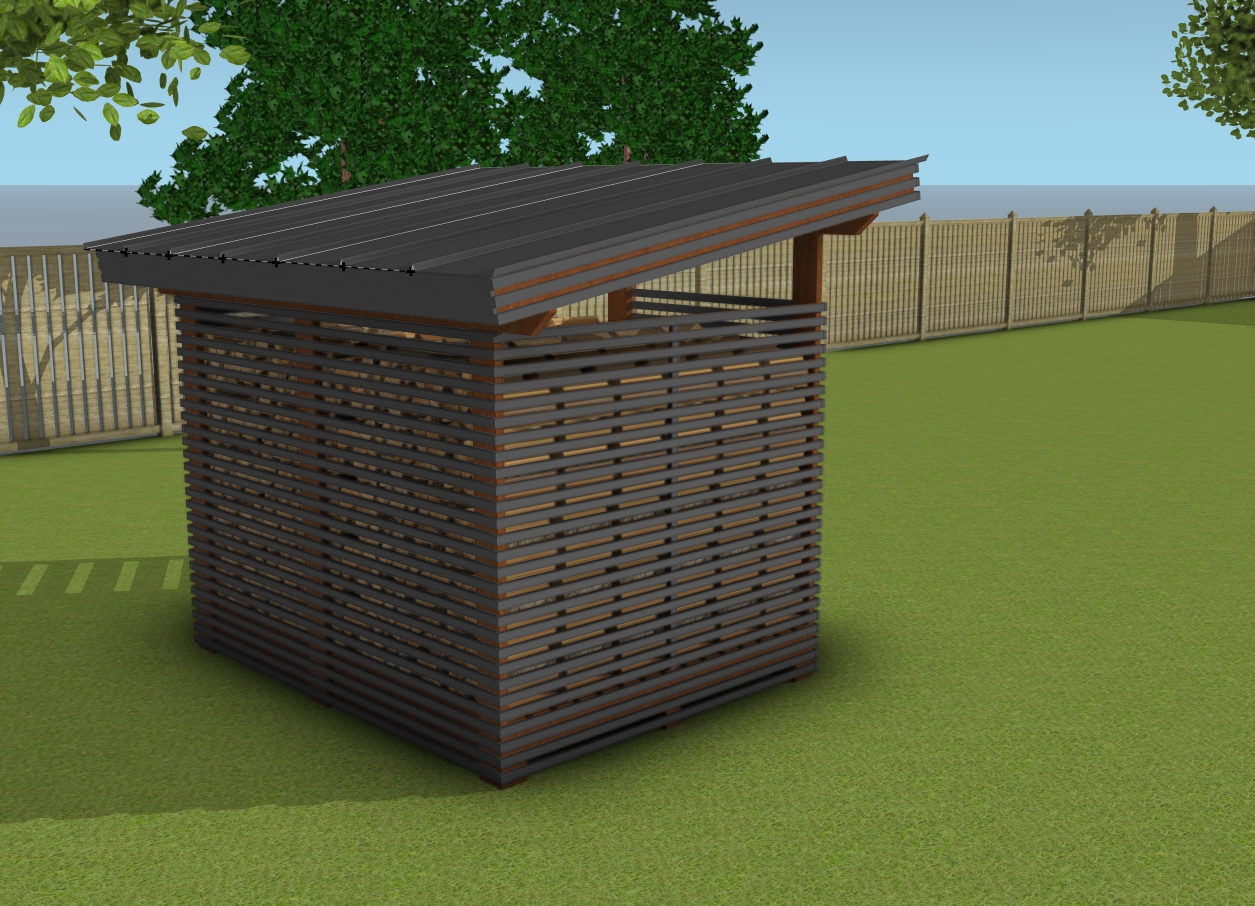
Back view – 2 cord firewood shed
With the structure complete, it’s time to focus on the finishing touches that will take your modern firewood shed to the next level. Start by sanding any rough edges on the slats and frame to ensure a smooth, clean look. You can then apply a weather-resistant wood stain or sealant to protect the shed from the elements while enhancing the natural beauty of the wood. For a final touch, consider adding decorative hardware or hooks for extra functionality.
These small details not only improve durability but also give your shed a polished, professional finish that complements your outdoor space perfectly.
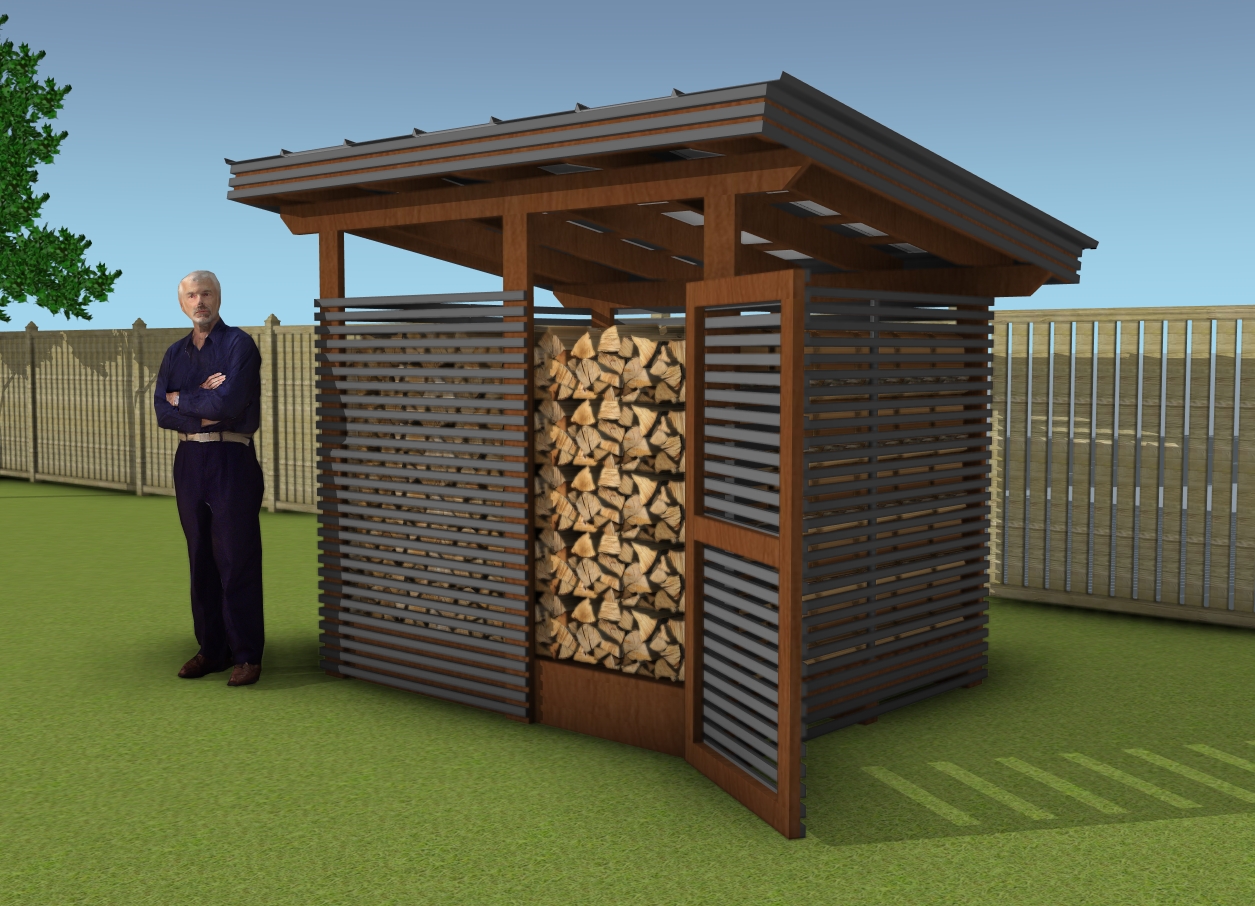
How to build a 6×8 modern firewood shed
And there you have it, your modern firewood shed is complete, providing both style and functionality for storing firewood all year long! From the sleek design to the sturdy structure, this project not only keeps your wood dry but also adds a striking element to your outdoor space.
If you enjoyed this build, be sure to check out PART 1, where I walk you through the step-by-step process of constructing the floor and roof. It’s the foundation that set the stage for this entire project, and you won’t want to miss those key details!
This woodworking project was about 6×8 modern wood shed roof plans. If you want to see more outdoor plans, check out the rest of our step by step projects and follow the instructions to obtain a professional result.

