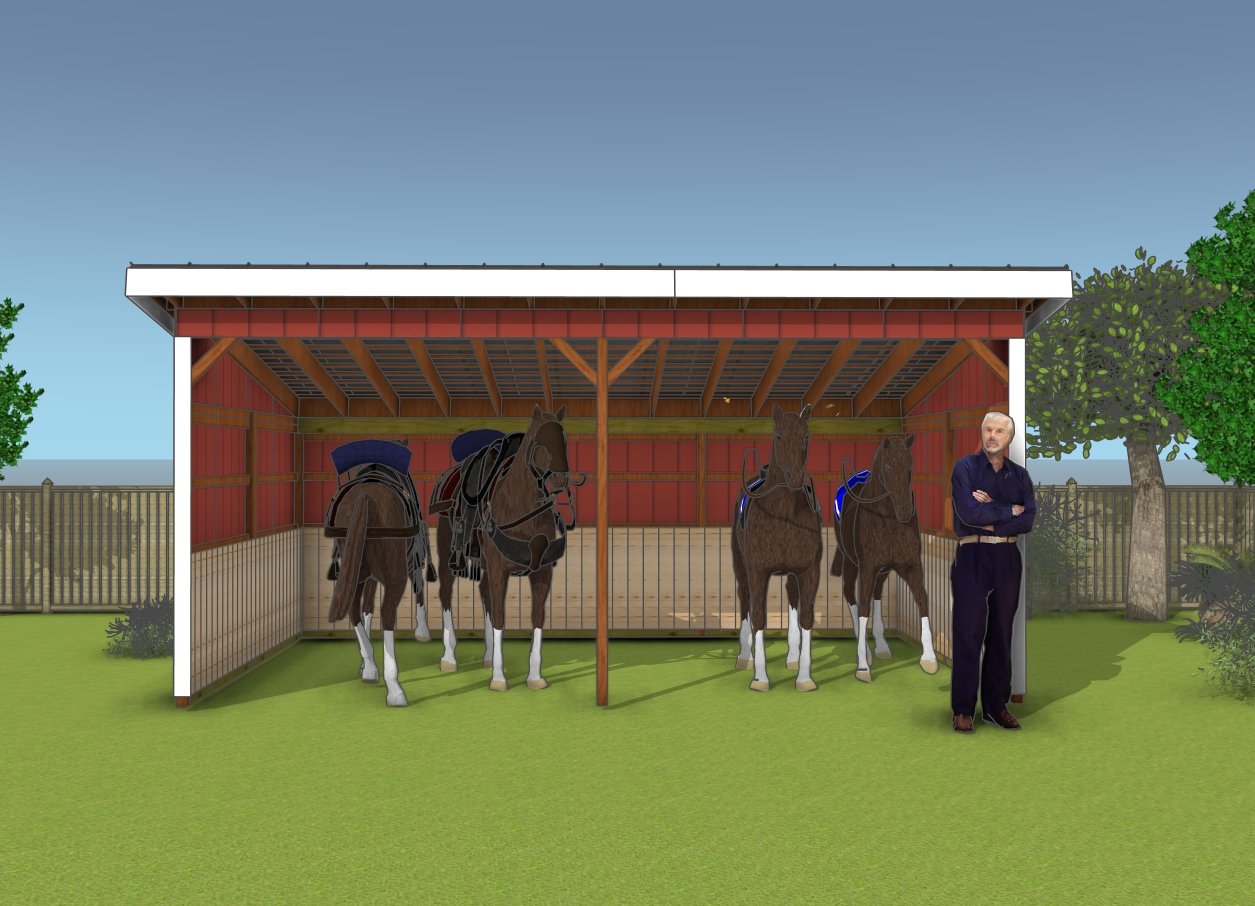
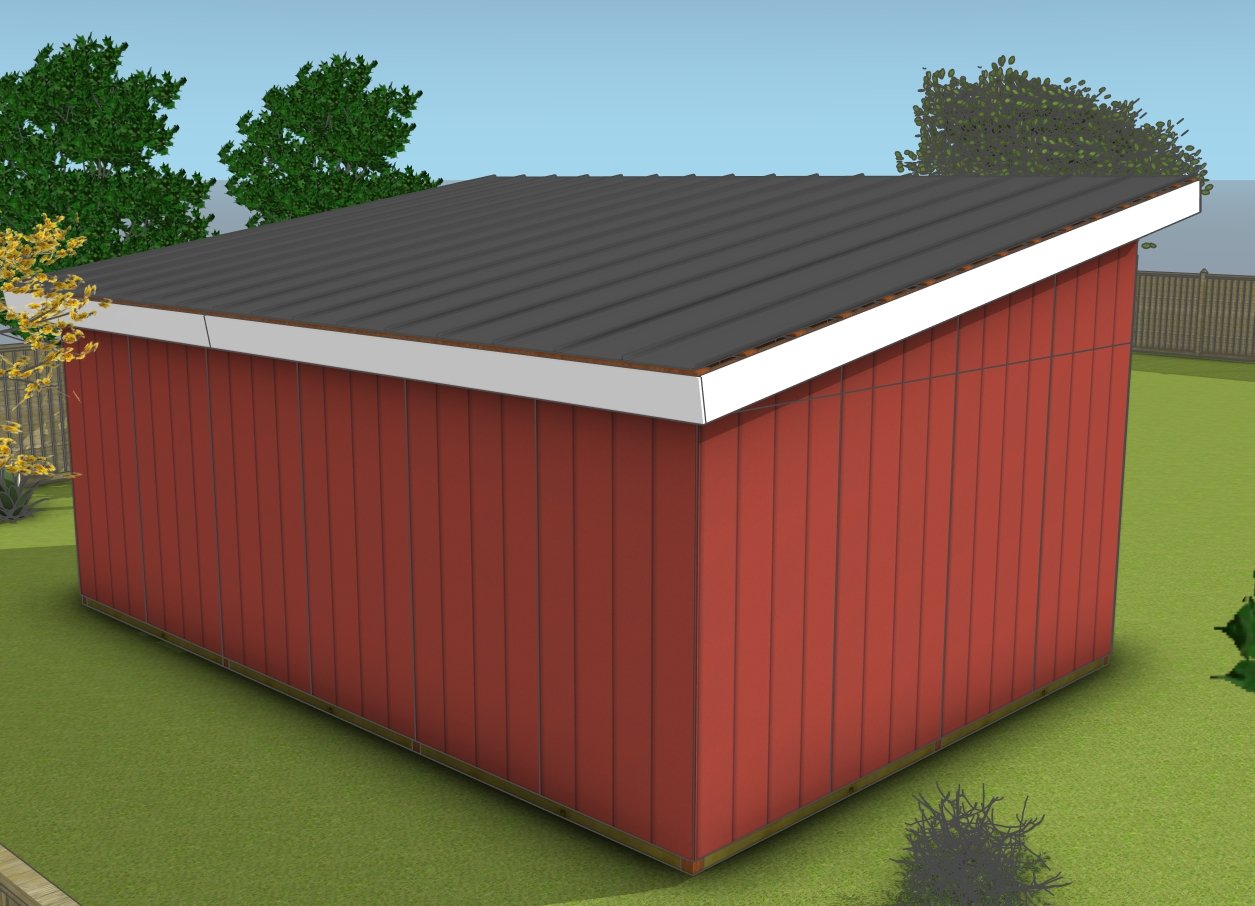
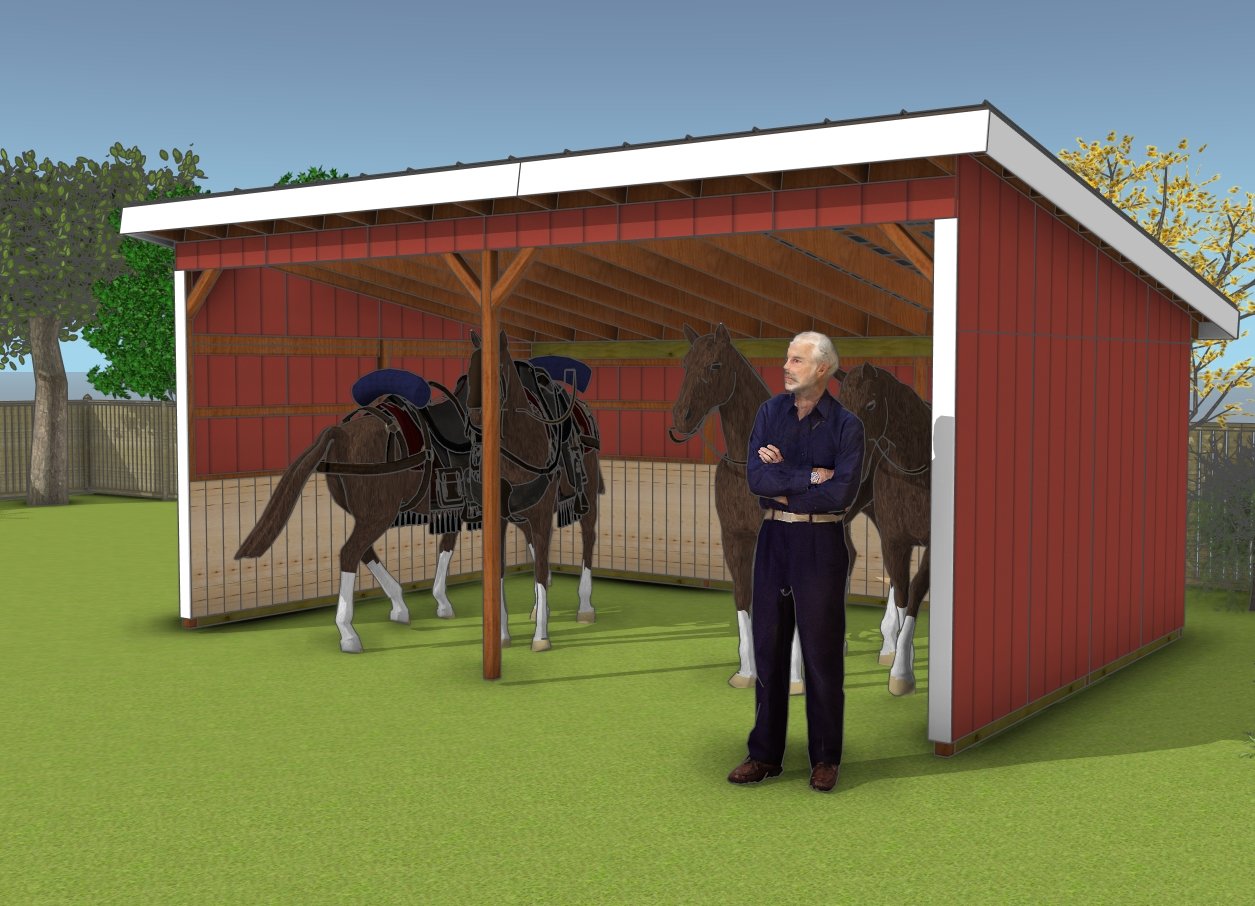
Looking to build a durable and spacious shelter? These 16×24 run-in shed plans are perfect for creating a versatile structure that can serve as a livestock shelter, equipment storage, or even a firewood shed. Designed with functionality and ease of construction in mind, this shed features a sturdy post-and-beam frame, open front for ventilation, and kickboards for added durability. Whether you’re an experienced DIYer or tackling your first big build, these plans will guide you step-by-step to create a structure that’s both practical and built to last.
This project is perfect for livestock, equipment storage, or firewood, this shed features a sturdy post-and-beam frame, front side open for ventilation, and durable kickboards. The plans include step-by-step instructions, diagrams, and material lists to guide you through every stage of construction.
Building a 16×24 run-in shed typically costs between $3,000 and $5,000, depending on material prices in your area and the quality of finishes you choose. This estimate includes lumber for the frame, rafters, and siding, as well as hardware, roofing materials, and optional extras like kickboards or concrete footings. As for time, expect the project to take about 3 to 5 weekends for a DIYer with basic carpentry skills, depending on weather and how many hands are on deck to help. With some careful planning and consistent effort, you’ll have a sturdy, functional shed in no time!
When buying the lumber, you should select the planks with great care, making sure they are straight and without any visible flaws (cracks, knots, twists, decay). Investing in cedar or other weather resistant lumber is a good idea, as it will pay off on the long run. Use a spirit level to plumb and align the components, before inserting the galvanized screws, otherwise the project won’t have a symmetrical look. If you have all the materials and tools required for the project, you could get the job done in about a day.
Projects made from these plans
Modern 16×24 Run In Shed – Free DIY Plans
Building-a-16×24-run-in-shed
Cut and Shopping Lists
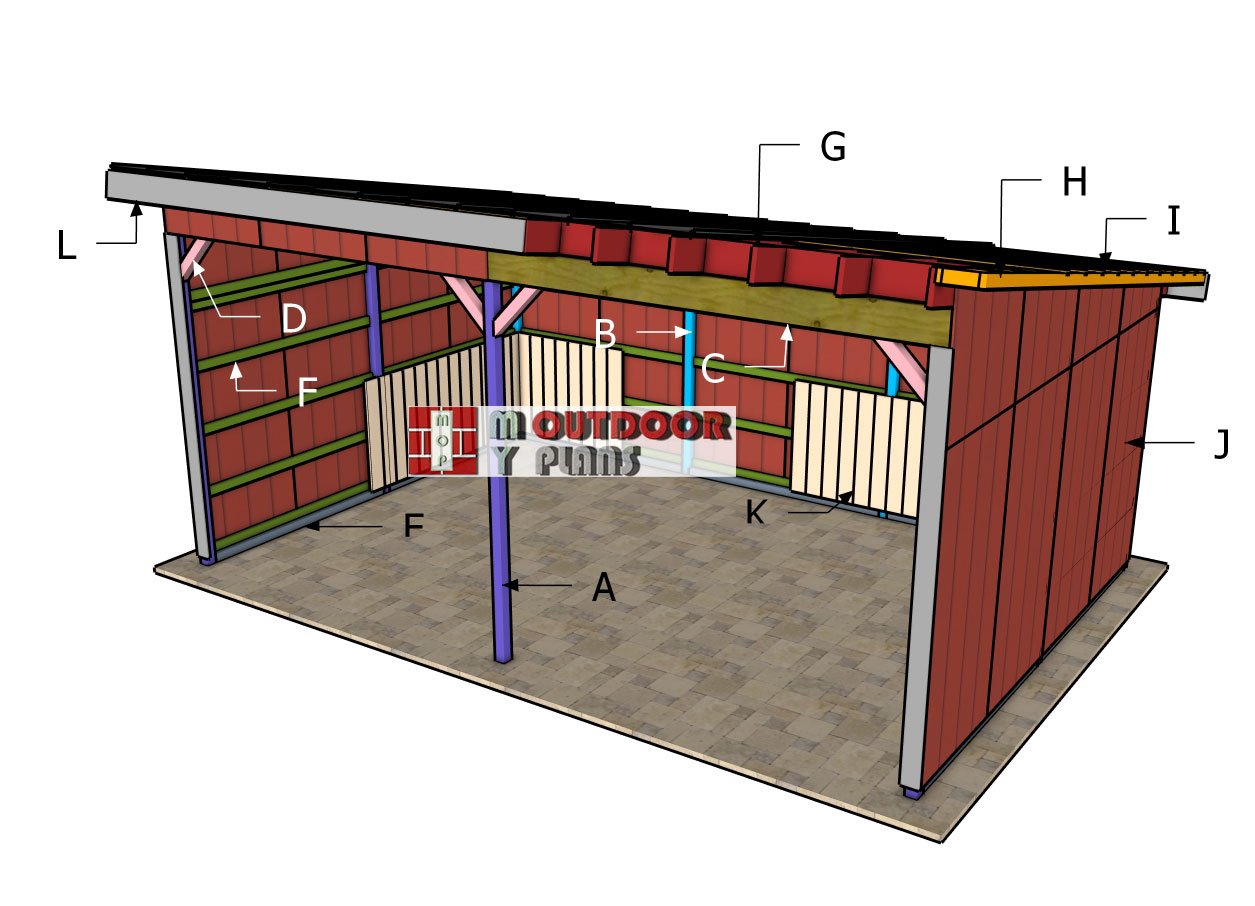
A – 3 pieces of 4×4 lumber – 125 1/8″, 2 pieces – 103 1/4” POSTS
B – 4 pieces of 4×4 lumber – 8 ft POSTS
C – 2 pieces of 1 3/4″x7 1/4″ LVL beam – 24 ft SUPPORT BEAMS
C – 2 pieces of 1 3/4″x9 1/2″ LVL beam – 24 ft SUPPORT BEAMS
D – 4 pieces of 4×4 lumber – 24” BRACES
E – 4 pieces of 4×4 lumber – 90 3/4″, 3 pieces – 91 3/8″ SKIDS
F – 32 pieces of 2×4 lumber – 90 3/4”, 21 pieces – 91 3/8″ GIRT BOARDS
G – 13 pieces of 2×10 lumber – 220″, 4 pieces – 21 3/4″, 20 pieces – 22 1/2″ RAFTERS
- 1 3/4″x7 1/4″ LVL beam 24 ft- 2 pieces
- 1 3/4″x9 1/2″ LVL beam 24 ft – 2 pieces
- 5/8″ T1-11 siding – 17 pieces
- 2×10 lumber 8 ft – 1 piece
- 2×10 lumber 10 ft – 4 pieces
- 2×10 lumber 20 ft – 13 pieces
- 2×4 lumber 8 ft – 53 pieces
- 2×4 lumber 12 ft – 1 piece
- 2×4 lumber 16 ft – 15 pieces
- 2×4 lumber 20 ft – 4 pieces
- 1×10 lumber 10 ft – 4 pieces
- 1×10 lumber 12 ft – 2 pieces
- 1×10 lumber 16 ft – 2 pieces
- 1×8 oak kickboard 8 ft – 46 pieces
- 4×4 PT lumber 8 ft – 12 pieces
- 4×4 PT lumber 10 ft – 2 pieces
- 4×4 PT lumber 10 ft – 2 pieces
- 4×4 PT lumber 12 ft – 3 pieces
- 14″ tube form – 9 pieces
- 4×4 post anchor – 9 pieces
- 9 concrete bags
- 3 boxes of 1 1/2″ structural nails / screws
- end column cap ECCQ44SDS2.5 – 4 pieces
- column cap CCQ44SDS2.5 – 3 pieces
- 3 1/2″ screws – 500 pieces
- 2 1/2″ screws – 500 pieces
- 8d nails – 500 pieces
- 12d nails – 500 pieces
- rafter ties – 26 pieces
- drip edges – 100 ft
- 500 sq ft of metal shingles
- 1 can of paint / stain
- 1 can of outdoor glue
Tools
![]() Hammer, Tape measure, Framing square, Level
Hammer, Tape measure, Framing square, Level
![]() Miter saw, Drill machinery, Screwdriver, Sander
Miter saw, Drill machinery, Screwdriver, Sander
![]() Safety Gloves, Safety Glasses
Safety Gloves, Safety Glasses
Time
Related
- PART 1: 16×24 Run in shed plans
- PART 2: 16×24 Run in shed roof plans
- Modern 12×29 lean to carport plans
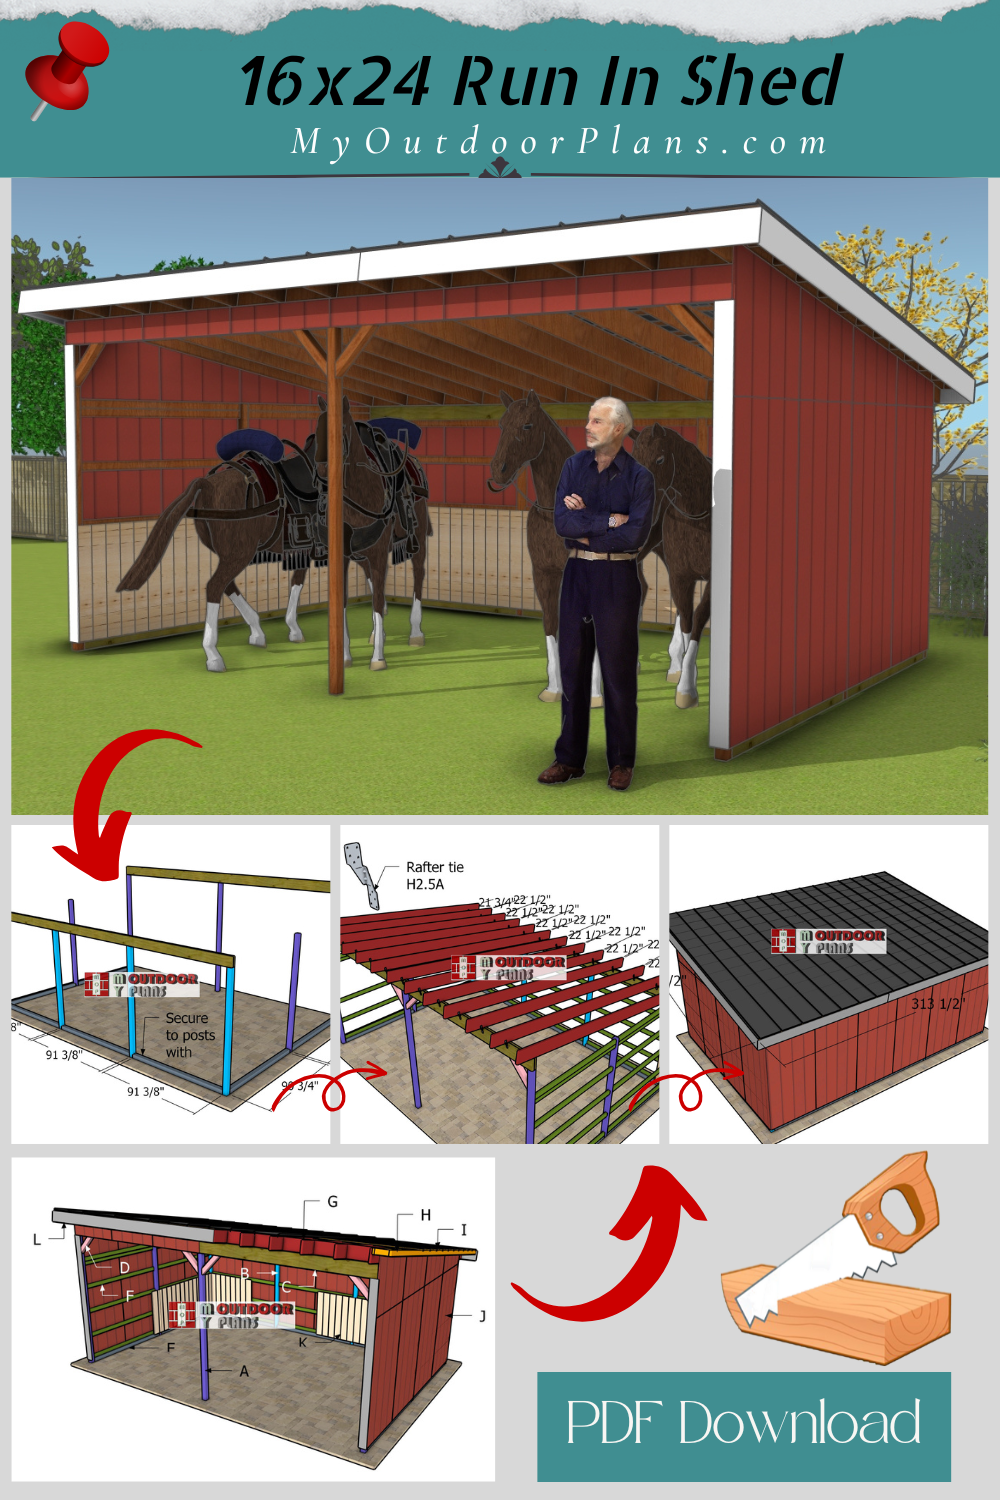
Pin it for later!
DIY 16×24 livestock shed plans
STEP 1: Setting the posts
Midpoint-layout
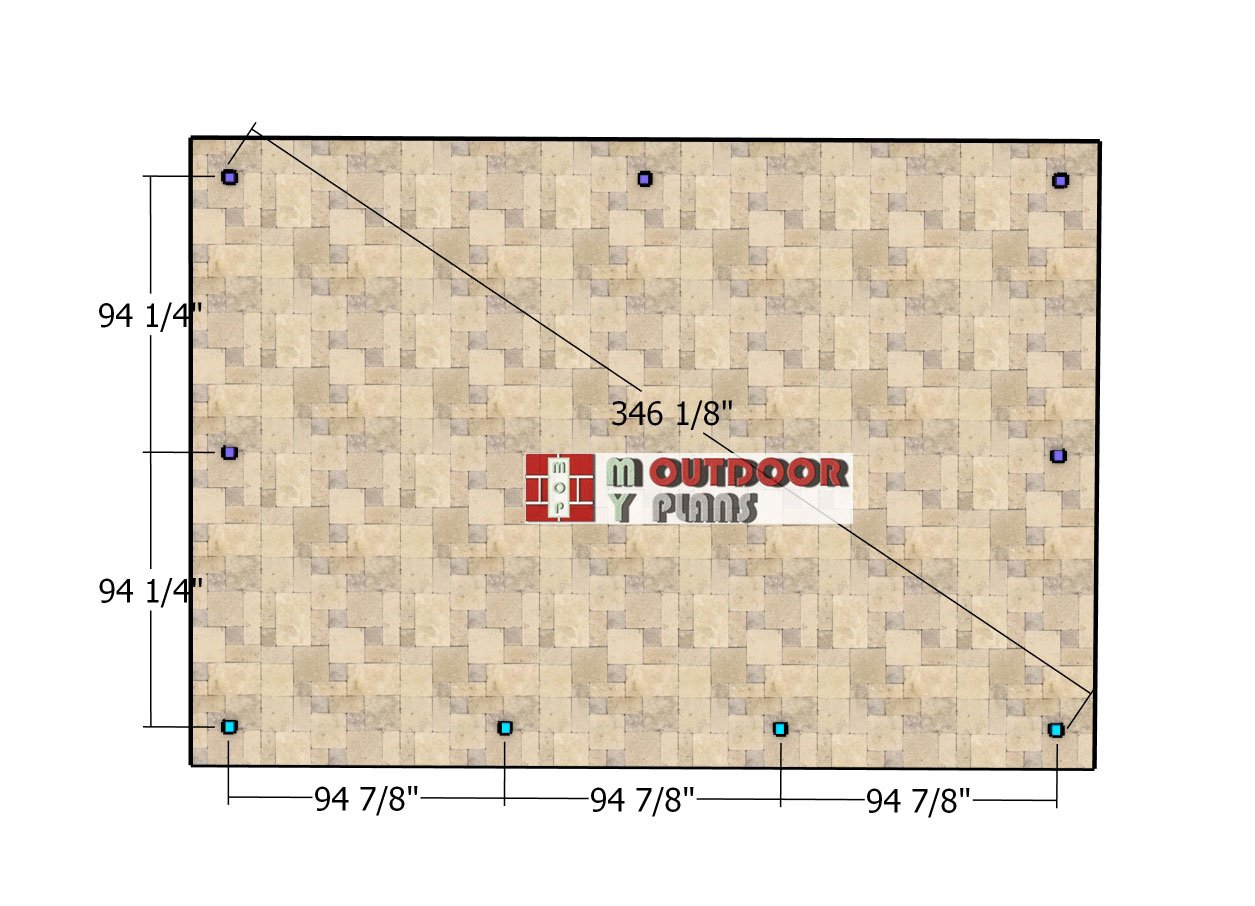
The first step in building your run-in shed is laying out the posts. Grab the diagram and use it to locate the middle of the posts. This will guide you in marking the exact center of each post on the ground. Take your time here—accurate layout makes everything easier down the road. Once the marks are in place, you’ll be ready to dig the holes for your concrete footings.
Laying-out-the-posts
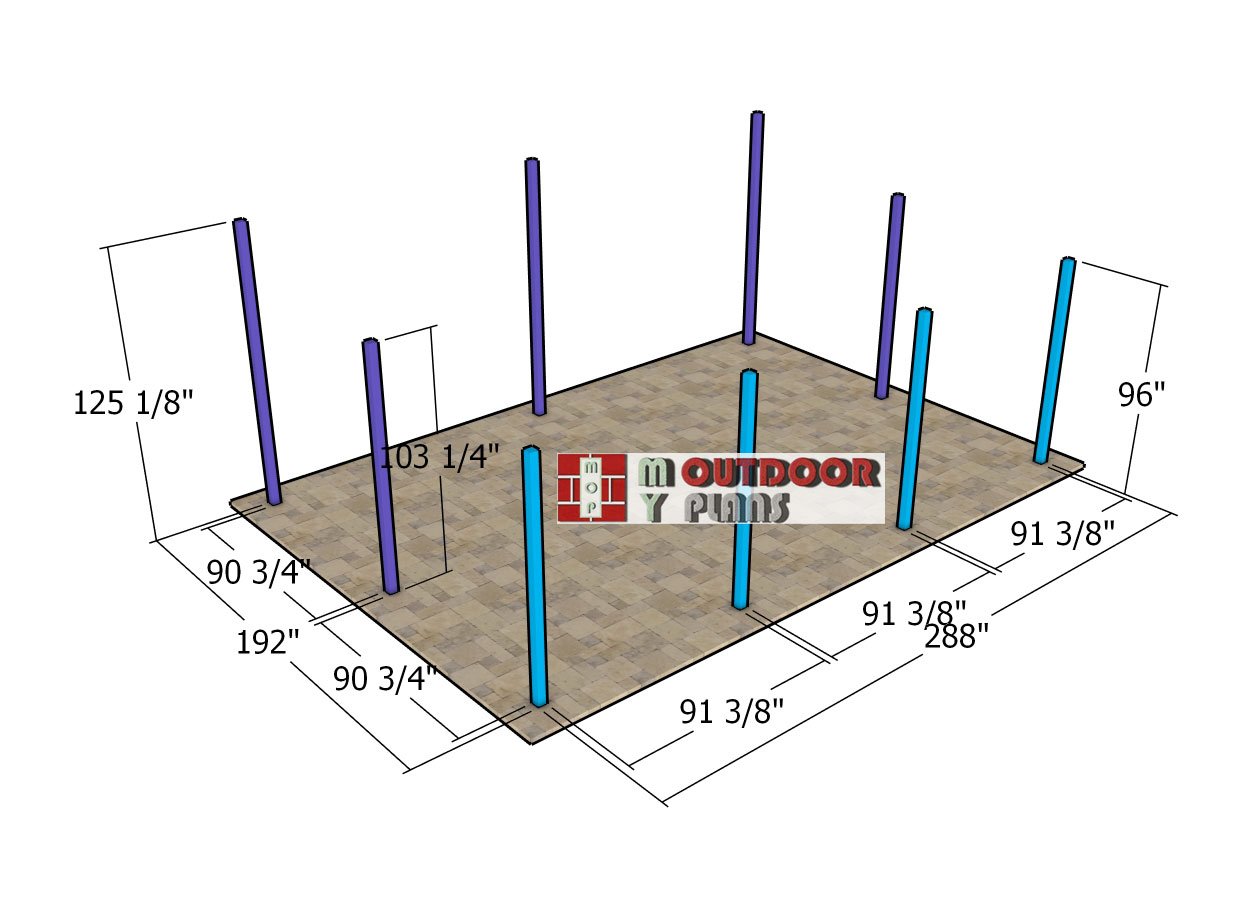
This diagram shows both the distance between the posts and their heights. The key to a smooth build is starting with a level base, so when pouring the concrete footings, take extra care to ensure the tube forms are level with each other. This simple step will make installing the posts according to the plans much easier and help you avoid headaches down the road.
Setting-the-posts
First up, we’re digging holes for our concrete footings. Grab your shovel and maybe a friend to lend a hand, because we’re going to dig down to the frost line to ensure our structure stands strong through all seasons. The depth will vary depending on your local codes, so make sure to check those before you start. A good starting depth is 3 ft deep.
Once you’ve got your 14″ in diameter holes dug, it’s time to set the tube forms in place. These cylindrical forms are essential, they shape the concrete and keep everything neat and tidy. Place the tube forms into the holes, making sure they’re centered and standing nice and straight. This is where your level becomes your best friend.
Now, let’s talk leveling across all your footings. Lay a straight board across the tube forms and place a level on top to ensure they’re all at the same height. Adjust as necessary by adding or removing soil beneath the forms. Getting this right is crucial for a level structure, so don’t rush this step.
With everything leveled and secure, we’re ready for the fun part, pouring the concrete! Mix up your concrete according to the manufacturer’s instructions until you have a good consistency, not too watery, not too thick. Carefully pour the concrete into the tube forms, filling them up to the top. Use a piece of rebar or a wooden dowel to poke down into the concrete and eliminate any air pockets. This ensures maximum strength and durability.
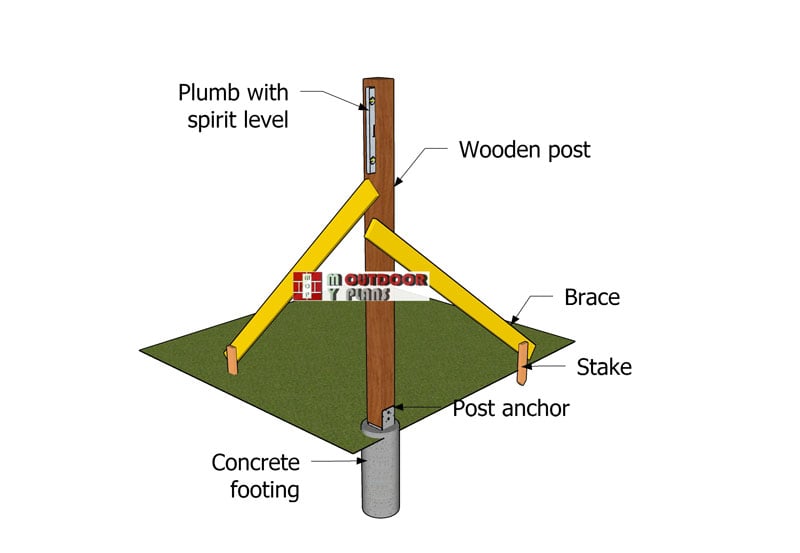
Before the concrete sets, it’s time to insert the post anchors. Place an anchor into the center of each footing, pressing it down so it’s embedded firmly in the concrete. Make sure the anchors are aligned correctly with where your posts will go and use your level to ensure they’re perfectly plumb. Allow the concrete to cure, usually 24 to 48 hours, but refer to your concrete mix for exact times. I know it’s tempting to move ahead, but patience here pays off big time. You want those footings to be rock solid before adding any weight.
Set the posts into place and secure them with temporarily braces, as shown in the diagram. This will allow you to add the rest of the components for the large run in shed, while everything stays into place tightly.
STEP 2: Shed structure
Fitting-the-support-beams
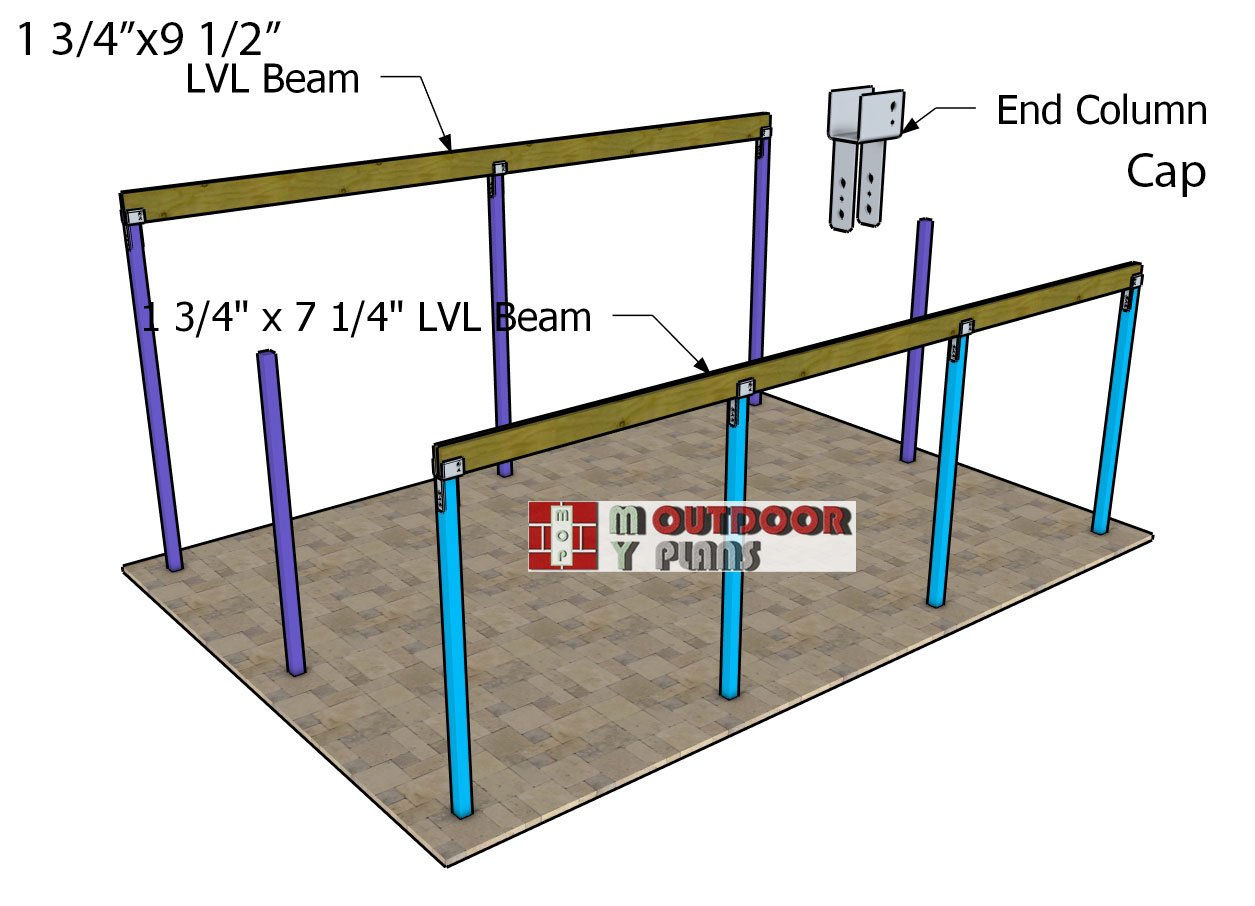
For the support beams, we’ll be using LVL beams, which are perfect for handling wider openings like those in this project. To ensure maximum strength, we’ll glue two LVL beams together for both the front and back. Once they’re aligned, secure them tightly with 2 1/2″ screws inserted from both sides. After that, lift the beams onto the posts—it’s starting to come together!
To attach the beams securely, we’ll use end column caps and 1 1/2″ structural nails or screws, following the diagram for precise placement. For the end posts, use ECCQ44SDS2.5 column caps, and for the middle posts, go with CCQ44SDS2.5 caps. These components will lock everything in place and ensure your structure is solid and reliable for the long haul.
Fitting-the-skids
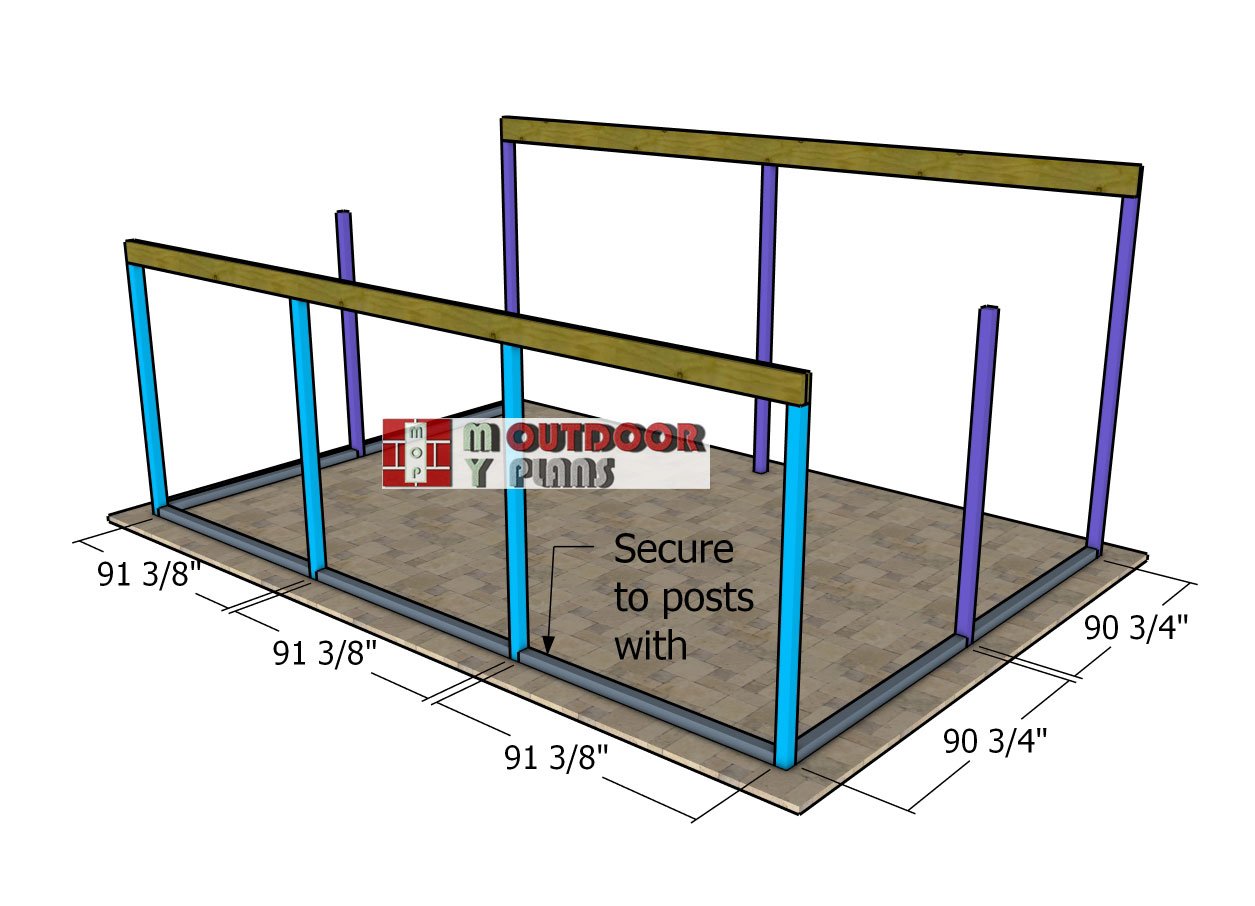
Fit the 4×4 skids between the posts as shown in the diagram. Cut the skids to size for a precise fit, and secure them with 3 1/2″ screws. Drill pilot holes at an angle to avoid splitting the wood, then drive the screws into the vertical posts. For added stability, attach screws on both the exterior and interior sides of the skids, using 2 screws per joint.
These skids serve a dual purpose: they create a sturdy barrier between the exterior and interior of the shed while raising the siding sheets 3 1/2″ off the ground to protect them from moisture. This small detail goes a long way in extending the lifespan of your shed!
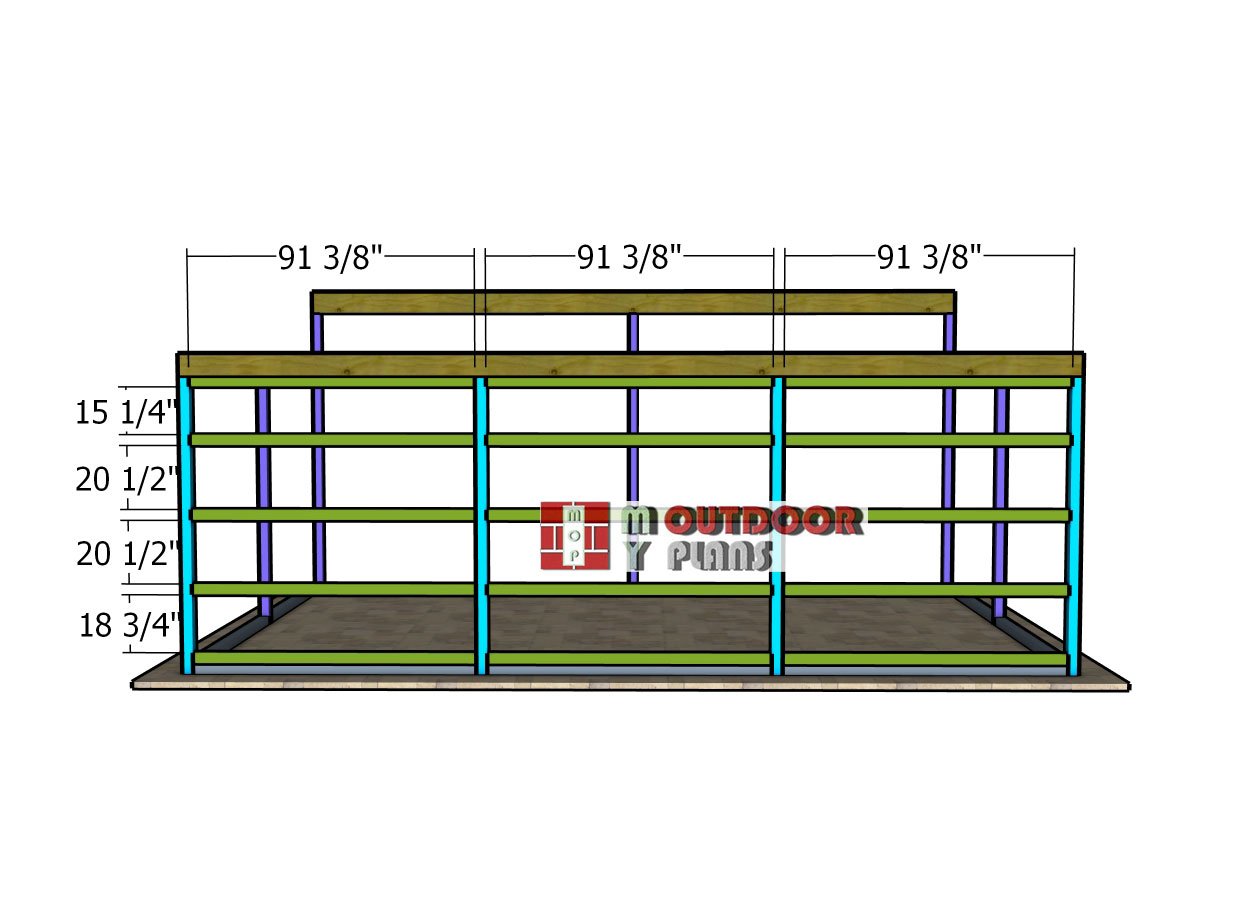
Girt-boards-side-walls
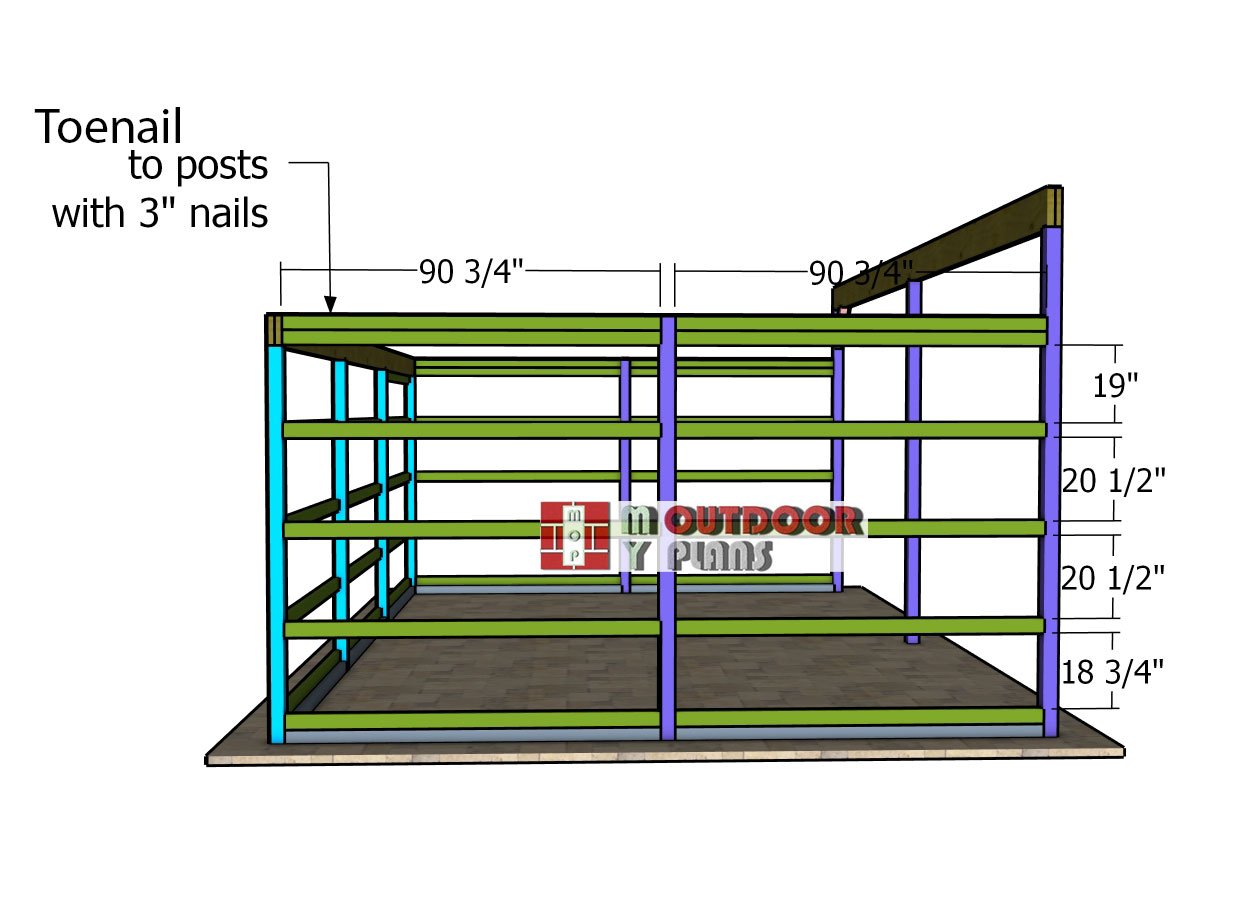
For the girt boards, we’ll be using 2×4 lumber. Cut the boards to 90 3/4″ for a precise fit, then secure them to the posts using 3″ nails. If you’re using a nail gun, you can quickly and easily drive the nails at an angle for extra hold. Prefer screws? No problem—just drill pocket holes at both ends of the boards and attach them to the posts with 2 1/2″ screws. Either method works great, so choose what fits your style and tools best. Let’s keep this project moving!
Girt-boards-side-walls
Repeat the same steps for the back of the loafing shed, ensuring everything is aligned perfectly. Take your time to double-check measurements and positioning as you go, precision here will save you time and effort later.
Fitting-the-braces
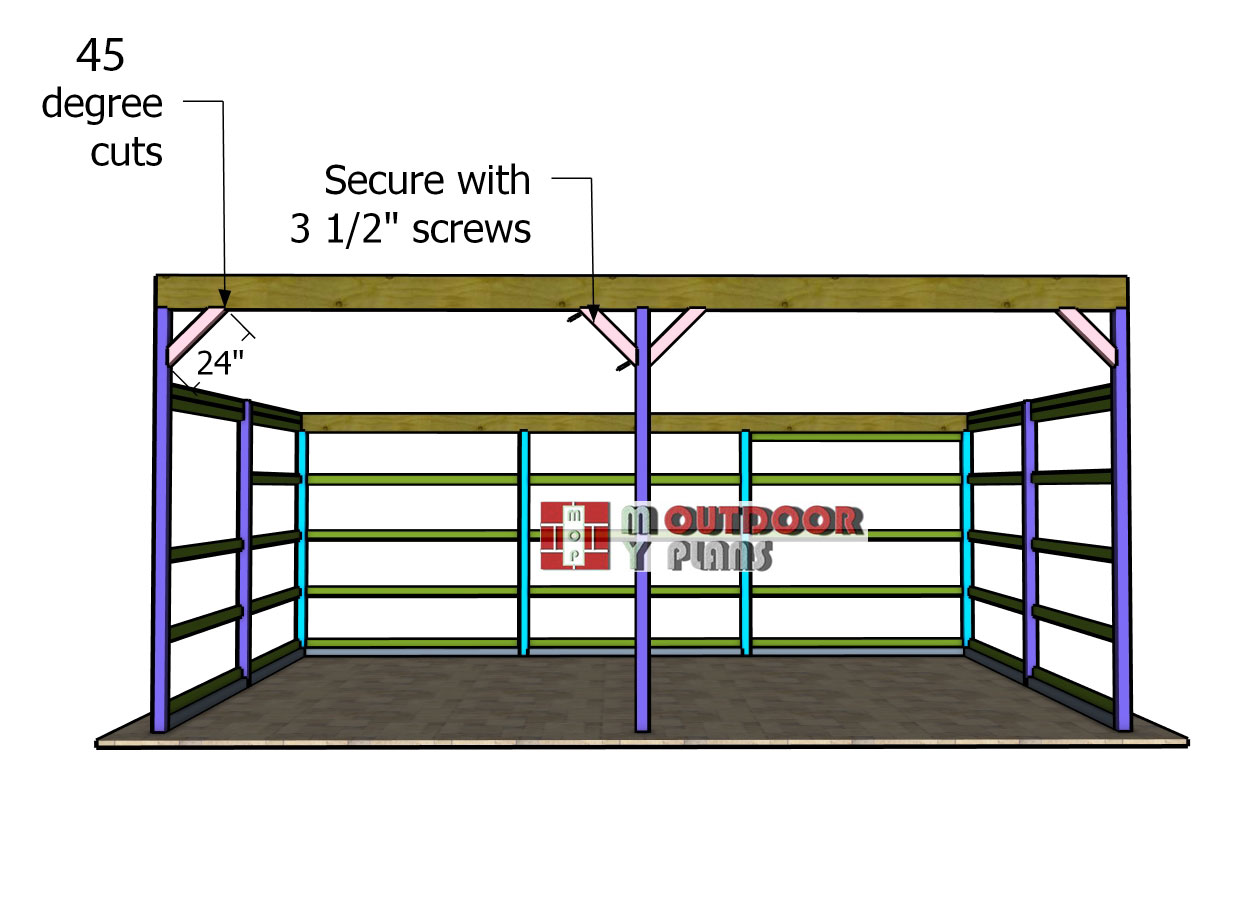
For the front wall braces, use 4×4 lumber for added strength. Cut both ends of the braces at a 45-degree angle to ensure a snug fit. Once cut, position the braces on the structure and secure them with 3 1/2″ screws. Don’t forget to drill pilot holes first—this helps prevent splitting and ensures a clean, professional finish. These braces will provide the extra stability your structure needs.
STEP 3: Rafters
Cutting-the-rafters
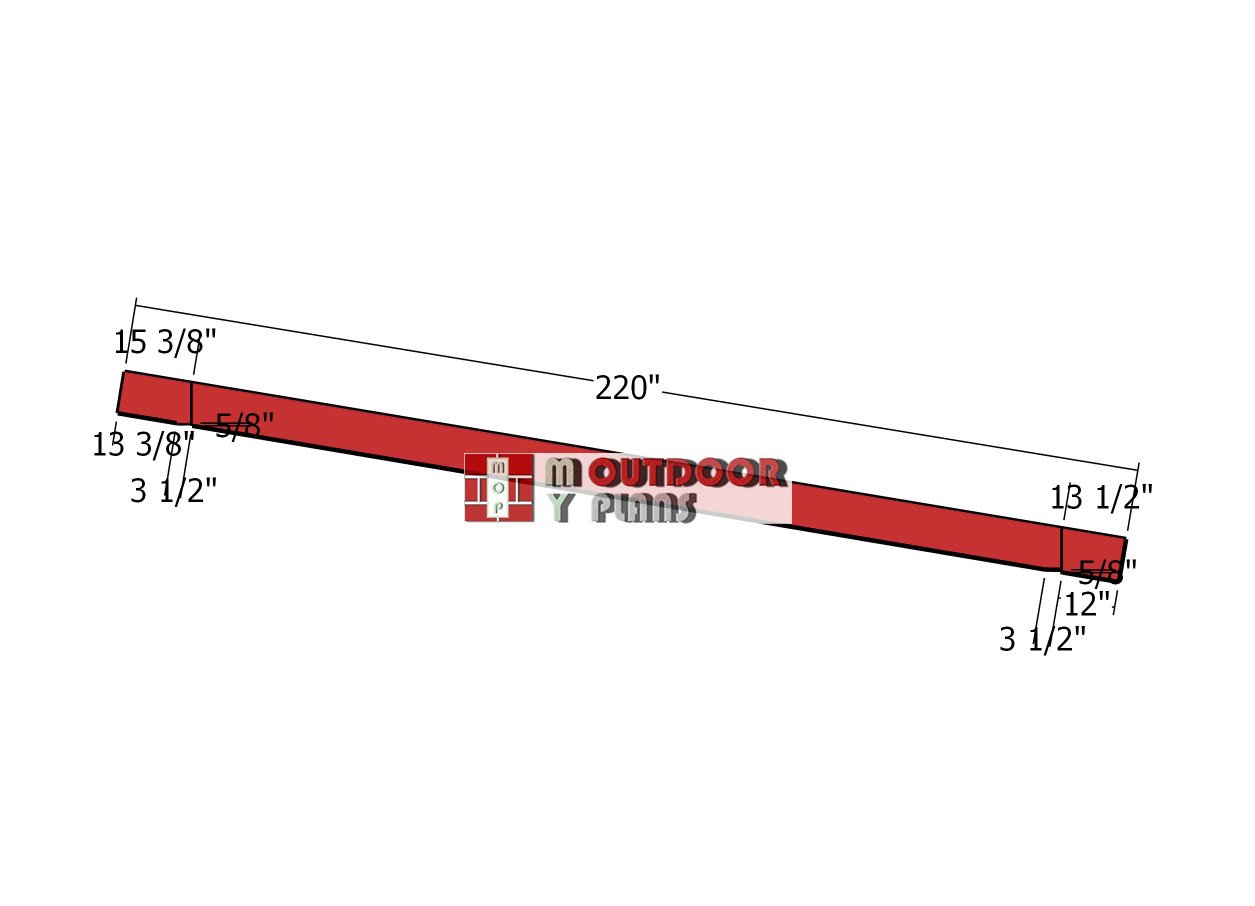
Next up, let’s build the rafters for the run-in shed using 2×10 boards. Start by marking the cut lines on each board according to the plans. Take your time to ensure precision, as this will make assembly much easier later. Once marked, use a circular saw to make the cuts, keeping your lines straight and clean. Repeat the process for all the rafters, and you’ll have a sturdy set ready to go in no time.
Fitting-the-rafters
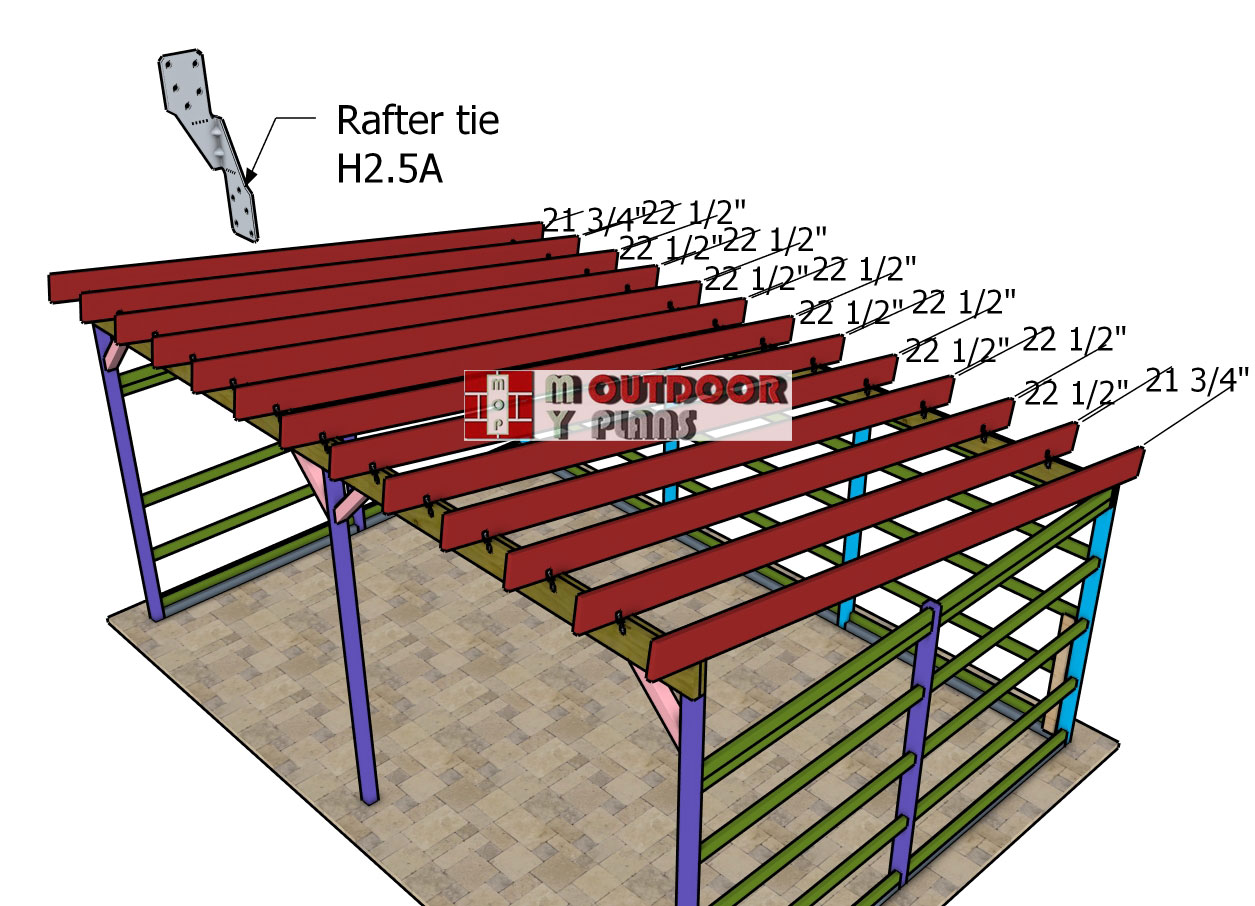
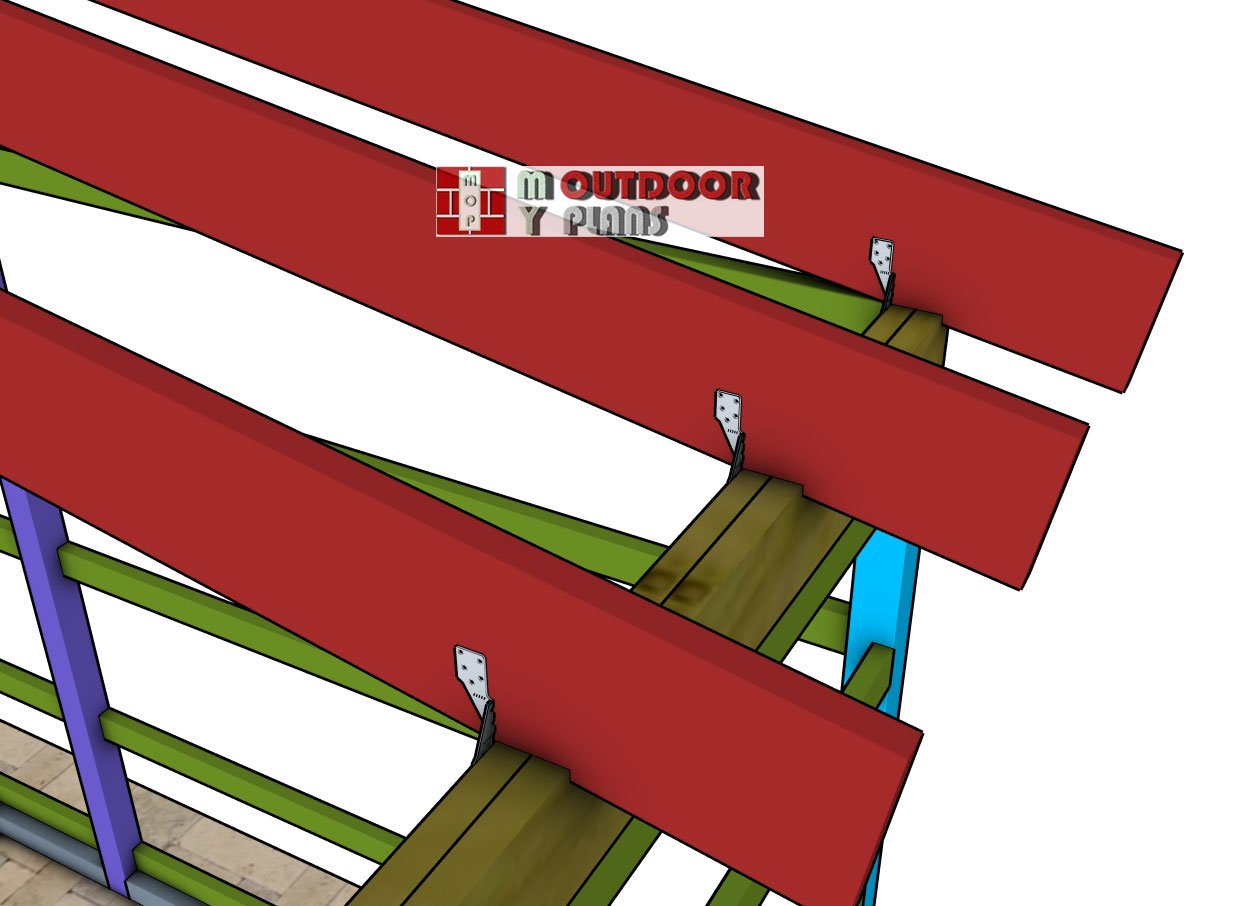
It’s time to fit the rafters onto the top of your lean-to shed! Position the rafters 24″ on center for even spacing and structural integrity. Secure each rafter to the support beams using rafter ties, attaching them firmly with 1 1/2″ structural nails or screws. Take a moment to double-check alignment as you go, this will ensure a strong, professional-looking roof framework.
Rafters—detail
Here’s a detailed close-up of the joint between the rafters and the support beams. This connection is reinforced with rafter ties, ensuring a secure and stable fit. The ties are fastened with 1 1/2″ structural nails or screws, providing both strength and durability. Properly aligning and securing these joints is crucial for a sturdy and long-lasting roof framework.
Fitting-the-blockings-between-rafters
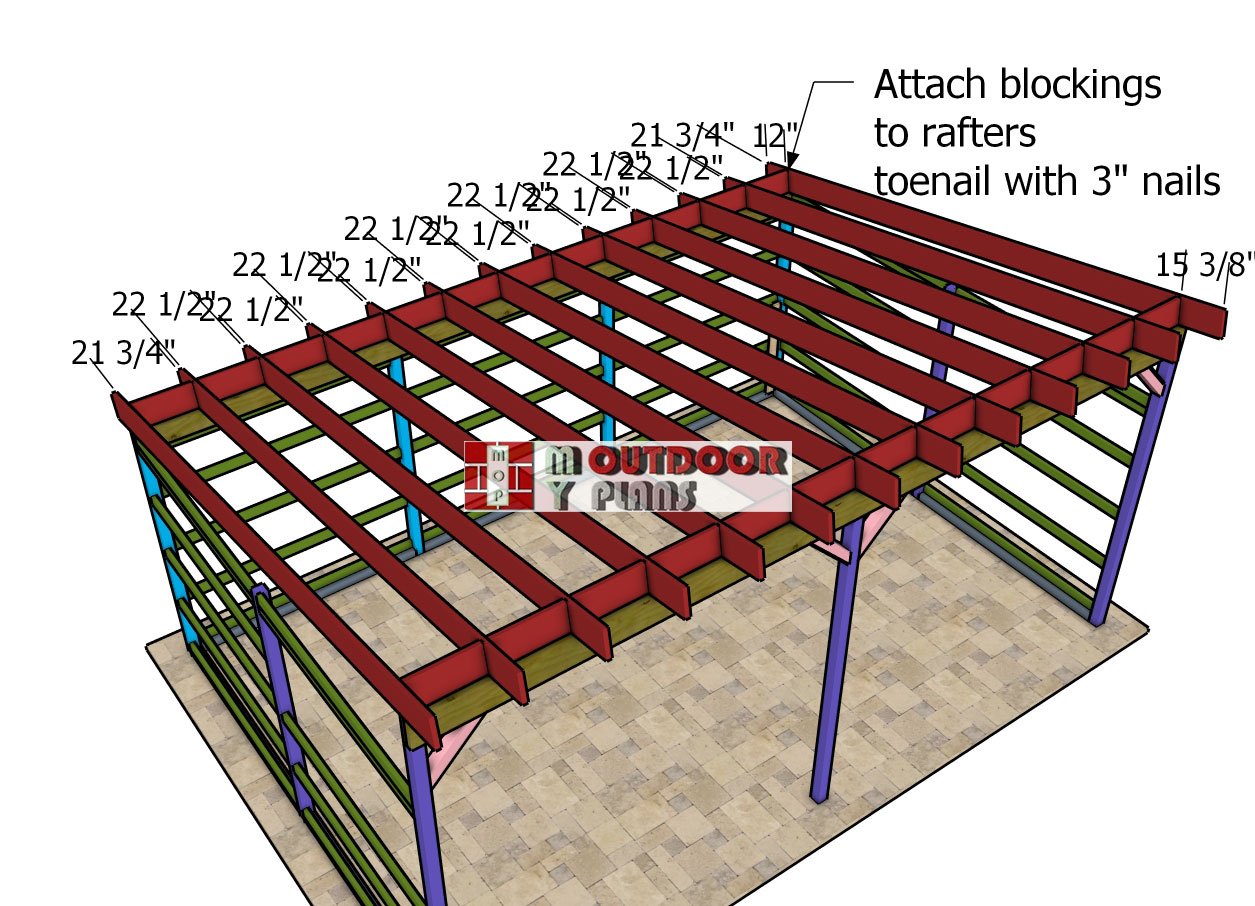
Cut the roof blockings from 2×10 lumber to fit snugly between the rafters, as shown in the image. Position each blocking carefully for a tight fit and toenail them into place using 3″ nails for a secure hold. If you prefer, you can drill pocket holes at both ends of the blockings and attach them with 2 1/2″ screws instead. Either method will ensure the blockings provide the stability and support your roof needs.
How to make a 16×24 run in shed
Back view – 16×24 run in shed
How to build a large run in shed
Don’t miss PART 2 of this project, where we bring the shed to life by tackling the roof construction and adding the all-important finishing touches. Ready to see it all come together? Head over now to watch the final steps and transform your shed into a complete, functional structure!
If you want to get Premium Plans, just press the GET PDF PLANS bellow. If you want to get the free version, please read the blog FAQs.
This woodworking project was about 16×24 run shed plans. If you want to see more outdoor plans, check out the rest of our step by step projects and follow the instructions to obtain a professional result.


