Are you ready to take on your next big DIY project? In this post, we’re kicking off free plans to build a spacious 16×20 lean to shed, perfect for storing tools, equipment, or anything else that needs a home. In PART 1, we’ll focus on constructing the frame and installing the rafters, the foundation for a strong and durable shed. Whether you’re a seasoned DIYer or tackling your first big project, we’ve got step-by-step guidance to help you build with confidence. This shed features a 3:12 roof pitch.
Taking on a 16×20 lean-to shed project is an exciting challenge that’s well worth the effort. With its spacious design, this shed is perfect for storing lawn equipment, tools, or even transforming into a versatile workspace. The project will take about two to three weekends, making it manageable for both experienced builders and ambitious DIYers. Expect to spend between $2,500 and $4,000 on materials, depending on your local prices and the features you choose, such as high-quality siding or upgraded roofing. By the end of this build, you’ll have a durable, functional structure that adds value to your property and solves your storage needs in style.
When buying the lumber, you should select the planks with great care, making sure they are straight and without any visible flaws (cracks, knots, twists, decay). Investing in cedar or other weather resistant lumber is a good idea, as it will pay off on the long run. Use a spirit level to plumb and align the components, before inserting the galvanized screws, otherwise the project won’t have a symmetrical look. If you have all the materials and tools required for the project, you could get the job done in about a day. See all my Premium Plans HERE.
Projects made from these plans
Pin it for later!
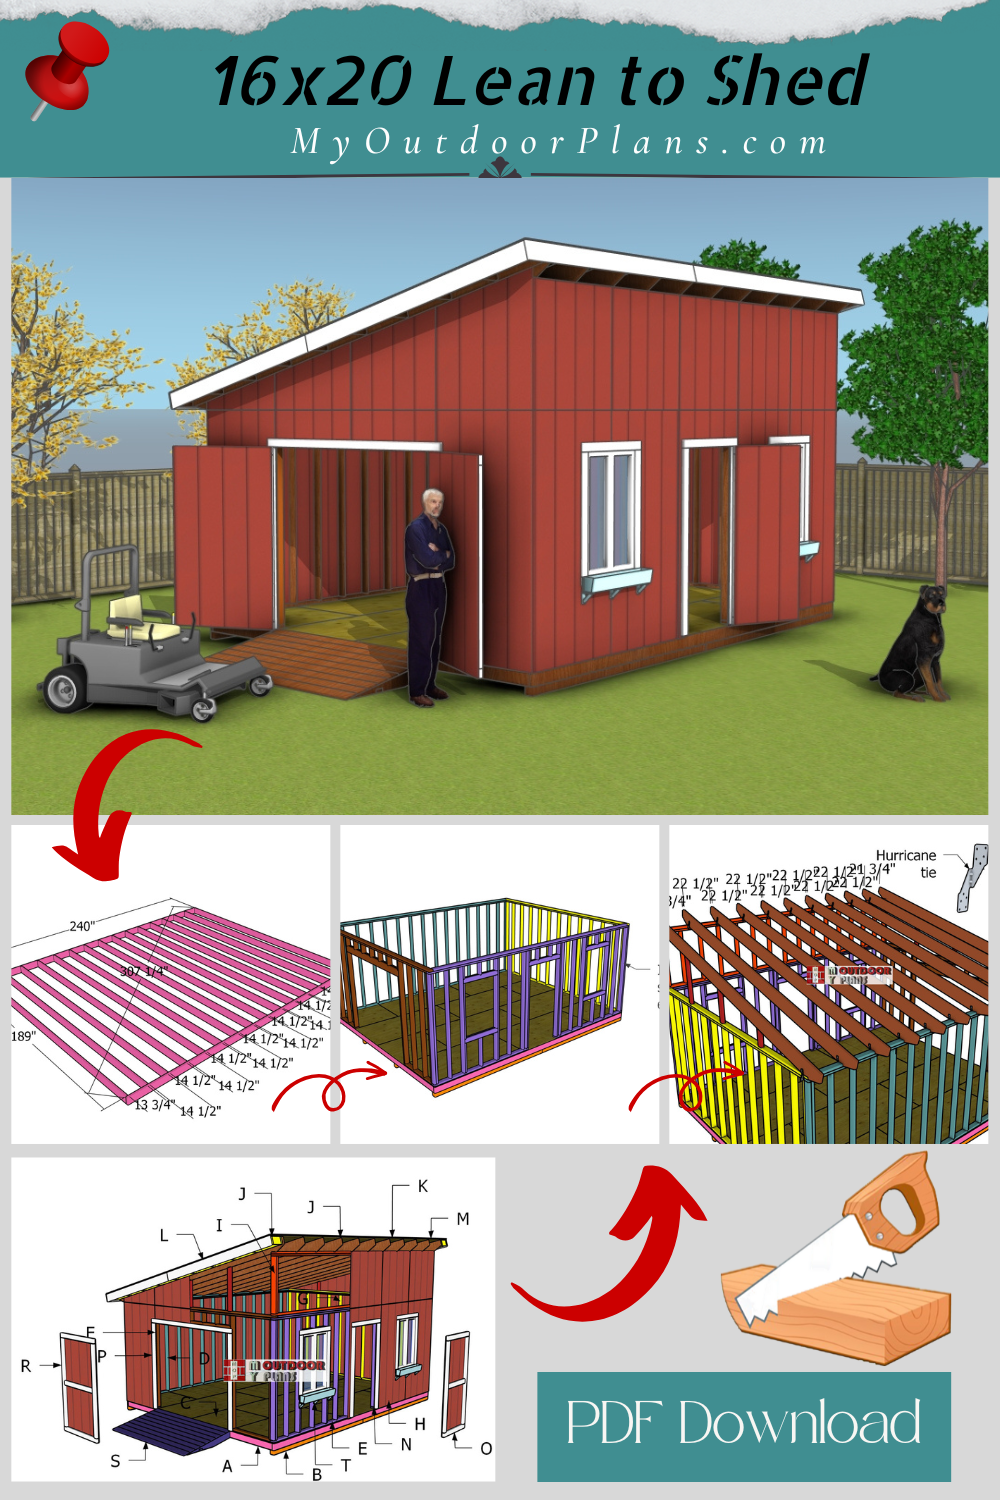
16×20 Lean to Shed Plans – PDF Download
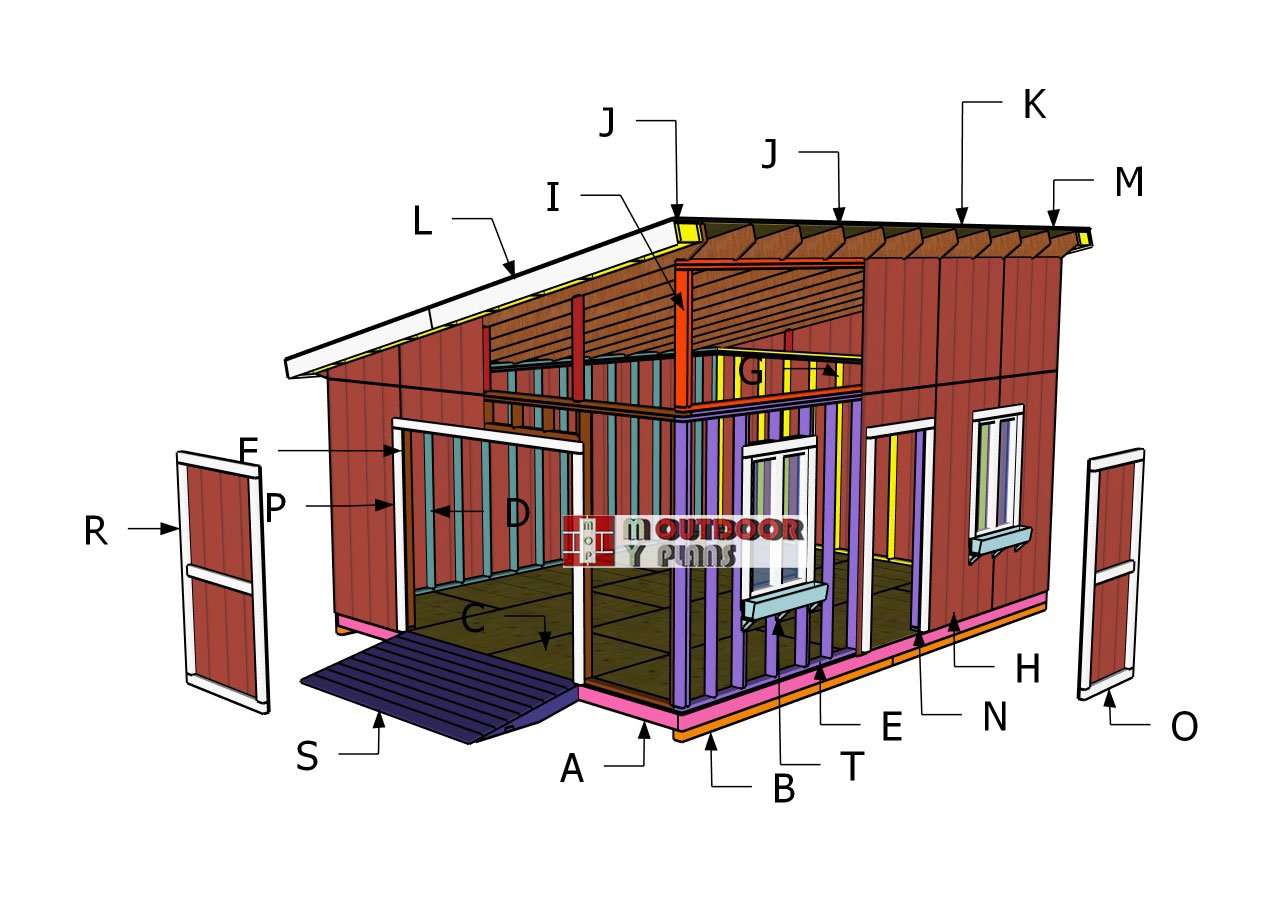
Building-a-16×20-lean-to-shed
Cut & Shopping Lists
- A – FLOOR FRAME – 2×6 lumber 20 ft – 2 pieces
- A – FLOOR FRAME – 2×6 lumber 20 ft – 2 pieces
- B – SKIDS – 4×4 lumber 10 ft – 8 pieces
- C – FLOOR – 3/4″ plywood 4’x8′ – 8 pieces
- C – FLOOR – 3/4″ plywood 4’x8′ – 4 pieces
- D – SIDE WALL – 2×4 lumber 20 ft – 2 pieces
- D – SIDE WALL – 2×4 lumber 233″ – 1 piece
- D – SIDE WALL – 2×4 lumber 92 3/4″ – 18 pieces
- E – SIDE WALL with WINDOWS – 2×4 lumber 20 ft – 1 piece
- E – SIDE WALL with WINDOWS – 2×4 lumber 233″ – 1 piece
- E – SIDE WALL with WINDOWS – 2×4 lumber 102″ – 2 pieces
- E – SIDE WALL with WINDOWS – 2×4 lumber 92 3/4″ – 16 pieces
- E – SIDE WALL with WINDOWS – 2×4 lumber 27″ – 6 pieces
- E – SIDE WALL with WINDOWS – 2×4 lumber 48″ – 4 pieces
- E – SIDE WALL with WINDOWS – 2×4 lumber 78 1/2″ – 2 pieces
- E – SIDE WALL with WINDOWS – 2×4 lumber 10 3/4″ – 10 pieces
- E – SIDE WALL with WINDOWS – 2×4 lumber 35″ – 8 pieces
- E – SIDE WALL with WINDOWS – 2×4 lumber 39″ – 2 pieces
- F – FRONT WALL – 2×4 lumber 192″ – 1 piece
- F – FRONT WALL – 2×4 lumber 185″ – 1 piece
- F – FRONT WALL – 2×4 lumber 44 1/2″ – 2 pieces
- F – FRONT WALL – 2×4 lumber 92 3/4″ – 4 pieces
- F – FRONT WALL – 2×4 lumber 78 1/2″ – 2 pieces
- F – FRONT WALL – 2×4 lumber 8 3/4″ – 7 pieces
- F – FRONT WALL – 2×6 lumber 99″ – 2 pieces
- G – BACK WALL – 2×4 lumber 185″ – 2 pieces
- G – BACK WALL – 2×4 lumber 192″ – 1 piece
- G – BACK WALL – 2×4 lumber 92 3/4″ – 13 pieces
- I – TOP FRAME – 2×4 lumber 240″ – 3 pieces
- I – TOP FRAME – 2×4 lumber 42 3/4″ – 18 pieces
- I – END SUPPORTS – 2×4 lumber 11 1/2″ – 2 pieces
- I – END SUPPORTS – 2×4 lumber 23 1/2″ – 2 pieces
- I – END SUPPORTS – 2×4 lumber 35 1/2″ – 2 pieces
- J – RAFTERS – 2×6 lumber 216″ – 11 pieces
Tools
![]() Hammer, Tape measure, Framing square, Level
Hammer, Tape measure, Framing square, Level
![]() Miter saw, Drill machinery, Screwdriver, Sander
Miter saw, Drill machinery, Screwdriver, Sander
![]() Safety Gloves, Safety Glasses
Safety Gloves, Safety Glasses
Time
Related
- 6×8 Lean to Shed Plans
- 16×20 Gable Shed Plans
- 16×20 Lean to Shed Plans – Part 1
- 16×20 Lean to Shed Plans – Part 2
It’s that easy to build this shed!
Step 1: Building the floor
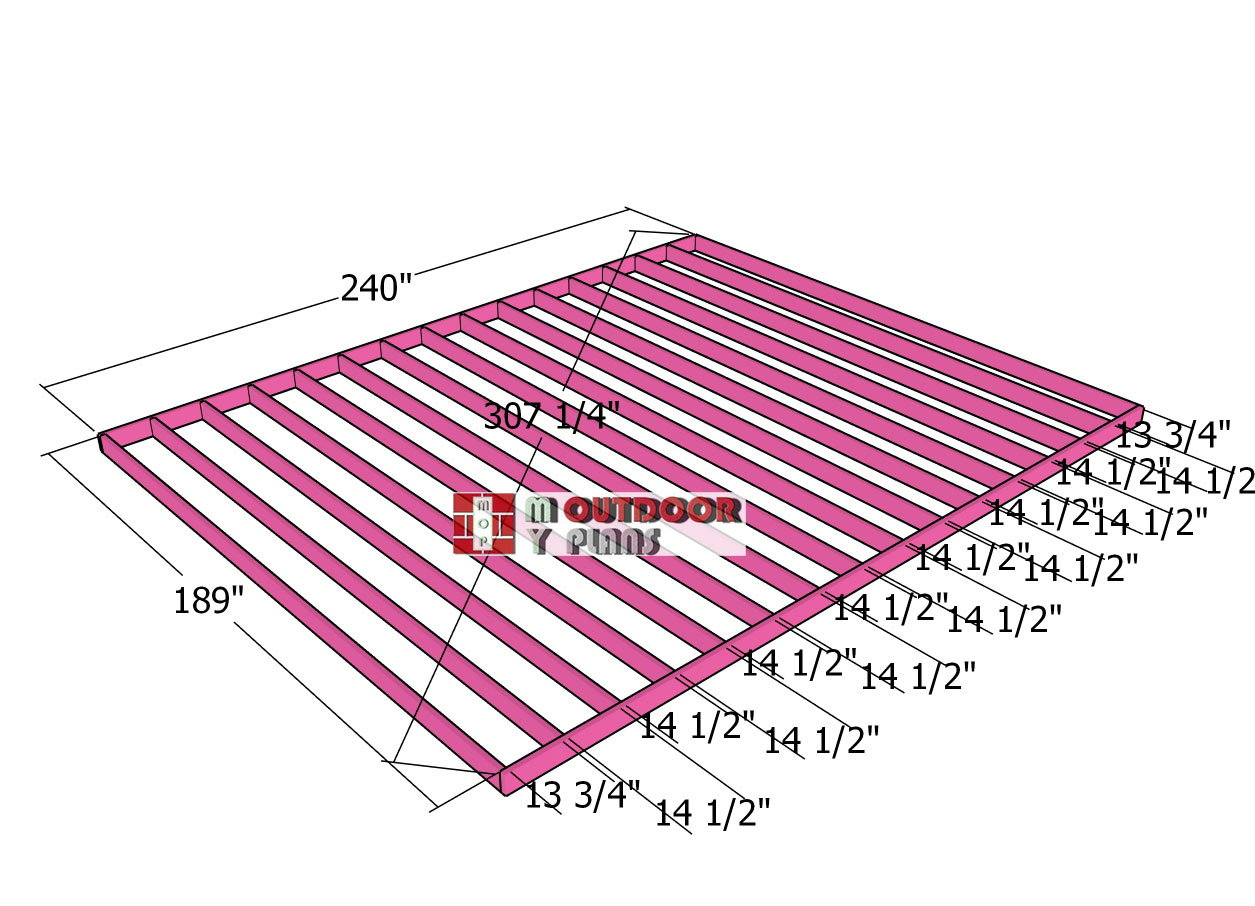
Assembling-the-floor-frame
Start by preparing the site for a sturdy foundation. Choose a level spot with good drainage, clear away rocks and debris, and mark the perimeter based on your shed plans. For added stability, lay gravel or compact the soil; for maximum durability, consider a concrete slab or blocks. A well-prepared base ensures your shed stays solid and weather-resistant for years to come.
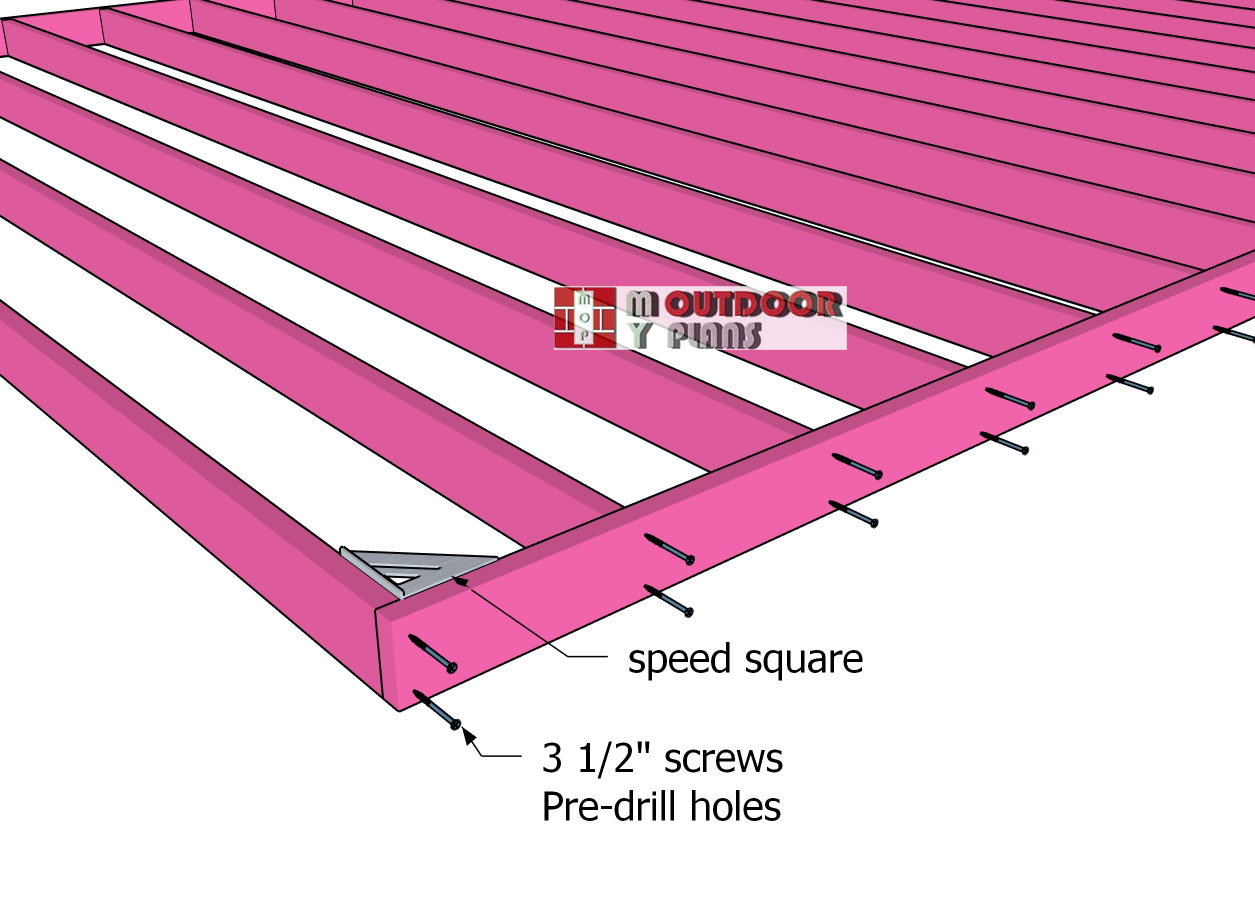
Floor-frame—square
Lay the 2×6 joists on a flat, level surface and align them carefully every 16″ OC. Drill pilot holes through the rim joists to prevent splitting, then secure each joist with 3 1/2″ screws to ensure a sturdy connection. Check that the corners are square by measuring the diagonals, adjust as needed until they match. For extra accuracy, use a speed square at all four corners to confirm perfect 90-degree angles before proceeding.
Floor-skids
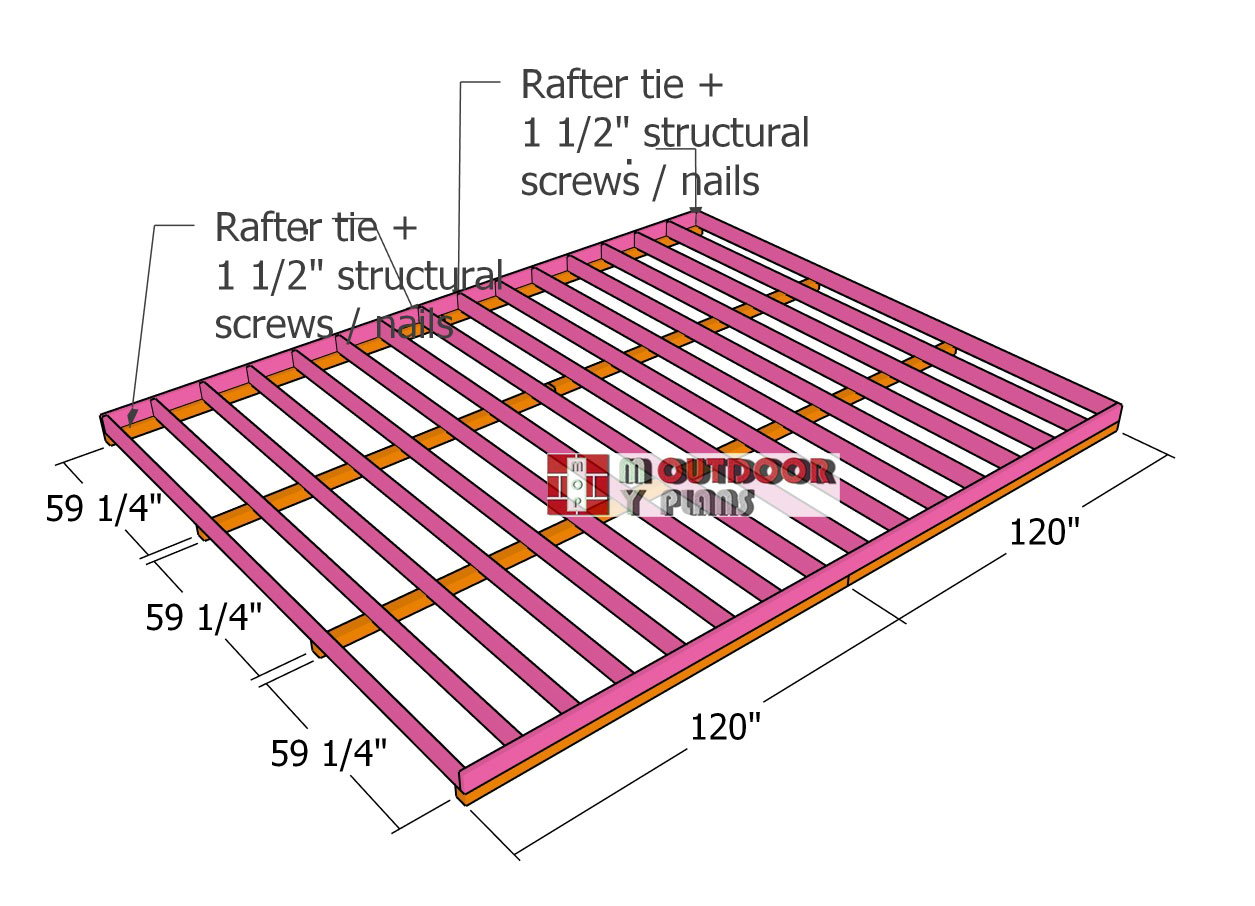
Position 4×4 skids evenly beneath the floor frame to elevate it off the ground, protecting it from moisture and decay. The skids also distribute the shed’s weight evenly. Align them with the joists as specified in the plans for maximum support. Ensure the skids are level and properly spaced before attaching the floor frame, as this step is crucial for the shed’s long-term stability and durability.
Fitting-the-skids-to-the-floor-frame
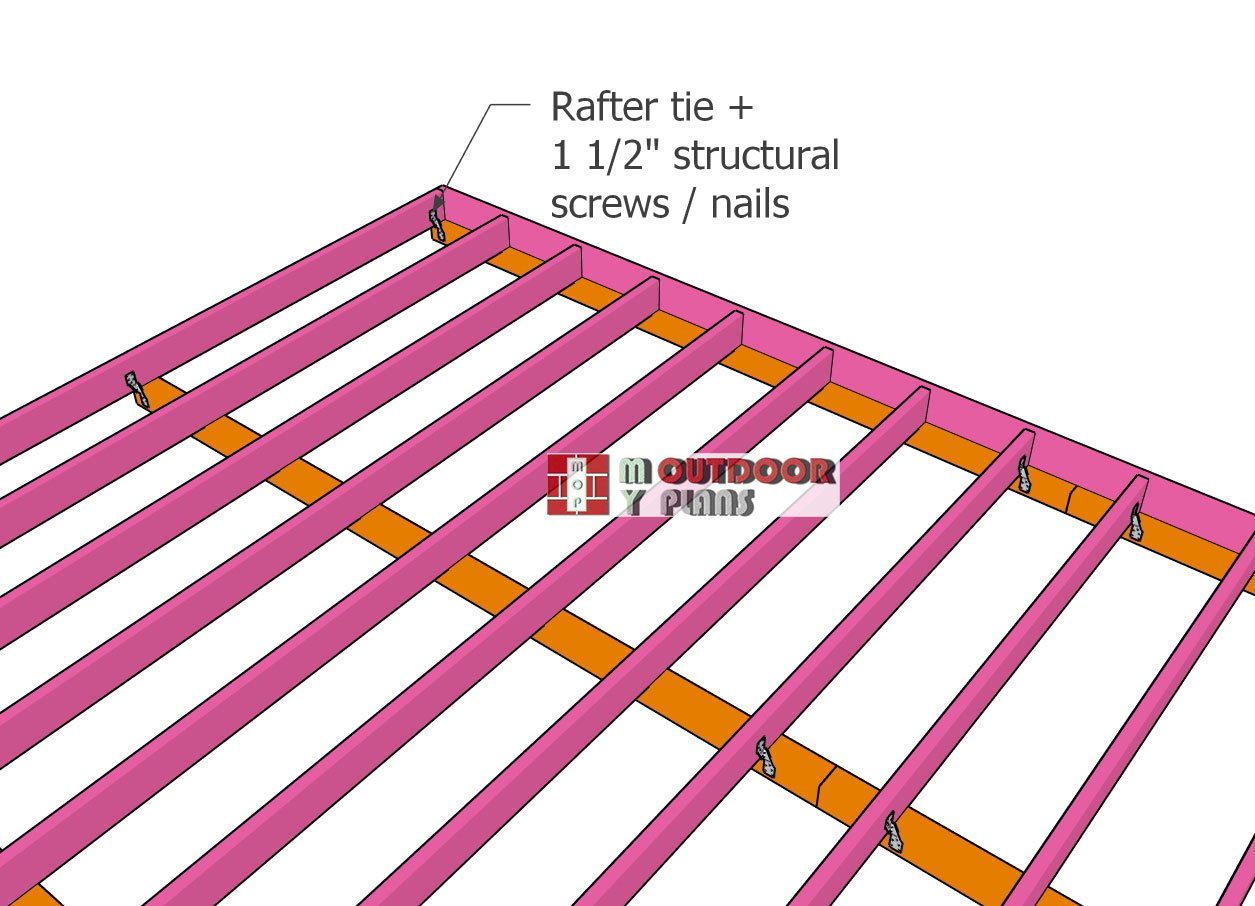
Secure the floor frame to the skids using rafter ties to prevent shifting and enhance stability. Place a rafter tie at each end of the skids, aligning them carefully with the frame. Fasten the ties to the skids using 1 1/2″ structural screws, ensuring a tight and durable connection. This anchoring step provides added strength, keeping your shed stable even in challenging weather.
Fitting-the-floor-sheets
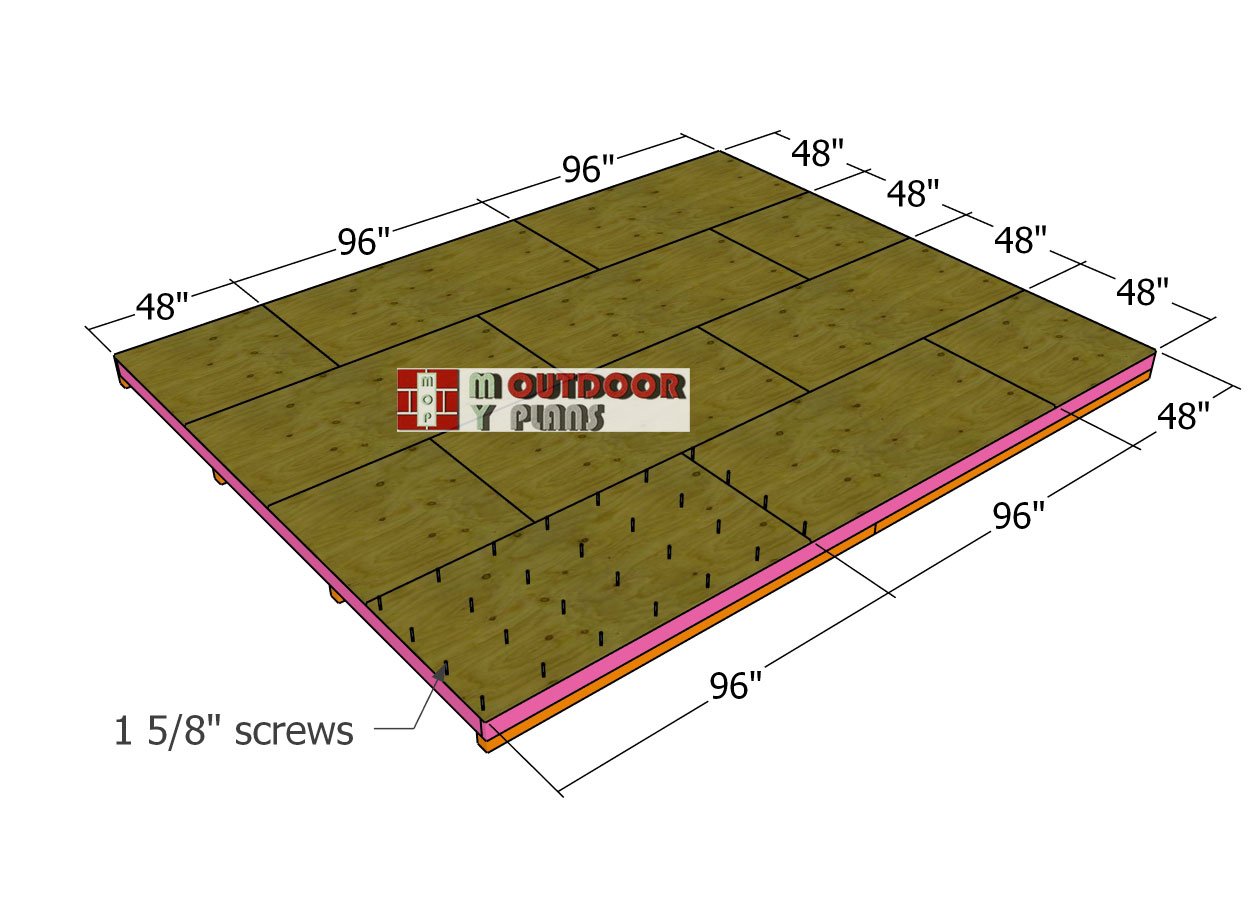
Lay the 3/4″ plywood sheets onto the floor frame, ensuring the edges are flush for a clean fit. Align the seams so they rest on the center of a floor joist for proper support. Use 1 5/8″ screws, spaced every 8 inches along the edges and across the joists, to secure the plywood.
Drill pilot holes to prevent splitting and ensure a snug fit. For precise screw placement, mark the joists on the plywood with a chalk line. For added strength and moisture resistance, apply wood glue along the joists before fastening the sheets. This step minimizes creaking and enhances the floor’s durability.
Building the shed wall frames
Plain-side-wall-frame
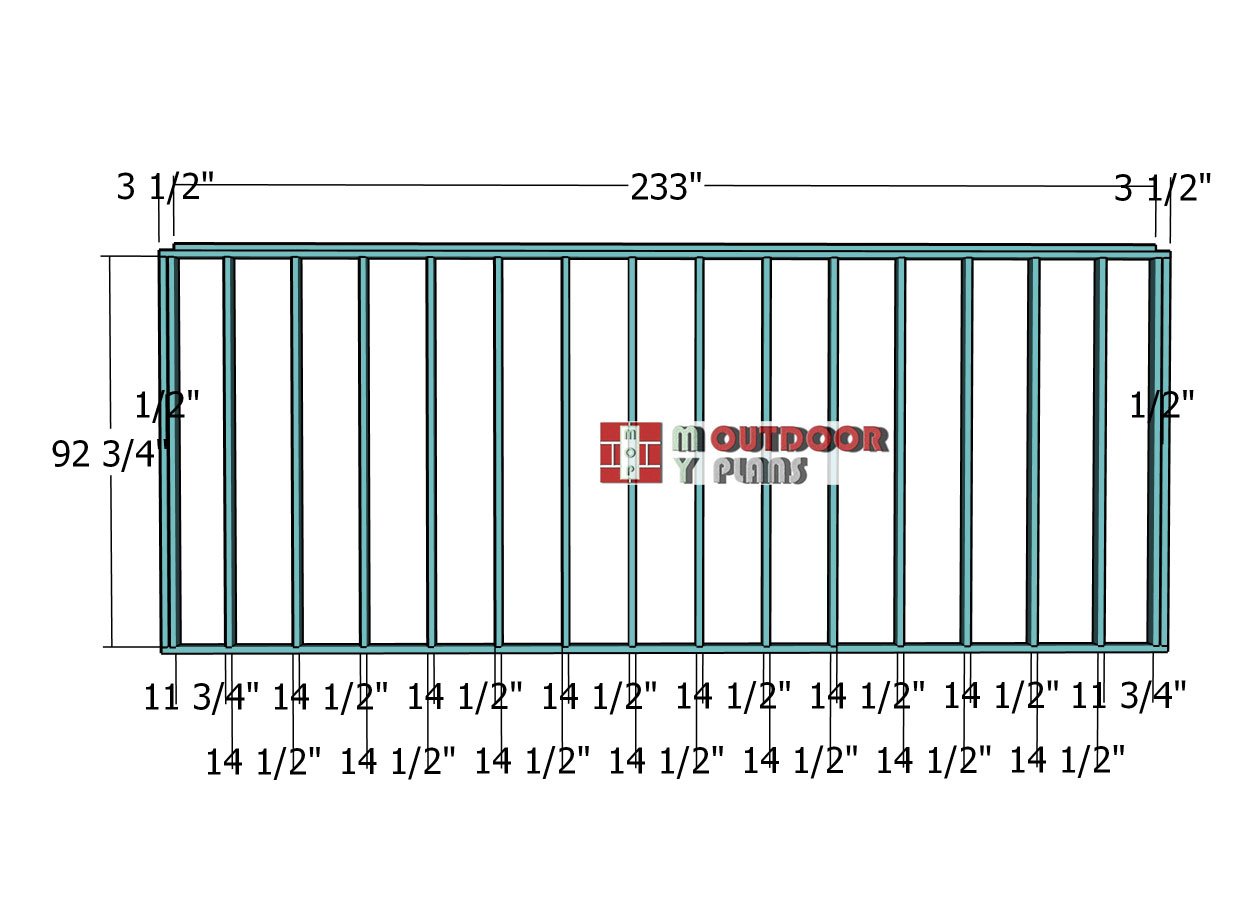
Construct the plain side wall using 2×4 lumber, following the dimensions in the diagram. Cut all components to size and lay them out on a level surface for accurate alignment. Drill pilot holes through the top and bottom plates, and secure the studs with 3 1/2″ screws, spacing them 16″ on center as shown in the diagram.
Reinforce the frame by installing double studs at both ends, using 1/2″ plywood spacers between them for extra strength and stability. Attach a double top plate, ensuring it insets 3 1/2″ on both ends, and secure it with 2 1/2″ screws. This sturdy wall frame is now ready for assembly into your shed.
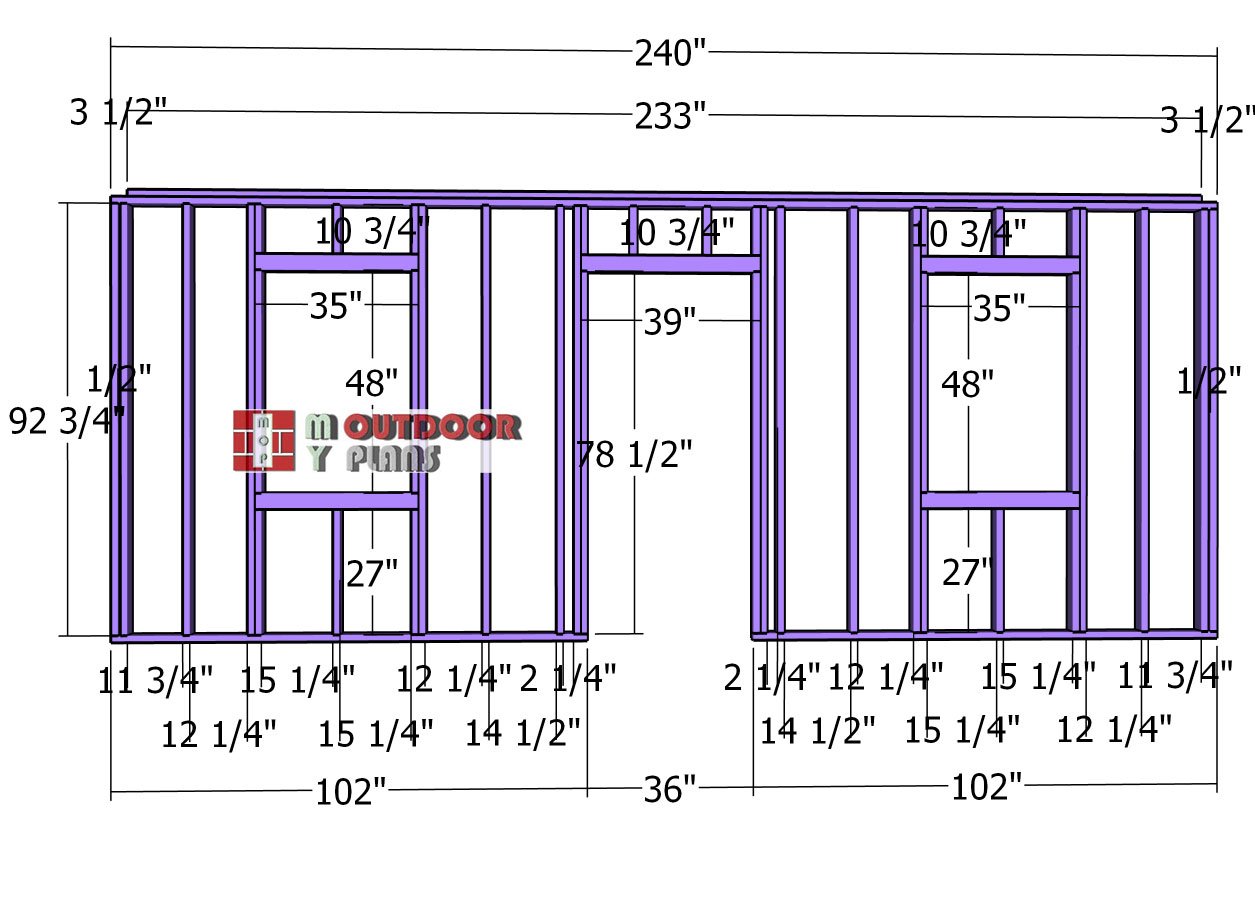
Side-wall-with-window-frame
Construct the opposite side wall frame using 2×4 lumber, incorporating openings for two windows and a man door as detailed in your plans. Adjust the dimensions and placement of the openings as needed. For the windows, create double headers by sandwiching a 1/2″ plywood spacer between two 2x4s.
Apply wood glue to the joints, align the edges flush, and secure the headers with 3 1/2″ screws driven from both sides for added strength. Position the headers at the top and bottom of the window openings and attach them to the wall frame using 3 1/2″ screws. For a snug fit, drill the screws at an angle or use pocket holes at the ends of the headers. This precise construction ensures the wall is strong and ready for assembly.
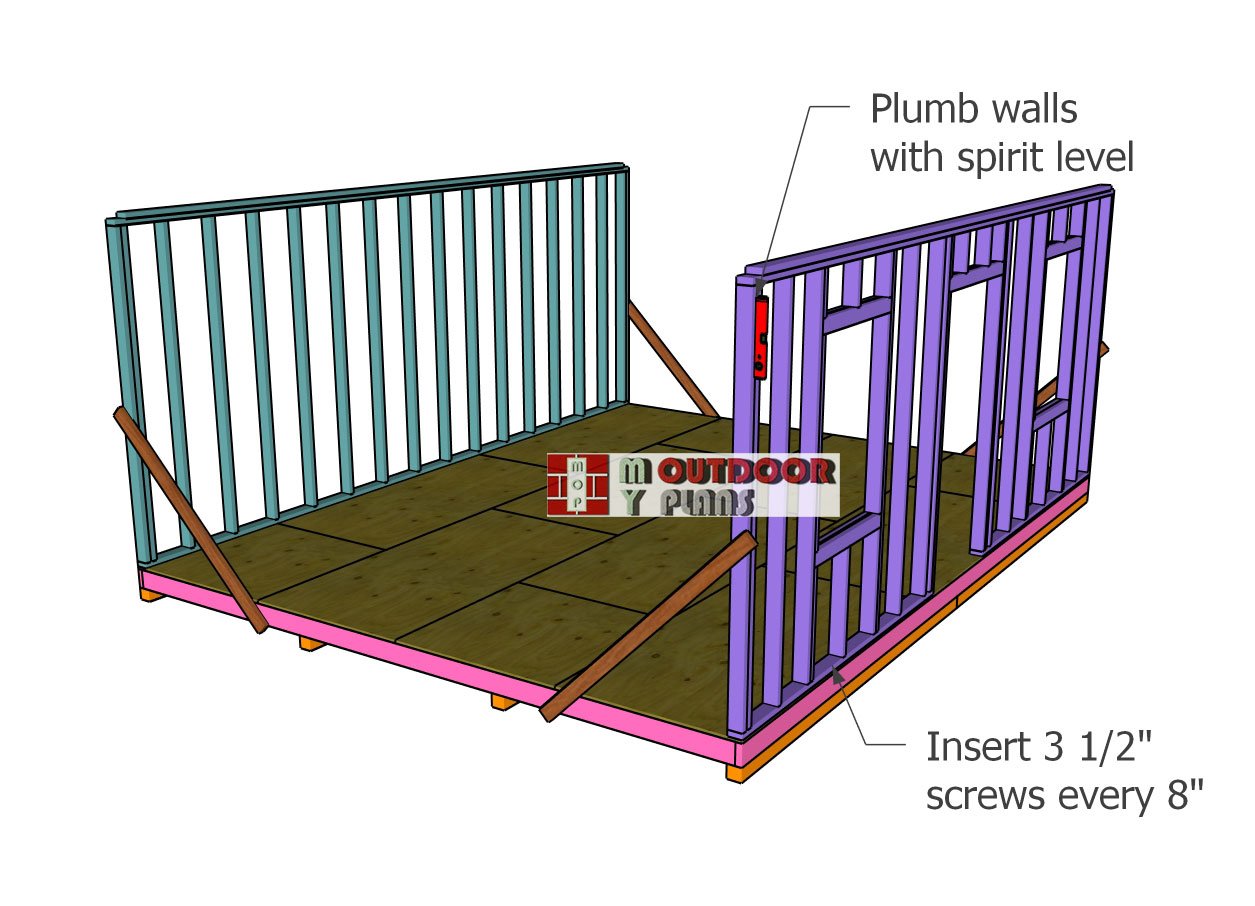
Fitting-the-side-wall-frames
Place the side wall frames onto the shed floor, aligning them flush with the edges for a precise fit. Use a spirit level to ensure the walls are perfectly plumb, and temporarily secure them with braces to hold their position.
Drill pilot holes through the bottom plates to prevent splitting, then fasten the walls to the floor using 3 1/2″ screws spaced every 8 inches. This step firmly anchors the walls, creating a stable foundation for the rest of your build.
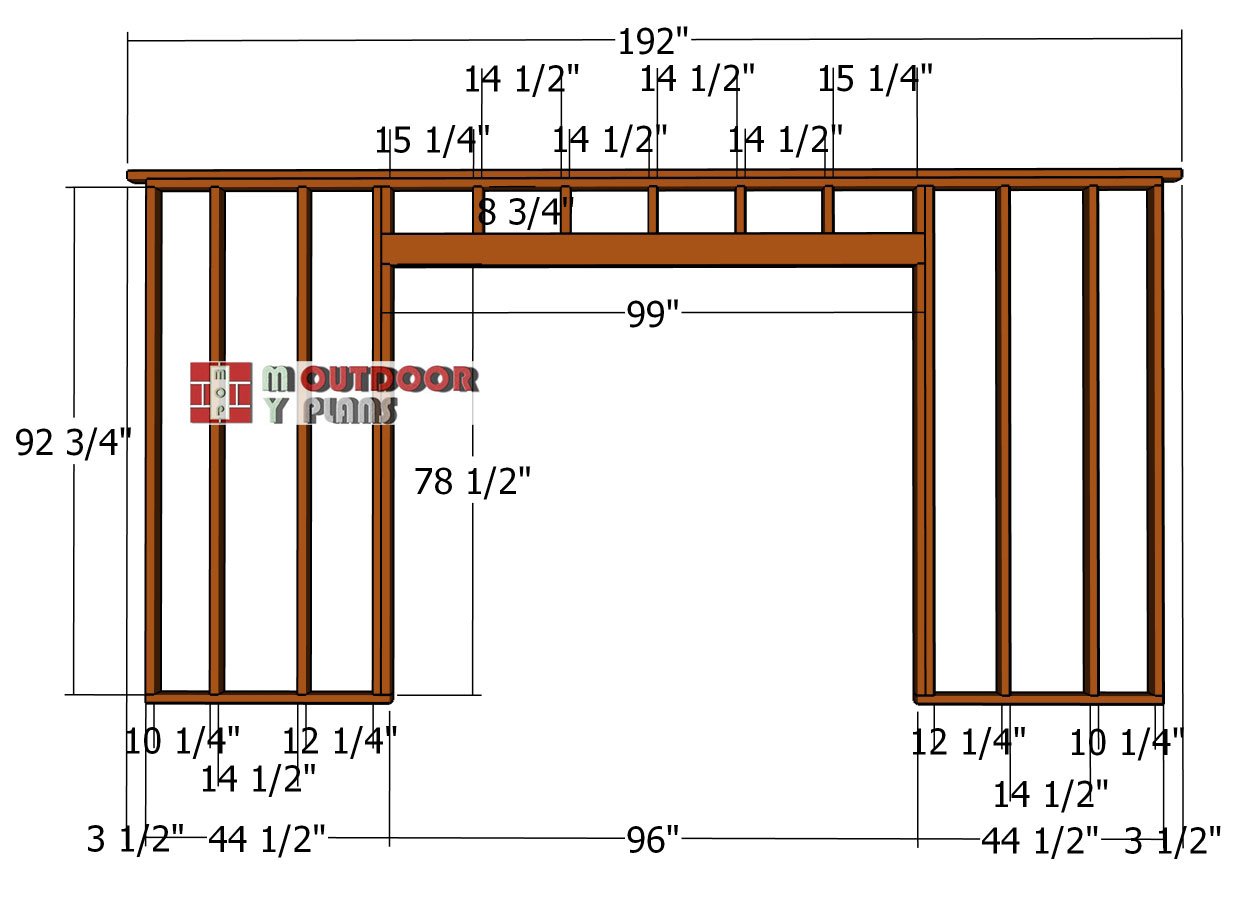
Front-wall-frame
Construct the front wall frame using 2×4 lumber and a double header made from 2×6 lumber for the door opening. Assemble the frame by drilling pilot holes and fastening the studs and plates with 3 1/2″ screws, ensuring accurate alignment and spacing as specified in the plans.
Create the double header by sandwiching a 1/2″ plywood spacer between two 2×6 boards and securing them with screws or nails. Position the header above the door opening so it rests firmly on the trimmer studs for proper load distribution. Attach the header to the wall frame using 3 1/2″ screws or 16d nails, driving them through the king studs into the header ends for a strong, durable connection.
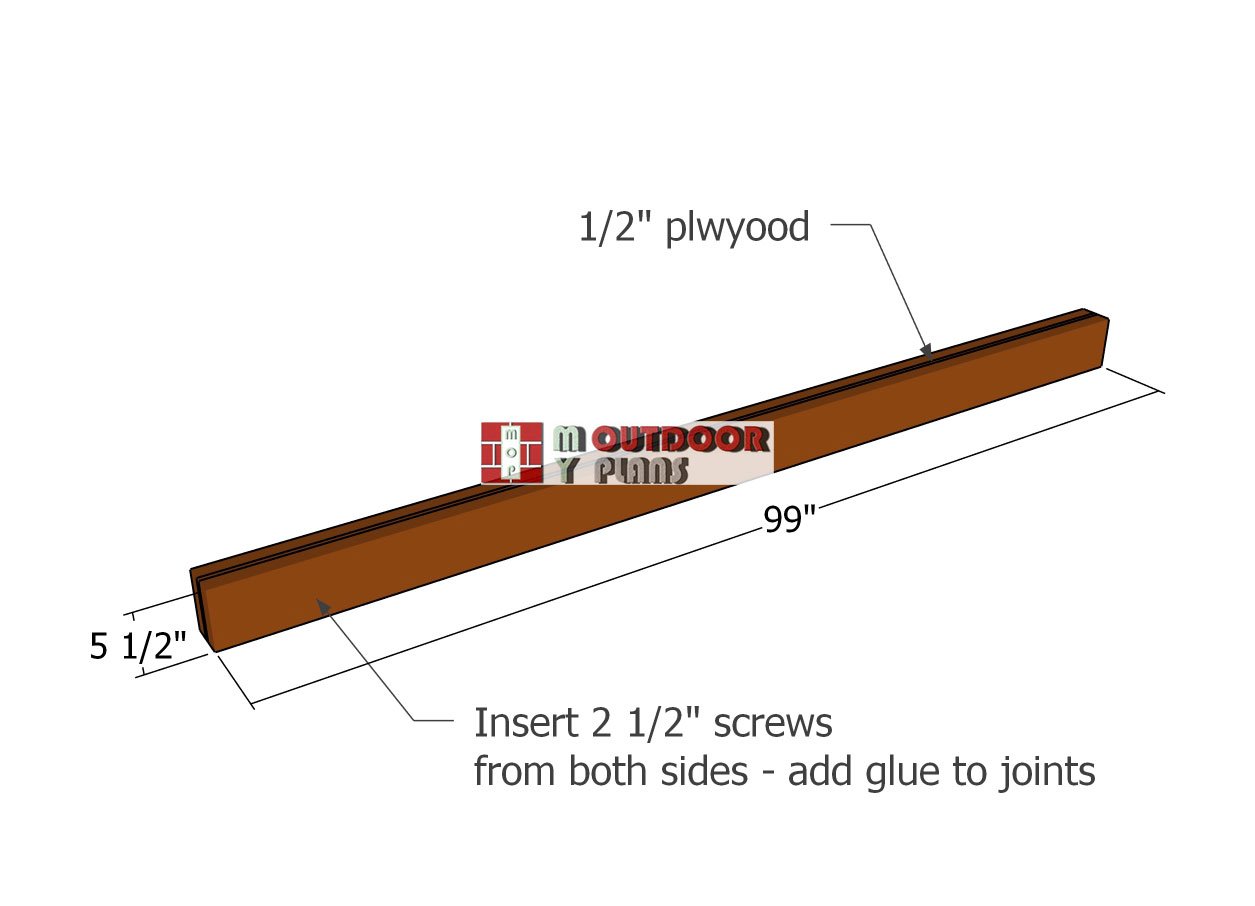
Double-headers
To construct a double 2×6 header, cut two 2×6 boards to 99″ and a matching piece of 1/2″ plywood. Sandwich the plywood between the boards to form a strong, insulated header. Apply construction adhesive between the layers for extra strength and clamp the assembly tightly to prevent shifting.
Drill pilot holes through the 2x6s and into the plywood spacer, spacing them every 12 inches along the length. Secure the layers with 3 1/2″ screws or 16d nails, ensuring the assembly is flush and square. This durable header will effectively distribute loads above doors or windows, maintaining the shed’s structural integrity.
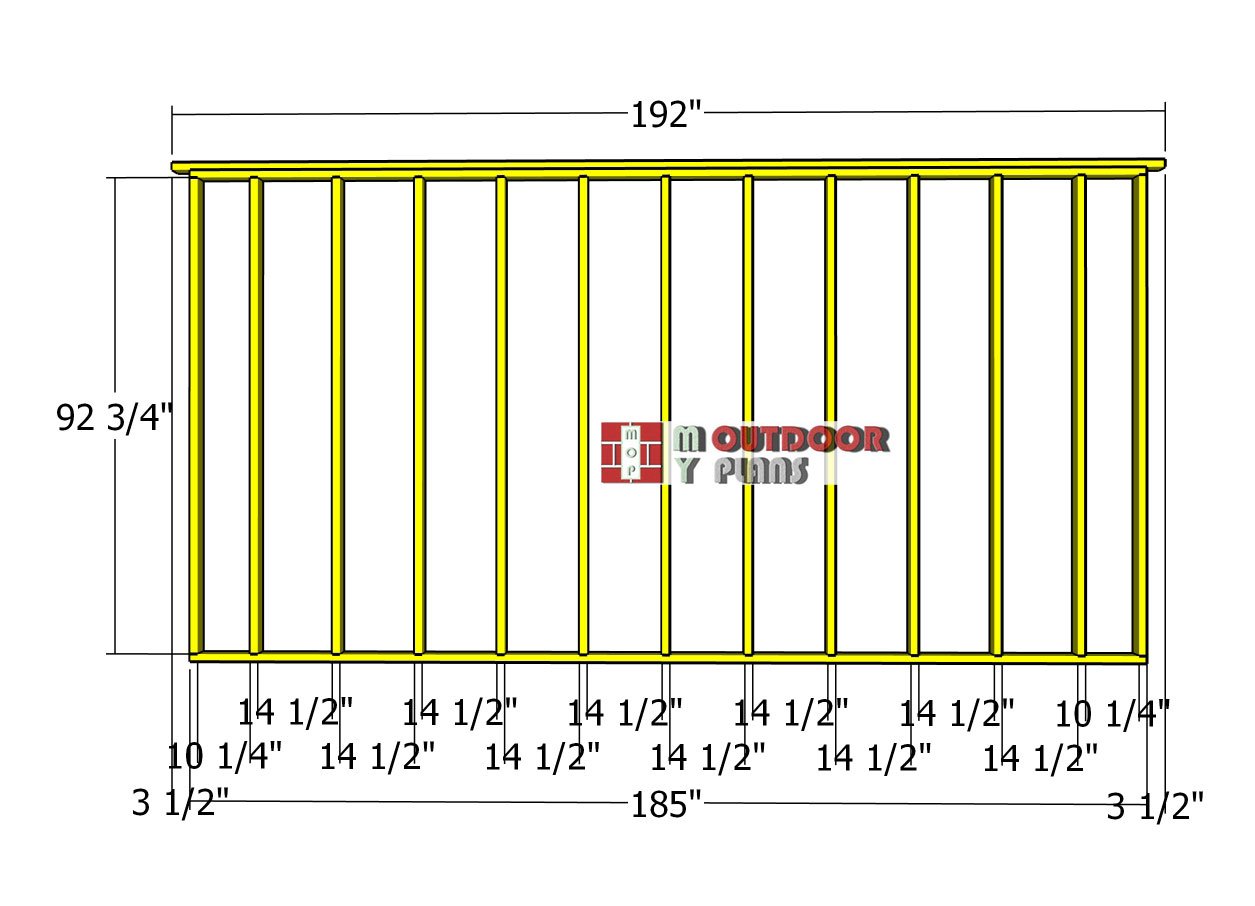
Back-wall-frame
Assemble the back wall, as well.
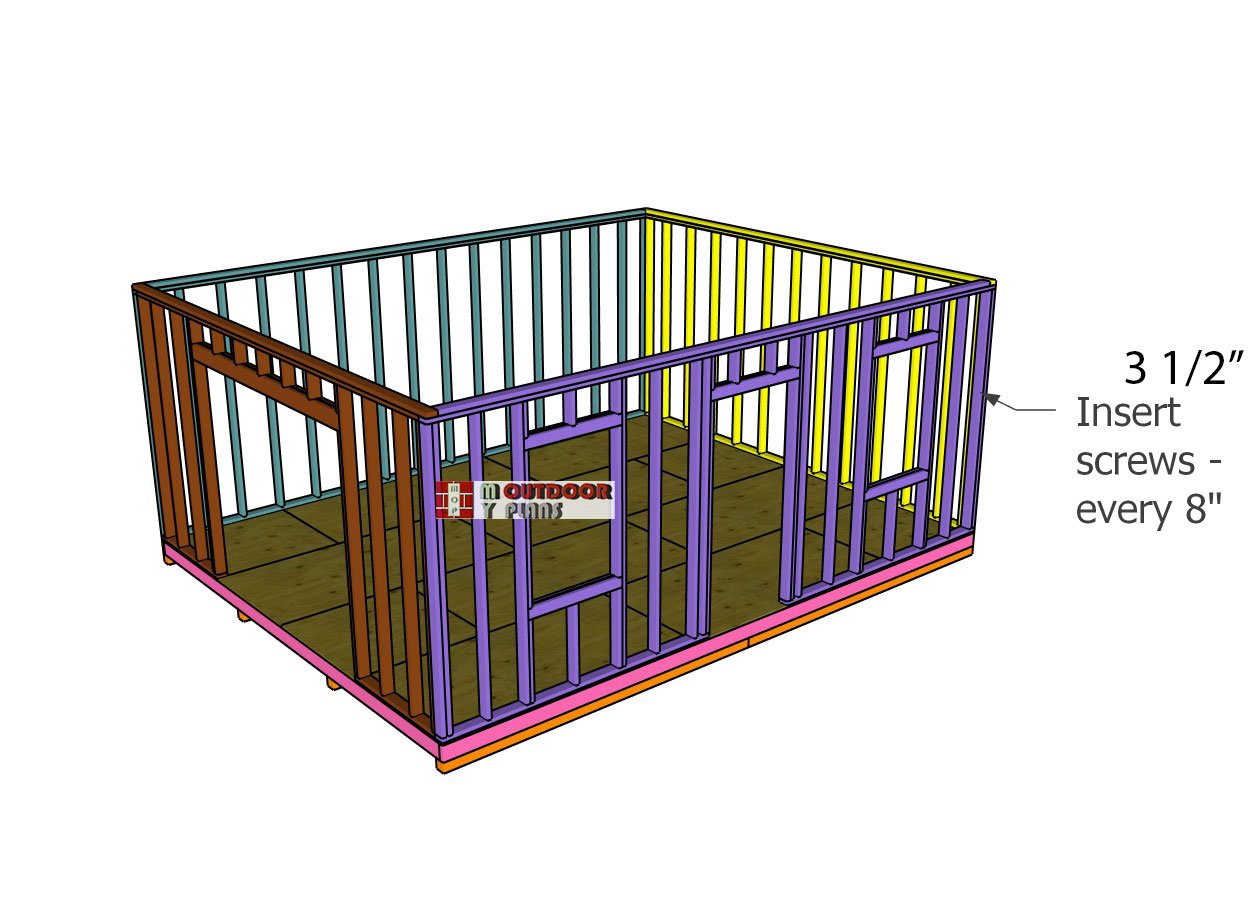
Assembling-the-shed-frame
Position the wall frames onto the shed floor, ensuring their edges are flush and the walls are plumb. Drill pilot holes through the bottom plates and secure them to the floor using 3 1/2″ screws spaced every 8 inches.
At the corners, align the adjacent wall frames tightly and fasten them together with 3 1/2″ screws driven through the studs. Double-check that all walls are square and firmly connected, creating a stable and rigid structure for your shed.
Step 2: Building the roof
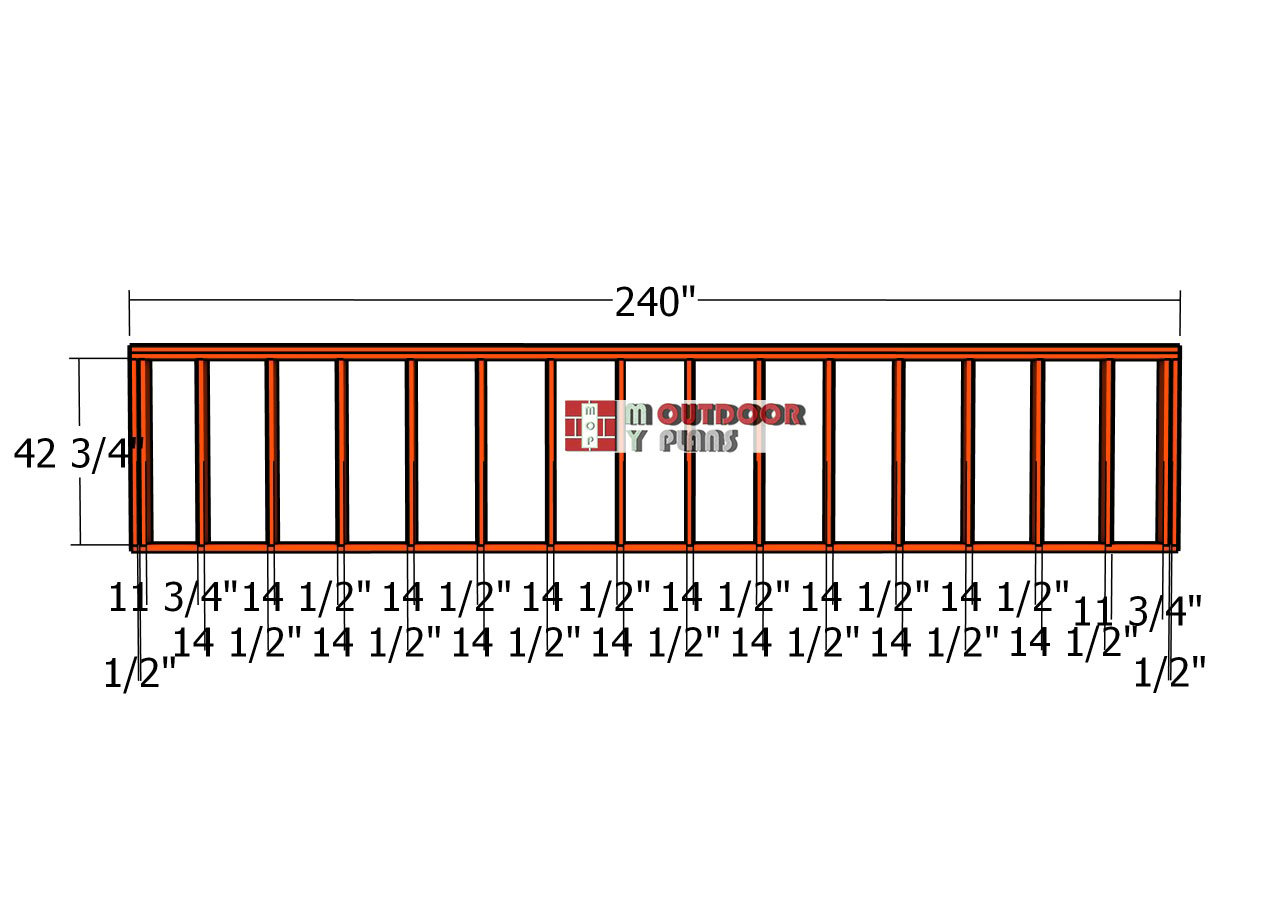
Top-wall-frame
Construct the top wall frame using 2×4 lumber. Cut all components to size as shown in the diagram and lay them out on a level surface. Drill pilot holes through the top and bottom plates, then secure the studs with 3 1/2″ screws, spacing them 16″ on center. Be sure to include double studs at both ends for added strength. Attach a double plate to the top of the wall frame, ensuring the edges are flush and aligned. Secure it with 3 1/2″ screws for a strong, stable assembly that’s ready for installation.
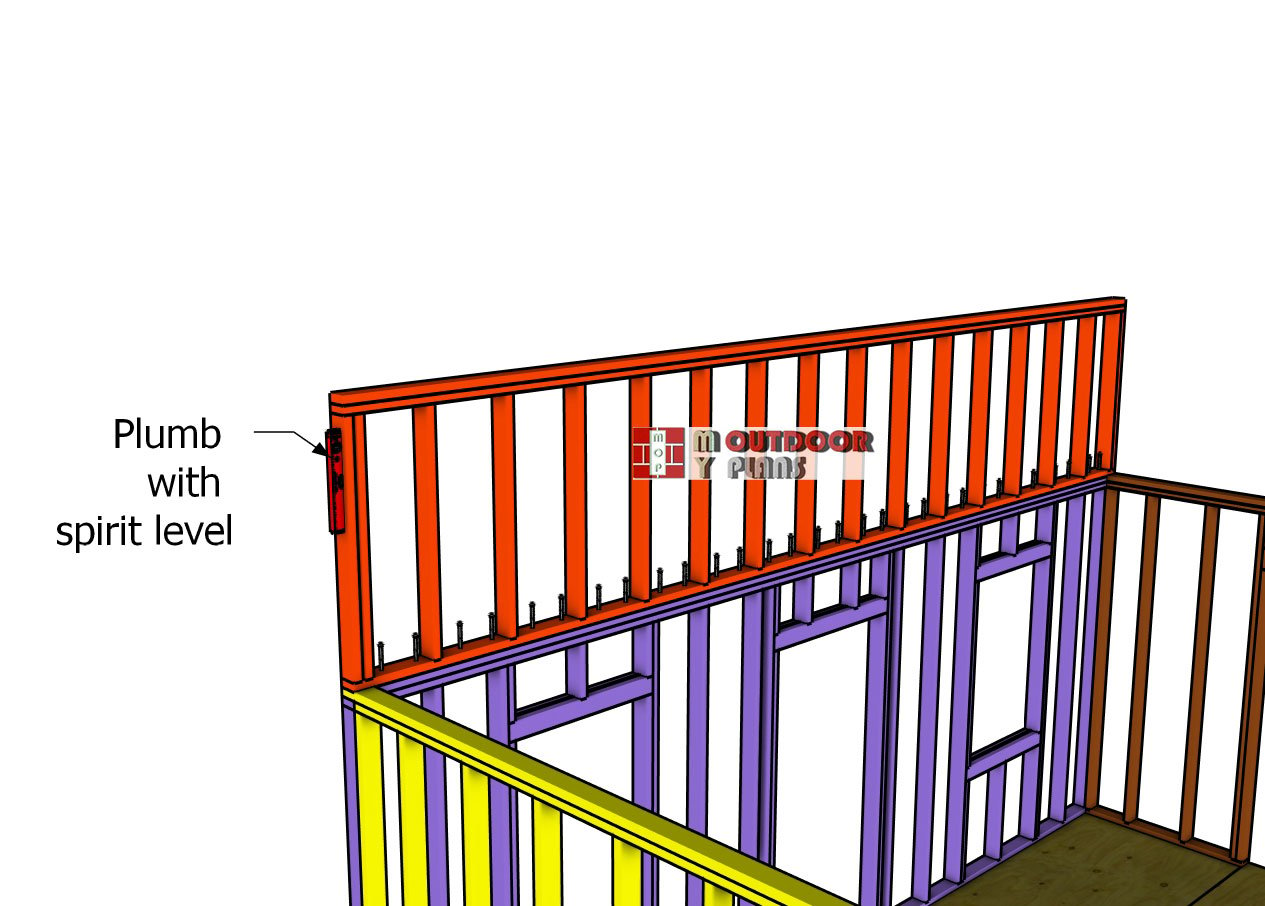
Fitting-the-front-wall-frame
Position the top wall frame on one side of the shed, choosing the side that matches your desired roof slope. Align the edges flush with the floor and ensure the wall is plumb. Drill pilot holes through the bottom plate and secure it to the floor with 3 1/2″ screws, spacing them evenly for a firm and stable connection.
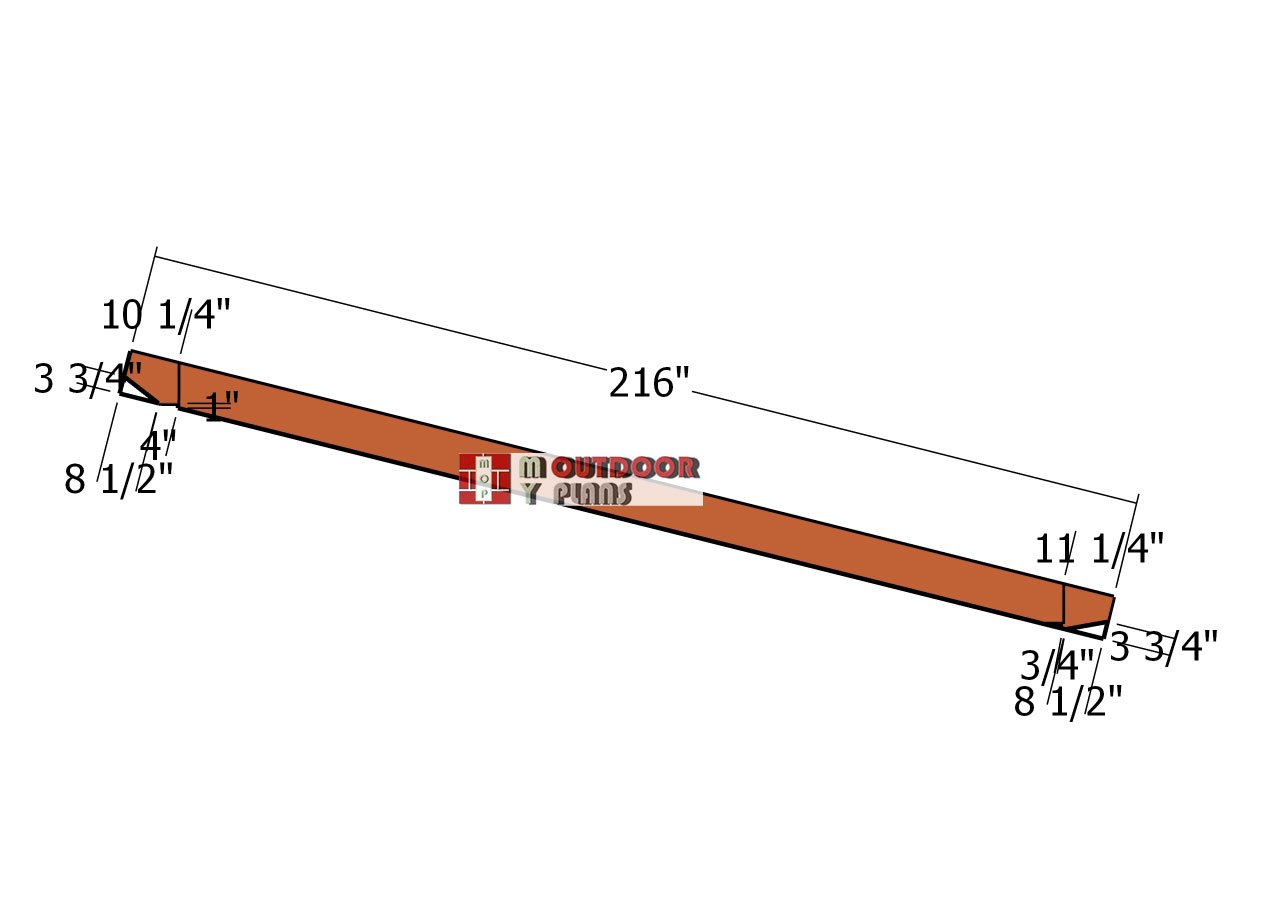
Rafters
To build the rafters for the large lean-to shed, use 2×10 lumber to accommodate the wide opening. Refer to your plans for the precise dimensions and angles. Mark and cut each rafter carefully, ensuring consistent measurements for a perfect fit and strong roof structure. Double-check all cuts before assembly to maintain accuracy and stability in the final build.
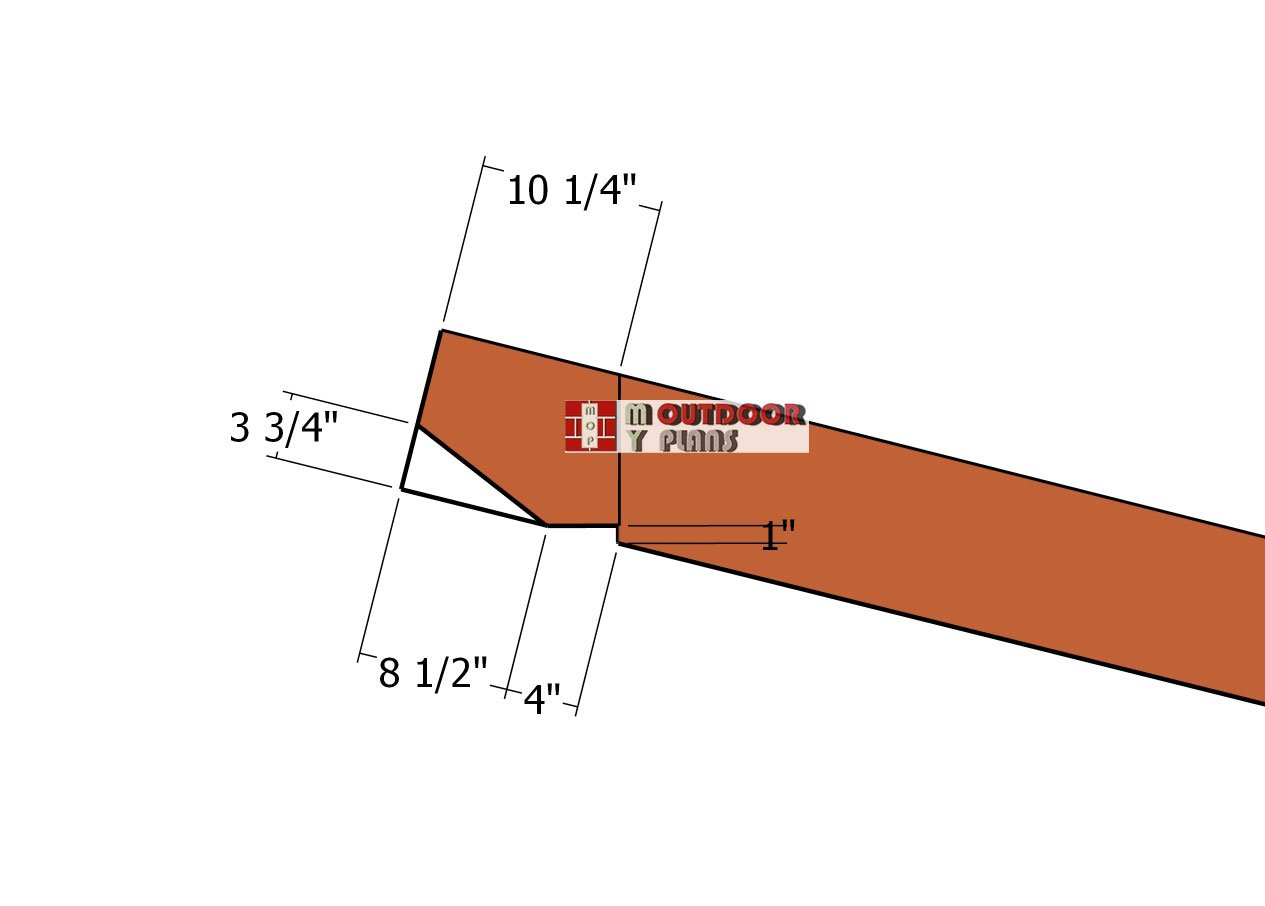
Top-cut
Pay close attention to the cut detail at the top of each rafter, as this ensures a snug fit against the top wall. Use the diagram or plans to mark the correct angle and length of the cut.
A speed square or protractor can help you achieve precision. This accurate cut is crucial for creating a strong and stable connection at the top of the rafter. Double-check your measurements before making the cut to avoid errors.
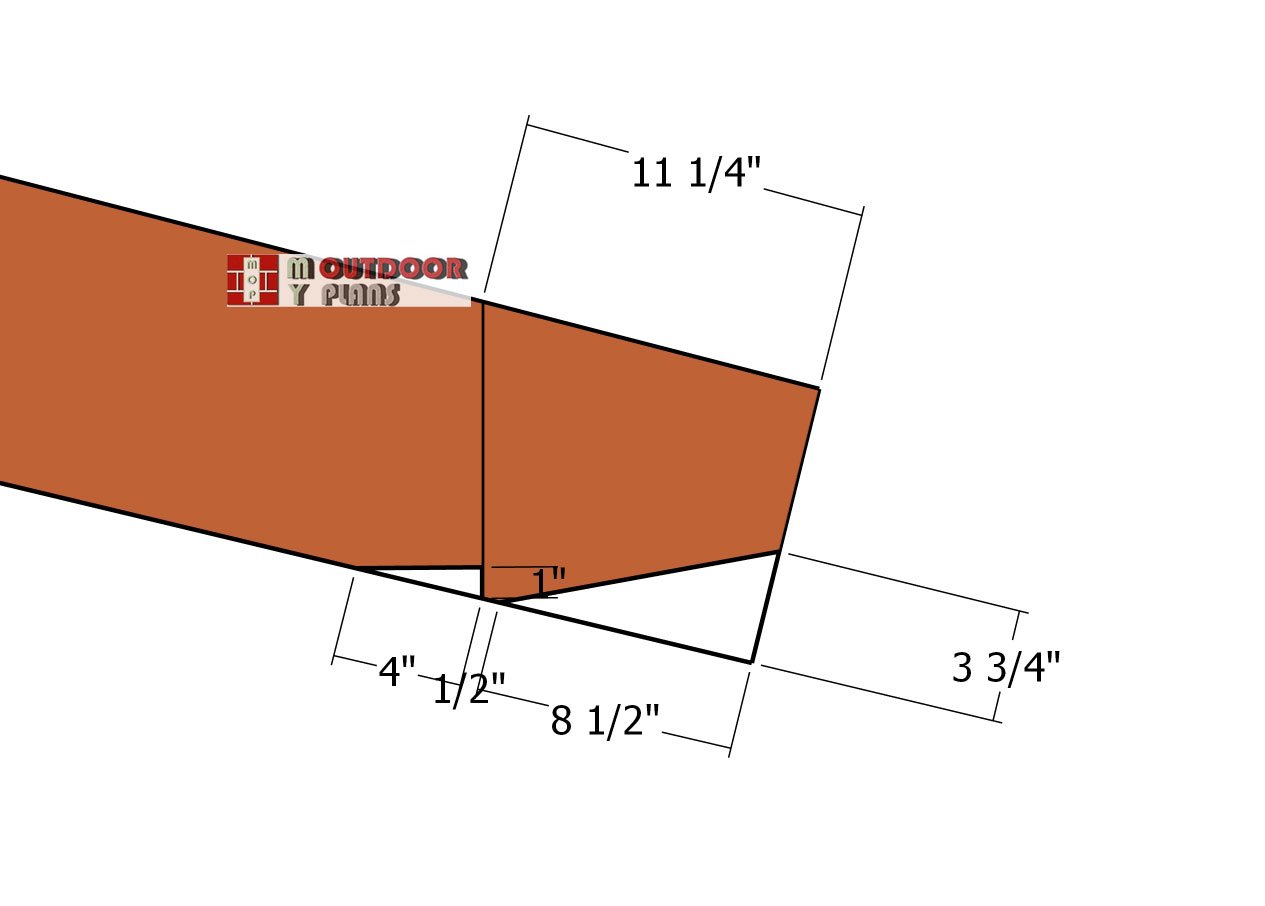
Bottom-cuts
The bottom cut of the rafter is just as important as the top. This cut ensures the rafter sits flush on the wall plate or ledger. Refer to the plans to mark the angle and depth of the bird’s mouth or seat cut. Use a speed square to ensure accuracy when marking the cuts, and make sure the seat cut is snug without over-cutting. Precise cuts will provide proper support and stability for the roof structure.
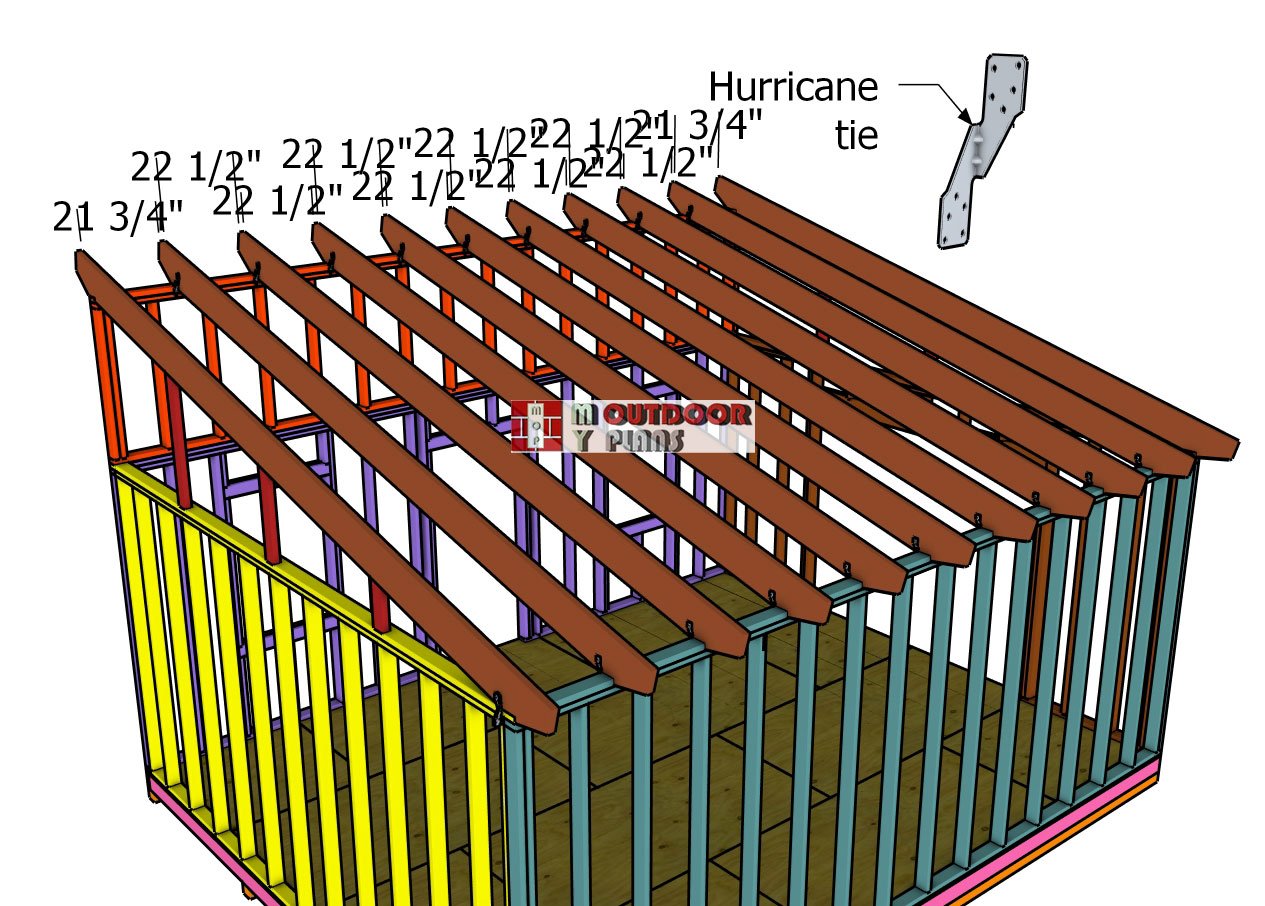
Fitting-the-rafters
Position the rafters on top of the storage shed, spacing them 24″ on center (OC) as specified in the plans. Secure each rafter in place using rafter ties attached to the top wall plate.
Fasten the rafter ties with 1 1/2″ structural screws or nails, ensuring a tight and stable connection. Double-check alignment and spacing as you go to maintain a consistent and sturdy roof structure.
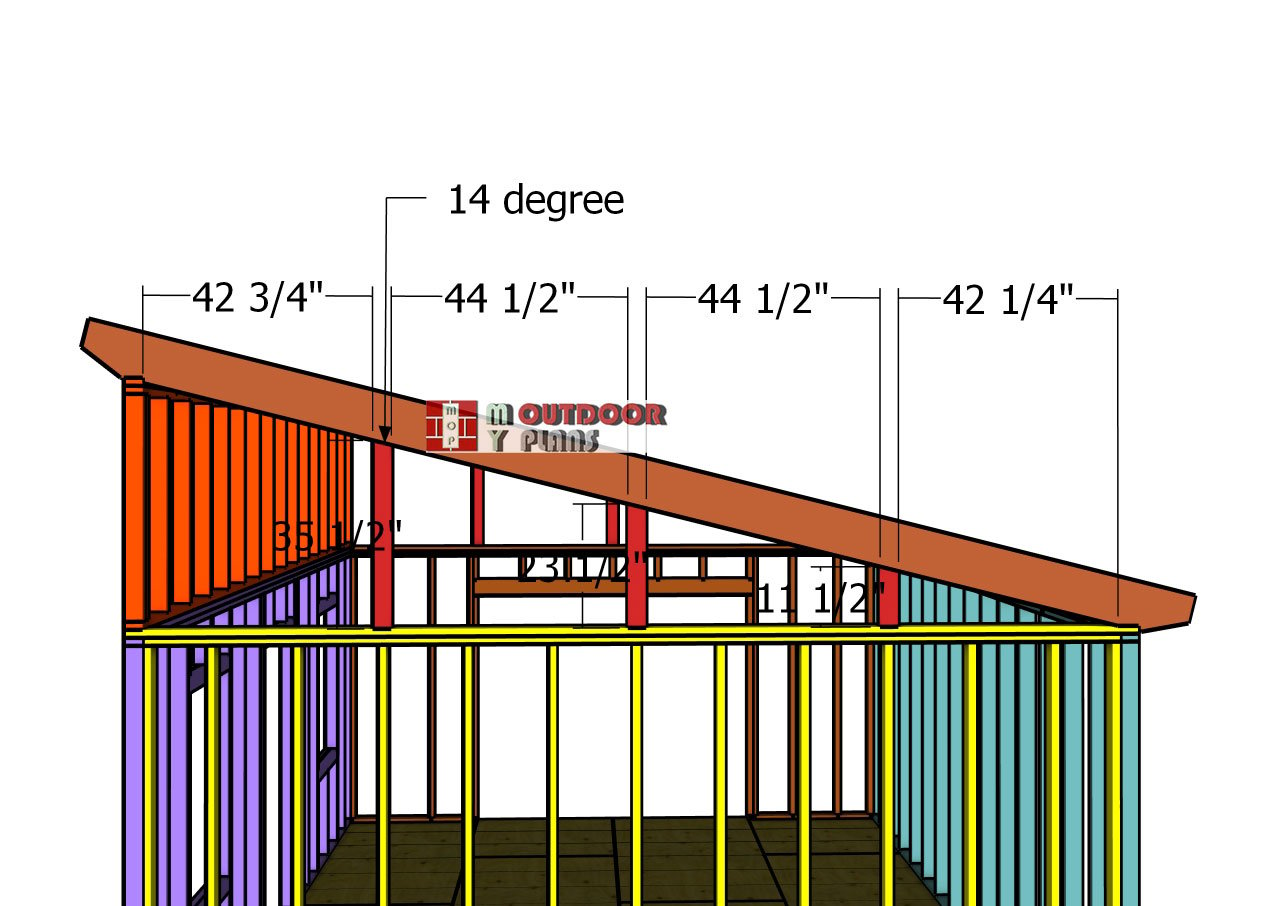
Lean-to-roof-supports
Once the rafters are in place, attach 2×4 supports to the front and back top ends of the shed. Cut one end of each support at a 14-degree angle for a precise fit.
Drill pocket holes at both ends of the supports to ensure a strong connection. Secure the supports to the rafters and the wall frames using 2 1/2″ screws, ensuring they are tight and aligned. These supports add stability and reinforce the overall structure of the shed.
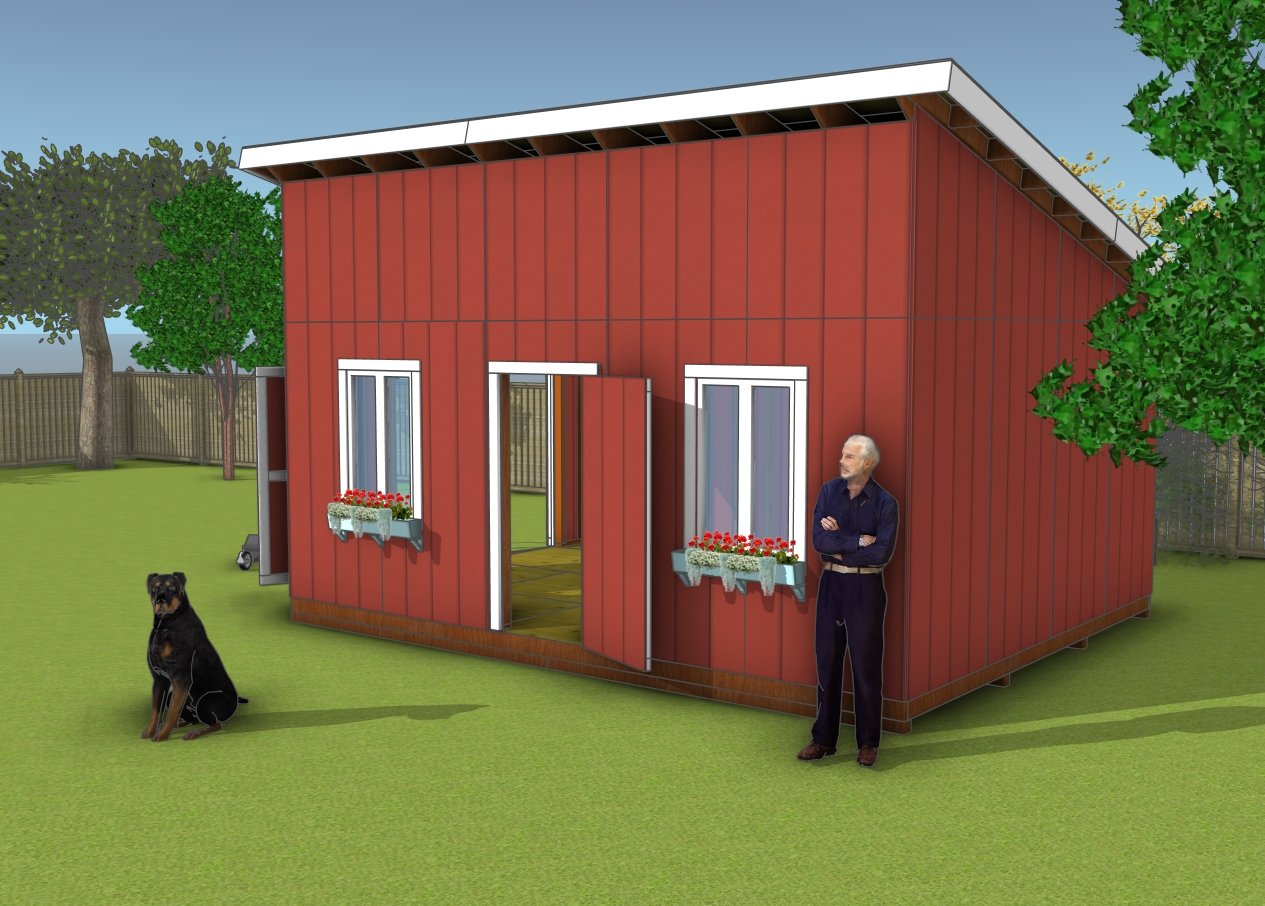
16×20 lean to shed plans
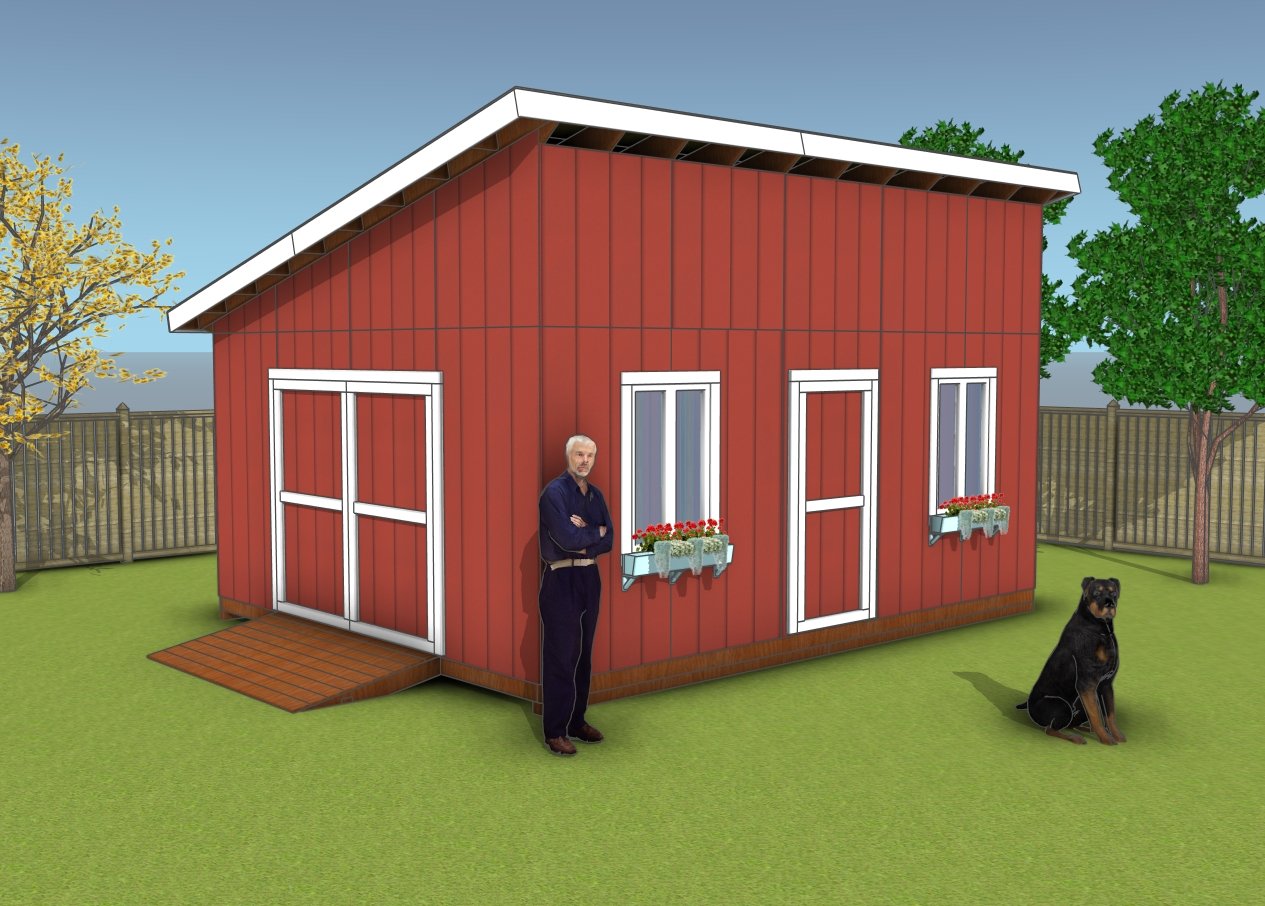
DIY Lean to shed plans
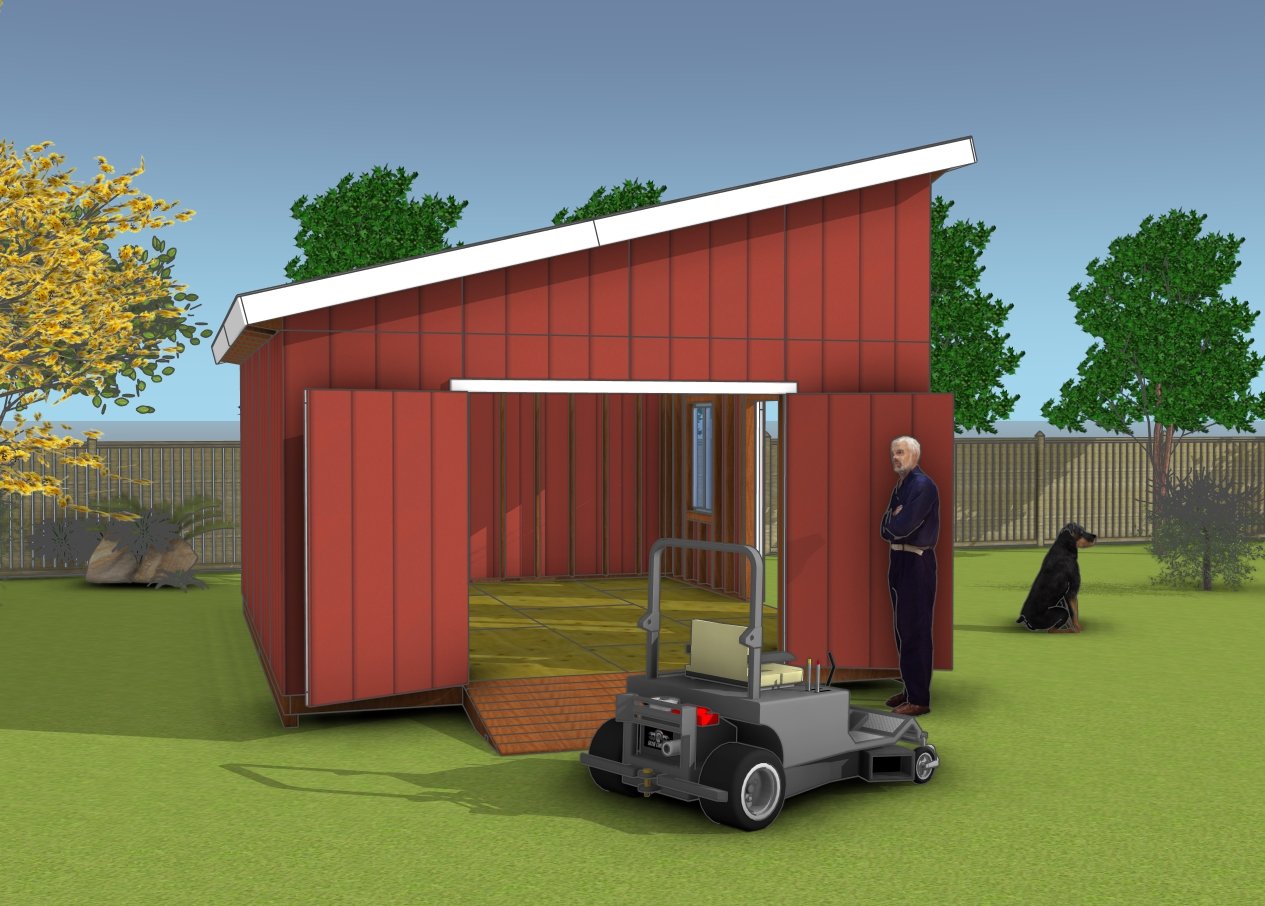
How to build a large lean to shed
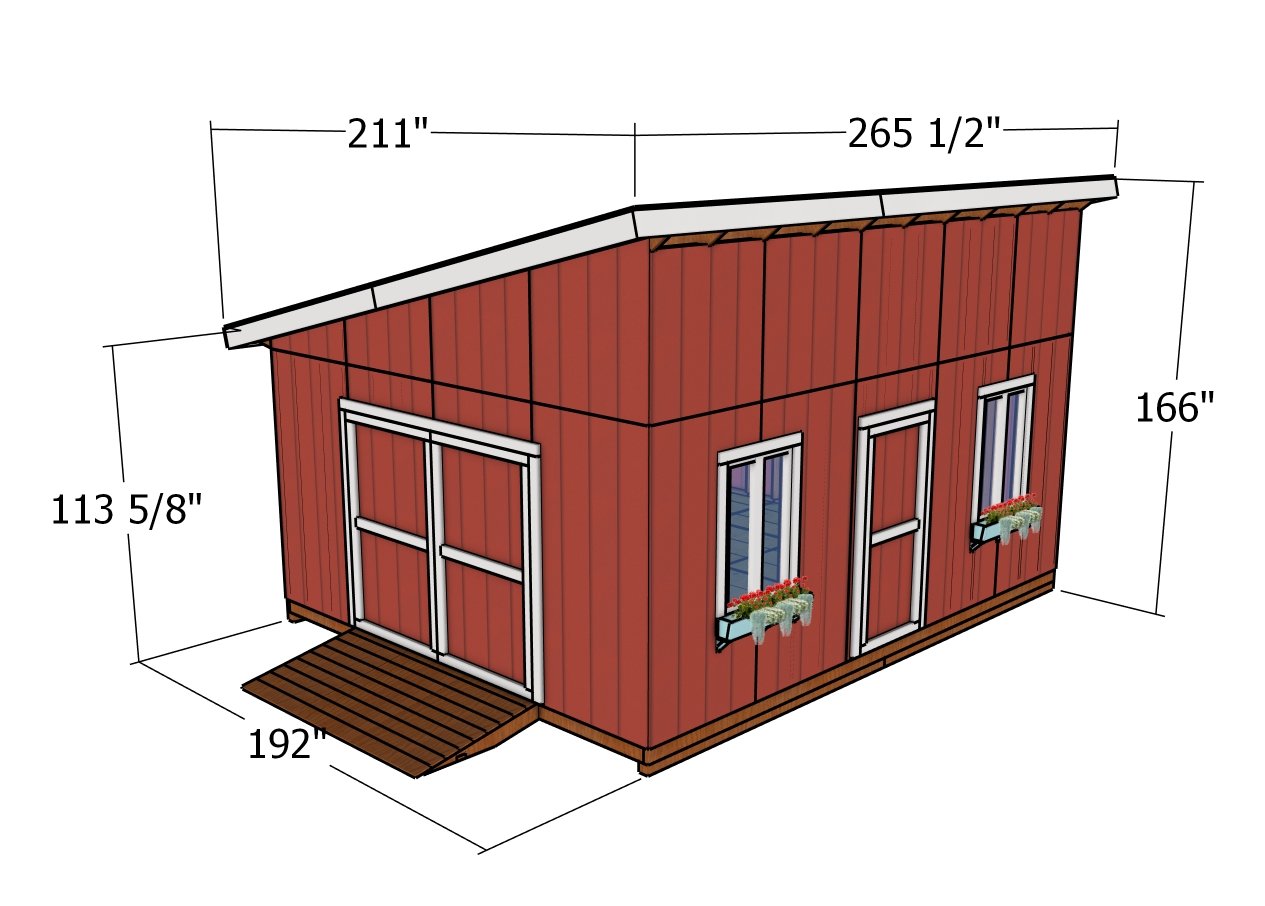
16×20 lean to shed – dimensions
You’ve successfully built the frame and installed the rafters for your shed. With the foundation and structure complete, your shed is well on its way to becoming a functional and sturdy addition to your outdoor space. Stay tuned for PART 2, where we’ll dive into installing the siding and building the doors to give your shed the perfect finishing touches.
This woodworking project was about 16×20 lean to shed plans. If you want to see more outdoor plans, check out the rest of our step by step projects and follow the instructions to obtain a professional result.


