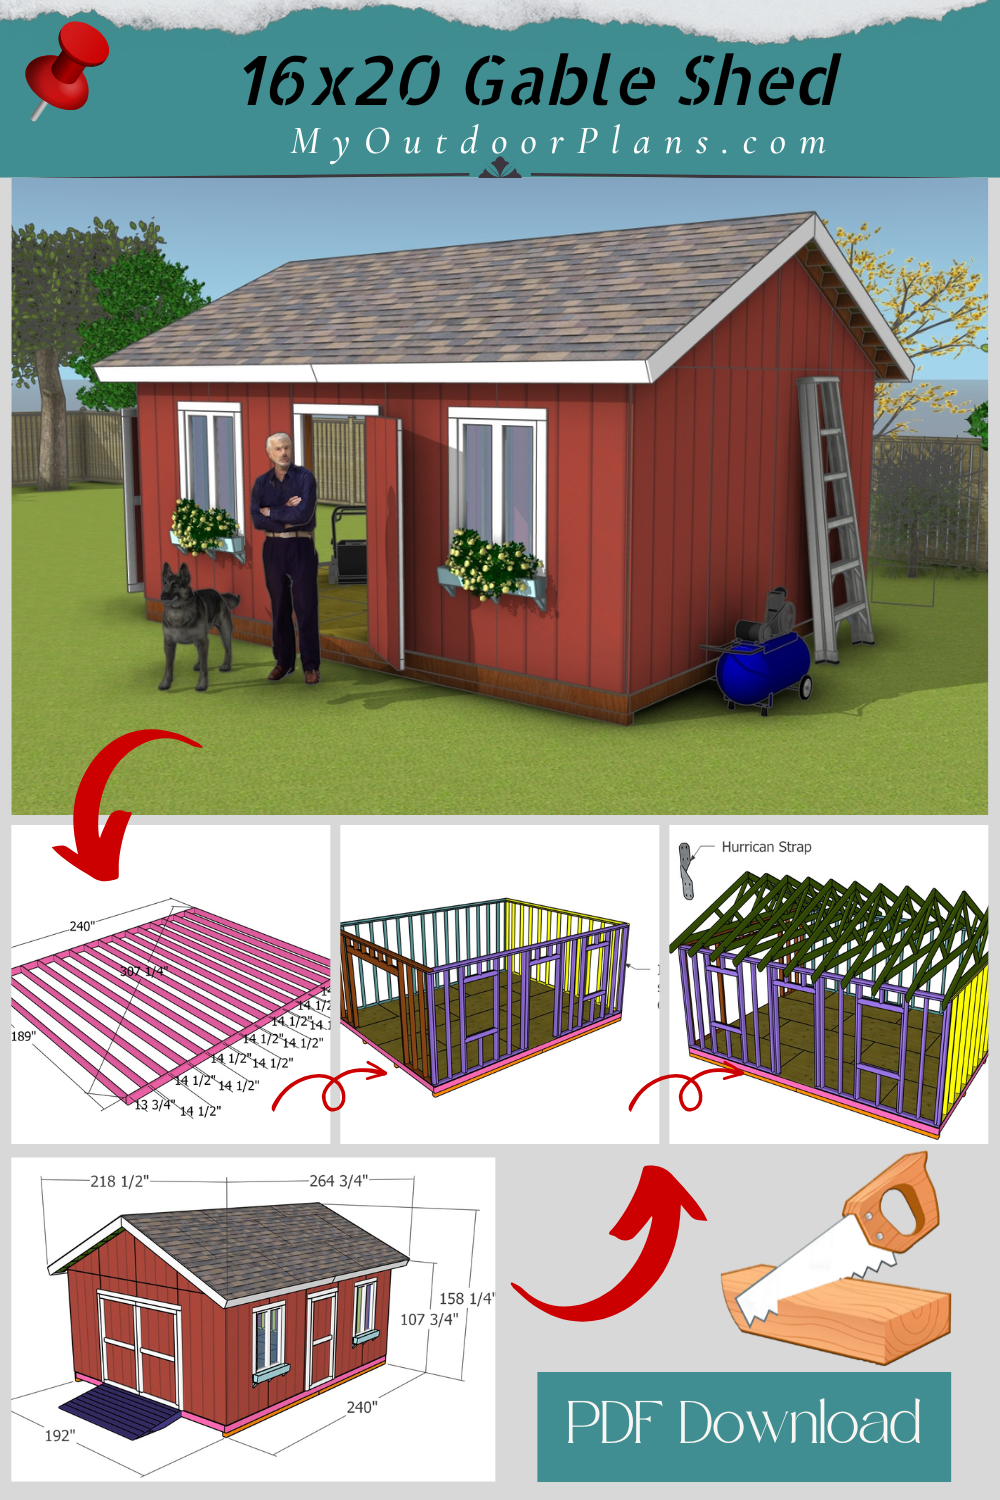
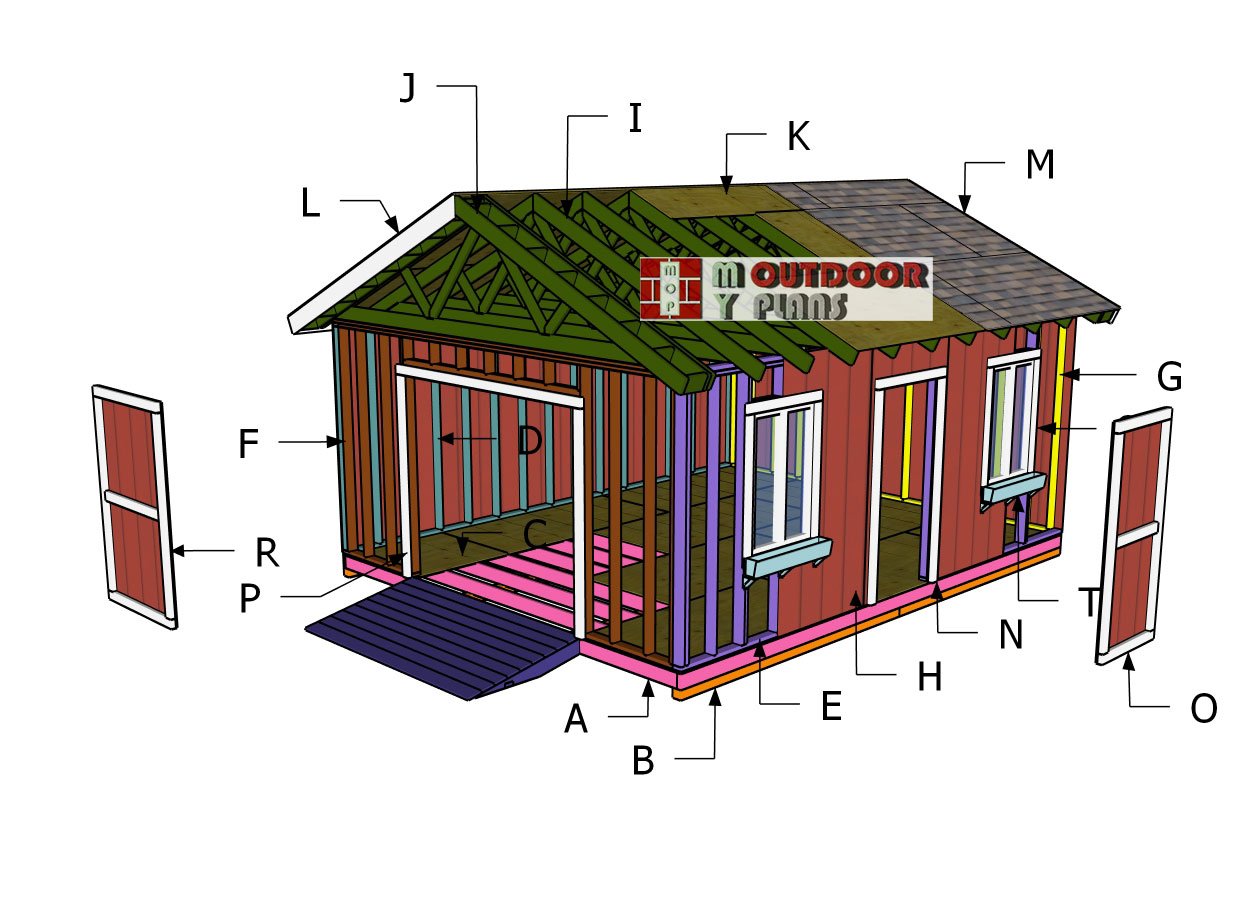
These 16×20 gable shed plans are perfect combination of functionality and style, offering a spacious design that meets a variety of storage or workspace needs. The double front doors provide easy access for large equipment, while the side door adds convenience for quick entry. With two windows placed on the sides, the shed is bathed in natural light, making it ideal for a workshop, gardening hub, or even a cozy getaway. The classic gable roof design ensures durability and a timeless aesthetic that complements any backyard. Whether you’re storing tools, tackling DIY projects, or creating a personal retreat, this shed is built to deliver.
Building this shed will typically costs between $5,500 and $8,000 for materials, depending on your location and material choices. Additional expenses like permits, site preparation, and optional finishes or utilities can increase the total. If you’re tackling the project yourself, expect it to take 2-4 weeks of part-time work, assuming moderate DIY skills and good weather. Hiring professionals can speed up the timeline, with the shed potentially completed in under a week, but labor costs may add $3,000 to $5,000 to the overall budget.
Start by selecting a level site with good drainage and laying a solid foundation, such as gravel, concrete, or blocks. Follow detailed plans and ensure you’ve obtained the necessary permits before beginning. Use high-quality materials like treated lumber for framing and durable roofing options, and purchase 10% extra to account for errors. Assemble the shed in sections, wall frames, trusses, and doors, to make handling easier, and always check for square and level during construction. For the roof, pre-assemble trusses on the ground and secure them in place with help or temporary braces. Finally, work safely by wearing protective gear, using the right tools, and enlisting a buddy to assist with heavy lifting or alignment.
When buying the lumber, you should select the planks with great care, making sure they are straight and without any visible flaws (cracks, knots, twists, decay). Investing in cedar or other weather resistant lumber is a good idea, as it will pay off on the long run. Use a spirit level to plumb and align the components, before inserting the galvanized screws, otherwise the project won’t have a symmetrical look. If you have all the materials and tools required for the project, you could get the job done in about a day. See all my Premium Plans HERE.
Projects made from these plans
Pin it for later!
16×20 Gable Shed Plans – PDF Download
Building-a-16×20-gable-shed
Cut & Shopping Lists
- A – FLOOR FRAME – 2×6 lumber 20 ft – 2 pieces
- A – FLOOR FRAME – 2×6 lumber 20 ft – 2 pieces
- B – SKIDS – 4×4 lumber 10 ft – 8 pieces
- C – FLOOR – 3/4″ plywood 4’x8′ – 8 pieces
- C – FLOOR – 3/4″ plywood 4’x8′ – 4 pieces
- D – SIDE WALL – 2×4 lumber 20 ft – 2 pieces
- D – SIDE WALL – 2×4 lumber 233″ – 1 piece
- D – SIDE WALL – 2×4 lumber 92 3/4″ – 18 pieces
- E – SIDE WALL with WINDOWS – 2×4 lumber 20 ft – 1 piece
- E – SIDE WALL with WINDOWS – 2×4 lumber 233″ – 1 piece
- E – SIDE WALL with WINDOWS – 2×4 lumber 102″ – 2 pieces
- E – SIDE WALL with WINDOWS – 2×4 lumber 92 3/4″ – 16 pieces
- E – SIDE WALL with WINDOWS – 2×4 lumber 27″ – 6 pieces
- E – SIDE WALL with WINDOWS – 2×4 lumber 48″ – 4 pieces
- E – SIDE WALL with WINDOWS – 2×4 lumber 78 1/2″ – 2 pieces
- E – SIDE WALL with WINDOWS – 2×4 lumber 10 3/4″ – 10 pieces
- E – SIDE WALL with WINDOWS – 2×4 lumber 35″ – 8 pieces
- E – SIDE WALL with WINDOWS – 2×4 lumber 39″ – 2 pieces
- F – FRONT WALL – 2×4 lumber 192″ – 1 piece
- F – FRONT WALL – 2×4 lumber 185″ – 1 piece
- F – FRONT WALL – 2×4 lumber 44 1/2″ – 2 pieces
- F – FRONT WALL – 2×4 lumber 92 3/4″ – 4 pieces
- F – FRONT WALL – 2×4 lumber 78 1/2″ – 2 pieces
- F – FRONT WALL – 2×4 lumber 8 3/4″ – 7 pieces
- F – FRONT WALL – 2×6 lumber 99″ – 2 pieces
- G – BACK WALL – 2×4 lumber 185″ – 2 pieces
- G – BACK WALL – 2×4 lumber 192″ – 1 piece
- G – BACK WALL – 2×4 lumber 92 3/4″ – 13 pieces
- I – TRUSSES – 2×6 lumber 192″ – 11 pieces
- I – TRUSSES – 2×6 lumber 119 1/4″ – 22 pieces
- I – TRUSSES – 2×4 lumber 23 7/8″ – 22 pieces
- I – TRUSSES – 2×4 lumber 50 5/8″ – 22 pieces
Tools
![]() Hammer, Tape measure, Framing square, Level
Hammer, Tape measure, Framing square, Level
![]() Miter saw, Drill machinery, Screwdriver, Sander
Miter saw, Drill machinery, Screwdriver, Sander
![]() Safety Gloves, Safety Glasses
Safety Gloves, Safety Glasses
Time
Related
- 6×8 Lean to Shed Plans
- 16×20 Gable Shed Plans – Part 1
- 16×20 Gable Shed Plans – Part 2
It’s that easy to build a storage shed!
Step 1: Building the floor
Assembling-the-floor-frame
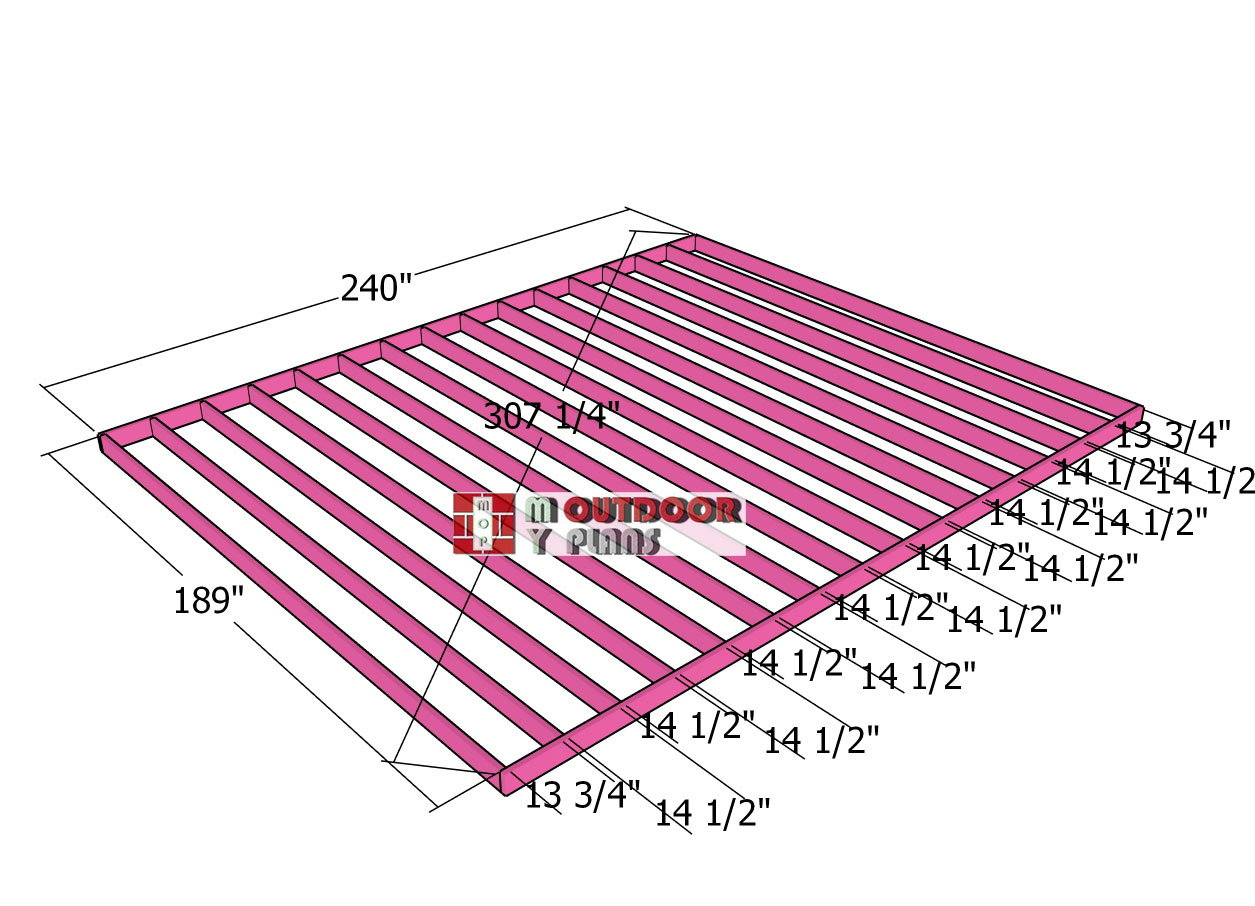
The first step of the project is to build the floor frame. Before you dive into building your shed, take the time to properly prepare the site—it’s the foundation (literally!) for a sturdy and long-lasting project. Start by picking a level spot with good drainage to avoid water pooling around your shed. Clear the area of any rocks, roots, or debris, then measure and mark the perimeter based on your shed plans. For added stability, consider laying gravel or compacting the soil to create a solid base. If you’re going all out, a concrete slab or blocks will take your project to pro level, ensuring your shed can withstand the elements and the test of time.
Floor-frame—square
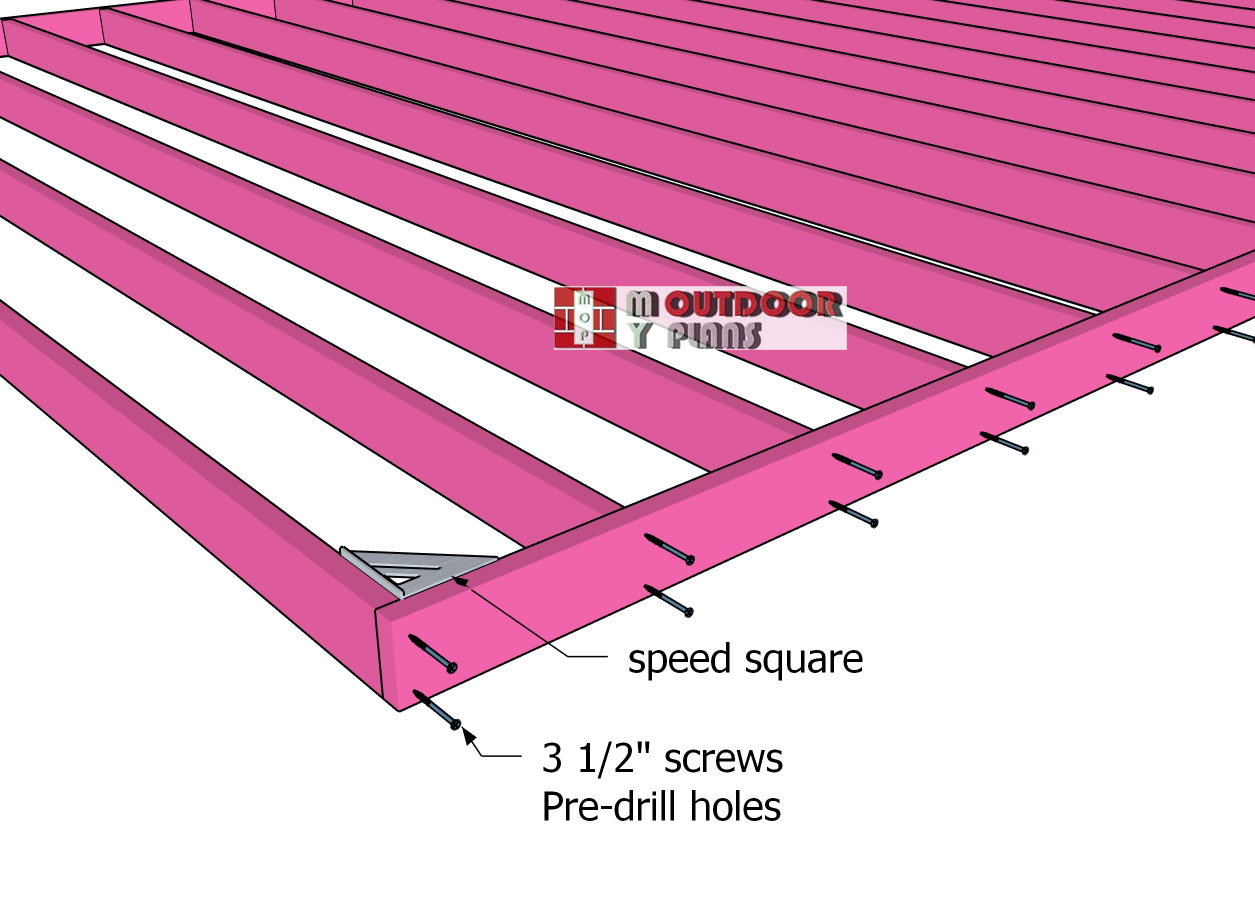
Lay the 2×6 joists on a flat, level surface, ensuring proper alignment before assembly. Drill pilot holes through the rim joists at the ends of the floor frame to prevent splitting and to guide the screws accurately. Secure each joist using 3 1/2″ screws, ensuring the connections are tight and the frame is sturdy.
Check that the corners are square by measuring the diagonals—if they’re not equal, adjust the frame until they match. For added precision, use a speed square at all four corners, as demonstrated in the diagram, to confirm perfect 90-degree angles before moving on.
Floor-skids
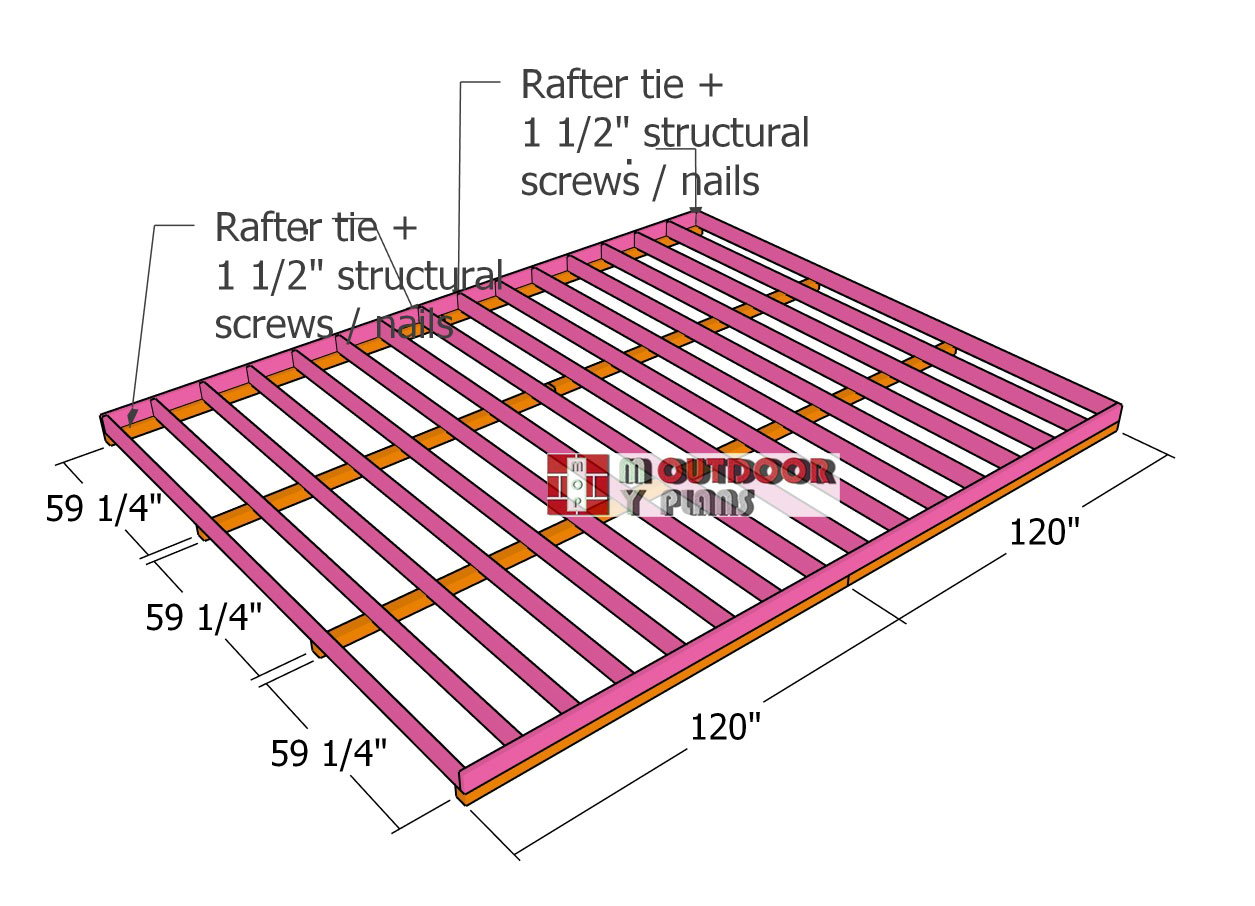
To protect the floor frame from moisture and decay, position 4×4 skids evenly beneath the frame to elevate it off the ground. The skids not only provide essential clearance to prevent water damage but also distribute the weight of the shed evenly. Space the skids according to the plans, ensuring they align with the joists for maximum support. Double-check that the skids are level and properly positioned before attaching the floor frame, as this foundation is key to the shed’s durability and stability.
Fitting-the-skids-to-the-floor-frame
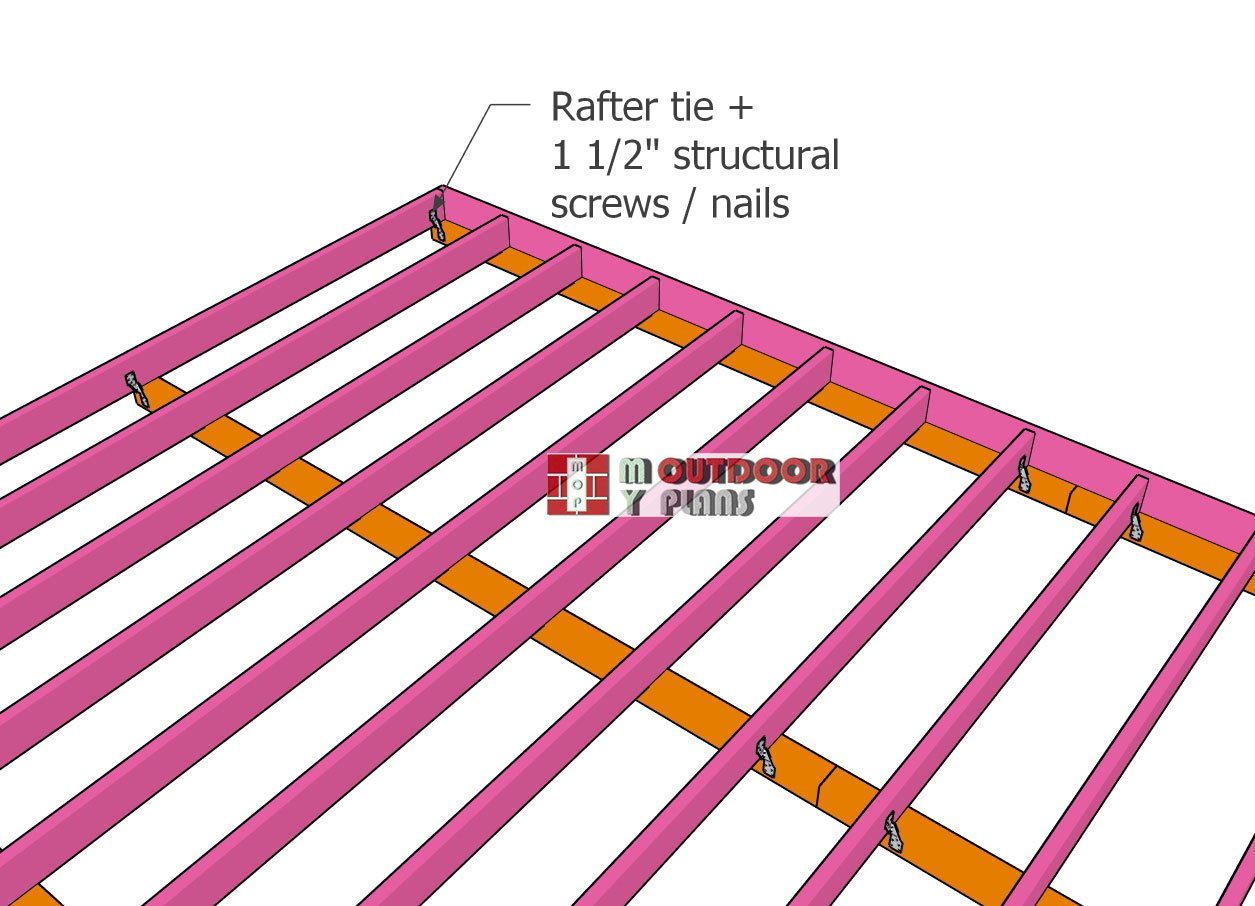
Secure the floor frame to the skids using rafter ties for added stability and resistance to shifting. Position a rafter tie at each end of the skids, ensuring they are aligned properly with the floor frame. Fasten the rafter ties to the skids using 1 1/2″ structural screws, driving them tightly to create a strong connection. This step will anchor the floor frame firmly to the skids, ensuring the shed remains stable even in harsh weather conditions.
Fitting-the-floor-sheets
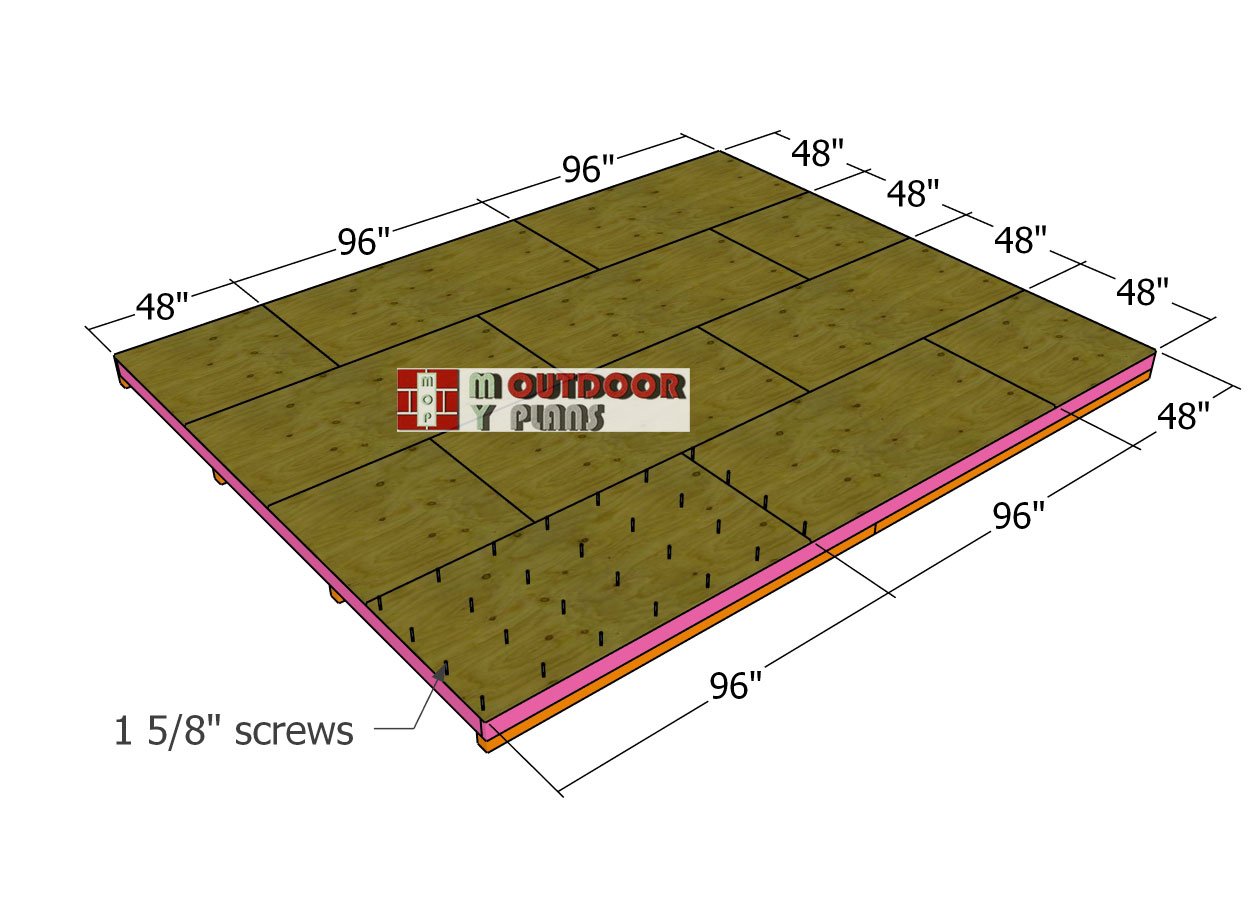
Lay the 3/4″ plywood sheets onto the floor frame, ensuring the edges are flush with the frame for a clean, precise fit. Use a tape measure to double-check that the sheets are properly aligned and that any seams between sheets land on the center of a floor joist for maximum support. Secure the sheets with 1 5/8″ screws, spacing them every 8 inches along the edges and across the joists. Drill pilot holes first to prevent splitting and ensure a tight fit.
If needed, use a chalk line to mark the joists on the plywood surface for accurate screw placement. For added durability and protection against moisture, consider applying wood glue along the joists before fastening the plywood. This step will reduce creaking and improve the overall strength of the floor.
Building the shed wall frames
Plain-side-wall-frame
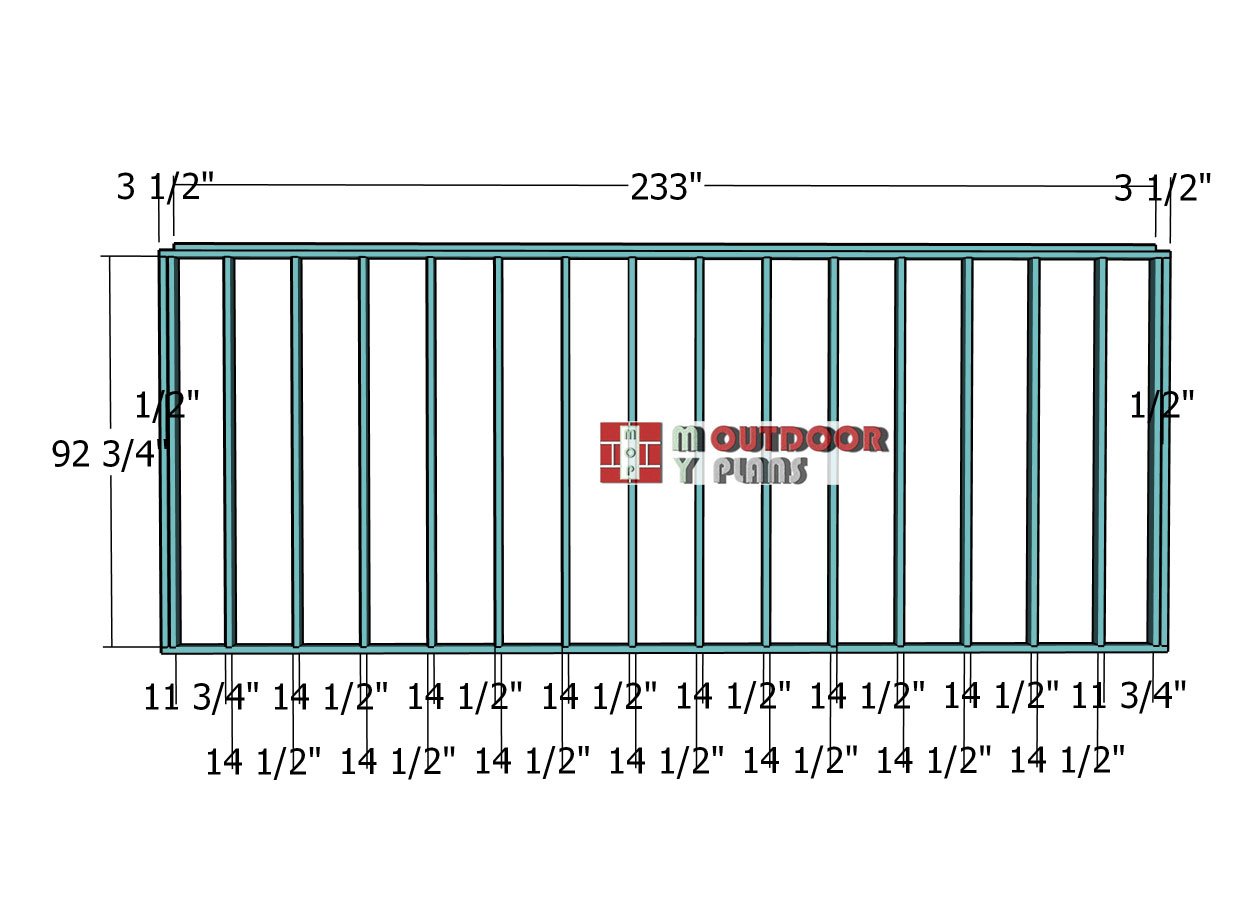
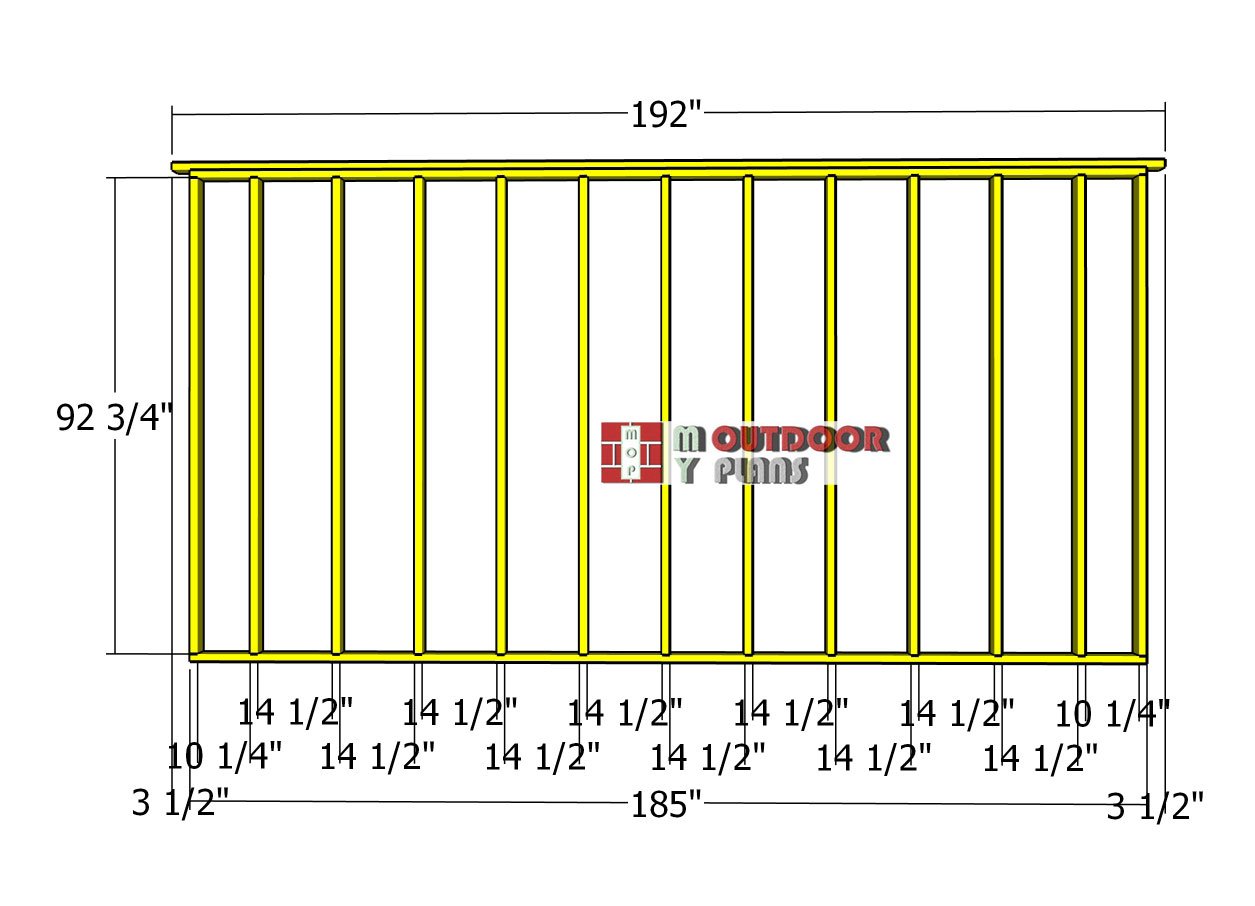
Build the plain side wall of the garden shed using 2×4 lumber, following the dimensions in the diagram. Start by cutting all the components to size, then lay them out on a level surface to ensure proper alignment. Drill pilot holes through the top and bottom plates, and secure the studs with 3 1/2″ screws, spacing them 16″ on center. The diagram will guide you with precise measurements for the spacing.
At each end of the wall frame, install double studs for added strength, and fit 1/2″ plywood spacers between them for structural stability. Attach a double top plate to the wall frame, centering it so that it insets 3 1/2″ on both ends, and secure it in place with 2 1/2″ screws. This design ensures the wall is sturdy and ready for assembly into the larger shed structure.
Side-wall-with-window-frame
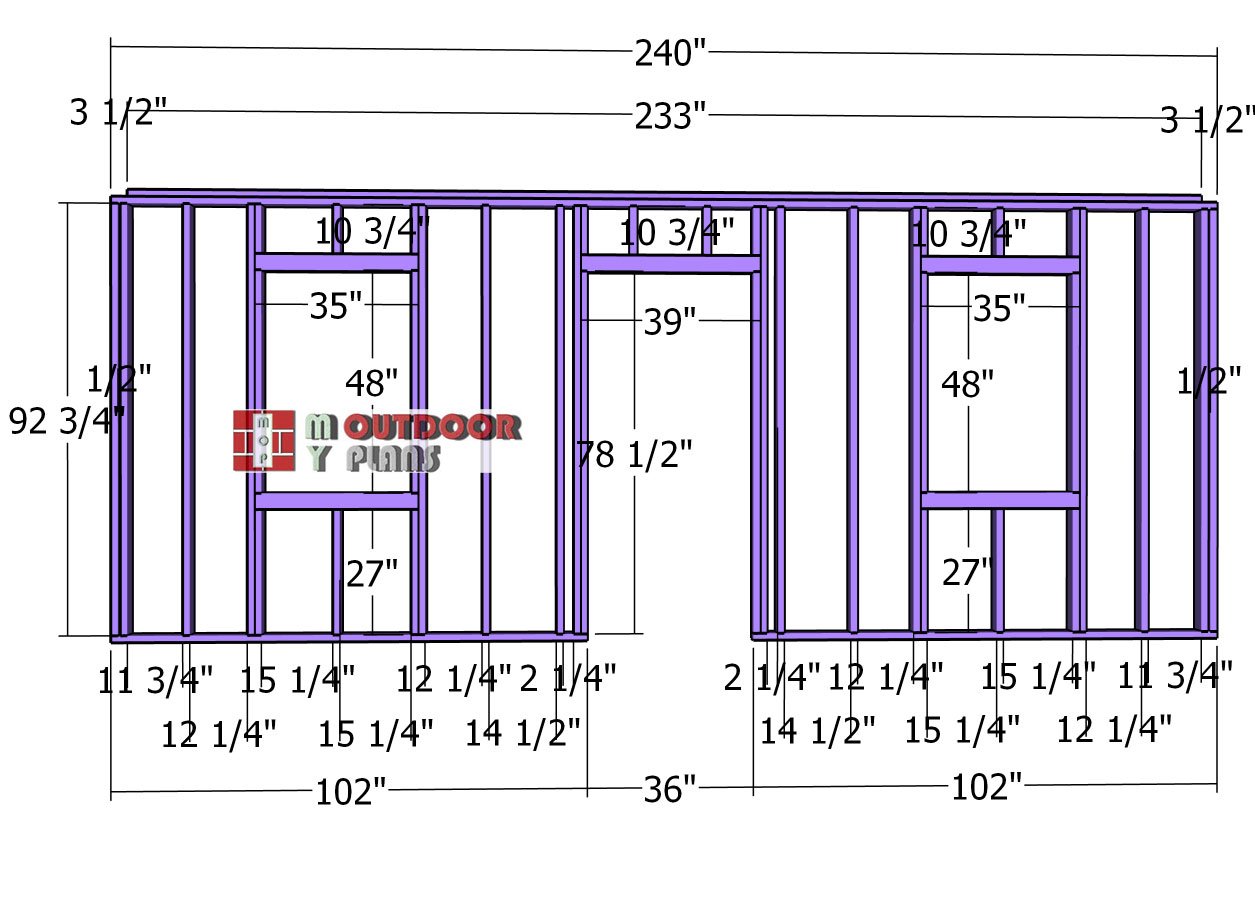
To assemble the opposite side wall, use 2×4 lumber to build the frame, accommodating openings for two windows and a man door, as specified in the plans. Adjust the size and placement of the openings to suit your needs. Construct double headers for the windows using 2×4 lumber and a 1/2″ plywood spacer sandwiched between them.
Apply wood glue to the joints, align the edges flush, and secure the headers with 3 1/2″ screws driven in from both sides for a strong connection. Position the headers at the top and bottom of the window openings and secure them to the wall frame with 3 1/2″ screws. Drill the screws at an angle or use pocket holes at the ends of the headers to ensure a tight fit. This detailed construction ensures the wall frame is sturdy and ready for installation.
Fitting-the-side-wall-frames
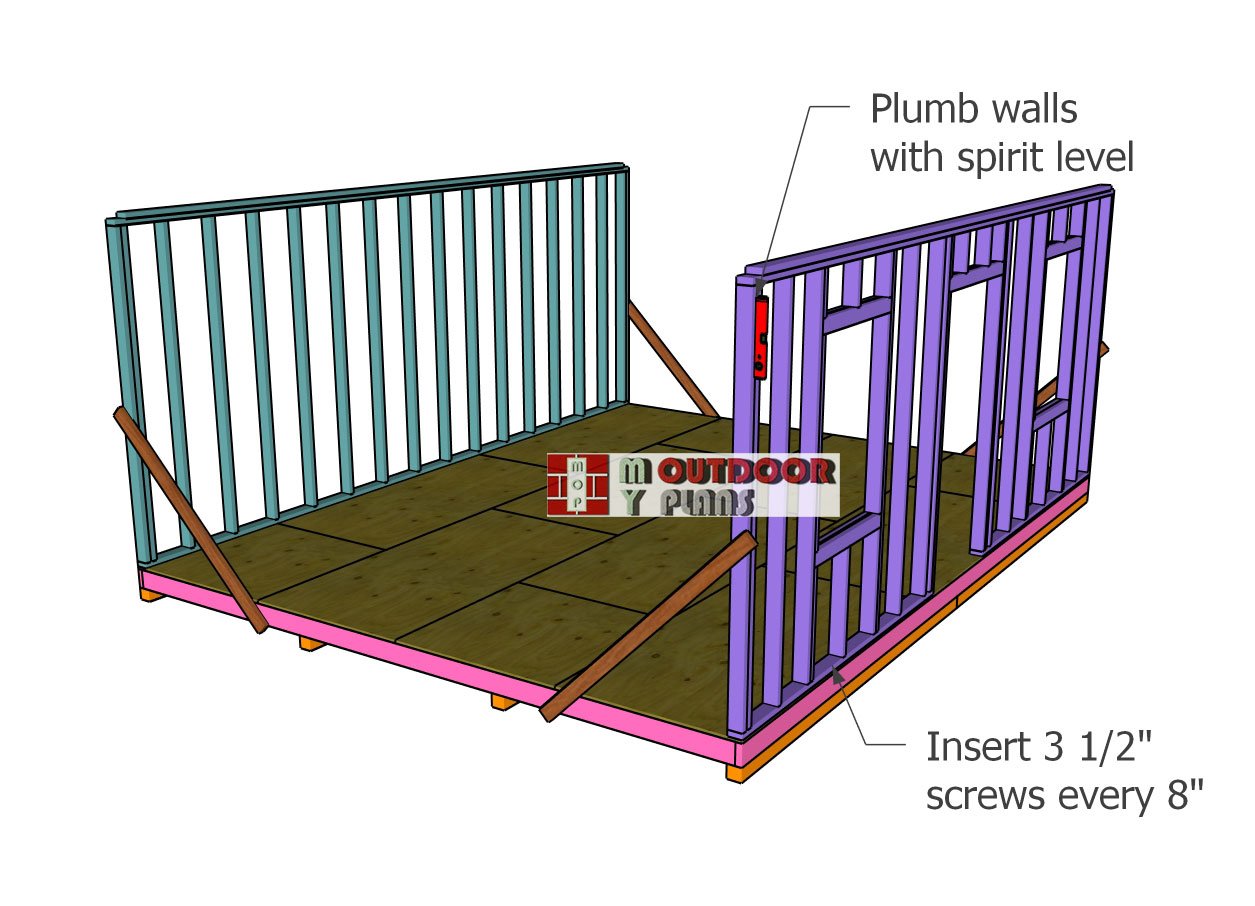
Position the side wall frames onto the floor of the shed, ensuring they are flush with the edges for a precise fit. Use a spirit level to check and adjust the frames until they are perfectly plumb. Secure the frames temporarily with braces to hold them in place while fastening.
Drill pilot holes through the bottom plates of the wall frames to prevent splitting, then drive 3 1/2″ screws through the plates and into the floor, spacing the screws every 8 inches for a strong and stable connection. This method ensures the walls are firmly anchored to the floor, ready for the next steps in your build.
Front-wall-frame
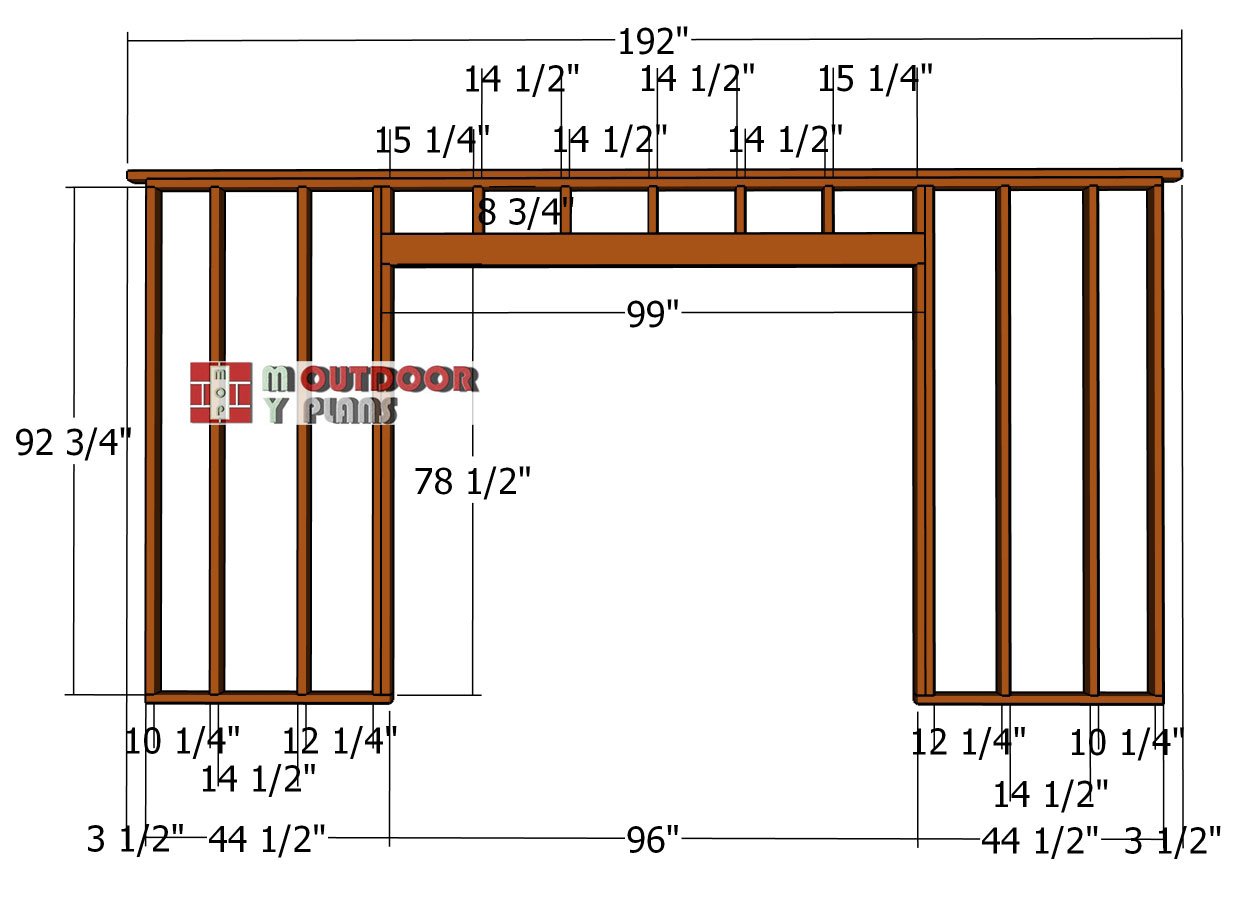
Construct the front wall of the shed using 2×4 lumber for the frame and 2×6 lumber for the double header above the door opening. Assemble the frame by drilling pilot holes and fastening the studs and plates together with 3 1/2″ screws, ensuring proper alignment and spacing as per the plans.
Cut and build the double 2×6 header, sandwiching a 1/2″ plywood spacer between the boards for added strength, and secure them with screws or nails. Position the header above the door opening, ensuring it rests firmly on the trimmer studs for optimal load support. Attach the header to the wall frame using 3 1/2″ screws or 16d nails, driving them through the king studs and into the ends of the header for a sturdy and durable connection.
Double-headers
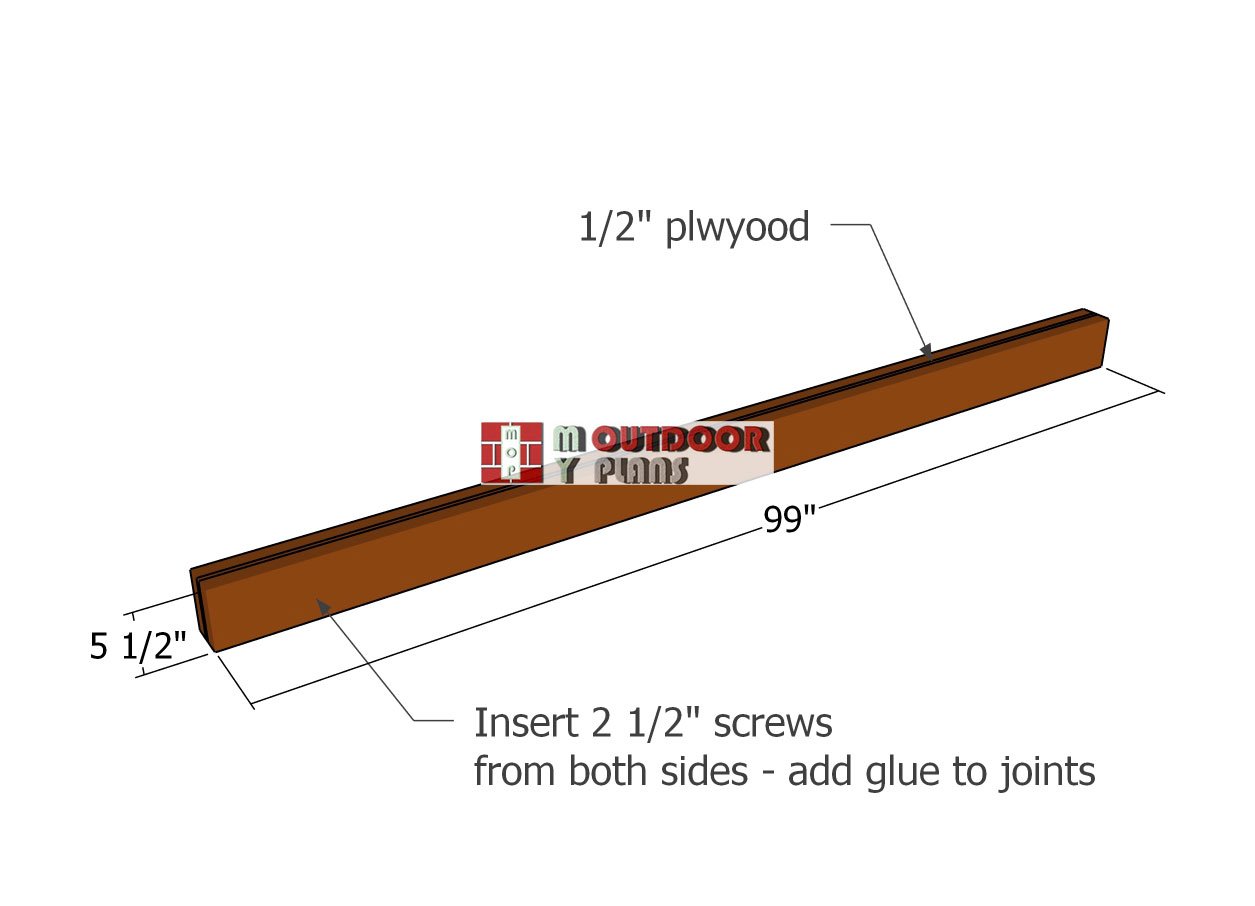
To assemble a double 2×6 header for your shed wall frame, start by cutting two 2×6 boards to 99″. Sandwich a piece of 1/2″ plywood of the same length between the boards to create a sturdy, insulated header. Apply construction adhesive between the layers for added strength, then clamp them tightly together to prevent shifting.
Drill pilot holes through the 2x6s and into the plywood spacer, spacing the holes every 12 inches along the length. Secure the assembly with 3 1/2″ screws or 16d nails, ensuring everything is flush and square. This solid header will distribute the load above doors or windows efficiently, ensuring the structural integrity of your shed.
Back-wall-frame
Assemble the back wall, as well.
Assembling-the-shed-frame
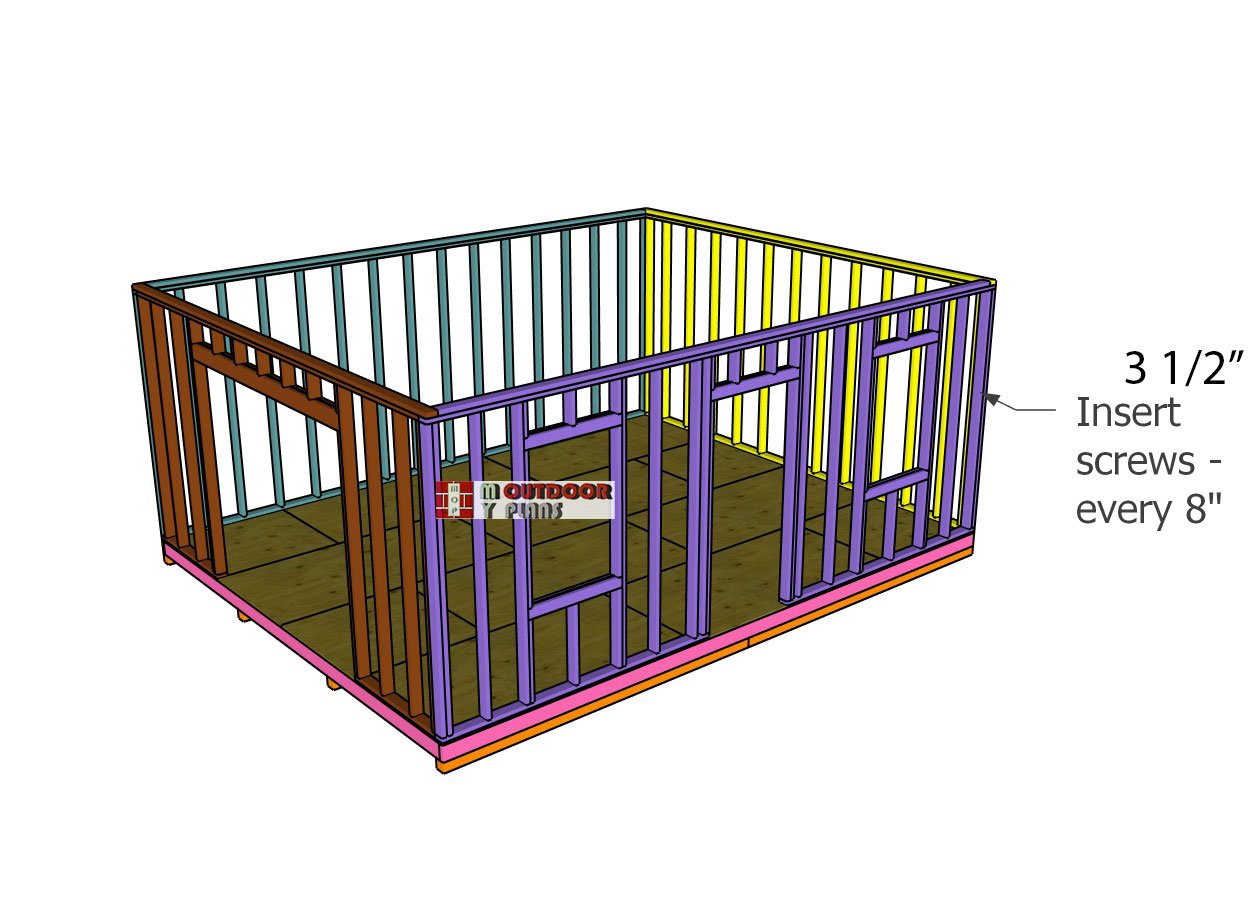
Place the wall frames onto the shed structure, aligning their edges flush with the floor and ensuring they are plumb. Secure the bottom plates of the frames to the shed floor by drilling pilot holes and driving 3 1/2″ screws every 8 inches. Join the adjacent wall frames at the corners by aligning them tightly and fastening them together with 3 1/2″ screws driven through the studs. Double-check that all walls are square and securely locked in place to create a stable and rigid structure.
Step 2: Building the roof

Rafters
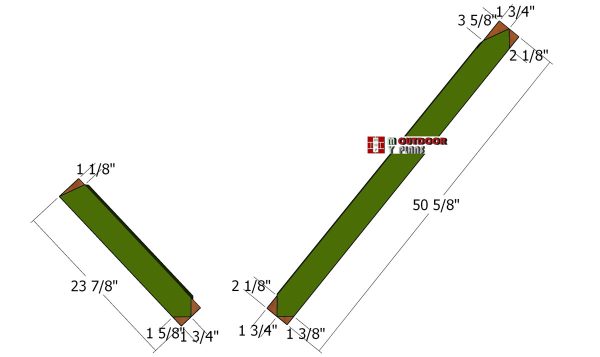
Use a miter saw to make a 25 degree cut to one end of the rafters. Use 2×6 lumber for the rafters.
Webs
Next, we need to build the webs for the trusses. Use a saw to make the cuts to both ends of the webs, as shown in the diagram. Use 2×4 lumber for these components.
Assembling-the-16-ft-trusses
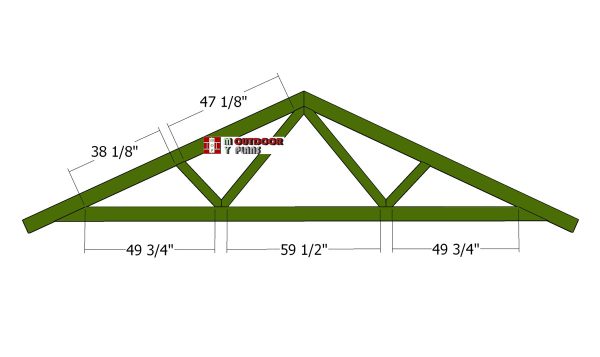
Lay all components on a level surface. You can even set a jig, so you can assemble all trusses in a similar manner and get consistent results.

Fitting-the-truss-gussets
Use 1/2″ plywood to create gussets for the trusses. Begin by marking the cut lines for the gussets on the plywood based on the dimensions specified in the plans, then cut them out with a saw for precision. Lay the gussets over the joints of the trusses, ensuring they cover the connections completely for maximum support.
Secure the gussets with 1 5/8″ screws, spacing the screws evenly to lock them tightly in place. For optimal stability, attach gussets to both sides of each truss, except for the end trusses, where leaving one side clear allows for attaching the siding panels later. This ensures a strong and durable roof structure for your shed.
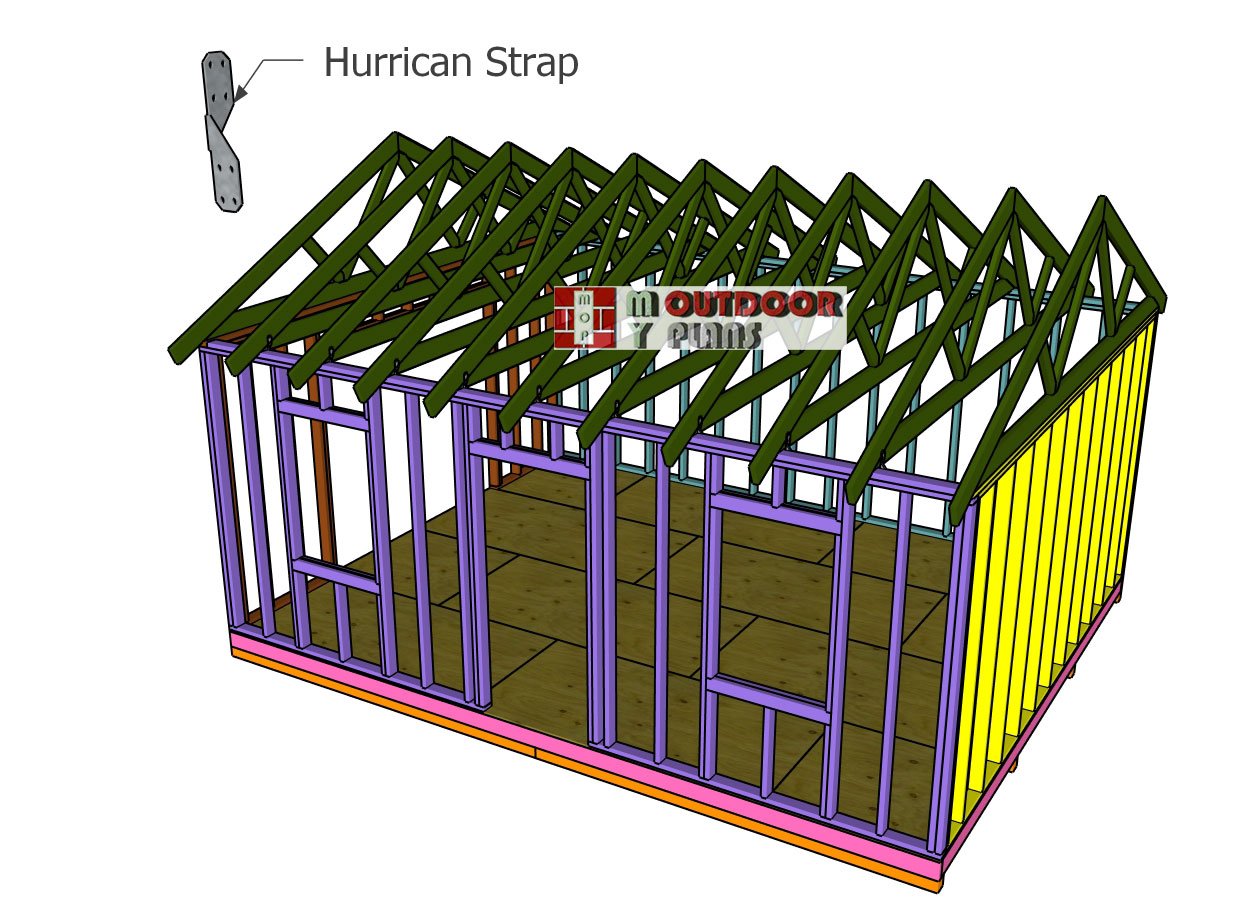
Fitting-the-Trusses
Position the trusses on top of the shed walls, spacing them 24″ on center as per the layout. Check each truss with a spirit level to ensure it is perfectly plumb, and align the edges of the trusses with the walls at both ends for a uniform appearance.
Secure each truss to the side wall frames using rafter ties, fastening them tightly with 1 1/2″ structural screws or nails. This step ensures the trusses are firmly anchored, creating a strong and stable roof frame ready for sheathing and roofing materials.
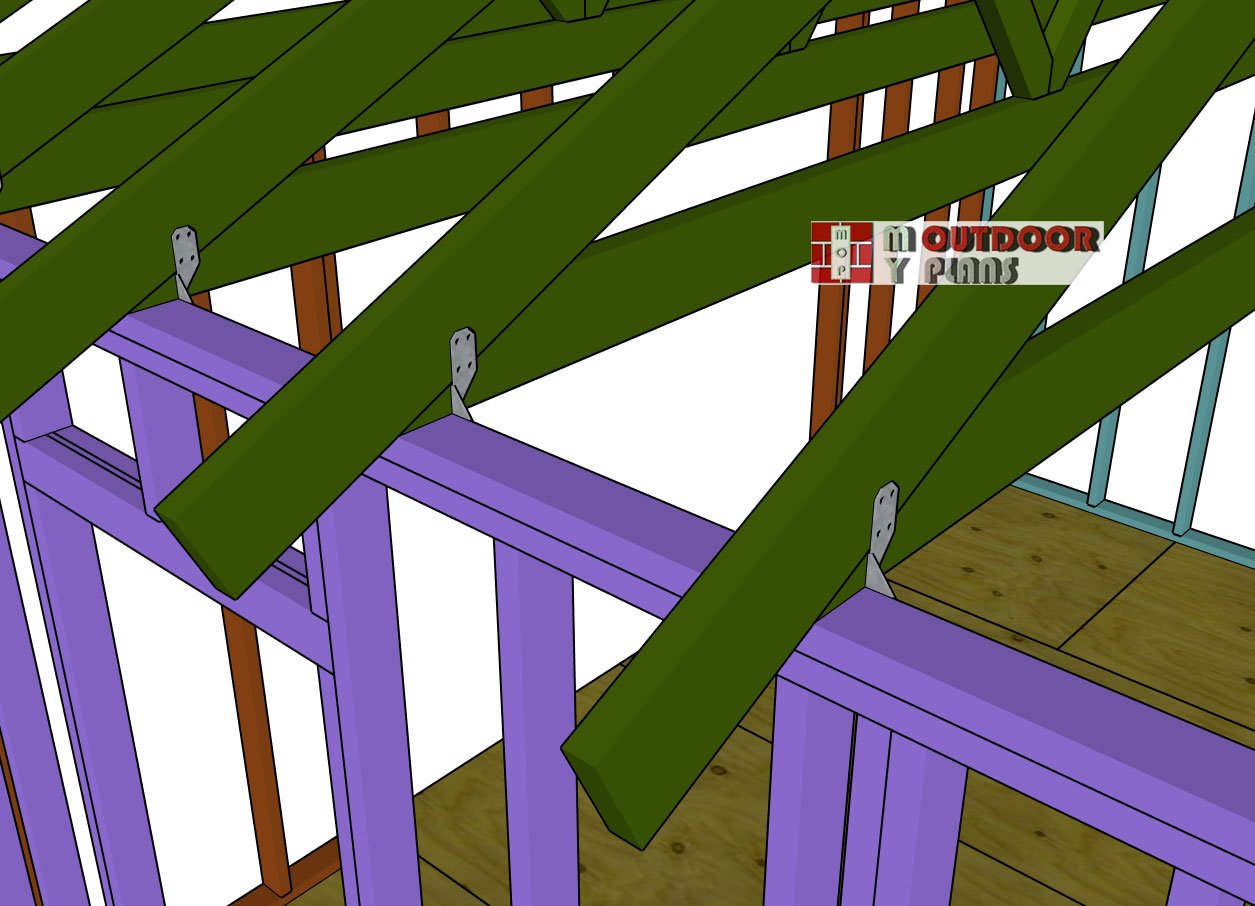
Truss—detail
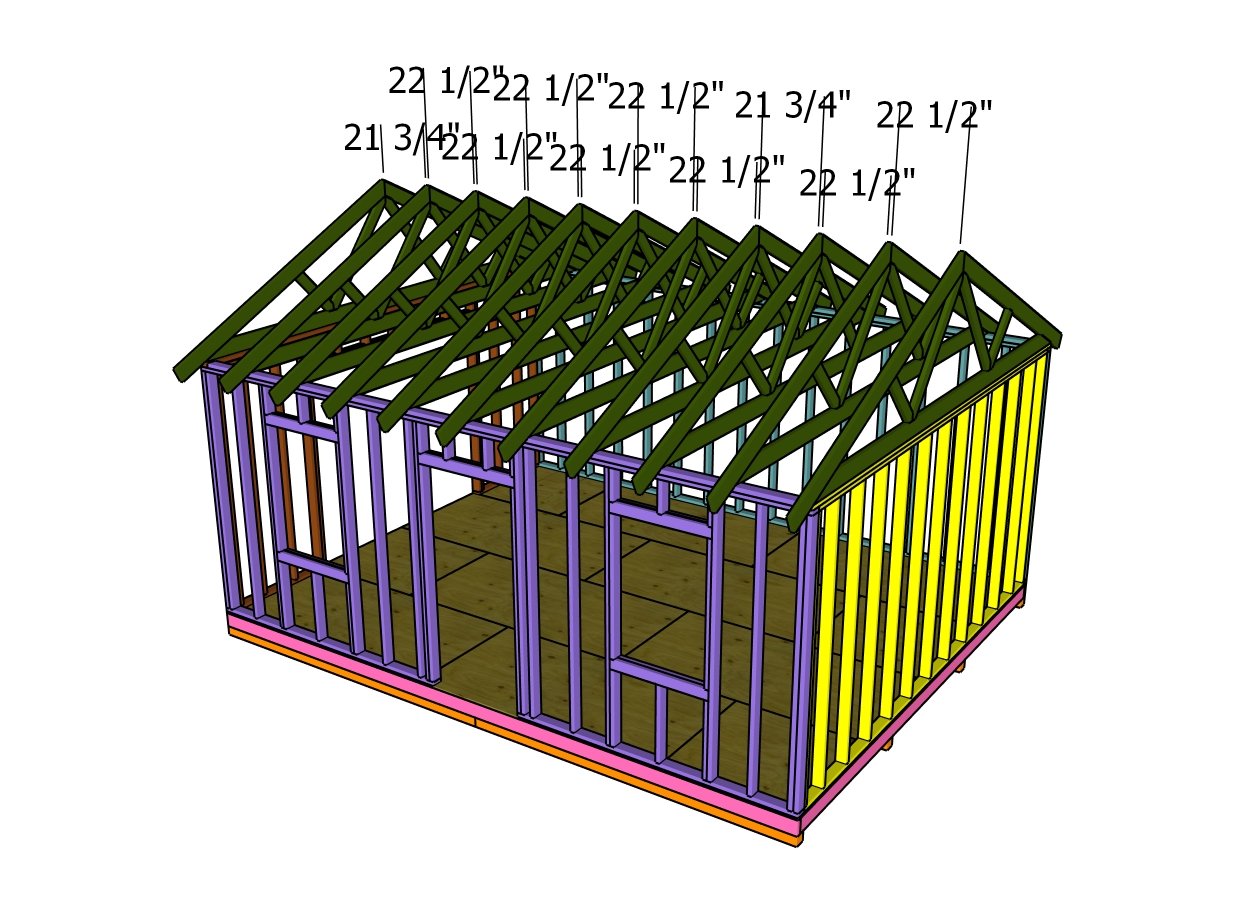
Gaps
Start by lifting each truss onto the top plates of the shed wall frames and aligning them with the layout marks, ensuring the trusses are plumb and evenly spaced. Attach a rafter tie to each side of the truss where it meets the top plate, using 1 1/2″ structural screws to secure the ties to both the truss and the top plate.
Drive the screws through the pre-drilled holes in the rafter ties for a snug fit, ensuring the connections are tight and stable. Repeat this process for all trusses, double-checking alignment and spacing as you go to maintain a uniform and sturdy roof frame.
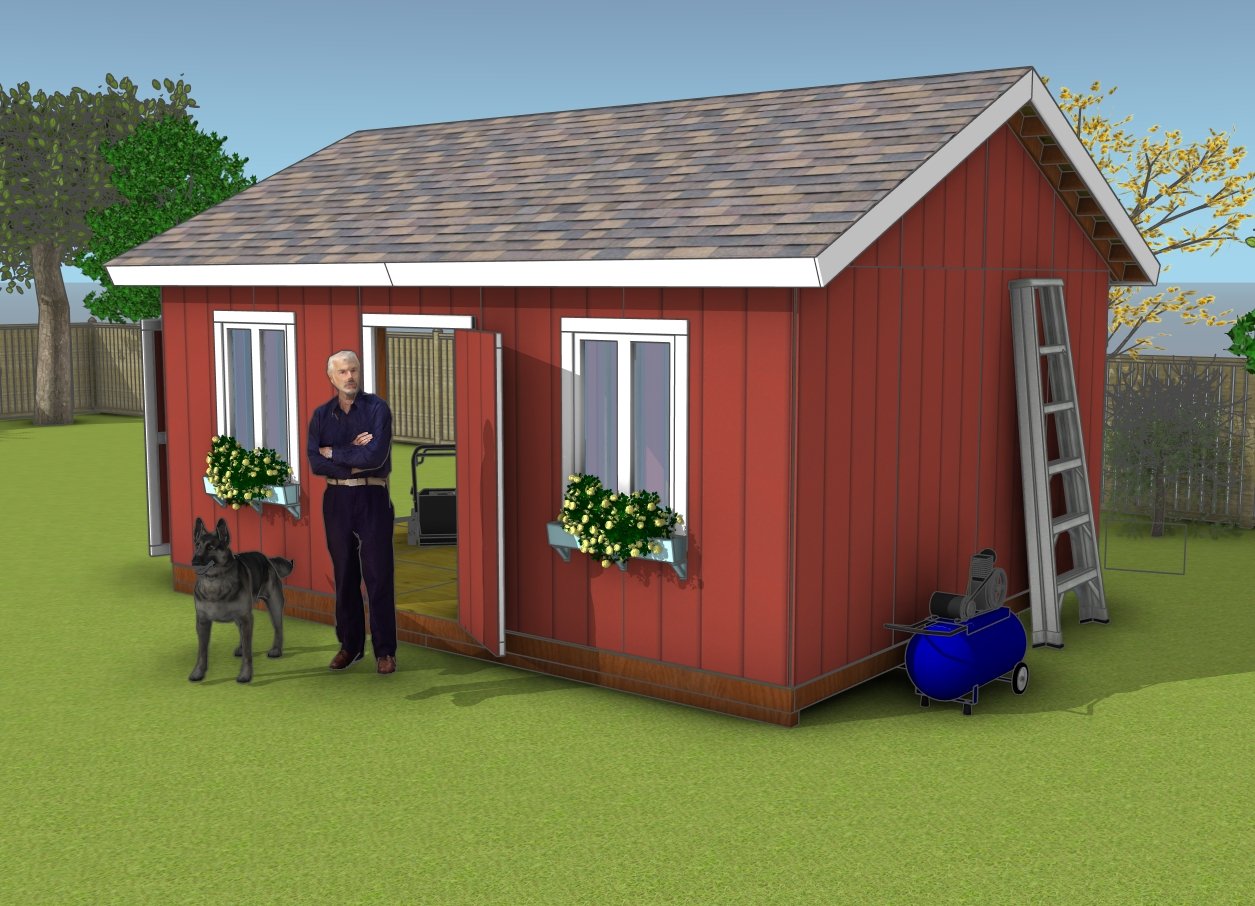
16×20 shed plans – free plans
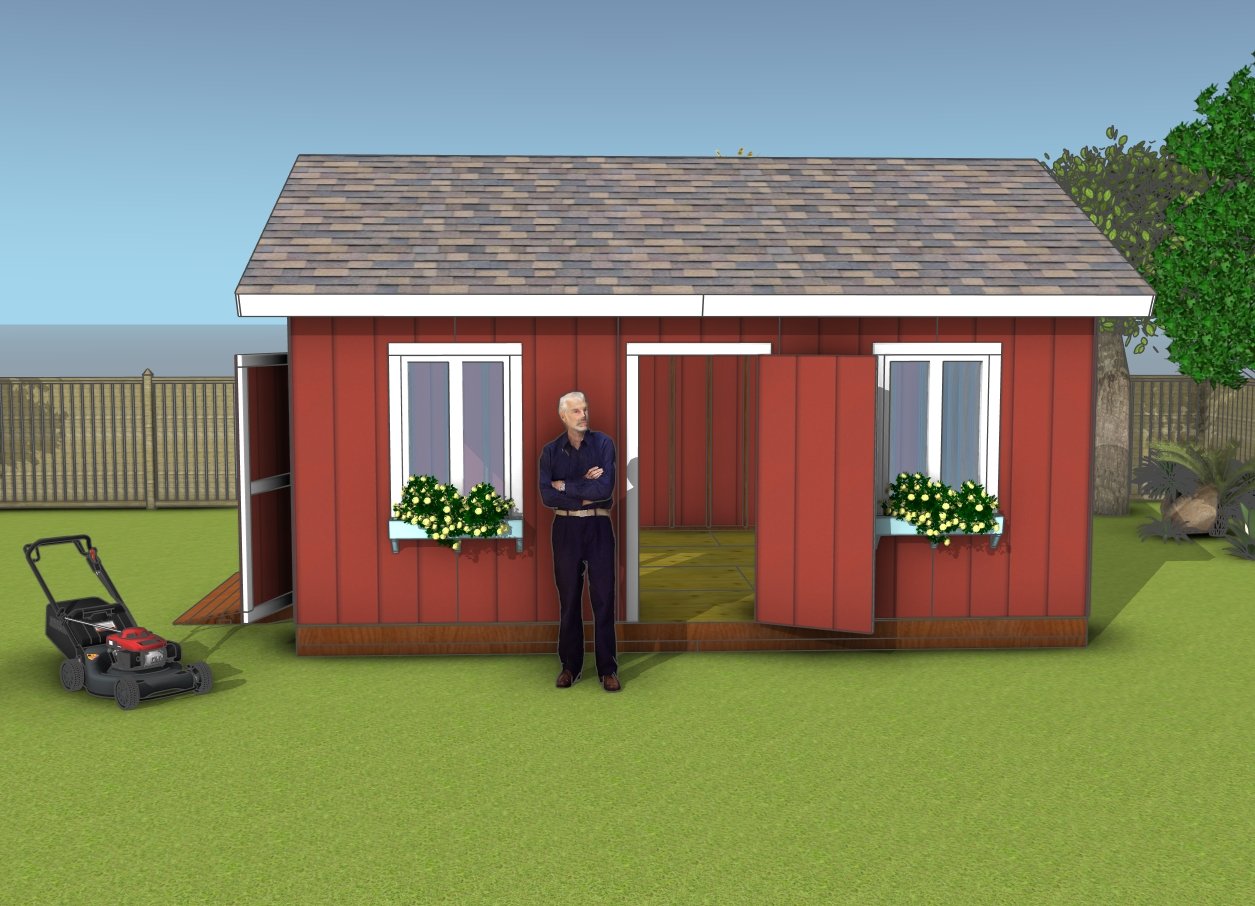
How to build a 16×20 shed
With the trusses securely in place, the framework for your 16×20 shed is complete! You’ve laid the groundwork for a sturdy, functional structure that’s built to last. But the journey doesn’t stop here, next comes the exciting part: giving your shed its finishing touches. In PART 2, we’ll dive into attaching the siding, adding weather protection, and crafting the doors to bring this project to life. Stay tuned, because this is where your shed starts to transform from a bare frame into a standout feature of your backyard!
This woodworking project was about 16×20 gable shed plans. If you want to see more outdoor plans, check out the rest of our step by step projects and follow the instructions to obtain a professional result.


