This step by step diy project is about 10×16 horse barn with tack room plans. I have designed this small horse barn with a tack room, so you can shelter a horse as well as other items. The shed has a 10×12 room for the horse with no floor and a 4×10 tack room with a wood floor. Make sure you check the local codes and make adjustments to the plans, if required. Take a look over the rest of my woodworking plans, if you want to get more building inspiration.
When buying the lumber, you should select the planks with great care, making sure they are straight and without any visible flaws (cracks, knots, twists, decay). Investing in cedar or other weather resistant lumber is a good idea, as it will pay off on the long run. Use a spirit level to plumb and align the components, before inserting the galvanized screws, otherwise the project won’t have a symmetrical look. See all my Premium Plans HERE.
Projects made from these plans
10×16 Horse Barn with Tack Room Plans
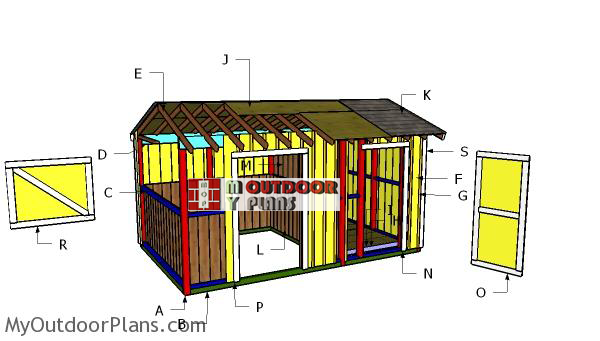
Building-a-horse-barn-with-tack-room
Cut List
- A – 3 pieces of 4×4 lumber – 127 1/2″ long, 3 pieces – 135 1/2″ long, 4 piece – 88″ long, 4 pieces – 96″ long POSTS
- B – 5 pieces of 4×4 lumber – 113″ long, 2 pieces – 68 1/2″long SKIDS
- C – 4 pieces of 2×4 lumber – 29″ long, 4 pieces – 12 3/4″ long, 4 pieces – 23″ long, 2 pieces – 68 1/2″ long, 22 pieces – 54 3/4″ long, 2 pieces of 2×6 lumber – 48″ long, 2 pieces – 36″ long SUPPORTS
- D – 2 pieces of 2×8 lumber – 192″ long BEAMS
Shopping List
- 10 pieces of 4×4 lumber – 8′
- 6 pieces of 4×4 lumber – 14′
- 5 pieces of 4×4 lumber – 10′
- 5 pieces of 2×4 lumber – 8′
- 11 pieces of 2×4 lumber – 10′
- 2 pieces of 2×6 lumber – 8′
- 2 pieces of 2×8 lumber – 16′
- 3 1/2″ lag screws
- 2 1/2″ screws, 3 1/2″ screws
- wood filler , wood glue, stain/paint
Tools
![]() Hammer, Tape measure, Framing square, Level
Hammer, Tape measure, Framing square, Level
![]() Miter saw, Drill machinery, Screwdriver, Sander
Miter saw, Drill machinery, Screwdriver, Sander
![]() Safety Gloves, Safety Glasses
Safety Gloves, Safety Glasses
Time
Related
- PART 1: 10×16 Horse Barn with Tack Room Plans
- PART 2: 10×16 Horse Barn Roof with Tack Room Plans
- PART 3: 10×16 Horse Barn Roof with Tack Room Plans
- 2 Stall Horse Barn Plans
How to build a 10×16 horse barn with tack room
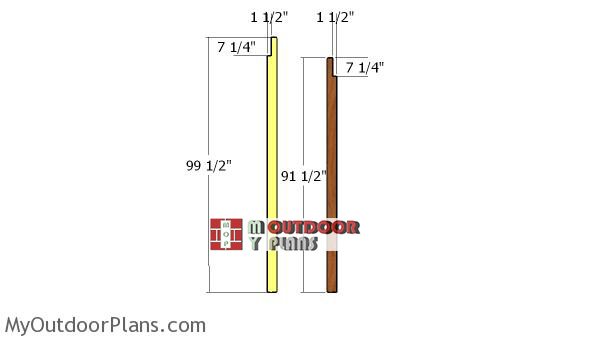
Posts
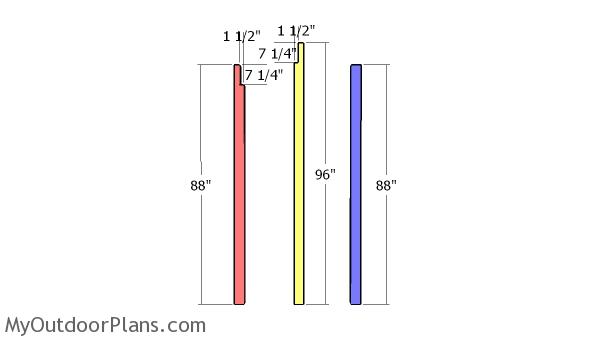
The first step of the project is to build the corner posts. As you can see in the diagram, you need to make a notch to the top of the 4×4 posts. Make parallel cuts to the top of the posts and then remove the excess with a chisel. You need to set the posts in concrete, therefore add 36″ to the posts.
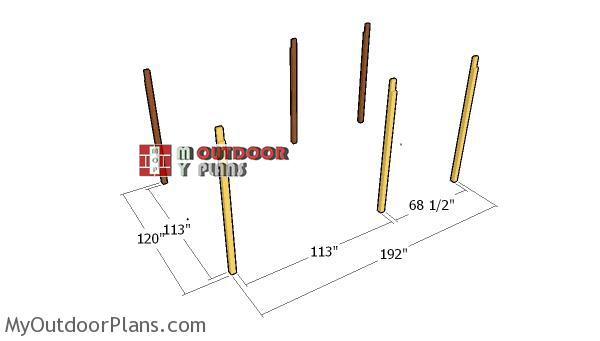
Fitting-the-posts
The next step of the project is to layout the location of the posts. Use batter boards and string to mark the location for the corner posts. Apply the 3-4-5 rule to the corners and then dig 3′ deep holes into the ground. Plumb the posts with a spirit level and then secure them into place temporarily with braces. Fill the holes with concrete and let it dry out for a few hours.
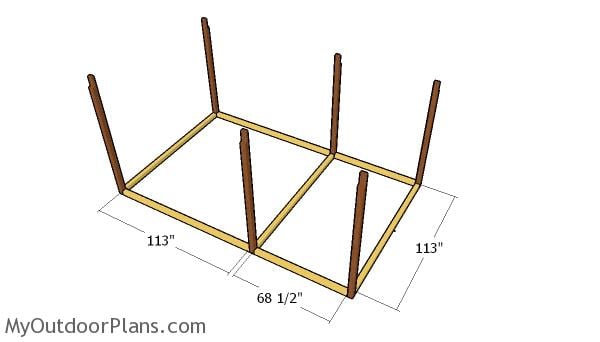
Fitting the skids
Fit the 4×4 pressure treated skids between the posts. Align the edges with attention and make sure the corners are square. Drill pilot holes and insert 3 1/2″ screws to lock them to the vertical posts.
Middle posts
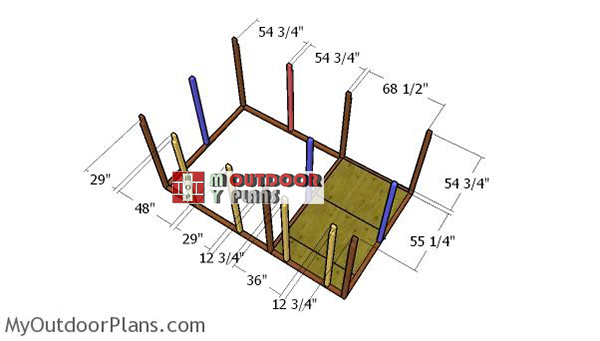
Use 4×4 lumber for the intermediary posts. As you can see in the diagram, you need to make notches to the top of several posts.
Fitting-the-middle-posts
Fit the posts to the structure of the shed, as shown in the diagram. Make sure the corners are square and plumb them with a spirit level. Use screws to lock the posts to the skids.
Building the tack room floor
Floor frame
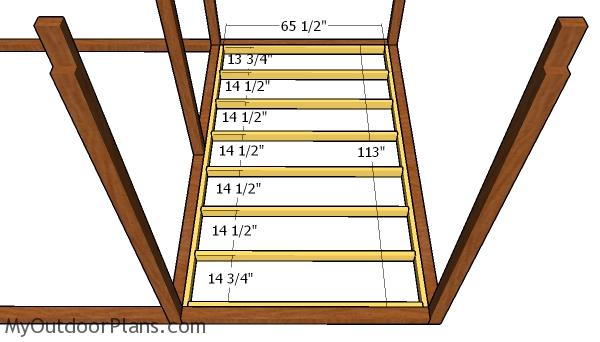
The next step of the project is to frame the floor for the tack roof. Cut the joists from 2×4 lumber and then secure them into place with 3 1/2″ screws. Make sure the corners are square for a professional result.
Floor sheets
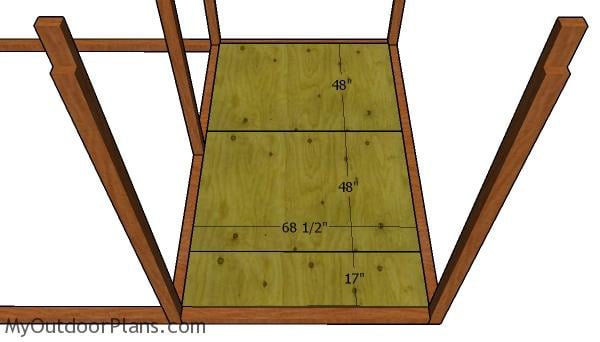
Cut the floor sheets for tack room from 3/4″ plywood. Leave no gaps between the floor sheets and then secure them to the joists with 1 5/8″ screws, every 8″ along the structure.
Framing the walls
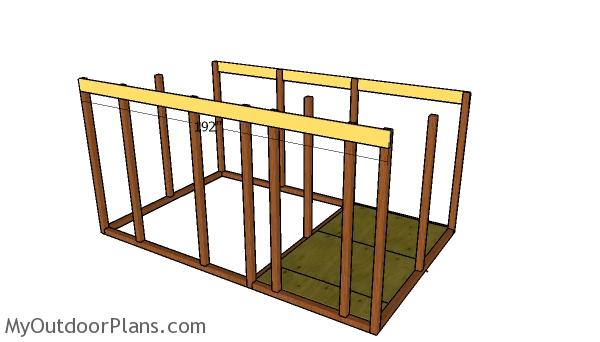
Fitting the support beams
Fit the 2×8 beams to the front and back of the shed. Align the edges with attention and then lock the beams to the posts with 3 1/2″ lag screws. Use a spirit level to check if the beams are horizontal.
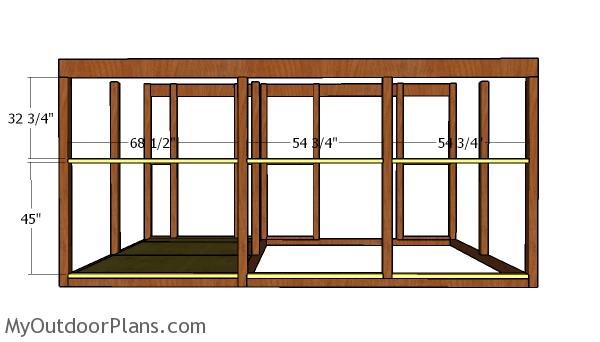
Back wall supports
Fit the supports for the kickboards to the back of the shed. Use 2×4 lumber for the supports. Drill pocket holes at both ends of the supports and insert 2 1/2″ screws to lock them to the posts.
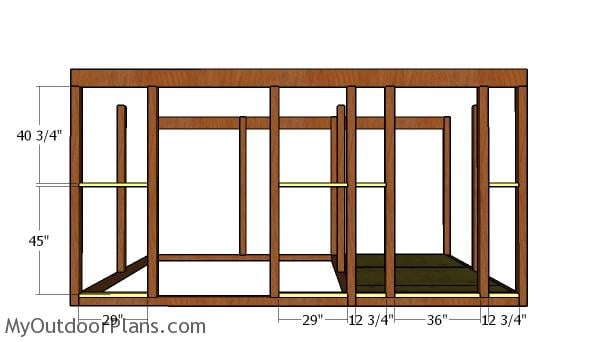
Front wall supports
Fit the 2×4 supports to the front of the shed, as well. Use a carpentry square to make sure the corners are right-angled.
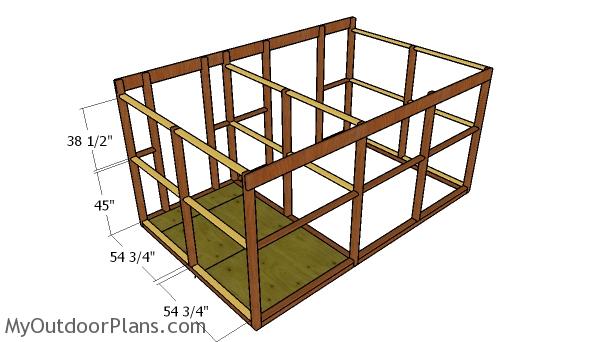
Fitting the side supports
Fit the 2×4 supports to the sides and middle of the shed, as shown in the plans.
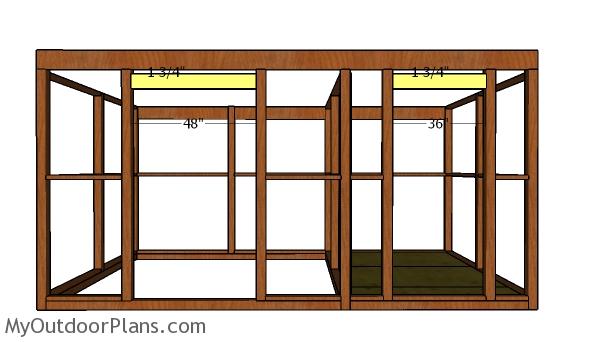
Fitting the headers
Fit the 2×6 header to the opening and then the 2×2 braces. Cut both ends of the braces at 45 degrees and lock them into place with 2 1/2″ screws.
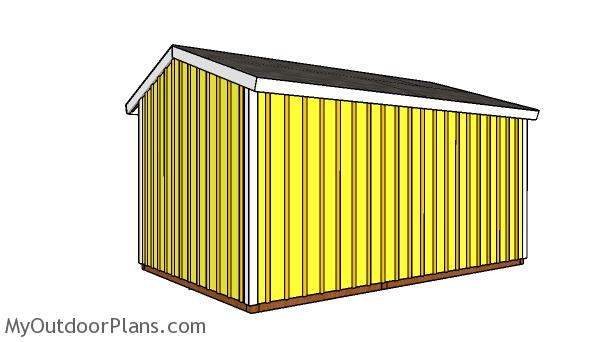
Back view
Make sure the edges are flush and check if the corners are square.
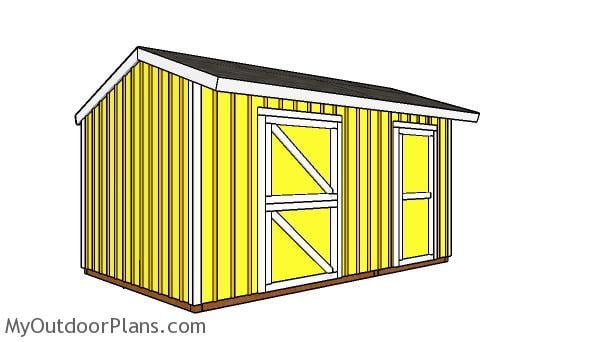
10×16 Horse barn with tack room plans
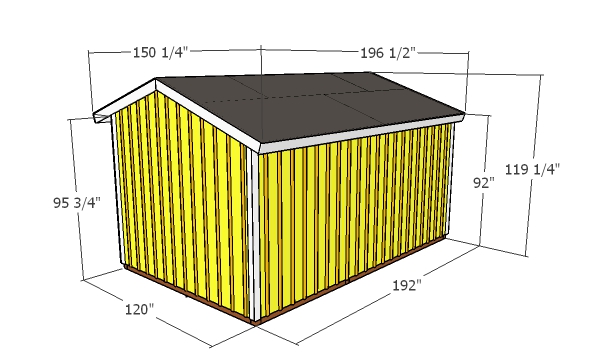
10×16 Horse barn with tack room plans – overall dimensions
Make sure you take a look over PART 2 and PART 3 of the run in shed project, so you learn how to build the roof and how to fit the trims to the shed. I have lots of other shed projects on the site so I recommend you to browse through all alternatives before starting the building project. See all my shed projects HERE.

Horse barn with tack room – free plans
Building a 10×16 horse barn with a tack room will likely cost you between $3,000 and $5,000, depending on the materials and finishes you choose. The inclusion of a tack room adds both functionality and convenience, making the barn a well-organized space for housing your horse and storing gear. This investment gives you a sturdy, practical barn that’s tailored to meet the needs of both you and your horse.

How to build a 10×16 horse barn with storage
As you complete your 10×16 horse barn with a tack room, you’ll have created a space that’s both a safe haven for your horse and a well-organized area for your equipment. The tack room offers easy access to all your gear, keeping everything in its place and making daily chores more efficient. This barn isn’t just a shelter – it’s a thoughtfully designed structure that enhances your property, providing comfort for your horse and convenience for you, ensuring it’s a valuable addition for years to come.
If you want to download this project as a PDF file, with 1 full Cut list and 1 full Shopping list, please take a look over the GET PDF PLANS button bellow.
This woodworking project was about 10×16 horse barn with tack room plans free. If you want to see more outdoor plans, check out the rest of our step by step projects and follow the instructions to obtain a professional result.


