This step by step diy project is about 10×10 hip roof shed plans. This is PART 2 of the shed project where I show you how to build the roof structure for the 10×10 shed. I show you all you need to know about framing a beautiful hip roof. If you want a shed with a hip roof to match your house design check out my free instructions. Make sure you read the local codes so you can comply with the legal requirements. Take a look over the rest of my woodworking plans, if you want to get more building inspiration.
When buying the lumber, you should select the planks with great care, making sure they are straight and without any visible flaws (cracks, knots, twists, decay). Investing in cedar or other weather resistant lumber is a good idea, as it will pay off on the long run. Use a spirit level to plumb and align the components, before inserting the galvanized screws, otherwise the project won’t have a symmetrical look. If you have all the materials and tools required for the project, you could get the job done in about a day. See all my Premium Plans HERE.
Projects made from these plans
10×10 Hip Roof Shed Plans

Building-a-10×10-hip-roof-shed
[tabs tab1=”Materials” tab2=”Tools” tab3=”Time” tab4=”Related Plans”] [tab id=1]
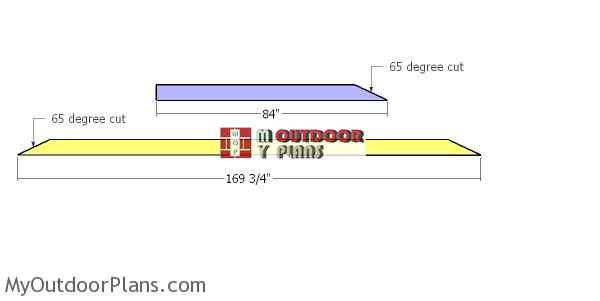
- I – 1 piece of 2×6 lumber – 169 3/4″ long, 2 pieces – 84″ long BOTTOM RAFTERS
- J – 1 piece of 2×2 lumber – 39 3/4″ long KING POST
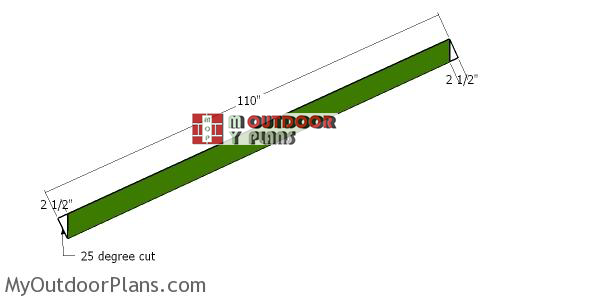
- K – 4 pieces of 2×6 lumber – 110″ long HIP RAFTERS
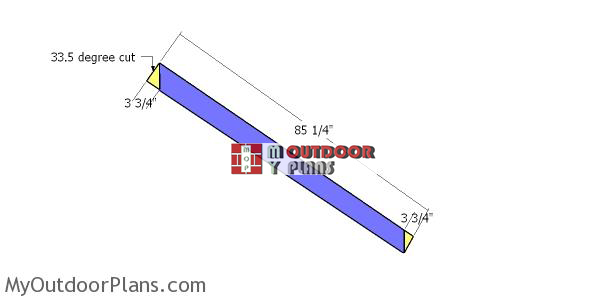
- L – 4 pieces of 2×6 lumber – 85 1/4″ long COMMON RAFTERS
- M – 8 pieces of 2×6 lumber – 29 1/2″ long, 8 pieces – 48 3/4″ long, 8 pieces – 67 3/4″ long JACK RAFTERS
- N – 8 pieces of 3/4″ plywood – 48″x70″ long, 8 pieces – 29 3/4″x35″ long ROOF SHEETS
- O – 180 sq ft of tar paper, 180 sq ft of asphalt shingles ROOFING
- P – 2 pieces of 1×8 lumber – 139 3/4″ long, 141 1/4″ long TRIMS
- 1 piece of 2×6 lumber – 16′
- 22 pieces of 2×6 lumber – 8′
- 4 pieces of 2×6 lumber – 10′
- 1 piece of 2×2 lumber – 4′
- 12 pieces of 3/4″ plywood – 4’x8′
- 4 pieces of 1×8 lumber – 12′
- 180 sq ft of tar paper, 180 sq ft of asphalt shingles
- 2 1/2″ screws, 3 1/2″ screws, 1 5/8″ screws
- 6d nails, 8d nails
- wood filler , wood glue, stain/paint
[/tab] [tab id=2]
![]() Hammer, Tape measure, Framing square, Level
Hammer, Tape measure, Framing square, Level
![]() Miter saw, Drill machinery, Screwdriver, Sander
Miter saw, Drill machinery, Screwdriver, Sander
[/tab] [tab id=3]
![]() One day
One day
[/tab][tab id=4]
- PART 1: 10×10 Shed with a Hip Roof Plans
- PART 2: 10×10 Hip Roof Shed Plans
- PART 3: Door Plans for 10×10 Shed
[/tab][/tabs]
It’s that simple to build a shed with a hip roof – Video!
10×10 Shed Hip Roof Plans
Building-the-bottom-rafters
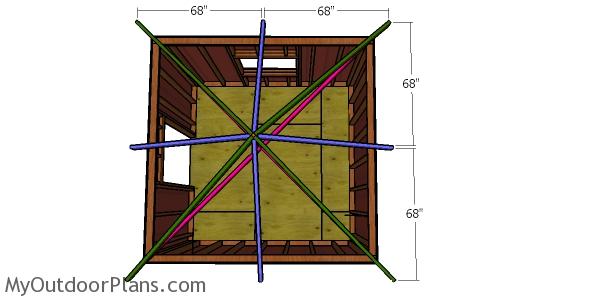
The first step of the project is to build the bottom rafters. Use a miter saw to make the angle cuts to the rafters.
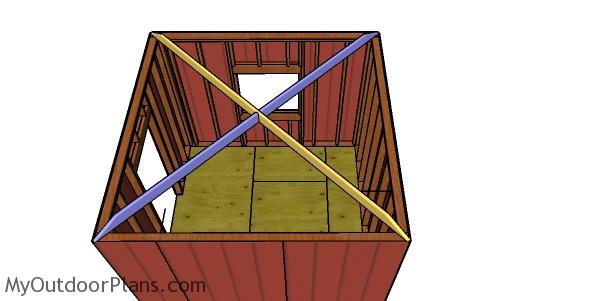
Fitting the bottom rafters – 10×10 hip shed
Fit the bottom rafters to the top of the shed, as shown in the diagram. Drill pocket holes through the end of the short rafters and insert 2 1/2″ screws into the perpendicular components. Make sure the angle between the rafters is 90 degree.
Building-the-hip-rafters—10×10-shed
Use a miter saw to make 25 degree cuts to both ends of the boards. These are the hip rafters. Smooth the edges with sandpaper.

Fitting the king post – 10×10 hip roof shed
Fit the 2×2 king post to the intersection of the bottom rafters. Drill pocket holes and insert 2 1/2″ screws to lock the king posts into place. Use a spirit level to plumb the king post.

Fitting the hip rafters – 10×10 shed
Fit the hip rafters to the top of the 10×10 shed. Align the edges and insert screws to lock the hip rafters into place tightly.
Building-the-common-rafters
Use 2×6 lumber for the common rafters. Use a miter saw to make the angle cuts to both ends of the rafters, as shown in the diagram.
Fitting the common rafters – 10×10 hip roof shed
Fit the common rafters to the top of the 10×10 shed. Align the edges, drill pilot holes and insert screws to lock them into place tightly.
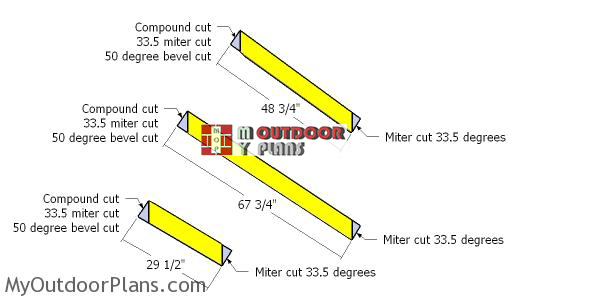
Building-the-jack-rafters—10×10-garden-gazebo
Next, build the jack rafters for the hip roof of the shed. Use a miter saw and make a simple miter cut at one end. Use the miter and make a compound cut for the opposite end: 33.5 miter cut and 50 degree bevel cut.
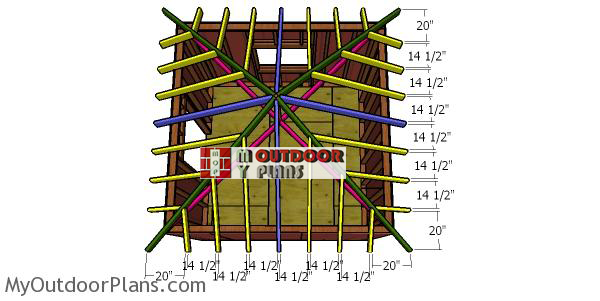
Fitting-the-rafters-to-the-hip-roof
Fit the jack rafters to the top of the shed. Start installing the jack rafters from the common rafters toward outside, every 16″ on center. Use rafter ties to the secure the rafters into place tightly.
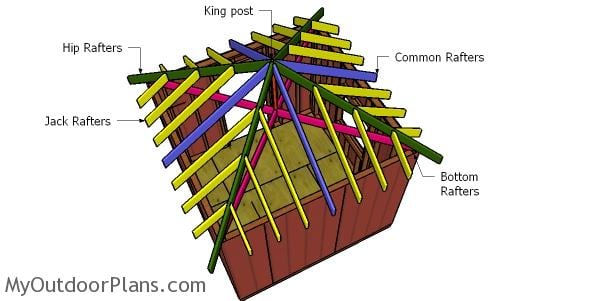
Hip Roof Components
This is basically the roof structure for a hip shed.

Fit the roof sheets to the 10×10 shed
Use 3/4″ plywood for the roof sheets. Cut the sheets at the right dimensions and then lay them to the top of the roof structure. Align the edges flush, leave no gaps between the sheets and insert 1 5/8″ screws, every 8″ along the framing.
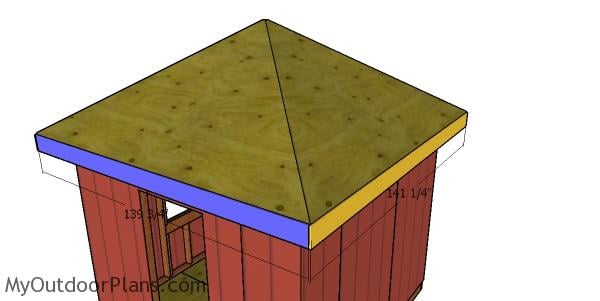
Fitting the roof trims – 10×10 hip roof shed
Use 1×8 lumber for the roof trims. Cut the trims at the right dimensions and secure them to the end of the rafters. Drill pilot holes and insert 2 1/2″ screws to lock the trims into place tightly.

Fitting the roofing to the hip roof shed
Install the roofing felt, starting from the bottom left of the roof. Secure the paper to the roofing, using a stapler. Make sure the tar paper overlaps at least 2”. Don’t forget to cover the top ridge with a 14” strip of paper .
Start the first course of shingles with a full tab, the second with 2 1/2 tabs, the third with 2 tabs, the forth with 1 1/2 tabs, the fifth with 1 tab, the sixth with half tab and the seventh with a 3 tabs.

How to build a shed with a hip roof
Make sure you check out PART 1 and PART 3 of the hip roof shed project, so you learn how to build the wall frames and the door.
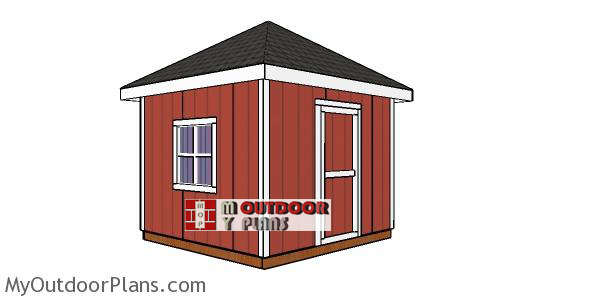
10×10-shed-with-hip-roof-plans
This 10×10 shed is beautiful, sturdy and it has a lot of room for storage. You can make a lot of adjustments and customize it to suit your needs. Please take a look over the rest of my woodworking plans, because I have over 1500 free designs.
This woodworking project was about 10×10 shed with hip roof plans free. If you want to see more outdoor plans, check out the rest of our step by step projects and follow the instructions to obtain a professional result.
 |
 |
EXPLORE MORE IDEAS FOR:
 |
 |
 |
 |