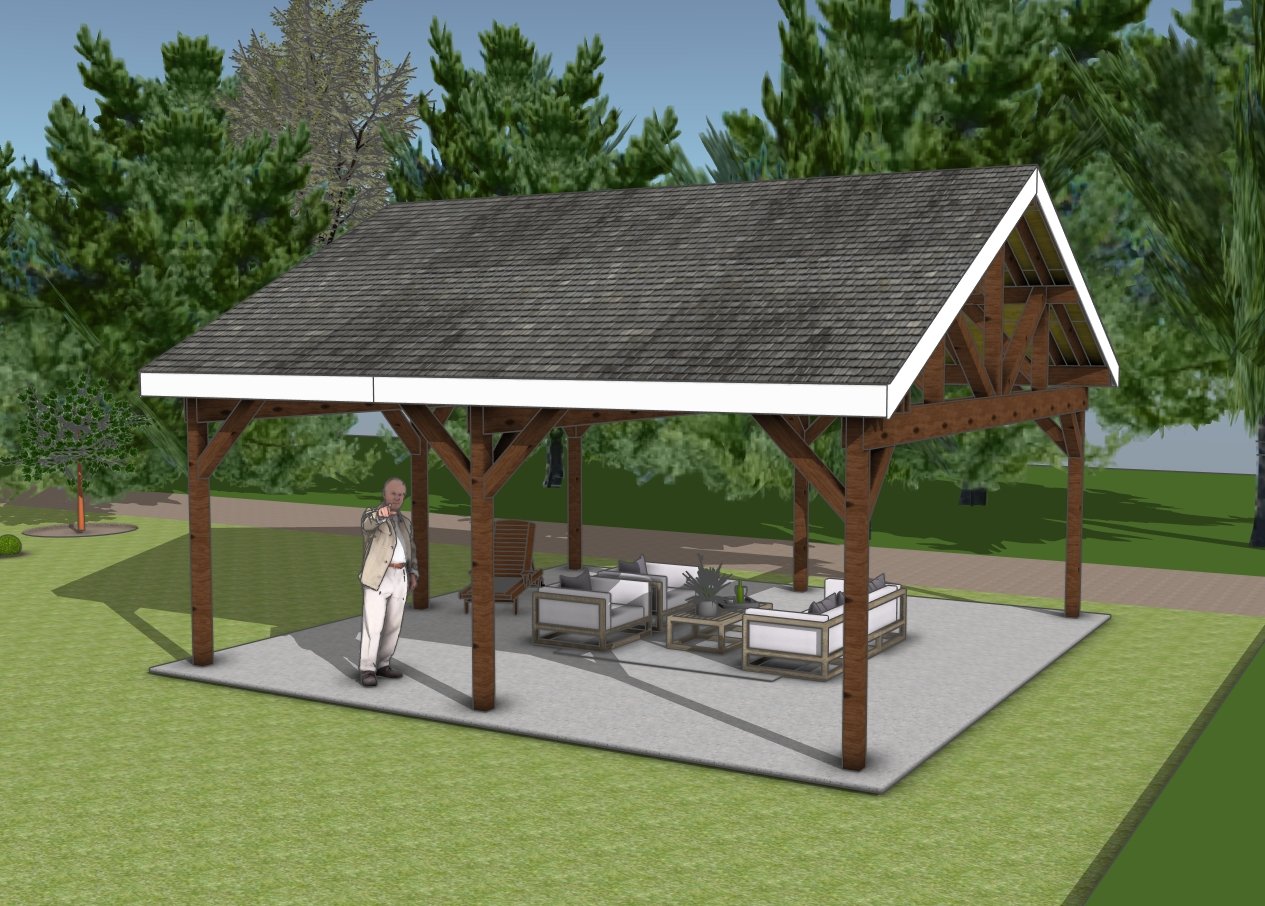
A 24×24 pavilion is a versatile and durable outdoor structure, perfect for creating a shaded gathering space, a functional carport, or a backyard retreat. With its sturdy 6×6 post framing and reinforced beam system, this pavilion is built to withstand the elements while offering a stylish and open design. The spacious layout provides plenty of room for seating, dining, or vehicle storage, making it a great addition to any outdoor setting.
The pavilion features a classic 6:12 gable roof pitch, which not only enhances its visual appeal but also improves water runoff and snow shedding. The three-ridge beam support system ensures even weight distribution, while the 2×8 rafters provide strong roof framing. Whether used for relaxation, entertainment, or protection from the elements, this pavilion is designed to be a long-lasting and practical addition to your property.
When buying the lumber, you should select the planks with great care, making sure they are straight and without any visible flaws (cracks, knots, twists, decay). Investing in cedar or other weather resistant lumber is a good idea, as it will pay off on the long run. Use a spirit level to plumb and align the components, before inserting the galvanized screws, otherwise the project won’t have a symmetrical look. If you have all the materials and tools required for the project, you could get the job done in about a day.
Projects made from these plans
Pin it for later!
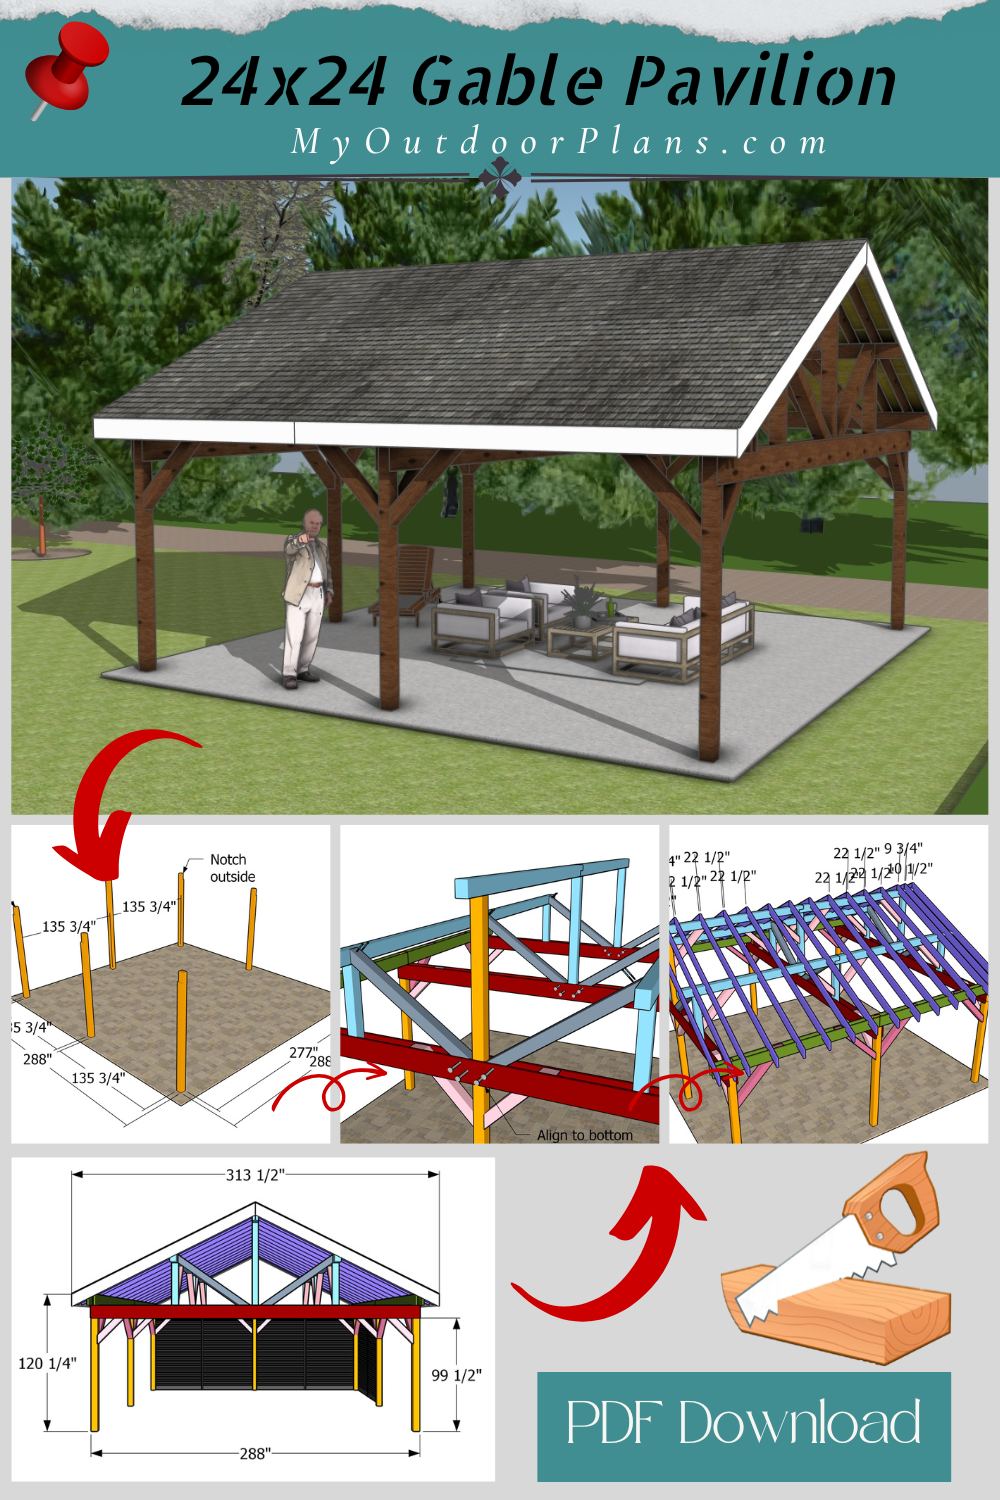
Building a 24×24 Gable Pavilion
Building-a-24×24-double-carport
Cut & Shopping Lists
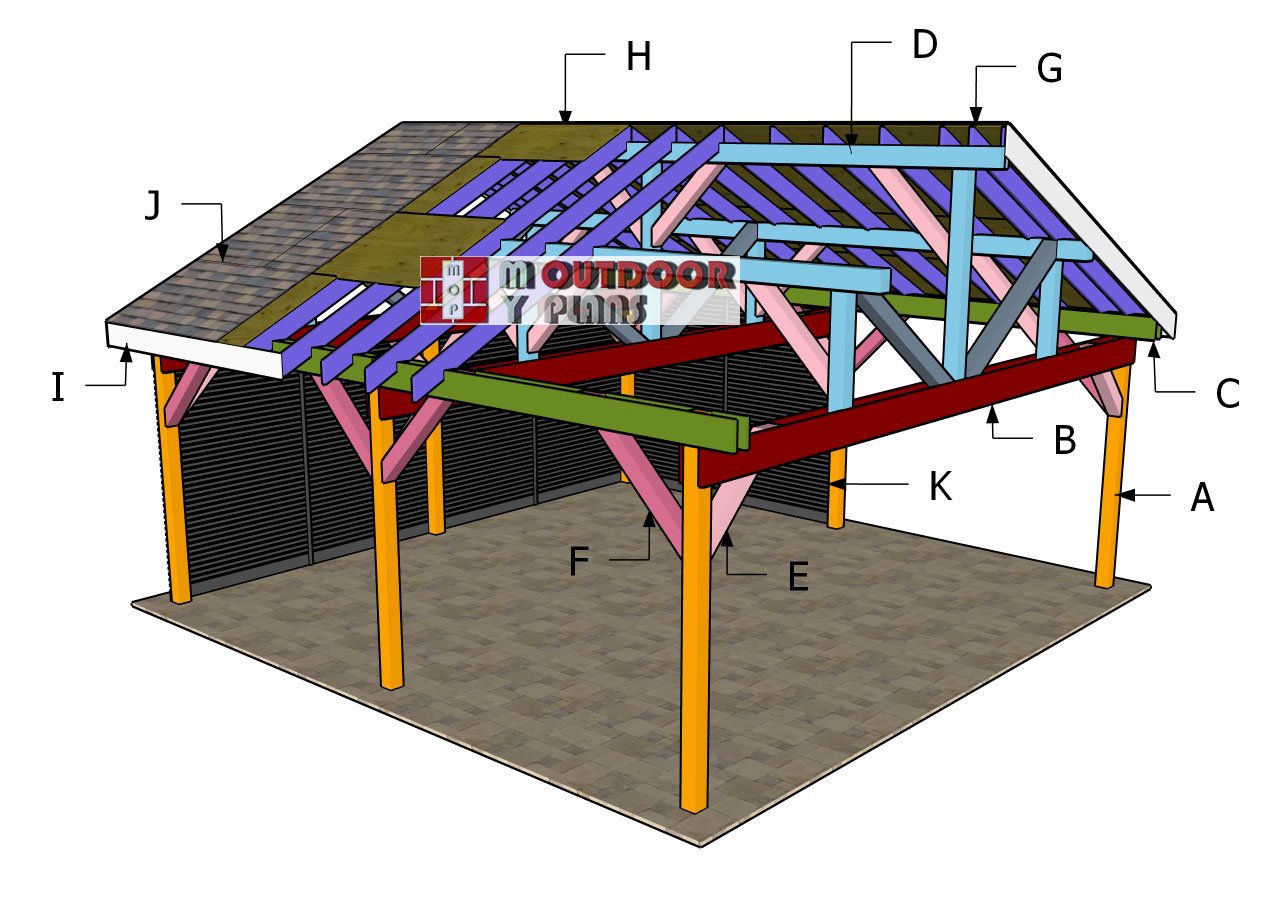
- A – 6×6 lumber – 120″ POSTS – 6 pieces
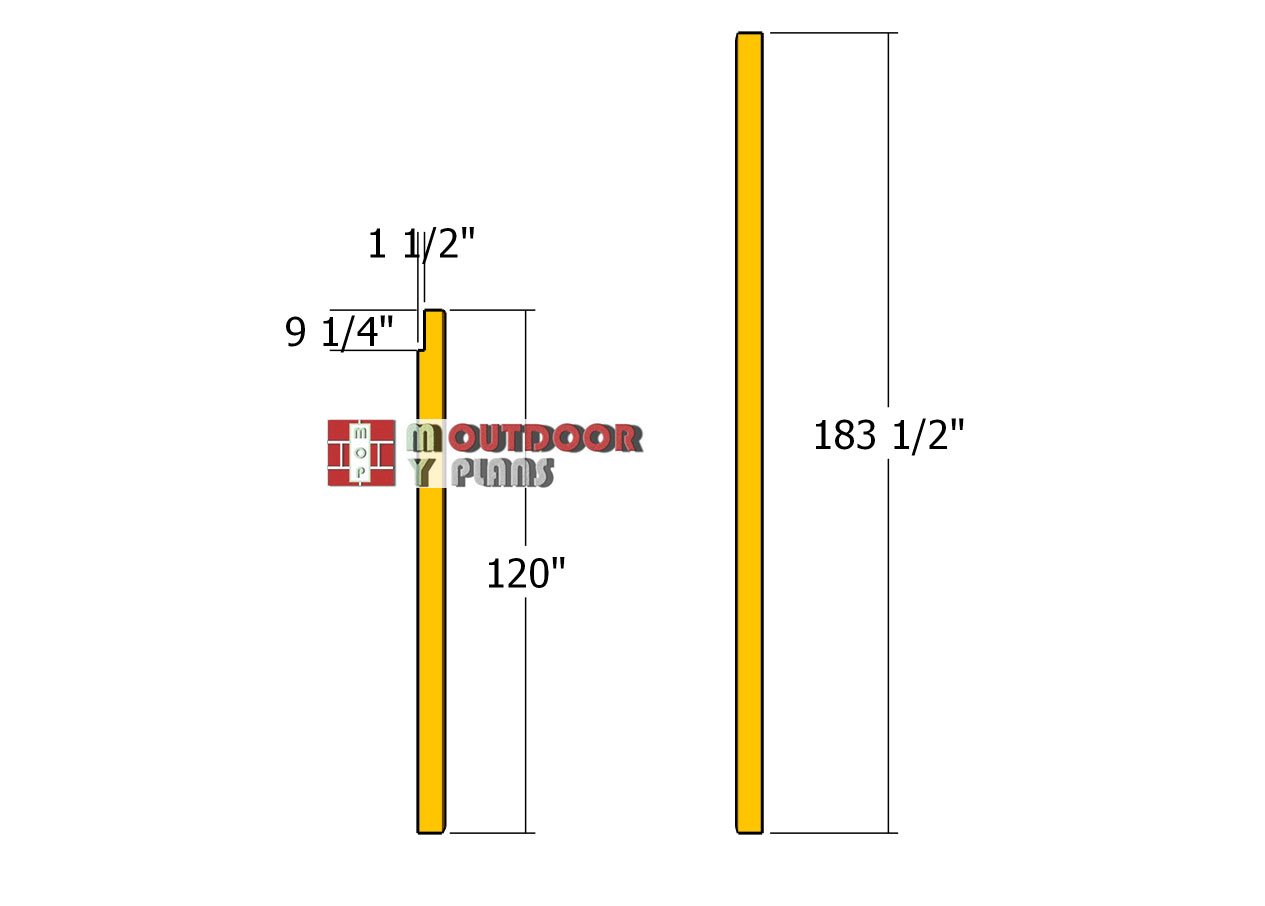
- A – 6×6 lumber – 183 1/2″ POSTS – 1 piece
- B – 2×10 lumber – 24 ft CROSSBEAMS – 6 pieces
- C – 2×10 lumber – 13 ft BACK BEAMS – 8 pieces
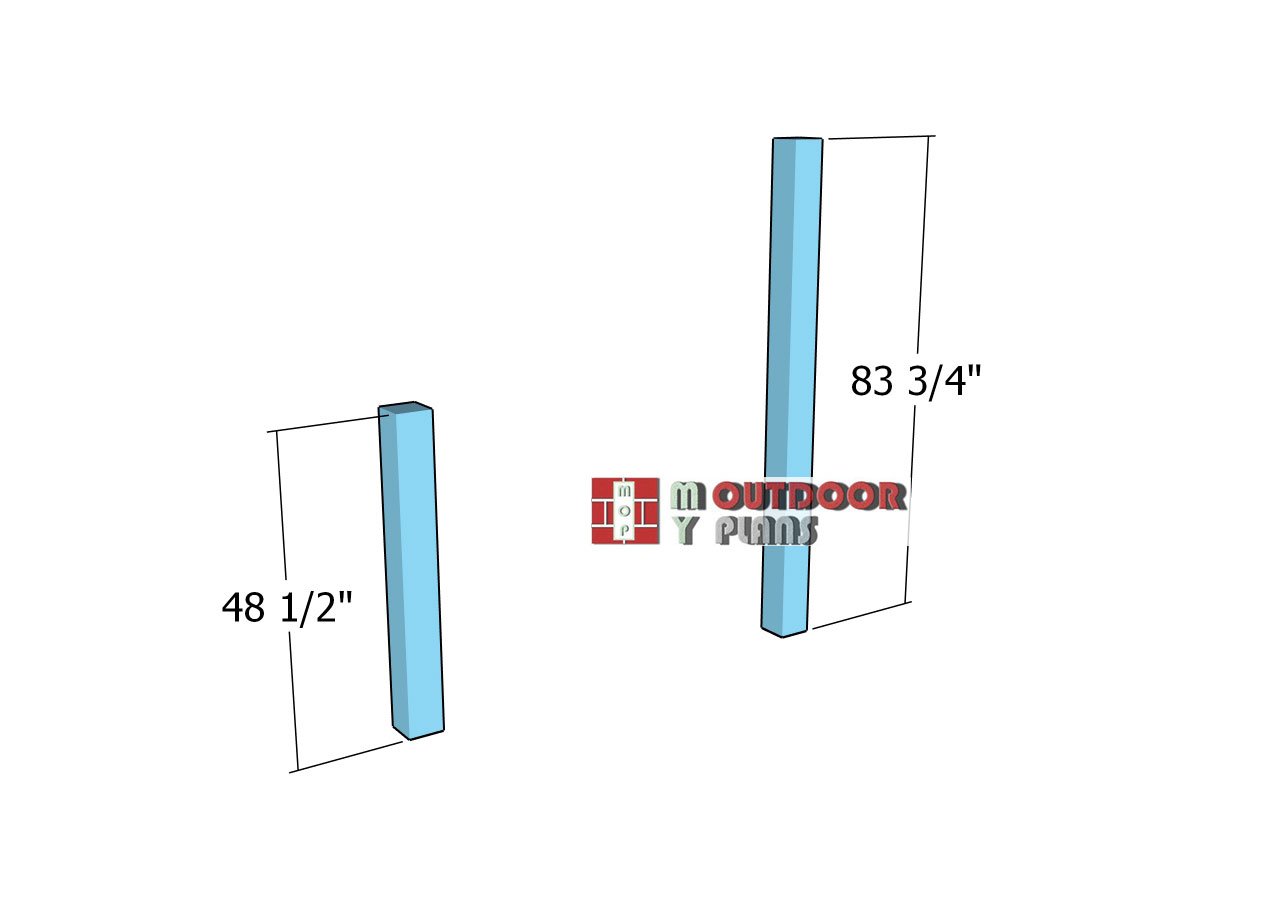
- D – 6×6 lumber – 48 1/2″ SUPPORTS – 3 pieces
- D – 6×6 lumber – 83 3/4″ SUPPORTS – 6 pieces
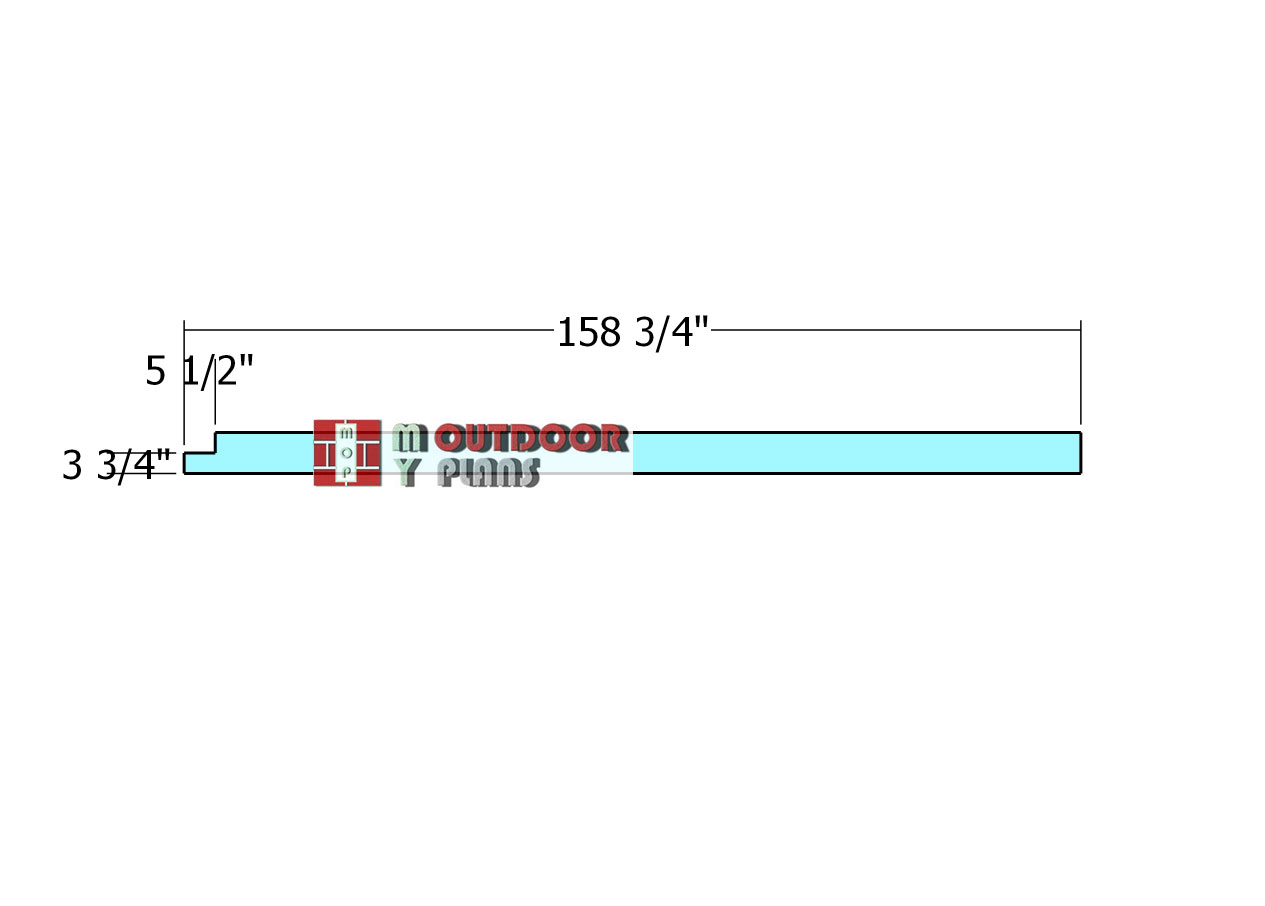
- D – 6×8 lumber – 158 3/4″ RIDGE BEAMS – 6 pieces
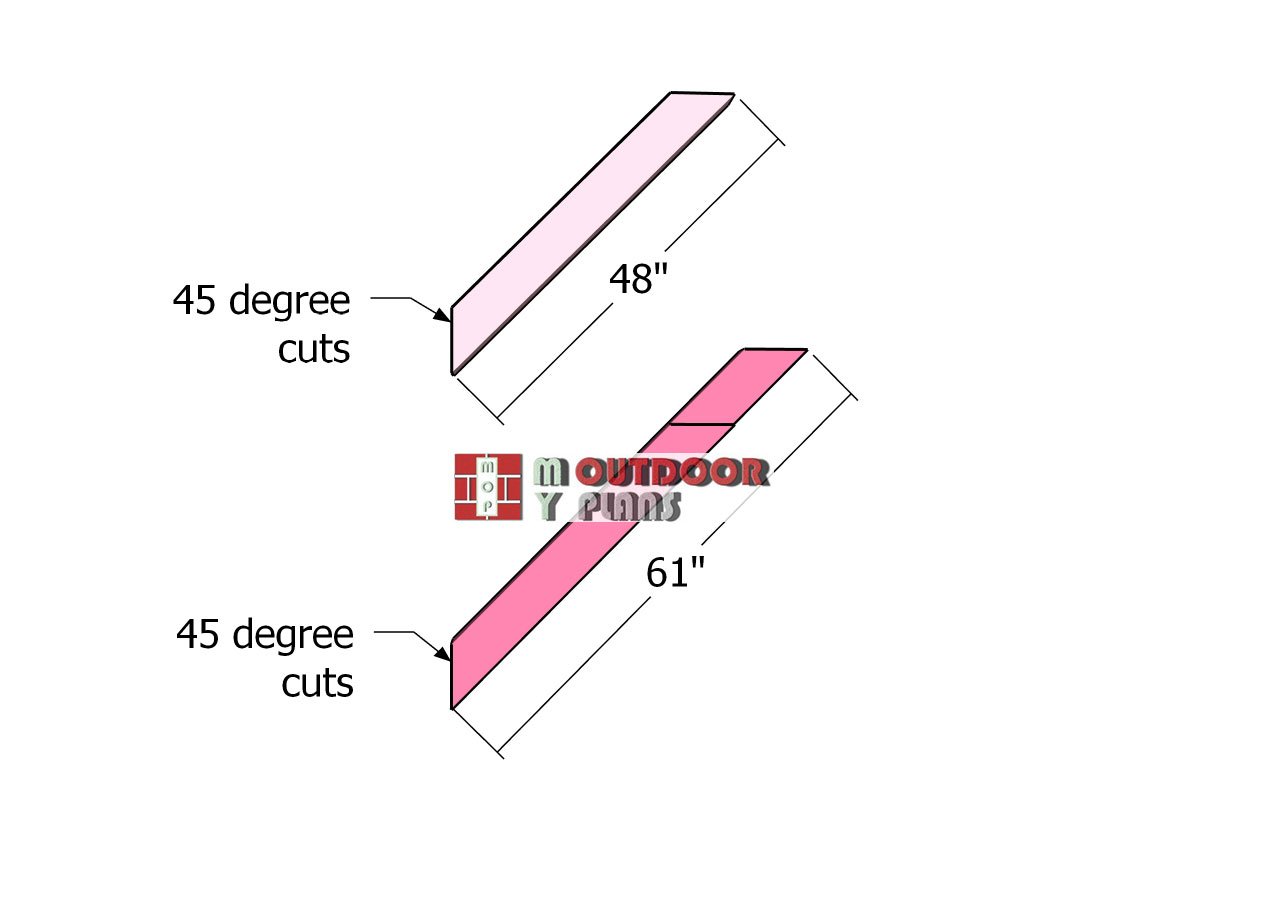
- E – 6×6 lumber – 48″ BRACES – 20 pieces
- F – 6×6 lumber – 61″ BRACES – 8 pieces
Tools
![]() Hammer, Tape measure, Framing square, Level
Hammer, Tape measure, Framing square, Level
![]() Miter saw, Drill machinery, Screwdriver, Sander
Miter saw, Drill machinery, Screwdriver, Sander
![]() Post hole digger, Concrete mixer
Post hole digger, Concrete mixer
![]() Safety Gloves, Safety Glasses
Safety Gloves, Safety Glasses
Time
![]() One week
One week
Related
- 12×20 modern pavilion plans
- PART 1: 24×24 pavilion plans
- PART 2: 24×24 pavilion roof plans
It’s that easy to build a large pavilion!
STEP 1: Fitting the posts
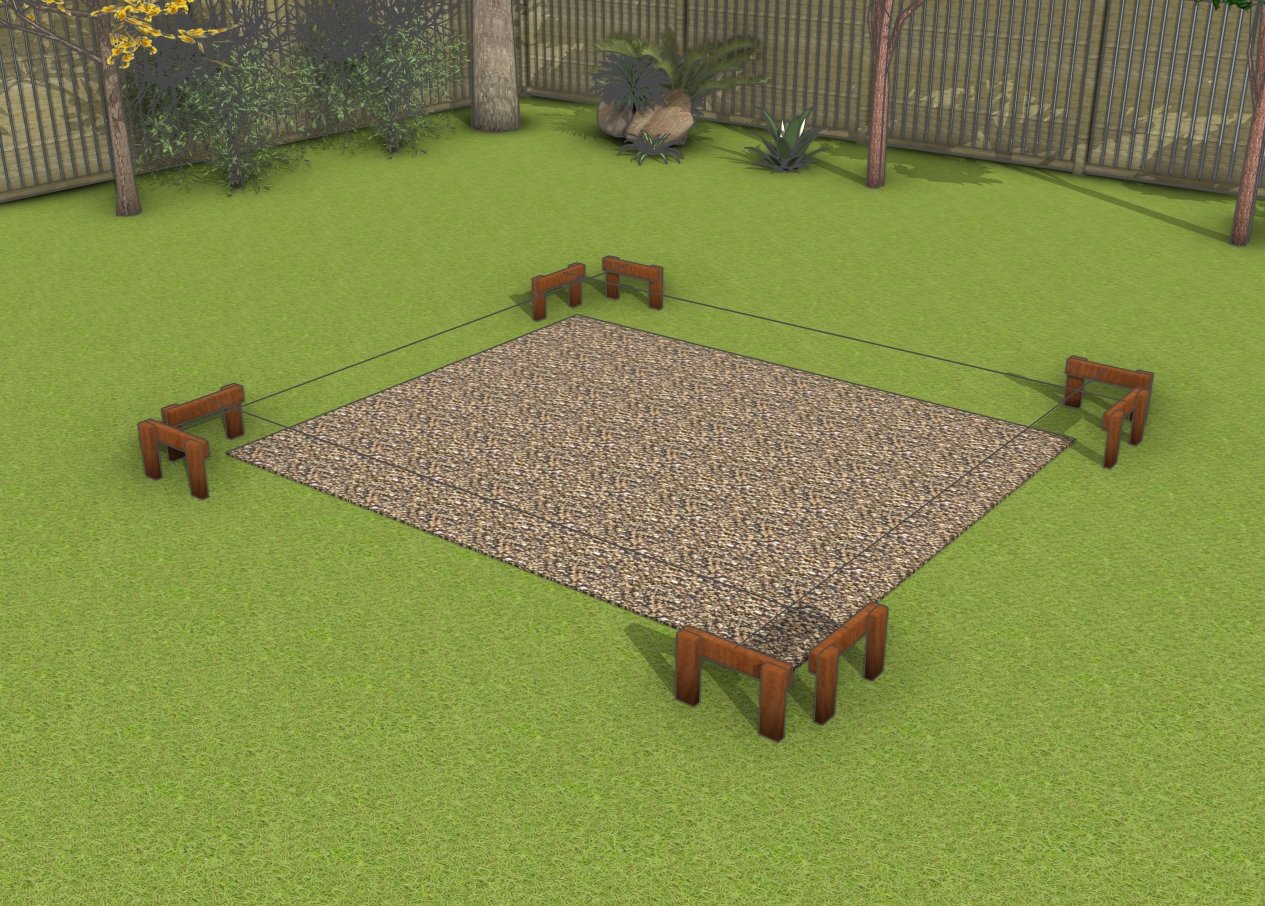
Laying out the shed location
Preparing the site for construction is a crucial first step to ensure a stable and durable structure. Start by clearing the area of any debris, vegetation, or obstacles, and level the ground to create a solid and even surface. Mark the layout of the pavilion using stakes and string, ensuring the dimensions are accurate and square.
If required, excavate the site to the proper depth for footings or concrete pads, depending on your local building codes and project needs. Taking the time to prepare the site thoroughly will make the construction process smoother and set the stage for a reliable and well-aligned finished structure.

Layout—24×24-gable-pavilion
To get started on this project, the first step is to lay out the posts for your modern pavilion. The diagram shows the exact distances between each axis, marking the center points for each post. This precise layout is key to building a stable and perfectly aligned structure, giving you a solid foundation for the gazebo’s frame.
Posts
Use 6×6 lumber for the posts to ensure a strong and stable structure. For the side posts, a notch cut is required at the top to accommodate the beams. Start by marking the area that needs to be removed, then use a circular saw to make multiple parallel cuts within the marked section. Once the cuts are made, use a chisel and hammer to remove the excess wood, creating a clean and precise notch.
This method ensures a snug fit for the beams, improving the overall strength and stability of the structure. To support the installation of privacy panels, a 183 1/2-inch-long post will be added to the back of the pavilion or carport. This additional post serves as a sturdy anchoring point, making it easier to install slatted panels or other privacy features. Properly securing this post ensures that the privacy panels remain stable and resistant to wind or other external forces.
Setting-the-posts
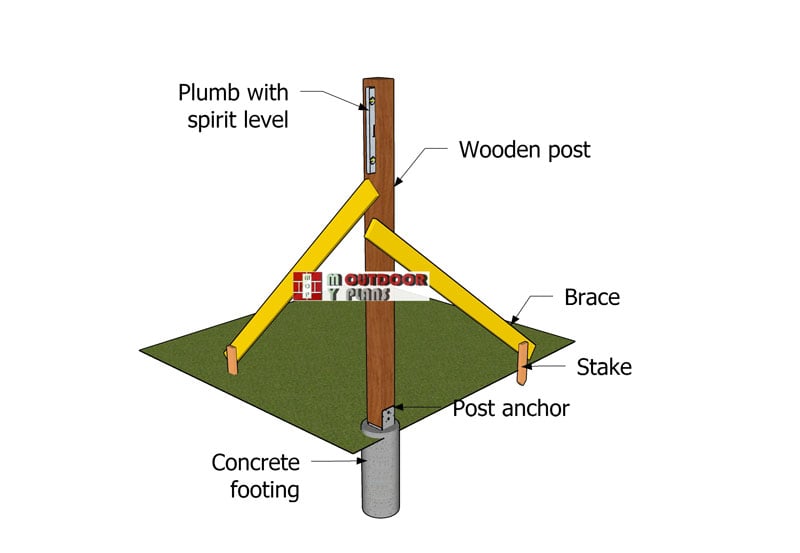
For anchoring your 6×6 posts, the best approach is to use concrete footings with post anchors to ensure stability and durability. Each footing should be at least 3 feet deep (or below the frost line) and 18-24 inches wide for proper load distribution. At the bottom of the hole, pour a 12-inch-thick concrete pad for extra strength. Reinforcing the concrete with 3-4 vertical #4 rebar rods tied with horizontal rings every 12 inches helps prevent cracking and improves load-bearing capacity (your local codes will give you more details on this).
The best anchoring method for longevity is using elevated post bases. These bases sit on the concrete footing and are secured with a ½” or ⅝” anchor bolt embedded in the concrete. This keeps the posts elevated, preventing moisture damage and rot. After the concrete cures for 24-48 hours, the post base is attached to the anchor bolt, and the 6×6 post is secured with structural screws or bolts.
STEP 2: Building the frame
Fitting-the-crossbeams
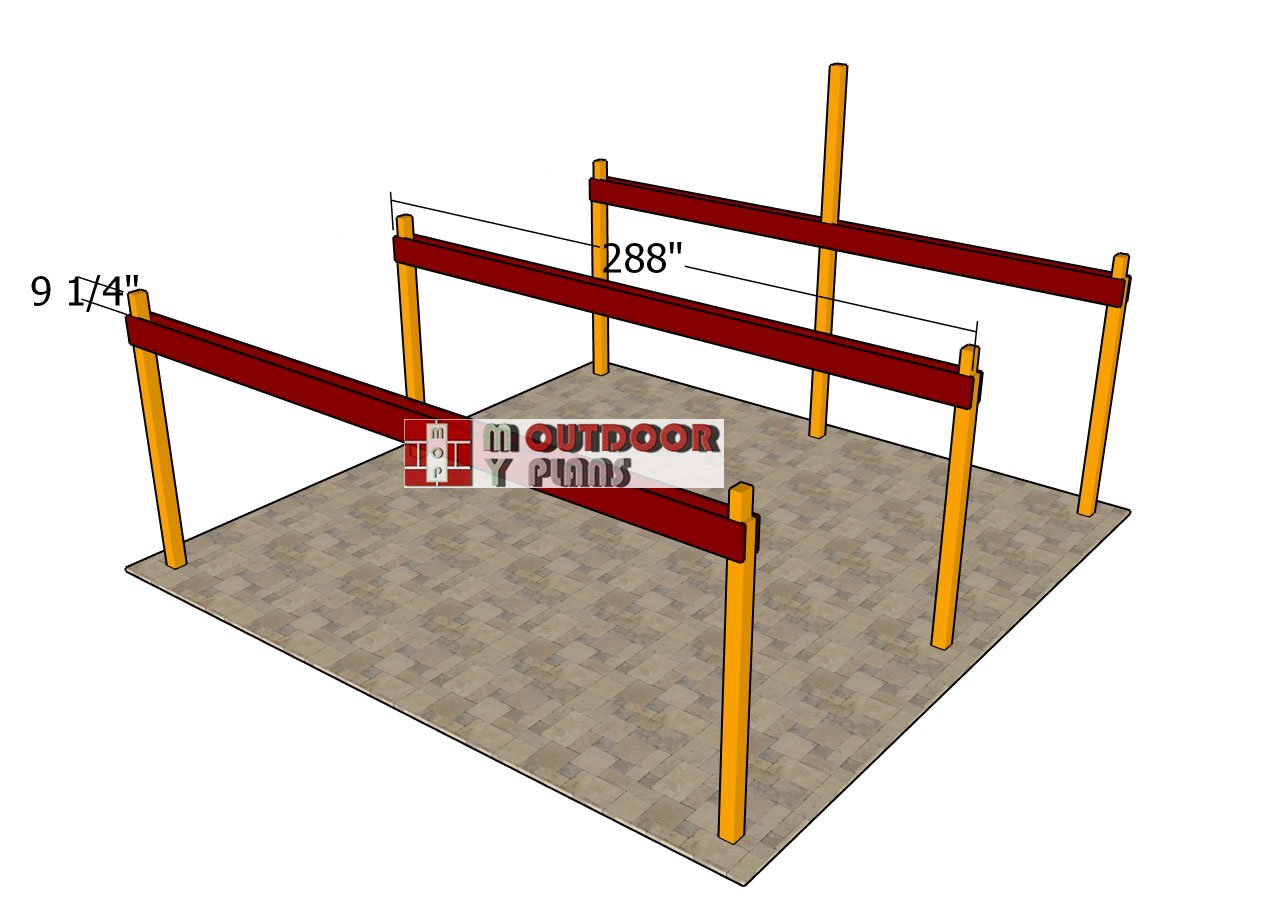
Using 2×10 lumber for the crossbeams provides strong structural support while maintaining a clean look for your 24×24 pavilion. Position the beams so there is exactly 9 1/4 inches from the top of the front posts to the top of the beams. This ensures consistency and alignment across the structure. Use a spirit level to check that everything is perfectly even before securing the beams temporarily with clamps.
Once the beams are clamped in place, drill pilot holes through both the beams and the posts to prevent splitting. Insert 9-inch carriage bolts through each hole, ensuring they pass completely through both pieces. Secure the bolts with washers and nuts, tightening them firmly to create a solid connection between the posts and beams. For maximum stability, use two bolts at each joint, spacing them evenly to distribute the load. This method ensures a strong and durable framework, reducing any potential shifting over time. Double-check that everything is level and secure before moving on to the next construction step.

Top-side-beams
Next, attach the 2×10 beams to the sides of the double carport, ensuring they are aligned properly with the previously installed crossbeams. Maintain a consistent 12-inch overhang on both sides of the structure for a balanced and finished appearance. Use a spirit level to confirm that the beams are perfectly horizontal before securing them in place. Drill pilot holes through both the beams and the posts to prevent wood from splitting. Insert 9-inch carriage bolts through the holes, ensuring they pass completely through for a secure fit.
Use washers and nuts on the opposite side, then tighten them firmly to lock the beams into place. For structural strength, use at least two bolts per joint, spacing them evenly. This will provide maximum stability and ensure that the beams remain secure over time. Once all the side beams are installed, double-check alignment and tighten any connections as needed before proceeding to the next step.
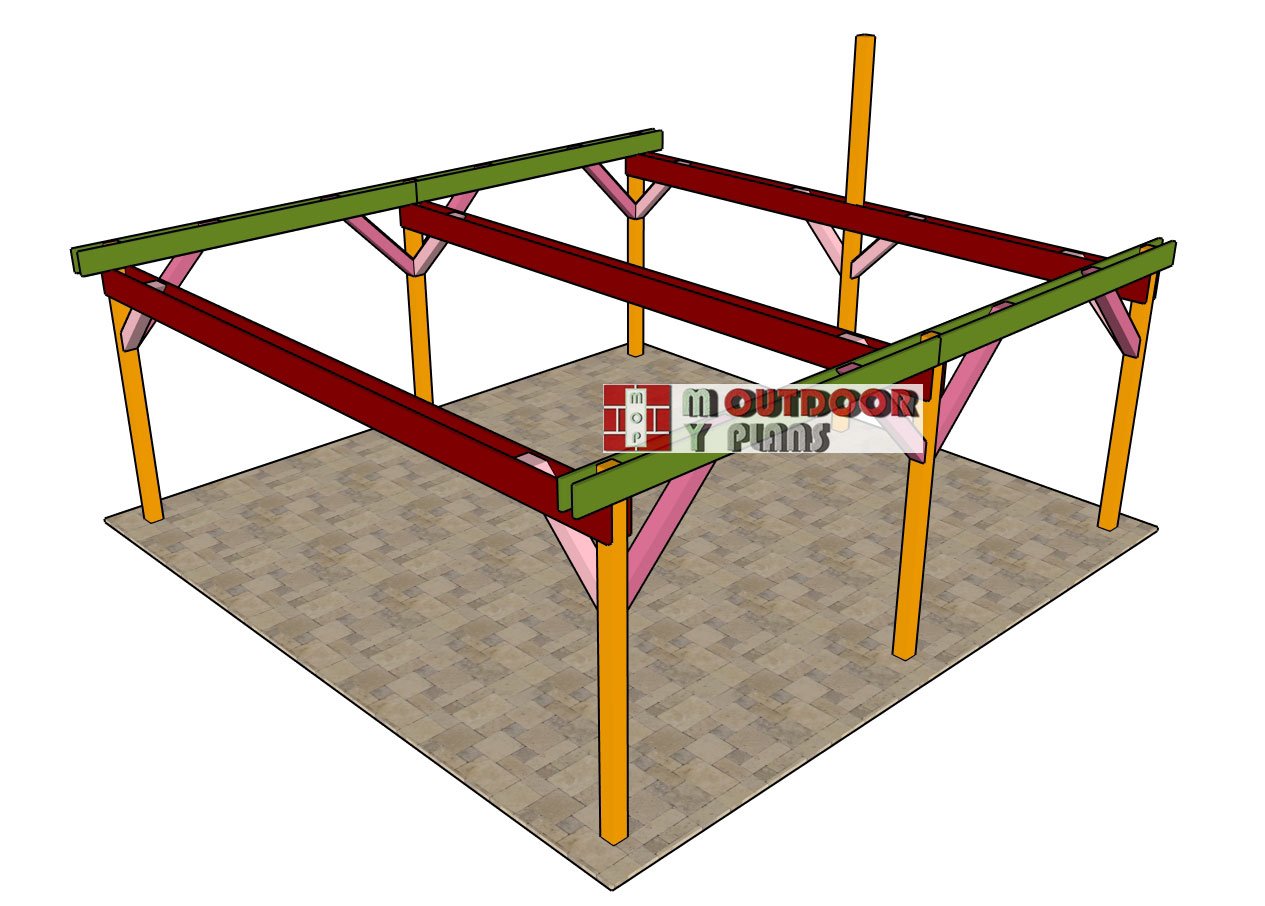
Braces
Next, cut the diagonal braces for your outdoor project. Make 45-degree cuts at both ends of each brace to ensure a snug fit and a clean, professional look. These braces will provide additional stability and enhance the overall strength of the structure. Measure each brace carefully before cutting to ensure proper alignment with the posts and beams. Make notches for the braces that attach to the sides of the pavilion. Mark the location on the beams and use a circular saw to make a series of 1 1/2-inch deep parallel cuts inside the marked area. Remove the excess material with a chisel and a hammer to create a smooth, recessed notch. This will allow the braces to sit flush against the beams, providing a stronger and more secure connection.
Fitting-the-braces
Plumb the posts before attaching the braces to ensure the structure is level. Secure the braces using 5 1/2-inch screws, driving them firmly into the posts and beams. These screws will help hold the braces in position while you install the carriage bolts. Drill pilot holes through the beams and braces before inserting the 9-inch carriage bolts. This prevents wood from splitting and ensures a precise fit. Insert the bolts and secure them tightly with washers and nuts, ensuring a strong connection between the braces and the beams. Once all braces are installed, check for stability and make any necessary adjustments before moving on to the next step.
STEP 3: Roof structure
Ridge-beam-supports
Use 6×6 lumber for the ridge beam supports to provide a strong and stable framework for the pavilion. Measure and cut the supports to the correct height, ensuring they align properly with the ridge beams. Position the supports evenly across the 24-foot front and back ends, making sure the spacing is equal for a balanced and symmetrical structure. Once the supports are in place, check that each post is perfectly plumb using a spirit level. This step is crucial to maintaining a straight and stable structure.
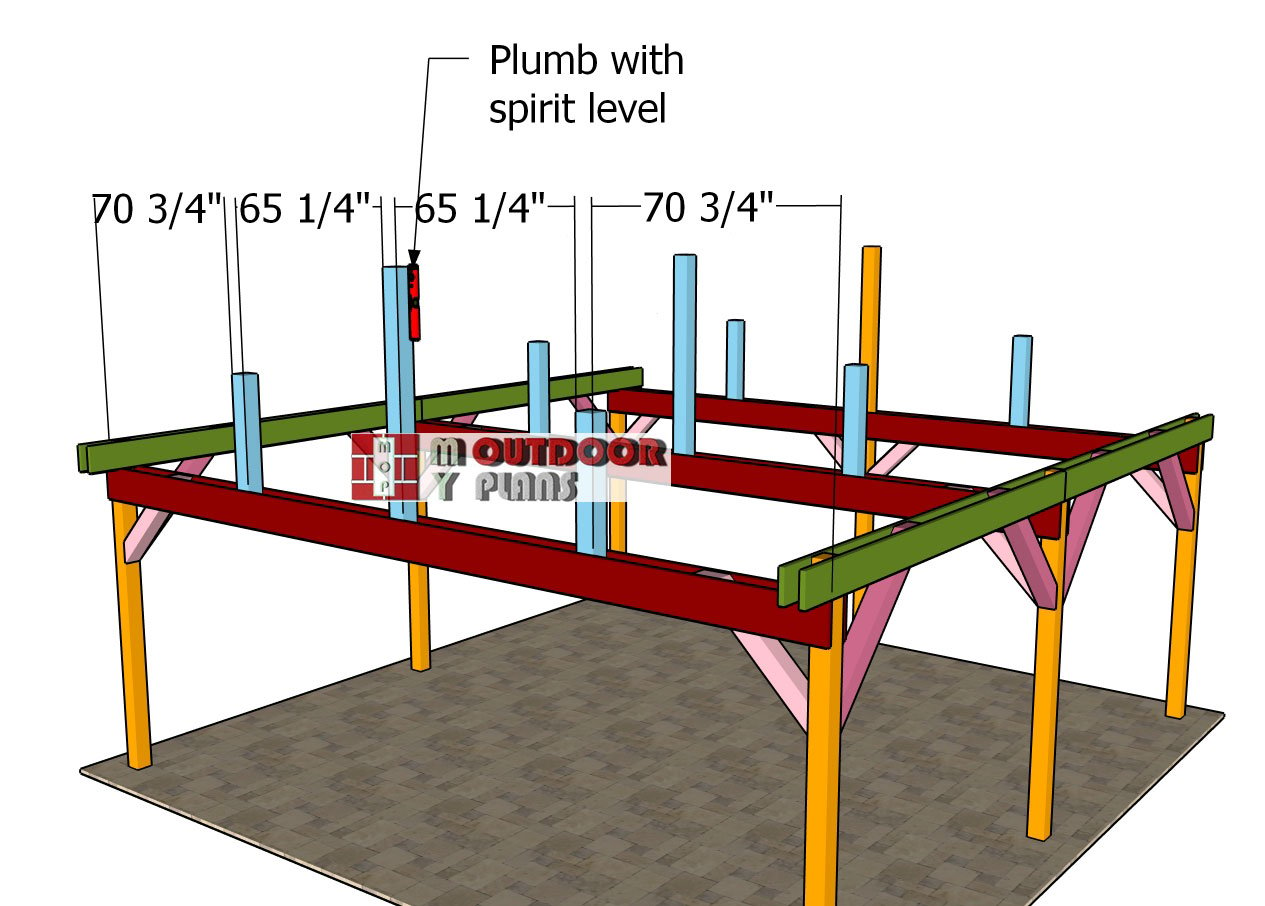
Fitting-the-ridge-beam-supports
Temporarily clamp the supports to the crossbeams to hold them in position while securing them permanently. Drill pilot holes through both the beams and the supports to prevent wood from splitting. Insert 9-inch carriage bolts through the holes, ensuring they pass completely through for a firm connection. Use washers and nuts on the opposite side, then tighten them securely to lock the supports in place. Double-check the alignment of each support and make any necessary adjustments before tightening all bolts. Once everything is securely fastened, the ridge beam supports will provide the necessary load-bearing capacity for the roof structure. Proceed with installing the ridge beams, ensuring they are properly seated on the supports.
Ridge-beams
Use 6×8 lumber for the ridge beams to ensure a strong and durable roof structure. Cut the beams to the correct length, making sure they align properly with the ridge beam supports. To create a seamless connection at the middle supports, make notches at the ends of the beams where they meet. These notches will allow the beams to interlock, improving stability and load distribution.
Carefully mark the notches at the points where the beams will meet over the middle supports. Use a circular saw or a handsaw to make precise cuts, ensuring the depth is accurate for a snug fit. Remove the excess material with a chisel and a hammer, smoothing out the surface for a flush joint. Dry-fit the beams before securing them to confirm the joints fit correctly.
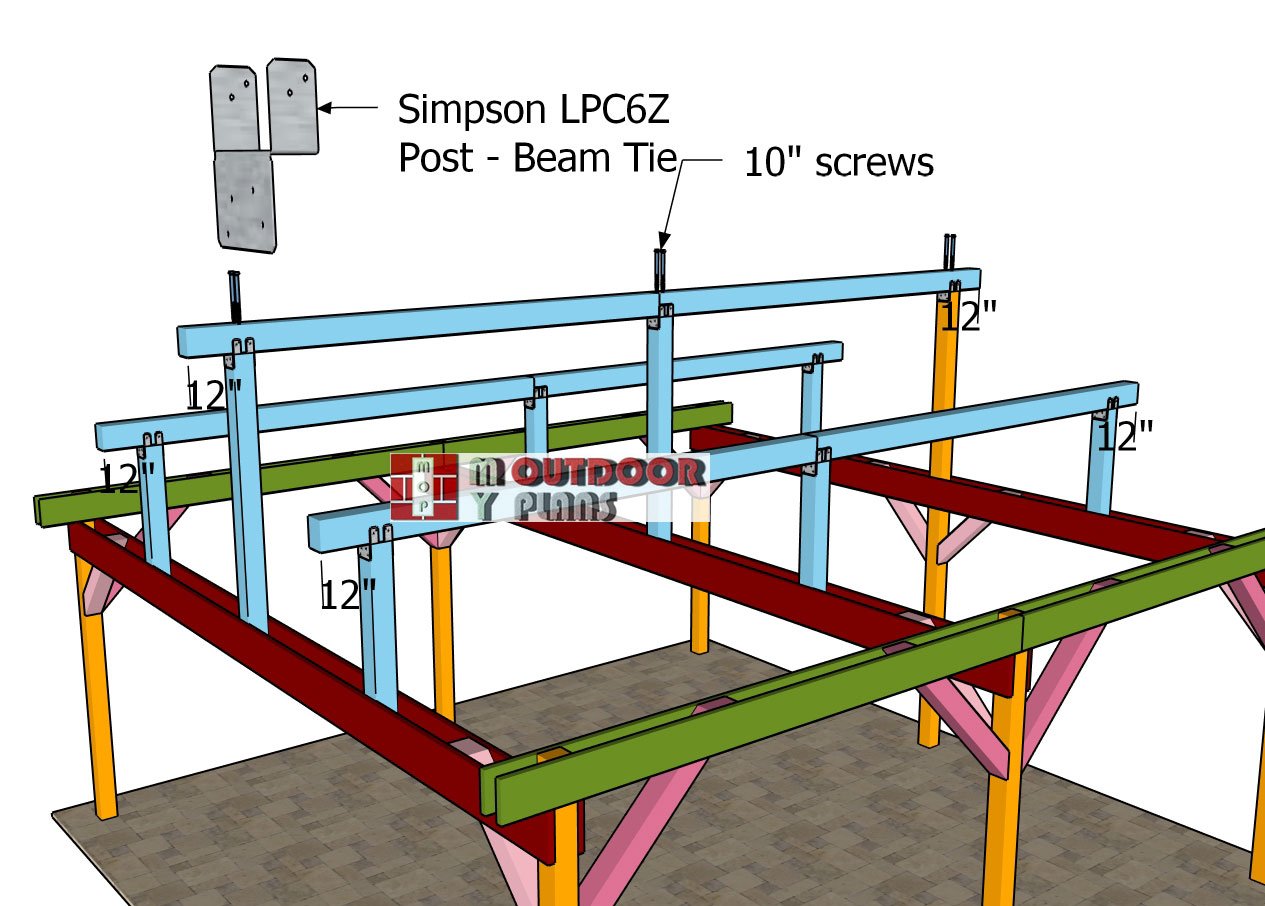
Fitting-the-ridge-beams
Secure the ridge beams to the 6×6 supports using post-to-beam supports. Select the appropriate hardware that meets local building codes and provides the necessary load capacity. Position the beam securely on top of the support and fasten it using 2 1/2-inch structural screws. Ensure all connections are tight to prevent movement under load.
After installing all ridge beams, double-check for level and alignment across the structure. Make any necessary adjustments before moving on to the next steps of the pavilion build. Properly secured ridge beams will provide a solid foundation for the rafters and ensure long-term structural integrity.
24×24 gable carport plans DIY
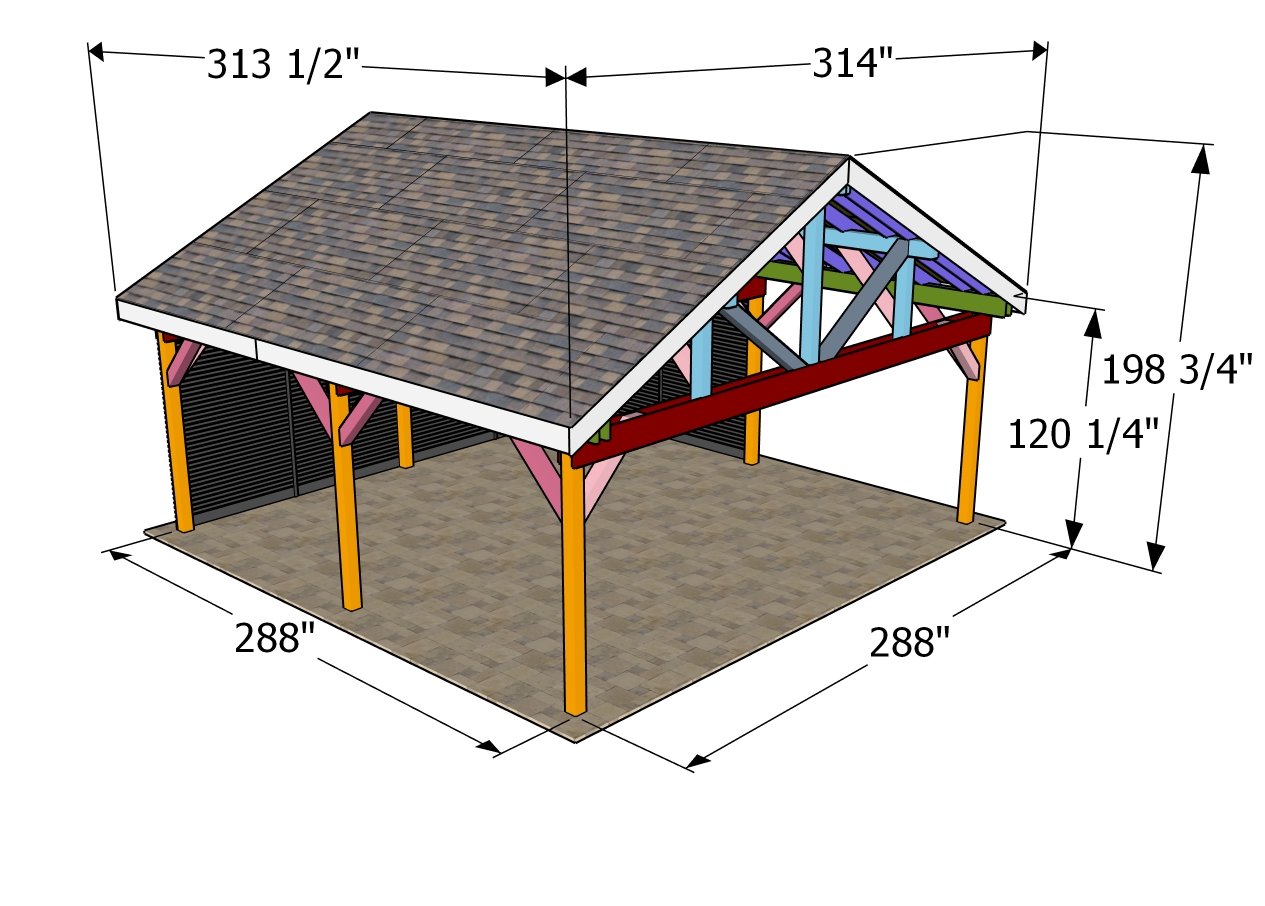
24×24 gable carport – dimensions overall
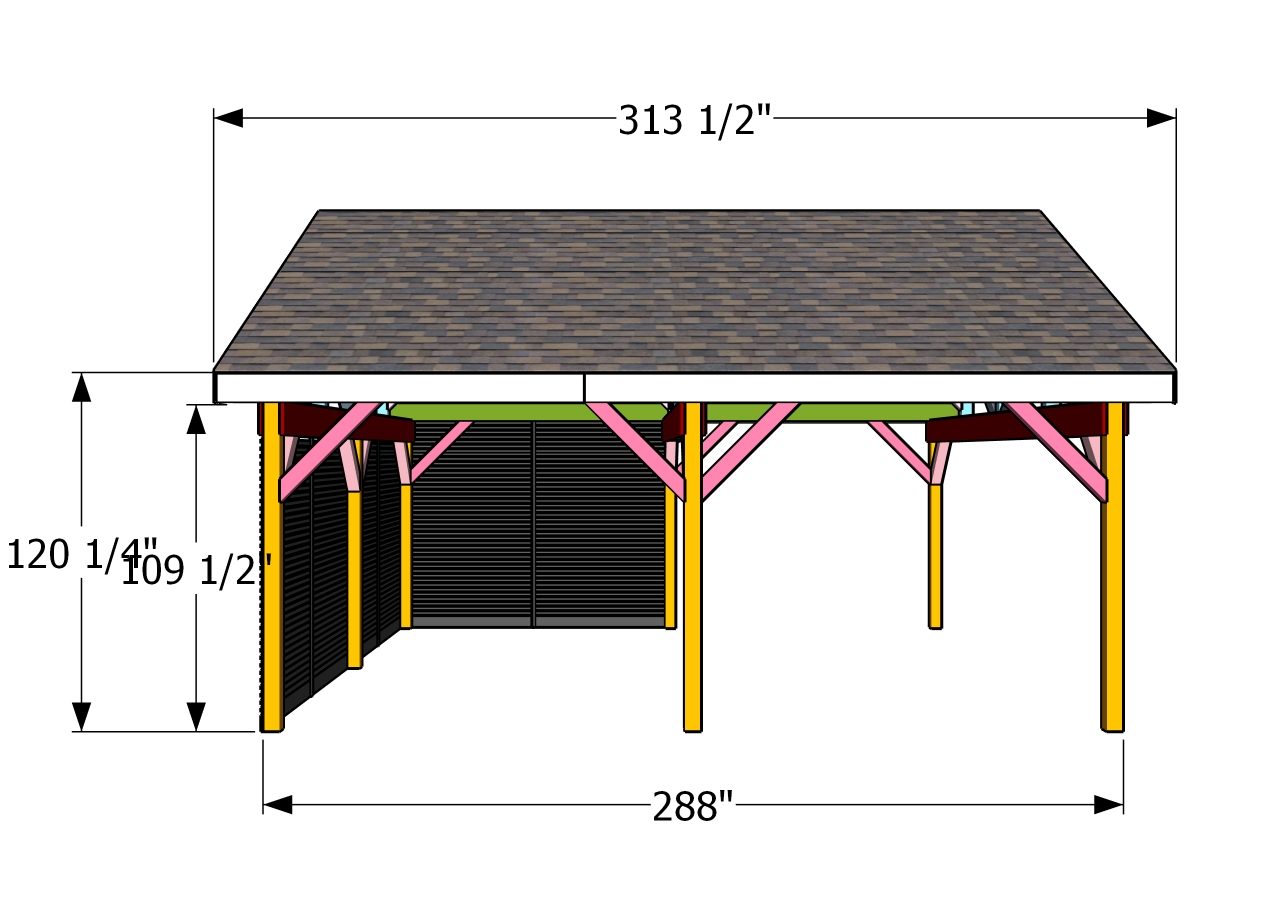
24×24 gable carport – side view
Check out PART 2 of the project, so you learn how to continue building the gable roof for this large double car carport.
Top Tip: If you want to get PREMIUM PLANS for this project, in a PDF format, please press GET PDF PLANS button bellow. If you want the free version of the plans, please read the blog FAQs. Thank you for your support.

This woodworking project was about 24×24 gable pavilion plans. If you want to see more outdoor plans, we recommend you to check out the rest of our step by step projects.
